参考资料
https://www.bilibili.com/video/BV1Fi4y1S7ix?p=4&vd_source=c581024b8cd9585ec6a75c56ac05571a
1. 初识Spring
Spring是一个开源的设计层面框架,他解决的是业务逻辑层和其他各层的松耦合问题,因此它将面向接口的编程思想贯穿整个系统应用。Spring是于2003 年兴起的一个轻量级的Java 开发框架,由Rod Johnson创建。简单来说,Spring是一个分层的JavaSE/EE full-stack(一站式) 轻量级开源框架。
Spring发展到今天已经形成了一种开发的生态圈,Spring提供了若干个项目,每个项目用于完成特定的功能。

Spring Framework 项目 是Spring生态的核心。
Spring Boot 项目 让开发更简单、更快速。
Spring Cloud 项目 分布式项目。
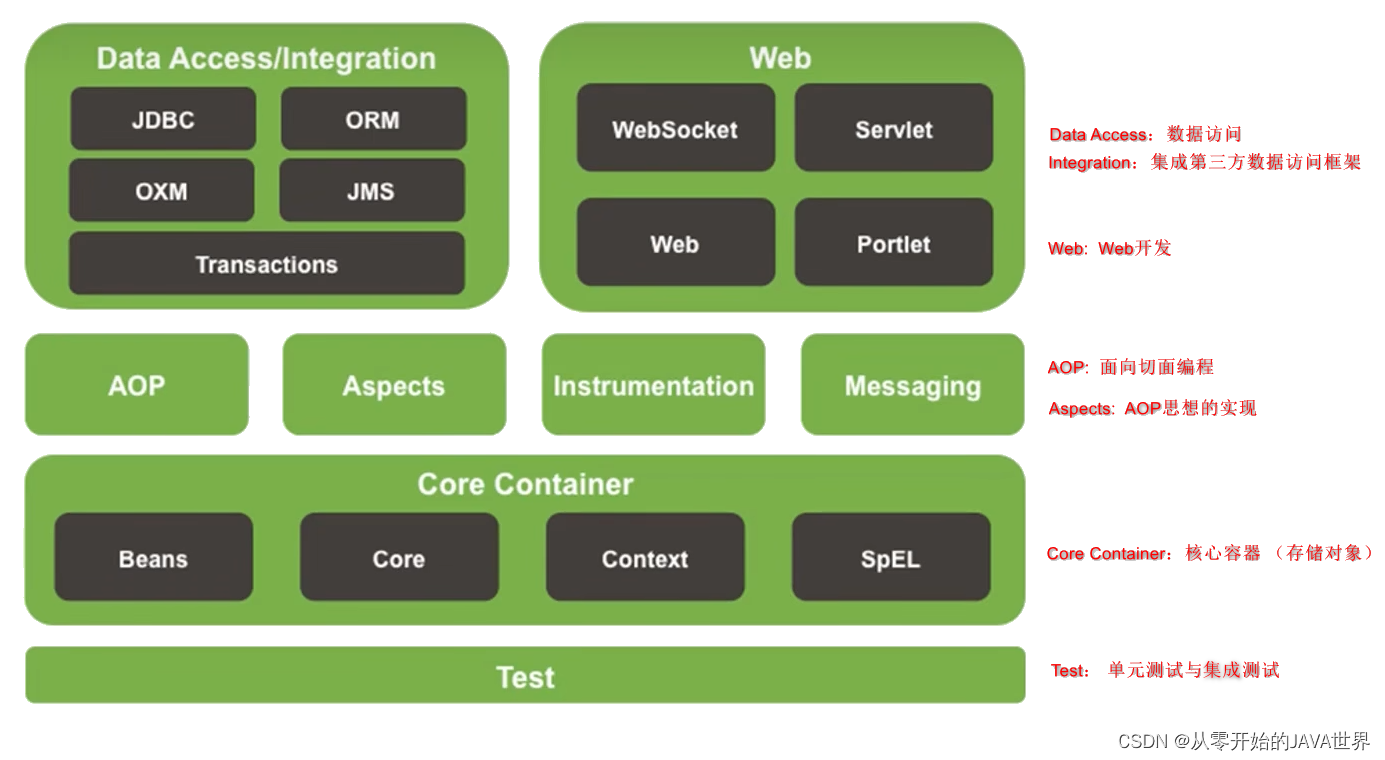
2. Spring Framework 系统架构
Spring Framework是Spring生态圈中最基础的项目,是其他项目的根基。
架构图
3. Spring Framework 学习
1. 核心思想
Ioc控制翻转
使用对象时,由主动new产生对象转换为由外部提供对象,此过程中对象创建控制权有程序转移到外部,此思想称为控制翻转。
Spring技术对Ioc思想进行了实现
Spring提供了一个容器,称为Ioc容器,用来充当Ioc思想中的外部。
Ioc容器负责对象的创建、初始化等一系列工作,被创建或被管理的对象在Ioc容器中统称为Bean。
DI 依赖注入
在容器中给依赖的属性赋值的过程,称为依赖注入。
Spring 使用Ioc容器管理Bean(IoC),并在创建Bean时将有依赖关系的进行关系绑定(DI),向外提供完整的对象。同时大大降低了对象间的耦合。
2. IoC 快速入门案例
- 引入依赖
        <dependency>
            <groupId>org.springframework</groupId>
            <artifactId>spring-context</artifactId>
            <version>5.3.20</version>
        </dependency>
- 创建类
package com.xin.service.impl;

public class UserServiceImpl {


    private String name ;

    public void save(){


        System.out.println("userService:save()");
    }

    public void setName(String name) {


        this.name = name;
    }
}
- 创建配置文件
<?xml version="1.0" encoding="UTF-8"?>
<beans xmlns="http://www.springframework.org/schema/beans"
       xmlns:xsi="http://www.w3.org/2001/XMLSchema-instance"
       xsi:schemaLocation="http://www.springframework.org/schema/beans http://www.springframework.org/schema/beans/spring-beans.xsd">
    //添加Bean
    <bean id="userService" class="com.xin.service.impl.UserServiceImpl"></bean>

</beans>
- 测试
package com.xin.service;

import org.junit.Test;
import org.springframework.context.ApplicationContext;
import org.springframework.context.support.ClassPathXmlApplicationContext;

public class UserServiceTest {


    @Test
    public void testSave(){


        //创建容器,加载配置文件。
        ApplicationContext context = new ClassPathXmlApplicationContext("applicationContext.xml");
        //根据Bean id 获取对应的Bean对象。
        UserService userService = context.getBean("userService", UserService.class);
        //调用UserService对象中的方法
        userService.save();
    }
}
3. IoC 底层原理
xml解析+工厂设计模式+反射
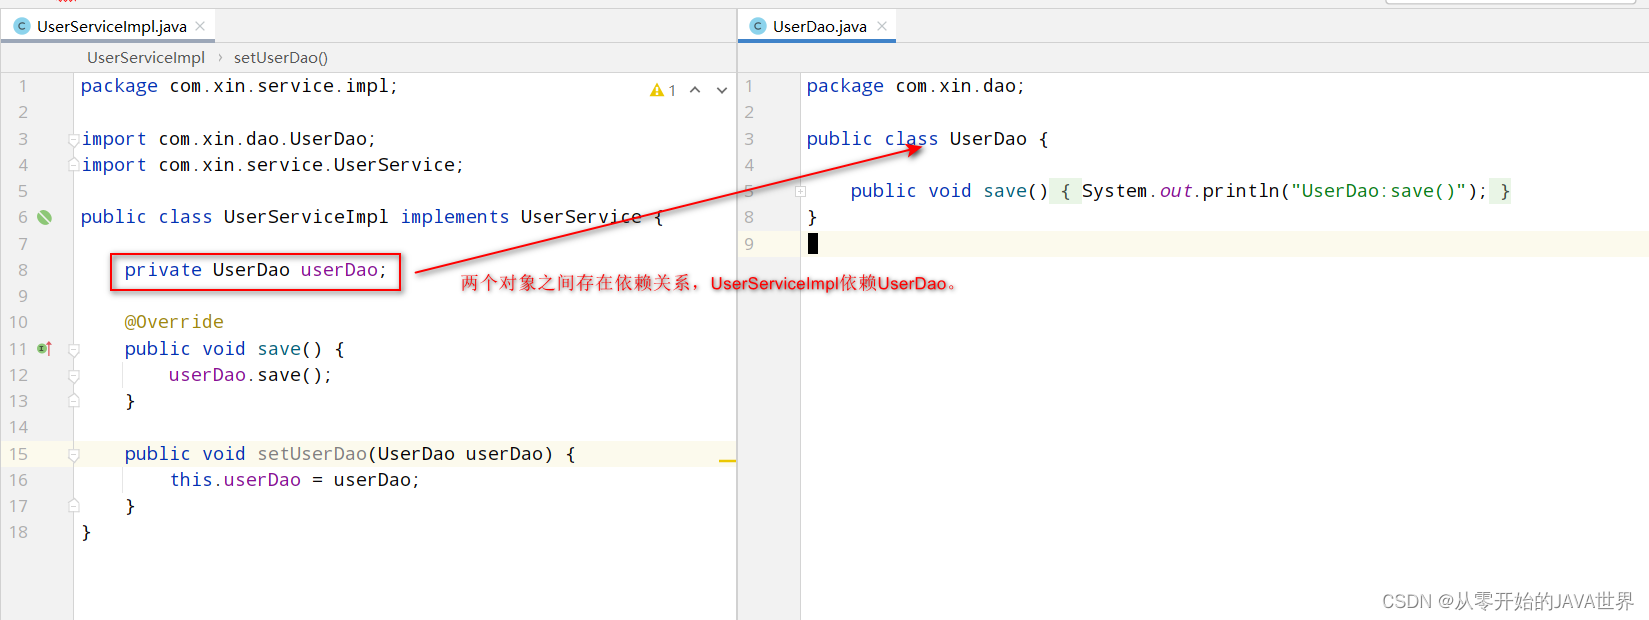
- 原始方式 new
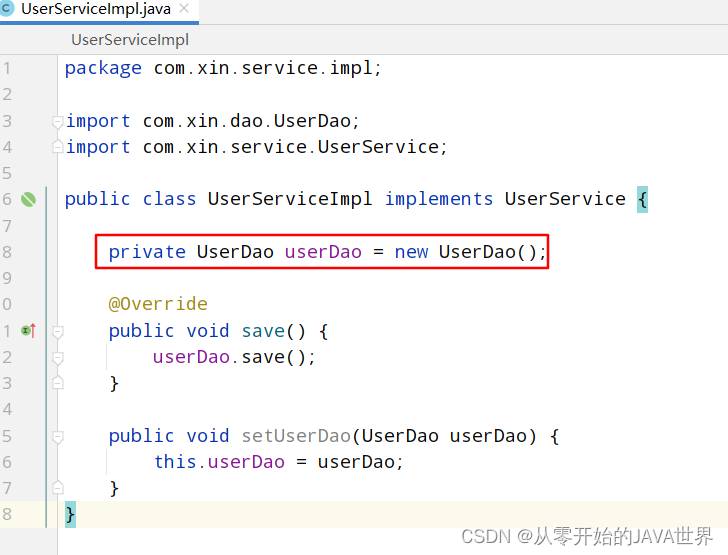
对象间强耦合在一起。
- 使用工厂模式降低耦合度
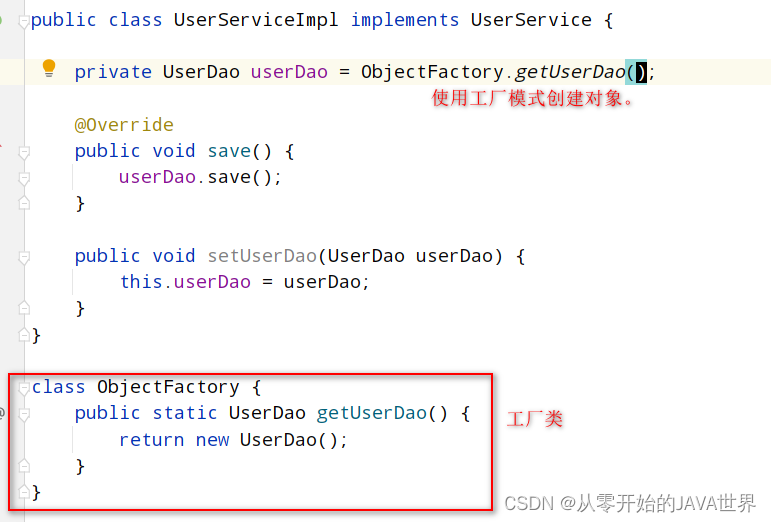
3. Spring 将对象的定义信息提到配置文件xml中,通过解析配置文件,配合工厂模式+反射 将耦合度大大降低。
<?xml version="1.0" encoding="UTF-8"?>
<beans xmlns="http://www.springframework.org/schema/beans"
       xmlns:xsi="http://www.w3.org/2001/XMLSchema-instance"
       xsi:schemaLocation="http://www.springframework.org/schema/beans http://www.springframework.org/schema/beans/spring-beans.xsd">

    <bean id="userService" class="com.xin.service.impl.UserServiceImpl">
        <property name="userDao" ref="userDao"/>  <!--DI依赖注入,配置userService和userDao两个对象间的关系-->
    </bean>

    <bean id="userDao" class="com.xin.dao.UserDao"/>

</beans>
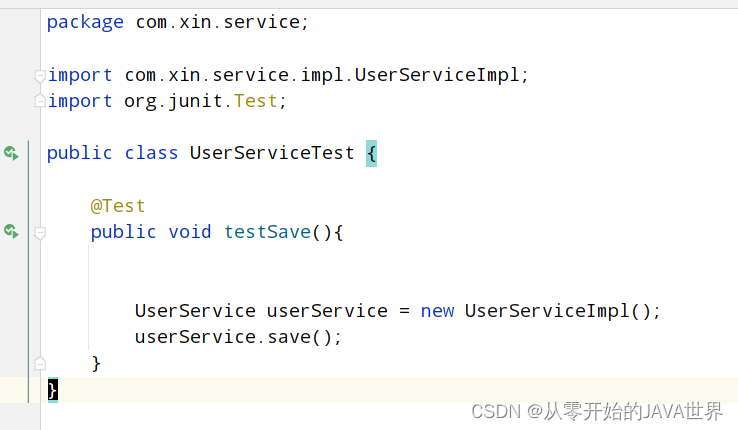
public class UserServiceTest {


    @Test
    public void testSave(){


        ApplicationContext context = new ClassPathXmlApplicationContext("applicationContext.xml");
        UserService userService = (UserService) context.getBean("userService");
        userService.save();
    }
}
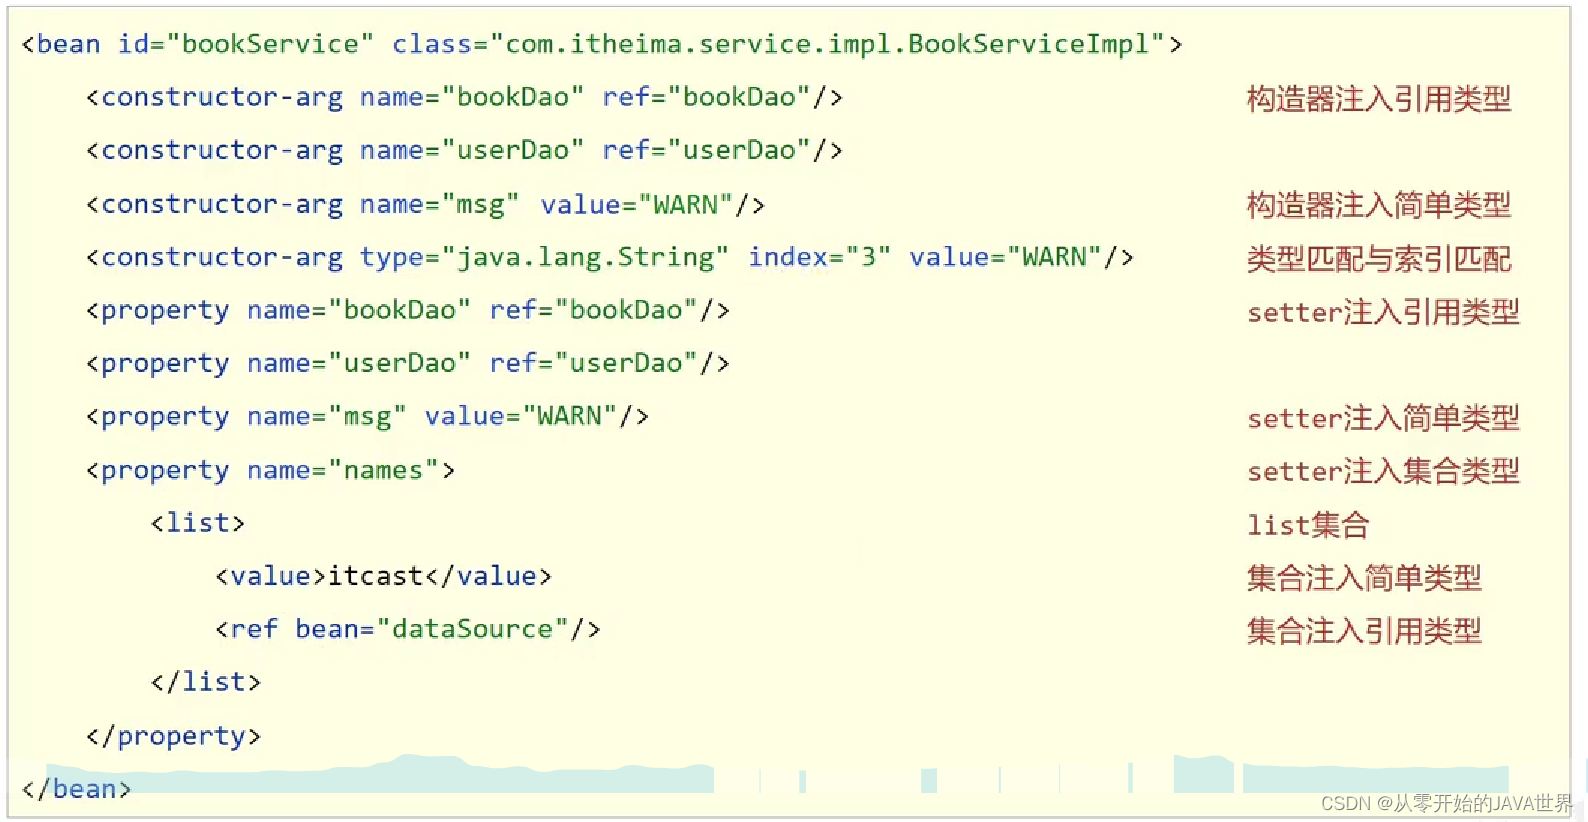
4. DI 依赖注入
两种方式:
- setter注入
<?xml version="1.0" encoding="UTF-8"?>
<beans xmlns="http://www.springframework.org/schema/beans"
       xmlns:xsi="http://www.w3.org/2001/XMLSchema-instance"
       xsi:schemaLocation="http://www.springframework.org/schema/beans http://www.springframework.org/schema/beans/spring-beans.xsd">

    <bean id="userService" class="com.xin.service.impl.UserServiceImpl">
        <property name="userDao" ref="userDao"/>  <!--setter注入,需要该属性有set方法-->
    </bean>

    <bean id="userDao" class="com.xin.dao.UserDao"/>

</beans>
- 构造器注入
<?xml version="1.0" encoding="UTF-8"?>
<beans xmlns="http://www.springframework.org/schema/beans"
       xmlns:xsi="http://www.w3.org/2001/XMLSchema-instance"
       xsi:schemaLocation="http://www.springframework.org/schema/beans http://www.springframework.org/schema/beans/spring-beans.xsd">

    <bean id="userService" class="com.xin.service.impl.UserServiceImpl">
        <constructor-arg name="userDao" ref="userDao"/>
    </bean>

    <bean id="userDao" class="com.xin.dao.UserDao"/>

</beans>
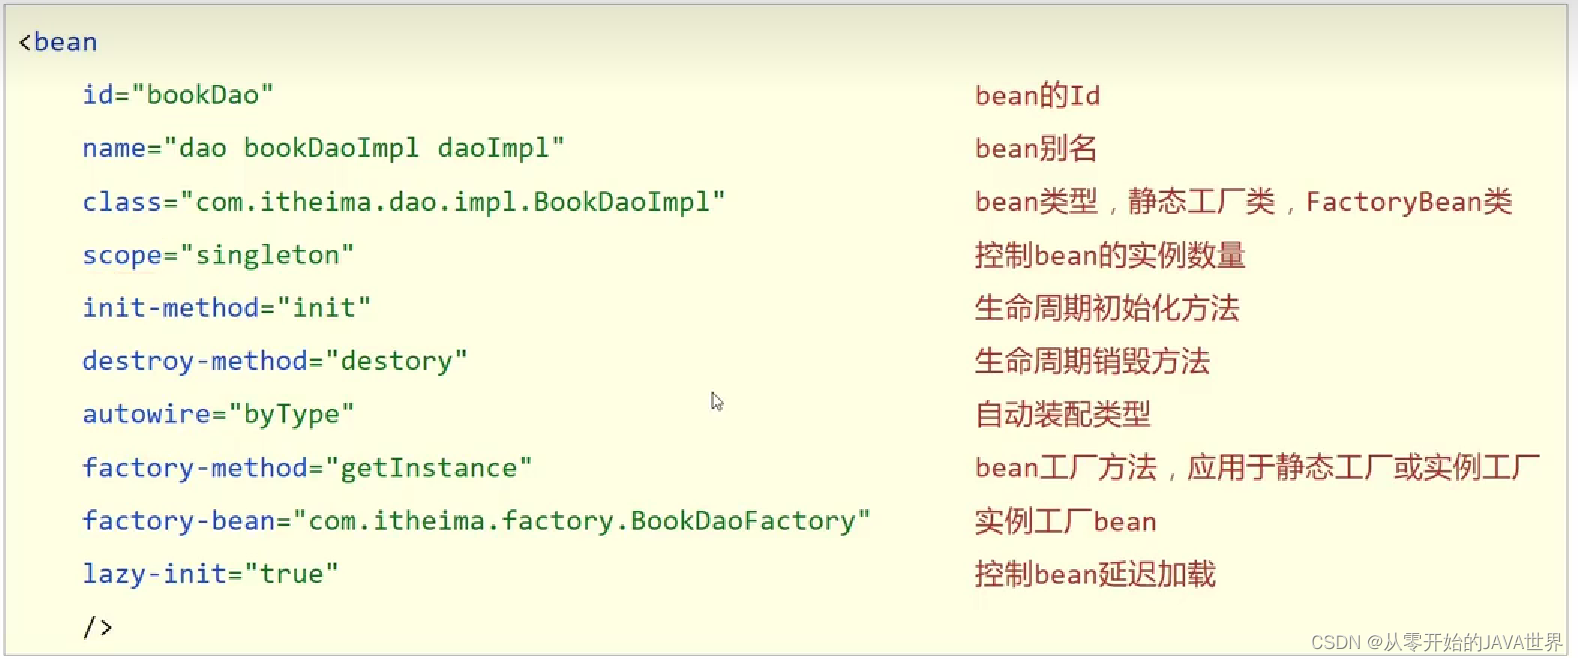
5. Bean的别名 name
<bean id="userService" name="service service2" class="com.xin.service.impl.UserServiceImpl"></bean>
6. Bean的作用域 scope

7. Bean的实例化
<?xml version="1.0" encoding="UTF-8"?>
<beans xmlns="http://www.springframework.org/schema/beans"
       xmlns:xsi="http://www.w3.org/2001/XMLSchema-instance"
       xsi:schemaLocation="http://www.springframework.org/schema/beans http://www.springframework.org/schema/beans/spring-beans.xsd">

    <!--方式一 构造器实例化Bean (默认使用空参构造)-->
    <bean id="userService" class="com.xin.service.impl.UserServiceImpl"/>

    <!--方式二 静态工厂创建对象-->
    <bean id="userService2" class="com.xin.service.impl.ObjectFactory" factory-method="getObject"/>

    <!--方式三 实例工厂创建对象-->
    <bean id="instanceObjectFactory" class="com.xin.service.impl.InstanceObjectFactory"/>
    <bean id="userService3" factory-bean="instanceObjectFactory" factory-method="getObject"/>

    <!--方式四 实现BeanFactory接口,规范实例化工厂-->
    <bean id="userService4" class="com.xin.service.impl.UserServiceObjectFactory"/>

</beans>
package com.xin.service.impl;

public class UserServiceImpl {


    public UserServiceImpl() {


        System.out.println("空参构造");
    }
}

//静态工厂
class ObjectFactory {


    public static UserServiceImpl getObject() {


        return new UserServiceImpl();
    }
}

//实例工厂
class InstanceObjectFactory {


    public UserServiceImpl getObject() {


        return new UserServiceImpl();
    }
}
//Spring 提供了BeanFactory接口来规范实例化工厂
public class UserServiceObjectFactory implements FactoryBean<UserService> {


    @Override
    public UserService getObject() throws Exception {


        return new UserServiceImpl();//返回实例化对象
    }

    @Override
    public Class<?> getObjectType() {


        return UserService.class;//类型
    }

    @Override
    public boolean isSingleton() {


        return true;//是否是单例
    }
}
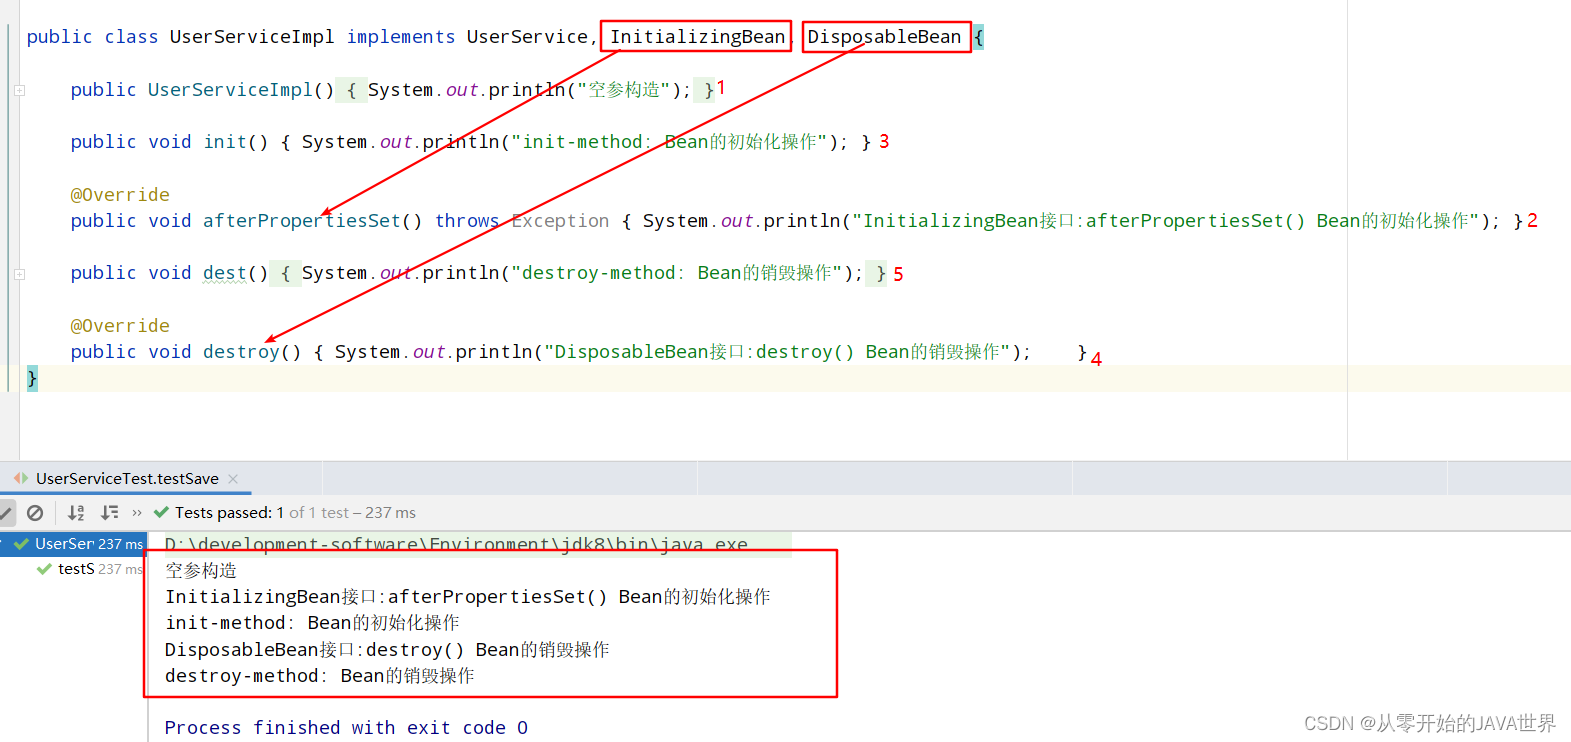
8. Bean的生命周期
- 实例化 (分配内存、执行构造方法() )
- 属性注入
- 执行初始化 (配置文件init-method 或 实现接口InitializingBean)
- 使用Bean对象,执行业务操作。
- 执行销毁方法 (配置文件 destroy-method 或实现接口DisposableBean)
<?xml version="1.0" encoding="UTF-8"?>
<beans xmlns="http://www.springframework.org/schema/beans"
       xmlns:xsi="http://www.w3.org/2001/XMLSchema-instance"
       xsi:schemaLocation="http://www.springframework.org/schema/beans http://www.springframework.org/schema/beans/spring-beans.xsd">

    <!--配置文件设置初始方法和销毁方法-->
    <bean id="userService" init-method="init" destroy-method="dest" class="com.xin.service.impl.UserServiceImpl"/>

</beans>
关闭容器的方式
public class UserServiceTest {


    @Test
    public void testSave() {


        ClassPathXmlApplicationContext context = new ClassPathXmlApplicationContext("applicationContext.xml");

        //方式一 //注册关闭钩子,JVM虚拟机关闭前时才先关闭容器。
        context.registerShutdownHook();

        //方式二 //直接关闭容器。
        context.close();
    }
}
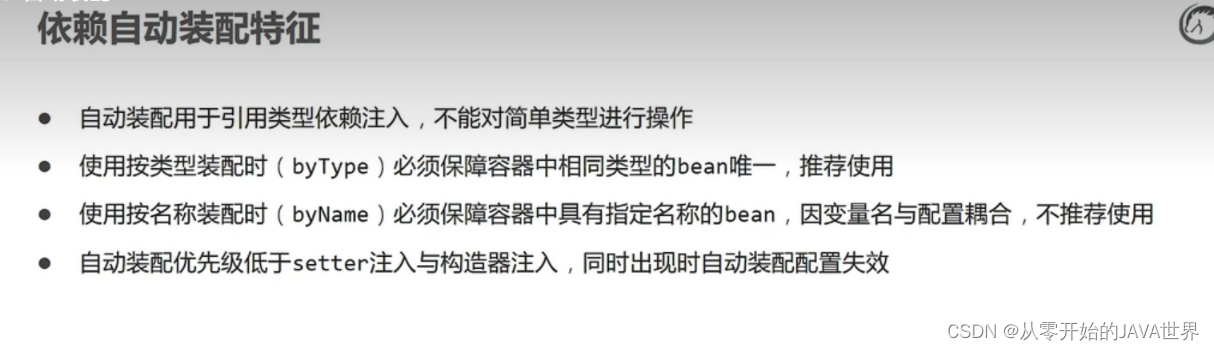
9. 自动装配
IoC容器根据Bean所依赖的资源在容器中自动查找并注入到Bean中的过程称为自动装配。不用setter注入和构造器注入了。

10. 配置DataSource
        <!--Druid数据库连接池-->
        <dependency>
            <groupId>com.alibaba</groupId>
            <artifactId>druid</artifactId>
            <version>1.2.8</version>
        </dependency>
<bean id="dataSource" class="com.alibaba.druid.pool.DruidDataSource">
<property name="driverClassName" value="com.mysql.cj.jdbc.Driver"/>
<property name="url"
value=" jdbc:mysql://localhost:3306/xin?serverTimezone=UTC&characterEncoding=utf8&useUnicode=true&useSSL=false"/>
<property name="username" value="root"/>
<property name="password" value="123456"/>
</bean>
11. 加载Properties配置文件
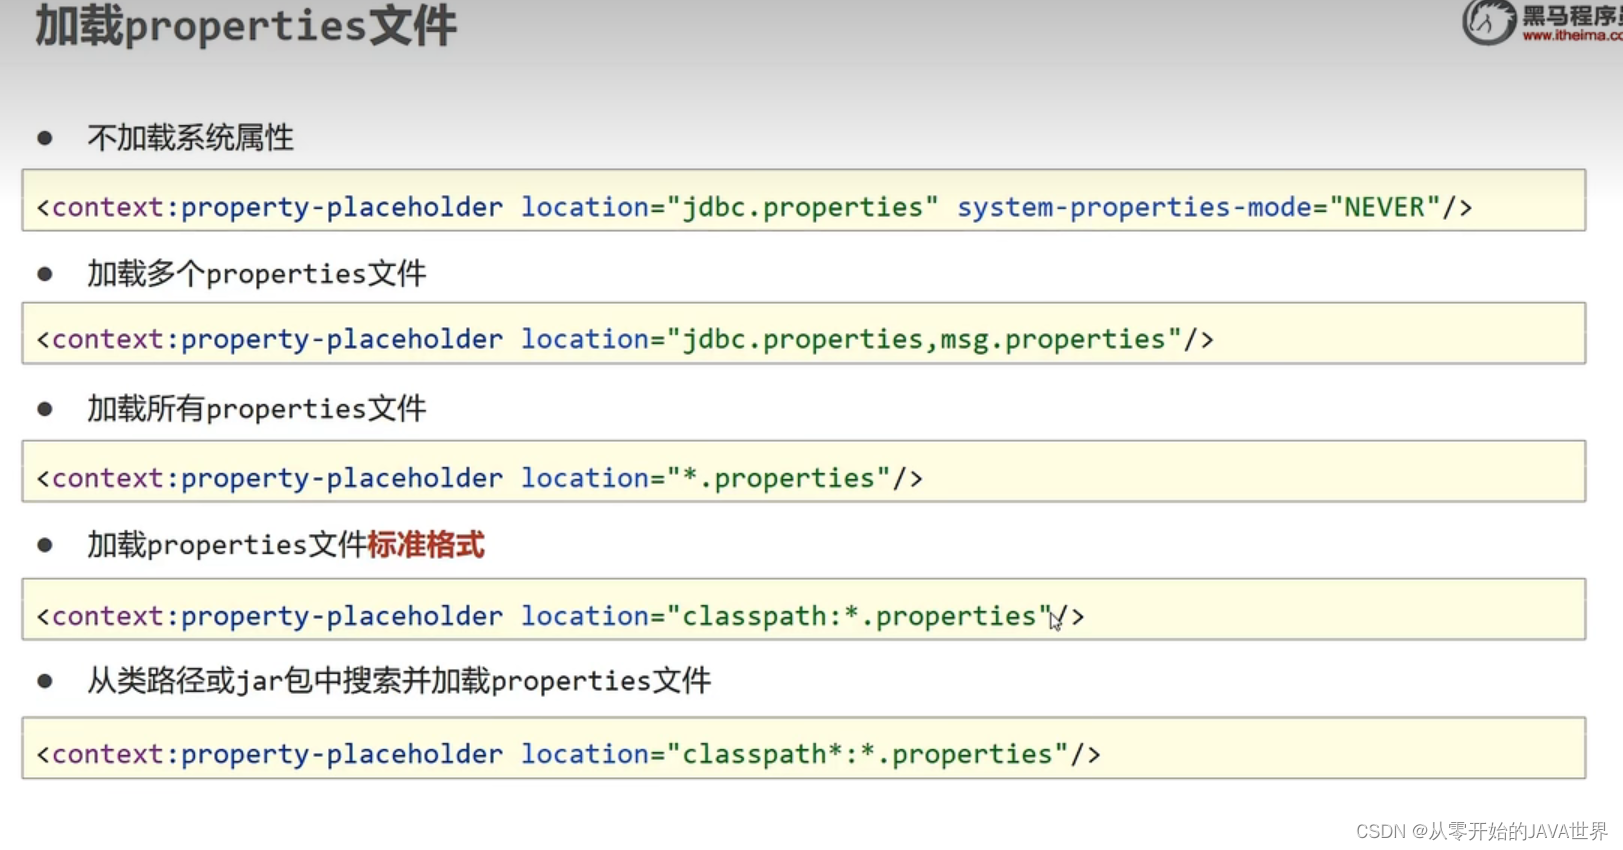
    <!--classpath*: 其他jar包配置文件    -->
    <context:property-placeholder location="db.properties" system-properties-mode="NEVER"/>

    <bean id="dataSource" class="com.alibaba.druid.pool.DruidDataSource">
        <property name="driverClassName" value="${driverClassName}"/>
        <property name="url" value="${url}"/>
        <property name="username" value="${username}"/>
        <property name="password" value="${password}"/>
    </bean>
driverClassName=com.mysql.cj.jdbc.Driver
url=jdbc:mysql://127.0.0.1:3306/xin?serverTimezone=UTC&useSSL=false
username=root
password=123456
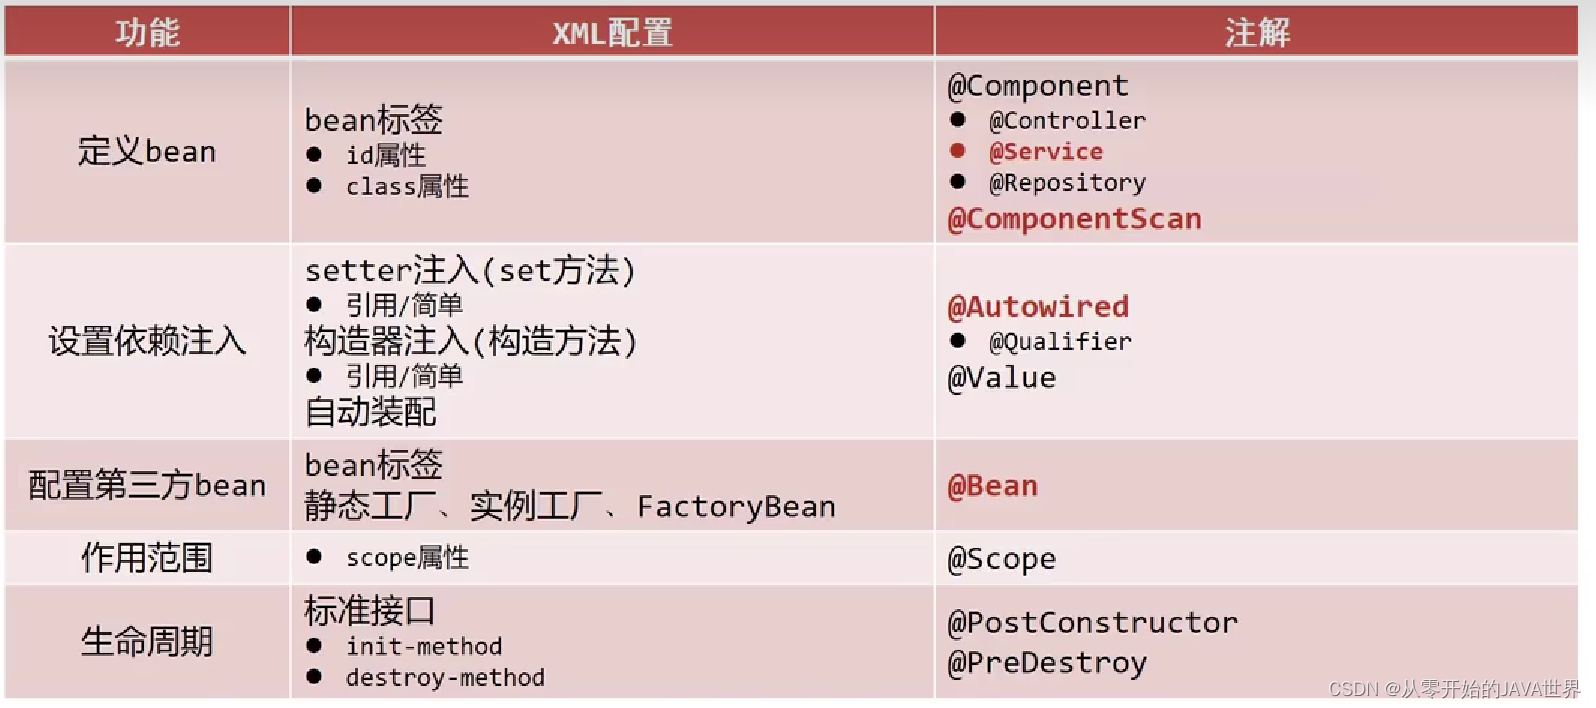
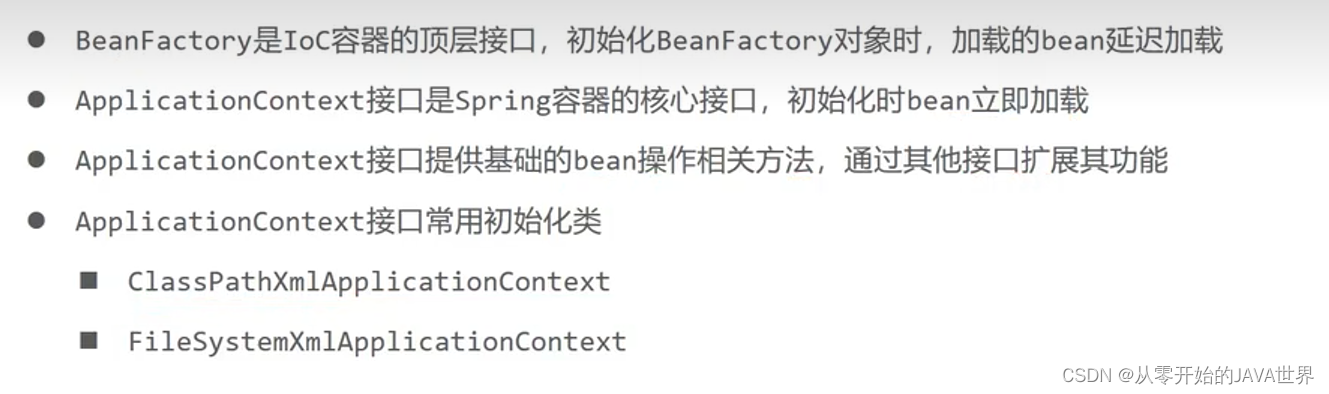
12. 容器、Bean、依赖注入总结
@Test
public void testSave() {


    //方式一: 类路径加载配置文件
    ApplicationContext context = new ClassPathXmlApplicationContext("applicationContext.xml");
    //加载多个配置文件
    context = new ClassPathXmlApplicationContext("applicationContext.xml,applicationContext2.xml");

    //方式二:文件路径加载配置文件
    context = new FileSystemXmlApplicationContext("D:\\Project\\spring\\src\\main\\resources\\applicationContext.xml");
}
13. 注解配置Bean
配置文件开启扫描
<?xml version="1.0" encoding="UTF-8"?>
<beans xmlns="http://www.springframework.org/schema/beans"
       xmlns:xsi="http://www.w3.org/2001/XMLSchema-instance"
       xmlns:context="http://www.springframework.org/schema/context"
       xsi:schemaLocation="http://www.springframework.org/schema/beans
       http://www.springframework.org/schema/beans/spring-beans.xsd
       http://www.springframework.org/schema/context
       https://www.springframework.org/schema/context/spring-context.xsd">

    <!--配合扫描的根路径,会扫描该包下及其子包中的所有带有@Component注解的类,注入到容器中。-->
    <context:component-scan base-package="com.xin"/>

</beans>
要放到容器的类上加@Component注解
package com.xin.service.impl;

import org.springframework.stereotype.Component;

@Component
public class UserServiceImpl {


}
4. 纯注解开发
1. 配置类
package com.xin.config;

import org.springframework.context.annotation.ComponentScan;
import org.springframework.context.annotation.Configuration;

@Configuration //配置类
@ComponentScan("com.xin") //配置包扫描路径
public class SpringConfig {


}
public class SpringAnnotationTest {


    public void testSpringAnnotation() {


        //传入配置类,创建容器.
        ApplicationContext context = new AnnotationConfigApplicationContext(SpringConfig.class);
    }
}
2. Bean的作用域和生命周期
@Service
@Scope("singleton")
public class UserService {


    @PostConstruct
    public void init() {


    }

    @PreDestroy
    public void destroy() {


    }
}
3. 依赖注入
@Service("userService")
@Scope("singleton")
public class UserServiceImpl implements UserService {


    @Autowired //暴力反射,不需要提供setter方法
    @Qualifier("userDao") //多个类型时,指定名称
    private UserDao userDao;

    @Value("zhx") //简单类型
    private String name;

    @Override
    public void save(){


        System.out.println(userDao);
        System.out.println(name);
        userDao.save();
    }
}
4. 注入第三方Bean
@Configuration //配置类
@ComponentScan("com.xin") //配置包扫描路径
@PropertySource("classpath:db.properties") //加载Properties文件
@Import(JDBCConfig.class) //推荐使用,也可以直接在JDBCConfig上加@Configuration但那样混乱,不能只管的知道导了那些配置。
public class SpringConfig {


}
public class JDBCConfig {


    @Value("${driverClassName}")
    private String driverClassName;
    @Value("${url}")
    private String url;
    @Value("${username}")
    private String username;
    @Value("${password}")
    private String password;

    @Bean
    public DataSource dataSource() {


        DruidDataSource dataSource = new DruidDataSource();
        dataSource.setDriverClassName(driverClassName);
        dataSource.setUrl(url);
        dataSource.setUsername(username);
        dataSource.setPassword(password);
        return dataSource;
    }
}
5. @Value(“${}”) 会读取系统变量,重名会覆盖
@Value("${username}")
private String username; //系统变量会覆盖配置文件中的,因此平常自定义属性时避免与系统环境变量重名,最好加上前缀。
jdbc.driverClassName=com.mysql.cj.jdbc.Driver
jdbc.url=jdbc:mysql://127.0.0.1:3306/xin?serverTimezone=UTC&useSSL=false
jdbc.username=root
jdbc.password=123456
6. 第三方Bean需要依赖其他Bean
public class JDBCConfig {


    @Value("${driverClassName}")
    private String driverClassName;
    @Value("${url}")
    private String url;
    @Value("${username}")
    private String username;
    @Value("${password}")
    private String password;

    @Bean
    public DataSource dataSource() {


        DruidDataSource dataSource = new DruidDataSource();
        dataSource.setDriverClassName(driverClassName);
        dataSource.setUrl(url);
        dataSource.setUsername(username);
        dataSource.setPassword(password);
        return dataSource;
    }

    @Bean
    public JdbcTemplate jdbcTemplate(DataSource dataSource){

     //形参会自动装配
        return new JdbcTemplate(dataSource);
    }
}
7. 注解开发总结