文章目录
js内置事件
如:
- 鼠标事件:click、mouseleave
- 键盘事件:keyup、keydown等
js内置事件是给htrml用的。
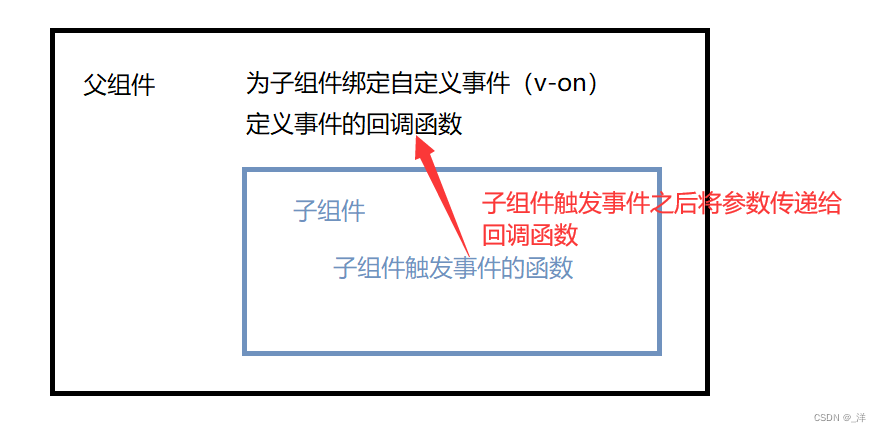
组件的自定义事件
我们也可以定义组件的自定义事件,这样定义出来的事件是给组件用的。
需求:实现子组件给父组件传递数据
使用props属性实现数据传递
步骤:
- 父组件定义函数
- 父组件将函数传递给子组件
- 子组件调用方法,将自己的值作为参数传递给父组件
eg:
APP.vue
<template>
  <div class="app">
    <h1>app组件</h1>
    <!--通过父组件给子组件传递函数类型的props实现: 子给父传递数据-->
    <School :getSchoolName="getSchoolName" />
  </div>
</template>
<script>
//引入组件
import School from './components/School'
export default {


  name: 'App',
  components: {


    School
  },
  data() {


    return {


      msg:"欢迎!!!"
    }
  },
  methods: {


    getSchoolName(name) {


      console.log("App收到了学校的名字:",name)
    },
  }

}
</script>

<style>
.app{


  background: lightgoldenrodyellow;
}
</style>
School.vue
<template>
    <div class="demo">
        <h2>名字:{

   { name}}</h2>
        <h2>性别:{

   { sex }}</h2>
        <button @click="sendStudentName">把名字给app</button>
        <hr>
    </div>
</template>
<script>
export default {


    name:'StudentVue',
    data() {


        console.log(this)
        return {


            name:"yang123",
            sex:"男"
        }
    },
    methods: {


        sendStudentName() {


            // 触发Student组件实例身上的getName事件
            this.$emit('getName', this.name)
        }
    }
}

</script>
<style scoped>
.demo{


    background: lightsalmon;
}
</style>
使用自定义事件实现数据传递
法一:使用@或v-on
步骤:
- 父组件将自定义的事件绑定到子组件身上
<Student v-on:getName="getStudentName" />
表示将自定义的事件 getName放到Student的实例对象上
-
父组件定义事件的回调函数(即事件出发之后执行的函数)
-
触发方法: Student的实例对象(vc)被父组件绑定一个事件getName,所以可以通过vc来触发自定义的事件
vc.$emit('事件名') -
子组件通过实例对象触发事件:
vc.$emit('事件名',参数名)
触发事件的同时可以传递参数(可以有多个),app组件通过触发自定义事件而触发的函数接收参数,获取子组件的值。
APP.vue
<template>
  <div class="app">
    <h1>app组件</h1>
    <!--通过父组件给子组件绑定一个自定义事件实现:子给父传递数据-->
    <Student v-on:getName="getStudentName" />
    <!--通过父组件给子组件传递函数类型的props实现: 子给父传递数据-->
    <School :getSchoolName="getSchoolName" />
  </div>
</template>
<script>
//引入组件
import Student from './components/Student'
import School from './components/School'
export default {


  name: 'App',
  components: {


    Student,
    School
  },
  data() {


    return {


      msg:"欢迎!!!"
    }
  },
  methods: {


    getSchoolName(name) {


      console.log("App收到了学校的名字:",name)
    },
    getStudentName(name) {


      console.log("getName被触发了")
      console.log("App收到了学生的名字:", name)
    }
  }

}
</script>

<style>
.app{


  background: lightgoldenrodyellow;
}
</style>
Student.vue
<template>
    <div class="demo">
        <h2>名字:{

   { name}}</h2>
        <h2>性别:{

   { sex }}</h2>
        <button @click="sendStudentName">把名字给app</button>
        <hr>
    </div>
</template>
<script>
export default {


    name:'StudentVue',
    data() {


        console.log(this)
        return {


            name:"yang123",
            sex:"男"
        }
    },
    methods: {


        sendStudentName() {


            // 触发Student组件实例身上的getName事件
            this.$emit('getName', this.name)
        }
    }
}

</script>
<style scoped>
.demo{


    background: lightsalmon;
}
</style>

法二:使用ref
通过ref结合mount()来实现自定义事件
- 父组件定义
ref和对应的mount(),在mount()将自定义的事件绑定给子组件
同时父组件定义回调函数由mount()进行调用。
格式:
<School ref="school" />
可以通过 this.$refs.student获取School的实例对象,通过$on为子组件绑定事件。
 methods: {


    getStudentName(name) {


      console.log("getName被触发了")
      console.log("App收到了学生的名字:", name)
    }
  },
  mounted() {


    this.$refs.student.$on('getName',this.getSchoolName)
  }
- 事件的触发使用
vc.$emit('事件名')
eg:
app.vue
<template>
  <div class="app">
    <h1>app组件</h1>
    <!--通过父组件给子组件传递函数类型的props实现: 子给父传递数据-->
    <School :getSchoolName="getSchoolName" />

    <!--通过父组件给子组件绑定一个自定义事件实现:子给父传递数据(使用v-on)-->
    <!-- <Student v-on:getName="getStudentName" /> -->

    <!--通过父组件给子组件传递函数类型的props实现: 子给父传递数据(使用ref)-->
    <Student ref="student" />
  </div>
</template>
<script>
//引入组件
import Student from './components/Student'
import School from './components/School'
export default {


  name: 'App',
  components: {


    Student,
    School
  },
  data() {


    return {


      msg:"欢迎!!!"
    }
  },
  methods: {


    getSchoolName(name) {


      console.log("App收到了学校的名字:",name)
    },
    getStudentName(name) {


      console.log("getName被触发了")
      console.log("App收到了学生的名字:", name)
    }
  },
  mounted() {


    this.$refs.student.$on('getName',this.getStudentName)
  }

}
</script>

<style>
.app{


  background: lightgoldenrodyellow;
}
</style>
student.vue:
<template>
    <div class="demo">
        <h2>名字:{

   { name}}</h2>
        <h2>性别:{

   { sex }}</h2>
        <button @click="sendStudentName">把名字给app</button>
        <hr>
    </div>
</template>
<script>
export default {


    name:'StudentVue',
    data() {


        console.log(this)
        return {


            name:"yang123",
            sex:"男"
        }
    },
    methods: {


        sendStudentName() {


            // 触发Student组件实例身上的getName事件
            this.$emit('getName', this.name)
        }
    }
}

</script>
<style scoped>
.demo{


    background: lightsalmon;
}
</style>
使用ref 和 v-on的区别
- 使用ref 的灵活性更强
如想要实现,点击按钮3s后再触发事件
  mounted() {


    setTimeout(() => {


      this.$refs.student.$on('getName', this.getStudentName)
    }, 3000)
  }
如想要事件只被触发一次
  mounted() {


      this.$refs.student.$once('getName', this.getStudentName)
  }
自定义事件的解绑
绑定的事件会出现在组件的实例对象上,所以如果事件不需要了,最好将事件进行解绑。
格式:vc.$off('事件名')解绑一个自定义事件
vc.$off([事件名1,事件名2,...])解绑多个自定义事件
vc.$off()解绑该组件实例的所有的自定义事件
<template>
    <div class="demo">
        <h2>名字:{

   { name}}</h2>
        <h2>性别:{

   { sex }}</h2>
        <button @click="sendStudentName">把名字给app</button>
        <button @click="unbind">点击解绑getName事件</button>
        <hr>
    </div>
</template>
<script>
export default {


    name:'StudentVue',
    data() {


        console.log(this)
        return {


            name:"yang123",
            sex:"男"
        }
    },
    methods: {


        sendStudentName() {


            // 触发Student组件实例身上的getName事件
            this.$emit('getName', this.name)
        },
        unbind() {


            this.$off('getName')//解绑一个自定义事件
        }

    }
}

</script>
<style scoped>
.demo{


    background: lightsalmon;
}
</style>
自定义事件和$destroy()方法
this.$destroy()用于销毁组件实例,当组件实例销毁后所有该组件实例的自定义事件全都不奏效。但是原生的js事件是不受影响的eg:click事件
需求:父组件如何将通过自定义事件获取的数据展示在页面上
- 在data中定义变量,在事件回调函数执设置该变量 = 从子组件获取的值。
 data() {


    return {


      studentName:''
    }
  },
  methods: {


    getStudentName(name) {


      console.log("App收到了学生的名字:", name)
      this.studentName = name
    }
  },
eg:使用:
app.vue
<template>
  <div class="app">
    <h1>app组件</h1>
    <h1>你好呀{

   {studentName}}</h1>

    <!--通过父组件给子组件绑定一个自定义事件实现:子给父传递数据(使用v-on)-->
    <Student v-on:getName="getStudentName" />
  </div>
</template>
<script>
//引入组件
import Student from './components/Student'
export default {


  name: 'App',
  components: {


    Student
  },
  data() {


    return {


      msg: "欢迎!!!",
      studentName:''
    }
  },
  methods: {


    getStudentName(name) {


      console.log("App收到了学生的名字:", name)
      this.studentName = name
    }
  },

}
</script>

<style>
.app{


  background: lightgoldenrodyellow;
}
</style>
两个注意点
ref注意点
当使用ref方法将获取到的子组件数据展示到页面上时
app.vue:
<template>
  <div class="app">
    <h1>app组件</h1>
    <h1>你好呀{

   {studentName}}</h1>
    <!--通过父组件给子组件传递函数类型的props实现: 子给父传递数据-->
    <School :getSchoolName="getSchoolName" />

    <!--通过父组件给子组件绑定一个自定义事件实现:子给父传递数据(使用v-on)-->
    <!-- <Student v-on:getName="getStudentName" /> -->

    <!--通过父组件给子组件传递函数类型的props实现: 子给父传递数据(使用ref)-->
    <Student ref="student" />
  </div>
</template>
<script>
//引入组件
import Student from './components/Student'
import School from './components/School'
export default {


  name: 'App',
  components: {


    Student,
    School
  },
  data() {


    return {


      msg: "欢迎!!!",
      studentName:''
    }
  },
  methods: {


    getSchoolName(name) {


      console.log("App收到了学校的名字:",name)
    },
    getStudentName(name) {


      console.log("App收到了学生的名字:", name)
      this.studentName = name
    }
  },
  mounted() {


    this.$refs.student.$on('getName', this.getStudentName)
      // this.$refs.student.$once('getName', this.getStudentName)
  }
}
</script>

<style>
.app{


  background: lightgoldenrodyellow;
}
</style>
可以将挂在函数mounted()和getStudentName一起写:
mounted() {


    this.$refs.student.$on('getName', function (name){


        console.log("App收到了学生的名字:", name)
        this.studentName = name
    })
  }
这样页面不能正常显示studentName,因为在事件调用函数中,谁调用事件,该函数的this就是谁,在该例子中,this就是Student实例对象,
如果一定要mounted()和getStudentName一起写,可以将getStudentName写成回调函数:
  mounted() {


    this.$refs.student.$on('getName', (name)=>{


        console.log("App收到了学生的名字:", name)
        this.studentName = name
    })
      // this.$refs.student.$once('getName', this.getStudentName)
  }
组件上使用js原生事件
组件上绑定js原生事件,组件会认为该事件是自定义的事件。
可以使用.native修饰符指明是原生的js事件
<Student ref="student" @click.native="show"/>
自定义事件绑定在哪一个实例上,就在那个实例上触发
自定义组件的使用场景
- 自定义组件是一种组件间通信的方式,适用于:
子组件===>父组件
使用场景:A是父组件,B是子组件,B想给A传数据,那么就要在A中给B绑定自定义事件(事件的回调函数在A中)。
事件的回调函数即触发事件所执行函数。
自定义组件的流程总结