目录
前言
MyBatis-Plus(简称 MP)是一个 MyBatis (opens new window)的增强工具,在 MyBatis 的基础上只做增强不做改变,为简化开发、提高效率而生。今天我们主要通过一个简单的案例来体会MyBatis-Plus功能的强大之处。

话不多说,直接进入正题
一、创建数据库
1、添加数据表
CREATE TABLE user
(
    id BIGINT(20) NOT NULL COMMENT '主键ID',
    name VARCHAR(30) NULL DEFAULT NULL COMMENT '姓名',
    age INT(11) NULL DEFAULT NULL COMMENT '年龄',
    email VARCHAR(50) NULL DEFAULT NULL COMMENT '邮箱',
    PRIMARY KEY (id)
);

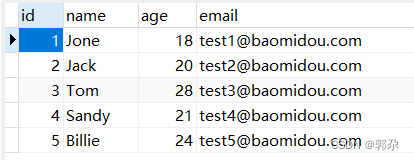
2、填充数据表
INSERT INTO user (id, name, age, email) VALUES
(1, 'Jone', 18, '[email protected]'),
(2, 'Jack', 20, '[email protected]'),
(3, 'Tom', 28, '[email protected]'),
(4, 'Sandy', 21, '[email protected]'),
(5, 'Billie', 24, '[email protected]');
二、整合MyBatis-Plus
1、新建springboot工程
2、导入对应的starter
<dependency>
    <groupId>com.baomidou</groupId>
    <artifactId>mybatis-plus-boot-starter</artifactId>
    <version>3.5.2</version>
</dependency>

<dependency>
    <groupId>mysql</groupId>
    <artifactId>mysql-connector-java</artifactId>
    <scope>runtime</scope>
</dependency>
<!--lombok :getter/setter方法以及构造器的生成 -->
<dependency>
    <groupId>org.projectlombok</groupId>
    <artifactId>lombok</artifactId>
    <optional>true</optional>
</dependency>
3、 添加配置
#配置dataSource
spring:
  datasource:
    driver-class-name: com.mysql.cj.jdbc.Driver
    url: jdbc:mysql://localhost:3306/test?serverTimezone=UTC
    username: root
    password: root
#配置日志,方便查看sql语句
mybatis-plus:
  configuration:
    log-impl: org.apache.ibatis.logging.stdout.StdOutImpl
4、创建实体类
@Data
@NoArgsConstructor
@AllArgsConstructor
public class User {


	@TableId(type = IdType.AUTO)
    private Long id;
    private String name;
    private Integer age;
    private String email;

}
5、定义数据层接口,继承BaseMapper
@Component
public interface UserMapper extends BaseMapper<User> {


	//这里不需要写任何代码
	//MyBatis-Plus已经给我们准备好了,直接拿来用即可
}
三、CRUD的实现
1、添加
@SpringBootTest
@MapperScan("com.example.dao")  //扫描数据层接口所在的包
class MybatisPlusApplicationTests {


    @Autowired
    private UserMapper userMapper;

    @Test
    public void testInsert(){


        User user = new User();
        user.setName("aaa");
        user.setAge(3);
        user.setEmail("[email protected]");
        int insert = userMapper.insert(user);
        System.out.println(insert);
    }
}

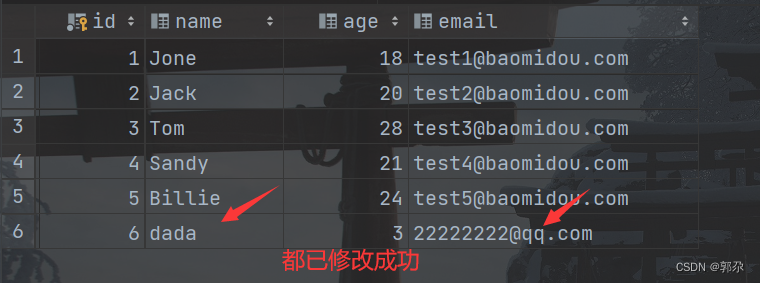
2、修改
@Test
public void testUpdate(){


    User user = new User();
    user.setId(6L);
    user.setName("dada");
    user.setEmail("[email protected]");
    int i = userMapper.updateById(user);
    System.out.println(i);
}
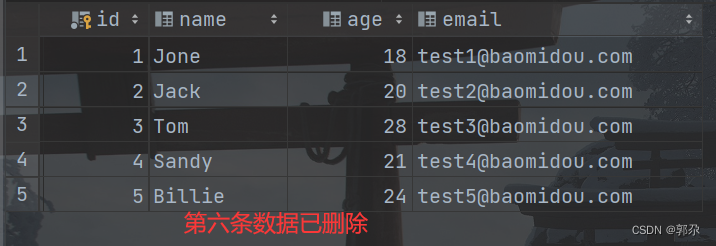
3、删除
3.1 通过id删除单条数据
这里我们删除 id 为 6 的用户
// 测试通过id单个删除
@Test
public void testDeleteById(){


    userMapper.deleteById(1L);
}
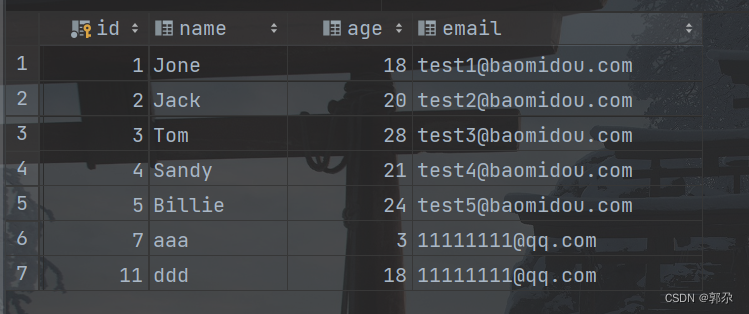
3.2 通过id删除多条数据
删除之前我们先多插入几条数据,方便测试
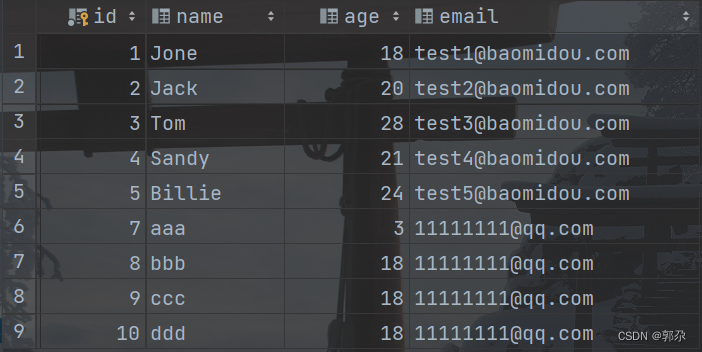
// 测试通过id批量删除
@Test
public void testDeleteBatchIds(){


    userMapper.deleteBatchIds(Arrays.asList(8L,9L,10L));
}
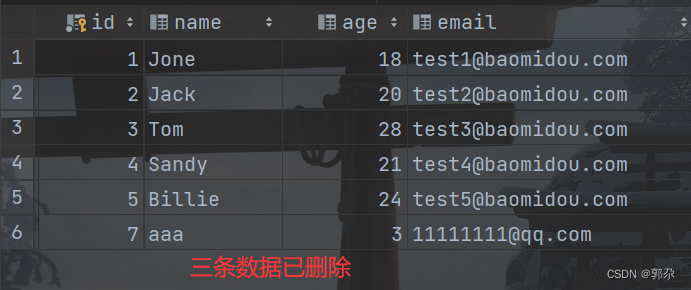
3.3 通过map批量删除
我们再添加一条数据,删除数据表中年龄等于 18 岁的用户
// 测试通过map批量删除
@Test
public void testDeleteByMap(){


    HashMap<String, Object> map = new HashMap<>();
    map.put("age","18");
    userMapper.deleteByMap(map);
}

4、查询
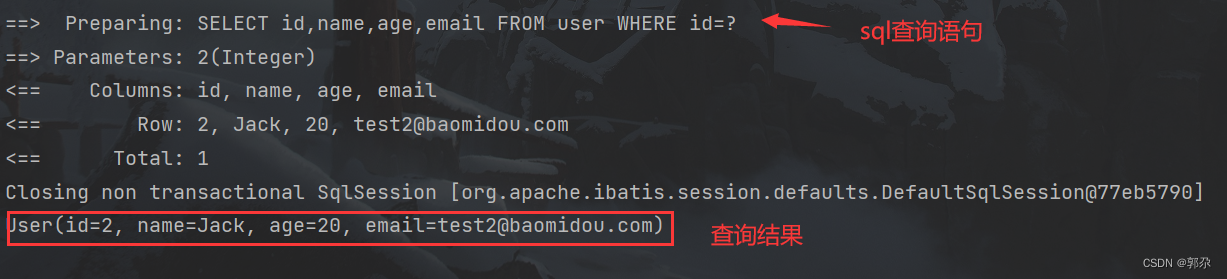
4.1 通过id查询单条数据
// 测试通过id查询
@Test
public void testSelectById(){


    User user = userMapper.selectById(2);
    System.out.println(user);
}
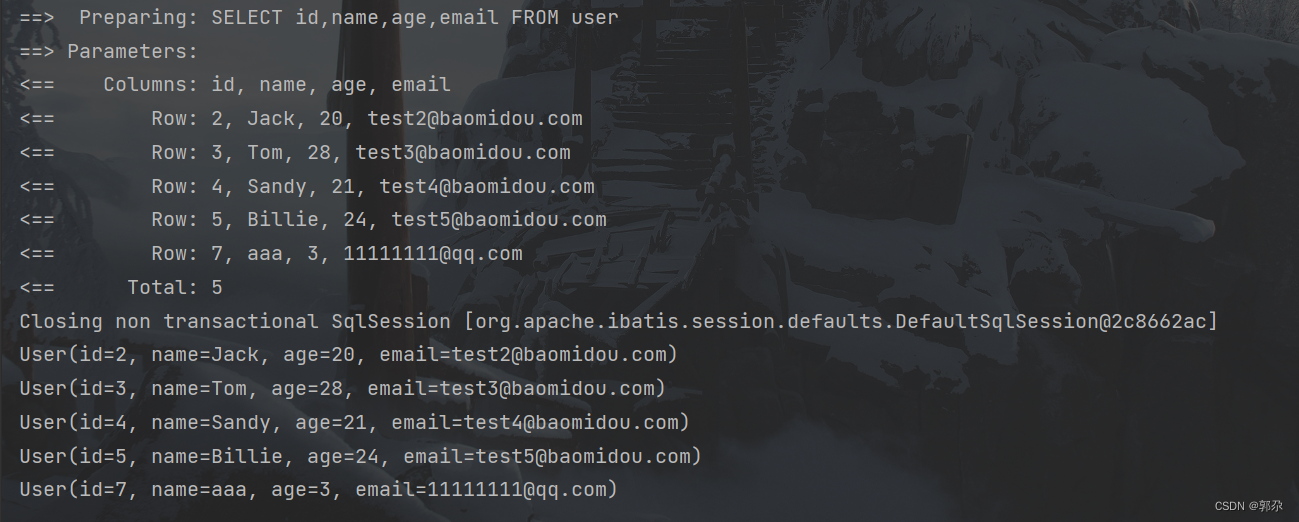
4.2 查询所有数据
 @Test
public void selectList() {


    List<User> list = userMapper.selectList(null);
    list.forEach(System.out::println);
}
至此,MyBatis-Plus实现的CRUD就告一段落了,有没有觉得特别爽!!!