Spring中事务的简单使用
1.什么是事务
- 事务时数据库操作最基本单元,是逻辑上的一组操作,要么都成功,如果有一个操作失败所有的操作都失败。
- 典型场景:银行转账A转账给B100元
- 两个步骤:将A的余额减少100,再将B的余额增加100
事务的四个特性(ACID)
- 原子性:事务是不可分割的,要么全部执行,要么全部不执行
- 一致性:保证数据的状态操作前和操作后保持一致
- 隔离性:多个事务同时操作相同数据库的同一个数据时,一个事务的执行不受另外一个事务的干扰
- 持久性:一个事务一旦提交,则数据将持久化到本地,除非其他事务对其进行修改
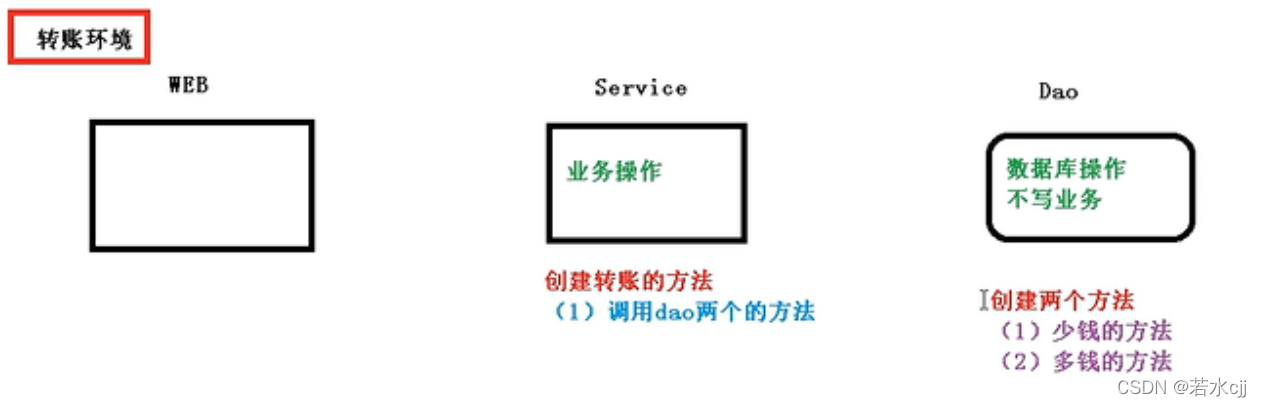
2.搭建事务环境
2.1理解事务逻辑
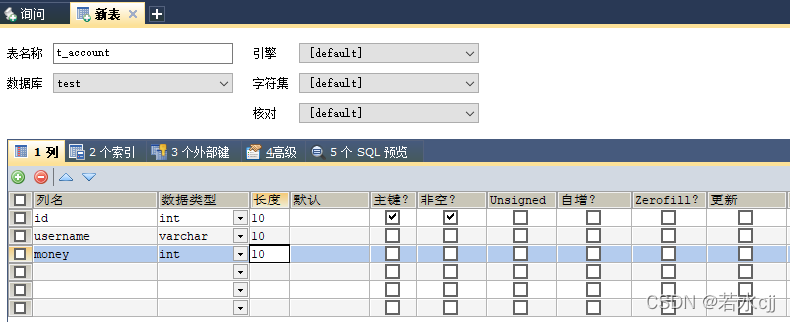
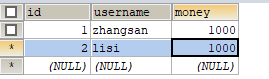
2.2创建事务使用的数据表并添加记录
2.3创建service,搭建dao,完成对象创建和注入关系
1.service注入dao,在dao中注入JDBCTemplate,在JDBCTemplate中注入DataSource
整体架构
UserDao文件
package com.atguigu.spring5.dao;

/**
 * @author
 * @create 2022-03-02 15:06
 */
public interface UserDao {


}
UserDaoImpl文件
package com.atguigu.spring5.dao;

import org.springframework.beans.factory.annotation.Autowired;
import org.springframework.jdbc.core.JdbcTemplate;
import org.springframework.stereotype.Repository;

/**
 * @author
 * @create 2022-03-02 15:06
 */
@Repository
public class UserDaoImpl implements UserDao{


    @Autowired
    private JdbcTemplate jdbcTemplate;
}
UserService文件
package com.atguigu.spring5.service;

import com.atguigu.spring5.dao.UserDao;
import org.springframework.beans.factory.annotation.Autowired;
import org.springframework.stereotype.Service;

/**
 * @author
 * @create 2022-03-02 15:06
 */
@Service
public class UserService {


    @Autowired
    private UserDao userDao;
}
spring.xml文件
<?xml version="1.0" encoding="UTF-8"?>
<beans xmlns="http://www.springframework.org/schema/beans"
       xmlns:xsi="http://www.w3.org/2001/XMLSchema-instance"
       xmlns:context="http://www.springframework.org/schema/context"
       xmlns:aop="http://www.springframework.org/schema/aop"
       xmlns:tx="http://www.springframework.org/schema/tx"
       xsi:schemaLocation="http://www.springframework.org/schema/beans http://www.springframework.org/schema/beans/spring-beans.xsd
        http://www.springframework.org/schema/context http://www.springframework.org/schema/context/spring-context.xsd
        http://www.springframework.org/schema/aop http://www.springframework.org/schema/aop/spring-aop.xsd
        http://www.springframework.org/schema/tx http://www.springframework.org/schema/tx/spring-tx.xsd">

    <!--组件扫描-->
    <context:component-scan base-package="com.atguigu"></context:component-scan>
    <!--配置数据库连接池-->
    <context:property-placeholder location="classpath:druid.properties"></context:property-placeholder>
    <bean id="dataSource" class="com.alibaba.druid.pool.DruidDataSource" destroy-method="close">
        <property name="url" value="${jdbc.url}"></property>
        <property name="username" value="${jdbc.username}"></property>
        <property name="password" value="${jdbc.password}"></property>
        <property name="driverClassName" value="${jdbc.driverclass}"></property>
    </bean>

    <!--JDBCTemplate对象-->
    <bean id="jdbcTemplate" class="org.springframework.jdbc.core.JdbcTemplate">
        <!--注入dataSource-->
        <property name="dataSource" ref="dataSource"></property>
    </bean>
</beans>
druit.properties配置文件
jdbc.url=jdbc:mysql://localhost:3306/test?useUnicode=true&characterEncoding=utf8&useSSL=false&serverTimezone=GMT
jdbc.driverclass=com.mysql.cj.jdbc.Driver
jdbc.username=root
jdbc.password=abc123
2.4创建事务中转账的相关方法
UserDao.java 文件
package com.atguigu.spring5.dao;

/**
 * @author huxuyang
 * @create 2022-03-02 15:06
 */
public interface UserDao {


    void addMoney();
    void reduceMoney();
}
UserDaoImpl.java 文件
package com.atguigu.spring5.dao;

import org.springframework.beans.factory.annotation.Autowired;
import org.springframework.jdbc.core.JdbcTemplate;
import org.springframework.stereotype.Repository;

/**
 * @author huxuyang
 * @create 2022-03-02 15:06
 */
@Repository
public class UserDaoImpl implements UserDao{


    @Autowired
    private JdbcTemplate jdbcTemplate;


    @Override
    public void addMoney() {


       String sql = "update t_account set money = money- ? where username= ?";
       jdbcTemplate.update(sql, 100, "zhangsan");
    }

    @Override
    public void reduceMoney() {


        String sql = "update t_account set money = money + ? where username= ?";
        jdbcTemplate.update(sql, 100, "lisi");
    }
}
UserService.java文件
package com.atguigu.spring5.service;

import com.atguigu.spring5.dao.UserDao;
import org.springframework.beans.factory.annotation.Autowired;
import org.springframework.stereotype.Service;

/**
 * @author huxuyang
 * @create 2022-03-02 15:06
 */
@Service
public class UserService {


    // 注入dao
    @Autowired
    private UserDao userDao;

    // 转账的过程
    public void accountMoney(){


        // 1.先给张三减100
        userDao.reduceMoney();

        // 2.再给李四增100
        userDao.addMoney();
    }
}
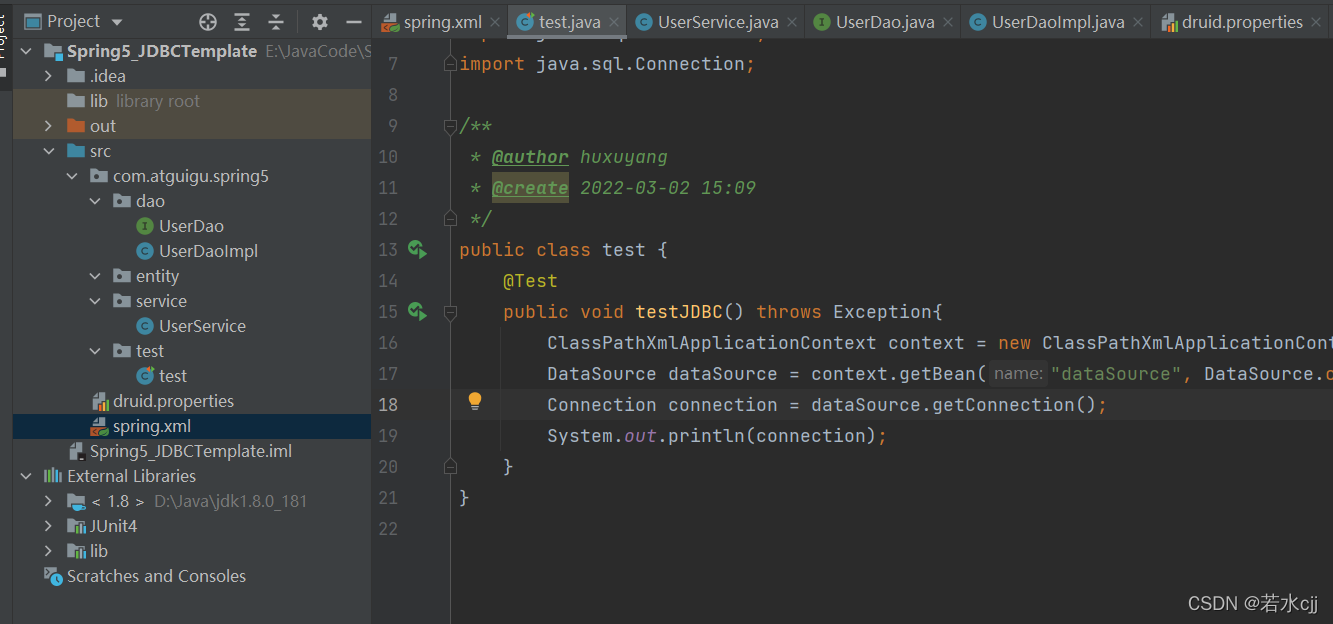
2.5测试
package com.atguigu.spring5.test;

import com.atguigu.spring5.service.UserService;
import org.junit.Test;
import org.springframework.context.support.ClassPathXmlApplicationContext;

import javax.sql.DataSource;
import java.sql.Connection;

/**
 * @author huxuyang
 * @create 2022-03-02 15:09
 */
public class test {


    @Test //测试数据库连接
    public void testJDBC() throws Exception{


        ClassPathXmlApplicationContext context = new ClassPathXmlApplicationContext("spring.xml");
        DataSource dataSource = context.getBean("dataSource", DataSource.class);
        Connection connection = dataSource.getConnection();
        System.out.println(connection);
    }

    @Test // 测试转账操作
    public void testAccount() throws Exception{


        ClassPathXmlApplicationContext context = new ClassPathXmlApplicationContext("spring.xml");
        UserService userService = context.getBean("userService", UserService.class);
        userService.accountMoney();
    }
}
测试结果
2.6上述代码,如果正常执行时没有问题的,但是如果出现网络问题或者其他问题,转账过程就会出错
模拟错误过程
    // 转账的过程
    public void accountMoney(){


        // 1.先给张三减100
        userDao.reduceMoney();

        // 模拟错误
        int a = 1/0;

        // 2.再给李四增100
        userDao.addMoney();
    }
3 使用事务解决上述问题
3.1 事务使用时的处理逻辑
// 转账的过程
    public void accountMoney(){


        try {


            // 第一步 开启事务

            // 第二步 进行业务操作

            // 1.先给张三减100
            userDao.reduceMoney();

            // 模拟错误
            int a = 1/0;

            // 2.再给李四增100
            userDao.addMoney();

            // 第三步 如果没有发生异常,则提交事务
        } catch (Exception e) {


            // 第四步 如果发生异常,则将事务回滚
        }
    }
3.2 事务操作
事务一般添加到service层
3.2.1 在Spring进行事务管理操作有两种方式
- (1)编程式事务管理
- (2)声明式事务管理(常用)
3.2.2 声明式事务管理实现方式
(1)基于注解方式实现(常用)
(2)基于xml配置文件方式实现
注意:在Spring中进行声明式事务管理,底层使用的是AOP
3.2.3 Spring事务管理API
Spring中提供一个接口PlatformTransactionManager,此接口代表事务管理器,这个接口针对不同的框架提供不同的实现类。
针对JDBCTemplate和Mybatis框架的实现类是DataSourceTransactionManager
针对Hibernate的框架的实现类是HibernateTransactionManager

4 注解方式实现声明式事务
1.在Spring配置文件中配置事务管理器
    <!--创建事务管理器-->
    <bean id="transactionManager" class="org.springframework.jdbc.datasource.DataSourceTransactionManager">
        <!--注入数据源-->
        <property name="dataSource" ref="dataSource"></property>
    </bean>
2.在Spring配置文件中,开启事务注解
- 2.1 在spirng配置文件中先引入名称空间tx
<?xml version="1.0" encoding="UTF-8"?>
<beans xmlns="http://www.springframework.org/schema/beans"
       xmlns:xsi="http://www.w3.org/2001/XMLSchema-instance"
       xmlns:context="http://www.springframework.org/schema/context"
       xmlns:aop="http://www.springframework.org/schema/aop"
       xmlns:tx="http://www.springframework.org/schema/tx"
       xsi:schemaLocation="http://www.springframework.org/schema/beans http://www.springframework.org/schema/beans/spring-beans.xsd
        http://www.springframework.org/schema/context http://www.springframework.org/schema/context/spring-context.xsd
        http://www.springframework.org/schema/aop http://www.springframework.org/schema/aop/spring-aop.xsd
        http://www.springframework.org/schema/tx http://www.springframework.org/schema/tx/spring-tx.xsd">
- 2.2 在Spring配置文件中开启事务注解
    <!--开启事务注解-->
    <tx:annotation-driven transaction-manager="transactionManager"></tx:annotation-driven>
3.在service类上面或者service类中方法上面添加事务注解
-  3.1 @Transactional ,这个注解可以添加到类上面,也可以添加到方法上面
- 3.2如果这个注解添加到类上面,这个类里面所有的方法都添加了事务
- 3.3 如果把这个注解添加到方法上面,那么只为这个方法添加事务
配置完成后,spring.xml配置文件如下
<?xml version="1.0" encoding="UTF-8"?>
<beans xmlns="http://www.springframework.org/schema/beans"
       xmlns:xsi="http://www.w3.org/2001/XMLSchema-instance"
       xmlns:context="http://www.springframework.org/schema/context"
       xmlns:aop="http://www.springframework.org/schema/aop"
       xmlns:tx="http://www.springframework.org/schema/tx"
       xsi:schemaLocation="http://www.springframework.org/schema/beans http://www.springframework.org/schema/beans/spring-beans.xsd
        http://www.springframework.org/schema/context http://www.springframework.org/schema/context/spring-context.xsd
        http://www.springframework.org/schema/aop http://www.springframework.org/schema/aop/spring-aop.xsd
        http://www.springframework.org/schema/tx http://www.springframework.org/schema/tx/spring-tx.xsd">

    <!--组件扫描-->
    <context:component-scan base-package="com.atguigu"></context:component-scan>
    <!--配置数据库连接池-->
    <context:property-placeholder location="classpath:druid.properties"></context:property-placeholder>
    <bean id="dataSource" class="com.alibaba.druid.pool.DruidDataSource" destroy-method="close">
        <property name="url" value="${jdbc.url}"></property>
        <property name="username" value="${jdbc.username}"></property>
        <property name="password" value="${jdbc.password}"></property>
        <property name="driverClassName" value="${jdbc.driverclass}"></property>
    </bean>

    <!--JDBCTemplate对象-->
    <bean id="jdbcTemplate" class="org.springframework.jdbc.core.JdbcTemplate">
        <!--注入dataSource-->
        <property name="dataSource" ref="dataSource"></property>
    </bean>

    <!--创建事务管理器-->
    <bean id="transactionManager" class="org.springframework.jdbc.datasource.DataSourceTransactionManager">
        <!--注入数据源-->
        <property name="dataSource" ref="dataSource"></property>
    </bean>

    <!--开启事务注解-->
    <tx:annotation-driven transaction-manager="transactionManager"></tx:annotation-driven>
</beans>
servic层文件如下
@Service
@Transactional
public class UserService {


	//	.............
}
4.1 测试配置事务后出现异常的结果
package com.atguigu.spring5.service;

import com.atguigu.spring5.dao.UserDao;
import org.springframework.beans.factory.annotation.Autowired;
import org.springframework.stereotype.Service;
import org.springframework.transaction.PlatformTransactionManager;
import org.springframework.transaction.annotation.Transactional;

/**
 * @author huxuyang
 * @create 2022-03-02 15:06
 */
@Service
@Transactional
public class UserService {


    // 注入dao
    @Autowired
    private UserDao userDao;

    // 转账的过程
    public void accountMoney() {


        // 1.先给张三减100
        userDao.reduceMoney();
        // 模拟错误
        int a = 1 / 0;
        // 2.再给李四增100
        userDao.addMoney();
    }
}
测试代码
    @Test // 测试转账操作
    public void testAccount() throws Exception{


        ClassPathXmlApplicationContext context = new ClassPathXmlApplicationContext("spring.xml");
        UserService userService = context.getBean("userService", UserService.class);
        userService.accountMoney();
    }
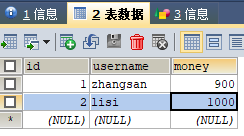
测试前数据库状态
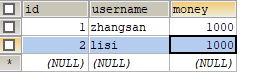
测试后数据库状态

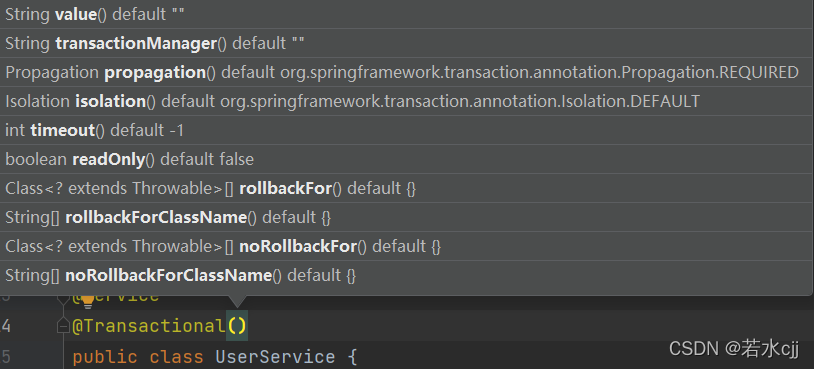
4.2声明式事务参数
在service类上面添加注解@Transactional, 这个注解里面可以配置事务相关参数
1.propagation:事务传播行为
多个事务之间进行调用,在调用的过程中事务是如果进行管理的

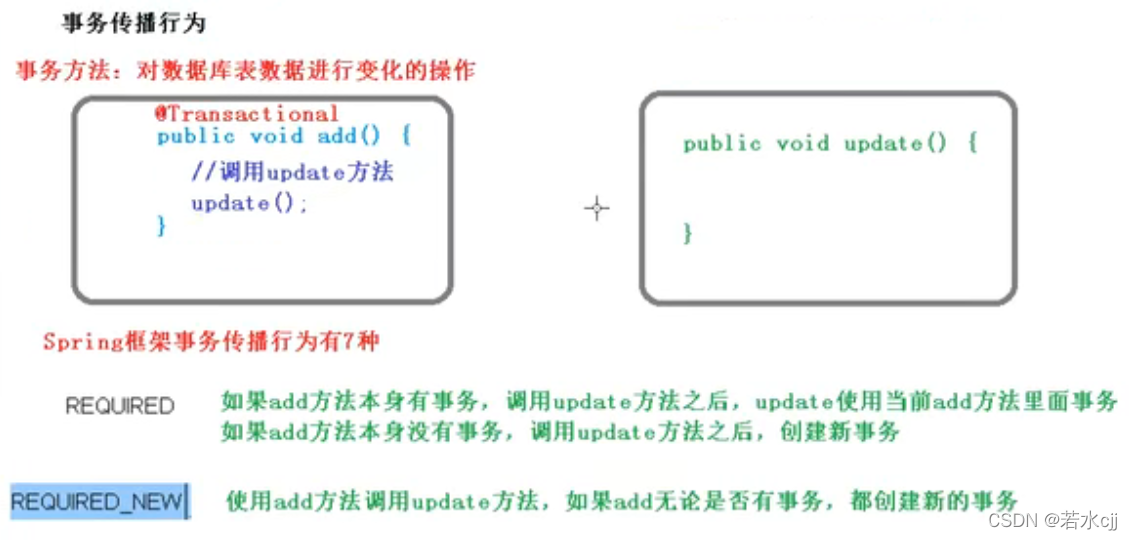
默认的传播行为是required
@Service
@Transactional(propagation = Propagation.REQUIRED)
2.ioslation:事务隔离级别
- 事务的隔离性目的是为了多个事务操作同一个数据之间不会产生影响。
- 若不考虑隔离性,并发操作会出现三个读问题:
- 脏读:一个事务读取到另一个事务未提交的数据
- 不可重复读:一个事务A读取到另一个事务B提交的数据(A在B提交前后读取到的数据不一样)
- 幻读:一个事务A读取到另一个事务B添加的数据
通过设置事务隔离级别,解决上述问题
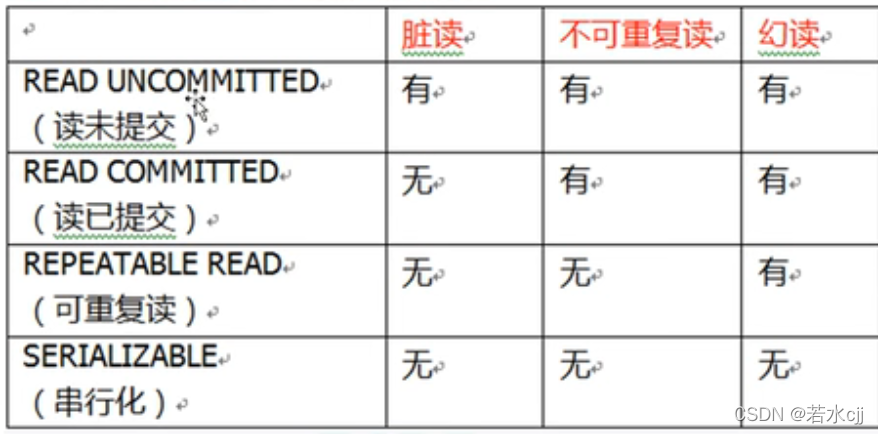
MySQL默认隔离级别为REPEATABLE_READ
@Service
@Transactional(propagation = Propagation.REQUIRED, isolation = Isolation.REPEATABLE_READ)
3.timeout:超时时间
- 事务要在一定的时间内提交,如果不提交就需要进行回滚
- 默认为-1,即为永不超时,超时单位为秒
4.readOnly:是否只读
- 读:查询操作 写:增删改操作
- readOnly默认值为false,表示可以进行增删改操作
- 将readOnly设置为true,则只能查询,不能增删改
5.rollbackFor:回滚
- 设置出现哪些异常进行事务回滚
6.norollbackFor:不回滚
- 设置出现哪些异常不进行事务回滚
@Service
@Transactional(
 propagation = Propagation.REQUIRED,
 isolation = Isolation.REPEATABLE_READ,
 timeout = -1,
 readOnly = false,
 rollbackFor = {

    NoClassDefFoundError.class}
 )
5.注解方式实现事务完整代码
完整架构
[外链图片转存失败,源站可能有防盗链机制,建议将图片保存下来直接上传(img-kKsvUDWg-1646224431965)(Spring%E4%B8%AD%E4%BA%8B%E5%8A%A1%E7%9A%84%E4%BD%BF%E7%94%A8.assets/image-20220302194530271-16462215330491.png)]
5.1 UserDao文件
package com.atguigu.spring5.dao;

/**
 * @author huxuyang
 * @create 2022-03-02 15:06
 */
public interface UserDao {


    void addMoney();
    void reduceMoney();
}
5.2 UserDaoImpl文件
package com.atguigu.spring5.dao;

import org.springframework.beans.factory.annotation.Autowired;
import org.springframework.jdbc.core.JdbcTemplate;
import org.springframework.stereotype.Repository;

/**
 * @author huxuyang
 * @create 2022-03-02 15:06
 */
@Repository
public class UserDaoImpl implements UserDao{


    @Autowired
    private JdbcTemplate jdbcTemplate;


    @Override
    public void addMoney() {


       String sql = "update t_account set money = money- ? where username= ?";
       jdbcTemplate.update(sql, 100, "zhangsan");
    }

    @Override
    public void reduceMoney() {


        String sql = "update t_account set money = money + ? where username= ?";
        jdbcTemplate.update(sql, 100, "lisi");
    }
}
5.3 UserService文件
package com.atguigu.spring5.service;

import com.atguigu.spring5.dao.UserDao;
import org.springframework.beans.factory.annotation.Autowired;
import org.springframework.stereotype.Service;
import org.springframework.transaction.PlatformTransactionManager;
import org.springframework.transaction.annotation.Isolation;
import org.springframework.transaction.annotation.Propagation;
import org.springframework.transaction.annotation.Transactional;

/**
 * @author huxuyang
 * @create 2022-03-02 15:06
 */
@Service
@Transactional(propagation = Propagation.REQUIRED, isolation = Isolation.REPEATABLE_READ, timeout = -1,readOnly = false,rollbackFor = {

    NoClassDefFoundError.class})
public class UserService {


    // 注入dao
    @Autowired
    private UserDao userDao;

    // 转账的过程
    public void accountMoney() {


        // 1.先给张三减100
        userDao.reduceMoney();

        // 模拟错误
        int a = 1 / 0;

        // 2.再给李四增100
        userDao.addMoney();
    }
}
5.4 druid.properties文件
jdbc.url=jdbc:mysql://localhost:3306/test?useUnicode=true&characterEncoding=utf8&useSSL=false&serverTimezone=GMT
jdbc.driverclass=com.mysql.cj.jdbc.Driver
jdbc.username=root
jdbc.password=abc123
5.5 spring.xml文件
<?xml version="1.0" encoding="UTF-8"?>
<beans xmlns="http://www.springframework.org/schema/beans"
       xmlns:xsi="http://www.w3.org/2001/XMLSchema-instance"
       xmlns:context="http://www.springframework.org/schema/context"
       xmlns:aop="http://www.springframework.org/schema/aop"
       xmlns:tx="http://www.springframework.org/schema/tx"
       xsi:schemaLocation="http://www.springframework.org/schema/beans http://www.springframework.org/schema/beans/spring-beans.xsd
        http://www.springframework.org/schema/context http://www.springframework.org/schema/context/spring-context.xsd
        http://www.springframework.org/schema/aop http://www.springframework.org/schema/aop/spring-aop.xsd
        http://www.springframework.org/schema/tx http://www.springframework.org/schema/tx/spring-tx.xsd">

    <!--组件扫描-->
    <context:component-scan base-package="com.atguigu"></context:component-scan>
    <!--配置数据库连接池-->
    <context:property-placeholder location="classpath:druid.properties"></context:property-placeholder>
    <bean id="dataSource" class="com.alibaba.druid.pool.DruidDataSource" destroy-method="close">
        <property name="url" value="${jdbc.url}"></property>
        <property name="username" value="${jdbc.username}"></property>
        <property name="password" value="${jdbc.password}"></property>
        <property name="driverClassName" value="${jdbc.driverclass}"></property>
    </bean>

    <!--JDBCTemplate对象-->
    <bean id="jdbcTemplate" class="org.springframework.jdbc.core.JdbcTemplate">
        <!--注入dataSource-->
        <property name="dataSource" ref="dataSource"></property>
    </bean>

    <!--创建事务管理器-->
    <bean id="transactionManager" class="org.springframework.jdbc.datasource.DataSourceTransactionManager">
        <!--注入数据源-->
        <property name="dataSource" ref="dataSource"></property>
    </bean>

    <!--开启事务注解-->
    <tx:annotation-driven transaction-manager="transactionManager"></tx:annotation-driven>
</beans>
5.46 test文件
package com.atguigu.spring5.test;

import com.atguigu.spring5.service.UserService;
import org.junit.Test;
import org.springframework.context.support.ClassPathXmlApplicationContext;

import javax.sql.DataSource;
import java.sql.Connection;

/**
 * @author huxuyang
 * @create 2022-03-02 15:09
 */
public class test {


    @Test //测试数据库连接
    public void testJDBC() throws Exception{


        ClassPathXmlApplicationContext context = new ClassPathXmlApplicationContext("spring.xml");
        DataSource dataSource = context.getBean("dataSource", DataSource.class);
        Connection connection = dataSource.getConnection();
        System.out.println(connection);
    }

    @Test // 测试转账操作
    public void testAccount() throws Exception{


        ClassPathXmlApplicationContext context = new ClassPathXmlApplicationContext("spring.xml");
        UserService userService = context.getBean("userService", UserService.class);
        userService.accountMoney();
    }
}
5.XML方式实现声明式事务
5.1 在Spring配置文件中进行配置
-
第一步 配置事务管理器
-
第二步 配置通知
-
第三步 配置切入点和切面
5.1.1 spring.xml文件
<?xml version="1.0" encoding="UTF-8"?>
<beans xmlns="http://www.springframework.org/schema/beans"
       xmlns:xsi="http://www.w3.org/2001/XMLSchema-instance"
       xmlns:context="http://www.springframework.org/schema/context"
       xmlns:aop="http://www.springframework.org/schema/aop"
       xmlns:tx="http://www.springframework.org/schema/tx"
       xsi:schemaLocation="http://www.springframework.org/schema/beans http://www.springframework.org/schema/beans/spring-beans.xsd
        http://www.springframework.org/schema/context http://www.springframework.org/schema/context/spring-context.xsd
        http://www.springframework.org/schema/aop http://www.springframework.org/schema/aop/spring-aop.xsd
        http://www.springframework.org/schema/tx http://www.springframework.org/schema/tx/spring-tx.xsd">

    <!--组件扫描-->
    <context:component-scan base-package="com.atguigu"></context:component-scan>
    <!--配置数据库连接池-->
    <context:property-placeholder location="classpath:druid.properties"></context:property-placeholder>
    <bean id="dataSource" class="com.alibaba.druid.pool.DruidDataSource" destroy-method="close">
        <property name="url" value="${jdbc.url}"></property>
        <property name="username" value="${jdbc.username}"></property>
        <property name="password" value="${jdbc.password}"></property>
        <property name="driverClassName" value="${jdbc.driverclass}"></property>
    </bean>

    <!--JDBCTemplate对象-->
    <bean id="jdbcTemplate" class="org.springframework.jdbc.core.JdbcTemplate">
        <!--注入dataSource-->
        <property name="dataSource" ref="dataSource"></property>
    </bean>

    <!--1. 创建事务管理器-->
    <bean id="transactionManager" class="org.springframework.jdbc.datasource.DataSourceTransactionManager">
        <!--注入数据源-->
        <property name="dataSource" ref="dataSource"></property>
    </bean>

    <!--2.配置通知-->
    <tx:advice id="txadvice">
        <!--配置事务参数-->
        <tx:attributes>
            <!--指定哪种规则的方法上面添加事务-->
            <tx:method name="accountMoney" propagation="REQUIRED" isolation="READ_COMMITTED"/>
            <!--<tx:method name="account*"></tx:method>  表名在以account开头的方法上添加事务-->
        </tx:attributes>
    </tx:advice>

    <!--3.配置切入点和切面-->
    <aop:config>
        <!--配置切入点-->
        <aop:pointcut id="pt" expression="(execution(* com.atguigu.spring5.service.UserService.*(..)))"/>
        <!--配置切面-->
        <aop:advisor advice-ref="txadvice" pointcut-ref="pt"></aop:advisor>
    </aop:config>
</beans>
5.1.2 UserService文件
package com.atguigu.spring5.service;

import com.atguigu.spring5.dao.UserDao;
import org.springframework.beans.factory.annotation.Autowired;
import org.springframework.stereotype.Service;

/**
 * @author huxuyang
 * @create 2022-03-02 15:06
 */
@Service
public class UserService {


    // 注入dao
    @Autowired
    private UserDao userDao;

    // 转账的过程
    public void accountMoney() {


        // 1.先给张三减100
        userDao.reduceMoney();

        // 模拟错误
        int a = 1 / 0;

        // 2.再给李四增100
        userDao.addMoney();
    }
}
6.完全注解方式实现事务
6.1 使用配置类代替配置文件
package com.atguigu.spring5.config;

import com.alibaba.druid.pool.DruidDataSource;
import org.junit.Test;
import org.springframework.context.annotation.Bean;
import org.springframework.context.annotation.ComponentScan;
import org.springframework.context.annotation.Configuration;
import org.springframework.jdbc.core.JdbcTemplate;
import org.springframework.jdbc.datasource.DataSourceTransactionManager;
import org.springframework.transaction.annotation.EnableTransactionManagement;

import javax.sql.DataSource;
import javax.xml.crypto.Data;
import java.io.InputStream;
import java.util.Properties;

/**
 * @author huxuyang
 * @create 2022-03-02 20:04
 */

@Configuration  //配置类
@ComponentScan(basePackages = "com.atguigu") // 组件扫描
@EnableTransactionManagement // 开启事务
public class TxConfig {


    // 创建数据库连接池
    @Bean
    public DruidDataSource getDruidDataSource() throws Exception{


        DruidDataSource dataSource = new DruidDataSource();
        InputStream is = ClassLoader.getSystemClassLoader().getResourceAsStream("druid.properties");
        Properties pros = new Properties();
        pros.load(is);
        dataSource.setDriverClassName(pros.getProperty("jdbc.driverclass"));
        dataSource.setUrl(pros.getProperty("jdbc.url"));
        dataSource.setUsername(pros.getProperty("jdbc.username"));
        dataSource.setPassword(pros.getProperty("jdbc.password"));
        return dataSource;
    }

    // 创建JDBCTemplate对象
    @Bean
    public JdbcTemplate getJdbcTemplate(DataSource dataSource){


        JdbcTemplate jdbcTemplate = new JdbcTemplate();
        // 参数中有dataSource,创建bean时会到ioc容器中根据类型找到dataSource并注入
        jdbcTemplate.setDataSource(dataSource);
        return jdbcTemplate;
    }

    // 创建事务管理器
    @Bean
    public DataSourceTransactionManager getDataSourceTransactionManager(DataSource dataSource){


        DataSourceTransactionManager transactionManager = new DataSourceTransactionManager();
        transactionManager.setDataSource(dataSource);
        return transactionManager;
    }
}
UserService 文件
package com.atguigu.spring5.service;

import com.atguigu.spring5.dao.UserDao;
import org.springframework.beans.factory.annotation.Autowired;
import org.springframework.stereotype.Service;

/**
 * @author huxuyang
 * @create 2022-03-02 15:06
 */
@Service
public class UserService {


    // 注入dao
    @Autowired
    private UserDao userDao;

    // 转账的过程
    public void accountMoney() {


        // 1.先给张三减100
        userDao.reduceMoney();

        // 模拟错误
        int a = 1 / 0;

        // 2.再给李四增100
        userDao.addMoney();
    }
}
@Test // 测试转账操作
public void testAccount2() throws Exception{


    AnnotationConfigApplicationContext context = new AnnotationConfigApplicationContext(TxConfig.class);
    UserService userService = context.getBean("userService", UserService.class);
    userService.accountMoney();
}