Spring Cloud Eureka 是Spring Cloud Netfix微服务套件中的一部分,主要负责完成微服务架构中的服务治理功能,我们只需简单引入依赖和注解配置就能让Spring Boot构建的微服务轻松的与Eureka服务治理体系进行整合。
本章主要内容:
1.构建服务注册中心
2.服务注册与服务发现
3.Eureka的基础架构
4.Eureka的服务治理机制
5.Eureka的配置
服务治理
服务治理是微服务架构中最为核心和基础的模块,主要用来实现各个微服务实例的自动化注册和发现。
Eureka服务端,也称为服务注册中心。同其他服务注册中心一样,支持高可用配置,依托于强一致性提供良好的服务实例可用性,可以应对多种不同的故障场景,如果Eureka以集群模式部署,当集群中有分片故障时,那么Eureka转入自我保护模式,允许在分片故障期间继续提供服务的发现和注册,当分片恢复运行时,集群中的其他分片会把它们的状态再次同步回来。
Eureka客户端,主要处理服务的注册与发现。客户端服务通过注解和参数配置的方式,嵌入在客户端应用程序的代码中,在应用程序运行时,Eureka客户端向服务注册中心注册自身提供的服务并周期性地发送心跳来更新服务租约。同时,也能从服务端查询当前注册的服务信息并把它们缓存到本地并周期性刷新服务状态。
搭建服务注册中心
新建spring boot项目:eureka-server
pom.xml配置:
<?xml version="1.0" encoding="UTF-8"?>
<project xmlns="http://maven.apache.org/POM/4.0.0" xmlns:xsi="http://www.w3.org/2001/XMLSchema-instance"
	xsi:schemaLocation="http://maven.apache.org/POM/4.0.0 http://maven.apache.org/xsd/maven-4.0.0.xsd">
	<modelVersion>4.0.0</modelVersion>

	<groupId>com.example</groupId>
	<artifactId>eureka-server</artifactId>
	<version>0.0.1-SNAPSHOT</version>
	<packaging>jar</packaging>

	<name>eureka-server</name>
	<description>Demo project for Spring Boot</description>

	<parent>
		<groupId>org.springframework.boot</groupId>
		<artifactId>spring-boot-starter-parent</artifactId>
		<version>1.3.7.RELEASE</version>
		<relativePath /> <!-- lookup parent from repository -->
	</parent>

	<properties>
		<project.build.sourceEncoding>UTF-8</project.build.sourceEncoding>
		<project.reporting.outputEncoding>UTF-8</project.reporting.outputEncoding>
		<java.version>1.8</java.version>
	</properties>

	<dependencies>
		<dependency>
			<groupId>org.springframework.boot</groupId>
			<artifactId>spring-boot-starter</artifactId>
		</dependency>

		<dependency>
			<groupId>org.springframework.boot</groupId>
			<artifactId>spring-boot-starter-test</artifactId>
			<scope>test</scope>
		</dependency>
		<!-- 引入eureka包 -->
		<dependency>
			<groupId>org.springframework.cloud</groupId>
			<artifactId>spring-cloud-starter-eureka-server</artifactId>
		</dependency>

	</dependencies>

	<build>
		<plugins>
			<plugin>
				<groupId>org.springframework.boot</groupId>
				<artifactId>spring-boot-maven-plugin</artifactId>
			</plugin>
		</plugins>
	</build>

	<dependencyManagement>
		<dependencies>
			<dependency>
				<groupId>org.springframework.cloud</groupId>
				<artifactId>spring-cloud-dependencies</artifactId>
				<version>Brixton.SR5</version>
				<type>pom</type>
				<scope>import</scope>
			</dependency>
		</dependencies>
	</dependencyManagement>

	<repositories>
		<repository>
			<id>spring-milestones</id>
			<name>Spring Milestones</name>
			<url>https://repo.spring.io/libs-milestone</url>
			<snapshots>
				<enabled>false</enabled>
			</snapshots>
		</repository>
	</repositories>

</project>
application.properties配置:
server.port=1111
eureka.instance.hostname=locahost
eureka.client.register-with-eureka=false
eureka.client.fetch-registry=false
eureka.client.serviceUrl.defaultZone=http://${eureka.instance.hostname}:${server.port}/eureka/
默认设置下,该服务注册中心会将自己作为客户端来尝试注册自己,所以我们需要禁用它的客户端注册行为,
设置eureka.client.register-with-eureka为false,代表不向应用中心注册自己。
设置eureka.client.fetch-registry为false,代表不需要去检索服务。
package com.example.eurekaserver;

import org.springframework.boot.SpringApplication;
import org.springframework.boot.autoconfigure.SpringBootApplication;
import org.springframework.cloud.netflix.eureka.server.EnableEurekaServer;

@EnableEurekaServer
@SpringBootApplication
public class EurekaServerApplication {

	public static void main(String[] args) {
		SpringApplication.run(EurekaServerApplication.class, args);
	}
}
通过@EnableEurekaServer注解启动一个服务注册中心提供给其他应用进行对话。
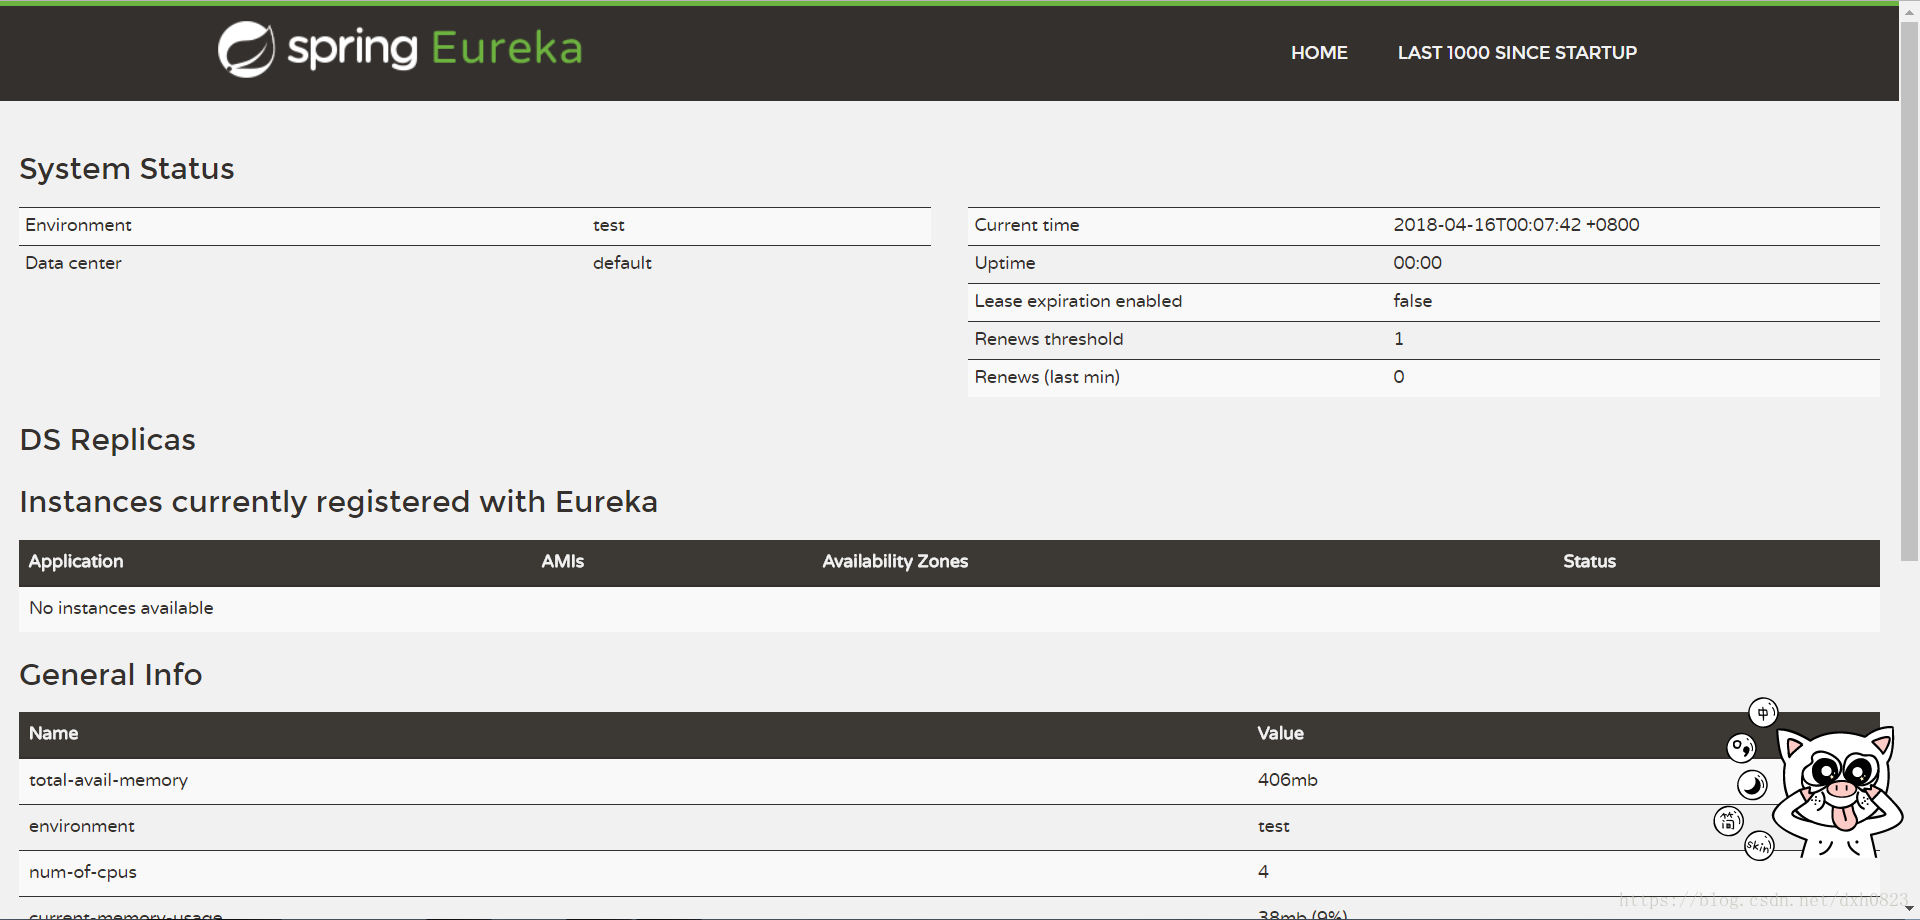
启动应用:访问http://localhost:1111/ 可以看到eureka的信息面板
注册服务提供者
创建一个新的Spring Boot应用:
<?xml version="1.0" encoding="UTF-8"?>
<project xmlns="http://maven.apache.org/POM/4.0.0" xmlns:xsi="http://www.w3.org/2001/XMLSchema-instance"
	xsi:schemaLocation="http://maven.apache.org/POM/4.0.0 http://maven.apache.org/xsd/maven-4.0.0.xsd">
	<modelVersion>4.0.0</modelVersion>

	<groupId>com.example</groupId>
	<artifactId>demo</artifactId>
	<version>0.0.1-SNAPSHOT</version>
	<!-- 默认将应用打包成jar.默认的web依赖会包含嵌入式的tomcat -->
	<packaging>jar</packaging>

	<name>demo</name>
	<description>Demo project for Spring Boot</description>

	<!-- 父项目定义了Spring Boot版本的基础依赖以及一些默认配置内容,比如application.properties的位置等 -->
	<parent>
		<groupId>org.springframework.boot</groupId>
		<artifactId>spring-boot-starter-parent</artifactId>
		<version>1.3.7.RELEASE</version>
		<relativePath /> <!-- lookup parent from repository -->
	</parent>

	<properties>
		<project.build.sourceEncoding>UTF-8</project.build.sourceEncoding>
		<project.reporting.outputEncoding>UTF-8</project.reporting.outputEncoding>
		<java.version>1.8</java.version>
	</properties>

	<dependencies>
		<!-- 全栈web开发模块,包含嵌入式的tomcat,spring MVC -->
		<dependency>
			<groupId>org.springframework.boot</groupId>
			<artifactId>spring-boot-starter-web</artifactId>
		</dependency>
		<!-- 通用的测试模块,包含Junit、Hamcrest、Mockito -->
		<dependency>
			<groupId>org.springframework.boot</groupId>
			<artifactId>spring-boot-starter-test</artifactId>
			<scope>test</scope>
		</dependency>

		<!-- 为应用提供一系列用于监控的端点。 -->
		<dependency>
			<groupId>org.springframework.boot</groupId>
			<artifactId>spring-boot-starter-actuator</artifactId>
		</dependency>

		<dependency>
			<groupId>org.springframework.cloud</groupId>
			<artifactId>spring-cloud-starter-eureka</artifactId>
		</dependency>

	</dependencies>

	<build>
		<!-- 插件,可以帮助方便的启停服务 -->
		<plugins>
			<plugin>
				<groupId>org.springframework.boot</groupId>
				<artifactId>spring-boot-maven-plugin</artifactId>
			</plugin>
		</plugins>
	</build>

	<dependencyManagement>
		<dependencies>
			<dependency>
				<groupId>org.springframework.cloud</groupId>
				<artifactId>spring-cloud-dependencies</artifactId>
				<version>Brixton.SR5</version>
				<type>pom</type>
				<scope>import</scope>
			</dependency>
		</dependencies>
	</dependencyManagement>

	<repositories>
		<repository>
			<id>spring-milestones</id>
			<name>Spring Milestones</name>
			<url>https://repo.spring.io/libs-milestone</url>
			<snapshots>
				<enabled>false</enabled>
			</snapshots>
		</repository>
	</repositories>

</project>
创建Restful 接口:
package com.example.demo.controller;


import org.slf4j.Logger;
import org.slf4j.LoggerFactory;
import org.springframework.beans.factory.annotation.Autowired;
import org.springframework.cloud.client.ServiceInstance;
import org.springframework.cloud.client.discovery.DiscoveryClient;
import org.springframework.web.bind.annotation.RequestMapping;
import org.springframework.web.bind.annotation.RequestMethod;
import org.springframework.web.bind.annotation.RestController;


@RestController
public class HelloController {

	private final Logger logger = LoggerFactory.getLogger(HelloController.class);

	@Autowired
	private DiscoveryClient discoveryClient;

	@RequestMapping(value="/hello",method=RequestMethod.GET)
	public String index(){
		ServiceInstance serviceInstance = discoveryClient.getLocalServiceInstance();
		logger.info("/hello ,host :" +serviceInstance.getHost() +", service_id : "+serviceInstance.getServiceId());
		return "Hello World !";
	}

}
然后在主类中加上@EnableDiscoveryClient激活Eureka中的DiscoveryClient实现
package com.example.demo;

import org.springframework.boot.SpringApplication;
import org.springframework.boot.autoconfigure.SpringBootApplication;
import org.springframework.cloud.client.discovery.EnableDiscoveryClient;

/**
 * @EnableDiscoveryClient激活Eureka中的DiscoveryClient实现
 * @author c_dingxuehua-001
 *
 */
@EnableDiscoveryClient
@SpringBootApplication
public class DemoApplication {

	public static void main(String[] args) {
		SpringApplication.run(DemoApplication.class, args);
	}
}
最后一步要在application.properties配置文件中,通过spring.application.name为服务命名,通过eureka.client.serviceUrl.defaultZone指定服务注册中心的地址
#服务命名
spring.application.name=hello-service
#指定服务注册中心地址
eureka.client.serviceUrl.defaultZone=http://localhost:1111/eureka/
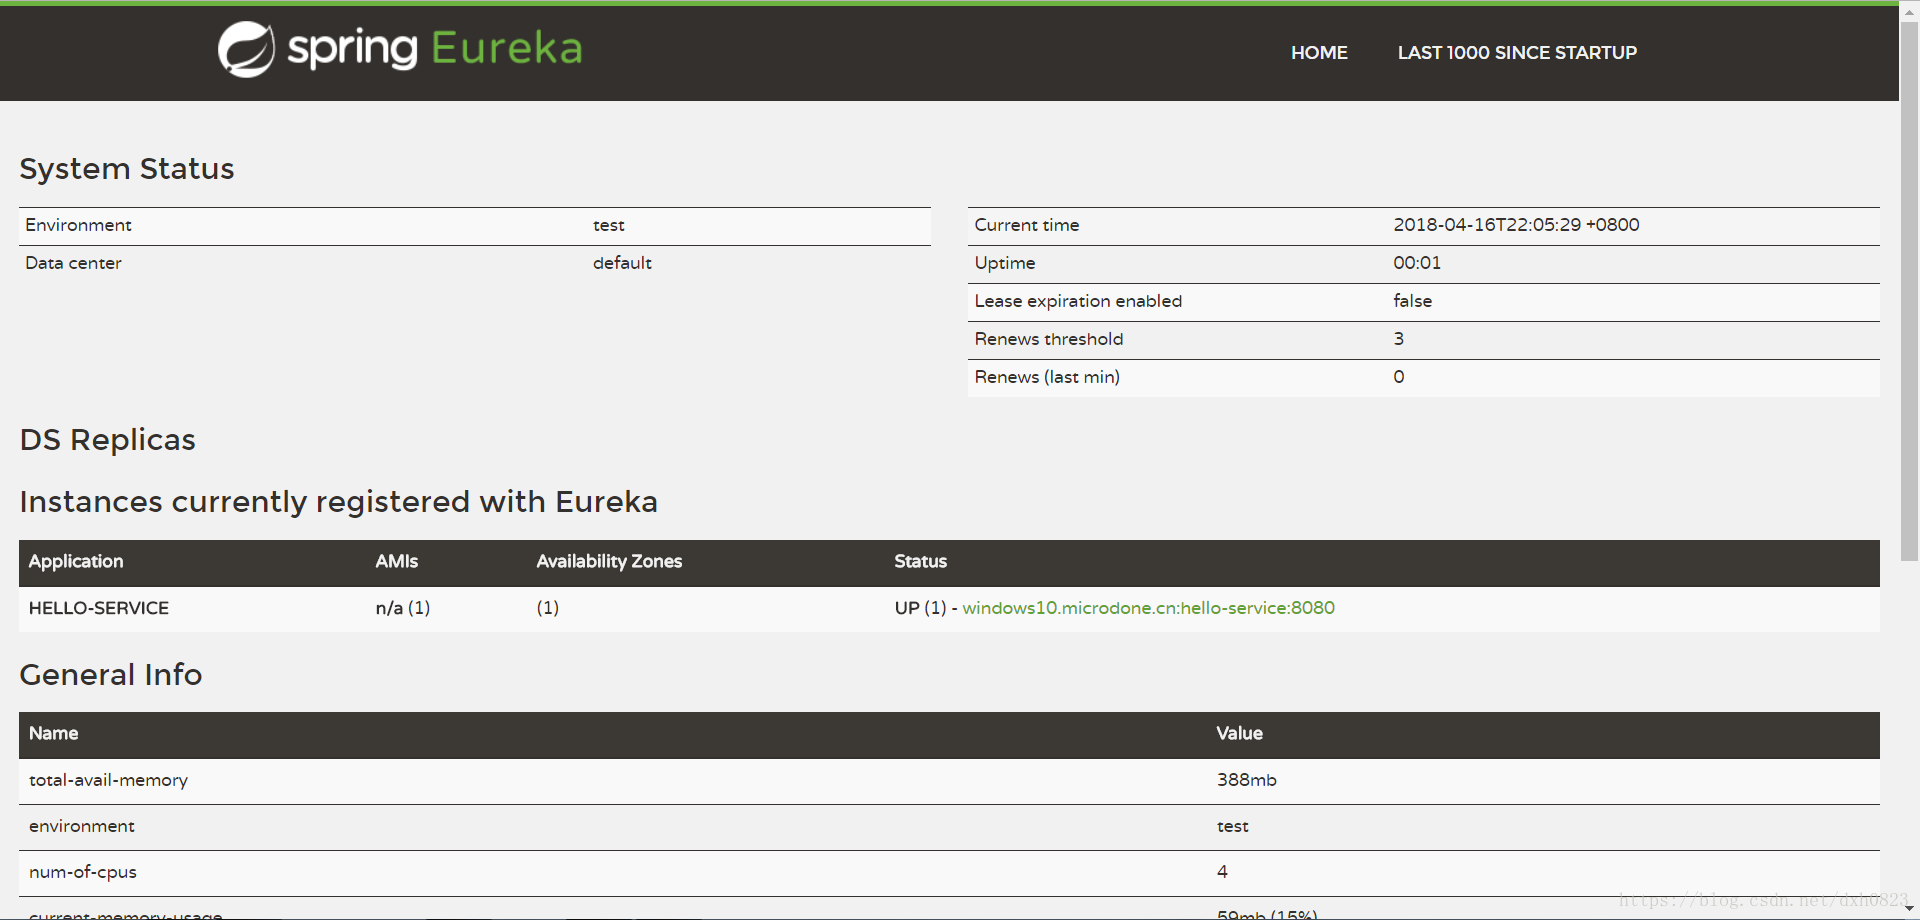
启动服务可以看到此时服务注册中心的控制台上,hello-service已经被注册。
访问http://localhost:8080/hello,直接向该服务发起请求,在控制台可以看到如下输出:
INFO 14704 --- [nio-8080-exec-2] c.e.demo.controller.HelloController : /hello ,host :windows10.microdone.cn, service_id : hello-service
这些输出内容就是之前在HelloController中注入的DiscoveryClient接口对象,从服务注册中心获取的服务相关信息。
高可用注册中心
在Eureka的服务治理设计中,所有节点既是服务提供方,又是服务消费方,服务注册中心也不例外。Eureka Server的高可用实际上就是将自己作为服务向其他服务注册中心注册自己,这样就可以形成一组相互注册的服务注册中心,以实现服务清单的相互同步,达到高可用的效果。
创建application-peer1.properties
spring.application.name=eureka-server
server.port=1111

eureka.instance.hostname=peer
eureka.client.serviceUrl.defaultZone=http://peer2:1112/eureka/

eureka.client.register-with-eureka=false
eureka.client.fetch-registry=false
创建application-peer2.properties
spring.application.name=eureka-server
server.port=1112


eureka.instance.hostname=peer2
eureka.client.serviceUrl.defaultZone=http://peer1:1111/eureka/


eureka.client.register-with-eureka=false
eureka.client.fetch-registry=false
配置C:\Windows\System32\drivers\etc\hosts :
127.0.0.1 peer1
127.0.0.1 peer2
cmd执行命令:ipconfig /flushdns 使hosts配置生效。
使用mvn install 打jar包,分别使用命令启动peer1和peer2:
java -jar eureka-server.jar --spring.profiles.active=peer1
java -jar eureka-server.jar --spring.profiles.active=peer2
此时访问peer1的注册中心:http://localhost:1111/,可以看到已经有了peer2节点了。
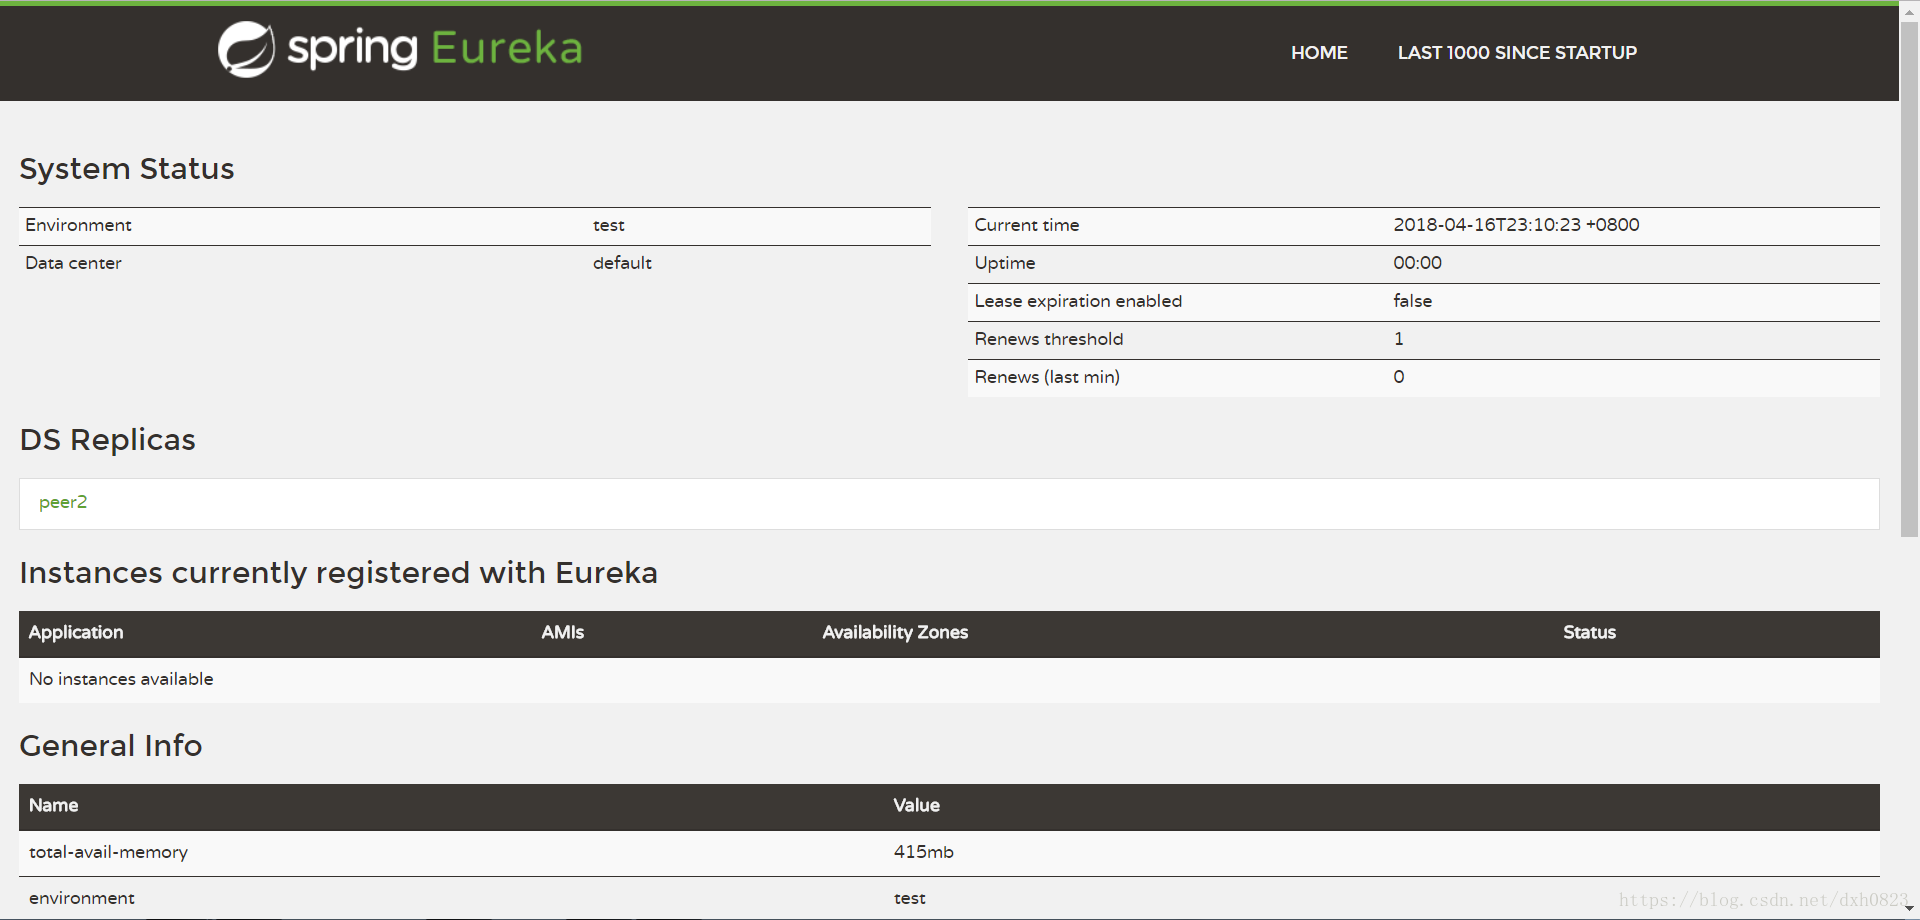
访问http://localhost:1112/,registered-replicas有了peer1节点的eureka-server了。
设置了多节点的服务注册中心之后,服务提供方要做一些简单的配置,修改application.properties:
#指定服务注册中心地址
eureka.client.serviceUrl.defaultZone=http://peer1:1111/eureka/,http://peer2:1112/eureka/
将注册中心指向了peer1和peer2,启动服务后可以观察到hello-service服务同时被注册到了peer1和peer2.
备注:
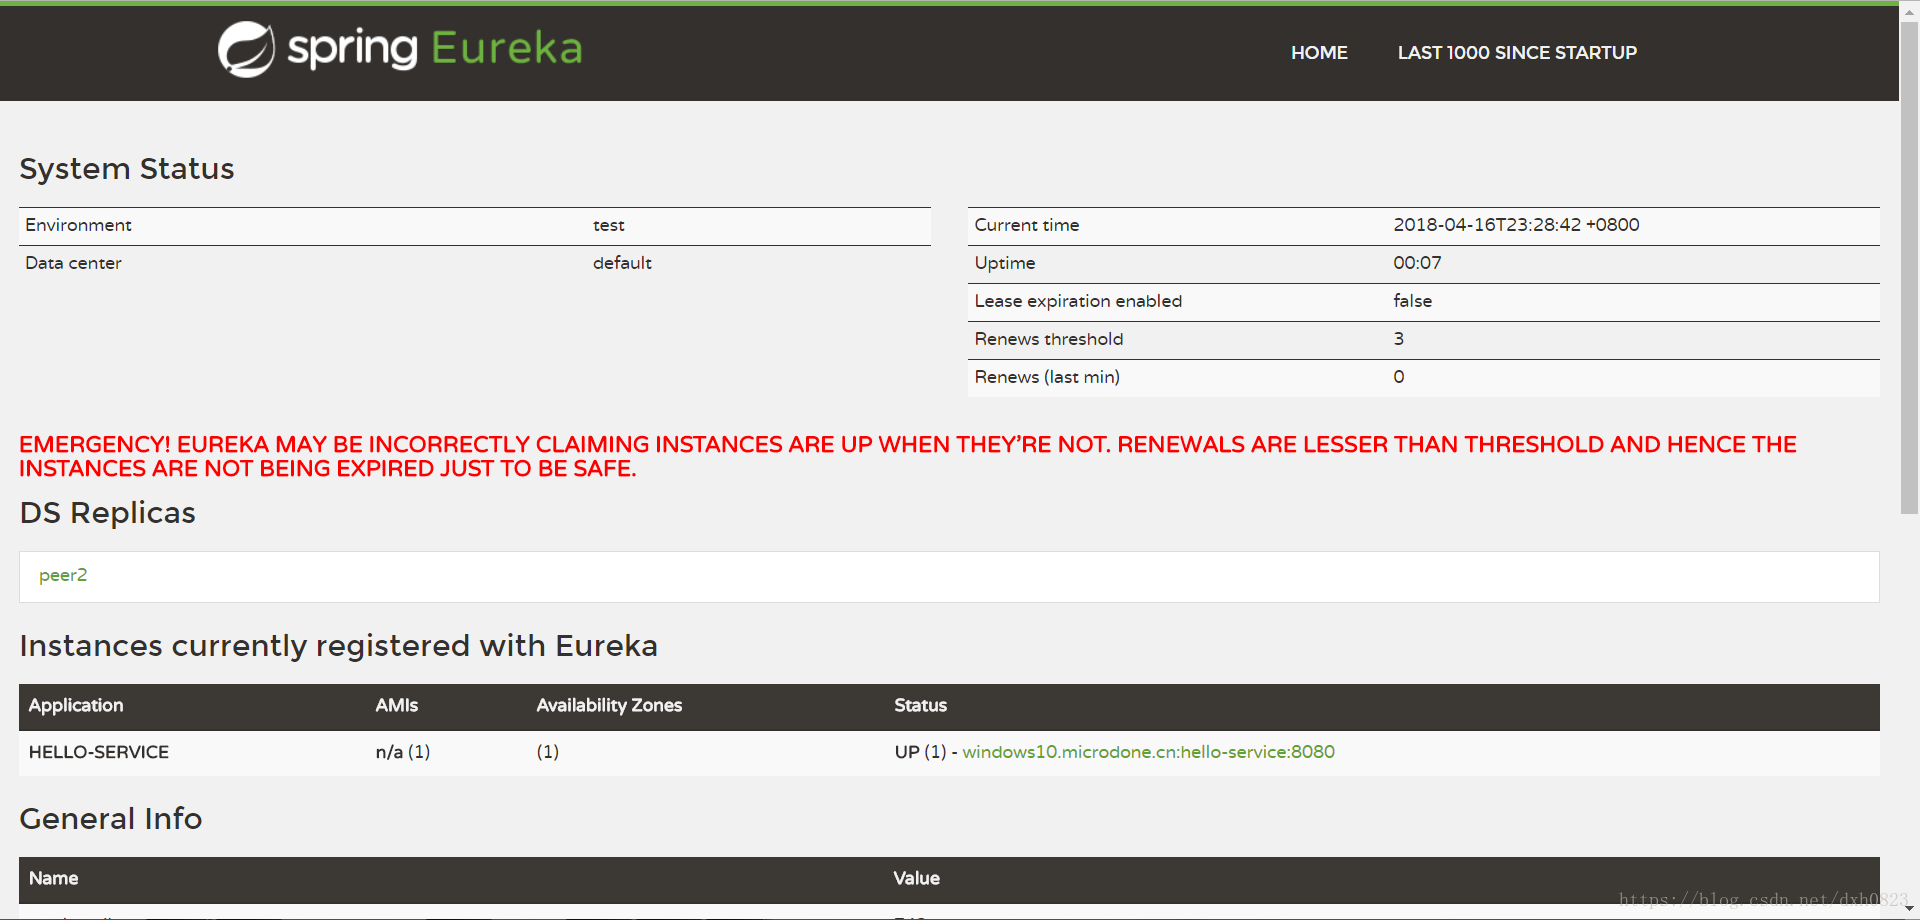
EMERGENCY! EUREKA MAY BE INCORRECTLY CLAIMING INSTANCES ARE UP WHEN THEY'RE NOT. RENEWALS ARE LESSER THAN THRESHOLD AND HENCE THE INSTANCES ARE NOT BEING EXPIRED JUST TO BE SAFE.
如果在Eureka Server的首页看到以下这段提示,则说明Eureka已经进入了保护模式。
保护模式主要用于一组客户端和Eureka Server之间存在网络分区场景下的保护。一旦进入保护模式,Eureka Server将会尝试保护其服务注册表中的信息,不再删除服务注册表中的数据(也就是不会注销任何微服务)。
服务发现和消费
服务消费者,主要完成两个目标,发现服务以及消费服务。其中服务发现的任务由Eureka的客户端完成,而服务消费的任务由Ribbon完成。Ribbon是一个基于Http和TCP的客户端负载均衡器,它可以在客户端中配置的ribbonServerList服务器列表去轮询访问以达到负载均衡的作用。当Ribbon与Eureka联合使用时,Ribbon的服务实例清单RibbonServerList会被DiscoveryEnabledIWSServletList重写,扩展成从Eureka注册中心获取服务端列表。同时它会用NIWSDidcoveryPing来取代Iping,它将职责委托给Eureka来确定服务端是否已经启动。
首先,为了实验Ribbon的客户端负载均衡功能,启动两个hello-service:
java -jar demo-0.0.1-SNAPSHOT.jar -- server.port=8081
java -jar demo-0.0.1-SNAPSHOT.jar -- server.port=8082
启动成功后,从Eureka信息面板可以看到两个实例单元

创建一个Spring Boot工程:ribbon-consumer
pom.xml如下:
<?xml version="1.0" encoding="UTF-8"?>
<project xmlns="http://maven.apache.org/POM/4.0.0" xmlns:xsi="http://www.w3.org/2001/XMLSchema-instance"
	xsi:schemaLocation="http://maven.apache.org/POM/4.0.0 http://maven.apache.org/xsd/maven-4.0.0.xsd">
	<modelVersion>4.0.0</modelVersion>

	<groupId>com.example</groupId>
	<artifactId>ribbon-consumer</artifactId>
	<version>0.0.1-SNAPSHOT</version>
	<packaging>jar</packaging>

	<name>ribbon-consumer</name>
	<description>Demo project for Spring Boot</description>

	<parent>
		<groupId>org.springframework.boot</groupId>
		<artifactId>spring-boot-starter-parent</artifactId>
		<version>1.3.7.RELEASE</version>
		<relativePath /> <!-- lookup parent from repository -->
	</parent>

	<properties>
		<project.build.sourceEncoding>UTF-8</project.build.sourceEncoding>
		<project.reporting.outputEncoding>UTF-8</project.reporting.outputEncoding>
		<java.version>1.8</java.version>
	</properties>

	<dependencies>
		<dependency>
			<groupId>org.springframework.cloud</groupId>
			<artifactId>spring-cloud-starter-eureka</artifactId>
		</dependency>

		<dependency>
			<groupId>org.springframework.boot</groupId>
			<artifactId>spring-boot-starter-test</artifactId>
			<scope>test</scope>
		</dependency>

		<!-- 全栈web开发模块,包含嵌入式的tomcat,spring MVC -->
		<dependency>
			<groupId>org.springframework.boot</groupId>
			<artifactId>spring-boot-starter-web</artifactId>
		</dependency>

		<!-- 引入ribbon包 -->
		<dependency>
			<groupId>org.springframework.cloud</groupId>
			<artifactId>spring-cloud-starter-ribbon</artifactId>
		</dependency>

	</dependencies>

	<build>
		<plugins>
			<plugin>
				<groupId>org.springframework.boot</groupId>
				<artifactId>spring-boot-maven-plugin</artifactId>
			</plugin>
		</plugins>
	</build>

	<dependencyManagement>
		<dependencies>
			<dependency>
				<groupId>org.springframework.cloud</groupId>
				<artifactId>spring-cloud-dependencies</artifactId>
				<version>Brixton.SR5</version>
				<type>pom</type>
				<scope>import</scope>
			</dependency>
		</dependencies>
	</dependencyManagement>

	<repositories>
		<repository>
			<id>spring-milestones</id>
			<name>Spring Milestones</name>
			<url>https://repo.spring.io/libs-milestone</url>
			<snapshots>
				<enabled>false</enabled>
			</snapshots>
		</repository>
	</repositories>

</project>
主类ConsumerServerApplication,通过@EnableDiscoveryClient注解,让该应用注册成为Eureka客户端应用,以获取服务发现的能力。同时,创建RestTemplate的Spring Bean实例,通过@LoadBalanced注解开启客户端负载均衡。
package com.example.ribbonconsumer;

import org.springframework.boot.SpringApplication;
import org.springframework.boot.autoconfigure.SpringBootApplication;
import org.springframework.cloud.client.discovery.EnableDiscoveryClient;
import org.springframework.cloud.client.loadbalancer.LoadBalanced;
import org.springframework.context.annotation.Bean;
import org.springframework.web.client.RestTemplate;

@EnableDiscoveryClient
@SpringBootApplication
public class ConsumerServerApplication {

	@Bean
	@LoadBalanced
	RestTemplate restTemplate(){
		return new RestTemplate();
	}

	public static void main(String[] args) {
		SpringApplication.run(ConsumerServerApplication.class, args);
	}
}
创建ConsumerController类并实现/ribbon-consumer接口。该接口通过RestTemplate实现对Hello-service服务提供/hello接口调用。
package com.example.ribbonconsumer.controller;

import org.springframework.beans.factory.annotation.Autowired;
import org.springframework.web.bind.annotation.RequestMapping;
import org.springframework.web.bind.annotation.RequestMethod;
import org.springframework.web.bind.annotation.RestController;
import org.springframework.web.client.RestTemplate;

@RestController
public class ConsumerController {

	@Autowired
	RestTemplate restTemplate;

	@RequestMapping(value="/ribbon-consumer",method=RequestMethod.GET)
	public String helloConsumer(){
		return restTemplate.getForEntity("http://HELLO-SERVICE/hello", String.class).getBody();
	}

}
application.properties配置了Eureka服务注册中心的位置。
server.port=9000
spring.application.name=ribbon-consumer

eureka.client.serviceUrl.defaultZone=http://localhost:1111/eureka/
启动ribbon-consumer应用后,可以看到除了hello-service之外,还有ribbon-consumer服务

通过向http://localhost:9000/ribbon-consumer 发起Get请求,成功返回 Hello World !
此时可以在ribbon-consumer应用的控制台看到hello-service的服务列表情况。包含了各个实例的位置,Ribbon就是按照此信息进行轮询访问,以实现基于客户端的负载均衡。
DynamicServerListLoadBalancer for client HELLO-SERVICE initialized: DynamicServerListLoadBalancer:{NFLoadBalancer:name=HELLO-SERVICE,current list of Servers=[windows10.microdone.cn:8081, windows10.microdone.cn:8082],Load balancer stats=Zone stats: {defaultzone=[Zone:defaultzone; Instance count:2; Active connections count: 0; Circuit breaker tripped count: 0; Active connections per server: 0.0;]
},Server stats: [[Server:windows10.microdone.cn:8082; Zone:defaultZone; Total Requests:0; Successive connection failure:0; Total blackout seconds:0; Last connection made:Thu Jan 01 08:00:00 CST 1970; First connection made: Thu Jan 01 08:00:00 CST 1970; Active Connections:0; total failure count in last (1000) msecs:0; average resp time:0.0; 90 percentile resp time:0.0; 95 percentile resp time:0.0; min resp time:0.0; max resp time:0.0; stddev resp time:0.0]
, [Server:windows10.microdone.cn:8081; Zone:defaultZone; Total Requests:0; Successive connection failure:0; Total blackout seconds:0; Last connection made:Thu Jan 01 08:00:00 CST 1970; First connection made: Thu Jan 01 08:00:00 CST 1970; Active Connections:0; total failure count in last (1000) msecs:0; average resp time:0.0; 90 percentile resp time:0.0; 95 percentile resp time:0.0; min resp time:0.0; max resp time:0.0; stddev resp time:0.0]
]}ServerList:org.springframework.cloud.netflix.ribbon.eureka.DomainExtractingServerList@60daff32
多发送几次请求,会看到在hello-service的两个控制台交替打印日志。
Eureka详解
基础架构:
服务注册中心:Eureka提供的服务端,提供注册服务与发现的功能。
服务提供者:提供服务的应用
服务消费者:消费者应用从服务注册中心获取消费列表。
服务治理机制:
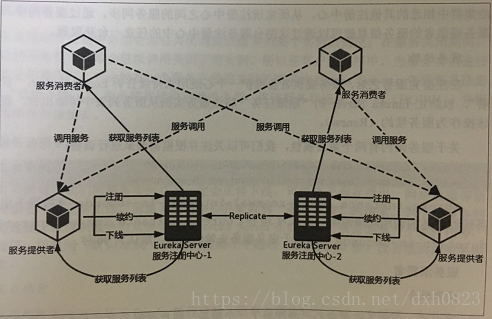
- 服务注册中心1和服务注册中心2,相互注册,组成了高可用集群。
- 服务提供者启动了两个实例,一个注册到服务中心1上,一个注册到服务中心2上。
- 还有两个服务消费者,他们分别指向了一个服务注册中心。
根据上图结构,了解一下从服务注册到服务调用,以及各个元素所涉及的一些重要通信行为
服务提供者
服务注册
服务提供者在启动的时候会通过发送REST请求的方式将自己注册到Eureka Server上,同时带上了自身服务的一些元数据信息。Eureka Server接收到这个REST请求后,将元数据信息存储在一个双层结构Map中,其中第一层的key是服务名,第二层的key是具体服务的实例名。
服务同步
上图中,两个服务提供者分别注册到了两个不同的服务注册中心上,它们的信息分别被两个服务注册中心维护。此时由于服务注册中心之间因为互相注册为服务,当服务提供者发送注册请求到一个服务注册中心是,它会将该请求转发给集群中相连的其他服务注册中心,从而实现服务注册中心之间的服务同步。
服务续约
注册完服务后,服务提供者会维护一个心跳告诉Eureka Server 我还活着,防止Eureka Server 将该实例从服务列表中排除出去。
//定义服务续约任务的调用间隔时间,默认30秒
eureka.instance.lease-renewal-interval-in-seconds=30
//服务失效的时间,默认90秒
eureka.instance.lease-expiration-duration-in-seconds=90
服务消费者
获取服务
当我们启动服务消费者时,它会发送一个REST请求给服务注册中心,来获取上面注册的服务清单。为了性能考虑,Eureka Server会维护一份只读的服务清单返回给客户端,同时该缓存清单会每隔30秒更新一次。
eureka.client.fetch-registry=true
eureka.client.registry-fetch-interval-seconds=30可修改缓存清单的更新时间
服务调用
服务消费者获取到服务清单后,通过服务名可以获得具体提供服务的实例名和该实例的元数据信息。Ribbon中会采用轮询的方式进行调用,从而实现客户端的负载均衡。
服务下线
在服务实例进行正常的关闭操作时,会触发一个服务下线的REST请求给Eureka Server ,告诉服务注册中心,我要下线了,服务端接收到请求后,将该服务状态置为下线DOWN,并把该下线事件传播出去。
服务注册中心
失效剔除
Eureka Server在启动的时候会创建一个定时任务,默认每隔一段时间(默认60秒)将当前清单中超时(默认90秒)没有续约的服务剔除出去。
自我保护
当服务注册中心的信息面板上出现这样的红色警告信息:
EMERGENCY! EUREKA MAY BE INCORRECTLY CLAIMING INSTANCES ARE UP WHEN THEY'RE NOT. RENEWALS ARE LESSER THAN THRESHOLD AND HENCE THE INSTANCES ARE NOT BEING EXPIRED JUST TO BE SAFE.
实际上,这个警告就是触发了Eureka Server的自我保护机制。服务注册到Eureka Server后,会维护一个心跳连接,告诉Eureka Server 自己还活着。Eureka Server 在运行期间,会统计心跳失败的比例在15分钟之内是否低于85%,如果低于,Eureka Server会将当前的实例注册信息保护起来,让这些实例不会过期。
可以配置eureka.server.enable-self-preservation=false 关闭保护机制,确保注册中心可以将不可用的实例正确剔除。