文章目录
Spring 事件监听机制离不开容器 IOC 特性提供的支持,比如容器会自动创建事件发布器,自动识别用户注册的监听器并进行管理,在特定的事件发布后会找到对应的事件监听器并对其监听方法进行回调。Spring 帮助用户屏蔽了关于事件监听机制背后的很多细节,使用户可以专注于业务层面进行自定义事件开发。然而我们还是忍不住对其背后的实现原理进行一番探讨,比如:
- 事件发布器
ApplicationEventMulticaster是何时被初始化的,初始化过程中都做了什么 - 注册事件监听器的过程是怎样的,容器怎么识别出它们并进行管理
- 容器发布事件的流程是怎样的?它如何根据发布的事件找到对应的事件监听器,事件和由该事件触发的监听器之间的匹配规则是怎样的
为了对以上问题进行解答,我们不得不深入源码层面一探究竟
初始化事件发布器流程
真正的事件发布器是ApplicationEventMulticaster,它定义在AbstractApplicationContext中,并在ApplicationContext容器启动的时候进行初始化。在容器启动的refrsh()方法中可以找到初始化事件发布器的入口方法,如下图所示:
public abstract class AbstractApplicationContext extends DefaultResourceLoader
        implements ConfigurableApplicationContext {


    ...
    @Override
    public void refresh() throws BeansException, IllegalStateException {


        synchronized (this.startupShutdownMonitor) {


            // Prepare this context for refreshing.
            prepareRefresh();

            // Tell the subclass to refresh the internal bean factory.
            ConfigurableListableBeanFactory beanFactory = obtainFreshBeanFactory();

            // Prepare the bean factory for use in this context.
            prepareBeanFactory(beanFactory);

            try {


                // Allows post-processing of the bean factory in context subclasses.
                postProcessBeanFactory(beanFactory);

                // Invoke factory processors registered as beans in the context.
                invokeBeanFactoryPostProcessors(beanFactory);

                // Register bean processors that intercept bean creation.
                registerBeanPostProcessors(beanFactory);

                // Initialize message source for this context.
                initMessageSource();

                // Initialize event multicaster for this context.
                initApplicationEventMulticaster();

                // Initialize other special beans in specific context subclasses.
                onRefresh();

                // Check for listener beans and register them.
                registerListeners();

                // Instantiate all remaining (non-lazy-init) singletons.
                finishBeanFactoryInitialization(beanFactory);

                // Last step: publish corresponding event.
                finishRefresh();
            } catch (BeansException ex) {


                if (logger.isWarnEnabled()) {


                    logger.warn("Exception encountered during context initialization - " +
                            "cancelling refresh attempt: " + ex);
                }

                // Destroy already created singletons to avoid dangling resources.
                destroyBeans();

                // Reset 'active' flag.
                cancelRefresh(ex);

                // Propagate exception to caller.
                throw ex;
            } finally {


                // Reset common introspection caches in Spring's core, since we
                // might not ever need metadata for singleton beans anymore...
                resetCommonCaches();
            }
        }
    }

    /**
     * Initialize the ApplicationEventMulticaster.
     * Uses SimpleApplicationEventMulticaster if none defined in the context.
     * @see org.springframework.context.event.SimpleApplicationEventMulticaster
     */
    protected void initApplicationEventMulticaster() {


        ConfigurableListableBeanFactory beanFactory = getBeanFactory();
        // 判断beanFactory里是否定义了id为applicationEventMulticaster的bean,默认是没有的
        if (beanFactory.containsLocalBean(APPLICATION_EVENT_MULTICASTER_BEAN_NAME)) {


            this.applicationEventMulticaster =
                    beanFactory.getBean(APPLICATION_EVENT_MULTICASTER_BEAN_NAME, ApplicationEventMulticaster.class);
            if (logger.isDebugEnabled()) {


                logger.debug("Using ApplicationEventMulticaster [" + this.applicationEventMulticaster + "]");
            }
        } else {


            //一般情况会走这里,创建一个SimpleApplicationEventMulticaster并交由容器管理
            this.applicationEventMulticaster = new SimpleApplicationEventMulticaster(beanFactory);
            beanFactory.registerSingleton(APPLICATION_EVENT_MULTICASTER_BEAN_NAME, this.applicationEventMulticaster);
            if (logger.isDebugEnabled()) {


                logger.debug("Unable to locate ApplicationEventMulticaster with name '" +
                        APPLICATION_EVENT_MULTICASTER_BEAN_NAME +
                        "': using default [" + this.applicationEventMulticaster + "]");
            }
        }
    }

}
initApplicationEventMulticaster()方法会初始化ApplicationEventMulticaster为SimpleApplicationEventMulticaster的实例。之后会调用beanFactory.registerSingleton方法将创建的SimpleApplicationEventMulticaster实例注册为容器的单实例 bean
初始化事件发布器的工作非常简单,一句话总结:由容器实例化用户自定义的事件发布器或者由容器帮我们创建一个简单的事件发布器并交由容器管理
注册事件监听器流程
注册事件监听器的流程在初始化事件发布器之后,在registerListeners()方法中:
protected void registerListeners() {


    // Register statically specified listeners first.
    for (ApplicationListener<?> listener : getApplicationListeners()) {


        getApplicationEventMulticaster().addApplicationListener(listener);
    }

    //获取实现ApplicationListener接口的所有bean的beanNamegetBeanNamesForType(ApplicationListener.class, true, false);
    for (String listenerBeanName : listenerBeanNames) {


        //将监听器的beanName保存到事件发布器中
        getApplicationEventMulticaster().addApplicationListenerBean(listenerBeanName);
    }

    // Publish early application events now that we finally have a multicaster...
    Set<ApplicationEvent> earlyEventsToProcess = this.earlyApplicationEvents;
    this.earlyApplicationEvents = null;
    if (earlyEventsToProcess != null) {


        for (ApplicationEvent earlyEvent : earlyEventsToProcess) {


            getApplicationEventMulticaster().multicastEvent(earlyEvent);
        }
    }
}

public void addApplicationListener(ApplicationListener<?> listener) {


    synchronized (this.retrievalMutex) {


        // Explicitly remove target for a proxy, if registered already,
        // in order to avoid double invocations of the same listener.
        Object singletonTarget = AopProxyUtils.getSingletonTarget(listener);
        if (singletonTarget instanceof ApplicationListener) {


            this.defaultRetriever.applicationListeners.remove(singletonTarget);
        }
        this.defaultRetriever.applicationListeners.add(listener);
        this.retrieverCache.clear();
    }
}

@Override
public void addApplicationListenerBean(String listenerBeanName) {


    synchronized (this.retrievalMutex) {


        this.defaultRetriever.applicationListenerBeans.add(listenerBeanName);
        this.retrieverCache.clear();
    }
}
主要流程为:
- 遍历
AbstractApplicationContext#applicationListeners的属性,其存放的是事件监听器ApplicationListener集合。将applicationListeners集合存入其关联的事件发布器SimpleApplicationEventMulticaster.ListenerRetriever#applicationListeners属性中 - 遍历
beanFactory中所有的 bean,获取所有实现ApplicationListener接口的 bean 的 beanName,并将这些 beanName 注册到其关联的事件发布器SimpleApplicationEventMulticaster.ListenerRetriever#applicationListenerBeans属性中 - 如果有
earlyApplicationEvents,则先发布这些事件
defaultRetriever是定义在抽象类AbstractApplicationEventMulticaster中的成员,用来保存所有事件监听器及其 beanName
public abstract class AbstractApplicationEventMulticaster
        implements ApplicationEventMulticaster, BeanClassLoaderAware, BeanFactoryAware {


    private final ListenerRetriever defaultRetriever = new ListenerRetriever(false);
}

private class ListenerRetriever {


        //保存所有事件监听器
        public final Set<ApplicationListener<?>> applicationListeners;

        //保存所有事件监听器的beanName
        public final Set<String> applicationListenerBeans;
}
其实看到这里会有一个疑问,registerListeners()方法只是找到了所有监听器的 beanName 并将其保存到了事件发布器ApplicationEventMulticaster中,那么真正的事件监听器实例是何时被创建并被加入到事件发布器中的?
这里我们不得不退回到启动容器的refresh()方法中,在初始化 beanFactory 之后,初始化事件发布器之前,容器在prepareBeanFactory(beanFactory)方法中又注册了一些重要组件,其中就包括一个特殊的BeanPostProcessor:ApplicationListenerDetector,正如其类名暗示的那样,这是一个事件监听器的探测器。
protected void prepareBeanFactory(ConfigurableListableBeanFactory beanFactory) {


    // Tell the internal bean factory to use the context's class loader etc.
    beanFactory.setBeanClassLoader(getClassLoader());
    beanFactory.setBeanExpressionResolver(new StandardBeanExpressionResolver(beanFactory.getBeanClassLoader()));
    beanFactory.addPropertyEditorRegistrar(new ResourceEditorRegistrar(this, getEnvironment()));
    ...
    // Register early post-processor for detecting inner beans as ApplicationListeners.
    beanFactory.addBeanPostProcessor(new ApplicationListenerDetector(this));

    // Detect a LoadTimeWeaver and prepare for weaving, if found.
    if (beanFactory.containsBean(LOAD_TIME_WEAVER_BEAN_NAME)) {


        beanFactory.addBeanPostProcessor(new LoadTimeWeaverAwareProcessor(beanFactory));
        // Set a temporary ClassLoader for type matching.
        beanFactory.setTempClassLoader(new ContextTypeMatchClassLoader(beanFactory.getBeanClassLoader()));
    }

    // Register default environment beans.
    if (!beanFactory.containsLocalBean(ENVIRONMENT_BEAN_NAME)) {


        beanFactory.registerSingleton(ENVIRONMENT_BEAN_NAME, getEnvironment());
    }
    if (!beanFactory.containsLocalBean(SYSTEM_PROPERTIES_BEAN_NAME)) {


        beanFactory.registerSingleton(SYSTEM_PROPERTIES_BEAN_NAME, getEnvironment().getSystemProperties());
    }
    if (!beanFactory.containsLocalBean(SYSTEM_ENVIRONMENT_BEAN_NAME)) {


        beanFactory.registerSingleton(SYSTEM_ENVIRONMENT_BEAN_NAME, getEnvironment().getSystemEnvironment());
    }
}
ApplicationListenerDetector实现了BeanPostProcessor接口,如下图所示:
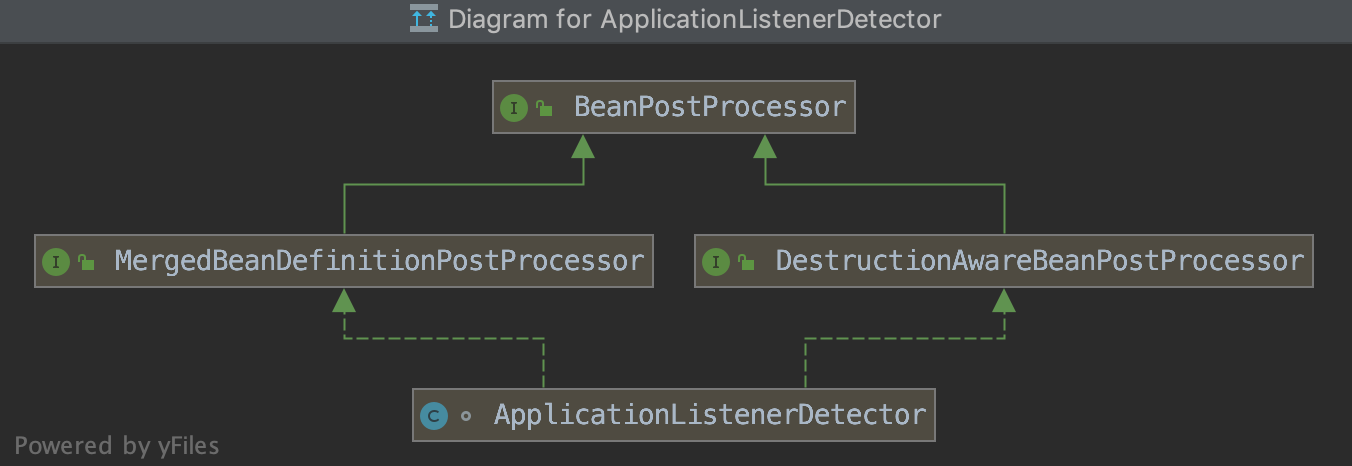
ApplicationListenerDetector实现了BeanPostProcessor接口,可以在容器级别对所有 bean 的生命周期过程进行增强。这里主要是为了能够在初始化所有 bean 后识别出所有的事件监听器 bean 并将其注册到事件发布器中
public Object postProcessAfterInitialization(Object bean, String beanName) {


    //判断该bean是否实现了ApplicationListener接口
    if (this.applicationContext != null && bean instanceof ApplicationListener) {


        // potentially not detected as a listener by getBeanNamesForType retrieval
        Boolean flag = this.singletonNames.get(beanName);
        if (Boolean.TRUE.equals(flag)) {


            // singleton bean (top-level or inner): register on the fly
            //将实现了ApplicationListener接口的bean注册到事件发布器applicationEventMulticaster中
            this.applicationContext.addApplicationListener((ApplicationListener<?>) bean);
        } else if (Boolean.FALSE.equals(flag)) {


            if (logger.isWarnEnabled() && !this.applicationContext.containsBean(beanName)) {


                // inner bean with other scope - can't reliably process events
                logger.warn("Inner bean '" + beanName + "' implements ApplicationListener interface " +
                            "but is not reachable for event multicasting by its containing ApplicationContext " +
                            "because it does not have singleton scope. Only top-level listener beans are allowed " +
                            "to be of non-singleton scope.");
            }
            this.singletonNames.remove(beanName);
        }
    }
    return bean;
}
在初始化所有的 bean 后,该ApplicationListenerDetector的postProcessAfterInitialization(Object bean, String beanName)方法会被作用在每一个 bean 上,通过判断传入的 bean 是否是ApplicationListener实例进行过滤,然后将找到的事件监听器 bean 注册到事件发布器中
容器事件发布流程
发布事件,调用AbstractApplicationContext#publishEvent(ApplicationEvent)方法:
public void publishEvent(ApplicationEvent event) {


    publishEvent(event, null);
}

protected void publishEvent(Object event, ResolvableType eventType) {


    Assert.notNull(event, "Event must not be null");
    if (logger.isTraceEnabled()) {


        logger.trace("Publishing event in " + getDisplayName() + ": " + event);
    }

    // Decorate event as an ApplicationEvent if necessary
    ApplicationEvent applicationEvent;
    if (event instanceof ApplicationEvent) {


        applicationEvent = (ApplicationEvent) event;
    }
    else {


        applicationEvent = new PayloadApplicationEvent<Object>(this, event);
        if (eventType == null) {


            eventType = ((PayloadApplicationEvent) applicationEvent).getResolvableType();
        }
    }

    // Multicast right now if possible - or lazily once the multicaster is initialized
    if (this.earlyApplicationEvents != null) {


        this.earlyApplicationEvents.add(applicationEvent);
    }
    else {


        getApplicationEventMulticaster().multicastEvent(applicationEvent, eventType);
    }

    // Publish event via parent context as well...
    if (this.parent != null) {


        if (this.parent instanceof AbstractApplicationContext) {


            ((AbstractApplicationContext) this.parent).publishEvent(event, eventType);
        }
        else {


            this.parent.publishEvent(event);
        }
    }
}
这里为了简化源码阅读的工作量,对一些细节和分支情形做了忽略,只考虑主流程,这里调用了事件发布器的multicastEvent()方法进行事件发布,需要传入事件event和事件类型eventType作为参数。不过通常这个eventType参数为 null,因为事件的类型信息完全可以通过反射的方式从event对象中获得。继续跟进源码:
public void multicastEvent(final ApplicationEvent event, ResolvableType eventType) {


    //获取事件类型
    ResolvableType type = (eventType != null ? eventType : resolveDefaultEventType(event));
    //遍历所有和事件匹配的事件监听器
    for (final ApplicationListener<?> listener : getApplicationListeners(event, type)) {


        Executor executor = getTaskExecutor();
        if (executor != null) {


            //异步回调监听方法
            executor.execute(new Runnable() {


                @Override
                public void run() {


                    invokeListener(listener, event);
                }
            });
        } else {


            //同步回调监听方法
            invokeListener(listener, event);
        }
    }
}
首先通过传入的参数或者通过调用resolveDefaultEventType(event)方法获取事件的事件类型信息,之后会通过getApplicationListeners(event, type)方法得到所有和该事件类型匹配的事件监听器,其实现逻辑后面会细说,这里先跳过。对于匹配的每一个监听器,看事件发布器内是否设置了任务执行器实例Executor,决定以何种方式对监听器的监听方法进行回调。
- 若执行器实例Executor未设置,则进行同步回调,即在当前线程执行监听器的回调方法
- 若用户设置了Executor实例(通常而言是线程池),则会进行异步回调,监听器的监听方法会交由线程池中的线程去执行。
默认情况下容器不会为用户创建执行器实例,因而对监听器的回调是同步进行的,即所有监听器的监听方法都在推送事件的线程中被执行,通常这也是处理业务逻辑的线程,若其中一个监听器回调执行阻塞,则会阻塞整个业务处理的线程,造成严重的后果。而异步回调的方式,虽然不会导致业务处理线程被阻塞,但是不能共享一些业务线程的上下文资源,比如类加载器,事务等等。因而究竟选择哪种回调方式,要视具体业务场景而定。
好了,现在可以来探究下困扰我们很久的一个问题了,那就是:如何根据事件类型找到匹配的所有事件监听器?这部分逻辑在getApplicationListeners方法中:
protected Collection<ApplicationListener<?>> getApplicationListeners(
            ApplicationEvent event, ResolvableType eventType) {


    //获取事件中的事件源对象
    Object source = event.getSource();
    //获取事件源类型
    Class<?> sourceType = (source != null ? source.getClass() : null);
    //以事件类型和事件源类型为参数构建一个cacheKey,用于从缓存map中获取与之匹配的监听器列表
    ListenerCacheKey cacheKey = new ListenerCacheKey(eventType, sourceType);

    // Quick check for existing entry on ConcurrentHashMap...
    ListenerRetriever retriever = this.retrieverCache.get(cacheKey);
    if (retriever != null) {


        //从缓存中获取监听器列表
        return retriever.getApplicationListeners();
    }

    if (this.beanClassLoader == null ||
        (ClassUtils.isCacheSafe(event.getClass(), this.beanClassLoader) &&
         (sourceType == null || ClassUtils.isCacheSafe(sourceType, this.beanClassLoader)))) {


        // Fully synchronized building and caching of a ListenerRetriever
        synchronized (this.retrievalMutex) {


            retriever = this.retrieverCache.get(cacheKey);
            if (retriever != null) {


                return retriever.getApplicationListeners();
            }
            retriever = new ListenerRetriever(true);
            //查找所有与发布事件匹配的监听器列表
            Collection<ApplicationListener<?>> listeners =
                retrieveApplicationListeners(eventType, sourceType, retriever);
            //将匹配结果缓存到map中
            this.retrieverCache.put(cacheKey, retriever);
            return listeners;
        }
    } else {


        // No ListenerRetriever caching -> no synchronization necessary
        return retrieveApplicationListeners(eventType, sourceType, null);
    }
}
整个流程可以概括为:
- 首先从缓存
retrieverCache中查找,这个 map 定义在事件发布器的抽象类中AbstractApplicationEventMulticaster:
final Map<ListenerCacheKey, ListenerRetriever> retrieverCache =
            new ConcurrentHashMap<ListenerCacheKey, ListenerRetriever>(64);
ListenerCacheKey由事件类型eventType和事件源类型sourceType构成,ListenerRetriever内部则维护了一个监听器列表。当所发布的事件类型和事件源类型与 Map 中的 key 匹配时,将直接返回 value 中的监听器列表作为匹配结果,通常这发生在事件不是第一次发布时,能避免遍历所有监听器并进行过滤,如果事件时第一次发布,则会执行流程2。
- 遍历所有的事件监听器,并根据事件类型和事件源类型进行匹配。这部分逻辑在
retrieveApplicationListeners方法中:
private Collection<ApplicationListener<?>> retrieveApplicationListeners(
            ResolvableType eventType, Class<?> sourceType, ListenerRetriever retriever) {


    //这是存放匹配的监听器的列表
    LinkedList<ApplicationListener<?>> allListeners = new LinkedList<ApplicationListener<?>>();
    Set<ApplicationListener<?>> listeners;
    Set<String> listenerBeans;
    synchronized (this.retrievalMutex) {


        listeners = new LinkedHashSet<ApplicationListener<?>>(this.defaultRetriever.applicationListeners);
        listenerBeans = new LinkedHashSet<String>(this.defaultRetriever.applicationListenerBeans);
    }
    //遍历所有的监听器
    for (ApplicationListener<?> listener : listeners) {


        //判断该事件监听器是否匹配
        if (supportsEvent(listener, eventType, sourceType)) {


            if (retriever != null) {


                retriever.applicationListeners.add(listener);
            }
            //将匹配的监听器加入列表
            allListeners.add(listener);
        }
    }
    //遍历所有的监听器 BeanName
    if (!listenerBeans.isEmpty()) {


        BeanFactory beanFactory = getBeanFactory();
        for (String listenerBeanName : listenerBeans) {


            try {


                Class<?> listenerType = beanFactory.getType(listenerBeanName);
                if (listenerType == null || supportsEvent(listenerType, eventType)) {


                    // 根据监听器 BeanName 获取监听器实例
                    ApplicationListener<?> listener =
                        beanFactory.getBean(listenerBeanName, ApplicationListener.class);
                    if (!allListeners.contains(listener) && supportsEvent(listener, eventType, sourceType)) {


                        if (retriever != null) {


                            retriever.applicationListenerBeans.add(listenerBeanName);
                        }
                        //将匹配的监听器加入列表
                        allListeners.add(listener);
                    }
                }
            } catch (NoSuchBeanDefinitionException ex) {


                // Singleton listener instance (without backing bean definition) disappeared -
                // probably in the middle of the destruction phase
            }
        }
    }
    // 对匹配完成的监听器进行排序
    AnnotationAwareOrderComparator.sort(allListeners);
    return allListeners;
}
判断监听器是否匹配的逻辑在supportsEvent(listener, eventType, sourceType)中:
protected boolean supportsEvent(ApplicationListener<?> listener, ResolvableType eventType, Class<?> sourceType) {


    //对原始的ApplicationListener进行一层适配器包装成为GenericApplicationListener
    GenericApplicationListener smartListener = (listener instanceof GenericApplicationListener ?
                                                (GenericApplicationListener) listener : new GenericApplicationListenerAdapter(listener));
    //判断监听器是否支持该事件类型以及该事件源类型
    return (smartListener.supportsEventType(eventType) && smartListener.supportsSourceType(sourceType));
}
首先对原始的ApplicationListener进行一层适配器包装成GenericApplicationListener,便于后面使用该接口中定义的方法判断监听器是否支持传入的事件类型或事件源类型:
public interface GenericApplicationListener extends ApplicationListener<ApplicationEvent>, Ordered {


   /**
    * Determine whether this listener actually supports the given event type.
    */
   boolean supportsEventType(ResolvableType eventType); //判断是否支持该事件类型

   /**
    * Determine whether this listener actually supports the given source type.
    */
   boolean supportsSourceType(Class<?> sourceType);   //判断是否支持该事件源类型

}
smartListener.supportsEventType(eventType)用来判断监听器是否支持该事件类型:
public boolean supportsEventType(ResolvableType eventType) {


    if (this.delegate instanceof SmartApplicationListener) {


        Class<? extends ApplicationEvent> eventClass = (Class<? extends ApplicationEvent>) eventType.resolve();
        return (eventClass != null && ((SmartApplicationListener) this.delegate).supportsEventType(eventClass));
    } else {


        return (this.declaredEventType == null || this.declaredEventType.isAssignableFrom(eventType));
    }
}
因为我们的监听器实例通常都不是SmartApplicationListener类型,而是GenericApplicationListener,所以直接看 else 语句。
declaredEventType是监听器泛型的实际类型,而eventType是发布的事件的类型declaredEventType.isAssignableFrom(eventType)当以下两种情况返回 true
declaredEventType和eventType类型相同declaredEventType是eventType的父类型
只要监听器泛型的实际类型和发布的事件类型一样或是它的父类型,则该监听器将被成功匹配。
而对于事件源类型的判断supportsSourceType(Class<?>),由于通常事件监听器为GenericApplicationListener,故通常会直接返回 true。
public boolean supportsSourceType(Class<?> sourceType) {


    return !(this.delegate instanceof SmartApplicationListener) ||
        ((SmartApplicationListener) this.delegate).supportsSourceType(sourceType);
}
最后,将所有匹配的监听器与其事件类型缓存到retrieverCache这个 map 中。
Collection<ApplicationListener<?>> listeners = retrieveApplicationListeners(eventType, sourceType, retriever);
//将匹配结果缓存到map中
this.retrieverCache.put(cacheKey, retriever);
return listeners;
梳理下容器事件发布监听的整个流程,可以总结如下:

总结
这篇文章主要是为了梳理下 Spring 的容器内事件体系并对其工作原理做一定程度上的源码上的剖析。Spring Boot 的事件监听机制复用了 Spring 的内建事件体系。但是 Spring 内建事件为 Spring 应用上下文事件,即ApplicationContextEvent,其事件源为ApplicationContext。而 Spring Boot 的事件类型是SpringApplicationEvent,事件源则是SpringApplication。Spring Boot 事件监听手段仅为SpringApplication关联的ApplicationListener集合。其关联途径有二:
SpringApplication构造阶段在 Class Path 下所加载的 META-INF/spring.factories 资源中的ApplicationListener对象集合。- 通过方法
SpringApplication#addListeners(ApplicationListener...)或SpringApplicationBuilder#listeners(ApplicationListener...)显式装配。