Docker容器的网络基础
Docker提供的网桥
首先,查看一个名为docker0的网络设备:
[root@localhost ~]# ifconfig docker0 docker0: flags=4163<UP,BROADCAST,RUNNING,MULTICAST> mtu 1500 inet 172.17.0.1 netmask 255.255.0.0 broadcast 0.0.0.0 inet6 fe80::42:2fff:fe56:7b2e prefixlen 64 scopeid 0x20<link> ether 02:42:2f:56:7b:2e txqueuelen 0 (Ethernet) RX packets 27406 bytes 2657911 (2.5 MiB) RX errors 0 dropped 0 overruns 0 frame 0 TX packets 42036 bytes 58020300 (55.3 MiB) TX errors 0 dropped 0 overruns 0 carrier 0 collisions 0
docker守护进程就是通过docker0为docker容器提供网络连接的各种服务。docker0实质事Linux的虚拟网桥
网桥是在OSI七层模型的数据链路层的网络设备,通过mac地址对网络进行划分,并且在不同网络直接传递数据,对于Linux的虚拟网桥:
可以设置IP地址
相当于拥有一个隐藏的虚拟网卡
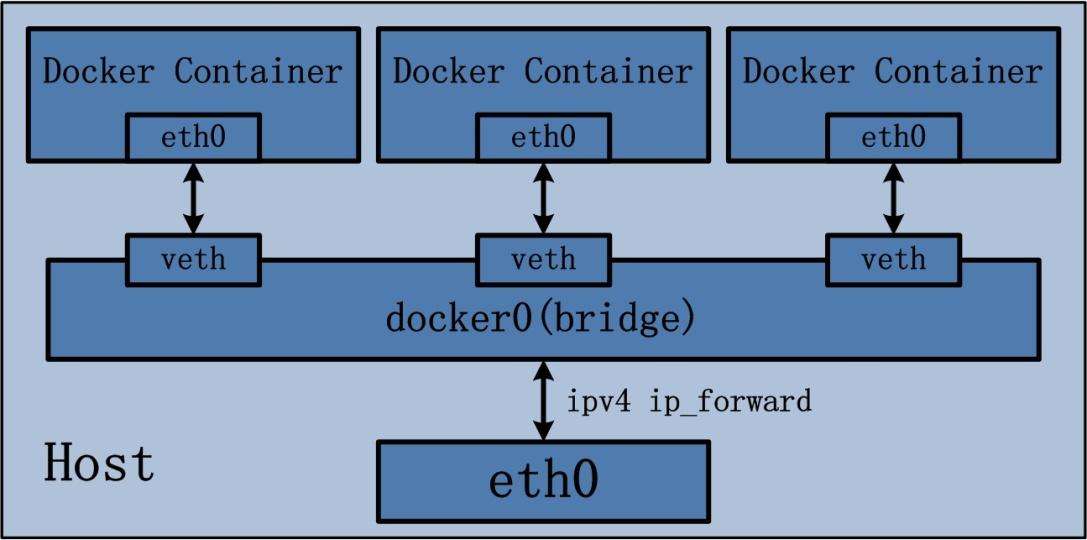
docker守护进程在一个容器启动时,实际上要创建网络连接的两端;一端是在容器中的网络设备,另一端在运行docker容器的宿主机上,打开一个veth*的一个接口,用来实现docker0网桥与容器的网络通信
在宿主机上查看网网桥设备
[root@localhost ~]# docker ps //运行了一个docker容器 CONTAINER ID IMAGE COMMAND CREATED STATUS PORTS NAMES 4a569e2df6ce ubuntu:latest "/bin/bash" 11 hours ago Up 20 minutes 0.0.0.0:8080->80/tcp commit [root@localhost ~]# brctl show //可以看到有一个docker0的网桥设备,interface=veth40cab8d bridge name bridge id STP enabled interfaces br0 8000.0021cc4ab047 no enp0s25 docker0 8000.02422f567b2e no veth40cab8d virbr0 8000.525400e12dcf yes virbr0-nic
可以对docker0进行修改,使之成为我们希望的网段
ifconfig docker0 IP netmask NATMASK
[root@localhost docker]# ifconfig docker0 172.25.11.1 netmask 255.255.255.0 [root@localhost docker]# ifconfig docker0 docker0: flags=4163<UP,BROADCAST,RUNNING,MULTICAST> mtu 1500 inet 172.25.11.1 netmask 255.255.255.0 broadcast 172.25.11.255 inet6 fe80::42:2fff:fe56:7b2e prefixlen 64 scopeid 0x20<link> ether 02:42:2f:56:7b:2e txqueuelen 0 (Ethernet) RX packets 27406 bytes 2657911 (2.5 MiB) RX errors 0 dropped 0 overruns 0 frame 0 TX packets 42047 bytes 58023011 (55.3 MiB) TX errors 0 dropped 0 overruns 0 carrier 0 collisions 0 [root@localhost docker]# service docker restart Redirecting to /bin/systemctl restart docker.service
自定义虚拟网桥
有时候,不希望使用docker默认提供的虚拟网桥,就可以添加自定义的虚拟网桥
添加虚拟网桥:
brctl addbr br_name
ifconfig br_name IP netmask NETMASK_NAME
修改/lib/systemd/system.docker.service文件
ExecStart=ExecStart=/usr/bin/dockerd -b=br0 //br0为宿主机的网络桥接设备
//完成之后要重启服务
Docker容器的互联
先创建一个用于测试的镜像:
[root@localhost docker]# cat Dockerfile FROM ubuntu:latest RUN apt-get install -y ping nginx curl EXPOSE 80 CMD /bin/bash [root@localhost docker]# docker build -t="test1" . Sending build context to Docker daemon 2.048 kB Step 1/4 : FROM ubuntu:latest 。。。构建过程省略
允许所有容器互联
同宿主机下,docker容器通过虚拟网桥来进行连接,默认情况,docker允许所有容器互联--icc=true
[root@localhost docker]# docker run -it --name cct1 test1 //构建容器cct1 root@db83f8dbedcc:/# nginx //启动cct1的nginx服务 root@db83f8dbedcc:/# ifconfig eth0 eth0 Link encap:Ethernet HWaddr 02:42:ac:11:00:02 inet addr:172.17.0.2 Bcast:0.0.0.0 Mask:255.255.0.0 inet6 addr: fe80::42:acff:fe11:2/64 Scope:Link UP BROADCAST RUNNING MULTICAST MTU:1500 Metric:1 RX packets:24 errors:0 dropped:0 overruns:0 frame:0 TX packets:14 errors:0 dropped:0 overruns:0 carrier:0 collisions:0 txqueuelen:0 RX bytes:1858 (1.8 KB) TX bytes:1862 (1.8 KB) root@db83f8dbedcc:/# //使用ctrl+p ctrl+q [root@localhost docker]# docker run -it --name cct2 test1 //构建容器cct2 root@2f8c3a090194:/# ifconfig eth0 eth0 Link encap:Ethernet HWaddr 02:42:ac:11:00:03 inet addr:172.17.0.3 Bcast:0.0.0.0 Mask:255.255.0.0 inet6 addr: fe80::42:acff:fe11:3/64 Scope:Link UP BROADCAST RUNNING MULTICAST MTU:1500 Metric:1 RX packets:8 errors:0 dropped:0 overruns:0 frame:0 TX packets:8 errors:0 dropped:0 overruns:0 carrier:0 collisions:0 txqueuelen:0 RX bytes:648 (648.0 B) TX bytes:648 (648.0 B) root@2f8c3a090194:/# ping 172.17.0.2 //可以ping通cct1 PING 172.17.0.2 (172.17.0.2) 56(84) bytes of data. 64 bytes from 172.17.0.2: icmp_seq=1 ttl=64 time=0.066 ms 64 bytes from 172.17.0.2: icmp_seq=2 ttl=64 time=0.102 ms root@2f8c3a090194:/# curl 172.17.0.2 //可以访问cct1的nginx服务 <!DOCTYPE html> <html> <head> <title>Welcome to nginx!</title> <style> body { width: 35em; margin: 0 auto; font-family: Tahoma, Verdana, Arial, sans-serif; } </style> </head> <body> <h1>Welcome to nginx!</h1> <p>If you see this page, the nginx web server is successfully installed and working. Further configuration is required.</p> <p>For online documentation and support please refer to <a href="http://nginx.org/">nginx.org</a>.<br/> Commercial support is available at <a href="http://nginx.com/">nginx.com</a>.</p> <p><em>Thank you for using nginx.</em></p> </body> </html>
在同一个宿主机下都是通过虚拟网桥连接,但是容器的IP地址是不可靠的连接(容器的重启会导致容器IP的改变),在docker上提供的服务,以IP地址连接不可靠,所以在容器启动时可以添加--link选项:
docker run --link=[CONTAINER_NAME]:ALIAS IMAGE COMMOND
CONTAINER_NAME 容器名
ALIAS 代号
如果指定了代号,就可以访问代号,从而避免容器IP地址变化带来的影响
[root@localhost docker]# docker run -it --name cct3 --link=cct1:web_test test1 //创建cct3,连接cct1,且别名为web_test root@02bd05e6a6ab:/# ping web_test //可以直接ping通web_test PING web_test (172.17.0.2) 56(84) bytes of data. 64 bytes from web_test (172.17.0.2): icmp_seq=1 ttl=64 time=0.110 ms 64 bytes from web_test (172.17.0.2): icmp_seq=2 ttl=64 time=0.105 ms ^C --- web_test ping statistics --- 2 packets transmitted, 2 received, 0% packet loss, time 999ms rtt min/avg/max/mdev = 0.105/0.107/0.110/0.010 ms root@02bd05e6a6ab:/# env |grep WEB //可以看到有大量web_test的环境变量,在容器启动时,由docker添加 WEB_TEST_PORT_80_TCP_ADDR=172.17.0.2 WEB_TEST_PORT=tcp://172.17.0.2:80 WEB_TEST_PORT_80_TCP_PORT=80 WEB_TEST_NAME=/cct3/web_test WEB_TEST_PORT_80_TCP=tcp://172.17.0.2:80 WEB_TEST_PORT_80_TCP_PROTO=tcp root@02bd05e6a6ab:/# cat /etc/hosts //hosts文件里也有相关一些信息(web_test的地址映射) 127.0.0.1 localhost ::1 localhost ip6-localhost ip6-loopback fe00::0 ip6-localnet ff00::0 ip6-mcastprefix ff02::1 ip6-allnodes ff02::2 ip6-allrouters 172.17.0.2 web_test db83f8dbedcc cct1 172.17.0.4 02bd05e6a6ab //重启cct3之后,也可以ping通cct1
拒绝所有容器互联
Docker守护进程的启动选项--icc=false
阻断连接是处于安全烤炉
允许特定容器连接
要允许特定容器连接,需要三个启动选项:
--icc=false
--iptables=true 允许docker容器将配置添加到Linux的iptables设置中
--link
示例:
关闭cct1、cct2、cct3
[root@localhost docker]# docker stop cct1 cct2 cct3 cct1 cct2 cct3
修改配置文件:/lib/systemd/system/docker.services
ExecStart= ExecStart=/usr/bin/dockerd -H tcp://0.0.0.0:2375 -H unix:///var/run/docker.sock --iptables=true --icc=false [root@localhost system]# systemctl daemon-reload //重启 [root@localhost system]# systemctl restart docker.service
重新启动cct1、cct2、cct3
[root@localhost docker]# docker start cct1 cct2 cct3 cct1 cct2 cct3 //attach到cct1、cct2、cct3,查看各自ip
测试:
[root@localhost docker_file]# docker attach cct2 root@c1ab09b07e87:/# root@c1ab09b07e87:/# ping 172.17.0.2 PING 172.17.0.2 (172.17.0.2) 56(84) bytes of data. ^C --- 172.17.0.2 ping statistics --- 4 packets transmitted, 0 received, 100% packet loss, time 2999ms //ping不通 root@c1ab09b07e87:/# curl 172.17.0.2 ^C //同样不能访问 [root@localhost rhel7mplayer]# docker attach cct3 root@0a3b40758348:/# curl web_test <!DOCTYPE html> <html> <head> <title>Welcome to nginx!</title> <style> body { width: 35em; margin: 0 auto; font-family: Tahoma, Verdana, Arial, sans-serif; } </style> </head> <body> <h1>Welcome to nginx!</h1> <p>If you see this page, the nginx web server is successfully installed and working. Further configuration is required.</p> <p>For online documentation and support please refer to <a href="http://nginx.org/">nginx.org</a>.<br/> Commercial support is available at <a href="http://nginx.com/">nginx.com</a>.</p> <p><em>Thank you for using nginx.</em></p> </body> </html> //curl访问成功
查看宿主机上的iptables规则:
[root@localhost system]# iptables -L Chain DOCKER (1 references) target prot opt source destination ACCEPT tcp -- 172.17.0.4 172.17.0.2 tcp dpt:http ACCEPT tcp -- 172.17.0.2 172.17.0.4 tcp spt:http ACCEPT tcp -- 172.17.0.5 172.17.0.2 tcp dpt:http ACCEPT tcp -- 172.17.0.2 172.17.0.5 tcp spt:http Chain DOCKER-ISOLATION (1 references) target prot opt source destination RETURN all -- anywhere anywhere //可以看到,DOCKER表中放行了两个IP的http访问
这也就是如果要允许特定的容器连接,就要同时使用