对象的本质
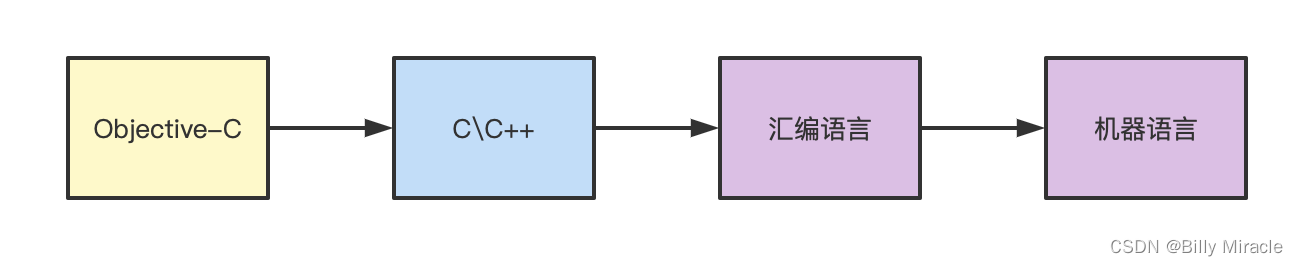
Objective-C 代码的底层都是通过 C/C++ 实现,所以 Objective-C 面向对象是基于 C/C++ 数据结构实现。
对于下面的OC代码:
@interface OSTestObject : NSObject
- (void)print;
@end

@implementation OSTestObject
- (void)print {

    }
@end

@interface OSTestObject1 : OSTestObject {


    @public int _count2;
}
@end

@implementation OSTestObject1
@end

int main(int argc, const char * argv[]) {


    @autoreleasepool {


        OSTestObject1 *obj1 = [[OSTestObject1 alloc] init];
    }
    return 0;
}
我们使用xcrun -sdk iphoneos clang -arch arm64 -rewrite-objc main.m -o main.cpp将其转换成为C++代码(即上面的第一步)。
下面摘取一部分重要的代码:
struct NSObject_IMPL {


	Class isa;
};

struct OSTestObject_IMPL {


	struct NSObject_IMPL NSObject_IVARS;
};

// - (void)print;
/* @end */


// @implementation OSTestObject

static void _I_OSTestObject_print(OSTestObject * self, SEL _cmd) {

    }
// @end
struct OSTestObject1_IMPL {


	struct OSTestObject_IMPL OSTestObject_IVARS;
	int _count2;
};

/* @end */


// @implementation OSTestObject1
// @end

int main(int argc, const char * argv[]) {


    /* @autoreleasepool */ {

     __AtAutoreleasePool __autoreleasepool;
        OSTestObject1 *obj1 = ((OSTestObject1 *(*)(id, SEL))(void *)objc_msgSend)((id)((OSTestObject1 *(*)(id, SEL))(void *)objc_msgSend)((id)objc_getClass("OSTestObject1"), sel_registerName("alloc")), sel_registerName("init"));
    }
    return 0;
}
结论:
OC对象的本质其实是结构体,对象里面存储了对象的成员变量信息。
对象创建的流程
alloc的流程
NSObject *object = [NSObject alloc];
其实,在这里打断点调试,系统并非直接走alloc方法:

而是进入了一个叫objc_alloc的函数:
id
objc_alloc(Class cls)
{


    return callAlloc(cls, true/*checkNil*/, false/*allocWithZone*/);
}
但是,我们还是先看一下alloc:
+ (id)alloc {


    return _objc_rootAlloc(self);
}
再看:
id
_objc_rootAlloc(Class cls)
{


    return callAlloc(cls, false/*checkNil*/, true/*allocWithZone*/);
}
我们顺着这个一直点下去,和前面提到的那个方法一样,同样是调用了callAlloc(),只是参数不同:
// Call [cls alloc] or [cls allocWithZone:nil], with appropriate
// shortcutting optimizations.
static ALWAYS_INLINE id
callAlloc(Class cls, bool checkNil, bool allocWithZone=false)
{


#if __OBJC2__
    if (slowpath(checkNil && !cls)) return nil;
    if (fastpath(!cls->ISA()->hasCustomAWZ())) {


        return _objc_rootAllocWithZone(cls, nil);
    }
#endif

    // No shortcuts available.
    if (allocWithZone) {


        return ((id(*)(id, SEL, struct _NSZone *))objc_msgSend)(cls, @selector(allocWithZone:), nil);
    }
    return ((id(*)(id, SEL))objc_msgSend)(cls, @selector(alloc));
}
因为这个类是第一次创建对象,类还没有初始化(懒加载),因此无法判断该类是否实现了allocWithZone方法,因而判断不成立,所以直接跳到下面allocWithZone的判断,但是callAlloc在调用的时候,传入的allocWithZone是false,因此直接走到return,调用 [cls alloc] 。
+ (id)alloc {


    return _objc_rootAlloc(self);
}
继续往下看:
id
_objc_rootAlloc(Class cls)
{


    return callAlloc(cls, false/*checkNil*/, true/*allocWithZone*/);
}
注意,allocWithZone参数变成true了。
接下来调用allocWithZone:
+ (id)allocWithZone:(struct _NSZone *)zone {


    return _objc_rootAllocWithZone(self, (malloc_zone_t *)zone);
}
id
_objc_rootAllocWithZone(Class cls, malloc_zone_t *zone __unused)
{


    // allocWithZone under __OBJC2__ ignores the zone parameter
    return _class_createInstanceFromZone(cls, 0, nil,
                                         OBJECT_CONSTRUCT_CALL_BADALLOC);
}
id
_objc_rootAllocWithZone(Class cls, malloc_zone_t *zone __unused)
{


    // allocWithZone under __OBJC2__ ignores the zone parameter
    return _class_createInstanceFromZone(cls, 0, nil,
                                         OBJECT_CONSTRUCT_CALL_BADALLOC);
}
我们知道一个对象的init其实根本是调用了c语言里面的calloc函数。但其实在这个操作之前还需要知道该对象所需要的内存大小。所以在源码中继续看_class_createInstanceFromZone的源码:
static ALWAYS_INLINE id
_class_createInstanceFromZone(Class cls, size_t extraBytes, void *zone,
                              int construct_flags = OBJECT_CONSTRUCT_NONE,
                              bool cxxConstruct = true,
                              size_t *outAllocatedSize = nil)
{


    ASSERT(cls->isRealized());

    // Read class's info bits all at once for performance
    bool hasCxxCtor = cxxConstruct && cls->hasCxxCtor();
    bool hasCxxDtor = cls->hasCxxDtor();
    bool fast = cls->canAllocNonpointer();
    size_t size;
	//1.
    size = cls->instanceSize(extraBytes);
    //1.end
    if (outAllocatedSize) *outAllocatedSize = size;

    id obj;
    //2.zone为空进入else
    if (zone) {


        obj = (id)malloc_zone_calloc((malloc_zone_t *)zone, 1, size);
    } else {


        obj = (id)calloc(1, size);
    }
    //2.end
    if (slowpath(!obj)) {


        if (construct_flags & OBJECT_CONSTRUCT_CALL_BADALLOC) {


            return _objc_callBadAllocHandler(cls);
        }
        return nil;
    }
	//3. zone为nil, fast经判断后是true
    if (!zone && fast) {


    	// 将cls类与obj的指针(即: isa)关联
        obj->initInstanceIsa(cls, hasCxxDtor);
    } else {


        // Use raw pointer isa on the assumption that they might be
        // doing something weird with the zone or RR.
        obj->initIsa(cls);
    }
	//3.end
    if (fastpath(!hasCxxCtor)) {


        return obj;
    }

    construct_flags |= OBJECT_CONSTRUCT_FREE_ONFAILURE;
    return object_cxxConstructFromClass(obj, cls, construct_flags);
}
这里就是对象创建的关键代码。可以大致总结为3个部分。
- 计算对象内存大小 (cls->instanceSize)
- 向系统请求内存空间 (calloc)
- 设置isa指针,关联到类对象,初始化对象信息 (obj->initInstanceIsa)
我们可以看一下instanceSize():
inline size_t instanceSize(size_t extraBytes) const {


	//  编译器快速计算内存空间大小方法
	if (fastpath(cache.hasFastInstanceSize(extraBytes))) {


		return cache.fastInstanceSize(extraBytes);
	}

	size_t size = alignedInstanceSize() + extraBytes;
	// CF requires all objects be at least 16 bytes.
	// 最小16
	if (size < 16) size = 16;
	return size;
}
这个方法和后面要介绍的内存对齐存在关系。
init源码探索
先看下init源码, 有两种:类方法init,实例方法init。
类方法init:
+ (id)init {


    return (id)self;
}
实例方法init:
- (id)init {


    return _objc_rootInit(self);
}
id
_objc_rootInit(id obj)
{


    // In practice, it will be hard to rely on this function.
    // Many classes do not properly chain -init calls.
    return obj;
}
也可以看到返回的是传入的self 本身。
new源码探索
先看底层, 可看到本身调用了callAlloc、init函数, 可以得出new等价于[XXX alloc ] init]。
+ (id)new {


    return [callAlloc(self, false/*checkNil*/) init];
}
new与init的爱恨情仇
我们重写一下一个新类的init方法:
- (instancetype)init {


    self = [super init];
    if (self != nil) {


        NSLog(@"1");
    }
    return self;
}

- (instancetype)initWithName {


    self = [super init];
    if (self != nil) {


        NSLog(@"2");
    }
    return self;
}
主函数:
Person *per = [[Person alloc] initWithName];
Person *per2 = [Person new];
输出:
2
1
new调用只会走1。
结论:
- 子类没有重写
init方法,new调用父类init方法 - 子类重写
init方法,new调用子类init方法 - 子类重写
init方法并自定义init方法new的话不会调用,所以alloc + init更为灵活一些,扩展性好
对象的大小
在OC中有3个关于对象大小的API:
| API | 所属库 | 含义 |
|---|---|---|
| sizeof | foundation | 成员变量所占空间 |
| class_getInstanceSize | runtime | 所有成员变量所占空间 |
| malloc_size | malloc | 对象分配的空间 |
其中sizeof和class_getInstanceSize的区别是,sizeof为符号,在编译的过程就确定了值,而class_getInstanceSize为函数,在运行的过程中才知道结果。
示例代码:
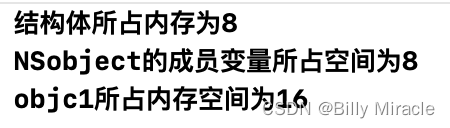
NSLog(@"结构体所占内存为%zd",sizeof(struct objcet_test));
NSObject *objc1 = [[NSObject alloc] init];
NSLog(@"NSobject的成员变量所占空间为%zd",class_getInstanceSize([NSObject class]));
NSLog(@"objc1所占内存空间为%zd", malloc_size((__bridge const void *)objc1));
运行结果:
内存对齐
造成上面情况的根本原因是内存对齐。可以大致理解为这样存储虽然数据空间会增大,但访问数据的效率会更高,是一种牺牲空间换取时间的操作。
在OC中是经过了2次内存对齐,一种是结构体的内存对齐,一种是对象的内存对齐。
其中class_getInstanceSize获取到的是结构体内存对齐后的结果。
而malloc_size获取到的是对象内存对齐后的结果。
结构体内存对齐规则
- 数据成员对齐规则:结构(struct)的第一个数据成员放在offset为0的地方,以后每个数据成员存储的起始位置要从该成员大小或者成员的子成员大小的整数倍开始(比如int为4字节,则要从4的整数倍地址开始存储)。
- 结构体作为成员:如果一个结构里有某些结构体成员,则结构体成员要从其内部最大元素大小的整数倍地址开始存储。(
struct a里存有struct b,b里有char,int ,double等元素,那b应该从8的整数倍开始存储)。 - 收尾:结构体的总大小,也就是
sizeof的结果必须是其内部最大成员的整数倍,不足的要补齐。
对象内存对齐
oc对象内存对齐可以粗暴的理解为所需的内存必须是16的倍数。这是苹果系统分配内存处理的。为了进一步优化内存读取效率,内存在使用的时候是有bucket这样一个概念的。苹果会把内存分为多个bucket,其中bucket最小的单位是16个字节。回到前面提到的instanceSize()方法,先看里面的alignedInstanceSize方法(虽然打断点时,会发现走的是fastInstanceSize快速计算内存空间方法):
// Class's ivar size rounded up to a pointer-size boundary.
// 类的 ivar 大小向上舍入到指针大小边界。
// 将未内存对齐的类的属性的总大小传入 word_align() 方法中进行对齐计算。
uint32_t alignedInstanceSize() const {


	return word_align(unalignedInstanceSize());
}
// May be unaligned depending on class's ivars.
// 可能未对齐,具体取决于类的 ivar。
uint32_t unalignedInstanceSize() const {


	ASSERT(isRealized());
	return data()->ro()->instanceSize;
}
static inline uint32_t word_align(uint32_t x) {


    return (x + WORD_MASK) & ~WORD_MASK;
}
解析:
我们知道NSObject对象有一个属性,那就是isa,是一个指针类型,所占空间大小为8字节,如果创建一个NSObject,我们看看这个方法如何计算的。看一下宏定义:
#define WORD_MASK 7UL
在64位下,WORD_MASK为7,当传入的x为8的时候,那么x + WORD_MASK为15,其二进制为:0000 1111,WORD_MASK的二进制为:0000 0111, 那么~WORD_MASK的二进制为:1111 1000。那么15 & ~7的计算为:
	0000 1111
&	1111 1000
=   0000 1000
0000 1000的十进制结果为8,即当传入x值为8的时候,经过计算后得到的结果为8字节。
那么假设传入x=9,我们再计算一遍。当传入的x为9的时候,那么x + WORD_MASK为16,其二进制为:0001 0000,16 & ~7的计算为:
	0001 0000
&	1111 1000
=   0001 0000
0001 0000的十进制结果为16,由此可知,类的属性总空间大小为9,经过对齐后需要的空间为16。
由上面的分析可以,对象申请内存空间的大小是8字节对齐计算的,我们得到的内存对齐后的数值就是对象创建的时候,向内存申请的空间大小,那么计算机真的是按照这个数值开辟的空间吗?
接下来看一下fastInstanceSize方法:
bool hasFastInstanceSize(size_t extra) const
{


	if (__builtin_constant_p(extra) && extra == 0) {


		return _flags & FAST_CACHE_ALLOC_MASK16;
	}
	return _flags & FAST_CACHE_ALLOC_MASK;
}

size_t fastInstanceSize(size_t extra) const
{


	ASSERT(hasFastInstanceSize(extra));

	if (__builtin_constant_p(extra) && extra == 0) {


		return _flags & FAST_CACHE_ALLOC_MASK16;
	} else {


		size_t size = _flags & FAST_CACHE_ALLOC_MASK;
		// remove the FAST_CACHE_ALLOC_DELTA16 that was added
		// by setFastInstanceSize
		return align16(size + extra - FAST_CACHE_ALLOC_DELTA16);
	}
}
这里留意下__builtin_constant_p 也是编译器gcc的内建函数 用于判断一个值是否为编译时常数,如果传入参数的值是常数,函数返回 1,否则返回 0。接着会走else一直执行到align16。
看一下size的计算:
#define FAST_CACHE_ALLOC_MASK         0x1ff8
#define FAST_CACHE_ALLOC_MASK16       0x1ff0
#define FAST_CACHE_ALLOC_DELTA16      0x0008

#if __LP64__
            uint16_t                   _flags;
#endif
_flags 是个16位无符号整数。接下来跳转到:
static inline size_t align16(size_t x) {


    return (x + size_t(15)) & ~size_t(15);
}
我们可以看到, 这是个16字节对齐方法。
例:x = 4
x + 15 & ~15
19 & ~15,  15为 0000 1111, ~ 15为 1111 0000

0001 0011  &
1111 0000  =
0001 0000 = 16

例:x = 8
x + 15 & ~15
23 & ~15,  15为 0000 1111, ~ 15为 1111 0000

0001 0111  &
1111 0000  =
0001 0000 = 16

例:x = 13
x + 15 & ~15
28 & ~15,  15为 0000 1111, ~ 15为 1111 0000

0001 1100  &
1111 0000  =
0001 0000 = 16

例:x = 24
x + 15 & ~15
39 & ~15,  15为 0000 1111, ~ 15为 1111 0000

0010 1001  &
1111 0000  =
0010 0000 = 32
内存的大小是以16的倍数增加的。
系统开辟空间
通过前面的探索,我们也看到了,系统一定会通过calloc()方法开辟空间,系统在calloc()方法中,对于开辟多大的空间,有自己的算法。
void *
calloc(size_t num_items, size_t size)
{


	return _malloc_zone_calloc(default_zone, num_items, size, MZ_POSIX);
}
其中default_zone是一个默认的zone, 目的是引导创建真正zone流程。接下来看_malloc_zone_calloc。
static void *
_malloc_zone_calloc(malloc_zone_t *zone, size_t num_items, size_t size,
		malloc_zone_options_t mzo)
{


	MALLOC_TRACE(TRACE_calloc | DBG_FUNC_START, (uintptr_t)zone, num_items, size, 0);

	void *ptr;
	if (malloc_check_start) {


		internal_check();
	}

	ptr = zone->calloc(zone, num_items, size);

	if (os_unlikely(malloc_logger)) {


		malloc_logger(MALLOC_LOG_TYPE_ALLOCATE | MALLOC_LOG_TYPE_HAS_ZONE | MALLOC_LOG_TYPE_CLEARED, (uintptr_t)zone,
				(uintptr_t)(num_items * size), 0, (uintptr_t)ptr, 0);
	}

	MALLOC_TRACE(TRACE_calloc | DBG_FUNC_END, (uintptr_t)zone, num_items, size, (uintptr_t)ptr);
	if (os_unlikely(ptr == NULL)) {


		malloc_set_errno_fast(mzo, ENOMEM);
	}
	return ptr;
}
其中这个ptr = zone->calloc(zone, num_items, size);方法是我们要找的关键。想要Jump to,结果是:
void *(* MALLOC_ZONE_FN_PTR(calloc))(struct _malloc_zone_t *zone, size_t num_items, size_t size); /* same as malloc, but block returned is set to zero */
但是,我们打断点调试,po一下:
可以看到,实际上调用了default_zone_calloc。也可以使用Step into查看。
static void *
default_zone_calloc(malloc_zone_t *zone, size_t num_items, size_t size)
{


	zone = runtime_default_zone();

	return zone->calloc(zone, num_items, size);
}
zone = runtime_default_zone();为创建真正的zonezone->calloc(zone, num_items, size);真正的zone进行calloc
先看runtime_default_zone():
MALLOC_NOEXPORT malloc_zone_t* lite_zone = NULL;

MALLOC_ALWAYS_INLINE
static inline malloc_zone_t *
runtime_default_zone() {


	return (lite_zone) ? lite_zone : inline_malloc_default_zone();
}
static inline malloc_zone_t *
inline_malloc_default_zone(void)
{


	_malloc_initialize_once();
	// malloc_report(ASL_LEVEL_INFO, "In inline_malloc_default_zone with %d %d\n", malloc_num_zones, malloc_has_debug_zone);
	return malloc_zones[0];
}
查看malloc_zones的值发现是NULL,可以得出,此时的zone还未赋值。
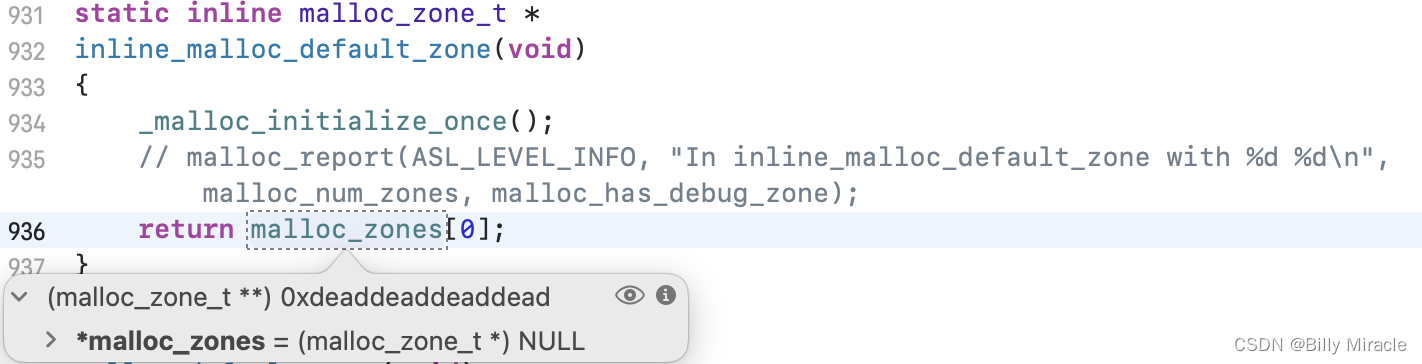
继续调试,断点打在default_zone_calloc的zone->calloc,在控制台po:

可以看到,调用了nano_calloc方法,去看它的源码:
static void *
nano_calloc(nanozone_t *nanozone, size_t num_items, size_t size)
{


	size_t total_bytes;

	if (calloc_get_size(num_items, size, 0, &total_bytes)) {


		return NULL;
	}

	if (total_bytes <= NANO_MAX_SIZE) {


		void *p = _nano_malloc_check_clear(nanozone, total_bytes, 1);
		if (p) {


			return p;
		} else {


			/* FALLTHROUGH to helper zone */
		}
	}
	malloc_zone_t *zone = (malloc_zone_t *)(nanozone->helper_zone);
	return zone->calloc(zone, 1, total_bytes);
}
先判断calloc_get_size()返回值,通过其注释,我们可以对本函数
的意图有所认知。
#define MALLOC_ABSOLUTE_MAX_SIZE (SIZE_T_MAX - (2 * large_vm_page_quanta_size))

// Gets the allocation size for a calloc(). Multiples size by num_items and adds
// extra_size, storing the result in *total_size. Returns 0 on success, -1 (with
// errno set to ENOMEM) on overflow.
// 获取 calloc() 的分配大小。将大小乘以num_items并
// 加extra_size,将结果存储在 *total_size 中。成功时返回 0,
// 溢出时返回 -1(将 errno 设置为 ENOMEM)。
static int MALLOC_INLINE MALLOC_ALWAYS_INLINE
calloc_get_size(size_t num_items, size_t size, size_t extra_size, size_t *total_size)
{


	size_t alloc_size = size;
	if (num_items != 1 && (os_mul_overflow(num_items, size, &alloc_size)
			|| alloc_size > MALLOC_ABSOLUTE_MAX_SIZE)) {


		errno = ENOMEM;
		return -1;
	}
	if (extra_size && (os_add_overflow(alloc_size, extra_size, &alloc_size)
			|| alloc_size > MALLOC_ABSOLUTE_MAX_SIZE)) {


		errno = ENOMEM;
		return -1;
	}
	*total_size = alloc_size;
	return 0;
}
开辟了空间之后,进入了下一个if判断。看一下NANO_MAX_SIZE定义:
#define NANO_MAX_SIZE 256 /* Buckets sized {16, 32, 48, ..., 256} */
从这个注释可以侧面看出,对象的内存对齐实际上是16字节的。如果开辟空间小于NANO_MAX_SIZE ,则会走_nano_malloc_check_clear方法,下面看一下_nano_malloc_check_clear源码:
static void *
_nano_malloc_check_clear(nanozone_t *nanozone, size_t size, boolean_t cleared_requested)
{


	MALLOC_TRACE(TRACE_nano_malloc, (uintptr_t)nanozone, size, cleared_requested, 0);

	void *ptr;
	size_t slot_key;
	// 获取16字节对齐之后的大小,slot_key非常关键,为slot_bytes/16的值,也是数组的二维下下标
	size_t slot_bytes = segregated_size_to_fit(nanozone, size, &slot_key); // Note slot_key is set here
	//根据_os_cpu_number经过运算获取 mag_index(meta_data的一维索引)
	mag_index_t mag_index = nano_mag_index(nanozone);
	//确定当前cpu对应的mag和通过size参数计算出来的slot,去对应metadata的链表中取已经被释放过的内存区块缓存
	nano_meta_admin_t pMeta = &(nanozone->meta_data[mag_index][slot_key]);
	//检测是否存在已经释放过,可以直接拿来用的内存,已经被释放的内存会缓存在 chained_block_s 链表
	//每一次free。同样会根据 index 和slot 的值回去 pMeta,然后把slot_LIFO的指针指向释放的内存。
	ptr = OSAtomicDequeue(&(pMeta->slot_LIFO), offsetof(struct chained_block_s, next));
	if (ptr) {


		unsigned debug_flags = nanozone->debug_flags;
#if NANO_FREE_DEQUEUE_DILIGENCE
		size_t gotSize;
		nano_blk_addr_t p; // the compiler holds this in a register

		p.addr = (uint64_t)ptr; // Begin the dissection of ptr
		if (NANOZONE_SIGNATURE != p.fields.nano_signature) {


			malloc_zone_error(debug_flags, true,
					"Invalid signature for pointer %p dequeued from free list\n",
					ptr);
		}

		if (mag_index != p.fields.nano_mag_index) {


			malloc_zone_error(debug_flags, true,
					"Mismatched magazine for pointer %p dequeued from free list\n",
					ptr);
		}

		gotSize = _nano_vet_and_size_of_free(nanozone, ptr);
		if (0 == gotSize) {


			malloc_zone_error(debug_flags, true,
					"Invalid pointer %p dequeued from free list\n", ptr);
		}
		if (gotSize != slot_bytes) {


			malloc_zone_error(debug_flags, true,
					"Mismatched size for pointer %p dequeued from free list\n",
					ptr);
		}

		if (!_nano_block_has_canary_value(nanozone, ptr)) {


			malloc_zone_error(debug_flags, true,
					"Heap corruption detected, free list canary is damaged for %p\n"
					"*** Incorrect guard value: %lu\n", ptr,
					((chained_block_t)ptr)->double_free_guard);
		}

#if defined(DEBUG)
		void *next = (void *)(((chained_block_t)ptr)->next);
		if (next) {


			p.addr = (uint64_t)next; // Begin the dissection of next
			if (NANOZONE_SIGNATURE != p.fields.nano_signature) {


				malloc_zone_error(debug_flags, true,
						"Invalid next signature for pointer %p dequeued from free "
						"list, next = %p\n", ptr, "next");
			}

			if (mag_index != p.fields.nano_mag_index) {


				malloc_zone_error(debug_flags, true,
						"Mismatched next magazine for pointer %p dequeued from "
						"free list, next = %p\n", ptr, next);
			}

			gotSize = _nano_vet_and_size_of_free(nanozone, next);
			if (0 == gotSize) {


				malloc_zone_error(debug_flags, true,
						"Invalid next for pointer %p dequeued from free list, "
						"next = %p\n", ptr, next);
			}
			if (gotSize != slot_bytes) {


				malloc_zone_error(debug_flags, true,
						"Mismatched next size for pointer %p dequeued from free "
						"list, next = %p\n", ptr, next);
			}
		}
#endif /* DEBUG */
#endif /* NANO_FREE_DEQUEUE_DILIGENCE */

		((chained_block_t)ptr)->double_free_guard = 0;
		((chained_block_t)ptr)->next = NULL; // clear out next pointer to protect free list
	} else {


		ptr = segregated_next_block(nanozone, pMeta, slot_bytes, mag_index);
	}

	if (cleared_requested && ptr) {


		memset(ptr, 0, slot_bytes); // TODO: Needs a memory barrier after memset to ensure zeroes land first?
	}
	return ptr;
}
重点: segregated_size_to_fit()
#define SHIFT_NANO_QUANTUM		4
#define NANO_REGIME_QUANTA_SIZE	(1 << SHIFT_NANO_QUANTUM)	// 16
static MALLOC_INLINE size_t
segregated_size_to_fit(nanozone_t *nanozone, size_t size, size_t *pKey)
{


	size_t k, slot_bytes;

	if (0 == size) {


		size = NANO_REGIME_QUANTA_SIZE; // Historical behavior
	}
	k = (size + NANO_REGIME_QUANTA_SIZE - 1) >> SHIFT_NANO_QUANTUM; // round up and shift for number of quanta
	slot_bytes = k << SHIFT_NANO_QUANTUM;							// multiply by power of two quanta size
	*pKey = k - 1;													// Zero-based!

	return slot_bytes;
}
这里是16字节对齐算法,重点是这块 k + 15 >> 4 <<4,k + 15先右移4位后左移4位返回。
例如: k = 3, k + 15 = 18

右移四位
00010010  →  00000001

左移四位
00000001  →  00010000

00010000 = 16
通式,最后面小于16的部分,按16对齐。
k < 16, k + 15 < 33

右移四位
0001xxxx  →  00000001

左移四位
00000001  →  00010000

00010000 = 16
不看上面if里的那么一大串串,看这一行:
ptr = segregated_next_block(nanozone, pMeta, slot_bytes, mag_index);
static MALLOC_INLINE void *
segregated_next_block(nanozone_t *nanozone, nano_meta_admin_t pMeta, size_t slot_bytes, unsigned int mag_index)
{


	while (1) {


		//当前这块pMeta可用内存的结束地址
		uintptr_t theLimit = pMeta->slot_limit_addr; // Capture the slot limit that bounds slot_bump_addr right now
		//原子的为pMeta->slot_bump_addr添加slot_bytes的长度,偏移到下一个地址
		uintptr_t b = OSAtomicAdd64Barrier(slot_bytes, (volatile int64_t *)&(pMeta->slot_bump_addr));
		//减去添加的偏移量,获取当前可以获取的地址
		b -= slot_bytes; // Atomic op returned addr of *next* free block. Subtract to get addr for *this* allocation.

		if (b < theLimit) {

       // Did we stay within the bound of the present slot allocation?
			//如果地址还在范围之内,则返回地址
			return (void *)b; // Yep, so the slot_bump_addr this thread incremented is good to go
		} else {


			//已经用尽了
			if (pMeta->slot_exhausted) {

     // exhausted all the bands availble for this slot?
				// 是否用尽了这个插槽的所有可用频段
				pMeta->slot_bump_addr = theLimit;
				return 0;				 // We're toast
			} else {


				// One thread will grow the heap, others will see its been grown and retry allocation
				// 一个线程将增长堆,其他线程将看到它已增长并重试分配
				_malloc_lock_lock(&nanozone->band_resupply_lock[mag_index]);
				// re-check state now that we've taken the lock
				// 重新检查状态,因为我们已经采取了锁
				// 多线程的缘故,重新检查是否用尽
				if (pMeta->slot_exhausted) {


					_malloc_lock_unlock(&nanozone->band_resupply_lock[mag_index]);
					return 0; // Toast
				} else if (b < pMeta->slot_limit_addr) {


					//如果小于最大限制地址,当重新申请一个新的band后,重新尝试while
					_malloc_lock_unlock(&nanozone->band_resupply_lock[mag_index]);
					continue; // ... the slot was successfully grown by first-taker (not us). Now try again.
				} else if (segregated_band_grow(nanozone, pMeta, slot_bytes, mag_index)) {


					//申请新的band成功,重新尝试while
					_malloc_lock_unlock(&nanozone->band_resupply_lock[mag_index]);
					continue; // ... the slot has been successfully grown by us. Now try again.
				} else {


					pMeta->slot_exhausted = TRUE;
					pMeta->slot_bump_addr = theLimit;
					_malloc_lock_unlock(&nanozone->band_resupply_lock[mag_index]);
					return 0;
				}
			}
		}
	}
}
可看出 segregated_next_block主要就是获取内存指针方法。
综上可以看出calloc只是开辟内存空间并返回指针对象,对齐方式按16个字节。测试代码:
int main(int argc, const char * argv[]) {


    @autoreleasepool {


		void *p = calloc(1, 24);
		NSLog(@"%lu",malloc_size(p));

    }
    return 0;
}
结果:
32
属性存储位置重排
系统在存储属性自动生成的成员变量的时候,会对这些成员变量重新排列顺序,而不是我们编码的顺序,所有我们编码的时候可以不考虑属性顺序对内存的影响。但如果是成员变量则不会重新排列。
先看结构体:
struct Mystruct1{


    char a;     //1字节
    double b;   //8字节
    int c;      //4字节
    short d;    //2字节
} Mystruct1;

struct Mystruct2{


    double b;   //8字节
    int c;      //4字节
    short d;    //2字节
    char a;     //1字节
} Mystruct2;

NSLog(@"%lu", sizeof(Mystruct1));
NSLog(@"%lu", sizeof(Mystruct2));
输出:
24
16
上面我们看到结构体1与结构体2里面属性是一样的,只有排列位置不一样,结果占用内存结果也不一样。所以结构体内存大小与结构体成员内存大小的顺序有关。
我们用一个自己的类试一下:
@property (nonatomic, strong) NSObject *name;
@property (nonatomic, strong) NSObject *name2;
@property (nonatomic, assign) int count;
@property (nonatomic, copy) NSString *str;
@property (nonatomic, assign) NSInteger integerCount;
Properties *pro = [[Properties alloc] init];
pro.name = @"a";
pro.name2 = @"b";
pro.count = 4;
pro.str = @"属性成员变量的重新排列";
pro.integerCount = 20;
在控制台打印一下信息:

读一下内存:
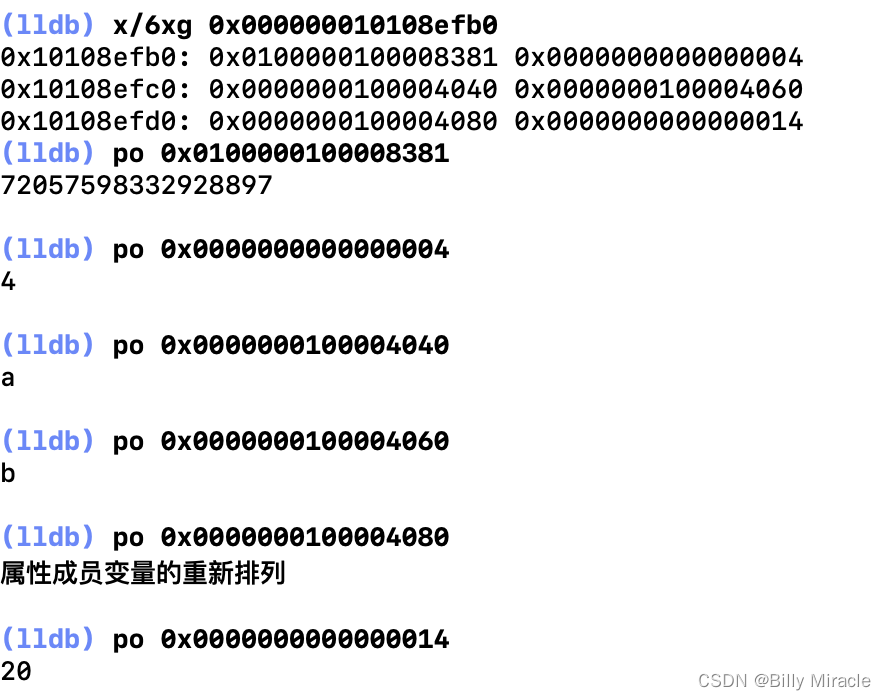
可以看到,经过重排,变成了:
 {


     int count,
     NSObject *name,
     NSObject *name2,
     NSString *str,
     NSInteger integerCount,
 }
我们浅浅介绍一下lldb查看内存的命令:
x /nuf 0x123456 	//常用,x指令的格式是:x空格/nfu,nfu代表三个参数
	n	代表显示几个单元(而不是显示几个字节,后面的u表示一个单元多少个字节),放在’/'后面
	u	代表一个单元几个字节,b(一个字节),h(两字节),w(四字节),g(八字节)
	f	代表显示数据的格式,f和u的顺序可以互换,也可以只有一个或者不带n,用的时候很灵活
		x 按十六进制格式显示变量。
		d 按十进制格式显示变量。
		u 按十六进制格式显示无符号整型。
		o 按八进制格式显示变量。
		t 按二进制格式显示变量。
		a 按十六进制格式显示变量。
		c 按字符格式显示变量。
		f 按浮点数格式显示变量。
		s 按字符串显示。
		b 按字符显示。
		i 显示汇编指令。
再试一个例子:
@property (nonatomic, strong) NSString *name;
@property (nonatomic, assign) int age;
@property (nonatomic, assign) long height;
@property (nonatomic, strong) NSString *hobby;
@property (nonatomic) char c1;
@property (nonatomic) char c2;
Properties2 *pro2 = [[Properties2 alloc] init];
pro2.name = @"Billy";
pro2.age = 6;
pro2.height = 133;
pro2.hobby = @"iOS";
pro2.c1 = 'a';
pro2.c2 = 'z';
梅开二度,再看一下信息:
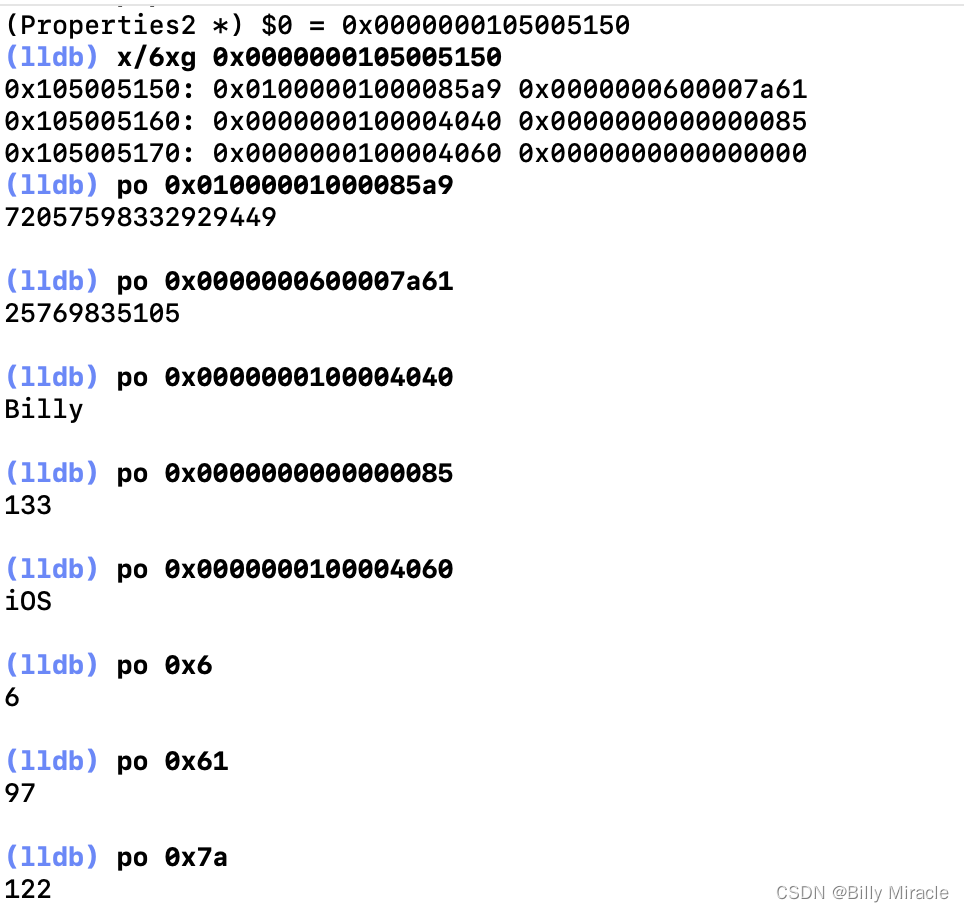
可以看到,age、c1、c2通过4+1+1的方式,按照8字节补齐的方式储存在了一个同一块内存中。注意char类型是以ASCII码形式显示,而地址为0x0000000000000000表示person中还有未赋值。
编译成C++看一下结构体:
struct Properties3_IMPL {


	struct NSObject_IMPL NSObject_IVARS;
	char _c1;
	char _c2;
	int _age;
	NSString *_name;
	long _height;
	NSString *_hobby;
};
其实重排顺序是为了优化内存。将零碎的存储空间整合,提高存储效率。
联合体
在C++语法中有除了结构体之外,还有一个联合体(union)。联合体和结构体一样也是一种数据结构。两者不同之处主要有以下2点:
- 结构体成员变量各自有各自的存储位置,联合体所有成员变量公用一块存储位置。
- 结构体的大小为所有成员变量大小的和(完事内存需要对齐)。联合体的大小是其中最大成员变量的大小。
isa指针介绍
在arm64架构之前,isa就是一个普通的指针,存储着Class、Meta-Class对象的内存地址,从arm64架构开始,对isa进行了优化,变成了一个联合体(union)结构,还使用位域来存储更多的信息。
isa结构如下图:
union isa_t {


    isa_t() {

     }
    isa_t(uintptr_t value) : bits(value) {

     }

    uintptr_t bits;

private:
    // Accessing the class requires custom ptrauth operations, so
    // force clients to go through setClass/getClass by making this
    // private.
    Class cls;

public:
#if defined(ISA_BITFIELD)
    struct {


        ISA_BITFIELD;  // defined in isa.h
    };

    bool isDeallocating() {


        return extra_rc == 0 && has_sidetable_rc == 0;
    }
    void setDeallocating() {


        extra_rc = 0;
        has_sidetable_rc = 0;
    }
#endif

    void setClass(Class cls, objc_object *obj);
    Class getClass(bool authenticated);
    Class getDecodedClass(bool authenticated);
};
看结构体:
struct {


	ISA_BITFIELD;  // defined in isa.h
};
这个结构体用宏定义的方式表示,具体定义是根据结构模式和真机模拟器类型划分,详情见 isa.h文件。接下来以arm64为例:
# if __arm64__
// ARM64 simulators have a larger address space, so use the ARM64e
// scheme even when simulators build for ARM64-not-e.
#   if __has_feature(ptrauth_calls) || TARGET_OS_SIMULATOR
#     define ISA_MASK        0x007ffffffffffff8ULL
#     define ISA_MAGIC_MASK  0x0000000000000001ULL
#     define ISA_MAGIC_VALUE 0x0000000000000001ULL
#     define ISA_HAS_CXX_DTOR_BIT 0
#     define ISA_BITFIELD                                                      \
        uintptr_t nonpointer        : 1;                                       \
        uintptr_t has_assoc         : 1;                                       \
        uintptr_t weakly_referenced : 1;                                       \
        uintptr_t shiftcls_and_sig  : 52;                                      \
        uintptr_t has_sidetable_rc  : 1;                                       \
        uintptr_t extra_rc          : 8
#     define RC_ONE   (1ULL<<56)
#     define RC_HALF  (1ULL<<7)
- nonpointer:是否是优化过的
isa指针
苹果之前所有的结构都是32位的,在32位的时候isa指针只有指向对应类对象/元类对象的功能。而到了64位后,isa指针里面的信息更多,为了适配兼容,这一位用作区分。 - has_assoc:是否存在关联对象
记录对象是否动态添加(使用runtime API),关联对象。如果有则为1,否则为0。在对向释放的时候要检
查这个信息。 - has_cxx_dtor:是否存在c++析构函数
一般有属性的时候就会有析构函数,析构函数是用来释放成员变量的。 - shiftcls :
class对象或者meta-class对象地址
存放class对象或者meta-class对象地址,在消息发送(objc_msgSend)的时候去找对应方法时候使用。 - magic:调试信息
用于在调试时分辨对象是否未完成初始化 - weakly_referenced:是否有被弱指针指向
如果有被弱指针指向,会在释放的时候去操作。如果没有则释放得更快 - unused:是否使用过
- has_sidetable_rc:引用计数是否存在
sidetable中
如果为1,那么引用计数会存储在一个叫sidetable的类的属性中 - extra_rc:引用计数
如果引用计数大于19位(arm64 & 真机)的最大值(2的19次方-1),则把has_sidetable_rc置位1,把引用计数去存到sidetable中。