Google 2018 I/O大会上,谷歌隆重推出一个新的架构组件:Navigation。从名字上可以看出他是一个导航,其实我们可以把它理解为FragmentNavigation。它提供了多Fragment之间的转场,栈管理,帮助你更轻松的使用Fragment。在以后抽屉式导航栏,底部、顶部导航栏的需求中我们可以尝试使用这个新组件。甚至,你可以尝试写一个单Activity的应用。
下面是我写的一个Sample,我将引导大家去实现这个小功能。
使用Navigation需要AndroidStudio的版本3.2以上,下面的网址可以下载最新的AndroidStudio
http://www.androiddevtools.cn/
第一步:创建两个Fragment,FristFragment和SecondFragment
<?xml version="1.0" encoding="utf-8"?>
<FrameLayout xmlns:android="http://schemas.android.com/apk/res/android"
    xmlns:tools="http://schemas.android.com/tools"
    android:layout_width="match_parent"
    android:layout_height="match_parent"
    tools:context=".FirstFragment">

    <!-- TODO: Update blank fragment layout -->
    <TextView
        android:layout_marginTop="100dp"
        android:layout_gravity="center_horizontal"
        android:text="我是第一个Fragment"
        android:layout_width="wrap_content"
        android:layout_height="wrap_content" />

    <Button
        android:textAllCaps="false"
        android:id="@+id/btn_next"
        android:layout_gravity="center"
        android:layout_width="wrap_content"
        android:layout_height="wrap_content"
        android:text="跳转到第二个Fragment" />

</FrameLayout>
<FrameLayout xmlns:android="http://schemas.android.com/apk/res/android"
    xmlns:tools="http://schemas.android.com/tools"
    android:layout_width="match_parent"
    android:layout_height="match_parent"
    android:orientation="vertical"
    tools:context=".SecondFragment">

    <!-- TODO: Update blank fragment layout -->

    <TextView
        android:layout_gravity="center_horizontal"
        android:layout_marginTop="100dp"
        android:text="我是第二个Fragment"
        android:layout_width="wrap_content"
        android:layout_height="wrap_content" />

    <Button
        android:layout_gravity="center"
        android:id="@+id/btn_back"
        android:layout_width="wrap_content"
        android:layout_height="wrap_content"
        android:text="返回" />

</FrameLayout>
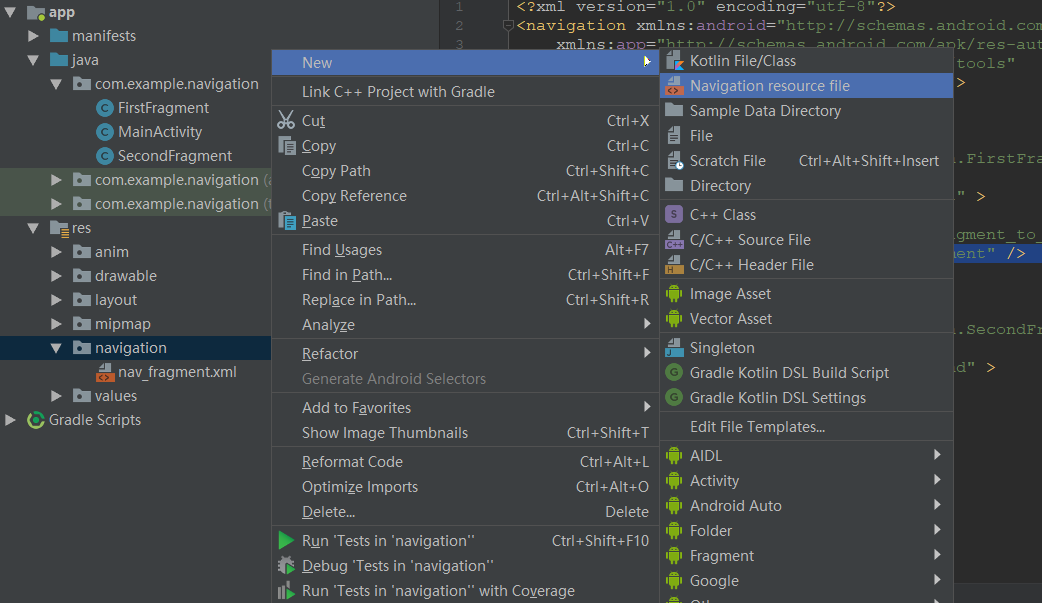
第二步:创建导航视图文件
在res目录下新建navigation文件夹,然后新建一个navigation资源文件(需要AndroidStudio3.2以上版本)
打开资源文件,切换为design可视化编辑模式,在这个界面,我们可以任意添加Fragment和Activity,用箭头线连接它们,就为它们绑定了跳转事件。
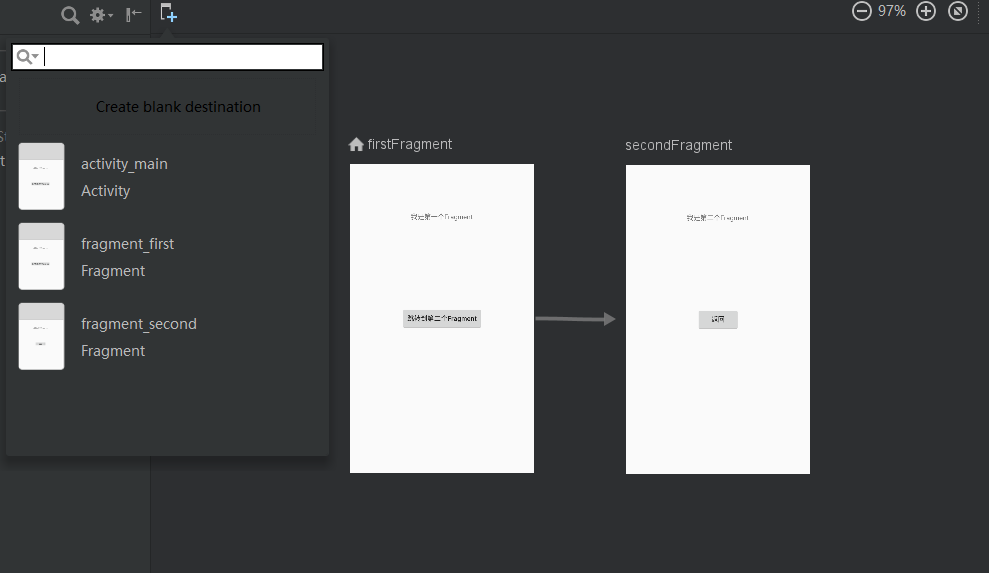
切换为Text模式,下面就是自动编辑好的代码。action标签描述的Fragment转场事件,在里面我们除了可以设置目标Fragment之外,还可以设置转场动画和启动模式。
<navigation xmlns:android="http://schemas.android.com/apk/res/android"
    xmlns:app="http://schemas.android.com/apk/res-auto"
    xmlns:tools="http://schemas.android.com/tools"
    app:startDestination="@id/firstFragment">

    <fragment
        android:id="@+id/firstFragment"
        android:name="com.example.navigation.FirstFragment"
        android:label="fragment_first"
        tools:layout="@layout/fragment_first" >
        <action
            android:id="@+id/action_firstFragment_to_secondFragment"
            app:destination="@id/secondFragment" />
    </fragment>
    <fragment
        android:id="@+id/secondFragment"
        android:name="com.example.navigation.SecondFragment"
        android:label="fragment_second"
        tools:layout="@layout/fragment_second" >
    </fragment>
</navigation>
第三步:编辑MainActivity
在Acitvity布局文件中添加fragment组件,设置name属性为androidx.navigation.fragment.NavHostFragment。在传统的单Activity多Fragment场景中,我们往往需要为Activity添加一个FrameLayout作为Fragment的容器。在Navigation中HavHostFragment就是Fragment的容器。布局中的navGraph属性建立了与navigation资源文件的关系。
<?xml version="1.0" encoding="utf-8"?>
<android.support.constraint.ConstraintLayout xmlns:android="http://schemas.android.com/apk/res/android"
    xmlns:app="http://schemas.android.com/apk/res-auto"
    xmlns:tools="http://schemas.android.com/tools"
    android:layout_width="match_parent"
    android:layout_height="match_parent"
    tools:context=".MainActivity">

   <fragment
       android:name="androidx.navigation.fragment.NavHostFragment"
       android:id="@+id/fragment"
       android:layout_width="0dp"
       android:layout_height="0dp"
       app:layout_constraintBottom_toBottomOf="parent"
       app:layout_constraintLeft_toLeftOf="parent"
       app:layout_constraintRight_toRightOf="parent"
       app:layout_constraintTop_toTopOf="parent"
       app:defaultNavHost="true"
       app:navGraph="@navigation/nav_fragment" />

</android.support.constraint.ConstraintLayout>
重写onSupportNavigateUp()方法,目的是将back事件委托出去。若栈中有两个以上Fragment,点击back键就会返回到上一个Fragment。
public class MainActivity extends AppCompatActivity {

    @Override
    protected void onCreate(Bundle savedInstanceState) {
        super.onCreate(savedInstanceState);
        setContentView(R.layout.activity_main);
    }

    @Override
    public boolean onSupportNavigateUp() {
        Fragment fragment = getSupportFragmentManager().findFragmentById(R.id.fragment);
        return NavHostFragment.findNavController(fragment).navigateUp();
    }
}
第四步:在Fragment中设置相应的跳转事件。
public class FirstFragment extends Fragment {


    public FirstFragment() {
        // Required empty public constructor
    }


    @Override
    public View onCreateView(LayoutInflater inflater, ViewGroup container,
                             Bundle savedInstanceState) {
        // Inflate the layout for this fragment
        return inflater.inflate(R.layout.fragment_first, container, false);
    }

    @Override
    public void onViewCreated(@NonNull View view, @Nullable Bundle savedInstanceState) {
        super.onViewCreated(view, savedInstanceState);
        Button btnNext = view.findViewById(R.id.btn_next);
        btnNext.setOnClickListener(new View.OnClickListener() {
            @Override
            public void onClick(View v) {
                Navigation.findNavController(v).navigate(R.id.action_firstFragment_to_secondFragment);
            }
        });
    }
}
public class SecondFragment extends Fragment {


    public SecondFragment() {
        // Required empty public constructor
    }


    @Override
    public View onCreateView(LayoutInflater inflater, ViewGroup container,
                             Bundle savedInstanceState) {
        // Inflate the layout for this fragment
        return inflater.inflate(R.layout.fragment_second, container, false);
    }

    @Override
    public void onViewCreated(@NonNull View view, @Nullable Bundle savedInstanceState) {
        super.onViewCreated(view, savedInstanceState);
        Button btnBack = view.findViewById(R.id.btn_back);
        btnBack.setOnClickListener(new View.OnClickListener(){

            @Override
            public void onClick(View v) {
                Navigation.findNavController(v).navigateUp();
            }
        });
    }
}
可以看到,关键API就是一行,界面切换如此简单。如果需要传值,把数据设置在Bundle中,使用以下api即可
Navigation.findNavController(view).navigate(actionid,bundle);
至此,我们就可以把程序运行起来。如果需要添加转场动画,需要在navigation资源文件的action标签下,添加动画属性。
<action
            app:enterAnim="@anim/slide_in_right"
            app:exitAnim="@anim/slide_out_left"
            app:popEnterAnim="@anim/slide_in_left"
            app:popExitAnim="@anim/slide_out_right"
            android:id="@+id/action_firstFragment_to_secondFragment"
            app:destination="@id/secondFragment" />
哇!跳转,传值,管理栈,还有转场动画!简直跟Activity的使用一模一样。从此,Fragment除了拥有自身的优点之外,还get了Activity的技能,我们在构建App的时候是不是可以更加肆意得使用Fragment呢?