前言:在iOS编程中,经常会有复杂的时间view嵌套,例如uitableviewcell中嵌套复杂的视图。这时候的touch事件的响应者就十分重要。在这篇之前写的基础文章中,我简单讲解了iOS中的事件种类,本文侧重以touch为例,讲解touch的传递。
触摸事件的响应者
window对象总会尝试把响应者设为touch产生的view,通过hit-test来判断。Touch事件会沿着第一响应者(Fist Responder)一直传递到UI Application,如果到最后也不能响应,则被抛弃。
系统如何通过hit-test找到Fist Responder的View
举个例子
点击如图的viewD 
通过hit-test来判断触摸在那个view的顺序如下
- Touch在ViewA的bounds中,递归检查ViewB和ViewC
- Touch不在ViewB的bounds中,检查ViewC
- Touch在ViewC的bounds中,检查ViewD和ViewE
- Touch不在ViewD中,检查ViewE
- Touch在ViewE中,所以ViewE为hit-test的结果
每一次hit-test通过两个函数实现。
调用pointInside:withEvent: 返回改触摸点是否在View中,hitTest:withEvent:返回触摸点所在的View,然后递归检查起subview
所以,可以通过重写pointInside:withEvent来限制一个View的部分区域响应视图,关于这个,最后我会写个例子。
Touch事件的传递顺序
注意,只有UIResponer的子类可以处理Touch事件,包括 UIApplication, UIViewController,和 UIView及其子类。
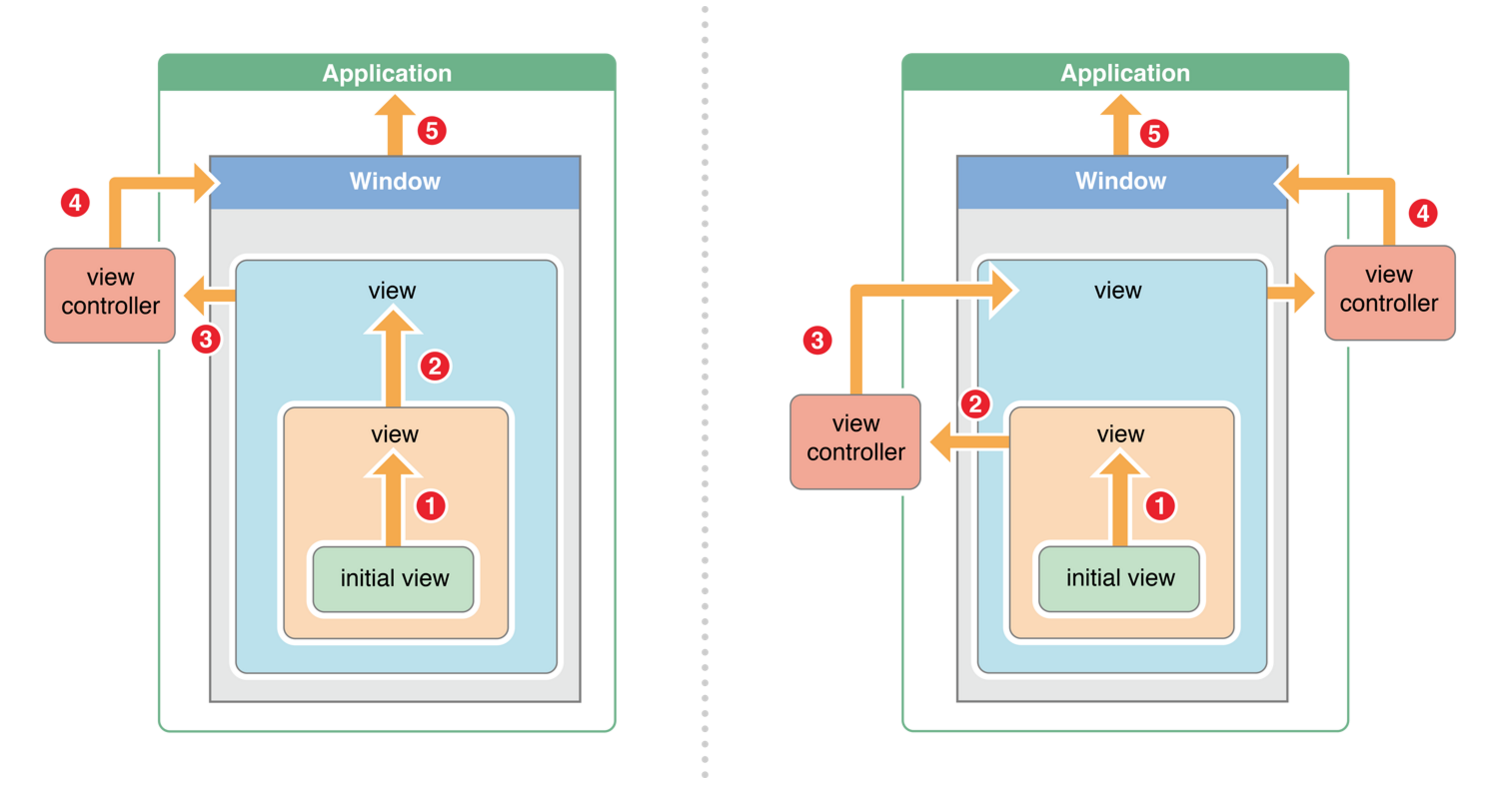
- 首先由View尝试处理,不能处理,则传递给Superview
- SuperView不能处理,继续传递给SuperView
- 因为SuperView是ViewController的根视图,则传递给ViewController
- ViewController不能处理,重复1,2,直到到达UIWindow
- Window不能处理,传递给UIApplication
- 抛弃
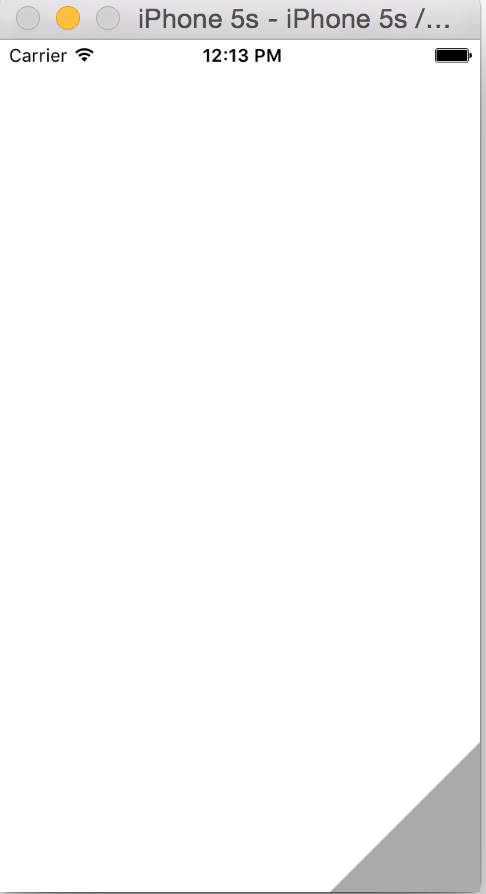
重写PointInside的一个例子
在右下角加一个不规则Button,注意,不能只设置背景色或者mask,因为button是矩形,button的响应区域也是矩形。这时候重写pointInside就有用了。
代码
为了方便,使用了hard-code 数字
#import "CustomButton.h"

@interface CustomButton ()

@property (strong,nonatomic)CAShapeLayer * shapeLayer;

@end
@implementation CustomButton

-(instancetype)initWithCoder:(NSCoder *)aDecoder{
    if (self = [super initWithCoder:aDecoder]) {
        [self setUp];
    }
    return self;
}
-(void)setUp{
    self.shapeLayer = [CAShapeLayer layer];
    CGMutablePathRef path = CGPathCreateMutable();
    CGPathMoveToPoint(path, nil,100, 0);
    CGPathAddLineToPoint(path, nil,100,100);
    CGPathAddLineToPoint(path, nil,0, 100);
    self.shapeLayer.path = path;
    [self.layer setMask:self.shapeLayer];
    self.layer.masksToBounds = true;
    self.backgroundColor = [UIColor lightGrayColor];
}
-(BOOL)pointInside:(CGPoint)point withEvent:(UIEvent *)event{
    if (CGPathContainsPoint(self.shapeLayer.path, nil, point, true)) {
        return [super pointInside:point withEvent:event];
    }else{
        return false;
    }
}

@end- 1
- 2
- 3
- 4
- 5
- 6
- 7
- 8
- 9
- 10
- 11
- 12
- 13
- 14
- 15
- 16
- 17
- 18
- 19
- 20
- 21
- 22
- 23
- 24
- 25
- 26
- 27
- 28
- 29
- 30
- 31
- 32
- 33
- 34
- 35
前言:在iOS编程中,经常会有复杂的时间view嵌套,例如uitableviewcell中嵌套复杂的视图。这时候的touch事件的响应者就十分重要。在这篇之前写的基础文章中,我简单讲解了iOS中的事件种类,本文侧重以touch为例,讲解touch的传递。

触摸事件的响应者
window对象总会尝试把响应者设为touch产生的view,通过hit-test来判断。Touch事件会沿着第一响应者(Fist Responder)一直传递到UI Application,如果到最后也不能响应,则被抛弃。
系统如何通过hit-test找到Fist Responder的View
举个例子
点击如图的viewD
通过hit-test来判断触摸在那个view的顺序如下
- Touch在ViewA的bounds中,递归检查ViewB和ViewC
- Touch不在ViewB的bounds中,检查ViewC
- Touch在ViewC的bounds中,检查ViewD和ViewE
- Touch不在ViewD中,检查ViewE
- Touch在ViewE中,所以ViewE为hit-test的结果
每一次hit-test通过两个函数实现。
调用pointInside:withEvent: 返回改触摸点是否在View中,hitTest:withEvent:返回触摸点所在的View,然后递归检查起subview
所以,可以通过重写pointInside:withEvent来限制一个View的部分区域响应视图,关于这个,最后我会写个例子。
Touch事件的传递顺序
注意,只有UIResponer的子类可以处理Touch事件,包括 UIApplication, UIViewController,和 UIView及其子类。
- 首先由View尝试处理,不能处理,则传递给Superview
- SuperView不能处理,继续传递给SuperView
- 因为SuperView是ViewController的根视图,则传递给ViewController
- ViewController不能处理,重复1,2,直到到达UIWindow
- Window不能处理,传递给UIApplication
- 抛弃
重写PointInside的一个例子
在右下角加一个不规则Button,注意,不能只设置背景色或者mask,因为button是矩形,button的响应区域也是矩形。这时候重写pointInside就有用了。
代码
为了方便,使用了hard-code 数字
#import "CustomButton.h"

@interface CustomButton ()

@property (strong,nonatomic)CAShapeLayer * shapeLayer;

@end
@implementation CustomButton

-(instancetype)initWithCoder:(NSCoder *)aDecoder{
    if (self = [super initWithCoder:aDecoder]) {
        [self setUp];
    }
    return self;
}
-(void)setUp{
    self.shapeLayer = [CAShapeLayer layer];
    CGMutablePathRef path = CGPathCreateMutable();
    CGPathMoveToPoint(path, nil,100, 0);
    CGPathAddLineToPoint(path, nil,100,100);
    CGPathAddLineToPoint(path, nil,0, 100);
    self.shapeLayer.path = path;
    [self.layer setMask:self.shapeLayer];
    self.layer.masksToBounds = true;
    self.backgroundColor = [UIColor lightGrayColor];
}
-(BOOL)pointInside:(CGPoint)point withEvent:(UIEvent *)event{
    if (CGPathContainsPoint(self.shapeLayer.path, nil, point, true)) {
        return [super pointInside:point withEvent:event];
    }else{
        return false;
    }
}

@end- 1
- 2
- 3
- 4
- 5
- 6
- 7
- 8
- 9
- 10
- 11
- 12
- 13
- 14
- 15
- 16
- 17
- 18
- 19
- 20
- 21
- 22
- 23
- 24
- 25
- 26
- 27
- 28
- 29
- 30
- 31
- 32
- 33
- 34
- 35