将通过拆解采集 → 编码 → 封装 → 解封装 → 解码 → 渲染流程并实现 Demo 来向大家介绍如何在 iOS/Android 平台上手音视频开发。
这里是第七篇:iOS 视频采集 Demo。这个 Demo 里包含以下内容:
-
1)实现一个视频采集模块;
-
2)实现视频采集逻辑并将采集的视频图像渲染进行预览,同时支持将数据转换为图片存储到相册;
-
3)详尽的代码注释,帮你理解代码逻辑和原理。
前六篇:
iOS音视频开发二:音频编码,采集 PCM 数据编码为 AAC
iOS音视频开发四:音频解封装,从 MP4 中解封装出 AAC
1、视频采集模块
首先,实现一个 KFVideoCaptureConfig 类用于定义视频采集参数的配置。
KFVideoCaptureConfig.h
#import <Foundation/Foundation.h>
#import <AVFoundation/AVFoundation.h>

NS_ASSUME_NONNULL_BEGIN

typedef NS_ENUM(NSInteger, KFVideoCaptureMirrorType) {
    KFVideoCaptureMirrorNone = 0,
    KFVideoCaptureMirrorFront = 1 << 0,
    KFVideoCaptureMirrorBack = 1 << 1,
    KFVideoCaptureMirrorAll = (KFVideoCaptureMirrorFront | KFVideoCaptureMirrorBack),
};

@interface KFVideoCaptureConfig : NSObject
@property (nonatomic, copy) AVCaptureSessionPreset preset; // 视频采集参数,比如分辨率等,与画质相关。
@property (nonatomic, assign) AVCaptureDevicePosition position; // 摄像头位置,前置/后置摄像头。
@property (nonatomic, assign) AVCaptureVideoOrientation orientation; // 视频画面方向。
@property (nonatomic, assign) NSInteger fps; // 视频帧率。
@property (nonatomic, assign) OSType pixelFormatType; // 颜色空间格式。
@property (nonatomic, assign) KFVideoCaptureMirrorType mirrorType; // 镜像类型。
@end

NS_ASSUME_NONNULL_END
这里的参数包括了:分辨率、摄像头位置、画面方向、帧率、颜色空间格式、镜像类型这几个参数。
其中画面方向是指采集的视频画面是可以带方向的,包括:Portrait、PortraitUpsideDown、LandscapeRight、LandscapeLeft 这几种。
颜色空间格式对应 RGB、YCbCr 这些概念,具体来讲,一般我们采集图像用于后续的编码时,这里设置 kCVPixelFormatType_420YpCbCr8BiPlanarFullRange 即可;如果想支持 HDR 时(iPhone12 及之后设备才支持),这里设置 kCVPixelFormatType_420YpCbCr10BiPlanarVideoRange。在我们这个 Demo 中,我们想要将采集的图像数据直接转换并存储为图片,所以我们会设置采集的颜色空间格式为 kCVPixelFormatType_32BGRA,这样将更方便将 CMSampleBuffer 转换为 UIImage。后面你会看到这个逻辑。
镜像类型表示采集的画面是否左右镜像,这个在直播时,主播经常需要考虑是否对自己的画面进行镜像,从而决定主播和观众的所见画面是否在『左右』概念的理解上保持一致。
其他的几个参数大家应该从字面上就能理解,就不做过多解释了。
KFVideoCaptureConfig.m
#import "KFVideoCaptureConfig.h"

@implementation KFVideoCaptureConfig

- (instancetype)init {
    self = [super init];
    if (self) {
        _preset = AVCaptureSessionPreset1920x1080;
        _position = AVCaptureDevicePositionFront;
        _orientation = AVCaptureVideoOrientationPortrait;
        _fps = 30;
        _mirrorType = KFVideoCaptureMirrorFront;

        // 设置颜色空间格式,这里要注意了:
        // 1、一般我们采集图像用于后续的编码时,这里设置 kCVPixelFormatType_420YpCbCr8BiPlanarFullRange 即可。
        // 2、如果想支持 HDR 时(iPhone12 及之后设备才支持),这里设置为:kCVPixelFormatType_420YpCbCr10BiPlanarVideoRange。
        _pixelFormatType = kCVPixelFormatType_420YpCbCr8BiPlanarFullRange;
    }

    return self;
}

@end
上面我们在 KFVideoCaptureConfig 的初始化方法里提供了一些默认值。
接下来,我们实现一个 KFVideoCapture 类来实现视频采集。
KFVideoCapture.h
#import <Foundation/Foundation.h>
#import "KFVideoCaptureConfig.h"

NS_ASSUME_NONNULL_BEGIN

@interface KFVideoCapture : NSObject
+ (instancetype)new NS_UNAVAILABLE;
- (instancetype)init NS_UNAVAILABLE;
- (instancetype)initWithConfig:(KFVideoCaptureConfig *)config;

@property (nonatomic, strong, readonly) KFVideoCaptureConfig *config;
@property (nonatomic, strong, readonly) AVCaptureVideoPreviewLayer *previewLayer; // 视频预览渲染 layer。
@property (nonatomic, copy) void (^sampleBufferOutputCallBack)(CMSampleBufferRef sample); // 视频采集数据回调。
@property (nonatomic, copy) void (^sessionErrorCallBack)(NSError *error); // 视频采集会话错误回调。
@property (nonatomic, copy) void (^sessionInitSuccessCallBack)(void); // 视频采集会话初始化成功回调。

- (void)startRunning; // 开始采集。
- (void)stopRunning; // 停止采集。
- (void)changeDevicePosition:(AVCaptureDevicePosition)position; // 切换摄像头。
@end

NS_ASSUME_NONNULL_END
上面是 KFVideoCapture 的接口设计,可以看到这些接口类似音频采集器的接口设计,除了初始化方法,主要是有获取视频配置以及视频采集数据回调和错误回调的接口,另外就是开始采集和停止采集的接口。
有一些不同的是,这里还提供了初始化成功回调、视频预览渲染 Layer、以及切换摄像头的接口,这个主要是因为视频采集一般会实现所见即所得,能让用户看到实时采集的画面,这样就需要在初始化成功后让业务层感知到来做一些 UI 布局,并通过预览渲染的 Layer 来展示采集的画面。切换摄像头的接口则主要是对应了手机设备常见的前置、后置等多摄像头的能力。
在上面的音频采集数据回调接口中,我们依然使用了 CMSampleBufferRef[1],可见这个数据结构的通用性和重要性。
CSDN站内私信我,领取最新最全C++音视频学习提升资料,内容包括(C/C++,Linux 服务器开发,FFmpeg ,webRTC ,rtmp ,hls ,rtsp ,ffplay ,srs)


KFVideoCapture.m
#import "KFVideoCapture.h"
#import <UIKit/UIKit.h>

@interface KFVideoCapture () <AVCaptureVideoDataOutputSampleBufferDelegate>
@property (nonatomic, strong, readwrite) KFVideoCaptureConfig *config;
@property (nonatomic, strong, readonly) AVCaptureDevice *captureDevice; // 视频采集设备。
@property (nonatomic, strong) AVCaptureDeviceInput *backDeviceInput; // 后置摄像头采集输入。
@property (nonatomic, strong) AVCaptureDeviceInput *frontDeviceInput; // 前置摄像头采集输入。
@property (nonatomic, strong) AVCaptureVideoDataOutput *videoOutput; // 视频采集输出。
@property (nonatomic, strong) AVCaptureSession *captureSession; // 视频采集会话。
@property (nonatomic, strong, readwrite) AVCaptureVideoPreviewLayer *previewLayer; // 视频预览渲染 layer。
@property (nonatomic, assign, readonly) CMVideoDimensions sessionPresetSize; // 视频采集分辨率。
@property (nonatomic, strong) dispatch_queue_t captureQueue;
@end

@implementation KFVideoCapture
#pragma mark - Property
- (AVCaptureDevice *)backCamera {
    return [self cameraWithPosition:AVCaptureDevicePositionBack];
}

- (AVCaptureDeviceInput *)backDeviceInput {
    if (!_backDeviceInput) {
        _backDeviceInput = [[AVCaptureDeviceInput alloc] initWithDevice:[self backCamera] error:nil];
    }

    return _backDeviceInput;
}

- (AVCaptureDevice *)frontCamera {
    return [self cameraWithPosition:AVCaptureDevicePositionFront];
}

- (AVCaptureDeviceInput *)frontDeviceInput {
    if (!_frontDeviceInput) {
        _frontDeviceInput = [[AVCaptureDeviceInput alloc] initWithDevice:[self frontCamera] error:nil];
    }

    return _frontDeviceInput;
}

- (AVCaptureVideoDataOutput *)videoOutput {
    if (!_videoOutput) {
        _videoOutput = [[AVCaptureVideoDataOutput alloc] init];
        [_videoOutput setSampleBufferDelegate:self queue:self.captureQueue]; // 设置返回采集数据的代理和回调。
        _videoOutput.videoSettings = @{(id)kCVPixelBufferPixelFormatTypeKey: @(_config.pixelFormatType)};
        _videoOutput.alwaysDiscardsLateVideoFrames = YES; // YES 表示:采集的下一帧到来前,如果有还未处理完的帧,丢掉。
    }

    return _videoOutput;
}

- (AVCaptureSession *)captureSession {
    if (!_captureSession) {
        AVCaptureDeviceInput *deviceInput = self.config.position == AVCaptureDevicePositionBack ? self.backDeviceInput : self.frontDeviceInput;
        if (!deviceInput) {
            return nil;
        }
        // 1、初始化采集会话。
        _captureSession = [[AVCaptureSession alloc] init];

        // 2、添加采集输入。
        for (AVCaptureSessionPreset selectPreset in [self sessionPresetList]) {
            if ([_captureSession canSetSessionPreset:selectPreset]) {
                [_captureSession setSessionPreset:selectPreset];
                if ([_captureSession canAddInput:deviceInput]) {
                    [_captureSession addInput:deviceInput];
                    break;
                }
            }
        }

        // 3、添加采集输出。
        if ([_captureSession canAddOutput:self.videoOutput]) {
            [_captureSession addOutput:self.videoOutput];
        }

        // 4、更新画面方向。
        [self _updateOrientation];

        // 5、更新画面镜像。
        [self _updateMirror];

        // 6、更新采集实时帧率。
        [self.captureDevice lockForConfiguration:nil];
        [self _updateActiveFrameDuration];
        [self.captureDevice unlockForConfiguration];

        // 7、回报成功。
        if (self.sessionInitSuccessCallBack) {
            self.sessionInitSuccessCallBack();
        }
    }

    return _captureSession;
}

- (AVCaptureVideoPreviewLayer *)previewLayer {
    if (!_captureSession) {
        return nil;
    }
    if (!_previewLayer) {
        // 初始化预览渲染 layer。这里就直接用系统提供的 API 来渲染。
        _previewLayer = [[AVCaptureVideoPreviewLayer alloc] initWithSession:_captureSession];
        [_previewLayer setVideoGravity:AVLayerVideoGravityResizeAspectFill];
    }

    return _previewLayer;
}

- (AVCaptureDevice *)captureDevice {
    // 视频采集设备。
    return (self.config.position == AVCaptureDevicePositionBack) ? [self backCamera] : [self frontCamera];
}

- (CMVideoDimensions)sessionPresetSize {
    // 视频采集分辨率。
    return CMVideoFormatDescriptionGetDimensions([self captureDevice].activeFormat.formatDescription);
}

#pragma mark - LifeCycle
- (instancetype)initWithConfig:(KFVideoCaptureConfig *)config {
    self = [super init];
    if (self) {
        _config = config;
        _captureQueue = dispatch_queue_create("com.KeyFrameKit.videoCapture", DISPATCH_QUEUE_SERIAL);
        [[NSNotificationCenter defaultCenter] addObserver:self selector:@selector(sessionRuntimeError:) name:AVCaptureSessionRuntimeErrorNotification object:nil];
    }

    return self;
}

- (void)dealloc {
    [[NSNotificationCenter defaultCenter] removeObserver:self];
}

#pragma mark - Public Method
- (void)startRunning {
    typeof(self) __weak weakSelf = self;
    dispatch_async(_captureQueue, ^{
        [weakSelf _startRunning];
    });
}

- (void)stopRunning {
    typeof(self) __weak weakSelf = self;
    dispatch_async(_captureQueue, ^{
        [weakSelf _stopRunning];
    });
}

- (void)changeDevicePosition:(AVCaptureDevicePosition)position {
    typeof(self) __weak weakSelf = self;
    dispatch_async(_captureQueue, ^{
        [weakSelf _updateDeveicePosition:position];
    });
}

#pragma mark - Private Method
- (void)_startRunning {
    AVAuthorizationStatus status = [AVCaptureDevice authorizationStatusForMediaType:AVMediaTypeVideo];
    if (status == AVAuthorizationStatusAuthorized) {
        if (!self.captureSession.isRunning) {
            [self.captureSession startRunning];
        }
    } else {
        NSLog(@"没有相机使用权限");
    }
}

- (void)_stopRunning {
    if (_captureSession && _captureSession.isRunning) {
        [_captureSession stopRunning];
    }
}

- (void)_updateDeveicePosition:(AVCaptureDevicePosition)position {
    // 切换采集的摄像头。

    if (position == self.config.position || !_captureSession.isRunning) {
        return;
    }

    // 1、切换采集输入。
    AVCaptureDeviceInput *curInput = self.config.position == AVCaptureDevicePositionBack ? self.backDeviceInput : self.frontDeviceInput;
    AVCaptureDeviceInput *addInput = self.config.position == AVCaptureDevicePositionBack ? self.frontDeviceInput : self.backDeviceInput;
    if (!curInput || !addInput) {
        return;
    }
    [self.captureSession removeInput:curInput];
    for (AVCaptureSessionPreset selectPreset in [self sessionPresetList]) {
        if ([_captureSession canSetSessionPreset:selectPreset]) {
            [_captureSession setSessionPreset:selectPreset];
            if ([_captureSession canAddInput:addInput]) {
                [_captureSession addInput:addInput];
                self.config.position = position;
                break;
            }
        }
    }

    // 2、更新画面方向。
    [self _updateOrientation];

    // 3、更新画面镜像。
    [self _updateMirror];

    // 4、更新采集实时帧率。
    [self.captureDevice lockForConfiguration:nil];
    [self _updateActiveFrameDuration];
    [self.captureDevice unlockForConfiguration];
}

- (void)_updateOrientation {
    // 更新画面方向。
    AVCaptureConnection *connection = [self.videoOutput connectionWithMediaType:AVMediaTypeVideo]; // AVCaptureConnection 用于把输入和输出连接起来。
    if ([connection isVideoOrientationSupported] && connection.videoOrientation != self.config.orientation) {
        connection.videoOrientation = self.config.orientation;
    }
}

- (void)_updateMirror {
    // 更新画面镜像。
    AVCaptureConnection *connection = [self.videoOutput connectionWithMediaType:AVMediaTypeVideo];
    if ([connection isVideoMirroringSupported]) {
        if ((self.config.mirrorType & KFVideoCaptureMirrorFront) && self.config.position == AVCaptureDevicePositionFront) {
            connection.videoMirrored = YES;
        } else if ((self.config.mirrorType & KFVideoCaptureMirrorBack) && self.config.position == AVCaptureDevicePositionBack) {
            connection.videoMirrored = YES;
        } else {
            connection.videoMirrored = NO;
        }
    }
}

- (BOOL)_updateActiveFrameDuration {
    // 更新采集实时帧率。

    // 1、帧率换算成帧间隔时长。
    CMTime frameDuration = CMTimeMake(1, (int32_t) self.config.fps);

    // 2、设置帧率大于 30 时,找到满足该帧率及其他参数,并且当前设备支持的 AVCaptureDeviceFormat。
    if (self.config.fps > 30) {
        for (AVCaptureDeviceFormat *vFormat in [self.captureDevice formats]) {
            CMFormatDescriptionRef description = vFormat.formatDescription;
            CMVideoDimensions dims = CMVideoFormatDescriptionGetDimensions(description);
            float maxRate = ((AVFrameRateRange *) [vFormat.videoSupportedFrameRateRanges objectAtIndex:0]).maxFrameRate;
            if (maxRate >= self.config.fps && CMFormatDescriptionGetMediaSubType(description) == self.config.pixelFormatType && self.sessionPresetSize.width * self.sessionPresetSize.height == dims.width * dims.height) {
                self.captureDevice.activeFormat = vFormat;
                break;
            }
        }
    }

    // 3、检查设置的帧率是否在当前设备的 activeFormat 支持的最低和最高帧率之间。如果是,就设置帧率。
    __block BOOL support = NO;
    [self.captureDevice.activeFormat.videoSupportedFrameRateRanges enumerateObjectsUsingBlock:^(AVFrameRateRange * _Nonnull obj, NSUInteger idx, BOOL * _Nonnull stop) {
        if (CMTimeCompare(frameDuration, obj.minFrameDuration) >= 0 &&
            CMTimeCompare(frameDuration, obj.maxFrameDuration) <= 0) {
            support = YES;
            *stop = YES;
        }
    }];
    if (support) {
        [self.captureDevice setActiveVideoMinFrameDuration:frameDuration];
        [self.captureDevice setActiveVideoMaxFrameDuration:frameDuration];
        return YES;
    }

    return NO;
}

#pragma mark - NSNotification
- (void)sessionRuntimeError:(NSNotification *)notification {
    if (self.sessionErrorCallBack) {
        self.sessionErrorCallBack(notification.userInfo[AVCaptureSessionErrorKey]);
    }
}

#pragma mark - Utility
- (AVCaptureDevice *)cameraWithPosition:(AVCaptureDevicePosition)position {
    // 从当前手机寻找符合需要的采集设备。
    NSArray *devices = nil;
    NSString *version = [UIDevice currentDevice].systemVersion;
    if (version.doubleValue >= 10.0) {
        AVCaptureDeviceDiscoverySession *deviceDiscoverySession = [AVCaptureDeviceDiscoverySession  discoverySessionWithDeviceTypes:@[AVCaptureDeviceTypeBuiltInWideAngleCamera] mediaType:AVMediaTypeVideo position:position];
        devices = deviceDiscoverySession.devices;
    } else {
#pragma GCC diagnostic push
#pragma GCC diagnostic ignored "-Wdeprecated-declarations"
        devices = [AVCaptureDevice devicesWithMediaType:AVMediaTypeVideo];
#pragma GCC diagnostic pop
    }

    for (AVCaptureDevice *device in devices) {
        if ([device position] == position) {
            return device;
        }
    }

    return nil;
}

- (NSArray *)sessionPresetList {
    return @[self.config.preset, AVCaptureSessionPreset3840x2160, AVCaptureSessionPreset1920x1080, AVCaptureSessionPreset1280x720, AVCaptureSessionPresetLow];
}

#pragma mark - AVCaptureVideoDataOutputSampleBufferDelegate
- (void)captureOutput:(AVCaptureOutput *)output didOutputSampleBuffer:(CMSampleBufferRef)sampleBuffer fromConnection:(AVCaptureConnection *)connection {
    // 向外回调数据。
    if (output == self.videoOutput) {
        if (self.sampleBufferOutputCallBack) {
            self.sampleBufferOutputCallBack(sampleBuffer);
        }
    }
}

@end
上面是 KFVideoCapture 的实现,结合下面这两张图可以让我们更好地理解这些代码:
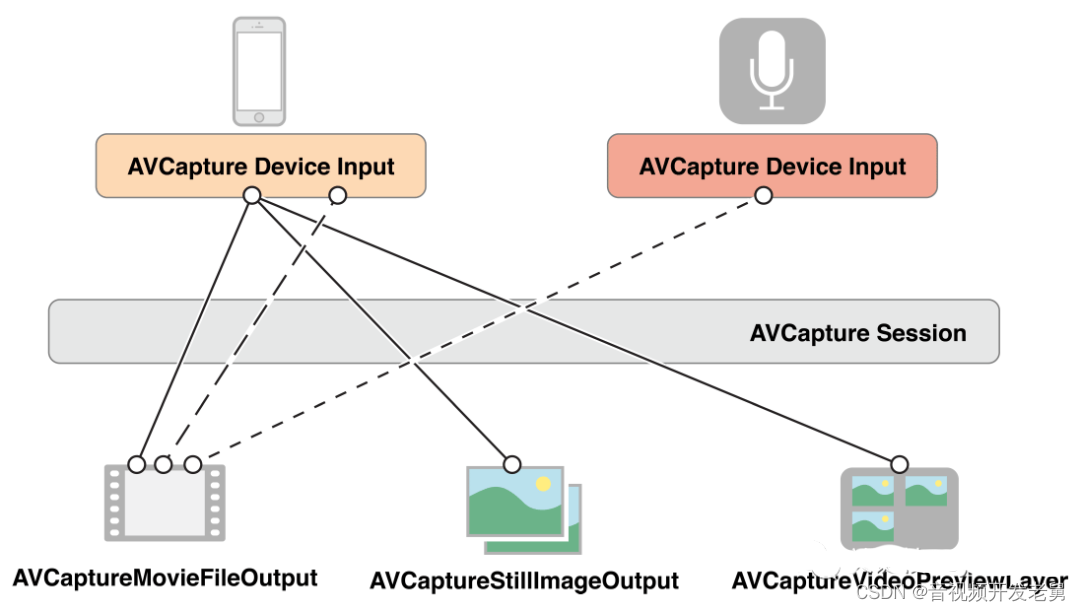
AVCaptureSession 配置多组输入输出

AVCaptureConnection 连接单或多输入到单输出
可以看到在实现采集时,我们是用 AVCaptureSession 来串联采集设备作为输入,其他输出对象作为输出。我们这个 Demo 里的一个输出对象就是 AVCaptureVideoPreviewLayer,用它来接收输出的数据并渲染。此外,还可以使用 AVCaptureConnection 来连接一个或多个输入到一个输出。
从代码上可以看到主要有这几个部分:
-
1)创建采集设备
AVCaptureDevice。-
在
-captureDevice中实现。 -
由于我们这里的采集模块支持前置和后置摄像头,所以这里的采集设备是根据当前选择的摄像头位置动态指定的。分别对应
-backCamera和-frontCamera。
-
-
2)基于采集设备,创建对应的采集输入
AVCaptureDeviceInput。-
由于支持前置和后置摄像头切换,所以这里我们有两个采集输入对象,分别绑定前置和后置摄像头。对应实现在
-backDeviceInput和-frontDeviceInput。
-
-
3)创建采集视频数据输出
AVCaptureVideoDataOutput。-
在
-videoOutput中实现。
-
-
4)创建采集会话
AVCaptureSession,绑定上面创建的采集输入和视频数据输出。-
在
-captureSession中实现。
-
-
5)创建采集画面预览渲染层
AVCaptureVideoPreviewLayer,将它绑定到上面创建的采集会话上。-
在
-previewLayer中实现。 -
该 layer 可以被外层获取用于 UI 布局和展示。
-
-
6)基于采集会话的能力封装开始采集和停止采集的对外接口。
-
分别在
-startRunning和-stopRunning方法中实现。注意,这里是开始和停止操作都是放在串行队列中通过dispatch_async异步处理的,这里主要是为了防止主线程卡顿。
-
-
7)实现切换摄像头的功能。
-
在
-changeDevicePosition:→-_updateDeveicePosition:方法中实现。注意,这里同样是异步处理。
-
-
8)实现采集初始化成功回调、数据回调、采集会话错误回调等对外接口。
-
采集初始化成功回调:在
-captureSession中初始化采集会话成功后,向外层回调。 -
数据回调:在
AVCaptureVideoDataOutputSampleBufferDelegate的回调接口-captureOutput:didOutputSampleBuffer:fromConnection:中接收采集数据并回调给外层。 -
采集会话错误回调:在
-sessionRuntimeError:中监听AVCaptureSessionRuntimeErrorNotification通知并向外层回调错误。
-
更具体细节见上述代码及其注释。
2、采集视频并实时展示或截图
我们在一个 ViewController 中来实现视频采集并实时预览的逻辑,也提供了对采集的视频数据截图保存到相册的功能。
KFVideoCaptureViewController.m
#import "KFVideoCaptureViewController.h"
#import "KFVideoCapture.h"
#import <Photos/Photos.h>

@interface KFVideoCaptureViewController ()
@property (nonatomic, strong) KFVideoCaptureConfig *videoCaptureConfig;
@property (nonatomic, strong) KFVideoCapture *videoCapture;
@property (nonatomic, assign) int shotCount;
@end

@implementation KFVideoCaptureViewController
#pragma mark - Property
- (KFVideoCaptureConfig *)videoCaptureConfig {
    if (!_videoCaptureConfig) {
        _videoCaptureConfig = [[KFVideoCaptureConfig alloc] init];
        // 由于我们的想要从采集的图像数据里直接转换并存储图片,所以我们这里设置采集处理的颜色空间格式为 32bit BGRA,这样方便将 CMSampleBuffer 转换为 UIImage。
        _videoCaptureConfig.pixelFormatType = kCVPixelFormatType_32BGRA;
    }

    return _videoCaptureConfig;
}

- (KFVideoCapture *)videoCapture {
    if (!_videoCapture) {
        _videoCapture = [[KFVideoCapture alloc] initWithConfig:self.videoCaptureConfig];
        __weak typeof(self) weakSelf = self;
        _videoCapture.sessionInitSuccessCallBack = ^() {
            dispatch_async(dispatch_get_main_queue(), ^{
                [weakSelf.view.layer addSublayer:weakSelf.videoCapture.previewLayer];
                weakSelf.videoCapture.previewLayer.frame = weakSelf.view.bounds;
            });
        };
        _videoCapture.sampleBufferOutputCallBack = ^(CMSampleBufferRef sample) {
            if (weakSelf.shotCount > 0) {
                weakSelf.shotCount--;
                [weakSelf saveSampleBuffer:sample];
            }
        };
        _videoCapture.sessionErrorCallBack = ^(NSError* error) {
            NSLog(@"KFVideoCapture Error:%zi %@", error.code, error.localizedDescription);
        };
    }

    return _videoCapture;
}

#pragma mark - Lifecycle
- (void)viewDidLoad {
    [super viewDidLoad];
    self.edgesForExtendedLayout = UIRectEdgeAll;
    self.extendedLayoutIncludesOpaqueBars = YES;
    self.title = @"Video Capture";
    self.view.backgroundColor = [UIColor whiteColor];

    self.shotCount = 0;
    [self requestAccessForVideo];

    // Navigation item.
    UIBarButtonItem *cameraBarButton = [[UIBarButtonItem alloc] initWithTitle:@"切换" style:UIBarButtonItemStylePlain target:self action:@selector(changeCamera)];
    UIBarButtonItem *shotBarButton = [[UIBarButtonItem alloc] initWithTitle:@"截图" style:UIBarButtonItemStylePlain target:self action:@selector(shot)];
    self.navigationItem.rightBarButtonItems = @[cameraBarButton, shotBarButton];
}

- (void)viewWillLayoutSubviews {
    [super viewWillLayoutSubviews];
    self.videoCapture.previewLayer.frame = self.view.bounds;
}

- (void)dealloc {

}

#pragma mark - Action
- (void)changeCamera {
    [self.videoCapture changeDevicePosition:self.videoCapture.config.position == AVCaptureDevicePositionBack ? AVCaptureDevicePositionFront : AVCaptureDevicePositionBack];
}

- (void)shot {
    self.shotCount = 1;
}

#pragma mark - Utility
- (void)requestAccessForVideo {
    __weak typeof(self) weakSelf = self;
    AVAuthorizationStatus status = [AVCaptureDevice authorizationStatusForMediaType:AVMediaTypeVideo];
    switch (status) {
        case AVAuthorizationStatusNotDetermined: {
            // 许可对话没有出现,发起授权许可。
            [AVCaptureDevice requestAccessForMediaType:AVMediaTypeVideo completionHandler:^(BOOL granted) {
                if (granted) {
                    [weakSelf.videoCapture startRunning];
                } else {
                    // 用户拒绝。
                }
            }];
            break;
        }
        case AVAuthorizationStatusAuthorized: {
            // 已经开启授权,可继续。
            [weakSelf.videoCapture startRunning];
            break;
        }
        default:
            break;
    }
}

- (void)saveSampleBuffer:(CMSampleBufferRef)sampleBuffer {
    __block UIImage *image = [self imageFromSampleBuffer:sampleBuffer];

    PHAuthorizationStatus authorizationStatus = [PHPhotoLibrary authorizationStatus];
    if (authorizationStatus == PHAuthorizationStatusAuthorized) {
        PHPhotoLibrary *library = [PHPhotoLibrary sharedPhotoLibrary];
        [library performChanges:^{
            [PHAssetChangeRequest creationRequestForAssetFromImage:image];
        } completionHandler:^(BOOL success, NSError * _Nullable error) {

        }];
    } else if (authorizationStatus == PHAuthorizationStatusNotDetermined) {
        // 如果没请求过相册权限,弹出指示框,让用户选择。
        [PHPhotoLibrary requestAuthorization:^(PHAuthorizationStatus status) {
            // 如果用户选择授权,则保存图片。
            if (status == PHAuthorizationStatusAuthorized) {
                [PHAssetChangeRequest creationRequestForAssetFromImage:image];
            }
        }];
    } else {
        NSLog(@"无相册权限。");
    }
}

- (UIImage *)imageFromSampleBuffer:(CMSampleBufferRef)sampleBuffer {
    // 从 CMSampleBuffer 中创建 UIImage。

    // 从 CMSampleBuffer 获取 CVImageBuffer(也是 CVPixelBuffer)。
    CVImageBufferRef imageBuffer = CMSampleBufferGetImageBuffer(sampleBuffer);

    // 锁定 CVPixelBuffer 的基地址。
    CVPixelBufferLockBaseAddress(imageBuffer, 0);
    void *baseAddress = CVPixelBufferGetBaseAddress(imageBuffer);

    // 获取 CVPixelBuffer 每行的字节数。
    size_t bytesPerRow = CVPixelBufferGetBytesPerRow(imageBuffer);
    // 获取 CVPixelBuffer 的宽高。
    size_t width = CVPixelBufferGetWidth(imageBuffer);
    size_t height = CVPixelBufferGetHeight(imageBuffer);

    // 创建设备相关的 RGB 颜色空间。这里的颜色空间要与 CMSampleBuffer 图像数据的颜色空间一致。
    CGColorSpaceRef colorSpace = CGColorSpaceCreateDeviceRGB();

    // 基于 CVPixelBuffer 的数据创建绘制 bitmap 的上下文。
    CGContextRef context = CGBitmapContextCreate(baseAddress, width, height, 8, bytesPerRow, colorSpace, kCGBitmapByteOrder32Little | kCGImageAlphaPremultipliedFirst);

    // 从 bitmap 绘制的上下文中获取 CGImage 图像。
    CGImageRef quartzImage = CGBitmapContextCreateImage(context);
    // 解锁 CVPixelBuffer。
    CVPixelBufferUnlockBaseAddress(imageBuffer, 0);

    // 是否上下文和颜色空间。
    CGContextRelease(context);
    CGColorSpaceRelease(colorSpace);

    // 从 CGImage 转换到 UIImage。
    UIImage *image = [UIImage imageWithCGImage:quartzImage];

    // 释放 CGImage。
    CGImageRelease(quartzImage);

    return image;
}

@end
上面是 KFVideoCaptureViewController 的实现,主要分为以下几个部分:
-
1)在
-videoCaptureConfig中初始化采集配置参数。-
这里需要注意的是,我们设置了采集的颜色空间格式为
kCVPixelFormatType_32BGRA。这主要是为了方便后面截图时转换数据。
-
-
2)在
-videoCapture中初始化采集器,并实现了采集会话初始化成功的回调、采集数据回调、采集错误回调。 -
3)在采集会话初始化成功的回调
sessionInitSuccessCallBack中,对采集预览渲染视图层进行布局。 -
4)在采集数据回调
sampleBufferOutputCallBack中,实现了截图逻辑。-
通过
-saveSampleBuffer:→-imageFromSampleBuffer:方法中实现截图。 -
-saveSampleBuffer:方法主要实现请求相册权限,以及获取图像存储到相册的逻辑。 -
-imageFromSampleBuffer:方法实现了将CMSampleBuffer转换为UIImage的逻辑。这里需要注意的是,我们在绘制 bitmap 时使用的是 RGB 颜色空间,与前面设置的采集的颜色空间一致。如果这里前后设置不一致,转换图像会出问题。
-
-
5)在
-requestAccessForVideo方法中请求相机权限并启动采集。 -
6)在
-changeCamera方法中实现切换摄像头。
更具体细节见上述代码及其注释。