文章目录
目前在不断更新<数据结构>的知识总结
该系列相关文章:
<数据结构>刷题笔记——链表篇(一)(有动图详解)
<数据结构>还不会写单向链表?我手把手教你
已完结系列:
c语言自学教程——博文总结
我的gitee:gitee网址
期待系统学习编程的小伙伴可以关注我,多篇保姆级教程,助你学习更多知识!
1. 结构讲解
链表有3类特征:
双向/单向
带哨兵位头/不带哨兵位头
循环/非循环
这3类特征之间可以随意组合,组合出多达8种链表。
之前我们学着写过单向不带头非循环链表,它的结构简单,不足之处较多,我们了解它是为了给学习哈希桶、图的邻接表打下基础。

今天我们要学习的带头双向循环链表:结构最复杂,一般用在单独存储数据。
实际中使用的链表数据结构,都是带头双向循环链表。另外这个结构虽然结构复杂,但是使用代码实现以后会发现结构会带来很多优势,实现反而简单了,今天我们代码实现了就知道了。
2. 带头双向循环链表的实现
2.1 搞一个新节点出来
方便后续使用
//买一个节点
LTNode* BuyLTNode(LTDataType x)
{


	LTNode* newnode = (LTNode*)malloc(sizeof(LTNode));
	if (newnode == NULL)
	{


		printf("malloc newnode fail");
		exit(-1);
	}
	newnode->data = x;
	newnode->next = NULL;
	newnode->prev = NULL;
	return newnode;
}
2.2 初始化
本来初始化函数要改变phead,应该传二级指针,但为了传参的一致性,我打算传参都传一级指针。
就把初始化函数改了一下,test.c函数也要改一下。
//初始化
LTNode* ListInit()
{


	LTNode* phead = BuyLTNode(0);
	phead->next = phead;
	phead->prev = phead;
	return phead;
}
//test.c里这样接收就能完成初始化
LTNode* plist = ListInit();
2.3 打印
打印的结束条件是循环了一次,也就是cur指针又到了phead处。
//打印
void ListPrint(LTNode* phead)
{


	assert(phead);

	LTNode* cur = phead->next;//从第一个元素开始打印

	while (cur != phead)
	{


		printf("%d ", cur->data);
		cur = cur->next;
	}
	printf("\n");
}
2.4 尾插
可以直接用phead的prev找尾,不用遍历。
而且只有一个节点时也可以满足要求。
这可比单链表方便多了

//尾插
void ListPushBack(LTNode* phead, LTDataType x)
{


	assert(phead);//哨兵位的头不能为空
	LTNode* newnode = BuyLTNode(x);
	LTNode* tail = phead->prev;//不用像单链表一样找尾

	tail->next = newnode;
	newnode->prev = tail;

	phead->prev = newnode;
	newnode->next = phead;
}
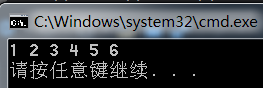
void TestList1()
{


	LTNode* plist = ListInit();
	ListPushBack(plist, 1);
	ListPushBack(plist, 2);
	ListPushBack(plist, 3);
	ListPushBack(plist, 4);
	ListPushBack(plist, 5);
	ListPushBack(plist, 6);
	ListPrint(plist);
}
2.5 尾删

这种写法就算链表里只有一个节点都可以轻松解决。
但要小心链表中只有head的情况,head不能为空,我们不能free掉phead。那种情况下phead->next == phead我们就把这种情况单独处理。

//尾删
void ListPopBack(LTNode* phead)
{


	assert(phead);
	//链表为空
	//assert(phead->next != phead);//强势的检查
	if (phead->next == phead)//温和的检查
	{


		return;
	}

	LTNode* tail = phead->prev;
	LTNode* tailPrev = tail->prev;

	free(tail);
	tail = NULL;

	tailPrev->next = phead;
	phead->prev = tailPrev;
}
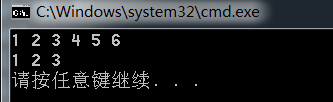
void TestList1()
{


	LTNode* plist = ListInit();
	ListPushBack(plist, 1);
	ListPushBack(plist, 2);
	ListPushBack(plist, 3);
	ListPushBack(plist, 4);
	ListPushBack(plist, 5);
	ListPushBack(plist, 6);
	ListPrint(plist);
	ListPopBack(plist);
	ListPopBack(plist);
	ListPopBack(plist);
	ListPrint(plist);
}
2.6 查找
逻辑跟ListPrint函数很像,查找一般跟后面的插入一起使用。
//查找
LTNode* ListFind(LTNode* phead, LTDataType x)
{


	assert(phead);

	LTNode* cur = phead->next;
	while (cur != phead)
	{


		if (cur->data == x)
		{


			return cur;
		}
		cur = cur->next;
	}
	return NULL;
}
2.7 在pos之前插入
如果不创建新指针,插入的顺序是有要求的。用下图举例子,如果你先把pos和newnode连接起来,pos->prev就被重置了,没法靠pos找到1节点了。所以要先把1和3连接起来在连接3和2

或者弄一个posPrev指针,这样的话就不用考虑顺序问题。
//在pos之前插入
void ListInsert(LTNode* pos, LTDataType x)
{


	assert(pos);
	LTNode* newnode = BuyLTNode(x);

	//方法一
	先
	//newnode->prev = pos->prev;
	//pos->prev->next = newnode;
	后
	//pos->prev = newnode;
	//newnode->next = pos;

	//方法二
	LTNode* posPrev = pos->prev;
	pos->prev = newnode;
	newnode->next = pos;
	posPrev->next = newnode;
	newnode->prev = posPrev;
}
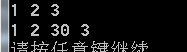
void TestList2()
{


	LTNode* plist = ListInit();
	ListPushBack(plist, 1);
	ListPushBack(plist, 2);
	ListPushBack(plist, 3);
	ListPrint(plist);

	LTNode* pos = ListFind(plist, 3);
	if (pos)
	{


		ListInsert(pos, 30);
	}
	ListPrint(plist);
}
2.8 删除pos位置

//删除pos位置
void ListErase(LTNode* pos)
{


	assert(pos);//phead不能删,如果是find出来的pos,pos不可能为phead
	LTNode* prev = pos->prev;
	LTNode* next = pos->next;

	free(pos);
	pos = NULL;

	prev->next = next;
	next->prev = prev;
}
void TestList2()
{


	LTNode* plist = ListInit();
	ListPushBack(plist, 1);
	ListPushBack(plist, 2);
	ListPushBack(plist, 3);
	ListPrint(plist);

	LTNode* pos = ListFind(plist, 2);
	if (pos)
	{


		ListErase(pos);
		pos = NULL;//没传二级指针,没法改变pos的值,只能在调用之后再置空,防止野指针的出现
	}
	ListPrint(plist);
}

2.9 头插
有了ListInsert函数,我们就能轻松复用函数,完成头插。头插就是在第一个节点前插入。
//头插
void ListPushFront(LTNode* phead, LTDataType x)
{


	assert(phead);
	ListInsert(phead->next, x);
}
2.10 改进尾插
有了ListInsert函数,我们就能轻松复用函数,改进尾插。尾插就是在phead前插入。(这是个循环链表,在头之前插入相当于在尾之后插入)
//尾插
void ListPushBack(LTNode* phead, LTDataType x)
{


	assert(phead);//哨兵位的头不能为空
	//LTNode* newnode = BuyLTNode(x);
	//LTNode* tail = phead->prev;//不用像单链表一样找尾

	//tail->next = newnode;
	//newnode->prev = tail;

	//phead->prev = newnode;
	//newnode->next = phead;
	ListInsert(phead, x);
}
2.11 头删
复用ListErase函数,直接删除。
//头删
void ListPopFront(LTNode* phead)
{


	assert(phead);
	//链表为空
	//assert(phead->next != phead);//强势的检查
	if (phead->next == phead)//温和的检查
	{


		return;
	}
	ListErase(phead->next);
}
2.12 改进尾删
复用ListErase函数,直接删除。
//尾删
void ListPopBack(LTNode* phead)
{


	assert(phead);
	//链表为空
	//assert(phead->next != phead);//强势的检查
	if (phead->next == phead)//温和的检查
	{


		return;
	}

	//LTNode* tail = phead->prev;
	//LTNode* tailPrev = tail->prev;

	//free(tail);
	//tail = NULL;

	//tailPrev->next = phead;
	//phead->prev = tailPrev;
	ListErase(phead->prev);
}
2.13 全部程序
List.h
#pragma once
#include<stdio.h>
#include<assert.h>
#include<string.h>
#include<stdlib.h>

typedef int LTDataType;
typedef struct ListNode
{


	LTDataType data;
	struct ListNode* next;
	struct ListNode* prev;
}LTNode;

LTNode* BuyLTNode(LTDataType x);//买一个节点

LTNode* ListInit();//初始化

void ListPrint(LTNode* phead);//打印

LTNode* ListFind(LTNode* phead, LTDataType x);//查找
void ListInsert(LTNode* pos, LTDataType x);//在pos之前插入
void ListErase(LTNode* pos);//删除pos位置

void ListPushBack(LTNode* phead, LTDataType x);//尾插
void ListPopBack(LTNode* phead);//尾删

void ListPushFront(LTNode* phead, LTDataType x);//头插
void ListPopFront(LTNode* phead);//头删

void ListDestory(LTNode* phead);//销毁
List.c
#define _CRT_SECURE_NO_WARNINGS
#include"List.h"

LTNode* BuyLTNode(LTDataType x)
{


	LTNode* newnode = (LTNode*)malloc(sizeof(LTNode));
	if (newnode == NULL)
	{


		printf("malloc newnode fail");
		exit(-1);
	}
	newnode->data = x;
	newnode->next = NULL;
	newnode->prev = NULL;
	return newnode;
}

//初始化
LTNode* ListInit()
{


	LTNode* phead = BuyLTNode(0);
	phead->next = phead;
	phead->prev = phead;
	return phead;
}

//打印
void ListPrint(LTNode* phead)
{


	assert(phead);

	LTNode* cur = phead->next;

	while (cur != phead)
	{


		printf("%d ", cur->data);
		cur = cur->next;
	}
	printf("\n");
}

//查找
LTNode* ListFind(LTNode* phead, LTDataType x)
{


	assert(phead);

	LTNode* cur = phead->next;
	while (cur != phead)
	{


		if (cur->data == x)
		{


			return cur;
		}
		cur = cur->next;
	}
	return NULL;
}

//在pos之前插入
void ListInsert(LTNode* pos, LTDataType x)
{


	assert(pos);
	LTNode* newnode = BuyLTNode(x);

	//方法一
	先
	//newnode->prev = pos->prev;
	//pos->prev->next = newnode;
	后
	//pos->prev = newnode;
	//newnode->next = pos;

	//方法二
	LTNode* posPrev = pos->prev;
	pos->prev = newnode;
	newnode->next = pos;
	posPrev->next = newnode;
	newnode->prev = posPrev;
}

//删除pos位置
void ListErase(LTNode* pos)
{


	assert(pos);//phead不能删,如果是find出来的pos,pos不可能为phead
	LTNode* prev = pos->prev;
	LTNode* next = pos->next;

	free(pos);
	pos = NULL;

	prev->next = next;
	next->prev = prev;
}


//尾插
void ListPushBack(LTNode* phead, LTDataType x)
{


	assert(phead);//哨兵位的头不能为空
	//LTNode* newnode = BuyLTNode(x);
	//LTNode* tail = phead->prev;//不用像单链表一样找尾

	//tail->next = newnode;
	//newnode->prev = tail;

	//phead->prev = newnode;
	//newnode->next = phead;
	ListInsert(phead, x);
}

//尾删
void ListPopBack(LTNode* phead)
{


	assert(phead);
	//链表为空
	//assert(phead->next != phead);//强势的检查
	if (phead->next == phead)//温和的检查
	{


		return;
	}

	//LTNode* tail = phead->prev;
	//LTNode* tailPrev = tail->prev;

	//free(tail);
	//tail = NULL;

	//tailPrev->next = phead;
	//phead->prev = tailPrev;
	ListErase(phead->prev);
}


//头插
void ListPushFront(LTNode* phead, LTDataType x)
{


	assert(phead);
	ListInsert(phead->next, x);
}

//头删
void ListPopFront(LTNode* phead)
{


	assert(phead);
	//链表为空
	//assert(phead->next != phead);//强势的检查
	if (phead->next == phead)//温和的检查
	{


		return;
	}
	ListErase(phead->next);
}

//销毁
void ListDestory(LTNode* phead)
{


	assert(phead);
	LTNode* cur = phead->next;
	while (cur != phead)
	{


		LTNode* next = cur->next;
		free(cur);
		cur = next;
	}
	free(phead);
	//phead = NULL;//在这置空作用不大,phead的改变影响不了实参
}
test.c
#define _CRT_SECURE_NO_WARNINGS
#include"List.h"

void TestList1()
{


	LTNode* plist = ListInit();
	ListPushBack(plist, 1);
	ListPushBack(plist, 2);
	ListPushBack(plist, 3);
	ListPushBack(plist, 4);
	ListPushBack(plist, 5);
	ListPushBack(plist, 6);
	ListPrint(plist);

	ListPopBack(plist);
	ListPopBack(plist);
	ListPopBack(plist);
	ListPrint(plist);

	LTNode* pos = ListFind(plist, 3);
	if (pos)
	{


		ListInsert(pos, 30);
	}
	ListPrint(plist);

}
void TestList2()
{


	LTNode* plist = ListInit();
	ListPushBack(plist, 1);
	ListPushBack(plist, 2);
	ListPushBack(plist, 3);
	ListPrint(plist);

	LTNode* pos = ListFind(plist, 2);
	if (pos)
	{


		ListErase(pos);
		pos = NULL;//没传二级指针,没法改变pos的值,只能在调用之后再置空
	}
	ListPrint(plist);
}

void TestList3()
{


	LTNode* plist = ListInit();
	ListPushBack(plist, 1);
	ListPushBack(plist, 2);
	ListPushBack(plist, 3);
	ListPrint(plist);
	ListPushFront(plist, 1);
	ListPushFront(plist, 2);
	ListPushFront(plist, 3);
	ListPrint(plist);

	ListPopBack(plist);
	ListPrint(plist);

	ListPopFront(plist);
	ListPrint(plist);
	ListDestory(plist);
	plist = NULL;
}
int main()
{


	TestList3();
	return 0;
}
3. 顺序表和链表的对比总结
顺序表:
- 优点:
- 物理上是连续的,方便用下标随机访问
- CPU高速缓存命中率会更高(等会解释)
- 缺点:
- 顺序表需要物理空间连续,空间不够时需要扩容。扩容本身有一定消耗。其次扩容机制还存在一定的空间浪费。
- 头部或者中部插入删除,挪动数据,效率低。O(N)
链表:
优点:
- 任意位置插入删除数据效率高。O(1)
- 按需申请和释放空间
缺点:不支持下标的随机访问。有些算法不适合在他上面进行。如:二分查找、排序等
为什么顺序表CPU高速缓存命中率会更高?

编译链接后,生成可执行程序,cpu去执行这个程序,cpu要去访问内存。
但cpu效率很高,内存的速度跟不上。为了让它俩配合的更好,cpu不会直接访问内存,而是把数据加载到三级缓存(高速缓存)或者寄存器(放4或8byte的小数据)中
cpu会看数据是否在高速缓存,在就叫命中,直接访问
不在就叫不命中,先把数据从内存中加载到高速缓存,再访问。
第一次访问不命中,会把一段数据都加载进去
第二次访问,这时连续存储的顺序表就更有可能命中,这样就不必再次加载数据,提高了效率。
结论:顺序表CPU高速缓存命中率会更高
顺序表和链表就告一段落了,之后的内容更精彩,敬请期待!