1、前言
上一篇记录了单独启动一个节点,然后再注册其他节点的过程,官方提供了使用docker-compose编排启动三个节点和Kibana的yml文件。
这次测试以这种方式来运行集群,依然还是在一台虚拟机上。
2、安装docker-compose
我这里使用了yum进行安装
yum install docker-compose-plugin如果是其它系统,可以参考官方网址安装
Install Docker Compose | Docker DocumentationHow to install Docker Composehttps://docs.docker.com/compose/install/ 安装成功后,可以运行如下命令来查看版本,查看到了安装就成功了。
docker compose version3、编写配置文件
找一个喜欢的地方放置配置文件,我这里放在了/home/docker-and-compose文件夹下,官方在github上提供了原始文件,我这里是直接复制改了改用的。
(1)创建.env文件
这里我加了两个自己的密码,把STACK_VERSION版本写死了。
# Password for the 'elastic' user (at least 6 characters)
ELASTIC_PASSWORD=这里改成你的密码

# Password for the 'kibana_system' user (at least 6 characters)
KIBANA_PASSWORD=这里改成你的密码

# Version of Elastic products
STACK_VERSION=8.2.0

# Set the cluster name
CLUSTER_NAME=docker-cluster

# Set to 'basic' or 'trial' to automatically start the 30-day trial
LICENSE=basic
#LICENSE=trial

# Port to expose Elasticsearch HTTP API to the host
ES_PORT=9200
#ES_PORT=127.0.0.1:9200

# Port to expose Kibana to the host
KIBANA_PORT=5601
#KIBANA_PORT=80

# Increase or decrease based on the available host memory (in bytes)
MEM_LIMIT=1073741824

# Project namespace (defaults to the current folder name if not set)
#COMPOSE_PROJECT_NAME=myproject
(2)编写docker-compose.yml文件
这个文件里面的version对我来说没用了,因为上一个环境文件我给写死了。另外就是这个文件里面的image,都改成我本地的了,就是删除了docker.elastic.co/kibana/,避免从远程下载。
version: "8.2.0"

services:
  setup:
    image: elasticsearch:${STACK_VERSION}
    volumes:
      - certs:/usr/share/elasticsearch/config/certs
    user: "0"
    command: >
      bash -c '
        if [ x${ELASTIC_PASSWORD} == x ]; then
          echo "Set the ELASTIC_PASSWORD environment variable in the .env file";
          exit 1;
        elif [ x${KIBANA_PASSWORD} == x ]; then
          echo "Set the KIBANA_PASSWORD environment variable in the .env file";
          exit 1;
        fi;
        if [ ! -f config/certs/ca.zip ]; then
          echo "Creating CA";
          bin/elasticsearch-certutil ca --silent --pem -out config/certs/ca.zip;
          unzip config/certs/ca.zip -d config/certs;
        fi;
        if [ ! -f config/certs/certs.zip ]; then
          echo "Creating certs";
          echo -ne \
          "instances:\n"\
          "  - name: es01\n"\
          "    dns:\n"\
          "      - es01\n"\
          "      - localhost\n"\
          "    ip:\n"\
          "      - 127.0.0.1\n"\
          "  - name: es02\n"\
          "    dns:\n"\
          "      - es02\n"\
          "      - localhost\n"\
          "    ip:\n"\
          "      - 127.0.0.1\n"\
          "  - name: es03\n"\
          "    dns:\n"\
          "      - es03\n"\
          "      - localhost\n"\
          "    ip:\n"\
          "      - 127.0.0.1\n"\
          > config/certs/instances.yml;
          bin/elasticsearch-certutil cert --silent --pem -out config/certs/certs.zip --in config/certs/instances.yml --ca-cert config/certs/ca/ca.crt --ca-key config/certs/ca/ca.key;
          unzip config/certs/certs.zip -d config/certs;
        fi;
        echo "Setting file permissions"
        chown -R root:root config/certs;
        find . -type d -exec chmod 750 \{\} \;;
        find . -type f -exec chmod 640 \{\} \;;
        echo "Waiting for Elasticsearch availability";
        until curl -s --cacert config/certs/ca/ca.crt https://es01:9200 | grep -q "missing authentication credentials"; do sleep 30; done;
        echo "Setting kibana_system password";
        until curl -s -X POST --cacert config/certs/ca/ca.crt -u elastic:${ELASTIC_PASSWORD} -H "Content-Type: application/json" https://es01:9200/_security/user/kibana_system/_password -d "{\"password\":\"${KIBANA_PASSWORD}\"}" | grep -q "^{}"; do sleep 10; done;
        echo "All done!";
      '
    healthcheck:
      test: ["CMD-SHELL", "[ -f config/certs/es01/es01.crt ]"]
      interval: 1s
      timeout: 5s
      retries: 120

  es01:
    depends_on:
      setup:
        condition: service_healthy
    image: elasticsearch:${STACK_VERSION}
    volumes:
      - certs:/usr/share/elasticsearch/config/certs
      - esdata01:/usr/share/elasticsearch/data
    ports:
      - ${ES_PORT}:9200
    environment:
      - node.name=es01
      - cluster.name=${CLUSTER_NAME}
      - cluster.initial_master_nodes=es01,es02,es03
      - discovery.seed_hosts=es02,es03
      - ELASTIC_PASSWORD=${ELASTIC_PASSWORD}
      - bootstrap.memory_lock=true
      - xpack.security.enabled=true
      - xpack.security.http.ssl.enabled=true
      - xpack.security.http.ssl.key=certs/es01/es01.key
      - xpack.security.http.ssl.certificate=certs/es01/es01.crt
      - xpack.security.http.ssl.certificate_authorities=certs/ca/ca.crt
      - xpack.security.http.ssl.verification_mode=certificate
      - xpack.security.transport.ssl.enabled=true
      - xpack.security.transport.ssl.key=certs/es01/es01.key
      - xpack.security.transport.ssl.certificate=certs/es01/es01.crt
      - xpack.security.transport.ssl.certificate_authorities=certs/ca/ca.crt
      - xpack.security.transport.ssl.verification_mode=certificate
      - xpack.license.self_generated.type=${LICENSE}
    mem_limit: ${MEM_LIMIT}
    ulimits:
      memlock:
        soft: -1
        hard: -1
    healthcheck:
      test:
        [
          "CMD-SHELL",
          "curl -s --cacert config/certs/ca/ca.crt https://localhost:9200 | grep -q 'missing authentication credentials'",
        ]
      interval: 10s
      timeout: 10s
      retries: 120

  es02:
    depends_on:
      - es01
    image: elasticsearch:${STACK_VERSION}
    volumes:
      - certs:/usr/share/elasticsearch/config/certs
      - esdata02:/usr/share/elasticsearch/data
    environment:
      - node.name=es02
      - cluster.name=${CLUSTER_NAME}
      - cluster.initial_master_nodes=es01,es02,es03
      - discovery.seed_hosts=es01,es03
      - bootstrap.memory_lock=true
      - xpack.security.enabled=true
      - xpack.security.http.ssl.enabled=true
      - xpack.security.http.ssl.key=certs/es02/es02.key
      - xpack.security.http.ssl.certificate=certs/es02/es02.crt
      - xpack.security.http.ssl.certificate_authorities=certs/ca/ca.crt
      - xpack.security.http.ssl.verification_mode=certificate
      - xpack.security.transport.ssl.enabled=true
      - xpack.security.transport.ssl.key=certs/es02/es02.key
      - xpack.security.transport.ssl.certificate=certs/es02/es02.crt
      - xpack.security.transport.ssl.certificate_authorities=certs/ca/ca.crt
      - xpack.security.transport.ssl.verification_mode=certificate
      - xpack.license.self_generated.type=${LICENSE}
    mem_limit: ${MEM_LIMIT}
    ulimits:
      memlock:
        soft: -1
        hard: -1
    healthcheck:
      test:
        [
          "CMD-SHELL",
          "curl -s --cacert config/certs/ca/ca.crt https://localhost:9200 | grep -q 'missing authentication credentials'",
        ]
      interval: 10s
      timeout: 10s
      retries: 120

  es03:
    depends_on:
      - es02
    image: elasticsearch:${STACK_VERSION}
    volumes:
      - certs:/usr/share/elasticsearch/config/certs
      - esdata03:/usr/share/elasticsearch/data
    environment:
      - node.name=es03
      - cluster.name=${CLUSTER_NAME}
      - cluster.initial_master_nodes=es01,es02,es03
      - discovery.seed_hosts=es01,es02
      - bootstrap.memory_lock=true
      - xpack.security.enabled=true
      - xpack.security.http.ssl.enabled=true
      - xpack.security.http.ssl.key=certs/es03/es03.key
      - xpack.security.http.ssl.certificate=certs/es03/es03.crt
      - xpack.security.http.ssl.certificate_authorities=certs/ca/ca.crt
      - xpack.security.http.ssl.verification_mode=certificate
      - xpack.security.transport.ssl.enabled=true
      - xpack.security.transport.ssl.key=certs/es03/es03.key
      - xpack.security.transport.ssl.certificate=certs/es03/es03.crt
      - xpack.security.transport.ssl.certificate_authorities=certs/ca/ca.crt
      - xpack.security.transport.ssl.verification_mode=certificate
      - xpack.license.self_generated.type=${LICENSE}
    mem_limit: ${MEM_LIMIT}
    ulimits:
      memlock:
        soft: -1
        hard: -1
    healthcheck:
      test:
        [
          "CMD-SHELL",
          "curl -s --cacert config/certs/ca/ca.crt https://localhost:9200 | grep -q 'missing authentication credentials'",
        ]
      interval: 10s
      timeout: 10s
      retries: 120

  kibana:
    depends_on:
      es01:
        condition: service_healthy
      es02:
        condition: service_healthy
      es03:
        condition: service_healthy
    image: docker.elastic.co/kibana/kibana:${STACK_VERSION}
    volumes:
      - certs:/usr/share/kibana/config/certs
      - kibanadata:/usr/share/kibana/data
    ports:
      - ${KIBANA_PORT}:5601
    environment:
      - SERVERNAME=kibana
      - ELASTICSEARCH_HOSTS=https://es01:9200
      - ELASTICSEARCH_USERNAME=kibana_system
      - ELASTICSEARCH_PASSWORD=${KIBANA_PASSWORD}
      - ELASTICSEARCH_SSL_CERTIFICATEAUTHORITIES=config/certs/ca/ca.crt
    mem_limit: ${MEM_LIMIT}
    healthcheck:
      test:
        [
          "CMD-SHELL",
          "curl -s -I http://localhost:5601 | grep -q 'HTTP/1.1 302 Found'",
        ]
      interval: 10s
      timeout: 10s
      retries: 120

volumes:
  certs:
    driver: local
  esdata01:
    driver: local
  esdata02:
    driver: local
  esdata03:
    driver: local
  kibanadata:
    driver: local
4、启动多节点集群
让我们cd到放置上面两个配置文件的文件夹,我这里就是/home/docker-and-compose这个文件夹,然后运行下面的命令,你要是在别的地方运行,也运行不起来,因为没有配置文件。
docker compose up -d停止集群命令(停止的时候会自动删除容器),另外要在停止集群时删除网络、容器和卷,使用-v指定选项。
docker-compose down运行和停止,如下图。

5、登录kibana
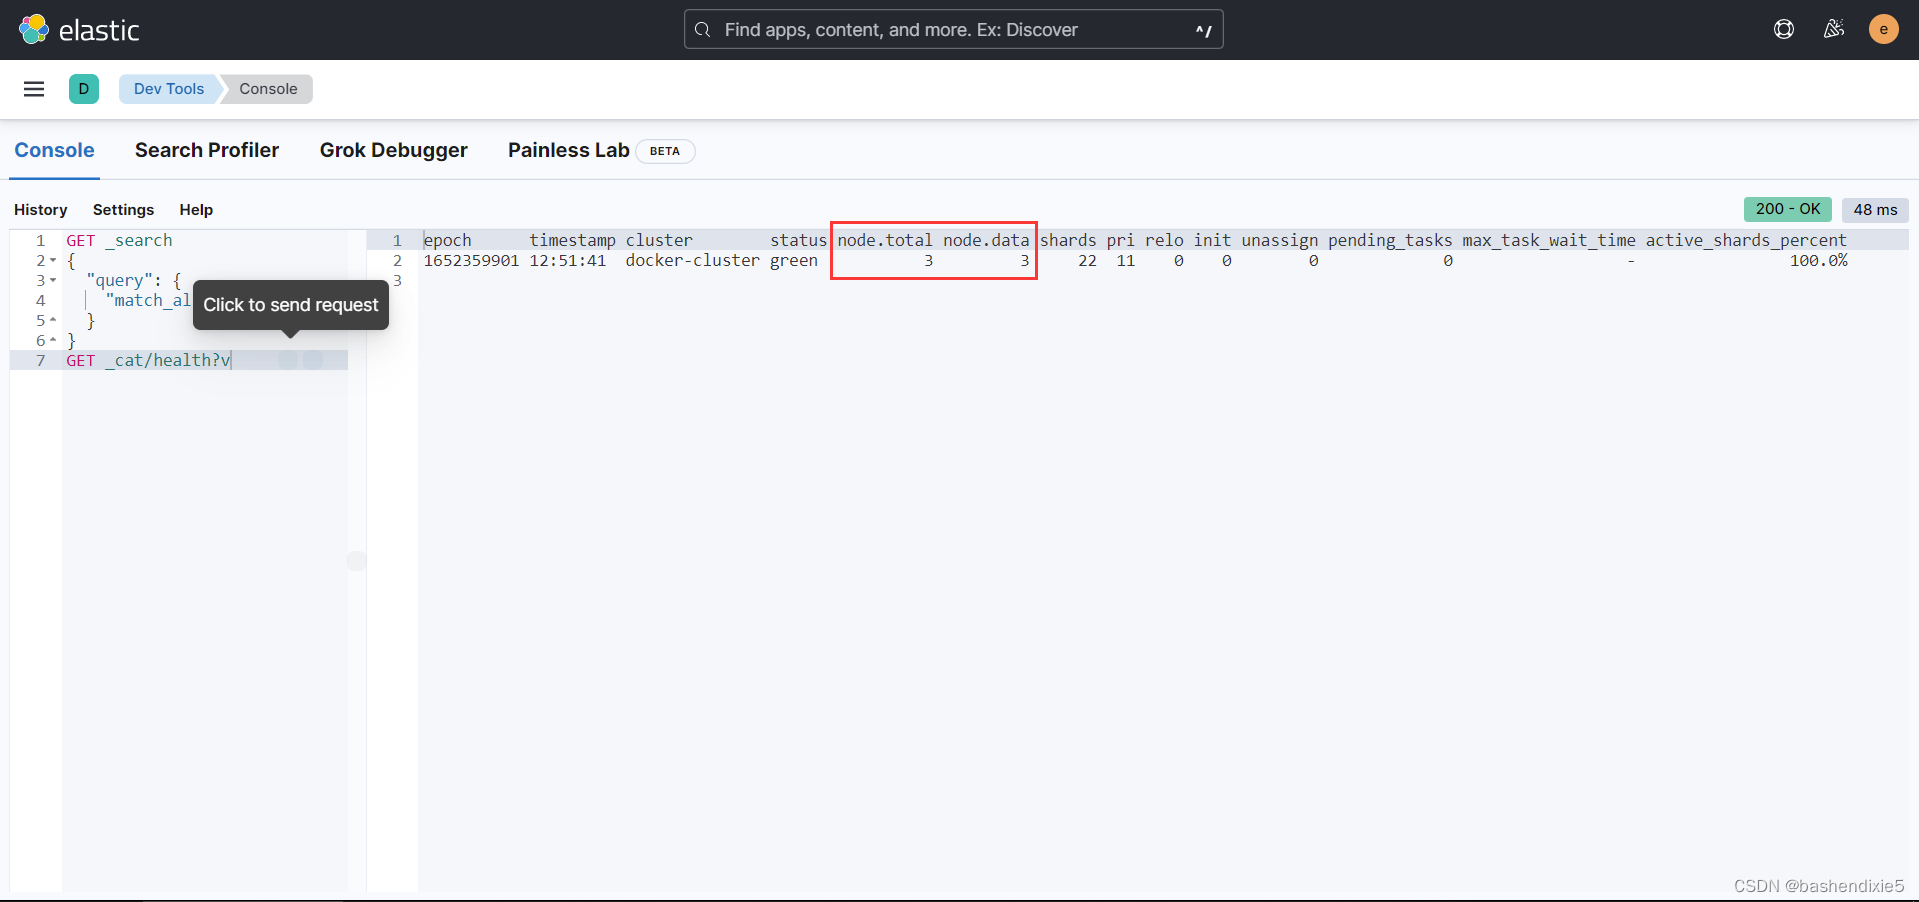
运行起来之后,我们访问ip+5601端口,我们使用用户名elastic和.env文件里面设置的密码登录。
运行脚本可以看到运行的三个节点。
6、未完小记
使用Docker Compose编排进行集群的启动还是十分方便的。不过就官方的原话翻译之后“此配置提供了一种启动安全集群的简单方法,您可以在构建具有多个主机的分布式部署之前将其用于开发。”,适合开发时使用,方便快捷。
下一步准备copy出3台虚拟机,测试一下如何多主机启动运行/组成集群/重启操作等。