关于上篇学习链接:Spring框架学习—Spring Framework上篇
3.6 静态代理和动态代理
3.6.1 静态代理
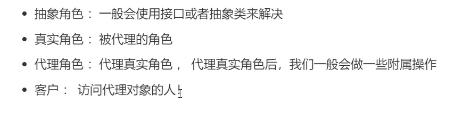
- 生活中的代理(租客通过中介租到房东的房子)(例1)

角色分析:
项目框架:
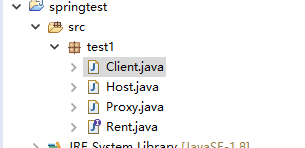
Host.Java 相当于现实生活中的房东(准备出租房子的人)

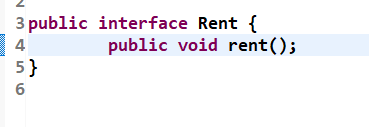
上面的Rent为接口,表示出租操作
Proxy.java 相当于现实生活中的中介(房东将房子交给中介进行出租)

Client.Java相当于现实生活中的租客(准备租房子的人,租客通过中介租到房东的房子)

运行效果:

上面提到的四个角色,抽象角色对应Rent接口,真实角色对应房东,代理角色对应中介,客户角色对应租客。
代理模式的优缺点:

再来一个例子(例2):
项目结构:
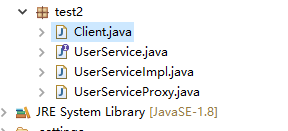
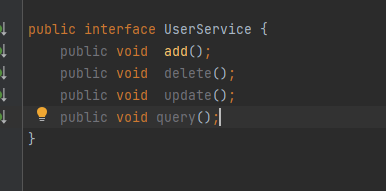
UserService.Java 抽象角色
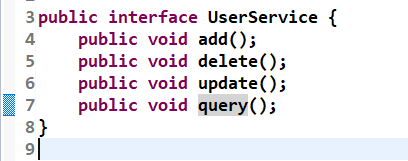
UserServiceImpl.Java 真实角色

Client.Java 客户角色

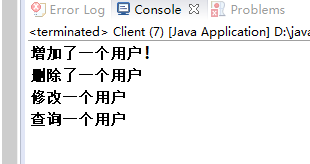
运行效果:
如果要给UserServiceImp里面每一个操作(增删改查)增加一个日志

像上面这种操作非常的麻烦,我们可以通过上面学到的代理来解决这个问题
首先先编写一个代理类(UserServiceProxy.Java),在代理类中添加日志业务,并在各个方法(增删改查)中实现日志
public class UserServiceProxy implements UserService {


	private UserService userService;

	public UserServiceProxy(UserService userService) {


		// TODO Auto-generated constructor stub
		this.userService = userService;
	}

	@Override
	public void add() {


		// TODO Auto-generated method stub
		log("add");
		userService.add();
	}

	@Override
	public void delete() {


		// TODO Auto-generated method stub
		log("delete");
		userService.delete();
	}

	@Override
	public void update() {


		// TODO Auto-generated method stub
		log("update");
		userService.update();
	}

	@Override
	public void query() {


		// TODO Auto-generated method stub
		log("query");
		userService.query();
	}

	//打印日志方法
	public void log(String msg) {


		System.out.println("[Debug]使用了"+msg+"方法");
	}

}
客户角色通过代理对象实现业务逻辑

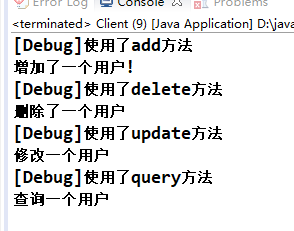
运行效果:

上面的操作其实是一种横向开发(保持原有方法不变的情况下增加相应业务)

3.6.2 动态代理

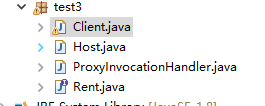
通过动态代理实现例1:
项目结构:(Host.Java和Rent.Java和实例1无差别)
ProxyInvocationHandler.Java代理处理程序,用户生成代理,代理的相关操作
public class ProxyInvocationHandler implements InvocationHandler{
private Rent rent;
public void setRent(Rent rent) {
this.rent = rent;
}
//生成得到代理类
public Object getProxy() {
return Proxy.newProxyInstance(this.getClass().getClassLoader(), rent.getClass().getInterfaces() , this);
}
// 处理代理实例,并返回结果
@Override
public Object invoke(Object proxy, Method method, Object[] args) throws Throwable {
// TODO Auto-generated method stub
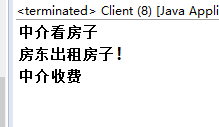
// 中介带租客看房子
seeHouse();
// 中介将房子出租给租客
Object result=method.invoke(rent, args);
//中介收取中介费
fare();
return result;
}
public void seeHouse() {
System.out.println("中介看房子");
}
public void fare() {
System.out.println("中介收费");
}
}
client.Java 租客通过中介租房子

运行效果:
通过动态代理实现例2:
项目框架:

ProxyInvocationHandler.Java
public class ProxyInvocationHandler implements InvocationHandler{


	private UserService	 userService;

	public void setRent(UserService userService) {


		this.userService = userService;
	}

	//生成得到代理类
	public Object getProxy() {


		return Proxy.newProxyInstance(this.getClass().getClassLoader(), userService.getClass().getInterfaces()	, this);
	}

	// 处理代理实例,并返回结果
	@Override
	public Object invoke(Object proxy, Method method, Object[] args) throws Throwable {


		// TODO Auto-generated method stub
		//打印日志
		log(method.getName());
		//执行相应业务
		Object result=method.invoke(userService, args);
		return result;
	}

	   //打印日志方法
		public void log(String msg) {


			System.out.println("[Debug]使用了"+msg+"方法");
		}

}
Client.Java

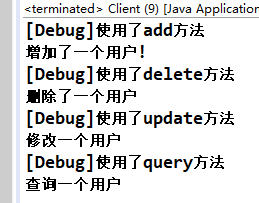
运行效果:
从上面的实例2我们可以发现其实我们只是稍微修改了一下ProxyInvocationHandler.Java中接口对象,其实我们可以整理出一个模板如下图(将接口对象设置为Object对象):

具体代码如下:
public class ProxyInvocationHandler implements InvocationHandler{


	private Object	 target;

	public void setTarget(Object target) {


		this.target = target;
	}

	//生成得到代理类
	public Object getProxy() {


		return Proxy.newProxyInstance(this.getClass().getClassLoader(),
                target.getClass().getInterfaces(),this);
	}

	// 处理代理实例,并返回结果
	@Override
	public Object invoke(Object proxy, Method method, Object[] args) throws Throwable {


		// TODO Auto-generated method stub
		//打印日志
		log(method.getName());
		//执行相应业务
		Object result=method.invoke(target, args);
		return result;
	}

	   //打印日志方法
		public void log(String msg) {


			System.out.println("[Debug]使用了"+msg+"方法");
		}

}
Client.Java中(需要使用的代理的类只需要给setTarget("接口“)传递一个接口对象即可)

运行效果一致:
动态代理的好处:

3.7 AOP
- 什么是AOP?
AOP为Aspect Oriented Programming的缩写,意为:面向切面编程(也叫面向方面),可以通过预编译方式和运行期动态代理实现在不修改源代码的情况下给程序动态统一添加功能的一种技术。AOP实际是GoF设计模式的延续,设计模式孜孜不倦追求的是调用者和被调用者之间的解耦,AOP可以说也是这种目标的一种实现。[1]
简单解释:中文叫做面向切面编程,在不改变源码的情况下给程序动态添加功能的一种技术。

- 相关概念

- 实例1
环境搭建
项目结构:

maven:
<dependencies>
    <dependency>
        <groupId>org.aspectj</groupId>
        <artifactId>aspectjweaver</artifactId>
        <version>1.9.4</version>
    </dependency>
        <dependency>
            <groupId>org.springframework</groupId>
            <artifactId>spring-aop</artifactId>
            <version>5.3.9</version>
        </dependency>
        <dependency>
            <groupId>org.springframework</groupId>
            <artifactId>spring-context</artifactId>
            <version>5.3.9</version>
            <scope>test</scope>
        </dependency>
    </dependencies>

service包:

log包:


resources包:
先导入aop的头文件
xmlns:aop="http://www.springframework.org/schema/aop"
http://www.springframework.org/schema/aop
http://www.springframework.org/schema/aop/spring-aop.xsd
配置aop

测试类:

运行效果:

- 另一种实现方式
新增一个diy包:

在包中增加一个DiyPointCut.Java类

修该配置(把原来胡aop配置注释了):

再次运行测试类:

- 通过注解实现
在DiyPointCut.Java类中,使用注解:

开启注解支持(把前面的aop配置注释掉):

再次运行测试类:

- 环绕切入
在DiyPointCut.Java类中添加一个around方法

运行测试类(签名就是具体执行的哪一个方法):

3.8 Spring整合Mybatis
- 整合前
项目架构:

Maven导入相关依赖:
在项目pom.xml中导入以下依赖
    <dependencies>
        <dependency>
            <groupId>junit</groupId>
            <artifactId>junit</artifactId>
            <version>4.12</version>
        </dependency>
        <dependency>
            <groupId>mysql</groupId>
            <artifactId>mysql-connector-java</artifactId>
            <version>5.1.47</version>
        </dependency>
        <dependency>
            <groupId>org.mybatis</groupId>
            <artifactId>mybatis</artifactId>
            <version>3.5.2</version>
        </dependency>
        <dependency>
            <groupId>org.springframework</groupId>
            <artifactId>spring-webmvc</artifactId>
            <version>5.2.8.RELEASE</version>
        </dependency>
        <dependency>
            <groupId>org.springframework</groupId>
            <artifactId>spring-jdbc</artifactId>
            <version>5.2.7.RELEASE</version>
        </dependency>
        <dependency>
            <groupId>org.aspectj</groupId>
            <artifactId>aspectjweaver</artifactId>
            <version>1.9.4</version>
        </dependency>
        <dependency>
            <groupId>org.mybatis</groupId>
            <artifactId>mybatis-spring</artifactId>
            <version>2.0.6</version>
        </dependency>
        <dependency>
            <groupId>org.projectlombok</groupId>
            <artifactId>lombok</artifactId>
            <version>RELEASE</version>
            <scope>compile</scope>
        </dependency>
    </dependencies>
Mybatis中资源导出失败解决之build配置
 <build>
        <resources>
            <resource>
                <directory>src/main/java</directory>
                <includes>
                    <include>**/*.properties</include>
                    <include>**/*.xml</include>
                </includes>
                <filtering>false</filtering>
            </resource>
            <resource>
                <directory>src/main/resources</directory>
                <includes>
                    <include>**/*.properties</include>
                    <include>**/*.xml</include>
                </includes>
                <filtering>false</filtering>
            </resource>
        </resources>
    </build>
创建dao包:
创建UserMapper接口

创建UserMapper接口对应的mapper映射文件
<?xml version="1.0" encoding="UTF-8" ?>
<!DOCTYPE mapper
        PUBLIC "-//mybatis.org//DTD Mapper 3.0//EN"
        "http://mybatis.org/dtd/mybatis-3-mapper.dtd">
<mapper namespace="dao.UserMapper">

    <select id="selectUser" resultType="User">
        select * from user_test
    </select>

</mapper>
创建pojo包:
在包中创建User的实体类

在resources包中创建mybatis的配置文件(mybatis-config.xml)
<?xml version="1.0" encoding="UTF-8" ?>
<!DOCTYPE configuration
PUBLIC "-//mybatis.org//DTD Config 3.0//EN"
"http://mybatis.org/dtd/mybatis-3-config.dtd">
<configuration>
<typeAliases>
<package name="pojo"/>
</typeAliases>
<!-- 对事务的管理和连接池的配置 -->
<environments default="development">
<environment id="development">
<transactionManager type="JDBC" />
<dataSource type="POOLED">
<property name="driver" value="com.mysql.jdbc.Driver" />
<property name="url" value="jdbc:mysql://localhost:3306/mybatis?useSSL=true&useUnicode=true&characterEncoding=utf8" />
<property name="username" value="root" />
<property name="password" value="root" />
</dataSource>
</environment>
</environments>
<mappers>
<mapper class="dao.UserMapper"></mapper>
</mappers>
</configuration>
创建测试类MyTest:
public class MyTest {


    @Test
    public void selectUser() throws IOException {


        String resource = "mybatis-config.xml";
        InputStream inputStream = Resources.getResourceAsStream(resource);
        SqlSessionFactory sqlSessionFactory = new SqlSessionFactoryBuilder().build(inputStream);
        SqlSession sqlSession = sqlSessionFactory.openSession();

        UserMapper mapper = sqlSession.getMapper(UserMapper.class);

        List<User> userList = mapper.selectUser();
        for (User user: userList){


            System.out.println(user);
        }

        sqlSession.close();
    }
}
运行selectUser:

- 整合后方式一(使用MyBatis-Spring)
什么是MyBatis-Spring?
MyBatis-Spring 会帮助你将 MyBatis 代码无缝地整合到 Spring 中。
相应版本对应:

导入MyBatis-Spring(在上面的项目中已经导入了该配置)

配置数据源替换mybaits的数据源:
创建spring-dao.xml

在spring-dao.xml中添加mybaits的数据源
<?xml version="1.0" encoding="UTF-8"?>
<beans xmlns="http://www.springframework.org/schema/beans"
xmlns:xsi="http://www.w3.org/2001/XMLSchema-instance"
xsi:schemaLocation="http://www.springframework.org/schema/beans http://www.springframework.org/schema/beans/spring-beans.xsd">
<!--配置数据源:数据源有非常多,可以使用第三方的,也可使使用Spring的-->
<bean id="dataSource" class="org.springframework.jdbc.datasource.DriverManagerDataSource">
<property name="driverClassName" value="com.mysql.jdbc.Driver"/>
<property name="url" value="jdbc:mysql://localhost:3306/mybatis?useSSL=true&useUnicode=true&characterEncoding=utf8"/>
<property name="username" value="root"/>
<property name="password" value="root"/>
</bean>
</beans>
在spring-dao.xml中配置SqlSessionFactory,关联MyBatis
    <!--配置SqlSessionFactory-->
    <bean id="sqlSessionFactory" class="org.mybatis.spring.SqlSessionFactoryBean">
        <property name="dataSource" ref="dataSource"/>
        <!--关联Mybatis-->
        <property name="configLocation" value="classpath:mybatis-config.xml"/>
        <property name="mapperLocations" value="classpath:dao/*.xml"/>
    </bean>
在配置文件中((mybatis-config.xml)只留下别名和相关配置即可(配置信息都移到上面去了)

在spring-dao.xml中注册sqlSessionTemplate,关联sqlSessionFactory;
   <!--注册sqlSessionTemplate , 关联sqlSessionFactory-->
    <bean id="sqlSession" class="org.mybatis.spring.SqlSessionTemplate">
        <!--利用构造器注入-->
        <constructor-arg index="0" ref="sqlSessionFactory"/>
    </bean>
增加Dao接口的实现类;私有化sqlSessionTemplate

public class UserDaoImpl implements UserMapper {


    //sqlSession不用我们自己创建了,Spring来管理
    private SqlSessionTemplate sqlSession;

    public void setSqlSession(SqlSessionTemplate sqlSession) {


        this.sqlSession = sqlSession;
    }

    public List<User> selectUser() {


        UserMapper mapper = sqlSession.getMapper(UserMapper.class);
        return mapper.selectUser();
    }

}
在spring-dao.xml中注册bean实现(初始化sqlSession)
  <bean id="userDao" class="dao.UserDaoImpl">
        <property name="sqlSession" ref="sqlSession"/>
    </bean>
测试类中新增测试方法test2
    @Test
    public void test2(){


        ApplicationContext context = new ClassPathXmlApplicationContext("spring-dao.xml");
        UserMapper mapper = (UserMapper) context.getBean("userDao");
        List<User> user = mapper.selectUser();
        System.out.println(user);
    }
运行test2

- 整合方式二(通过继承SqlSessionDaoSupport,就无需再配置注册sqlSessionTemplate,因为SqlSessionDaoSupport提供了getSqlSession()可以直接获取SqlSession())
(备注:mybatis-spring1.2.3版才可以使用以下这种方式)
在spring-dao中把sqlSessionTemplate注释掉

创建一个UserDaorImpl2类,继承SqlSessionDaoSupport并且实现UserMapper接口

在applicationContext.xml配置中将bean进行修改(初始化sqlSessionFactory)

再次运行测试2:

3.9 事物
根据ACID原则一个操作执行要么成功,要么不成功,不存在一部分成功,一部分不成功,为了做到这一点,我们需要使用事务,事务分为编程式事务和声明式事务。
- 编程式事务
将事务管理代码嵌到业务方法中来控制事务的提交和回滚,这种方式有一个明显的缺点就是必须在每个事务操作业务逻辑中包含额外的事务管理代码。 - 声明式事务
将事务管理代码从业务方法中分离出来,以声明的方式来实现事务管理,但是这种方式需要Aop的支持,将事务管理作为横切关注点,通过aop方法模块化。
在spring-dao.xml配置文件中:
先导入事务(tx)和aop的头文件

       xmlns:tx="http://www.springframework.org/schema/tx"
       xmlns:aop="http://www.springframework.org/schema/aop"
        http://www.springframework.org/schema/tx
        http://www.springframework.org/schema/tx/spring-tx.xsd
         http://www.springframework.org/schema/aop
         http://www.springframework.org/schema/aop/spring-aop.xsd
配置声明式事务
    <!--配置声明式事务-->
    <bean id="transactionManager" class="org.springframework.jdbc.datasource.DataSourceTransactionManager">
        <property name="dataSource" ref="dataSource" />
    </bean>
结合Aop实现事务的置入,先配置事务通知
    <!--配置事务通知-->
    <tx:advice id="txAdvice" transaction-manager="transactionManager">
        <tx:attributes>
            <!--配置哪些方法使用什么样的事务,配置事务的传播特性-->
            <tx:method name="add" propagation="REQUIRED"/>
            <tx:method name="delete" propagation="REQUIRED"/>
            <tx:method name="update" propagation="REQUIRED"/>
            <tx:method name="search*" propagation="REQUIRED"/>
            <tx:method name="get" read-only="true"/>
            <tx:method name="*" propagation="REQUIRED"/>
        </tx:attributes>
    </tx:advice>
7种事务传播,默认REQUIRED

然后再配置事务的切入点
    <aop:config>
        <aop:pointcut id="txPointcut" expression="execution(* dao.*.*(..))"/>
        <aop:advisor advice-ref="txAdvice" pointcut-ref="txPointcut"/>
    </aop:config>
在UserMapper接口中新增addUser(User user)和delUser(int id)二个方法

配置这二个方法的映射

在UserDaorImpl2类中

在映射文件中,我们故意把delUser的语句设置错误

测试类中,新增一个test3

运行情况

我们查看一下数据库中user_test表的数据,并没有增加(如果不使用事务的话,执行addUser是会成功的,就会增加数据)
