湖南大学编译原理实验二cminus_compiler-2021-fall
前言
实验文档来源湖南大学编译原理课程,实验报告是笔者写的。
Lab2 实验文档
0. 快速上手指南
本次实验需要在 Lab1 已完成的 flex 词法分析器的基础上,进一步使用 bison 完成语法分析器。
主要工作
- 了解
bison基础知识和理解 Cminus-f 语法(重在了解如何将文法产生式转换为bison语句) - 阅读
/src/common/SyntaxTree.c,对应头文件/include/SyntaxTree.h(重在理解分析树如何生成) - 了解
bison与flex之间是如何协同工作,看懂pass_node函数并改写 Lab1 代码(提示:了解yylval是如何工作,在代码层面上如何将值传给$1、$2等) - 补全
src/parser/syntax_analyzer.y文件和lexical_analyzer.l文件
Tips:在未编译的代码文件中是无法看到关于协同工作部分的代码,建议先编译 1.3 给出的计算器样例代码,再阅读 /build/src/parser/ 中的 syntax_analyzer.h 与 syntax_analyzer.c 文件
思考题
本部分不算做实验分,出题的本意在于想要帮助同学们加深对实验细节的理解,欢迎有兴趣和余力的同学在报告中写下你的思考答案,或者在issue中分享出你的看法。
- 在1.3样例代码中存在左递归文法,为什么
bison可以处理?(提示:不用研究bison内部运作机制,在下面知识介绍中有提到bison的一种属性,请结合课内知识思考) - 请在代码层面上简述下
yylval是怎么完成协同工作的。(提示:无需研究原理,只分析维护了什么数据结构,该数据结构是怎么和$1、$2等联系起来?) - 请尝试使用1.3样例代码运行除法运算除数为0的例子(测试case中有)看下是否可以通过,如果不,为什么我们在case中把该例子认为是合法的?(请从语法与语义上简单思考)
- 能否尝试修改下1.3计算器文法,使得它支持除数0规避功能。
1. 基础知识
我们在这里简单介绍如何让 bison 和 flex 协同工作及其原理,并简单介绍 bison 的一些基础知识。
1.1 Cminus-f 语法
本小节将给出Cminus-f的语法,该语法在Cminus语言的基础上增加了float类型。
Cminus的详情请参考《编译原理与实践》第九章附录。
我们将 Cminus-f 的所有规则分为五类。
- 字面量、关键字、运算符与标识符
idtype-specifierrelopaddopmulop
- 声明
declaration-listdeclarationvar-declarationfun-declarationlocal-declarations
- 语句
compound-stmtstatement-liststatementexpression-stmtiteration-stmtselection-stmtreturn-stmt
- 表达式
expressionvaradditive-expressiontermfactorintegerfloatcall
- 其他
paramsparam-listparamargsarg-list
起始符号是 program。
Cminus-f语法如下
- ‘ program → declaration-list ‘ `\text{program} \rightarrow \text{declaration-list}` ‘program→declaration-list‘
- ‘ declaration-list → declaration-list declaration ∣ declaration ‘ `\text{declaration-list} \rightarrow \text{declaration-list}\ \text{declaration}\ |\ \text{declaration}` ‘declaration-list→declaration-list declaration ∣ declaration‘
- ‘ declaration → var-declaration ∣ fun-declaration ‘ `\text{declaration} \rightarrow \text{var-declaration}\ |\ \text{fun-declaration}` ‘declaration→var-declaration ∣ fun-declaration‘
- ‘ var-declaration → type-specifier ID ; ∣ type-specifier ID [ INTEGER ] ; ‘ `\text{var-declaration}\ \rightarrow \text{type-specifier}\ \textbf{ID}\ \textbf{;}\ |\ \text{type-specifier}\ \textbf{ID}\ \textbf{[}\ \textbf{INTEGER}\ \textbf{]}\ \textbf{;}` ‘var-declaration →type-specifier ID ; ∣ type-specifier ID [ INTEGER ] ;‘
- ‘ type-specifier → int ∣ float ∣ void ‘ `\text{type-specifier} \rightarrow \textbf{int}\ |\ \textbf{float}\ |\ \textbf{void}` ‘type-specifier→int ∣ float ∣ void‘
- ‘ fun-declaration → type-specifier ID ( params ) compound-stmt ‘ `\text{fun-declaration} \rightarrow \text{type-specifier}\ \textbf{ID}\ \textbf{(}\ \text{params}\ \textbf{)}\ \text{compound-stmt}` ‘fun-declaration→type-specifier ID ( params ) compound-stmt‘
- ‘ params → param-list ∣ void ‘ `\text{params} \rightarrow \text{param-list}\ |\ \textbf{void}` ‘params→param-list ∣ void‘
- ‘ param-list → param-list , param ∣ param ‘ `\text{param-list} \rightarrow \text{param-list}\ ,\ \text{param}\ |\ \text{param}` ‘param-list→param-list , param ∣ param‘
- ‘ param → type-specifier ID ∣ type-specifier ID [] ‘ `\text{param} \rightarrow \text{type-specifier}\ \textbf{ID}\ |\ \text{type-specifier}\ \textbf{ID}\ \textbf{[]}` ‘param→type-specifier ID ∣ type-specifier ID []‘
- ‘ compound-stmt → { local-declarations statement-list } ‘ `\text{compound-stmt} \rightarrow \textbf{\{}\ \text{local-declarations}\ \text{statement-list} \textbf{\}}` ‘compound-stmt→{ local-declarations statement-list}‘
- ‘ local-declarations → local-declarations var-declaration ∣ empty ‘ `\text{local-declarations} \rightarrow \text{local-declarations var-declaration}\ |\ \text{empty}` ‘local-declarations→local-declarations var-declaration ∣ empty‘
- ‘ statement-list → statement-list statement ∣ empty ‘ `\text{statement-list} \rightarrow \text{statement-list}\ \text{statement}\ |\ \text{empty}` ‘statement-list→statement-list statement ∣ empty‘
- ‘ statement → expression-stmt ∣ compound-stmt ∣ selection-stmt ∣ iteration-stmt ∣ return-stmt ‘ `\begin{aligned}\text{statement} \rightarrow\ &\text{expression-stmt}\\ &|\ \text{compound-stmt}\\ &|\ \text{selection-stmt}\\ &|\ \text{iteration-stmt}\\ &|\ \text{return-stmt}\end{aligned}` ‘statement→ expression-stmt∣ compound-stmt∣ selection-stmt∣ iteration-stmt∣ return-stmt‘
- ‘ expression-stmt → expression ; ∣ ; ‘ `\text{expression-stmt} \rightarrow \text{expression}\ \textbf{;}\ |\ \textbf{;}` ‘expression-stmt→expression ; ∣ ;‘
- ‘ selection-stmt → if ( expression ) statement ∣ if ( expression ) statement else statement ‘ `\begin{aligned}\text{selection-stmt} \rightarrow\ &\textbf{if}\ \textbf{(}\ \text{expression}\ \textbf{)}\ \text{statement}\\ &|\ \textbf{if}\ \textbf{(}\ \text{expression}\ \textbf{)}\ \text{statement}\ \textbf{else}\ \text{statement}\end{aligned}` ‘selection-stmt→ if ( expression ) statement∣ if ( expression ) statement else statement‘
- ‘ iteration-stmt → while ( expression ) statement ‘ `\text{iteration-stmt} \rightarrow \textbf{while}\ \textbf{(}\ \text{expression}\ \textbf{)}\ \text{statement}` ‘iteration-stmt→while ( expression ) statement‘
- ‘ return-stmt → return ; ∣ return expression ; ‘ `\text{return-stmt} \rightarrow \textbf{return}\ \textbf{;}\ |\ \textbf{return}\ \text{expression}\ \textbf{;}` ‘return-stmt→return ; ∣ return expression ;‘
- ‘ expression → var = expression ∣ simple-expression ‘ `\text{expression} \rightarrow \text{var}\ \textbf{=}\ \text{expression}\ |\ \text{simple-expression}` ‘expression→var = expression ∣ simple-expression‘
- ‘ var → ID ∣ ID [ expression ] ‘ `\text{var} \rightarrow \textbf{ID}\ |\ \textbf{ID}\ \textbf{[}\ \text{expression} \textbf{]}` ‘var→ID ∣ ID [ expression]‘
- ‘ simple-expression → additive-expression relop additive-expression ∣ additive-expression ‘ `\text{simple-expression} \rightarrow \text{additive-expression}\ \text{relop}\ \text{additive-expression}\ |\ \text{additive-expression}` ‘simple-expression→additive-expression relop additive-expression ∣ additive-expression‘
- ‘ relop → <= ∣ < ∣ > ∣ >= ∣ == ∣ != ‘ `\text{relop}\ \rightarrow \textbf{<=}\ |\ \textbf{<}\ |\ \textbf{>}\ |\ \textbf{>=}\ |\ \textbf{==}\ |\ \textbf{!=}` ‘relop →<= ∣ < ∣ > ∣ >= ∣ == ∣ !=‘
- ‘ additive-expression → additive-expression addop term ∣ term ‘ `\text{additive-expression} \rightarrow \text{additive-expression}\ \text{addop}\ \text{term}\ |\ \text{term}` ‘additive-expression→additive-expression addop term ∣ term‘
- ‘ addop → + ∣ - ‘ `\text{addop} \rightarrow \textbf{+}\ |\ \textbf{-}` ‘addop→+ ∣ -‘
- ‘ term → term mulop factor ∣ factor ‘ `\text{term} \rightarrow \text{term}\ \text{mulop}\ \text{factor}\ |\ \text{factor}` ‘term→term mulop factor ∣ factor‘
- ‘ mulop → * ∣ / ‘ `\text{mulop} \rightarrow \textbf{*}\ |\ \textbf{/}` ‘mulop→* ∣ /‘
- ‘ factor → ( expression ) ∣ var ∣ call ∣ integer ∣ float ‘ `\text{factor} \rightarrow \textbf{(}\ \text{expression}\ \textbf{)}\ |\ \text{var}\ |\ \text{call}\ |\ \text{integer}\ |\ \text{float}` ‘factor→( expression ) ∣ var ∣ call ∣ integer ∣ float‘
- ‘ integer → INTEGER ‘ `\text{integer} \rightarrow \textbf{INTEGER}` ‘integer→INTEGER‘
- ‘ float → FLOATPOINT ‘ `\text{float} \rightarrow \textbf{FLOATPOINT}` ‘float→FLOATPOINT‘
- ‘ call → ID ( args ) ‘ `\text{call} \rightarrow \textbf{ID}\ \textbf{(}\ \text{args} \textbf{)}` ‘call→ID ( args)‘
- ‘ args → arg-list ∣ empty ‘ `\text{args} \rightarrow \text{arg-list}\ |\ \text{empty}` ‘args→arg-list ∣ empty‘
- ‘ arg-list → arg-list , expression ∣ expression ‘ `\text{arg-list} \rightarrow \text{arg-list}\ \textbf{,}\ \text{expression}\ |\ \text{expression}` ‘arg-list→arg-list , expression ∣ expression‘
1.2 Bison 简介
Bison 是一款解析器生成器(parser generator),它可以将 LALR 文法转换成可编译的 C 代码,从而大大减轻程序员手动设计解析器的负担。Bison 是 GNU 对早期 Unix 的 Yacc 工具的一个重新实现,所以文件扩展名为 .y。(Yacc 的意思是 Yet Another Compiler Compiler。)
每个 Bison 文件由 %% 分成三部分。
%{


#include <stdio.h>
/* 这里是序曲 */
/* 这部分代码会被原样拷贝到生成的 .c 文件的开头 */
int yylex(void);
void yyerror(const char *s);
%}

/* 这些地方可以输入一些 bison 指令 */
/* 比如用 %start 指令指定起始符号,用 %token 定义一个 token */
%start reimu
%token REIMU

%%
/* 从这里开始,下面是解析规则 */
reimu : marisa {

     /* 这里写与该规则对应的处理代码 */ puts("rule1"); }
      | REIMU  {

     /* 这里写与该规则对应的处理代码 */ puts("rule2"); }
      ; /* 规则最后不要忘了用分号结束哦~ */

/* 这种写法表示 ε —— 空输入 */
marisa : {

     puts("Hello!"); }

%%
/* 这里是尾声 */
/* 这部分代码会被原样拷贝到生成的 .c 文件的末尾 */

int yylex(void)
{


    int c = getchar(); // 从 stdin 获取下一个字符
    switch (c) {


    case EOF: return YYEOF;
    case 'R': return REIMU;
    default:  return 0;     // 返回无效 token 值,迫使 bison 报错
    }
}

void yyerror(const char *s)
{


    fprintf(stderr, "%s\n", s);
}

int main(void)
{


    yyparse(); // 启动解析
    return 0;
}
另外有一些值得注意的点:
- Bison 传统上将 token 用大写单词表示,将 symbol 用小写字母表示。
- Bison 能且只能生成解析器源代码(一个
.c文件),并且入口是yyparse,所以为了让程序能跑起来,你需要手动提供main函数(但不一定要在.y文件中——你懂“链接”是什么,对吧?)。 - Bison 不能检测你的 action code 是否正确——它只能检测文法的部分错误,其他代码都是原样粘贴到
.c文件中。 - Bison 需要你提供一个
yylex来获取下一个 token。 - Bison 需要你提供一个
yyerror来提供合适的报错机制。
顺便提一嘴,上面这个 .y 是可以工作的——尽管它只能接受两个字符串。把上面这段代码保存为 reimu.y,执行如下命令来构建这个程序:
$ bison reimu.y
$ gcc reimu.tab.c
$ ./a.out
R<-- 不要回车在这里按 Ctrl-D
rule2
$ ./a.out
<-- 不要回车在这里按 Ctrl-D
Hello!
rule1
$ ./a.out
blablabla <-- 回车或者 Ctrl-D
Hello!
rule1     <-- 匹配到了 rule1
syntax error <-- 发现了错误
于是我们验证了上述代码的确识别了该文法定义的语言 { "", "R" }。
1.3 Bison 和 Flex 的关系
聪明的你应该发现了,我们这里手写了一个 yylex 函数作为词法分析器。而 lab1 我们正好使用 flex 自动生成了一个词法分析器。如何让这两者协同工作呢?特别是,我们需要在这两者之间共享 token 定义和一些数据,难道要手动维护吗?哈哈,当然不用!下面我们用一个四则运算计算器来简单介绍如何让 bison 和 flex 协同工作——重点是如何维护解析器状态、YYSTYPE 和头文件的生成。
首先,我们必须明白,整个工作流程中,bison 是占据主导地位的,而 flex 仅仅是一个辅助工具,仅用来生成 yylex 函数。因此,最好先写 .y 文件。
/* calc.y */
%{


#include <stdio.h>
    int yylex(void);
    void yyerror(const char *s);
%}

%token RET
%token <num> NUMBER
%token <op> ADDOP MULOP LPAREN RPAREN
%type <num> top line expr term factor

%start top

%union {


    char   op;
    double num;
}

%%

top
: top line {

    }
| {

    }

line
: expr RET
{


    printf(" = %f\n", $1);
}

expr
: term
{


    $$ = $1;
}
| expr ADDOP term
{


    switch ($2) {


    case '+': $$ = $1 + $3; break;
    case '-': $$ = $1 - $3; break;
    }
}

term
: factor
{


    $$ = $1;
}
| term MULOP factor
{


    switch ($2) {


    case '*': $$ = $1 * $3; break;
    case '/': $$ = $1 / $3; break; // 想想看,这里会出什么问题?
    }
}

factor
: LPAREN expr RPAREN
{


    $$ = $2;
}
| NUMBER
{


    $$ = $1;
}

%%

void yyerror(const char *s)
{


    fprintf(stderr, "%s\n", s);
}
/* calc.l */
%option noyywrap

%{


/* 引入 calc.y 定义的 token */
#include "calc.tab.h"
%}

%%

\( {

     return LPAREN; }
\) {

     return RPAREN; }
"+"|"-" {

     yylval.op = yytext[0]; return ADDOP; }
"*"|"/" {

     yylval.op = yytext[0]; return MULOP; }
[0-9]+|[0-9]+\.[0-9]*|[0-9]*\.[0-9]+ {

     yylval.num = atof(yytext); return NUMBER; }
" "|\t {

      }
\r\n|\n|\r {

     return RET; }

%%
最后,我们补充一个 driver.c 来提供 main 函数。
int yyparse();

int main()
{


    yyparse();
    return 0;
}
使用如下命令构建并测试程序:
$ bison -d calc.y
   (生成 calc.tab.c 和 calc.tab.h。如果不给出 -d 参数,则不会生成 .h 文件。)
$ flex calc.l
   (生成 lex.yy.c)
$ gcc lex.yy.c calc.tab.c driver.c -o calc
$ ./calc
1+1
 = 1.000000
2*(1+1)
 = 4.000000
2*1+1
 = 3.000000
如果你复制粘贴了上述程序,可能会觉得很神奇,并且有些地方看不懂。下面就详细讲解上面新出现的各种构造。
-
YYSTYPE: 在 bison 解析过程中,每个 symbol 最终都对应到一个语义值上。或者说,在 parse tree 上,每个节点都对应一个语义值,这个值的类型是YYSTYPE。YYSTYPE的具体内容是由%union构造指出的。上面的例子中,%union { char op; double num; }会生成类似这样的代码
typedef union YYSTYPE {


  char op;
  double num;
} YYSTYPE;
为什么使用
union呢?因为不同节点可能需要不同类型的语义值。比如,上面的例子中,我们希望ADDOP的值是char类型,而NUMBER应该是double类型的。 -
$$和$1,$2,$3, …:现在我们来看如何从已有的值推出当前节点归约后应有的值。以加法为例:term : term ADDOP factor { switch $2 { case '+': $$ = $1 + $3; break; case '-': $$ = $1 - $3; break; } }其实很好理解。当前节点使用
$$代表,而已解析的节点则是从左到右依次编号,称作$1,$2,$3… -
%type <>和%token <>:注意,我们上面可没有写$1.num或者$2.op哦!那么 bison 是怎么知道应该用union的哪部分值的呢?其秘诀就在文件一开始的%type和%token上。例如,
term应该使用num部分,那么我们就写%type <num> term这样,以后用
$去取某个值的时候,bison 就能自动生成类似stack[i].num这样的代码了。%token<>见下一条。 -
%token:当我们用%token声明一个 token 时,这个 token 就会导出到.h中,可以在 C 代码中直接使用(注意 token 名千万不要和别的东西冲突!),供 flex 使用。%token <op> ADDOP与之类似,但顺便也将ADDOP传递给%type,这样一行代码相当于两行代码,岂不是很赚。 -
yylval:这时候我们可以打开.h文件,看看里面有什么。除了 token 定义,最末尾还有一个extern YYSTYPE yylval;。这个变量我们上面已经使用了,通过这个变量,我们就可以在 lexer 里面设置某个 token 的值。
呼……说了这么多,现在回头看看上面的代码,应该可以完全看懂了吧!这时候你可能才意识到为什么 flex 生成的分析器入口是 yylex,因为这个函数就是 bison 专门让程序员自己填的,作为一种扩展机制。另外,bison(或者说 yacc)生成的变量和函数名通常都带有 yy 前缀,希望在这里说还不太晚……
最后还得提一下,尽管上面所讲已经足够应付很大一部分解析需求了,但是 bison 还有一些高级功能,比如自动处理运算符的优先级和结合性(于是我们就不需要手动把 expr 拆成 factor, term 了)。这部分功能,就留给同学们自己去探索吧!
2. 实验要求
本次实验需要各位同学首先将自己的 lab1 的词法部分复制到 /src/parser 目录的 lexical_analyzer.l并合理修改相应部分,然后根据 cminus-f 的语法补全 syntax_analyer.y 文件,完成语法分析器,要求最终能够输出解析树。如:
输入:
int bar;
float foo(void) {

     return 1.0; }
则 parser 将输出如下解析树:
>--+ program
|  >--+ declaration-list
|  |  >--+ declaration-list
|  |  |  >--+ declaration
|  |  |  |  >--+ var-declaration
|  |  |  |  |  >--+ type-specifier
|  |  |  |  |  |  >--* int
|  |  |  |  |  >--* bar
|  |  |  |  |  >--* ;
|  |  >--+ declaration
|  |  |  >--+ fun-declaration
|  |  |  |  >--+ type-specifier
|  |  |  |  |  >--* float
|  |  |  |  >--* foo
|  |  |  |  >--* (
|  |  |  |  >--+ params
|  |  |  |  |  >--* void
|  |  |  |  >--* )
|  |  |  |  >--+ compound-stmt
|  |  |  |  |  >--* {
|  |  |  |  |  >--+ local-declarations
|  |  |  |  |  |  >--* epsilon
|  |  |  |  |  >--+ statement-list
|  |  |  |  |  |  >--+ statement-list
|  |  |  |  |  |  |  >--* epsilon
|  |  |  |  |  |  >--+ statement
|  |  |  |  |  |  |  >--+ return-stmt
|  |  |  |  |  |  |  |  >--* return
|  |  |  |  |  |  |  |  >--+ expression
|  |  |  |  |  |  |  |  |  >--+ simple-expression
|  |  |  |  |  |  |  |  |  |  >--+ additive-expression
|  |  |  |  |  |  |  |  |  |  |  >--+ term
|  |  |  |  |  |  |  |  |  |  |  |  >--+ factor
|  |  |  |  |  |  |  |  |  |  |  |  |  >--+ float
|  |  |  |  |  |  |  |  |  |  |  |  |  |  >--* 1.0
|  |  |  |  |  |  |  |  >--* ;
|  |  |  |  |  >--* }
请注意,上述解析树含有每个解析规则的所有子成分,包括诸如 ; {
} 这样的符号,请在编写规则时务必不要忘了它们。
2.1 目录结构
.
├── CMakeLists.txt
├── Documentations
│   ├── lab1
│   └── lab2
│       ├── readings.md        <- 扩展阅读
│       └── README.md          <- lab2实验文档说明(你在这里)
├── README.md
├── Reports
│   ├── lab1
│   └── lab2
│       └── report.md          <- lab2所需提交的实验报告(你需要在此提交实验报告)
├── include                     <- 实验所需的头文件
│   ├── lexical_analyzer.h
│   └── SyntaxTree.h
├── src                         <- 源代码
│   ├── common
│   │   └── SyntaxTree.c      <- 分析树相关代码
│   ├── lexer
│   └── parser
│       ├── lexical_analyzer.l <- lab1 的词法部分复制到这,并进行一定改写
│       └── syntax_analyzer.y  <- lab2 需要完善的文件
└── tests                      <- 测试文件
    ├── lab1
    └── lab2                   <- lab2 测试用例文件夹
2.2 编译、运行和验证
-
编译
与 lab1 相同。若编译成功,则将在
${WORKSPACE}/build/下生成parser命令。 -
运行
与
lexer命令不同,本次实验的parser命令使用 shell 的输入重定向功能,即程序本身使用标准输入输出(stdin 和 stdout),但在 shell 运行命令时可以使用<>和>>灵活地自定义输出和输入从哪里来。$ cd cminus_compiler-2021-fall $ ./build/parser # 交互式使用(不进行输入重定向) <在这里输入 Cminus-f 代码,如果遇到了错误,将程序将报错并退出。> <输入完成后按 ^D 结束输入,此时程序将输出解析树。> $ ./build/parser < test.cminus # 重定向标准输入 <此时程序从 test.cminus 文件中读取输入,因此不需要输入任何内容。> <如果遇到了错误,将程序将报错并退出;否则,将输出解析树。> $ ./build/parser test.cminus # 不使用重定向,直接从 test.cminus 中读入 $ ./build/parser < test.cminus > out <此时程序从 test.cminus 文件中读取输入,因此不需要输入任何内容。> <如果遇到了错误,将程序将报错并退出;否则,将输出解析树到 out 文件中。>通过灵活使用重定向,可以比较方便地完成各种各样的需求,请同学们务必掌握这个 shell 功能。
此外,提供了 shell 脚本
/tests/lab2/test_syntax.sh调用parser批量分析测试文件。注意,这个脚本假设parser在项目目录/build下。# test_syntax.sh 脚本将自动分析 ./tests/lab2/testcase_$1 下所有文件后缀为 .cminus 的文件,并将输出结果保存在 ./tests/lab2/syntree_$1 文件夹下 $ ./tests/lab2/test_syntax.sh easy ... ... ... $ ls ./tests/lab2/syntree_easy <成功分析的文件> $ ./tests/lab2/test_syntax.sh normal $ ls ./tests/lab2/syntree_normal -
验证
本次试验测试案例较多,为此我们将这些测试分为两类:
- easy: 这部分测试均比较简单且单纯,适合开发时调试。
- normal: 较为综合,适合完成实验后系统测试。
我们使用
diff命令进行验证。将自己的生成结果和助教提供的xxx_std进行比较。$ diff ./tests/lab2/syntree_easy ./tests/lab2/syntree_easy_std # 如果结果完全正确,则没有任何输出结果 # 如果有不一致,则会汇报具体哪个文件哪部分不一致 # 使用 -qr 参数可以仅列出文件名test_syntax.sh脚本也支持自动调用diff。# test_syntax.sh 脚本将自动分析 ./tests/lab2/testcase_$1 下所有文件后缀为 .cminus 的文件,并将输出结果保存在 ./tests/lab2/syntree_$1 文件夹下 $ ./tests/lab2/test_syntax.sh easy yes <分析所有 .cminus 文件并将结果与标准对比,仅输出有差异的文件名> $ ./tests/lab2/test_syntax.sh easy verbose <分析所有 .cminus 文件并将结果与标准对比,详细输出所有差异>请注意助教提供的
testcase并不能涵盖全部的测试情况,完成此部分仅能拿到基础分,请自行设计自己的testcase进行测试。
实验报告
实验要求
本次实验需要先将自己的 lab1 的词法部分复制到 /src/parser 目录的 lexical_analyzer.l并合理修改相应部分,然后根据 cminus-f 的语法补全 syntax_analyer.y 文件,完成语法分析器,要求最终能够输出解析树。如:
输入:
int bar;
float foo(void) {

     return 1.0; }
则 parser 将输出如下解析树:
>--+ program
|  >--+ declaration-list
|  |  >--+ declaration-list
|  |  |  >--+ declaration
|  |  |  |  >--+ var-declaration
|  |  |  |  |  >--+ type-specifier
|  |  |  |  |  |  >--* int
|  |  |  |  |  >--* bar
|  |  |  |  |  >--* ;
|  |  >--+ declaration
|  |  |  >--+ fun-declaration
|  |  |  |  >--+ type-specifier
|  |  |  |  |  >--* float
|  |  |  |  >--* foo
|  |  |  |  >--* (
|  |  |  |  >--+ params
|  |  |  |  |  >--* void
|  |  |  |  >--* )
|  |  |  |  >--+ compound-stmt
|  |  |  |  |  >--* {


|  |  |  |  |  >--+ local-declarations
|  |  |  |  |  |  >--* epsilon
|  |  |  |  |  >--+ statement-list
|  |  |  |  |  |  >--+ statement-list
|  |  |  |  |  |  |  >--* epsilon
|  |  |  |  |  |  >--+ statement
|  |  |  |  |  |  |  >--+ return-stmt
|  |  |  |  |  |  |  |  >--* return
|  |  |  |  |  |  |  |  >--+ expression
|  |  |  |  |  |  |  |  |  >--+ simple-expression
|  |  |  |  |  |  |  |  |  |  >--+ additive-expression
|  |  |  |  |  |  |  |  |  |  |  >--+ term
|  |  |  |  |  |  |  |  |  |  |  |  >--+ factor
|  |  |  |  |  |  |  |  |  |  |  |  |  >--+ float
|  |  |  |  |  |  |  |  |  |  |  |  |  |  >--* 1.0
|  |  |  |  |  |  |  |  >--* ;
|  |  |  |  |  >--* }
请注意,上述解析树含有每个解析规则的所有子成分,包括诸如 ; { } 这样的符号,请在编写规则时务必不要忘了它们。
实验难点
1.需要了解bison的基本知识,懂得怎么将文法产生式转化为bison语句。
2.了解在SyntaxTree.c中如何构建解析树,以及在syntax_analyzer.y中syntax_tree_node *node(const char *name, int children_num, ...)这个函数的用法和作用。
3.了解bison与flex之间是如何协同工作的,如何共享token等。
4.看懂yylval.node的含义。
实验设计
1.实验要求我们补全 src/parser/syntax_analyzer.y文件和 lexical_analyzer.l文件,先考虑lexical_analyzer.l如何补充。
观察到pass_node函数,flex将数值存入yylval,而bison读取yylval之中的值,所以对于每个token,我们都应该创建其的结点。
void pass_node(char *text){


     yylval.node = new_syntax_tree_node(text);
}
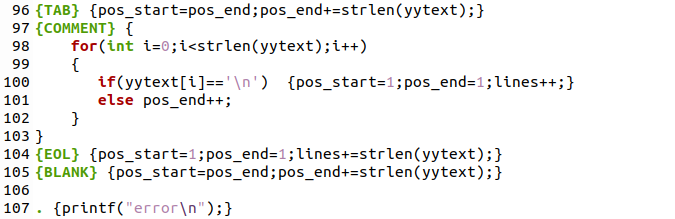
如图所示,修改lab1中的lexical_analyzer.l补充到lab2中的lexical_analyzer.l,lab1中正则定义即token保持不变。但对于每个token匹配时对应的动作进行修改,都添加一个pass_node(yytext)。因为语法分析树不考虑制表符TAB,注释COMMENT,换行EOL以及空格BLANK,所以不用建立结点不进行返回,只需要把pos_end,pos_start进行修改即可。对于其他未定义的字符只需要printf(“error\n”)。同时lab1中的void analyzer函数也不需要。


2.补全syntax_analyzer.y
(1)先考虑%union,因为在 parse tree 上,每个节点都对应一个语义值,这个值的类型是 YYSTYPE。YYSTYPE 的具体内容是由 %union 构造指出的。如图所示,不管是%token还是%type,都应该是syntax_tree_node * node类型,这样才能构建解析树。

(2)如图所示,根据lexical_analyzer.l中的token定义%token<node> ,以及lab2的要求定义%type<node>。

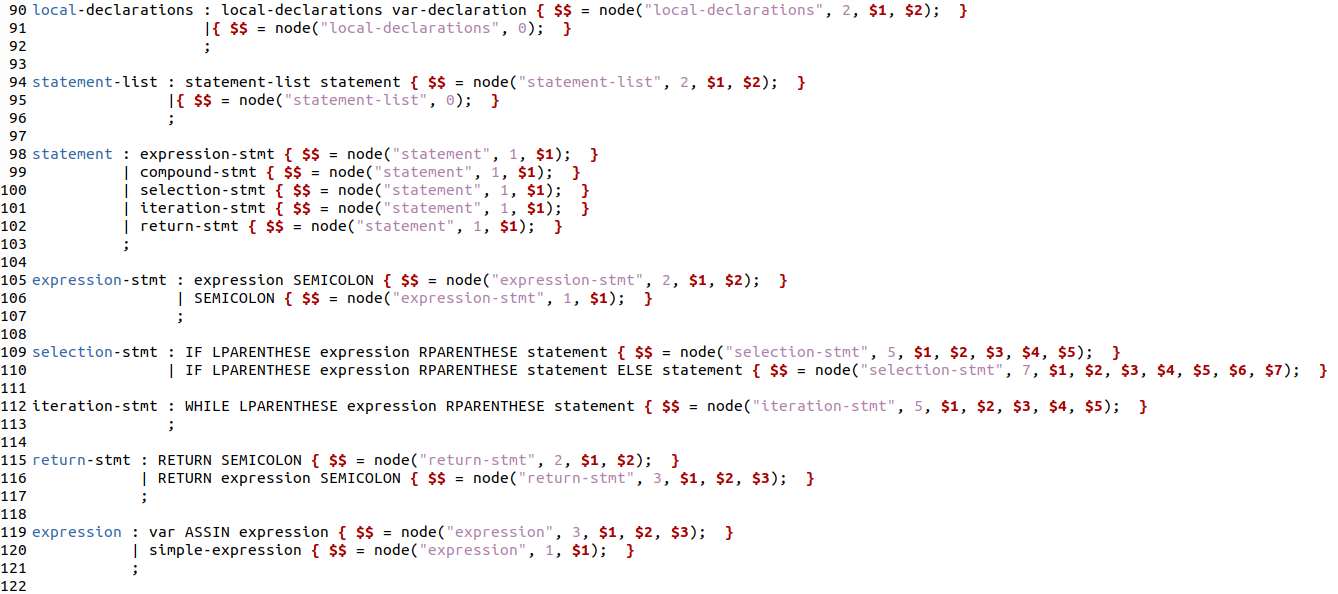
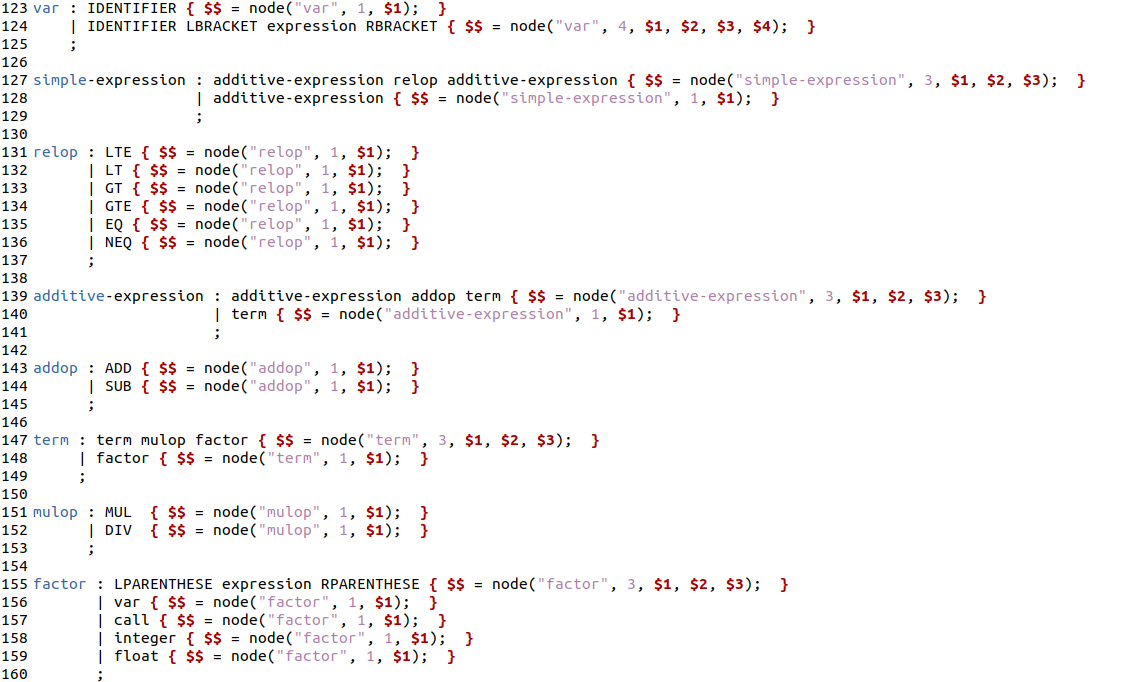
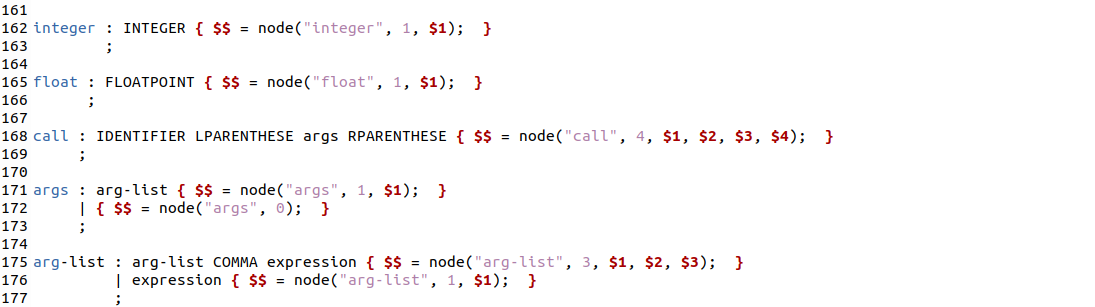
(3) 如图所示,根据实验中所给的Cminus-f语法,补充每个%type<node>的文法解析。注意的是每个条文法解析后面都要有分号,{}里写与该解析对应的处理代码,例如declaration-list ,其第一条解析所得到的是两个解析符号declaration-list declaration,所以对于该解析要执行的操作是{$$ = node("declaration-list", 2, $1, $2);},$$ 表示当前节点,解析的2个节点从左到右依次编号,称作 $1、 $2,node函数则是创建declaration-list的两个孩子节点。需要注意的是,当解析为空时,node函数所传参数为(name,0),name对应字符串,而0表示孩子为空。

实验结果验证
1.执行命令make parser进行编译

2.执行命令./tests/lab2/test_syntax.sh easy和./tests/lab2/test_syntax.sh normal生成语法解析树

3.如图所示,使用 diff 命令进行验证,将自己的生成结果和助教提供的syntree_easy_std和syntree_normal_std进行比较。结果完全正确,没有任何输出结果。

4.如图所示,设计一个测试样例test1.cminus进行验证:
int main(void)
{


  int b;
  int n;
  n=10;
  b=1+2+3+4+5;
  while(n=n-1){


   b=b+1;
  }
}

void fun(int a){

    }

void funtion(int b){


   b=b/2;
}
执行指令./build/parser < tests/lab2/test1.cminus > tests/lab2/test1_tree,在没有语法错误的情况下,将解析树定向输出到test1_tree中。

test1_tree文档中解析树如图所示(太长了所以只截取部分),验证正确。

5.再设计一个test2.cminus中含有不符合文法的句子,看其是否可以识别
int main(void){


  int a;
  int b=a;
}
因为文法规则中不能在定义变量的时候赋值,所以int b=a;语句会出现语法错误。如图所示,在第3行第8列即=出现错误,分析正确。
