Multus-CNI简介
Multus-CNI是intel开发的一款应用于Kubernetes上的插件,可以作为其他CNI插件与k8s的中间件,使得kubernetes支持多个网络,实现网络冗余,为实现控制面与数据面分离提供支持。PS:multus-cni本身不提供网络配置功能,它是通过用其他满足CNI规范的插件进行container的网络配置,例如flannel/sriov等。 Multus-CNI源码地址。
其workflow如下图所示:

kubectl调用RunPod()开始启动container;- setUpPod()调用网络配置插件(k8s的CNI);
- 网络配置插件根据k8s配置(默认位于
/etc/cni/net.d/下),调用Multus,进入Multus逻辑;- Multus首先调用主pulgin,然后调用其他的plugin创建相应的interface,plugin包括flannel,IPAM, SR-IOV CNI plugin等。
Multus-CNI数据结构
Multus-CNI数据结构如下所示:
type NetConf struct {
    types.NetConf
    // 用于存放配置信息的位置, 默认"/var/lib/cni/multus, 一般用不到"
    CNIDir     string                   `json:"cniDir"`
    // 具体的第三方插件的配置信息
    Delegates  []map[string]interface{} `json:"delegates"`
    // k8s的配置文件的绝对路径
    Kubeconfig string                   `json:"kubeconfig"`
}

type PodNet struct {
    Networkname string `json:"name"`
}

type netplugin struct {
    metav1.TypeMeta   `json:",inline"`
    metav1.ObjectMeta `json:"metadata,omitempty" description:"standard object metadata"`
    Plugin            string `json:"plugin"`
    Args              string `json:"args"`
}

// K8sArgs is the valid CNI_ARGS used for Kubernetes
type K8sArgs struct {
    types.CommonArgs
    IP                         net.IP
    K8S_POD_NAME               types.UnmarshallableString
    K8S_POD_NAMESPACE          types.UnmarshallableString
    K8S_POD_INFRA_CONTAINER_ID types.UnmarshallableString
}
Multus-CNI核心函数
cmdAdd(args *skel.CmdArgs)主要是读取网络配置,然后调用具体的CNI实现配置,cmdDel(args *skel.CmdArgs)则是其逆过程。配置过程的log可以通过/var/log/syslog进行查看。 此处仅对cmdAdd函数进行简单介绍:
func cmdAdd(args *skel.CmdArgs) error {
    var result error
    var nopodnet bool
    // 读取配置信息
    n, err := loadNetConf(args.StdinData)
    if err != nil {
        return fmt.Errorf("err in loading netconf: %v", err)
    }

    // 读取k8s配置信息
    if n.Kubeconfig != "" {
        // 获取k8s的网络信息;
        // “/etc/cni/net.d/” 下的第一个(按照文件名的ASCII顺序)网络配置应该是multus的配置
        podDelegate, err := getK8sNetwork(args, n.Kubeconfig)
        if err != nil {
            if _, ok := err.(*NoK8sNetworkError); ok {
                nopodnet = true
                if !defaultcninetwork {
                    return fmt.Errorf("Multus: Err in getting k8s network from the pod spec annotation, check the pod spec or set delegate for the default network, Refer the README.md: %v", err)
                }
            } else if !defaultcninetwork {
                return fmt.Errorf("Multus: Err in getting k8s network from pod: %v", err)
            }
        }
        // 获取默认配置中的 Delegate 字段,即具体调用的CNI的配置信息
        if len(podDelegate) != 0 {
            n.Delegates = podDelegate
        }
    }

    for _, delegate := range n.Delegates {
        if err := checkDelegate(delegate); err != nil {
            return fmt.Errorf("Multus: Err in delegate conf: %v", err)
        }
    }

    if n.Kubeconfig == "" || nopodnet {
        if err := saveDelegates(args.ContainerID, n.CNIDir, n.Delegates); err != nil {
            return fmt.Errorf("Multus: Err in saving the delegates: %v", err)
        }
    }
    // 获取在pod内的网卡名
    podifName := getifname()
    var mIndex int
    // 遍历delegate进行配置,此次遍历进配置主plugin
    for index, delegate := range n.Delegates {
        /* delegateAdd 函数就是调用具体的容器网络配置插件CNI进行网络配置,并得到具体的配置信息r。
         * 最后一个参数true表示是否为主plugin
         * 若配置失败,则直接退出,容器启动会失败
         */
        err, r := delegateAdd(podifName, args.IfName, delegate, true)
        if err != true {
            result = r
            mIndex = index
        } else if (err != false) && r != nil {
            return r
        }
    }
    /* 遍历delegate进行配置,此次遍历配置其他plugins
     * 若plugin配置失败,清除该plugin配置
     * 清除配置成功,则multus仍可顺利完成
     */
    for index, delegate := range n.Delegates {
        err, r := delegateAdd(podifName, args.IfName, delegate, false)
        if err != true {
            result = r
        } else if (err != false) && r != nil {
            perr := clearPlugins(mIndex, index, args.IfName, n.Delegates)
            if perr != nil {
                return perr
            }
            return r
        }
    }

    return result
}
Multus配置示例
multus支持Kubernetes Custom Resource Object (CRD)以及Third Party Resource(TPR)两种网络配置方式. 我们以CRD为例,从multus安装开始详细介绍其完整配置过程.TRP配置类似.
Multus安装
//下载源码
https://github.com/Intel-Corp/multus-cni.git
cd multus-cni
// build可执行文件
./build
// cni的可执行文件默认放置在`/opt/cni/bin/`目录下
mv bin/multus /opt/cni/bin/
k8s配置使用Multus 并设置主plugin
k8s cni的默认配置路径是/etc/cni/net.d/,目录下的配置文件按照ASCII进行排序。配置结束后需要重启kubelet。
root@xftony:/etc/cni/net.d# cat 01-crd-multus-cni.conf
{
    "name": "multus-network",
    "type": "multus",
    # 选用admin.conf 而非github上示例的node-kubeconfig.yaml
    "kubeconfig": "/etc/kubernetes/admin.conf",
    "delegates": [{
        "type": "flannel",
        "name": "cbr0",
        "hairpinMode": true,
        "masterplugin": true,
        "isDefaultGateway": true
    }]
}
//  重启kubelet
root@xftony:/etc/cni/net.d#systemctl restart kubelet
CRD配置
首先在k8s中定义network object,即后续网络配置文件选用的resource类型.
root@xftony:~/xftony/netYaml#cat crdnetwork.yaml
apiVersion: apiextensions.k8s.io/v1beta1
kind: CustomResourceDefinition
metadata:
  # name must match the spec fields below, and be in the form: <plural>.<group>
  name: networks.kubernetes.com
spec:
  # group name to use for REST API: /apis/<group>/<version>
  group: kubernetes.com
  # version name to use for REST API: /apis/<group>/<version>
  version: v1
  # either Namespaced or Cluster
  scope: Namespaced
  names:
    # plural name to be used in the URL: /apis/<group>/<version>/<plural>
    plural: networks
    # singular name to be used as an alias on the CLI and for display
    singular: network
    # kind is normally the CamelCased singular type. Your resource manifests use this.
    kind: Network
    # shortNames allow shorter string to match your resource on the CLI
    shortNames:
    - net
预置k8s可用的网络
编写要使用的网络配置文件,然后注册到k8s,以便建立pod是进行调用。此处以最常用的flannel和之前提到过的sriov为例。
flannel
创建flannel的网络配置文件;
生成k8s网络
// 创建flannel的网络配置信息
root@xftony:~/xftony/netYaml# cat flannel.yaml
apiVersion: "kubernetes.com/v1"
# 这里的Network就是crdnetwork.yaml中定义的kind
kind: Network
metadata:
  name: flannel-network
plugin: flannel
args: '[
        {
                "delegate": {
                        "isDefaultGateway": true
                }
        }
]'
// 生成k8s网络配置
root@xftony:~/xftony/netYaml# kubectl create -f flannel.yaml

// 查看k8s可用的网络配置
root@xftony:~/xftony/netYaml# kubectl get network -o wide
NAME                                   AGE
flannel-network                       2s
sriov
此处的sriov是使用我自己修改的sriov版本,新增了pfOnly参数,默认为false。因此默认情况下需要所在node开启sriov功能,并有可用的VF。
创建sriov的网络配置文件;
生成k8s网络
/* 创建sriov的网络配置信息
 * 此处创建了两个sriov网卡,一个是普通的sriov网卡,另一个是dpdk接管的sriov网卡
 */
root@xftony:~/xftony/netYaml# cat sriov-dpdk-network-enp4s0f1.yaml
apiVersion: "kubernetes.com/v1"
kind: Network
metadata:
  name: sriov-dpdk-network-enp4s0f1
plugin: sriov
args: '[
       {
                "if0": "enp4s0f1",
                "pfOnly": false,
                "type": "sriov",
                "if0name": "net0-4s0f1",
                "ipam": {
                        "type": "host-local",
                        "subnet": "18.1.0.0/24",
                        "rangeStart": "18.1.0.70",
                        "rangeEnd": "18.1.0.99",
                        "routes": [
                                { "dst": "0.0.0.0/0" }
                        ],
                        "gateway": "18.1.0.1"
                }
       },
       {        "if0": "enp4s0f1",
                "pfOnly": false,
                "type": "sriov",
                "if0name": "Dpdk1-4s0f1",
                "dpdk": {
                        "kernel_driver": "ixgbevf",
                        "dpdk_driver": "igb_uio",
                        "dpdk_tool": "/root/xftony/plugins/dpdk-17.11/usertools/dpdk-devbind.py"
                }
       }
]'
配置并测试pod
通过yaml文件创建pod配置,并创建之。
root@xftony:~/xftony/podYaml# cat xftony-test-pod.yaml
apiVersion: v1
kind: Pod
metadata:
  name: xftony-test
  annotations:
    # 网络选用之前已经配置到了的flannel-network,以及sriov-dpdk-network-enp4s0f1
    networks: '[
        { "name": "flannel-network"},
        { "name": "sriov-dpdk-network-enp4s0f1"}
   ]'
spec:  # specification of the pod's contents
  nodeSelector:
   name: node1
  containers:
  - name: xftony-test-1
    image: "ubuntu:14.04"
    imagePullPolicy: IfNotPresent
    command: ["top"]
    stdin: true
    tty: true

// 创建pod
root@xftony:~/xftony/podYaml# kubectl create -f xftony-test-pod.yaml
使用kubectl指令,查看pod状态。
root@ubuntu90:~/xftony/podYaml# kubectl get pods -o wide
NAME                     READY     STATUS             RESTARTS   AGE       IP             NODE
xftony-test              1/1       Running            0          8s        172.17.2.11    node1
进入pod内,查看其网卡。其中eth0为flannel创建的网卡,net0-4s0f1为sriov创建的普通sriov网卡,dpdk网卡无法直接通过ifconfig进行查看。
root@xftony:~# kubectl exec -it xftony-test /bin/bash
root@xfxftony-test-1:/# ifconfig
eth0      Link encap:Ethernet  HWaddr 0a:58:ac:11:02:0b
          inet addr:172.17.2.11  Bcast:0.0.0.0  Mask:255.255.255.0
          inet6 addr: fe80::cc37:c5ff:fe1c:ea04/64 Scope:Link
          UP BROADCAST RUNNING MULTICAST  MTU:1450  Metric:1
          RX packets:14 errors:0 dropped:0 overruns:0 frame:0
          TX packets:14 errors:0 dropped:0 overruns:0 carrier:0
          collisions:0 txqueuelen:0
          RX bytes:1116 (1.1 KB)  TX bytes:1116 (1.1 KB)

lo        Link encap:Local Loopback
          inet addr:127.0.0.1  Mask:255.0.0.0
          inet6 addr: ::1/128 Scope:Host
          UP LOOPBACK RUNNING  MTU:65536  Metric:1
          RX packets:0 errors:0 dropped:0 overruns:0 frame:0
          TX packets:0 errors:0 dropped:0 overruns:0 carrier:0
          collisions:0 txqueuelen:1000
          RX bytes:0 (0.0 B)  TX bytes:0 (0.0 B)

net0-4s0f1 Link encap:Ethernet  HWaddr 96:80:02:7c:ef:e1
          inet addr:18.1.0.71  Bcast:0.0.0.0  Mask:255.255.255.0
          inet6 addr: fe80::9480:2ff:fe7c:efe1/64 Scope:Link
          UP BROADCAST RUNNING MULTICAST  MTU:1500  Metric:1
          RX packets:38 errors:0 dropped:0 overruns:0 frame:0
          TX packets:352 errors:0 dropped:0 overruns:0 carrier:0
          collisions:0 txqueuelen:1000
          RX bytes:3268 (3.2 KB)  TX bytes:30028 (30.0 KB)
dpdk网卡信息查看的步骤如下(把对应目录挂进来,然后写个小脚本就行):
1、查看容器的
namespace信息;
root@xfxftony-test-1:/# ll /proc/1/ns/
total 0
dr-x--x--x 2 root root 0 Jun  1 02:59 ./
dr-xr-xr-x 9 root root 0 Jun  1 02:49 ../
lrwxrwxrwx 1 root root 0 Jun  1 02:59 cgroup -> cgroup:[4026531835]
lrwxrwxrwx 1 root root 0 Jun  1 02:59 ipc -> ipc:[4026533208]
lrwxrwxrwx 1 root root 0 Jun  1 02:59 mnt -> mnt:[4026532762]
lrwxrwxrwx 1 root root 0 Jun  1 02:59 net -> net:[4026533211]
lrwxrwxrwx 1 root root 0 Jun  1 02:59 pid -> pid:[4026533310]
lrwxrwxrwx 1 root root 0 Jun  1 02:59 user -> user:[4026531837]
lrwxrwxrwx 1 root root 0 Jun  1 02:59 uts -> uts:[4026533309]
2、进入宿主机查看sriov保存的配置文件,
/var/lib/cni/sriov/是默认的sriov配置文件位置,4026533211就是其容器的namespace。具体介绍详见sriov。
root@xftony:/var/lib/cni/sriov/4026533211# ls
7d888af4d7da943a41ee063f0606ec0b558eb583de12a165a530e392992e751c-Dpdk1-4s0f1
7d888af4d7da943a41ee063f0606ec0b558eb583de12a165a530e392992e751c-net0-4s0f1

root@xftony:/var/lib/cni/sriov/4026533211# cat 7d888af4d7da943a41ee063f0606ec0b558eb583de12a165a530e392992e751c-Dpdk1-4s0f1
{"type":"sriov","ipam":{},"dns":{},"DPDKMode":true,"Sharedvf":false,"dpdk":{"pci_addr":"0000:04:10.5","ifname":"Dpdk1-4s0f1","kernel_driver":"ixgbevf","dpdk_driver":"igb_uio","dpdk_tool":"/root/xftony/plugins/dpdk-17.11/usertools/dpdk-devbind.py","VFID":2},"cniDir":"/var/lib/cni/sriov","if0":"enp4s0f1","if0name":"Dpdk1-4s0f1","l2enable":false,"vlan":0,"pfOnly":false,"pci_addr":"0000:04:10.5"}root@ubuntu89:/var/lib/cni/sriov/4026533211#
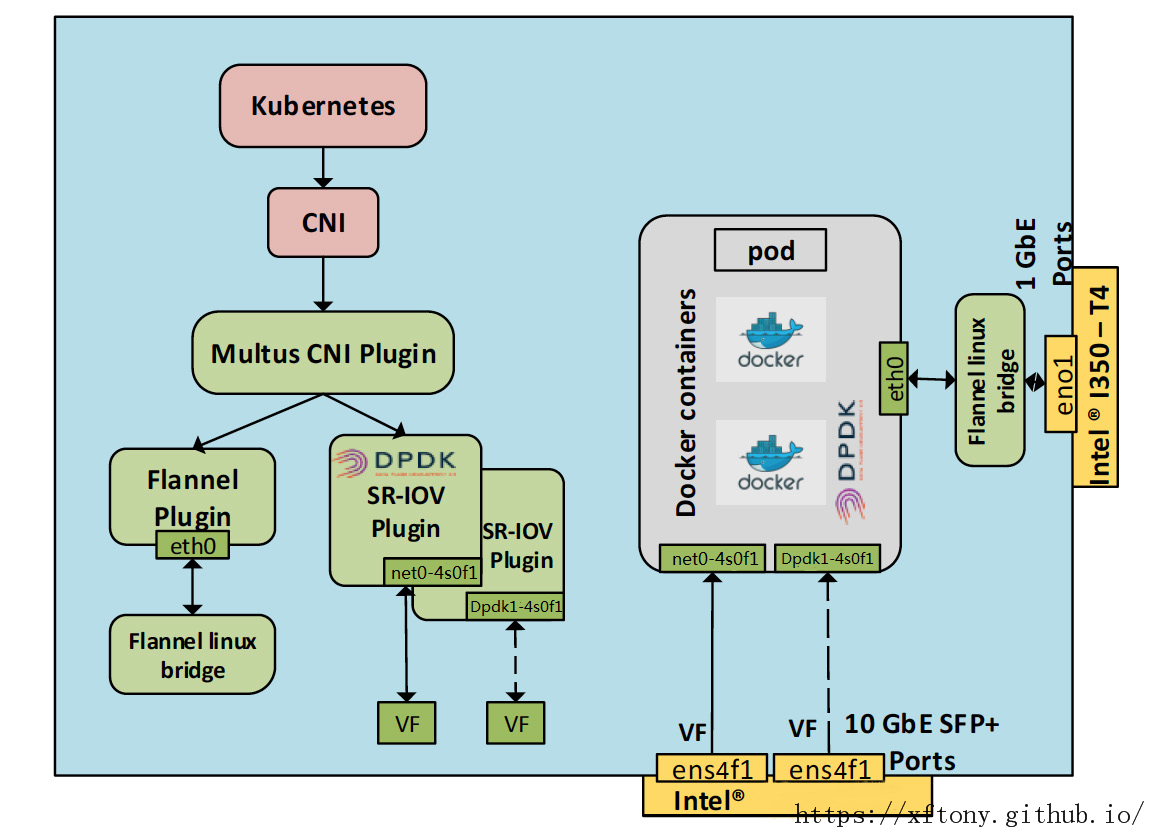
Intel写的白皮书(Enabling New Features with Kubernetes for NFV)里面有个图听适合这里的,不过,里面的north0和south0都是普通的sriov网卡,对应示例中的net0-4s0f1。所以我稍稍的P了一下,增加了dpdk的口。
以上~