前言
虽然Deepin系统号称开箱即用,不过还是有很大的提升空间的。
本文调教的点在于:
-
1、Deepin应用商店应用比较少,安装一系列包管理工具进行扩展。
-
2、触摸板支持类似Mac的多指触控(触控板自由)
-
3、终端支持zsh,优化bash使用体验
wget工具
- wget + 下载链接:
例如:wget http://cmotionpro.2.2.1.tar.gz
会在当前目录从给定的链接下载文件
执行.sh脚本的时候,如果不能执行,那么就切换sudo,或者 chmod 777 给予运行权限。
- wget -c 断点续传
wget可以在下载大文件的时候断点续传。
apt-get工具
apt工具
- 安装git
sudo apt install git
add-apt-repository,PPA等工具
-
sudo: add-apt-repository:找不到命令解决办法:
执行下面的命令(会有一个命中的)
sudo apt-get install python-software-propertiessudo apt-get install software-properties-common
sudo apt-get update
sudo apt-get install software-properties-common python-software-properties
安装deb包的方法
sudo apt install ./touchegg_*.deb
安装flatpak,安装后缀为flatpakref的软件包
flatpak官网:
https://flatpak.org/setup/
选择Deepin系统(Deepin系统已经出名到直接支持了),如果没有Deepin系统,选择Debian。
deepin安装flatpac方式:
https://flatpak.org/setup/Deepin
按照官方网站指引安装完成后,你就可以安装后缀为flatpakref后缀的文件了。教程网址如下:
https://www.louishe.com/2021/07/22/doc-10854.html
你也可以用flatpak install命令,像apt-get那样安装软件。比如:flatpak install flathub com.github.joseexposito.touche
安装zsh和oh-my-zsh
-
安装zsh和主题
https://www.cnblogs.com/nangec/p/12788868.html


-
安装zsh插件的方法见上篇,不过你必须先将注释打开才可以无脑复制上篇(路径不能动):

-
手动克隆并安装oh-my-zsh(如果你自动下载oh-my-zsh失败)
https://www.jianshu.com/p/9df4bc46429a -
设置随机zsh主题:
vim ~/.zshrc,然后设置成random
配置zsh别名(alias)
全局配置别名:
vim ~/.bashrc
如果你用了zsh,还需要修改zsh的配置文件。直接让zsh继承bashrc即可:
vim ~/.zshrc
然后让zsh继承~/.bashrc的配置文件(在zsh配置文件添加如下一行):
source ~/.bash_profile
使得修改生效:
source ~/.bashrc
source ~/.zshrc
最后注销或者重启生效。
- 别名备份:
alias yc="cd /home/daji/data/works/yonyou/codeSpaces/shandongPort && ll"
alias yp="cd /home/daji/data/works/yonyou/projectDocs/shandongPort_proj && ll"
alias personal_work="cd /home/daji/data/works/graduation_design && ll"
alias opn="xdg-open"
alias opnn="xdg-open ./"
alias seealias="cat ~/.zshrc"
alias data="cd ~/data && ll"
alias temp="cd ~/tempFiles"
alias powersave="sudo tlp start && systemctl start tlp.service"
alias reform="cd ~/data/codes/reform725 && ll"
alias csdn="cd /home/daji/data/codes/csdn-edit && ll"
alias sdgxx="opn ~/data/works/yonyou/projectDocs/shandongPort_proj/山东港信息.xlsx"
alias idea2020="sh ~/data/developtools/ideaIU-2020.3.4/idea-IU-203.8084.24/bin/idea.sh"
alias english="vim /home/daji/data/codes/reform725/englishVocabulary.md"
alias restartwifi="systemctl restart wpa_supplicant.service"
alias restart_wifi_off="nmcli r wifi off"
alias restart_wifi_on="nmcli r wifi on"
alias restartblue="systemctl restart bluetooth.service"
alias conn_realme="sudo nmcli dev wifi connect \"realme GT Neo\" password \"qwertyui\""
alias conn_home="sudo nmcli dev wifi connect \"CMCC-2u72\" password \"ca4b349p\""
alias conn_sdport="sudo nmcli dev wifi connect \"cgzx1\" password \"cgzx1234\""
alias conn_wanglu="sudo nmcli dev wifi connect \"LAPTOP-G095D935 1028\" password \"98|661Qt\""
alias conn_guopc="sudo nmcli dev wifi connect \"LAPTOP-1A9IJK5G 3935\" password \"guo1259194546\""
alias yinliu="echo '<font color=red size=5px>**本文全套资料和源代码已上传至Gitee:[https://gitee.com/da-ji/full-stack-developer](https://gitee.com/da-ji/full-stack-developer),大家需要可自取**</font>'"
alias imgupd='imgupd(){ cd /home/daji/data/datas/blogImage;git add *;git commit -m "upd";git push};imgupd'
alias 执行一组命令
alias imgupd='imgupd(){ cd /home/daji/data/datas/blogImage;git add *;git commit -m "upd";git push};imgupd'
cd到该gitee仓库目录,执行添加全部,最终提交。一个alias完事儿
安装touchegg
touchegg这个软件呢,能让你linux的触摸板触控体验媲美MacOS,使用了此软件你就再也不想用鼠标了,强烈推荐。
https://github.com/JoseExposito/touchegg
文档里写的比较清楚,大致步骤是先安装,安装你要找到Ubuntu和Debian系:
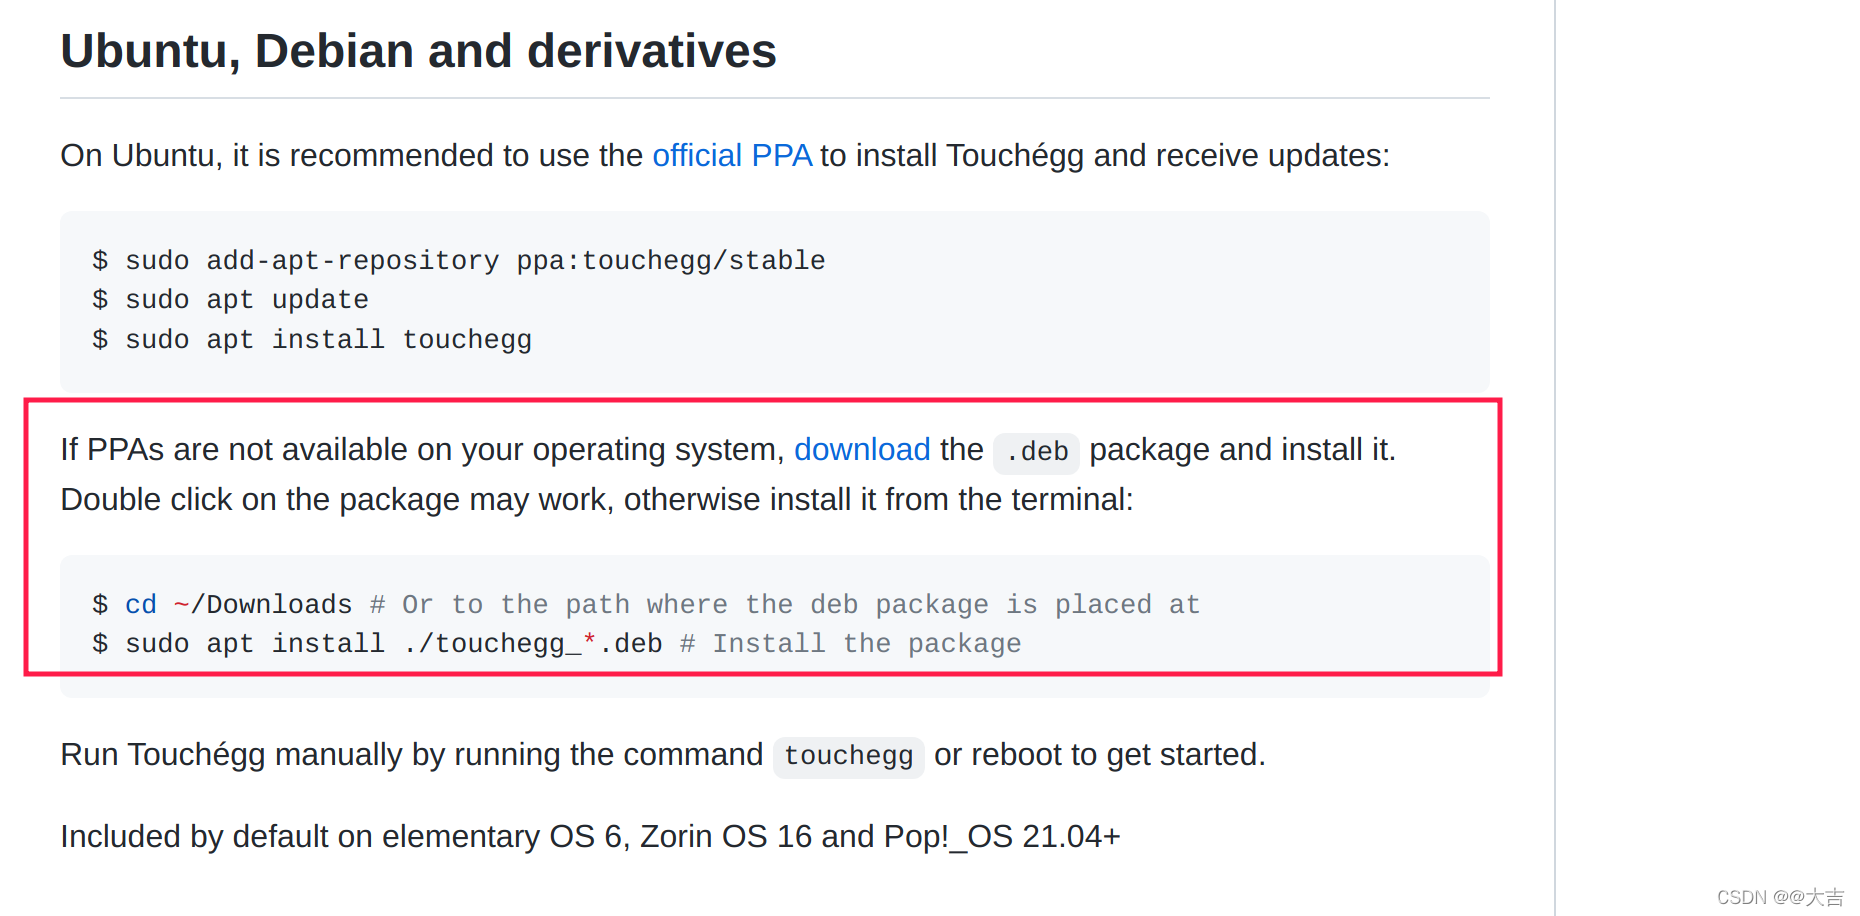
文档里让你下载deb包。这里我们选择amd64的deb包:
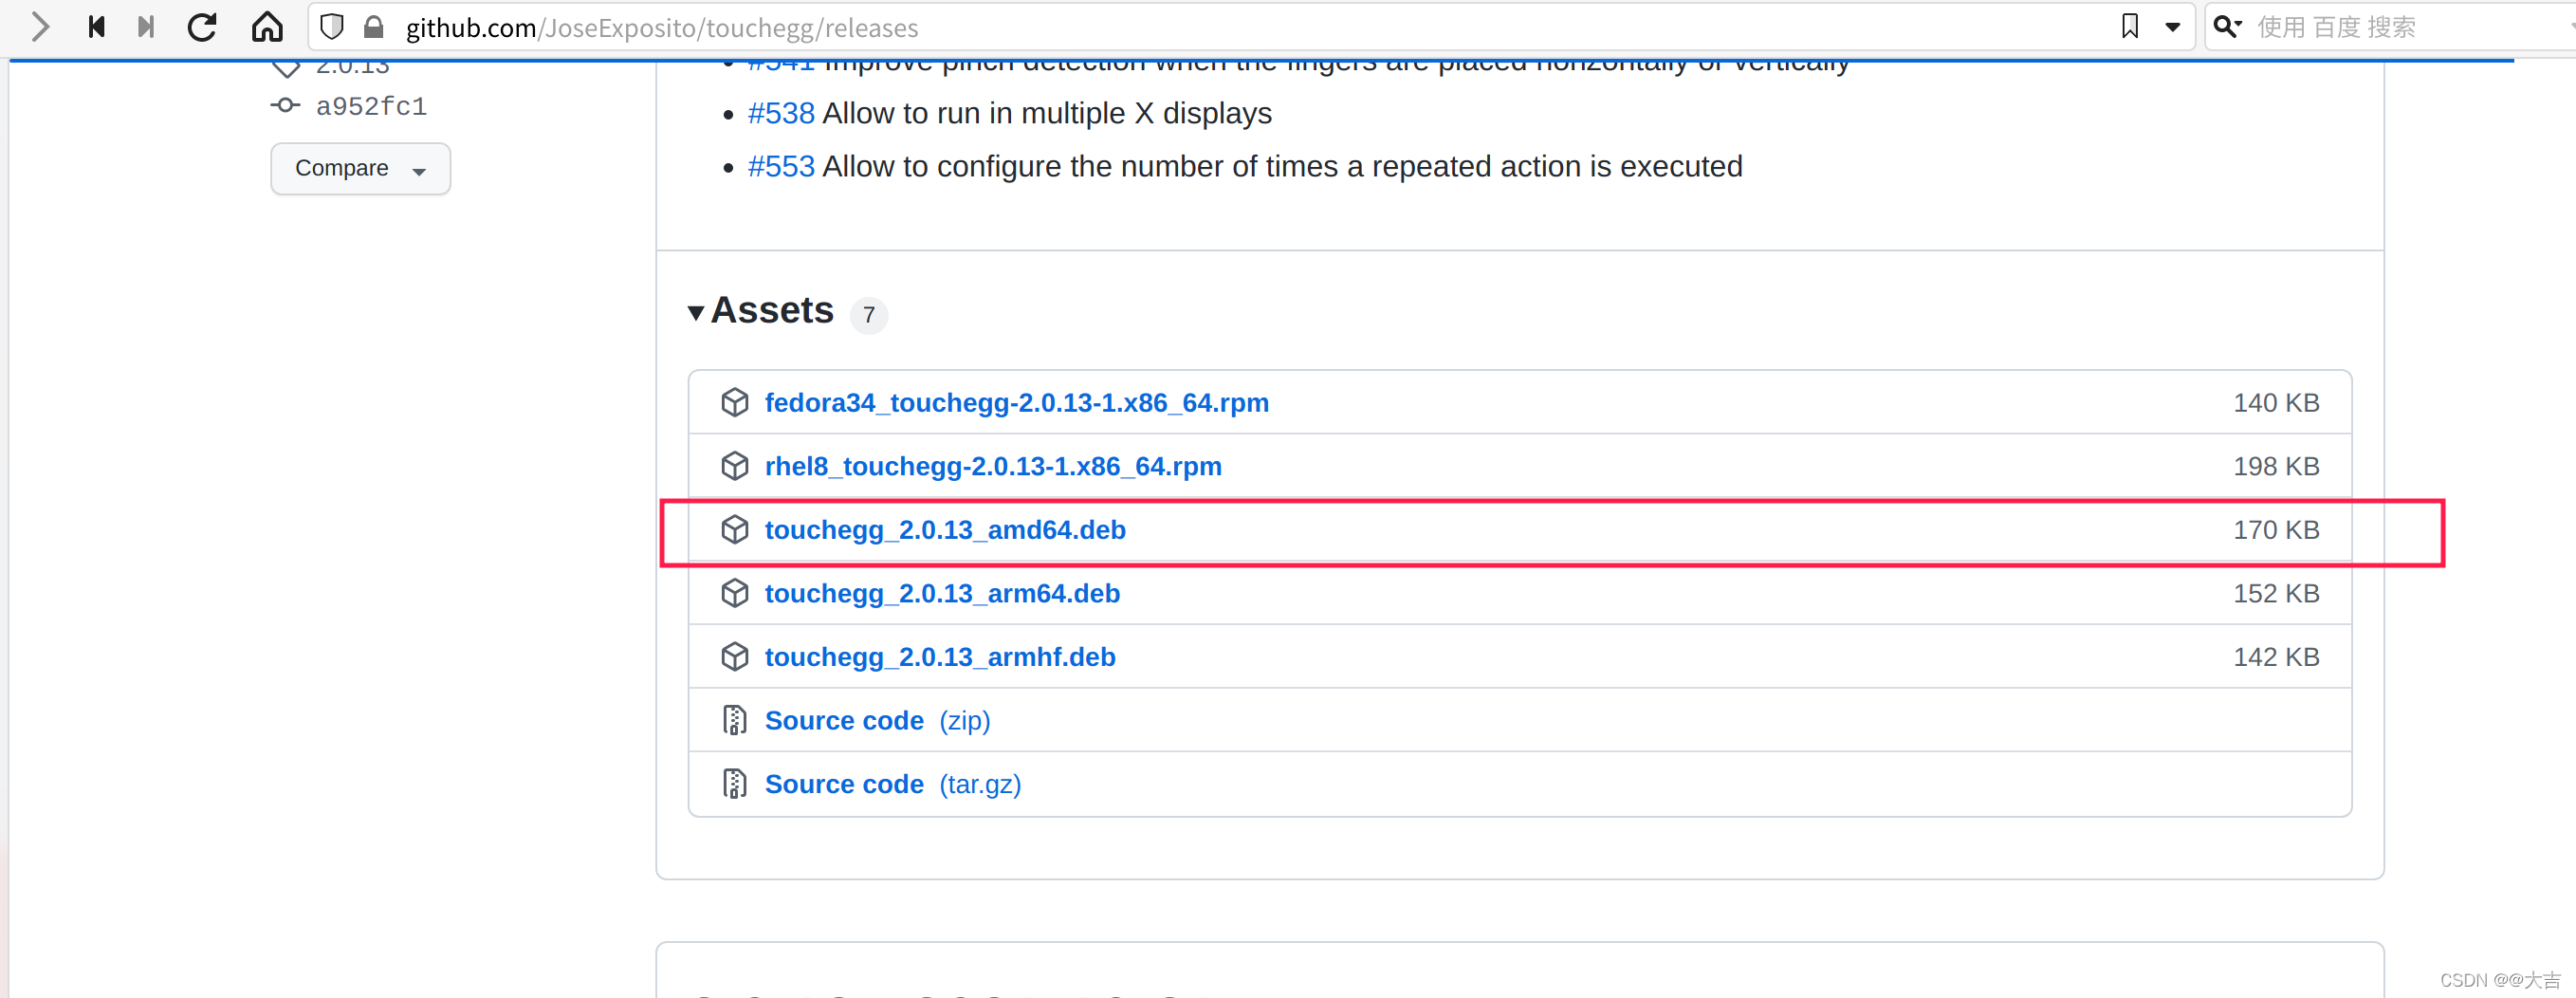
执行命令:sudo apt install ./touchegg_2.0.13_amd64.deb安装该deb包
然后启动touchegg服务:systemctl start touchegg.service
使用flatpak下载可视化界面:touche
https://flathub.org/apps/details/com.github.joseexposito.touche
首先你得有一个flatpak才能使用flatpak的命令。如何安装flatpak,见上文。
然后拉到文章最底部,看到安装touche的命令和执行touche可执行程序的方法:
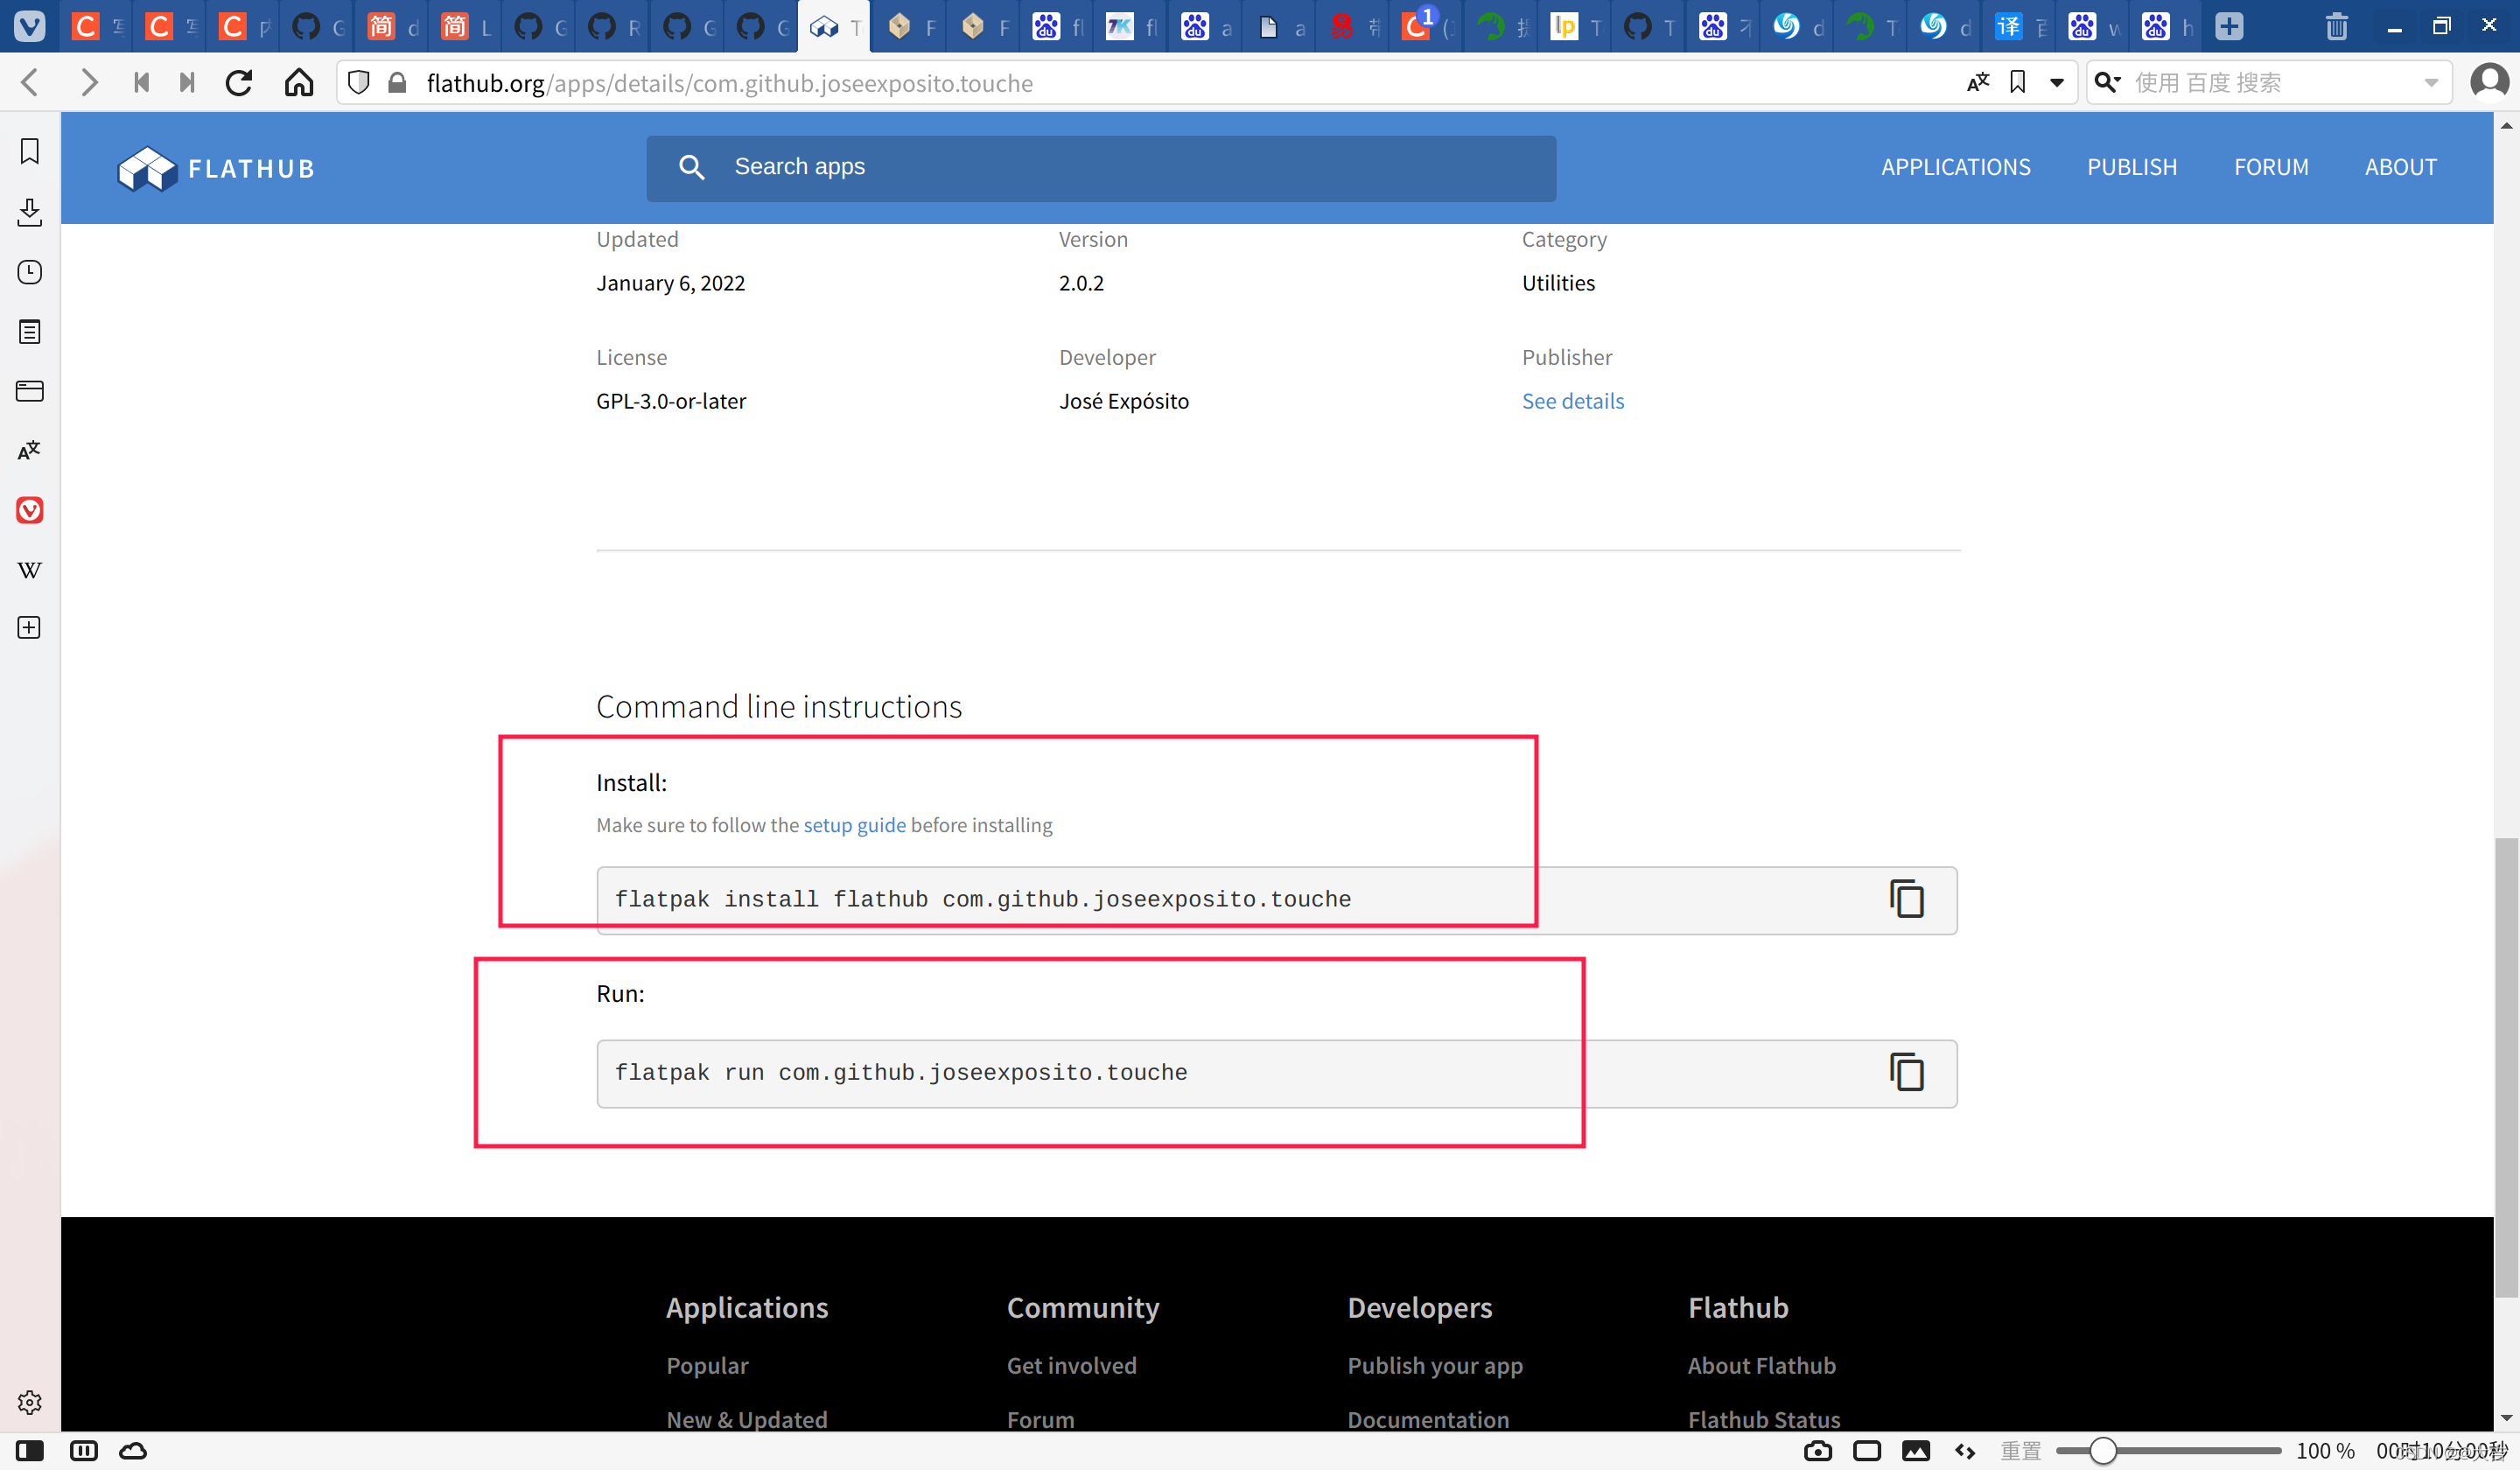
Deepin执行touche可视化界面的方法
flatpak run com.github.joseexposito.touche
xdotool 命令,是Linux上的按键精灵。
例:控制台执行
xdotool mousemove 10 10 click 1
手势大全:https://github.com/jordansissel/xdotool/blob/master/xdotool.pod
根据上文总结:
-
鼠标中键,双击等:
click [options] button
Send a click, that is, a mousedown followed by mouseup for the given button with a short delay between the two (currently 12ms).Buttons generally map this way: Left mouse is 1, middle is 2, right is 3, wheel up is 4, wheel down is 5.
所以中键是:
xdotool click 2 -
alt+tab:
xdotool key alt+Tab
xdotool 键盘映射关系
使用xev即可获取。linux直接输入命令 xev
然后随便按一个键盘,观察keyRelease event,就可以得到keycode
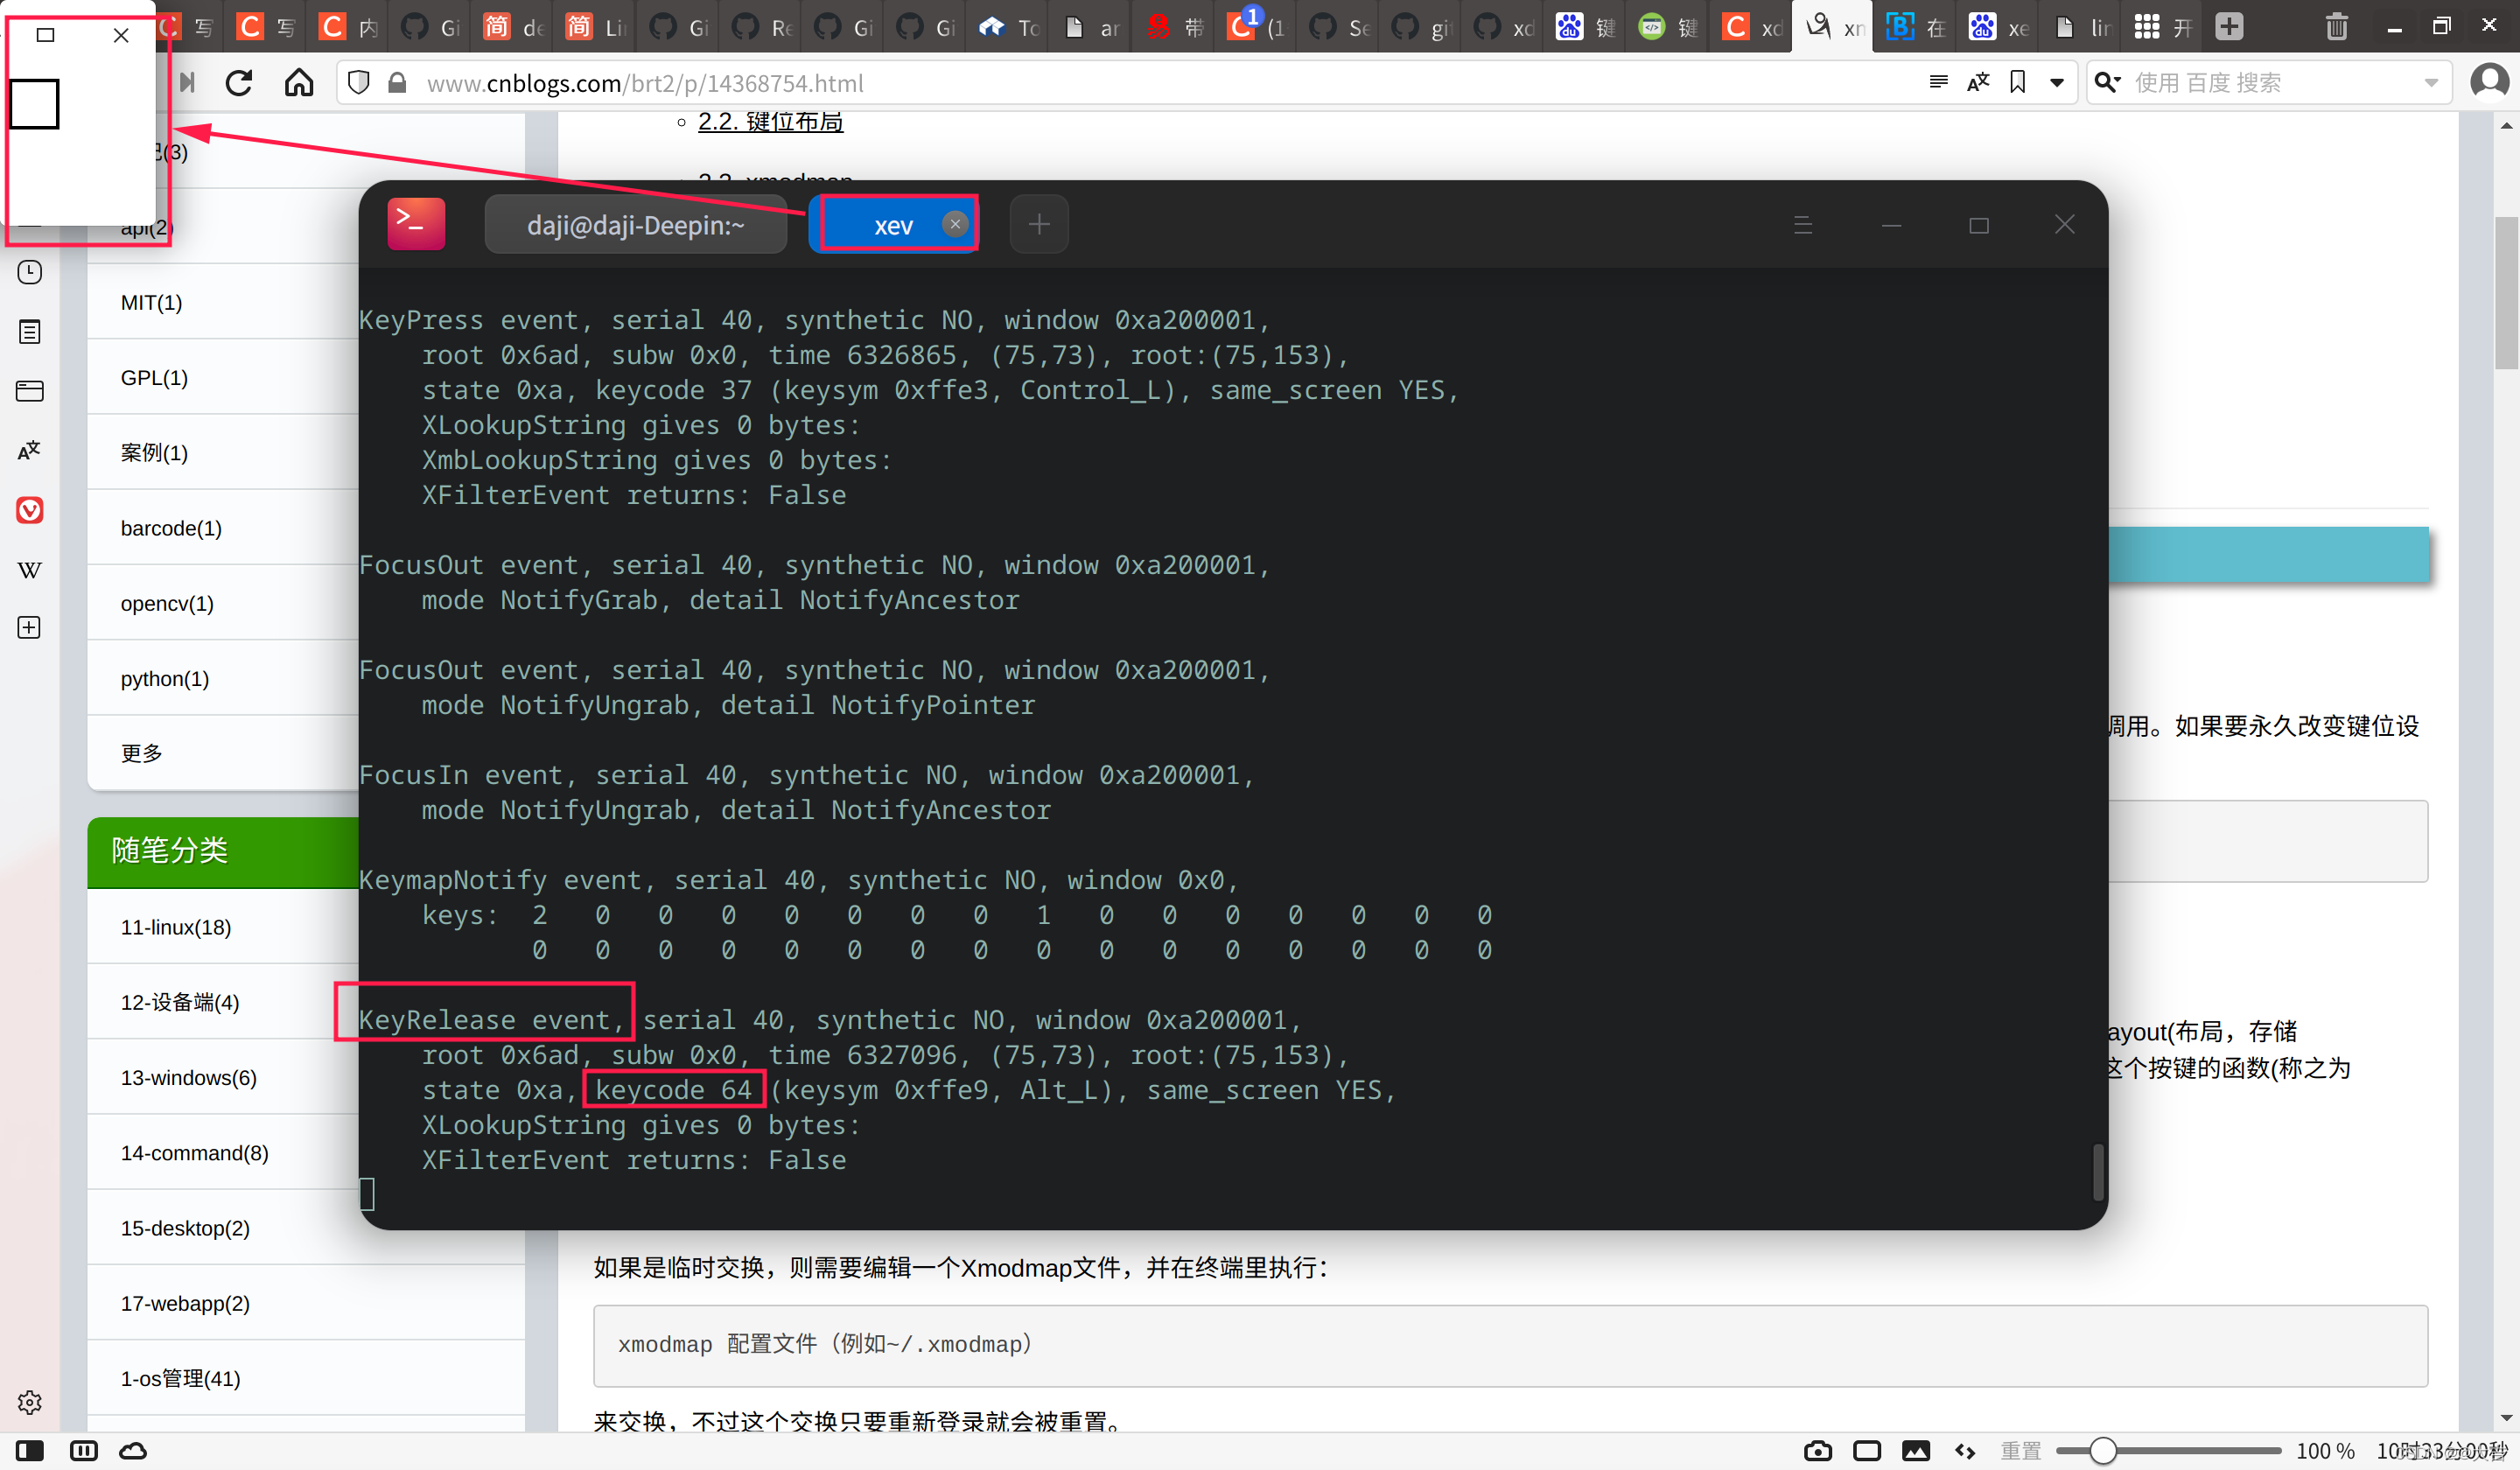
所以我们可以知道一些奇葩的映射关系,比如左箭头是113
xdotool key super+113就是super+←的快捷键
xdotool key alt+70就是ALT+F4的快捷键
借助touchegg和xdotool实现触摸板自由
deepin的触摸板支持天生和Arch系列不能比。
导致我装了touchegg只有捏合好用。
编辑系统自带的触摸板json文件, sudo vim /usr/share/dde-daemon/gesture.json只能实现滑动姿势好用。
所以可以两者结合。
xdotool , 可以用来写连点脚本,和中键事件。见上文有写到。我们可以利用xdotool来为gesture.json配置更加复杂的手势模拟。
- 首先上文的touchegg,设置了两指捏合和反捏合分别为关闭页面和最大最小化窗口。
- 三指轻拍:鼠标中键 (没错,就连这个基础功能deepin都不支持)
- 三指上滑:多任务视图(键盘快捷键为super+s)
- 三指下滑:显示桌面(键盘快捷键为super+d)
- 三指左右滑:切换桌面工作区(键盘快捷键为super+左右箭头)
- 四指轻拍:同应用切换不同实例(alt+~)
- 四指左右滑:将当前运行的应用带到左/右桌面去(快捷键为shift+super+左右箭头)
- 四指上划:同应用切换不同实例(alt+~)
- 四指下划:alt+F4
三指左右划和四指左右划在我这里的设置是相反的。。我也不知道我咋养成的习惯。
gesture.json 备份
[
    {


        "Event": {


            "Name": "swipe",
            "Direction": "up",
            "Fingers": 3
        },
        "Action": {


            "Type": "commandline",
            "Action": "xdotool key super+w"
        }
    },
    {


        "Event": {


            "Name": "swipe",
            "Direction": "down",
            "Fingers": 3
        },
        "Action": {


            "Type": "commandline",
            "Action": "xdotool key super+d"
        }
    },
    {


        "Event": {


            "Name": "swipe",
            "Direction": "left",
            "Fingers": 3
        },
        "Action": {


            "Type": "commandline",
            "Action": "xdotool key super+114"
        }
    },
    {


        "Event": {


            "Name": "swipe",
            "Direction": "right",
            "Fingers": 3
        },
        "Action": {


            "Type": "commandline",
            "Action": "xdotool key super+113"
        }
    },
    {


        "Event": {


            "Name": "tap",
            "Direction": "none",
            "Fingers": 3
        },
        "Action": {


            "Type": "commandline",
            "Action": "xdotool click 2"
        }
    },
    {


        "Event": {


            "Name": "swipe",
            "Direction": "up",
            "Fingers": 4
        },
        "Action": {


            "Type": "commandline",
            "Action": "xdotool key alt+49"
        }
    },
    {


        "Event": {


            "Name": "swipe",
            "Direction": "down",
            "Fingers": 4
        },
        "Action": {


            "Type": "commandline",
            "Action": "xdotool key alt+70"
        }
    },
    {


        "Event": {


            "Name": "swipe",
            "Direction": "right",
            "Fingers": 4
        },
        "Action": {


            "Type": "commandline",
            "Action": "xdotool key shift+super+114"
        }
    },
    {


        "Event": {


            "Name": "swipe",
            "Direction": "left",
            "Fingers": 4
        },
        "Action": {


            "Type": "commandline",
            "Action": "xdotool key shift+super+113"
        }
    },
    {


        "Event": {


            "Name": "tap",
            "Direction": "none",
            "Fingers": 4
        },
        "Action": {


            "Type": "commandline",
            "Action": "xdotool key alt+49"
        }
    },
    {


        "Event": {


            "Name": "swipe",
            "Direction": "up",
            "Fingers": 5
        },
        "Action": {


            "Type": "built-in",
            "Action": "Handle4Or5FingersSwipeUp"
        }
    },
    {


        "Event": {


            "Name": "swipe",
            "Direction": "down",
            "Fingers": 5
        },
        "Action": {


            "Type": "built-in",
            "Action": "Handle4Or5FingersSwipeDown"
        }
    },
    {


        "Event": {


            "Name": "swipe",
            "Direction": "right",
            "Fingers": 5
        },
        "Action": {


            "Type": "built-in",
            "Action": "ReverseSwitchWorkspace"
        }
    },
    {


        "Event": {


            "Name": "swipe",
            "Direction": "left",
            "Fingers": 5
        },
        "Action": {


            "Type": "built-in",
            "Action": "SwitchWorkspace"
        }
    },
    {


        "Event": {


            "Name": "tap",
            "Direction": "none",
            "Fingers": 5
        },
        "Action": {


            "Type": "commandline",
            "Action": "dbus-send --type=method_call --dest=com.deepin.dde.Launcher /com/deepin/dde/Launcher com.deepin.dde.Launcher.Toggle"
        }
    }
]
fusuma手势
github地址:https://github.com/iberianpig/fusuma
安装Fusuma
必须做的第一件事是使用以下命令将你的用户添加到输入组:
sudo gpasswd -a $USER input
退出,然后重新登录。
Fusuma必须与gem一起安装,这意味着你需要Ruby。因此,在安装Fusuma之前,必须先安装Ruby。打开终端窗口并发出命令:
sudo apt-get install ruby
安装Ruby后,你需要使用以下命令安装单个依赖项:
sudo apt-get install libinput-tools
可以使用以下命令安装可选的依赖项(用于发送快捷方式):
sudo apt-get install xdotool
你现在可以使用以下命令安装Fusuma:
sudo gem install fusuma
修改fusuma配置文件:
配置文件有两个可能的位置:
/root/.config/fusuma/config.yml
/var/lib/gems/2.5.0/gems/fusuma-2.4.0/lib/fusuma/config.yml
肯定有一个是好用的。然后你编辑配置文件:
配置文件的threshold和interval分别是灵敏度和延迟。这里 我将灵敏度设置为最高(1)

开机自启动fusuma
fusuma比较奇葩,他并不能根据 systemctl service注册启动,它是通过命令行 fusuma 来启动的。
执行命令fusuma,启动fusuma。这是个前台应用
我们想开机后台执行fusuma命令,应该这么做:
利用 /etc/profile这个配置文件是开机自动执行的特点,让其直接在后台 执行:
编辑 /etc/profile,在其最后加入这一行:
sudo -S fusuma -d &

开机之后 ,ps一下该进程,如果真正执行了,那么你就成功了!

电源管理
Linux的耗电问题永远比不过win,我们只能通过局部的优化让其尽可能耗电更低。
安装tlp
sudo apt install tlp tlp-rdw
启动:sudo tlp start
systemctl start tlp.service
查看tlp服务状态:systemctl status tlp.service
tlp还可以进行更详细的配置,这里可以自行百度。我这里只是用了默认的配置。
最后添加一行alias:alias powersave="sudo tlp start && systemctl start tlp.service",每当断开电源的时候输入powersave就可以省电了。
实测续航
经过了上述的设置,我的Yoga14s(AMD锐龙),在轻度办公条件下(浏览器+markdown写文章+微信聊天),能够坚挺5.5h
Windows同样的办公条件下,能够坚挺6H。Linux能做到这样,已经是非常大的进步了。
如果是代码开发的话,估计续航会缩短很多。
Deepin窗口上方标题栏太宽解决方案:
GitHub的issue里面有人给出了解决方案,非常有效:
https://github.com/linuxdeepin/developer-center/issues/1210

我个人的配置是:
[Active]
height=0

[Inactive]
height=0
重启计算机生效。
wifi管理
笔者的deepin的wifi非常之难用, 建议通过一款命令行软件来使用:
其实就是nmcli。如果没有,请使用 sudo apt-get install nmcli来安装。
详细配置介绍:
https://www.cnblogs.com/mind-water/p/12079647.html?ivk_sa=1024320u
如何开热点:

常用命令(不生效请使用sudo):
-
扫描wifi:
nmcli dev wifi -
列出你历史连接过的已激活wifi:
nmcli connection show --active
去掉 --active,则显示未激活的 -
你只要连接过一次,你的wifi配置文件目录(含wifi密码):
/etc/NetworkManager/system-connections -
开关wifi:
nmcli r wifi on/off -
连接某wifi:
sudo nmcli dev wifi connect "realme GT Neo" password "qwertuui"
systemctl启动管理
控制应用开机自启动:systemctl enable/disable nfs-server.service
卸载重装motionpro
motionpro使用sh安装,默认会安装在 /opt/Motionpro 目录下
我是直接暴力 sudo rm -rf Motionpro来卸载的
重新安装Motionpro :
下载对应版本:https://client.arraynetworks.com.cn:8080/zh/troubleshooting
我下载的是1.2.12。 安装包是个.sh文件,安装包已经存放于reform中。
如果该版本不行,立马重装1.1.1版本。安装包相同位置。
1.1.1版本下载命令:wget https://support.arraynetworks.net/prx/001/http/supportportal.arraynetworks.net/downloads/motionpro/Linux/Ubuntu/20171228/MotionPro_Linux_Ubuntu_x86-64_1.1.1.sh
安装:只需要执行命令:
sudo ./MotionPro_Linux_Ubuntu_x86-64_1.2.12.sh
配置文件 /etc/profile
这里全都是环境变量。直接在这个文件的最下面添加环境变量即可。
下面我只添加了jdk和node:
export JAVA_HOME=/home/daji/jdk1.8
export PATH=$JAVA_HOME/bin:$PATH
export CLASSPATH=.:$JAVA_HOME/lib/dt.jar:$JAVA_HOME/lib/tools.jar

export PATH=/home/daji/data/developtools/node-v14.19.1-linux-x64/bin:$PATH