说明
环境准备
-
一台有外网的电脑
-
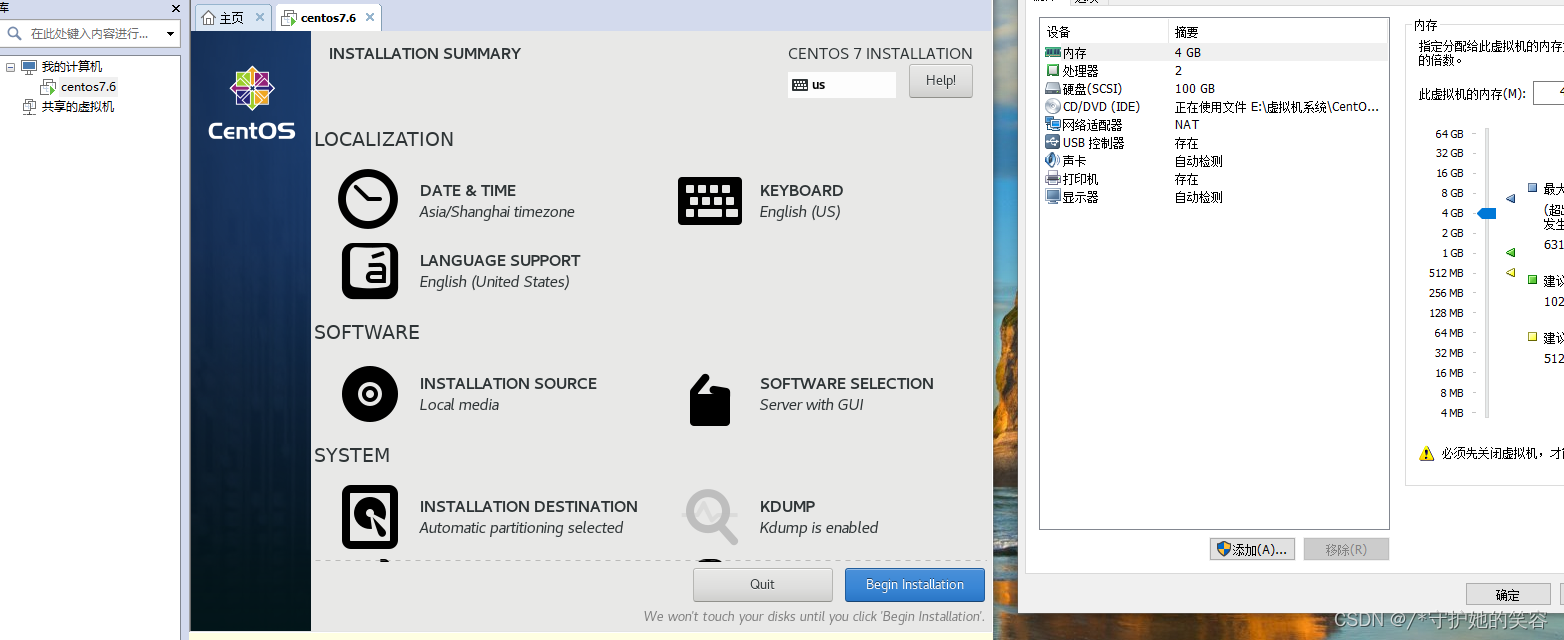
安装一台虚拟机【我用的VMware】
随便装一台就行了,
-
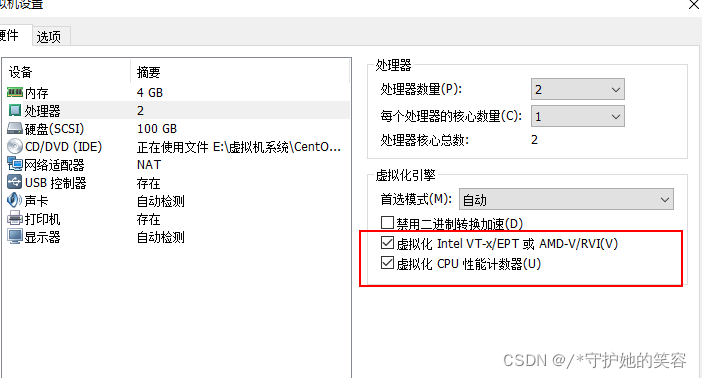
记得把虚拟机的虚拟化打开。
-
系统装好以后,改成固定ip,然后用工具连接虚拟机吧,方便后面操作

-
全都弄好了 然后创建一个快照,后续出问题了也可以恢复重来一下。

-
上传一个ISO镜像到虚拟机里面

虚拟机中安装kvm虚拟机
1、确保支持cpu虚拟化
/proc/cpuinfo | egrep 'svm|vmx'【如果没有输出证明不支持】
[root@ccx ~]# cat /proc/cpuinfo | egrep 'svm|vmx'
flags           : fpu vme de pse tsc msr pae mce cx8 apic sep mtrr pge mca cmov pat pse36 clflush dts mmx fxsr sse sse2 ss syscall nx pdpe1gb rdtscp lm constant_tsc arch_perfmon pebs bts nopl xtopology tsc_reliable nonstop_tsc aperfmperf eagerfpu pni pclmulqdq vmx ssse3 fma cx16 pcid sse4_1 sse4_2 x2apic movbe popcnt tsc_deadline_timer aes xsave avx f16c rdrand hypervisor lahf_lm abm epb ibrs ibpb stibp tpr_shadow vnmi ept vpid fsgsbase tsc_adjust bmi1 avx2 smep bmi2 invpcid xsaveopt dtherm ida arat pln pts spec_ctrl intel_stibp
flags           : fpu vme de pse tsc msr pae mce cx8 apic sep mtrr pge mca cmov pat pse36 clflush dts mmx fxsr sse sse2 ss syscall nx pdpe1gb rdtscp lm constant_tsc arch_perfmon pebs bts nopl xtopology tsc_reliable nonstop_tsc aperfmperf eagerfpu pni pclmulqdq vmx ssse3 fma cx16 pcid sse4_1 sse4_2 x2apic movbe popcnt tsc_deadline_timer aes xsave avx f16c rdrand hypervisor lahf_lm abm epb ibrs ibpb stibp tpr_shadow vnmi ept vpid fsgsbase tsc_adjust bmi1 avx2 smep bmi2 invpcid xsaveopt dtherm ida arat pln pts spec_ctrl intel_stibp
[root@ccx ~]#
2、安装qemu-kvm、libvirt、virt-install包和权限调整
- 安装下面几个包
yum -y install qemu-kvm libvirt virt-install
[root@ccx ~]# yum -y install qemu-kvm libvirt virt-install
...
  Verifying  : libvirt-daemon-driver-qemu-4.5.0-10.el7.x86_64                                                                                                                                                                         69/70
  Verifying  : libvirt-daemon-driver-interface-4.5.0-10.el7.x86_64                                                                                                                                                                    70/70

Installed:
  libvirt.x86_64 0:4.5.0-36.el7_9.5                                                                                    virt-install.noarch 0:1.5.0-7.el7

Dependency Installed:
  autogen-libopts.x86_64 0:5.18-5.el7              gnutls-dane.x86_64 0:3.3.29-9.el7_6                              gnutls-utils.x86_64 0:3.3.29-9.el7_6                        libvirt-bash-completion.x86_64 0:4.5.0-36.el7_9.5
  libvirt-client.x86_64 0:4.5.0-36.el7_9.5         libvirt-daemon-config-nwfilter.x86_64 0:4.5.0-36.el7_9.5         libvirt-daemon-driver-lxc.x86_64 0:4.5.0-36.el7_9.5         libvirt-python.x86_64 0:4.5.0-1.el7
  python-ipaddr.noarch 0:2.1.11-2.el7              python-requests.noarch 0:2.6.0-10.el7                            python-urllib3.noarch 0:1.10.2-7.el7                        virt-manager-common.noarch 0:1.5.0-7.el7

Updated:
  qemu-kvm.x86_64 10:1.5.3-175.el7_9.5

Dependency Updated:
  glusterfs.x86_64 0:6.0-49.1.el7                                              glusterfs-api.x86_64 0:6.0-49.1.el7                                            glusterfs-cli.x86_64 0:6.0-49.1.el7
  glusterfs-client-xlators.x86_64 0:6.0-49.1.el7                               glusterfs-libs.x86_64 0:6.0-49.1.el7                                           gnutls.x86_64 0:3.3.29-9.el7_6
  libvirt-daemon.x86_64 0:4.5.0-36.el7_9.5                                     libvirt-daemon-config-network.x86_64 0:4.5.0-36.el7_9.5                        libvirt-daemon-driver-interface.x86_64 0:4.5.0-36.el7_9.5
  libvirt-daemon-driver-network.x86_64 0:4.5.0-36.el7_9.5                      libvirt-daemon-driver-nodedev.x86_64 0:4.5.0-36.el7_9.5                        libvirt-daemon-driver-nwfilter.x86_64 0:4.5.0-36.el7_9.5
  libvirt-daemon-driver-qemu.x86_64 0:4.5.0-36.el7_9.5                         libvirt-daemon-driver-secret.x86_64 0:4.5.0-36.el7_9.5                         libvirt-daemon-driver-storage.x86_64 0:4.5.0-36.el7_9.5
  libvirt-daemon-driver-storage-core.x86_64 0:4.5.0-36.el7_9.5                 libvirt-daemon-driver-storage-disk.x86_64 0:4.5.0-36.el7_9.5                   libvirt-daemon-driver-storage-gluster.x86_64 0:4.5.0-36.el7_9.5
  libvirt-daemon-driver-storage-iscsi.x86_64 0:4.5.0-36.el7_9.5                libvirt-daemon-driver-storage-logical.x86_64 0:4.5.0-36.el7_9.5                libvirt-daemon-driver-storage-mpath.x86_64 0:4.5.0-36.el7_9.5
  libvirt-daemon-driver-storage-rbd.x86_64 0:4.5.0-36.el7_9.5                  libvirt-daemon-driver-storage-scsi.x86_64 0:4.5.0-36.el7_9.5                   libvirt-daemon-kvm.x86_64 0:4.5.0-36.el7_9.5
  libvirt-libs.x86_64 0:4.5.0-36.el7_9.5                                       qemu-img.x86_64 10:1.5.3-175.el7_9.5                                           qemu-kvm-common.x86_64 10:1.5.3-175.el7_9.5

Complete!
[root@ccx ~]#
- 权限调整
将user和group前面的#去掉,让root用户可以操作
[root@ccx ~]# vim /etc/libvirt/qemu.conf
442 user = "root"
446 group = "root"
- 重启服务
[root@ccx ~]# systemctl daemon-reload #重载配置
[root@ccx ~]# systemctl restart libvirtd
[root@ccx ~]#
3、开启libvirtd服务病开机自启
systemctl start libvirtd && systemctl enable libvirtd
[root@ccx ~]#  systemctl enable libvirtd
[root@ccx ~]# systemctl is-active libvirtd
active
[root@ccx ~]#
4、创建一个磁盘文件
- 我们创建一个磁盘并且把镜像移动下位置,镜像和存储路径最好分开存放
qemu-img create -f qcow2 /centos7.6-kvm.qcow2【自定义名称和路径】 20G【大小】
[root@ccx ~]# mkdir /kvm
[root@ccx ~]# mkdir /kvm/iso
[root@ccx ~]# mkdir /kvm/sys
[root@ccx ~]# mv CentOS-7.6-x86_64-DVD-1810.iso /kvm/iso/
[root@ccx ~]# qemu-img create -f qcow2 /kvm/sys/centos7.6-kvm.qcow2 20G
Formatting '/kvm/sys/centos7.6-kvm.qcow2', fmt=qcow2 size=21474836480 encryption=off cluster_size=65536 lazy_refcounts=off
[root@ccx ~]#
[root@ccx ~]# ls /kvm/sys/
centos7.6-kvm.qcow2
[root@ccx ~]#
5、创建虚拟机。
virt-install --virt-type kvm【类型为kvm】 --name centos7-2020【名称随意】 --ram 1024【内存1G】 --cdrom=/home/kvm/CentOS-7-x86_64-Minimal-2003.iso【镜像文件指定位置】 --disk path=/home/kvm/centos7-kvm.qcow2【磁盘文件就是步骤4中的】 --network network=default【网络默认】 --graphic vnc【图形选择vnc】,listen=0.0.0.0 --noautoconsole
[root@ccx ~]# virt-install --virt-type kvm --name centos7.6 --ram 2048 --cdrom=/root/CentOS-7.6-x86_64-DVD-1810.iso --disk path=/root/centos7.6-kvm.qcow2,format=qcow2 --network network=default  --graphic vnc,listen=0.0.0.0 --noautoconsole --os-type=linux --os-variant=centos7 --check all=off
WARNING  /root/centos7.6-kvm.qcow2 may not be accessible by the hypervisor. You will need to grant the 'qemu' user search permissions for the following directories: ['/root']

Starting install...
ERROR    Cannot access storage file '/root/centos7.6-kvm.qcow2' (as uid:107, gid:107): Permission denied
Domain installation does not appear to have been successful.
If it was, you can restart your domain by running:
  virsh --connect qemu:///system start centos7.6
otherwise, please restart your installation.
[root@ccx ~]#
[root@ccx ~]# virt-install --virt-type kvm --name centos7.6 --ram 1024 --vcpus 2 --cdrom=/kvm/iso/CentOS-7.6-x86_64-DVD-1810.iso --disk path=/kvm/sys/centos7.6-kvm.qcow2 --network=default --graphics vnc,listen=0.0.0.0 --noautoconsole

Starting install...
Domain installation still in progress. You can reconnect to
the console to complete the installation process.

# 出现上面内容为正常,翻译后就是
开始安装......
域安装仍在进行。您可以重新连接
到控制台以便完成安装进程。
[root@ccx ~]#
virt-install --virt-type kvm --name centos7.6 --ram 2048 --cdrom=/root/CentOS-7.6-x86_64-DVD-1810.iso --disk path=/root/centos7.6-kvm.qcow2 --network network=default --graphic vnc,listen=0.0.0.0 --noautoconsole
6、宿主机安装vnc server
yum -y install tigervnc-server tigervnc vnc vnc-server
systemctl daemon-reload
[root@ccx ~]# yum -y install tigervnc-server tigervnc vnc vnc-server
Loaded plugins: fastestmirror, langpacks
Loading mirror speeds from cached hostfile
 * base: mirrors.aliyun.com
 * extras: mirrors.bfsu.edu.cn
 * updates: mirrors.aliyun.com
Resolving Dependencies
--> Running transaction check
---> Package tigervnc.x86_64 0:1.8.0-22.el7 will be installed
--> Processing Dependency: tigervnc-icons for package: tigervnc-1.8.0-22.el7.x86_64
--> Processing Dependency: libfltk_images.so.1.3()(64bit) for package: tigervnc-1.8.0-22.el7.x86_64
--> Processing Dependency: libfltk.so.1.3()(64bit) for package: tigervnc-1.8.0-22.el7.x86_64
---> Package tigervnc-server.x86_64 0:1.8.0-22.el7 will be installed
--> Running transaction check
---> Package fltk.x86_64 0:1.3.4-2.el7 will be installed
--> Processing Dependency: libGLU.so.1()(64bit) for package: fltk-1.3.4-2.el7.x86_64
---> Package tigervnc-icons.noarch 0:1.8.0-22.el7 will be installed
--> Running transaction check
---> Package mesa-libGLU.x86_64 0:9.0.0-4.el7 will be installed
--> Finished Dependency Resolution

Dependencies Resolved

===================================================================================================================
 Package                         Arch                   Version                      Repository               Size
===================================================================================================================
Installing:
 tigervnc                        x86_64                 1.8.0-22.el7                 updates                 236 k
 tigervnc-server                 x86_64                 1.8.0-22.el7                 updates                 211 k
Installing for dependencies:
 fltk                            x86_64                 1.3.4-2.el7                  base                    560 k
 mesa-libGLU                     x86_64                 9.0.0-4.el7                  base                    196 k
 tigervnc-icons                  noarch                 1.8.0-22.el7                 updates                  40 k

Transaction Summary
===================================================================================================================
Install  2 Packages (+3 Dependent packages)

Total download size: 1.2 M
Installed size: 3.0 M
Downloading packages:
(1/5): mesa-libGLU-9.0.0-4.el7.x86_64.rpm                                                   | 196 kB  00:00:00
(2/5): tigervnc-icons-1.8.0-22.el7.noarch.rpm                                               |  40 kB  00:00:00
(3/5): tigervnc-server-1.8.0-22.el7.x86_64.rpm                                              | 211 kB  00:00:00
(4/5): tigervnc-1.8.0-22.el7.x86_64.rpm                                                     | 236 kB  00:00:00
(5/5): fltk-1.3.4-2.el7.x86_64.rpm                                                          | 560 kB  00:00:00
-------------------------------------------------------------------------------------------------------------------
Total                                                                              1.4 MB/s | 1.2 MB  00:00:00
Running transaction check
Running transaction test
Transaction test succeeded
Running transaction
  Installing : tigervnc-icons-1.8.0-22.el7.noarch                                                              1/5
  Installing : mesa-libGLU-9.0.0-4.el7.x86_64                                                                  2/5
  Installing : fltk-1.3.4-2.el7.x86_64                                                                         3/5
  Installing : tigervnc-1.8.0-22.el7.x86_64                                                                    4/5
  Installing : tigervnc-server-1.8.0-22.el7.x86_64                                                             5/5
  Verifying  : tigervnc-server-1.8.0-22.el7.x86_64                                                             1/5
  Verifying  : mesa-libGLU-9.0.0-4.el7.x86_64                                                                  2/5
  Verifying  : tigervnc-icons-1.8.0-22.el7.noarch                                                              3/5
  Verifying  : fltk-1.3.4-2.el7.x86_64                                                                         4/5
  Verifying  : tigervnc-1.8.0-22.el7.x86_64                                                                    5/5

Installed:
  tigervnc.x86_64 0:1.8.0-22.el7                       tigervnc-server.x86_64 0:1.8.0-22.el7

Dependency Installed:
  fltk.x86_64 0:1.3.4-2.el7       mesa-libGLU.x86_64 0:9.0.0-4.el7       tigervnc-icons.noarch 0:1.8.0-22.el7

Complete!
[root@ccx ~]#
7、执行下述命令设置密码
- 直接执行:
vncserver
密码6位以上,输2次密码然后输入y即可,忘记保存了。。。 - 然后执行
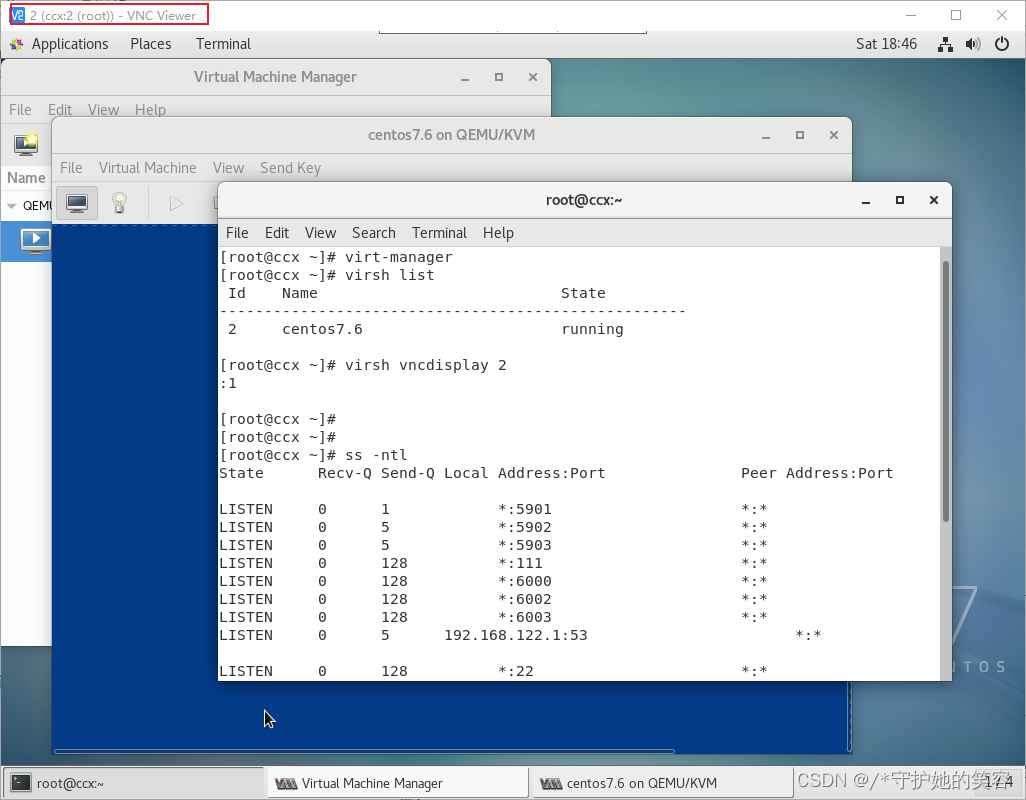
ss -ntl查看监听端口,这样就可以看到第一个有一个5900的端口监听【我下面有多个是因为我执行了多次vncserver(不懂这个咋用,也是在研究)。
[root@ccx ~]# ss -ntl
State       Recv-Q Send-Q            Local Address:Port                           Peer Address:Port
LISTEN      0      1                             *:5900                                      *:*
LISTEN      0      5                             *:5901                                      *:*
LISTEN      0      5                             *:5902                                      *:*
LISTEN      0      128                           *:111                                       *:*
LISTEN      0      128                           *:6000                                      *:*
LISTEN      0      128                           *:6001                                      *:*
LISTEN      0      128                           *:6002                                      *:*
LISTEN      0      5                 192.168.122.1:53                                        *:*
LISTEN      0      128                           *:22                                        *:*
LISTEN      0      128                   127.0.0.1:631                                       *:*
LISTEN      0      100                   127.0.0.1:25                                        *:*
LISTEN      0      5                            :::5901                                     :::*
LISTEN      0      5                            :::5902                                     :::*
LISTEN      0      128                          :::111                                      :::*
LISTEN      0      128                          :::6000                                     :::*
LISTEN      0      128                          :::6001                                     :::*
LISTEN      0      128                          :::6002                                     :::*
LISTEN      0      128                          :::22                                       :::*
LISTEN      0      128                         ::1:631                                      :::*
LISTEN      0      100                         ::1:25                                       :::*
[root@ccx ~]#
8、启动vnc服务
-
这个启动的是 vnc的服务【@后面默认是主机名】
systemctl start vncserver@ccx:0 -
启动这个服务的意义呢就是后面可以用客户端连接这个桌面【注意,这启动的是vnc服务,也就是说这属于服务端,下面10步骤中属于客户端】
9、关闭防火墙和selinux
- 防火墙一定要关,selinux不关其实也可以
如果你的还是报错把selinux关了继续尝试 临时关闭selinux:setenforce 0
[root@ccx ~]# systemctl status firewalld
鈼[0m firewalld.service - firewalld - dynamic firewall daemon
   Loaded: loaded (/usr/lib/systemd/system/firewalld.service; enabled; vendor preset: enabled)
   Active: active (running) since Sat 2022-03-19 05:19:48 CST; 1h 6min ago
     Docs: man:firewalld(1)
 Main PID: 5145 (firewalld)
    Tasks: 2
   CGroup: /system.slice/firewalld.service
           鈹斺攢5145 /usr/bin/python -Es /usr/sbin/firewalld --nofork --nopid

Mar 19 05:19:47 ccx systemd[1]: Starting firewalld - dynamic firewall daemon...
Mar 19 05:19:48 ccx systemd[1]: Started firewalld - dynamic firewall daemon.
[root@ccx ~]# systemctl stop firewalld.service
[root@ccx ~]# systemctl disable firewalld.service
Removed symlink /etc/systemd/system/multi-user.target.wants/firewalld.service.
Removed symlink /etc/systemd/system/dbus-org.fedoraproject.FirewallD1.service.
[root@ccx ~]#
10、vnc客户端连接宿主机,然后正常安装虚拟机
- 说明,网上有些说linux可以直接调出vnc客户端的,可是我不会啊,没折腾出来,所以直接在windows上下载一个客户端使用咯。。。。反正效果一样,后面再慢慢学习linux上的客户端调用把,这就不浪费时间了。
- 现在呢,准备一个windows上的vnc客户端【任意都行】
你没有安装包呢,可以下载我上传的,然后照着用就好了~~~~
直接点击下载:VNC-Viewe-Windows.rar
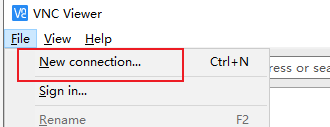
- 添加刚才定义的那啥,虚拟机,如果之前没有vnc,那么默认第一个【0】就好了,如果不是,0123挨个测呗!

- 勾选一直点击跳过

- 然后就到之前定义的vnc上咯。。。。开始安装系统把
我这装的全量包,我们云上都是精简版的qcow2,唉,因为缺少依赖包,有些应用使用不正常,想弄一个全量包的cenots,方便别人使用。

- 安装这些我不过多累赘,我装的gui桌面

- 等待安装完毕然后点击重启

导出新装虚拟机为qcow2格式
-
——我这是将qcow2格式导出为qcow2哦
-
按下面顺序导出,因为我也是第一次做,网上有2种方法:
- 1、安装好系统后直接导出
- 2、进入虚拟机做配置后删除信息再导出
-
因为我也是第一次做,既然网上有这2种方法,我就2种都做一下,最后放在openstack上面,看哪种可行就用哪种~
1、直接导出
直接导出为qcow2格式
- 1、一条命令即可
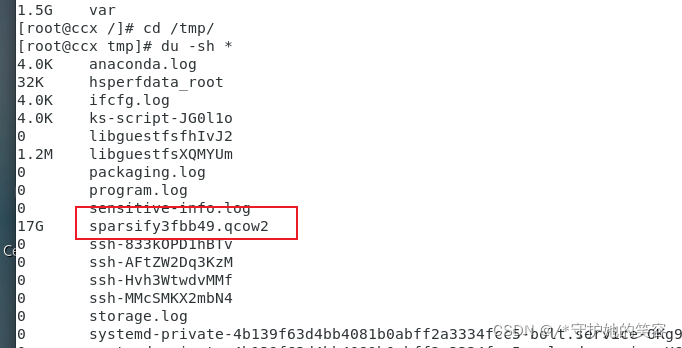
qemu-img convert -c -O qcow2【-O表示导出格式】 /kvm/sys/centos7.6-kvm.qcow2【系统所处文件,上面步骤4中定义的】 ccx_centos76.qcow2【自定义导出后的文件名】
过程有点慢,且没有进度条,耐心等待。 - 额 导出来的文件从4G多变成1.8G了,虽然qcow2官网下载的只有几百M,但我也不知道是不是正常的,下面安装看看吧,期待。。。。
[root@ccx ~]# qemu-img convert -c -O qcow2 /kvm/sys/centos7.6-kvm.qcow2 ccx_centos76.qcow2
[root@ccx ~]#
[root@ccx ~]# ls ccx
ls: cannot access ccx: No such file or directory
[root@ccx ~]# ls
anaconda-ks.cfg     Desktop    Downloads             Music     Public     Videos
ccx_centos76.qcow2  Documents  initial-setup-ks.cfg  Pictures  Templates
[root@ccx ~]# du -sh ccx_centos76.qcow2
1.8G    ccx_centos76.qcow2
[root@ccx ~]#
总结和历史命令
- 最后我发现,原来我再vnc上操作的也是我当前的主机欸
不对,我是后面用的1才是我的主机,0是新装的系统,那么说明我用1并没有进入到我新装的系统里面。
但是我看了存放系统的文件,大小确实有4G了,那么证明系统应该是装成功了的,因为我这也是第一次搞,也不清除这个vnc逻辑到底是啥,反正,既然这文件有4g了,就继续搞,吧这个文件导出为qcow2格式安装虚拟机看看呢,如果正常就一切ok啦。。。
[root@ccx ~]# du -sh /kvm/sys/centos7.6-kvm.qcow2
4.1G    /kvm/sys/centos7.6-kvm.qcow2
[root@ccx ~]#
- 历史命令全部如下
[root@ccx ~]# history
    1  hostnamectl set-hostname ccx
    2  nmtui
    3  ip a
    4  ifup ens33
    5  ip a
    6  nmtui
    7  ip a
    8  ping baidu.com
    9  cd /etc/sysconfig/network-scripts/
   10  ls
   11  vi ifcfg-ens33
   12  cat /proc/cpuinfo | egrep 'svm|vmx'
   13  yum -y install qemu-kvm libvirt virt-install
   14  systemctl start libvirtd && systemctl enable libvirtd\\
   15  systemctl start libvirtd && systemctl enable libvirtd
   16  systemctl is-active libvirtd
   17  qemu-img create -f qcow2 /centos7.6-kvm.qcow2 20G
   18  yum -y install bridge-utils
   19  rpm -qa |grep bridge-utils
   20  vim /etc/libvirt/qemu.conf
   21  systemctl daemon-reload
   22  systemctl restart libvirtd
   23  ls
   24  pwd
   25  mkdir /kvm
   26  mkdir /kvm/iso
   27  mkdir /kvm/sys
   28  mv CentOS-7.6-x86_64-DVD-1810.iso /kvm/iso/
   29  qemu-img create -f qcow2 /kvm/sys/centos7.6-kvm.qcow2 20G
   30  ls /kvm/sys/
   31  irt-install --virt-type kvm --name centos7.6 --ram 1024 --vcpus 2 --cdrom=/kvm/iso/CentOS-7.6-x86_64-DVD-1810.iso --disk path=/kvm/sys/centos7.6-kvm.qcow2 --network=default --graphics vnc,listen=0.0.0.0 --noautoconsole
   32  virt-install --virt-type kvm --name centos7.6 --ram 1024 --vcpus 2 --cdrom=/kvm/iso/CentOS-7.6-x86_64-DVD-1810.iso --disk path=/kvm/sys/centos7.6-kvm.qcow2 --network=default --graphics vnc,listen=0.0.0.0 --noautoconsole
   33  yum -y install tigervnc-server tigervnc vnc vnc-server
   34  ss -tnl
   35  vncservere
   36  vncserver
   37  systemctl start vncserver@ccx:1
   38  vncserver 1
   39  vncserver :1
   40  vncserver:1
   41  vncserver :0
   42  ss -ntl
   43  vncserver :0
   44  vncserver
   45  ss -ntl
   46  vncserver -kill 2
   47  vncserver -kill 1
   48  vncserver -kill: 2
   49  ss -ntl
   50  systemctl status firewalld
   51  systemctl stop firewalld.service
   52  systemctl disable firewalld.service
   53  history
   54  ss -ntl
   55  ip a
   56  lscpu
   57  ip a
   58  ip a | grep 192
   59  cat /etc/redhat-release
   60  poweroff
   61  history
[root@ccx ~]#
2、进入虚拟机删除信息再删除
正确做法
vnc说明和思考
- 上面重启以后呢,其实之前的vnc信息就用不了了【可以看到5900端口已经没了】
[root@ccx ~]# ss -ntl
State       Recv-Q Send-Q            Local Address:Port                           Peer Address:Port
LISTEN      0      5                             *:5901                                      *:*
LISTEN      0      5                             *:5902                                      *:*
LISTEN      0      128                           *:111                                       *:*
-
查看这个虚拟机的vnc号方法
更多可以去看我这篇文章:宿主机上查看云机vnc桌面号

-
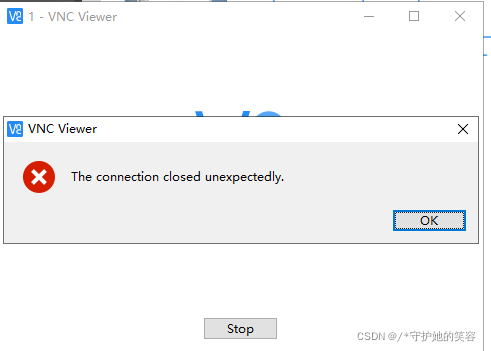
但是我连接报错了哦 进虚拟机内部看 网络成122段的了,我windows电脑ping不通这个地址,所以无法访问把,宿主机可以ping通,但我不会再linux上使用vnc客户端。。。。所以 kvm虚拟机的vnc我是无法直接通过我的windows电脑直接连接了,所以我都在linux宿主机上操作把,只是不能复制粘贴命令了,有点讨厌。

-
下面是我通过windows直接连接kvm宿主机的报错内容【并不是超时哦,超时才证明vnc桌面不存在】
-
vnc思考
其实我有用上面7和8的方法新建了vnc,但新建以后发现只有5902和5903能用
[root@ccx ~]# ss -ntl
State      Recv-Q Send-Q Local Address:Port               Peer Address:Port
LISTEN     0      1            *:5901                     *:*
LISTEN     0      5            *:5902                     *:*
LISTEN     0      5            *:5903                     *:*
LISTEN     0      128          *:111                      *:*
LISTEN     0      128          *:6000                     *:*
LISTEN     0      128          *:6002                     *:*
LISTEN     0      128          *:6003                     *:*
LISTEN     0      5      192.168.122.1:53                       *:*
LISTEN     0      128          *:22                       *:*
LISTEN     0      128    127.0.0.1:631                      *:*
LISTEN     0      100    127.0.0.1:25                       *:*
LISTEN     0      5           :::5902                    :::*
LISTEN     0      5           :::5903                    :::*
LISTEN     0      128         :::111                     :::*
LISTEN     0      128         :::6000                    :::*
LISTEN     0      128         :::6002                    :::*
LISTEN     0      128         :::6003                    :::*
LISTEN     0      128         :::22                      :::*
LISTEN     0      128        ::1:631                     :::*
LISTEN     0      100        ::1:25                      :::*
[root@ccx ~]#
- 但这2个端口通过vnc进入呢,实际上都是我宿主机【这种理论上能无限建,一个桌面号给一个人用,这是不是就是多客户端呢?】
进入kvm虚拟机
- 我后来安装virt-namager以后呢,发现我们之前操作的虚拟机实际在这可以看到,那么我们就在这继续操作吧【看下面安装virt-manager,先把这个安装都】
我们可以看到进入后就是接受许可界面了【上面系统安装完重启就会到这个界面,应该都知道的把】

- 我们直接接受并进入系统把【到这个界面其实就不需要用vnc了,直接用virt就可以】

配置网卡和公网ip
-
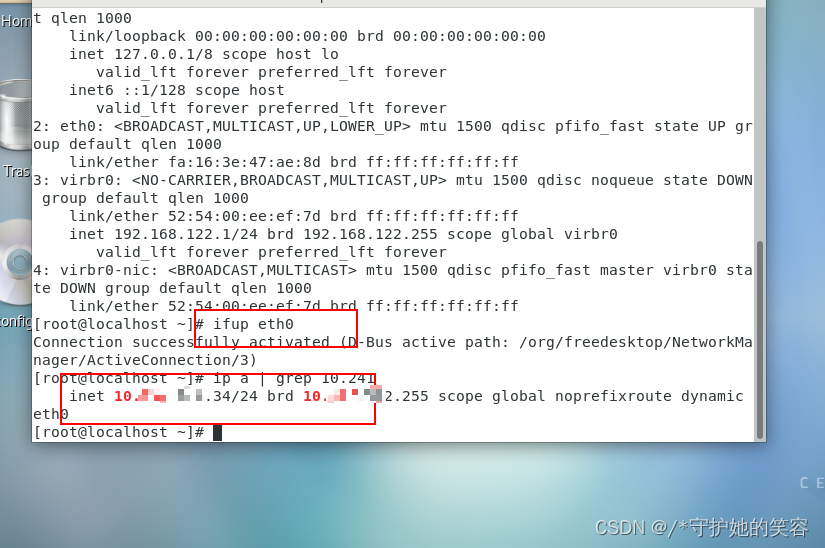
这个网卡呢,是dhcp方式获取的ip,我们不要修改dhcp,直接
ip a查看网卡名称,然后ifup 网卡名称,ip就会自动出来啦~
然后进入到网卡配置文件把onboot改为yes【这个应该不需要我说了把】
上面的忘截图了,如果有疑问或不懂的的留言。 -
配置公网
你可能没ip,需要ifup eth0启动网卡才会自动生成ip呢。
然后就照着下面做把,能ping通百度即可。【配置dns不能重启网络哈,不然dns信息就没了】

-
后来我发现kvm虚拟机上的dns只能通几秒钟,然后就断了,等几分钟又通几秒钟又断了,,真恶心啊

-
然后发现kvm可以ssh到宿主机,但宿主机不能ssh到kvm虚拟机。。。说没路由,我也不懂网络,折腾了一会还是不行就算了,反正kvm可以ssh到宿主机,那么就用离线的方法安装下面cloud-init的包把。

安装cloud和其他服务
- 安装cloud-init
#如果你的网络正常,直接在kvm主机下执行下面2个命令
yum install -y acpid cloud-init cloud-utils jq parted qemu-guest-agent

[[ `uname -r` == *el6* ]] && {

     yum install -y dracut-modules-growroot; }
- 我这kvm不正常,用离线的方法安装
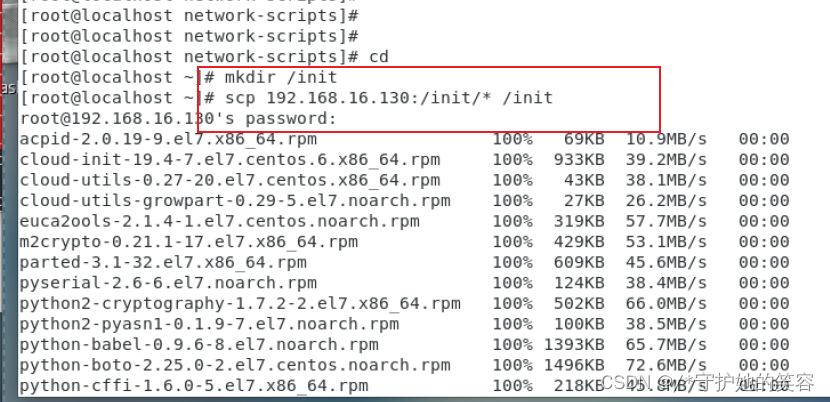
具体方法去看我这篇博客,我这就不做解释了【yum】linux离线安装rpm包及其依赖和卸载包及其依赖 - 我这下载下来有24个包,也不知道全不全【如果已安装的包是不会被i下载的】
[root@ccx init]# ls
acpid-2.0.19-9.el7.x86_64.rpm
cloud-init-19.4-7.el7.centos.6.x86_64.rpm
cloud-utils-0.27-20.el7.centos.x86_64.rpm
cloud-utils-growpart-0.29-5.el7.noarch.rpm
euca2ools-2.1.4-1.el7.centos.noarch.rpm
m2crypto-0.21.1-17.el7.x86_64.rpm
parted-3.1-32.el7.x86_64.rpm
pyserial-2.6-6.el7.noarch.rpm
python2-cryptography-1.7.2-2.el7.x86_64.rpm
python2-pyasn1-0.1.9-7.el7.noarch.rpm
python-babel-0.9.6-8.el7.noarch.rpm
python-boto-2.25.0-2.el7.centos.noarch.rpm
python-cffi-1.6.0-5.el7.x86_64.rpm
python-enum34-1.0.4-1.el7.noarch.rpm
python-idna-2.4-1.el7.noarch.rpm
python-jinja2-2.7.2-4.el7.noarch.rpm
python-jsonpatch-1.2-4.el7.noarch.rpm
python-jsonpointer-1.9-2.el7.noarch.rpm
python-markupsafe-0.11-10.el7.x86_64.rpm
python-paramiko-2.1.1-9.el7.noarch.rpm
python-ply-3.4-11.el7.noarch.rpm
python-prettytable-0.7.2-3.el7.noarch.rpm
python-pycparser-2.14-1.el7.noarch.rpm
qemu-guest-agent-2.12.0-3.el7.x86_64.rpm
[root@ccx init]# ls |wc -l
24
[root@ccx init]#
-
开始拷贝到kvm上rpm安装把,挺简单的
-
解压这些包

-
上面同样的方法安装:dracut-modules-growroot
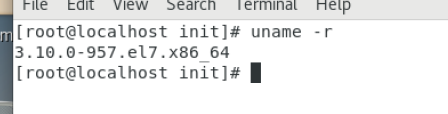
注:上面说e16才安装,我的是e17,所以就不安装了
-
同理,如果你想在这个系统内集成任何命令,上面的方法直接安装好即可!我这没啥需要安装的,所以就啥都不装了。
-
cloud-int,开启root密码登录
sed -i 's/disable_root: 1/disable_root: 0/g' /etc/cloud/cloud.cfg

sed -i 's/ssh_pwauth:   0/ssh_pwauth:   1/g' /etc/cloud/cloud.cfg
因为我kvm不能粘贴嘛,所以我直接vim编辑的,修改后如下

- grub启动项添加
console=ttyS0,115200n8
# 添加到securetty中允许登录
grep ttyS0 /etc/securetty || echo "ttyS0" >> /etc/securetty
grep 115200n8 /etc/securetty || echo "115200n8" >> /etc/securetty
# 使用grubby在内核参数中添加ttyS0
grubby --update-kernel=ALL --args=console=ttyS0,115200n8
# 添加到inittab中实现开机初始化tty
grep ttyS0 /etc/inittab || echo "S0:12345:respawn:/sbin/agetty ttyS0 115200n8" >> /etc/inittab
# 重启生效,这不重启哈
reboot

# 上面来源于网络,因为这个人创建虚拟机用的下面内容,创建的时候已经指定了,但我创建的时候没有指定,【上面配置网卡那有附上下面内容的网址哈】
virt-install \
--name $kvname \
--ram 1024 --vcpus 1 \
--os-type linux --os-variant rhel7 --arch=x86_64 \
--network network=default,model=virtio \
--disk path=/data4/kvm/img/$kvname.qcow2,format=qcow2 \
--location /data4/kvm/iso/$ISO \
--console pty,target_type=serial \
--initrd-inject=/data4/kvm/iso/$ksname \
--extra-args="console=ttyS0,115200n8 serial ks=file:/$ksname" \
--graphics none

- 配置文件增加下面内容
echo 'NETWORKING=yes
NOZEROCONF=yes'>/etc/sysconfig/network

- ssh配置
sed  -i 's/^PasswordAu.*$/PasswordAuthentication yes/' /etc/ssh/sshd_config
sed  -i 's/^GSSAPIAuthentication yes/GSSAPIAuthentication no/' /etc/ssh/sshd_config
sed  -i 's/^#UseDNS.*$/UseDNS no/' /etc/ssh/sshd_config
#下面行意思呢,我估计是$Ve=6是检车centos版本,其实这个没必要了,笔记版本7也是可以使用6的命令的,直接用下面哪个命令重启sshd都行。
[[ $Ve = 6 ]] && {

     service sshd restart; } || {

     systemctl restart sshd; }

- 开机自启
#额,下面呢是版本6和版本7的使用方法,不能都执行哦,我这用7的方法
[[ $Ve = 6 ]] && {


chkconfig acpid on
chkconfig cloud-init on
chkconfig qemu-ga on
sed -i 's/timeout=5/timeout=2/g' /boot/grub/grub.conf
 } || {


systemctl enable acpid cloud-init qemu-guest-agent
sed -i 's/timeout=5/timeout=2/g' /boot/grub2/grub.cfg
 }
timeout=2是默认启动时间,其实改不改都行。
清理信息【类似于重封装】
- 清理下面信息
yum clean all
rm -rf /tmp/*
rm -rf /root/*
rm -f /var/log/wtmp /var/log/btmp
> /var/log/cloud-init.log

- 清理网卡信息
sed -i '/HWADDR/d' /etc/sysconfig/network-scripts/ifcfg-eth*
sed -i '/UUID/d' /etc/sysconfig/network-scripts/ifcfg-eth*
>/etc/udev/rules.d/7*.rules
删除mac地址HWADDR和UUID信息,然后清空这个文件信息>/etc/udev/rules.d/7*.rules,最终如下


- 清空历史记录
history -c

- 关机
poweroff
关机以后该台虚拟机就开不了机了,也别开机了,因为root路径下东西都被删完了,关机以后直接导出文件为qcow2镜像,然后新装系统哈

镜像操作
说明
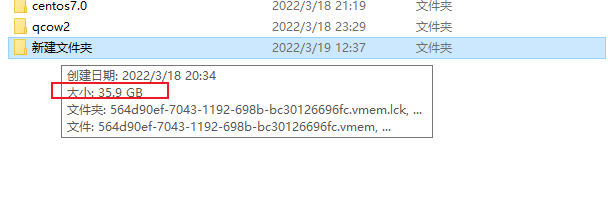
- 查看系统文件,在宿主机上,这个路径是上面步骤4创建的磁盘文件,还有印象嘛?
然后之前是1.8G嘛,现在操作过后呢,是4.2G了【其实我开机后有8G多,没截图而已,因为上面删了些东西,才是只有现在的4g多】。

显示所有虚拟机
virsh list --all
[root@ccx ~]# virsh list --all
 Id    Name                           State
----------------------------------------------------
 -     centos7.6                      shut off

[root@ccx ~]#
清除虚拟机缓存、virt-sysprep命令不存在解决方法
virt-sysprep -d Name
# 额报错了,没有这个命令,tm的。
[root@ccx ~]# virt-sysprep -d centos7.6
bash: virt-sysprep: command not found...
[root@ccx ~]#
# 解决方法在下面
[root@ccx ~]# yum whatprovides */virt-sysprep
Loaded plugins: fastestmirror, langpacks
Loading mirror speeds from cached hostfile
 * base: mirrors.aliyun.com
 * extras: mirrors.cqu.edu.cn
 * updates: mirrors.aliyun.com
extras/7/x86_64/filelists_db                             | 277 kB     00:00
1:libguestfs-bash-completion-1.40.2-10.el7.noarch : Bash tab-completion scripts
                                                  : for libguestfs tools
Repo        : base
Matched from:
Filename    : /usr/share/bash-completion/completions/virt-sysprep


1:libguestfs-tools-c-1.40.2-10.el7.x86_64 : System administration tools for
                                          : virtual machines
Repo        : base
Matched from:
Filename    : /usr/bin/virt-sysprep


[root@ccx ~]# yum -y install libguestfs-tools-c-1.40.2-10.el7.x86_64
。。。
Installed:
  libguestfs-tools-c.x86_64 1:1.40.2-10.el7

Dependency Installed:
  hexedit.x86_64 0:1.2.13-5.el7
  hivex.x86_64 0:1.3.10-6.12.el7_9
  libguestfs.x86_64 1:1.40.2-10.el7
  perl-hivex.x86_64 0:1.3.10-6.12.el7_9
  scrub.x86_64 0:2.5.2-7.el7
  squashfs-tools.x86_64 0:4.3-0.21.gitaae0aff4.el7
  supermin5.x86_64 0:5.1.19-1.el7
  syslinux.x86_64 0:4.05-15.el7
  syslinux-extlinux.x86_64 0:4.05-15.el7

Complete!
[root@ccx ~]#
- 继续清理
刚开始卡了一会没动静了,紧张死了以为出错了,不过幸好没报错。。。。
[root@ccx ~]# virsh list --all
 Id    Name                           State
----------------------------------------------------
 -     centos7.6                      shut off

[root@ccx ~]# virt-sysprep -d centos7.6
[   0.0] Examining the guest ...
[  31.4] Performing "abrt-data" ...
[  31.4] Performing "backup-files" ...
[  36.1] Performing "bash-history" ...
[  36.1] Performing "blkid-tab" ...
[  36.2] Performing "crash-data" ...
[  36.2] Performing "cron-spool" ...
[  36.2] Performing "dhcp-client-state" ...
[  36.2] Performing "dhcp-server-state" ...
[  36.2] Performing "dovecot-data" ...
[  36.2] Performing "logfiles" ...
[  36.5] Performing "machine-id" ...
[  36.5] Performing "mail-spool" ...
[  36.5] Performing "net-hostname" ...
[  36.5] Performing "net-hwaddr" ...
[  36.6] Performing "pacct-log" ...
[  36.6] Performing "package-manager-cache" ...
[  36.6] Performing "pam-data" ...
[  36.6] Performing "passwd-backups" ...
[  36.6] Performing "puppet-data-log" ...
[  36.6] Performing "rh-subscription-manager" ...
[  36.6] Performing "rhn-systemid" ...
[  36.6] Performing "rpm-db" ...
[  36.6] Performing "samba-db-log" ...
[  36.7] Performing "script" ...
[  36.7] Performing "smolt-uuid" ...
[  36.7] Performing "ssh-hostkeys" ...
[  36.7] Performing "ssh-userdir" ...
[  36.7] Performing "sssd-db-log" ...
[  36.7] Performing "tmp-files" ...
[  36.7] Performing "udev-persistent-net" ...
[  36.7] Performing "utmp" ...
[  36.7] Performing "yum-uuid" ...
[  36.8] Performing "customize" ...
[  36.8] Setting a random seed
[  36.8] Setting the machine ID in /etc/machine-id
[  36.9] Performing "lvm-uuids" ...
[root@ccx ~]#

# 文件大小没变
[root@ccx ~]# du -sh /kvm/sys/centos7.6-kvm.qcow2
4.2G	/kvm/sys/centos7.6-kvm.qcow2
[root@ccx ~]#
压缩【打包qcow2镜像】
virt-sparsify --compress kvname.qcow2【源文件】 kvname-new.qcow2【新文件名】【需要在磁盘文件所处路径执行】
[root@ccx ~]# cd /kvm/sys/
[root@ccx sys]# ls
centos7.6-kvm.qcow2
[root@ccx sys]#
- 慢慢等哦 有进度条还不错
【我这报错了,最终处理继续往下看哈】

报错如果该文件位于远程文件系统上。。。
-
因为我之前在vnc上嘛,看到vnc上面卡在92的时候不动了,然后到VMware后台,发现报错了,报错内容如下,


-
我以为我创建虚拟机的磁盘空间不够,然后去VMware看分了100,才用30多G,然后我去看磁盘空间, 卧槽,发现本地磁盘给我搞满了,30多G可用空间啊,竟然不够搞,就离谱。。。。
-
我先把该虚拟机全部文件移到磁盘空间更多的地方去搞,如果不行我就得重头弄一遍,我的天,折磨啊】。
哈哈 发现我家里的游戏电脑的固态磁盘空间不够大,是不是考虑得加个机械盘了,现在就只剩下50G的盘可以折腾了,

-
就在我移动的时候,突然想起来,我为啥不把其他虚拟机删了呢。。。。然后又释放13G出来噻
-
开机,果然可以了

-
接着打包
卧槽,还差1.5g,再删点东西,重来

-
我删了3G多东西,还是提示差1.5G,那就直接跳过试试把

-
过程中发现消耗很快,中途也有继续删东西,释放空间。。。
过程好慢啊,一直卡在下面状态没动过,但一直在刷新磁盘,看到容量再慢慢减少,不然真以为卡了还是出问题了。。。。

-
终于压缩完了,但我发现竟然比昨天的1.8G还小欸,神奇!

-
这个也才不到6G,我看看啥占我空间了
哦,kvm虚拟机和qcow2缓存哦。

把镜像转换成RAW格式
qemu-img convert -f qcow2 -O raw centos7.4-.qcow2【源镜像文件】 centos7.4-LNMP.raw【自定义名称】
# 转之前我还是先把这个qocw2导出到我本地电脑吧
sftp> lcd I:\
sftp> cd /kvm/sys/
sftp> get c
centos7.6-kvm.qcow2   centos76_qcow2_4.3G_ccxhero.qcow2
sftp> get centos76_qcow2_4.3G_ccxhero.qcow2
Downloading centos76_qcow2_4.3G_ccxhero.qcow2 from /kvm/sys/centos76_qcow2_4.3G_ccxhero.qcow2
    7% 113907KB  37969KB/s 00:00:39 ETA

# 下面开始转
[root@ccx ~]# cd /kvm/sys/
[root@ccx sys]# ls
centos7.6-kvm.qcow2  centos76_qcow2_4.3G_ccxhero.qcow2
[root@ccx sys]# qemu-img convert -f qcow2 -O raw centos76_qcow2_4.3G_ccxhero.qcow2 centos76_ccx_root.raw
[root@ccx sys]# ls
centos76_ccx_root.raw  centos7.6-kvm.qcow2  centos76_qcow2_4.3G_ccxhero.qcow2
[root@ccx sys]# #RAW格式镜像还挺大的,有3.7G呢
[root@ccx sys]# du -sh *
3.7G    centos76_ccx_root.raw
4.2G    centos7.6-kvm.qcow2
1.6G    centos76_qcow2_4.3G_ccxhero.qcow2
[root@ccx sys]#
# 导出该镜像到本地,就完成啦~
sftp> get centos76_ccx_root.raw
Downloading centos76_ccx_root.raw from /kvm/sys/centos76_ccx_root.raw
  100% 20971520KB  39794KB/s 00:08:47
/kvm/sys/centos76_ccx_root.raw: 21474836480 bytes transferred in 527 seconds (39794 KB/s)
sftp>
- 卧槽,我导出以后发现又20G,我以为我搞错了,又重新转了一次,发现也是20G,好像du命令出问题了,看到的3.7G,但ll看到的都是20个G

底层命令行上传glance镜像
- 下面的为命令行方式,但我不会用这种的,我都喜欢在dashboard上上传镜像,方便省事。
openstack image create "centos7.4-LNMP"【自定义名称】 \
  --file centos7.4-LNMP.raw【镜像】 \
  --disk-format raw --container-format bare \
  --property hw_qemu_guest_agent=yes \
  --public
错误做法【了解即可】
- 下面呢是我第一次做的笔记,最后发现这是错误的,也不删了,留这当个反面教材也是好事。
- 重启没问题以后呢,关机。
我发现,我重启以后呢,之前的vnc不能用了,需要用桌面1才行了,然后我再后台看到5900端口确实没了,现在用的是5901【也就是桌面1了】
[root@ccx ~]# ss -ntl
State       Recv-Q Send-Q            Local Address:Port                           Peer Address:Port
LISTEN      0      5                             *:5901                                      *:*
LISTEN      0      5                             *:5902                                      *:*
LISTEN      0      128                           *:111                                       *:*
LISTEN      0      128                           *:6000                                      *:*
LISTEN      0      128                           *:6001                                      *:*
LISTEN      0      128                           *:6002                                      *:*
LISTEN      0      5                 192.168.122.1:53                                        *:*
LISTEN      0      128                           *:22                                        *:*
LISTEN      0      128                   127.0.0.1:631                                       *:*
LISTEN      0      100                   127.0.0.1:25                                        *:*
LISTEN      0      5                            :::5901                                     :::*
LISTEN      0      5                            :::5902                                     :::*
LISTEN      0      128                          :::111                                      :::*
LISTEN      0      128                          :::6000                                     :::*
LISTEN      0      128                          :::6001                                     :::*
LISTEN      0      128                          :::6002                                     :::*
LISTEN      0      128                          :::22                                       :::*
LISTEN      0      128                         ::1:631                                      :::*
LISTEN      0      100                         ::1:25                                       :::*
[root@ccx ~]#
- 新的vnc如下
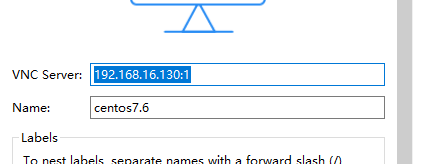

- 因为是安装好系统的,所以这里需要输入vnc密码了哦【这是vnc密码,不是虚拟机密码,就是第6设置的密码】

- 进来以后呢,这才是root密码

- 进入虚拟机呢可以看到ip是和我宿主机一样的,不管咯,然后直接关机把【不能关机不能关机不能关机,下面的poweroff别执行,具体看下面说明把】,这种好像不需要删除啥信息,直接导出就能用啦。

- 卧槽不能关机,特么的把我外面虚拟机关机了,完犊子了,重新进入系统会 影响我后面操作吗?先试试再说把,如果不想重头来一遍就是了。

virt-manager安装qcow2虚拟机【叫导入qcow2虚拟机也行】
——我这使用linux自带的工具virt-manager导入安装把
1、安装virt-manager
yum -y install virt-manager
[root@ccx ~]# yum -y install virt-manager
Loaded plugins: fastestmirror, langpacks
Loading mirror speeds from cached hostfile
 * base: mirrors.ustc.edu.cn
 * extras: mirrors.huaweicloud.com
 * updates: mirrors.ustc.edu.cn
Resolving Dependencies
--> Running transaction check
---> Package virt-manager.noarch 0:1.5.0-7.el7 will be installed
--> Finished Dependency Resolution

Dependencies Resolved

===================================================================================================================
 Package                       Arch                    Version                         Repository             Size
===================================================================================================================
Installing:
 virt-manager                  noarch                  1.5.0-7.el7                     base                  661 k

Transaction Summary
===================================================================================================================
Install  1 Package

Total download size: 661 k
Installed size: 3.7 M
Downloading packages:
virt-manager-1.5.0-7.el7.noarch.rpm                                                         | 661 kB  00:00:00
Running transaction check
Running transaction test
Transaction test succeeded
Running transaction
  Installing : virt-manager-1.5.0-7.el7.noarch                                                                 1/1
  Verifying  : virt-manager-1.5.0-7.el7.noarch                                                                 1/1

Installed:
  virt-manager.noarch 0:1.5.0-7.el7

Complete!
[root@ccx ~]#
2、打开
virt-manager
说明,如果是工具的话,xshell可能可以直接调用这个后台,但我的是CRT工具,是没用的,如下
[root@ccx ~]# virt-manager
[root@ccx ~]#
(virt-manager:16318): Gtk-WARNING **: 07:05:57.213: cannot open display:
- 所以呢,我跑后台去了

3、新建虚拟机,选择镜像导入
- 我这其实更多的是为了验证这个qcow2镜像是否可以使用。
a.创建虚拟机
选择使用已有的那啥

b.选择镜像:
- 导入镜像
选择对应的qcow2文件

c.设置cpu内存

d.定义名字并完成设置

e.进入系统
- 前面步骤都一样,我这只放有区别的地方哈。
没有删除信息的镜像虚拟机
- 可以直接进入系统的,但是需要接受许可,因为刚装完我没进系统,所有有这个也是正常的。

删除信息过的镜像虚拟机
哇,啥都不需要做,直接就可以进入系统的哦


f.完成新的虚拟机创建
没有删除信息的镜像虚拟机

-
这进来以后就相当刚装好系统的样子,啥都没做。

-
而且连网卡都没有启动欸,确实很新了。。。
ip是新的,没问题。

-
网络有,我们配个ip试试公网能不能通
这个网络好像还是有问题,前面我做虚拟机进入删除信息的时候就遇到过,就是公网只有一会生效,还记得嘛? 这和那情况一样。。。 还有就是,我重封装过的虚拟机并不会有这种情况。。。

-
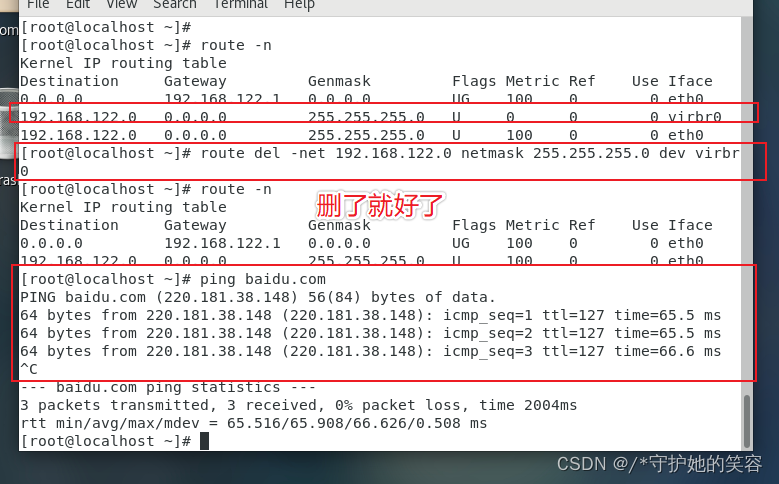
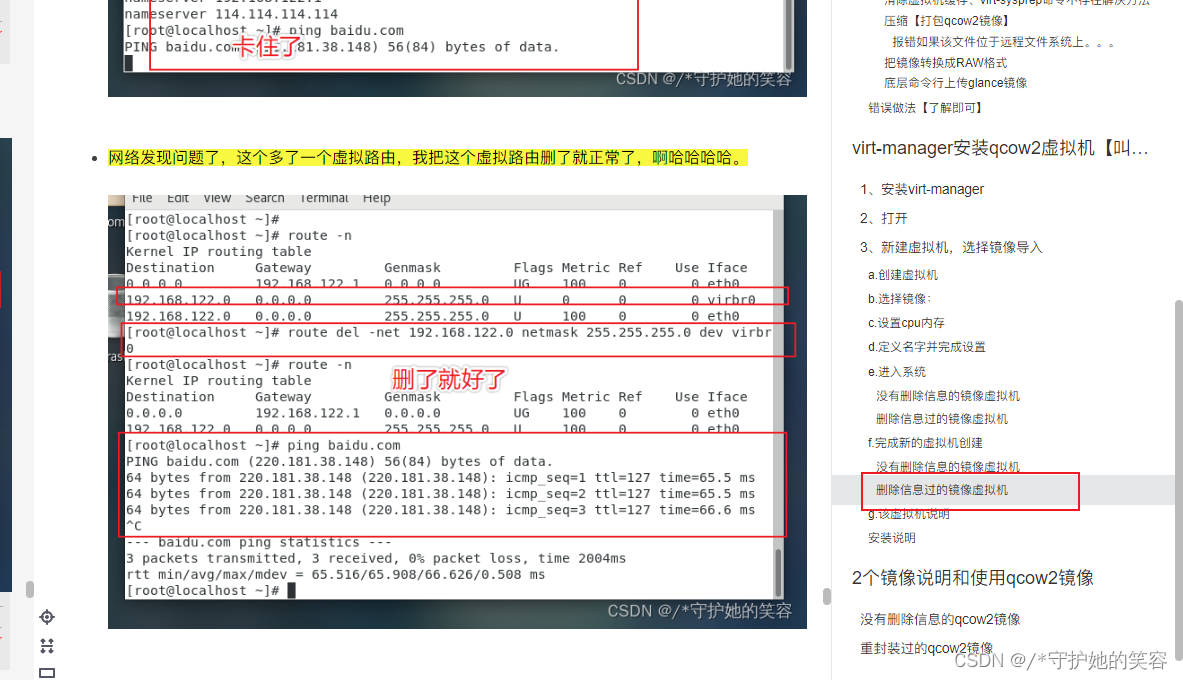
网络发现问题了,这个多了一个虚拟路由,我把这个虚拟路由删了就正常了,啊哈哈哈哈。
-
然后看看内存,确实可以动态调整了,虚拟机没问题,所以现在这个机子就是发现DNS有问题,坚持不了一会,可能是路由的问题呢?

-
网络测试说明
这原生的qcow2呢,就是发现网络有问题,反正应该是路由的问题,我不会网络,以后学多了,会了再回来解释。。。
重封装过的虚拟机呢,网络就变正常了,也不知道为啥。

删除信息过的镜像虚拟机
-
进系统以后,看到已经自动生成新的ip了。
而且我还发现,这的dns竟然一直可以用,而我做镜像这个kvm虚拟机,dns只能用几秒钟,就。。。挺神奇的,反正可以用就是好事啦~

-
而且cpu内存以及可以动态调整了,而且是有lv的,成功了,nice。

-
重封装过的虚拟机呢,网络就变正常了,因为虚拟路由被删了。。。所以正常了。


g.该虚拟机说明
- 前面我们说过了,是为了测试这个镜像是否正常,而且我们是通过选择已有文件来生成的,所以这个镜像就是根文件了,我们做的修改都会直接保存到这个镜像里面,所以我们通过这个生成前呢,一定要先导出该镜像或者做个备份,不然生成虚拟机以后该原生镜像就不存在了。
猜想:换句话说,我们安装的所有软件,都会自动保存在这个镜像里面,那我们此时在把这个镜像导出去 ,别的地方安装,是不是也可以直接使用呢? 【不是当模板哈,而是当虚拟机,这么生成虚拟机以后,估计不能再当模板使用了,因为不能够再动态分配cpu内存了】
注:删除该虚拟机,如果删除磁盘,那么该镜像也会跟着被删除哈。。。

安装说明
- 如果我们再virt-manager中使用qcow2镜像用其他方法安装,是不得行的哈,会直接报下面错误,你可以试试。
我在网上查了下资料,好像qcow2格式直接安装不行的。

2个镜像说明和使用qcow2镜像
没有删除信息的qcow2镜像
-
镜像名称和大小

-
root密码是
root -
这个网络,有一个virbr0的路由,可能会导致dns只能维持几秒钟,而且宿主机不能连接到该虚拟机上。需要删除,删除方法见下面
重封装过的qcow2镜像和raw镜像
-
镜像名称和大小
额,raw竟然有20个G,离谱了。

-
root密码是
root -
这个镜像再测试中呢,发现一切正常,没有啥问题。
openstack上使用
- 因为我主要是为了放在云上使用的
- 1、通过dashboard导入镜像
- 2、然后再创建虚拟机~
没有删除信息的镜像虚拟机
-
上传镜像【忘记截图了,看下面删除信息过的虚拟机测试】
-
创建虚拟机


-
进系统测试
下面为底层控制台显示内容


-
真实生产环境,ip码了
-
和上面测试一样,除了网络这些需要自己定义,其他一切正常。
能ssh别人,也能通过工具ssh到这台虚拟机。

- 好了 删。

删除信息过的镜像虚拟机
-
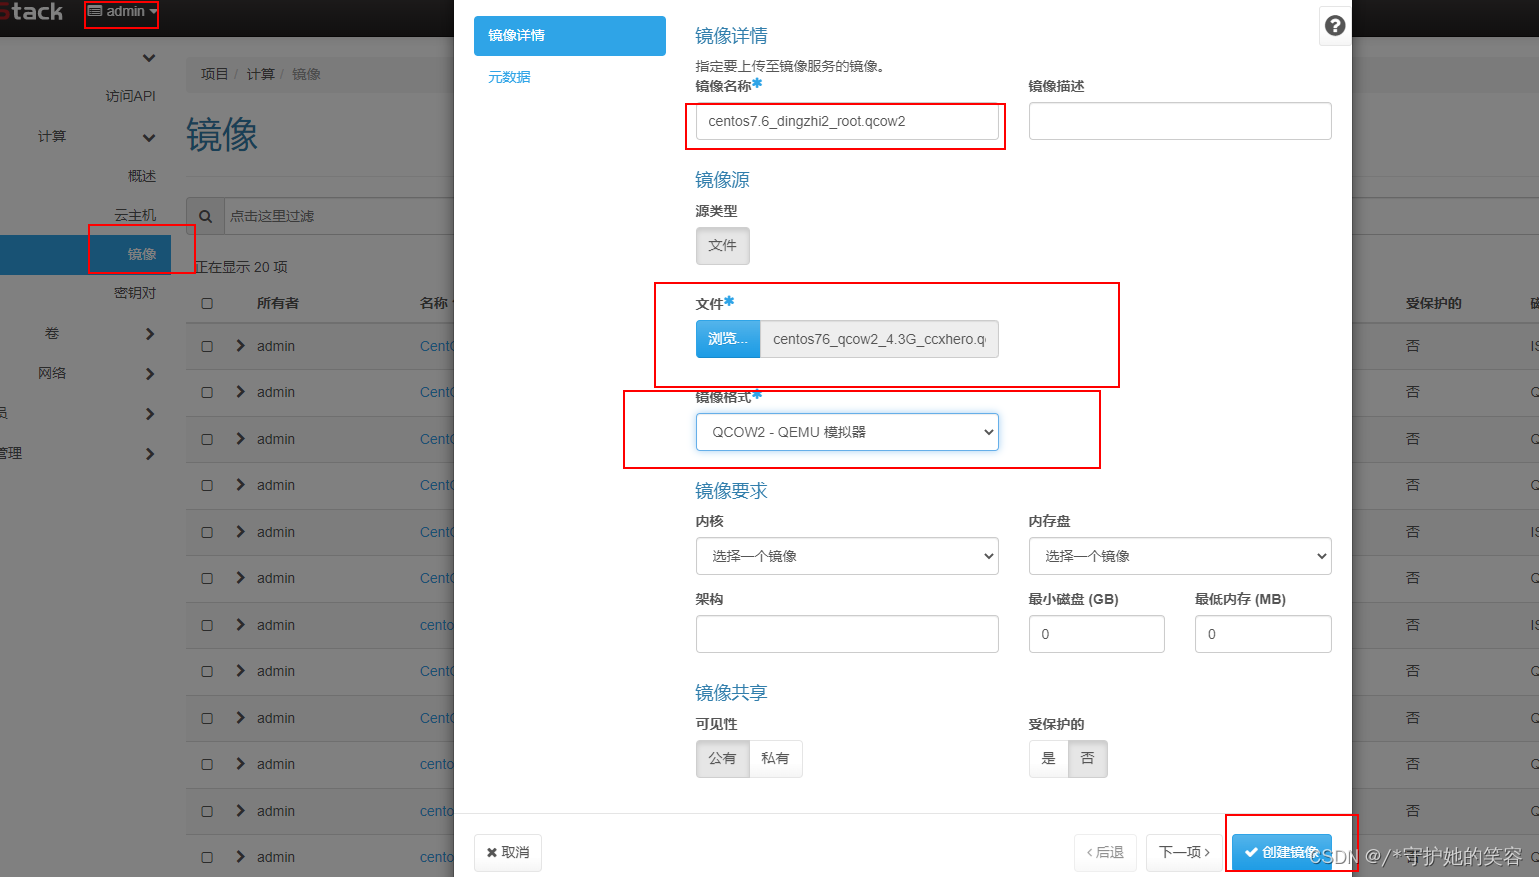
镜像上传【然后等待上传完成即可】


-
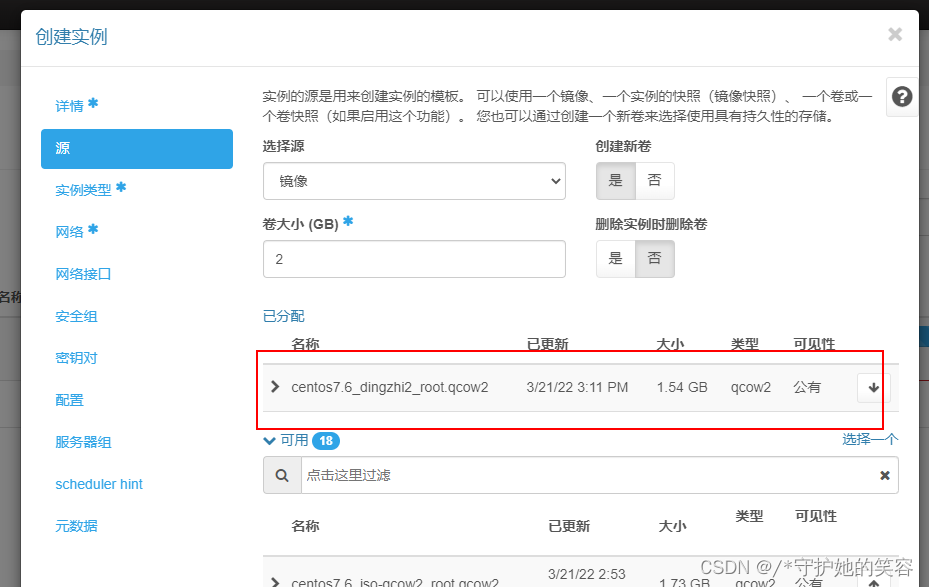
创建虚拟机


-
进系统测试
下面为底层控制台显示内容
进来就是这个界面,可以看到右上角网络已经有了

-
真实生产环境,ip码了

-
能ssh别人,也能通过工具ssh到这台虚拟机,其他一切正常。

-
一切正常,删。
