Spring注解

bean 注入与装配的的方式有很多种,可以通过 xml,get set 方式,构造函数或者注解等。简单易
用的方式就是使用 Spring 的注解了,Spring 提供了大量的注解方式。
IOC和DI
在介绍注解之前呢,我先来给大家谈谈IOC(控制反转和依赖注入)。作为Spring核心思想之一的IOC,唯一目的就是降低对象与对象之间的一个耦合度,例如我们平时写的代码,经常将几个对象之间进行嵌套使用,错综复杂管理起来极不方便,所以导致了代码维护困难。如下图:
其实耦合关系不仅会出现在对象与对象之间,也会出现在软件系统的各模块之间,以及软件系统和硬件系统之间。要想降低对象与对象之间的一个耦合度,科学家们提出了IOC控制反转的思想,如下图:
通过IOC容器来过度对象与对象之间的连接关系,若此时去掉IOC容器四个对象就独立出来了。且相互之间毫无联系。控制反转,传统的应用程序中,控制权在程序本身,程序的控制流程完全由开发者控制,这种模式的缺点是,一个组件如果要使用另一个组件,必须先知道如何正确地创建它。在IoC模式下,控制权发生了反转,即从应用程序转移到了IoC容器,所有组件不再由应用程序自己创建和配置,而是由IoC容器负责,这样,应用程序只需要直接使用已经创建好并且配置好的组件。为了能让组件在IoC容器中被“装配”出来,需要某种“注入”机制(DI)。由原来的主动创建,到现在的被动实现,控制权实现了反转,也就叫控制反转。由主动行为变为了被动行为,控制权颠倒过来了,这就是“控制反转”这个名称的由来。
DI: 实际上DI就是IOC的另一个名字,区别不是很大,控制反转要依赖于DI注入,实际上给出了实现IOC的方法:注入。所谓依赖注入,就是由IOC容器在运行期间,动态地将某种依赖关系注入到对象之中。 所以,依赖注入(DI)和控制反转(IOC)是从不同的角度的描述的同一件事情,指就是通过引入IOC容器,利用依赖关系注入的方式,实现对象之间的解耦。
(注入的方式已在另一篇文章介绍DI注入方式)
注解
注解
1.注解的使用
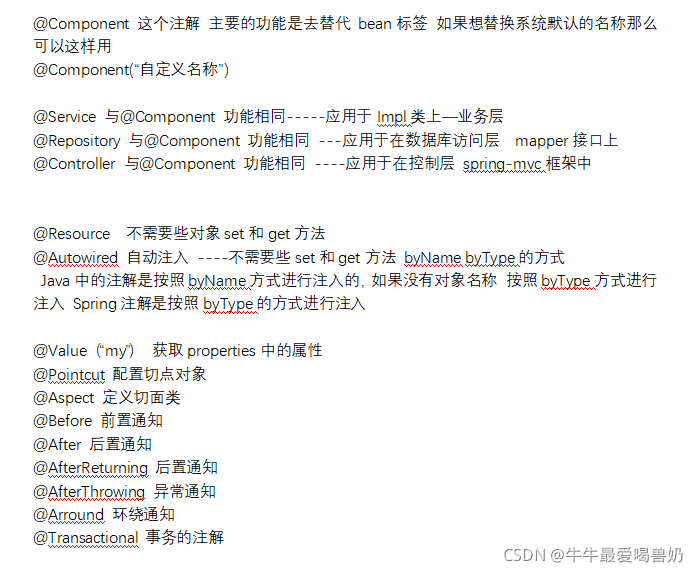
@Controller
@Controller(“Bean的名称”) 定义控制层Bean,如Action
@Service
@Service(“Bean的名称”) 定义业务层Bean
@Repository
@Repository(“Bean的名称”) 定义DAO层Bean
@Component 定义Bean, 不好归类时使用.
可以指定bean的id,默认时类名首字母小写。@Component注解就相当于定义了一个Bean
@Autowired  (Spring提供的)@Autowired就相当于把指定类型的Bean注入到指定的字段中。为了给类成员变量赋值。

默认按类型匹配,自动装配(Spring提供的),可以写在成员属性上,或写在setter方法上
@Autowired(required=true)
一定要找到匹配的Bean,否则抛异常。 默认值就是true
@Autowired
@Qualifier("bean的名字")
按名称装配Bean,与@Autowired组合使用,解决按类型匹配找到多个Bean问题。

@Resource   JSR-250提供的
默认按名称装配,当找不到名称匹配的bean再按类型装配.
可以写在成员属性上,或写在setter方法上
可以通过@Resource(name="beanName") 指定被注入的bean的名称, 要是未指定name属性, 默认使用成员属性的变量名,一般不用写name属性.
@Resource(name="beanName")指定了name属性,按名称注入但没找到bean, 就不会再按类型装配了.
@Inject   是JSR-330提供的
按类型装配,功能比@Autowired少,没有使用的必要。
bean配置文件中必须加入以下配置,否则注解不起作用。
<context:component-scan base-package="com.xiaoliu.pojo">
</context:component-scan>
dao层
import org.springframework.stereotype.Repository;
@Repository
public class DaoTest {


    public void add(){


        System.out.println("Dao_test com on!");
    }
}
服务层
@org.springframework.stereotype.Service//将该类交给spring来管理
public class Service {


    @Qualifier("daoTest")//指定加载daoTest
    @Autowired//根据变量类型赋值
    private DaoTest daoTest;
    public void add(){


        daoTest.add();
        System.out.println("service_test hello");
    }
}
控制层
@Controller
public class Action {


    @Autowired
    private Service service;
    public void add(){


        service.add();
        System.out.println("Action come on!");
    }
}
测试:
    @Test
    public void test3(){


        ApplicationContext at = new ClassPathXmlApplicationContext("spring-action.xml");
        Action a = at.getBean("action",Action.class);//默认id是类名首字母小写
        System.out.println(a);
        Service s = at.getBean(Service.class);//("service",Service.class)
        System.out.println(s);
        DaoTest d = at.getBean(DaoTest.class);
        System.out.println(d);
        a.add();
    }
本质上就是将类交给IOC容器进行管理
2.无配置注解
    <!--扫描包+注解-->
    <context:component-scan base-package="com.xiaoliu"></context:component-scan>
    <!--出去控制层注解,-->
    <context:component-scan base-package="com.xiaoliu.pojo" use-default-filters="false"><!--只包含必须取消默认-->
        <context:include-filter type="annotation" expression="org.springframework.stereotype.Controller"/>
    </context:component-scan>

    <context:component-scan base-package="com.xiaoliu.pojo" ><!--不包含-->
        <context:exclude-filter type="annotation" expression="org.springframework.stereotype.Controller" />
    </context:component-scan>
测试案例
1.引入外部文件以及数据库连接池的配置(druid.pool)
<!-- 导入外部文件-->
    <context:property-placeholder location="db.properties"></context:property-placeholder>
    <bean class="com.alibaba.druid.pool.DruidDataSource" id="dataSource">
        <property name="driverClassName" value="${jdbc.driverClassName}"></property>
        <property name="url" value="${jdbc.url}"></property>
        <property name="password" value="${jdbc.password}"></property>
        <property name="username" value="${jdbc.name}"></property>
    </bean>
IOC核心原理
IOC采用了设计模式之一的工厂模式,一个工厂可以生产出多个对象,但是首先创建出工厂对象,在生产出产品对象。静态工厂不需要工厂对象。
BeanFactory和ApplicationContext的区别在于,BeanFactory的实现是按需创建,即第一次获取Bean时才创建这个Bean,而ApplicationContext会一次性创建所有的Bean。实际上,ApplicationContext接口是从BeanFactory接口继承而来的,并且,ApplicationContext提供了一些额外的功能,包括国际化支持、事件和通知机制等。通常情况下,我们总是使用ApplicationContext,很少会考虑使用BeanFactory。

DI依赖注入
有时候创建的bean对象要依赖于其他的bean对象,此时就需要链接注入其他对象。例如:
    <bean name="pYn" class="com.xiaoliu.pojo.test.Person">
        <property name="Mycar">
            <bean class="com.xiaoliu.pojo.test.Car" p:brand="北汽" p:maxpeed="100" p:price="2000000"></bean>
        </property>
    </bean>
或者可以使用ref链接:
  <bean id="p" class="com.openlab.pojo.Person">
        <property name="name">
           <value>李思峰</value>
        </property>
        <property name="age">
          <value>399</value>
        </property>
        <property name="desk" ref="desk"></property>
        </bean>
        <bean id="desk" class="com.openlab.pojo.Desk">
          <property name="deskName" value="书桌5号"></property>
          <property name="deskSize" value="10"></property>
        </bean>
AOP的含义
正常程序流程
面向切面编程,它只是一种编程思想。在程序纵向的执行流程中,针对某一个方法,添加通知去形成切面的过程,我们把这个过程称为面向切面。

使用切面编程的好处,在不修改源码的基础下就可以实现功能的扩展,释放相应的业务逻辑,让方法更加明确。增强了程序的扩展性!采用横向抽取机制,取代了传统纵向继承体系重复性代码。
主要意图:将日志记录,性能统计,安全控制,事务处理,异常处理等代码从业务逻辑代码中划分出来,通过对这些行为的分离,我们希望可以将它们独立到非指导业务逻辑的方法中,进而改变这些行为的时候不影响业务逻辑的代码。
底层实现方式
动态代理:我所理解的代理思想无非就是自己不能或不想直接去做某件事,而需要中间人来帮我完成部分工作。
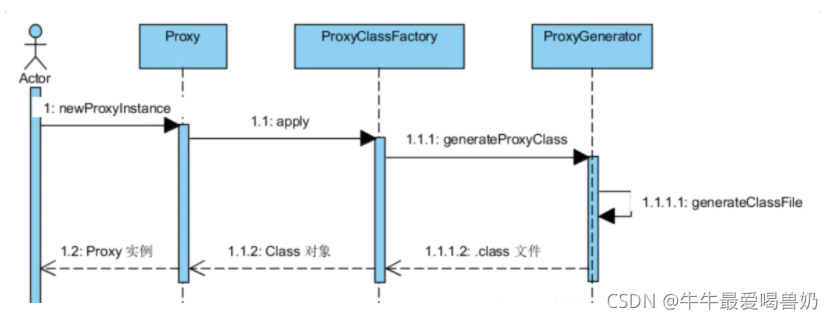
1.JDK动态代理实现
动态代理是利用反射机制在运行时创建代理类,仅支持接口。
代码:
接口
public interface DeptDao {


    public  int upate();

}
实现类
public class DeptDaoImpl implements DeptDao{


    @Override
    public int upate() {


        return 1234;

    }
}
代理类
public class MyHandle implements InvocationHandler {


    private Object target;
    public MyHandle(Object target){

    //指定代理对象

        this.target = target;
    }
    @Override
    public Object invoke(Object proxy, Method method, Object[] args) throws Throwable {

    //实现invoke方法,proxy代表代理对象,method表示需要增强的方法,args表示值的参数列表
        System.out.println("-------Methon:"+method+"---------args"+ Arrays.toString(args));
        System.out.println("事务开启之前-----------");

        Object res = method.invoke(target,args);//target DeptDao对象
        System.out.println(res);
        System.out.println("事务关闭之后-----------");
        return res;
    }
}
测试类:
public class ProxyTest {


        synchronized
    public static void main(String[] args) {


        DeptDaoImpl dept = new DeptDaoImpl();
        Class[] classes = dept.getClass().getInterfaces();//获取接口class对象集合
        DeptDao dao = (DeptDao) Proxy.newProxyInstance(ProxyTest.class.getClassLoader(),classes,new MyHandle(dept));//类加载器,接口集合,指定代理类代理的目标对象

        int res = dao.upate();//代理对象的invok方法,并不会去执行Impl中的方法


    }
}
结果
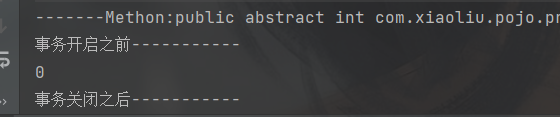
代理对象帮我们实现的upate方法!
2.cglib动态代理实现
针对类实现代理,对是否实现接口无要求。原理是对指定的类生成一个子类,覆盖其中的方法,因为是继承,所以被代理的类或方法最好不要声明为final类型。
1.定义一个实现了MethodInterceptor接口的类。
2.实现其intercept()方法,在其中调用proxy.invokeSuper( )。
**特点:**不需要实现接口,但是需要继承的子类基于字节码生成的真实对象的子类,运行效率高于jdk的动态代理
AOP操作术语:
Joinpoint(连接点): 类里面可以被增强的方法,这些方法称为连接点
原有功能:切点:pointcut所谓切入点是指我们要对哪些Joinpoint进行拦截的定义
Aspect(切面): 是切入点和通知(引介)的结合
前置通知:在切点之前加入的功能, before advice
后置通知:在切点之后加入的功能, after advice
异常通知:在切点执行过程中 如果发生异常,会触发异常通知 throw advice
以上所有的功能 被称为切面
织入: 把切面嵌入到原有的功能当中
环绕通知: 前置通知+后置通知
注解方式实现:
只需要添加将类交给spring管理然后让spring能够扫描到你的包,并且支持AOP。
<context:component-scan base-package="com.xiaoliu">
</context:component-scan>
    <aop:aspectj-autoproxy/>
@Component
@Aspect
@Order(0)
public class UserDaoProxy {
@Pointcut(value = "execution(* com.xiaoliu.pojo.aop.*.*(..))")
public void point(){
}
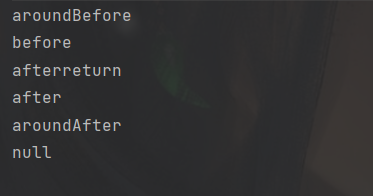
@Before(value="point()")
public void before(){
System.out.println("before");
}
@After(value = "point()")
public void after(){
System.out.println("after");
}
@Around(value = "point()")
public void around(ProceedingJoinPoint joinPoint) throws Throwable {
System.out.println("aroundBefore");
joinPoint.proceed();
System.out.println("aroundAfter");
}
@AfterReturning(value = "point()")
public void afterreturn(){
System.out.println("afterreturn");
}
@AfterThrowing(value = "point()")
public void afterthrow(){
System.err.println("发生异常");
}
}
测试
    public void test01(){


        ApplicationContext context = new ClassPathXmlApplicationContext("spring-config-03.xml");
        UserDao ud = context.getBean("userDao",UserDao.class);
        System.out.println(ud.update());
        ud.save();
    }
测试结果:
第二种写aop配置文件
        <bean id="proxy" class="com.xiaoliu.pojo.aop.UserDaoProxy"></bean>
        <aop:config>
                <aop:aspect id="aspect" ref="proxy">
                <aop:pointcut id="point" expression="execution(* com.xiaoliu.pojo.aop.*.*(..))"/>
                        <aop:before method="before" pointcut-ref="point"/>
                        <aop:after method="after" pointcut-ref="point"/>
                        <aop:around method="around" pointcut-ref="point"/>
                </aop:aspect>
        </aop:config>
Proxy-target-class= false 默认支持JDK 动态代理方式
Proxy-target-class= true 支持cglib 动态代理方式
jdbcTemplate的使用
JdbcTemplate是Spring对JDBC的封装,目的是使JDBC更加易于使用。JdbcTemplate是Spring的一部分。JdbcTemplate处理了资源的建立和释放。
jdbcTemplate可以帮助我们更好的去执行数据库的增删改查工作,具有5种方法:
execute方法:可以用于执行任何SQL语句,一般用于执行DDL语句;
update方法及batchUpdate方法:update方法用于执行新增、修改、删除等语句;batchUpdate方法用于执行批处理相关语句;
query方法及queryForXXX方法:用于执行查询相关语句;
call方法:用于执行存储过程、函数相关语句。
接下来实现过程:
导入db.properties,配置druidDataSource数据源,druid也是数据库连接池的一种,dbcp!
    <!--扫描包+注解-->
    <context:component-scan base-package="com.xiaoliu.pojo"/>
    <context:property-placeholder location="db.properties"/>

    <bean class="com.alibaba.druid.pool.DruidDataSource" id="dataSource">
        <property name="driverClassName" value="${jdbc.driverClassName}"/>
        <property name="url" value="${jdbc.url}"/>
        <property name="password" value="${jdbc.password}"/>
        <property name="username" value="${jdbc.name}"/>
    </bean>
接下来配置jdbcTemplate
 <bean class="org.springframework.jdbc.core.JdbcTemplate" id="jdbcTemplate">
        <property name="dataSource" ref="dataSource"/>
    </bean>
dao层类
@Repository
public class UserDao1 {


 public  int updata(JdbcTemplate jdbcTemplate){


     String sql = "UPDATE user SET username=?, password=? WHERE id=?;";
     return jdbcTemplate.update(sql,"小牛","123456",123);
 }
 public int delete(JdbcTemplate jdbcTemplate){


     String sql = "DELETE FROM user WHERE id=?;";
     return  jdbcTemplate.update(sql,123);
 }
 public int insert(JdbcTemplate jdbcTemplate){


     String sql = "INSERT INTO user VALUES (NULL, ?, ?);";
     return jdbcTemplate.update(sql,"小白","123456");
 }
public int queryInt(JdbcTemplate jdbcTemplate){


     String sql = "SELECT COUNT(*) FROM user where roleId=1;";
     return jdbcTemplate.queryForObject(sql,Integer.class);
}

}
测试:
    ApplicationContext ac =null;
    JdbcTemplate jdbcTemplate = null;
    UserDao1 ud = null;
   @Before
    public void defaultBefore(){


         ac = new ClassPathXmlApplicationContext("JDBC.xml");
         jdbcTemplate = (JdbcTemplate) ac.getBean("jdbcTemplate");
         ud = ac.getBean("userDao1", UserDao1.class);
        System.out.println("hello");
    }
    @Test
    public void test02(){


        System.out.println(ud.updata(jdbcTemplate));
    }
    @Test
    public void test03(){


        System.out.println(ud.queryInt(jdbcTemplate));
    }