如果你一直在关注无头商务生态系统,你会听到社区中关于更新的Shopify Storefront API的一些议论。该API允许店主将他们的Shopify商店作为一个后台服务来支持他们选择的任何前端应用程序。
这意味着你可以拥有一个拥有所有产品的Shopify商店,然后用你选择的任何前端工具(如React、Vue、Angular、Next.js、Nuxt等)建立你的定制电子商务网站。这让你可以通过其他渠道,如移动应用、网络游戏和网络应用,来销售你Shopify商店里的产品。
当我们看到这个公告时,我在Netlify的团队决定用它来旋转和建立东西。结果是五个不同的启动模板--Astro、Nuxt、Gridsome、Eleventy和Angular--都是用Shopify驱动的后端商店建立的。让我们用SvelteKit再建一个吧!
设置Shopify
我们应该做的第一件事是建立一个Shopify商店。没有它,这一切都不可能实现。以下是你如何快速为自己建立一个。
- 创建一个Shopify合作伙伴账户,如果你还没有的话
- 登录到您的合作伙伴账户并创建一个Shopify开发商店(以测试您的实施)。
- 生成您的API凭证,对您的Storefront API进行认证请求
- 在您的商店中创建产品和产品变体。这些可以是虚拟产品或实际产品
- 在您的Shopify管理仪表板上创建一个私人应用程序。这将代表你的客户应用程序,你将在那里发出请求。
如果你做了所有这些,休息一下,喝杯水。然后回来和我一起。让我们来建立这个东西!
设置SvelteKit
要开始使用SvelteKit,你可能想快速浏览一下SvelteKit的文档,了解它是如何工作的。否则,请不要走开,我将指导你完成建立这个网站所需要的东西。
用下面的命令安装并运行SvelteKit。
npm init svelte@next sveltekit-shopify-demo
cd sveltekit-shopify-demo
npm install
npm run dev -- --open

复制代码
这些命令将为你做几件事情。
- 为你创建一个新的SvelteKit项目
- 安装所需的软件包
- 在你的浏览器上打开该项目,
localhost:3000,像这样。
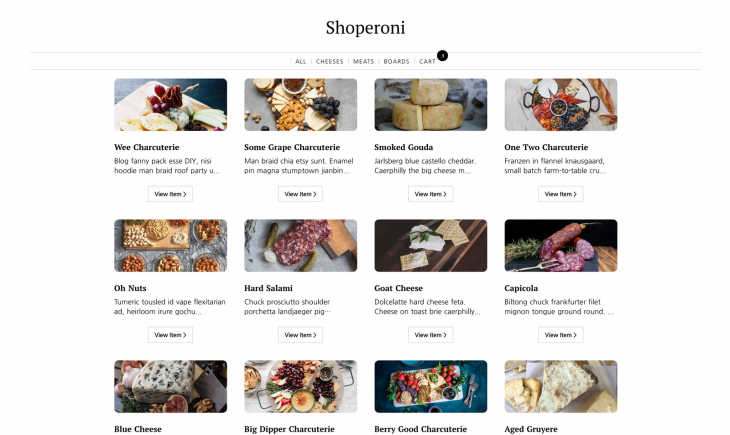
好的,看起来我们都准备好了,可以开始编辑这个项目,使其看起来像我们想要建立的网站。哦,顺便说一下,这就是我们正在建设的项目,如果你想看一下的话。
好了,让我们开始建设吧!
风格设计
为了方便起见,我将在这个项目中使用一个全局样式文件。打开你的app.css 文件,用这个CSS片段来更新它的样式。这就是样式设计。我们现在需要做的就是在项目文件中引用正确的类,这个应用程序应该完全按照预期的效果来做。
从Shopify获取产品
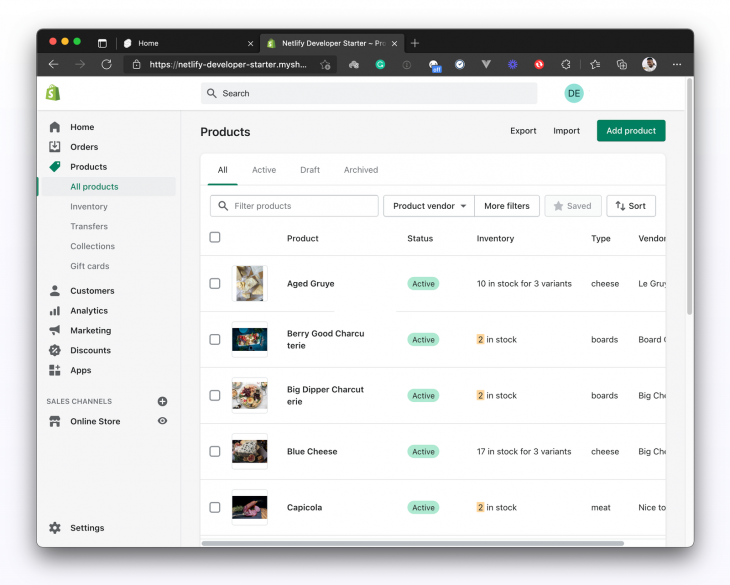
一个没有产品的电子商务网站是什么,对吗?我知道。如果你创建了你的Shopify账户并添加了产品,你应该能够在你的Shopify管理仪表板上看到你的产品列表页面。
这是我的。感谢我的同事塔拉创建了这个商店,并将产品填入其中,这样我就可以使用它,并假装我做了所有的工作。
现在我们要做的是从我们的SvelteKit应用程序中进行API调用,从我们的Shopify商店中获取所有这些产品,并在我们的应用程序中显示它们。在这之前,我们先来谈谈认证问题。
认证
知道你商店里的数据受到保护,只有你能访问它,这不是很好吗?是的。每个Shopify商店都有凭证,你可以用它来从其他应用程序访问它们--在这种情况下,从我们的SvelteKit应用程序。
如果你还没有为你的商店生成凭证,现在就去生成凭证。在你的SvelteKit项目中,创建一个.env 文件,并像这样用你的Shopify API密钥更新它。
VITE_SHOPIFY_STOREFRONT_API_TOKEN = "ADD_YOUR_API_TOKEN_HERE"
VITE_SHOPIFY_API_ENDPOINT = "ADD_YOUR_STORE_API_ENDPOINT_HERE"

复制代码
取出你的产品
现在我们已经完成了认证,我们可以继续获取产品了。这可能是让你知道Shopify Storefront API只是基于GraphQL的一个好时机。这意味着没有REST的选择,所以我们要定义GraphQL查询来与API互动。
在我们获取产品之前,我们需要一个地方来存储它们,这样我们就可以在我们应用程序的其他地方使用产品数据。这就是Svelte商店的作用。如果你想了解更多关于它的信息,我给你介绍一下--请阅读链接信息。
在你的项目文件夹的根部创建一个store.js 文件,并用这个片段来更新它。
// store.js
import { writable } from 'svelte/store';
import { postToShopify } from '../src/routes/api/utils/postToShopify';

export const getProducts = async () => {
    try {
        const shopifyResponse = await postToShopify({
            query: `{
         products(sortKey: TITLE, first: 100) {
          edges {
            node {
              id
              handle
              description
              title
              totalInventory
              productType
              variants(first: 5) {
                edges {
                  node {
                    id
                    title
                    quantityAvailable
                    price
                  }
                }
              }
              priceRange {
                maxVariantPrice {
                  amount
                  currencyCode
                }
                minVariantPrice {
                  amount
                  currencyCode
                }
              }
              images(first: 1) {
                edges {
                  node {
                    src
                    altText
                  }
                }
              }
            }
          }
        }
    }
      `
        });
        return shopifyResponse;
    } catch (error) {
        console.log(error);
    }
};

复制代码好的,那是什么?让我们来看看。首先,我们定义一个getProducts 查询,要求获得我们Shopify商店中的前100个产品。然后,我们将该查询传递给我们的PostToShopify 实用函数,该函数接收该查询,添加我们的API密钥以验证该请求,并调用Shopify端点。
但你可能注意到,postToShopify 函数还不存在,所以让我们继续前进,在项目src/api/utils 文件夹中创建它。如果该文件夹不存在,你可以创建它或把函数放在你想放的地方(只要确保正确引用它)。我的是在这个目录下:src/routes/api/utils/postToShopify.js 。
用下面的片段更新该文件。
export const postToShopify = async ({ query, variables }) => {
    try {
        const result = await fetch(import.meta.env.VITE_SHOPIFY_API_ENDPOINT, {
            method: 'POST',
            headers: {
                'Content-Type': 'application/json',
                'X-Shopify-Storefront-Access-Token': import.meta.env.VITE_SHOPIFY_STOREFRONT_API_TOKEN
            },
            body: JSON.stringify({ query, variables })
        }).then((res) => res.json());
        if (result.errors) {
            console.log({ errors: result.errors });
        } else if (!result || !result.data) {
            console.log({ result });
            return 'No results found.';
        }
        return result.data;
    } catch (error) {
        console.log(error);
    }
};

复制代码注意,我正在使用我们之前设置的环境变量来验证我们向Shopify发出的请求。请确保在你的环境变量前加上import.meta.env.
完成这些后,我们现在可以测试我们的实现,检查我们是否成功地从我们的Shopify商店获取产品。进入你的项目的src/routes/index.svelte ,用这个片段更新它。
// src/routes/index.svelte
<script context="module">
    import { products, getProducts } from '../../store';
    export async function load(ctx) {
        await getProducts();
        return { props: { products } };
    }
</script>

<script>
export let products;
</script>
<svelte:head>
    <title>Home</title>
</svelte:head>
<section>
<h2>
    {#each $products as product}
        <p>{product.node.title} </p>
    {/each}
</h2>
</section>

复制代码
我们在这里所做的是。
- 从我们的商店获取产品的数据
- 将
products作为一个道具传递给索引页 - 遍历整个产品数据并显示每个产品的名称
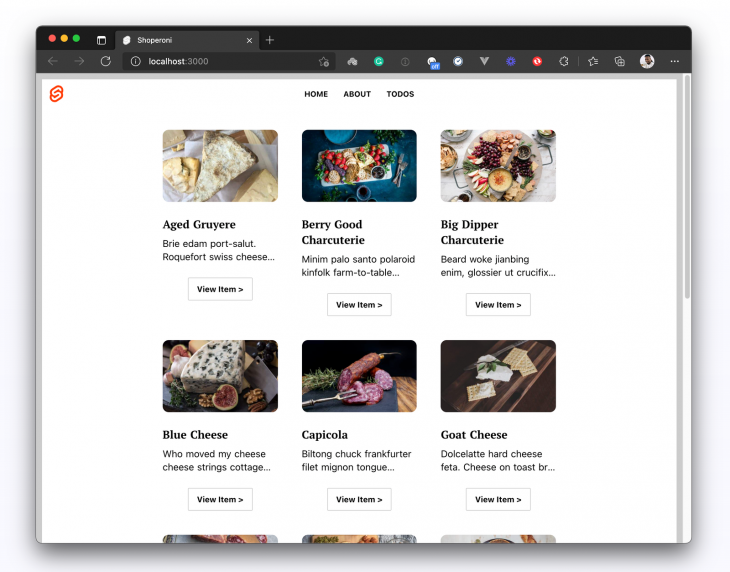
让我们检查一下浏览器,看看情况是否如此。
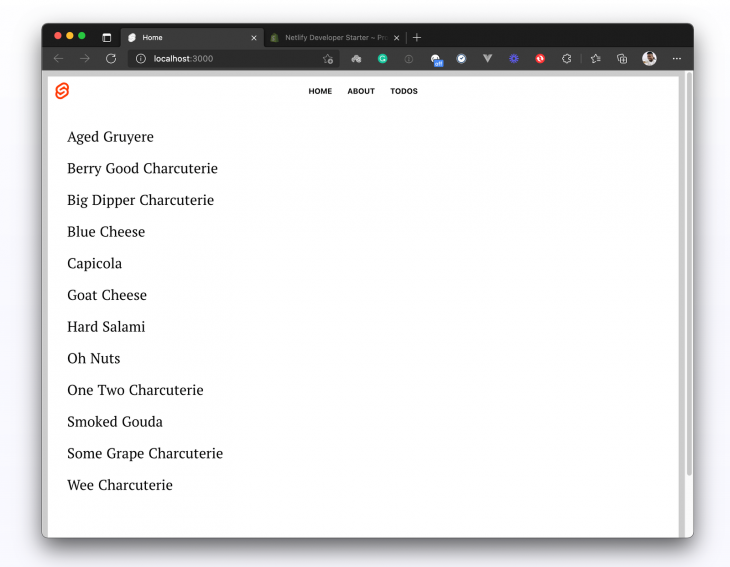
而我们确实在正确地从我们的商店获取产品。
恭喜你,我们已经完成了第一个任务。但当然,我们这样做只是为了测试我们的实现。让我们创建两个组件(ProductCard.svelte 和ProductList.svelte)来帮助我们以我们想要的方式组织和显示产品。
创建组件来组织和显示产品
在你的项目src 文件夹中创建一个组件文件夹,并添加我上面提到的两个文件。我将这样设置。
// src/components/ProductCard.svelte
<script>
    export let product;
</script>
<section>
    <div class="product-card">
        <div class="product-card-frame">
            <a href={`/products/${product.handle}`}>
                <img class="prodimg" src={product.images.edges[0].node.src} alt={product.handle} />
            </a>
        </div>
        <div class="product-card-text">
            <h3 class="product-card-title">{product.title}</h3>
            <p class="product-card-description">{product.description.substring(0, 60) + '...'}</p>
        </div>
        <a href={`/products/${product.handle}`}>
            <button>View Item {">"}</button>
        </a>
    </div>
</section>

复制代码在这里,我们期待着一个product ,这个道具将从我们渲染的地方传入这个组件。当我们得到这个道具时,我们会从中提取我们需要的不同的产品细节,然后使用这些细节来构建我们的产品卡,正如你在上面的片段中看到的那样。
让我们为我们的产品列表组件做同样的事情。在src/components 文件夹中创建一个ProductList.svelte 文件,并像这样设置它。
// src/components/ProductList.svelte
<script>
    import ProductCard from '../components/ProductCard.svelte';
    export let products;
</script>
<div class="product-grid">
    {#each products as product}
        <ProductCard product={product.node} />
    {/each}
</div>

复制代码在这里,我们从我们的索引页接收一个products (这就是我们要渲染这个组件的地方),然后迭代产品,为每个产品渲染一个产品卡。有了这个,我们就可以到索引页src/routes/index.svelte ,渲染我们的productList 组件。用这个片段更新它。
// src/routes/index.svelte
<script context="module">
    import { products, getProducts } from '../../store';
    export async function load(ctx) {
        await getProducts();
        const productType = ctx.page.query.get('type');
        if (productType) {
            products.update((items) => {
                const updated = items.filter((product) => product.node.productType === productType);
                return updated;
            });
        }
        return { props: { products} };
    }
</script>
<script>
    import ProductList from '../components/ProductList.svelte';
    export let products
</script>
<svelte:head>
    <title>Shoperoni</title>
</svelte:head>
<main>
   <ProductList products={$products} />
</main>

复制代码
在这里,我们正在做以下事情。
- 从我们的商店获取产品数据
- 根据页面查询过滤产品列表(我们将在以后的
Header组件中使用页面查询来过滤产品列表)。 - 将过滤后的产品列表作为一个道具传递给页面
- 渲染我们的
ProductList组件,并将产品数据作为一个道具传给它。
这就是了!当我们在浏览器上检查时,我们应该得到一个更好看的产品列表页面。
建立一个产品详情页
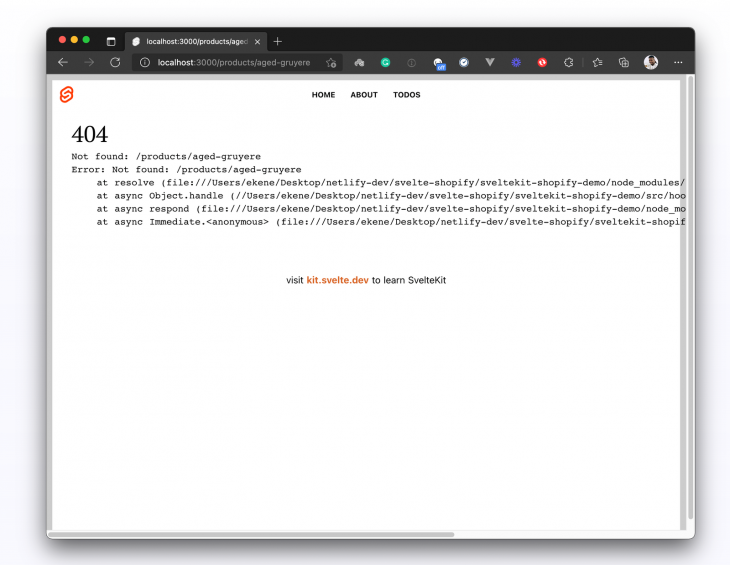
所以,我们已经建立了我们的产品列表页面,很好!如果用户在上面的截图上点击View Item ,会发生什么?此刻,什么都没有。实际上,会发生一些事情:浏览器会导航到这个路线/products/[the-product-title] ,结果会是404,因为这个页面还不存在。
为了创建单独的产品页面,让我们更新我们的store.js 文件,并添加另一个查询,该查询将采用我们的产品句柄,并使用它从我们的Shopify商店获取该特定产品。
这将意味着,每当用户访问我们的单个产品页面,即/products/aged-gruyere ,产品句柄aged-gruyere 将在该页面上作为page.params.handle 。然后我们可以使用这个句柄来查询Shopify的产品。用这个查询更新store.js 。
// store.js
import { writable } from "svelte/store";
import { postToShopify } from "./src/routes/api/utils/postToShopify";
export const products = writable([]);
export const productDetails = writable([]);
export const getProducts = async () => {
   // get products query
};

// Get product details
export const getProductDetails = async (handle) => {
  try {
    const shopifyResponse = await postToShopify({
      query: `
        query getProduct($handle: String!) {
          productByHandle(handle: $handle) {
            id
            handle
            description
            title
            totalInventory
            variants(first: 5) {
              edges {
                node {
                  id
                  title
                  quantityAvailable
                  priceV2 {
                    amount
                    currencyCode
                  }
                }
              }
            }
            priceRange {
              maxVariantPrice {
                amount
                currencyCode
              }
              minVariantPrice {
                amount
                currencyCode
              }
            }
            images(first: 1) {
              edges {
                node {
                  src
                  altText
                }
              }
            }
          }
        }
      `,
      variables: {
        handle: handle,
      },
    });

    productDetails.set(shopifyResponse.productByHandle);
    return shopifyResponse.productByHandle;
  } catch (error) {
    console.log(error);
  }
};

复制代码在这里,我们定义了一个新的查询,它将根据产品的句柄来获取一个特定的产品,我们把这个句柄作为一个变量传入查询。当我们从我们的动态页面调用getProductDetails() ,并将产品句柄传递给它时,我们应该得到返回的产品数据。
好了,让我们创建一个动态页面,代表我们的各个产品页面。在routes 文件夹中,创建一个新的routes/products/[handle].svelte 文件,并像这样设置它。
// src/routes/products/[handle].svelte
<script context="module">
    import { productDetails, getProductDetails } from '../../../store';
    export async function load(ctx) {
        let handle = ctx.page.params.handle;
        await getProductDetails(handle);
        return { props: { productDetails } };
    }
</script>
<script>
    export let productDetails;
    let quantity = 0;
    let product = $productDetails
    let productImage = product.images.edges[0].node.src;
    let productVariants = product.variants.edges.map((v) => v.node);
    let selectedProduct = productVariants[0].id;
        const addToCart = async () => {
        // add selected product to cart
        try {
            const addToCartResponse = await fetch('/api/add-to-cart', {
                method: 'POST',
                body: JSON.stringify({
                    cartId: localStorage.getItem('cartId'),
                    itemId: selectedProduct,
                    quantity: quantity
                })
            });
            const data = await addToCartResponse.json();
            // save new cart to localStorage
            localStorage.setItem('cartId', data.id);
            localStorage.setItem('cart', JSON.stringify(data));
            location.reload();
        } catch (e) {
            console.log(e);
        }
    };
    function price(itemPrice) {
        const amount = Number(itemPrice).toFixed(2);
        return amount + ' ' + 'USD';
    }
</script>
<main> <!-- page content --> </main>

复制代码在这一点上,你可能想知道为什么我们在这个片段上有两个<script> 标签。嗯,这就是原因:我们想让我在第一个脚本中定义的load() 函数在组件被渲染之前运行。要做到这一点,我们需要在脚本中添加context="module" 。其他的东西都可以放在第二个脚本标签中,而不需要context 这个道具。
所以我们在上面的代码片段中所做的是。
- 在初始化过程中运行
load()函数,从我们的商店中获取单个产品 - 将
productDetails对象作为一个道具传递给页面 - 在页面中接收
productDetails道具 - 对
productDetails对象进行解构,以获得我们在页面中需要的数据
接下来,让我们使用去结构化的产品数据来构建产品细节页面。
// src/routes/products/[handle].svelte
<script context="module">
//...
</script>
<script>
//...
</script>
<main class="product-page">
    <article>
        <section class="product-page-content">
            <div>
                <img class="product-page-image" src={productImage} alt={product.handle} />
            </div>
            <div>
                <h1>{product.title}</h1>
                <p>{product.description}</p>
                <form>
                    {#if productVariants.length > 1}
                        <div class="product-page-price-list">
                            {#each productVariants as { id, quantityAvailable, title, priceV2 }}
                                <div class="product-page-price">
                                    <input
                                        {id}
                                        bind:value={selectedProduct}
                                        type="radio"
                                        name="merchandiseId"
                                        disabled={quantityAvailable === 0}
                                    />
                                    <label for={id}>
                                        {title} - {price(priceV2.amount)}
                                    </label>
                                </div>
                            {/each}
                        </div>
                    {:else}
                        <div class="product-page-price is-solo">
                            {price(productVariants[0].priceV2.amount)}
                        </div>
                    {/if}
                    <div class="product-page-quantity-row">
                        <input
                            class="product-page-quantity-input"
                            type="number"
                            name="quantity"
                            min="1"
                            max={productVariants[0].quantityAvailable}
                            bind:value={quantity}
                        />
                        <button type="submit" on:click|preventDefault={addToCart} class="button purchase">
                            Add to Cart
                        </button>
                    </div>
                </form>
            </div>
        </section>
    </article>
</main>
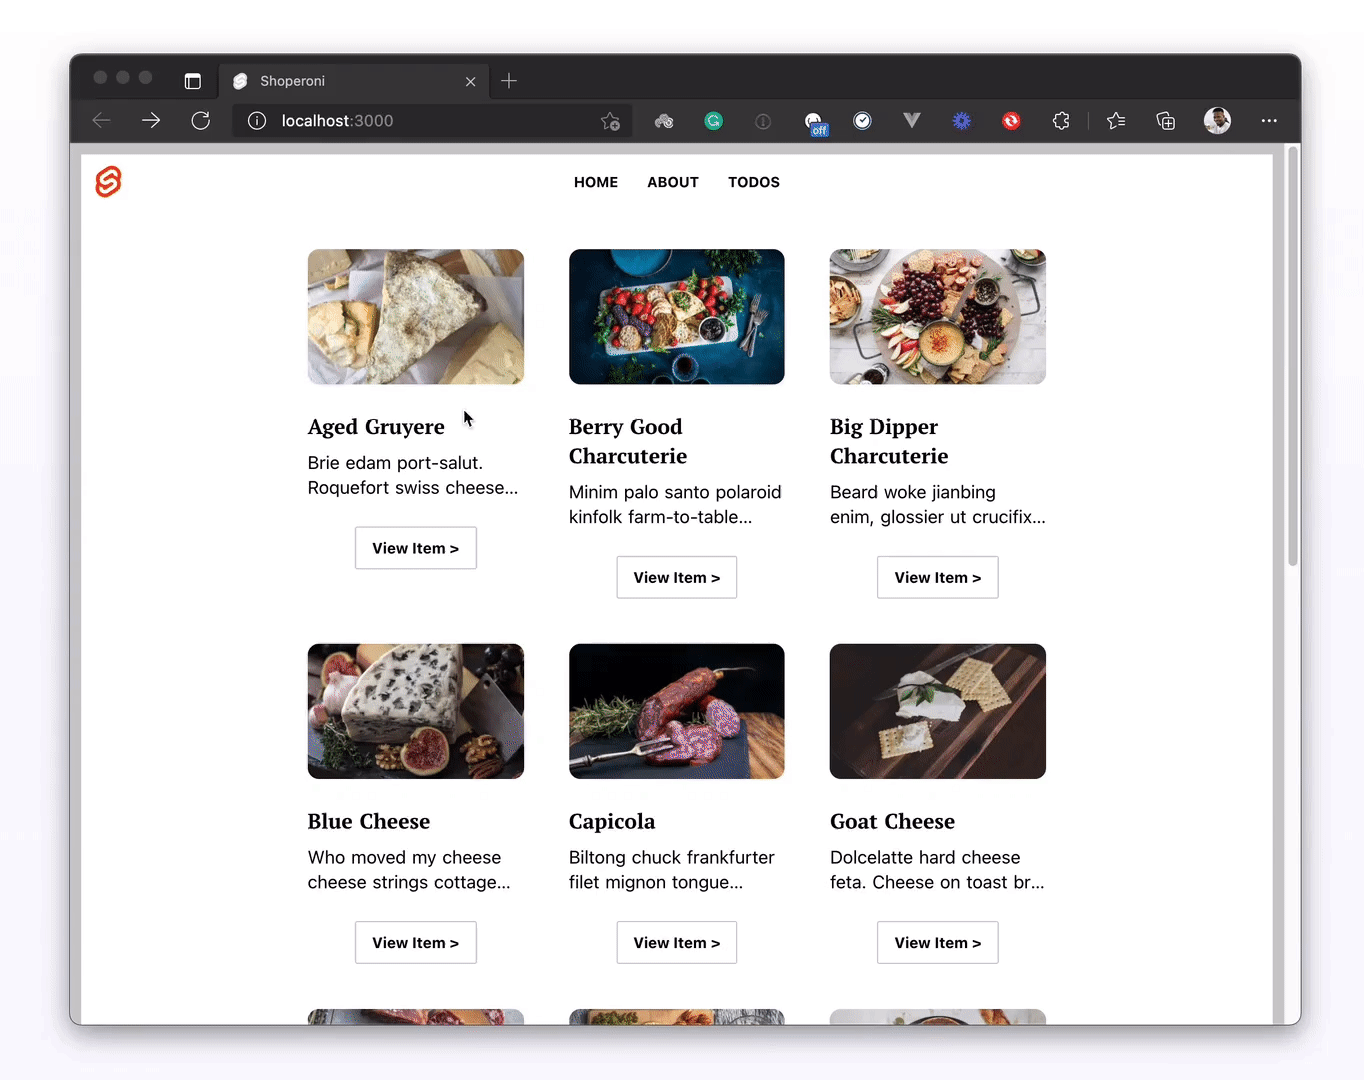
复制代码现在,如果我们点击产品列表页面上的View Item 按钮,我们应该得到像这样的单个产品详细页面。
复制代码
看起来我们就快完成了。让我们开始部署这个网站吧!
部署到Netlify
现在我们有了一个产品列表页面,并且可以查看我们的单个产品页面,我们可以继续部署这个网站了。
要部署一个SvelteKit应用程序,你需要将其调整到你选择的部署目标。SvelteKit文档提供了一些适配器,你可以快速使用它们来部署你的应用程序。我选择使用SvelteKit提供的Netlify适配器将其部署到Netlify。
我们需要做的第一件事是将Netlify适配器安装到我们的SvelteKit项目中。
npm i -D @sveltejs/adapter-netlify@next

复制代码然后,编辑你的svelte.config.js 文件并导入我们刚刚安装的Netlify适配器。
import adapter from '@sveltejs/adapter-netlify';
export default {
    kit: {
        adapter: adapter(),
        target: '#svelte'
    }
};

复制代码我们已经在我们的SvelteKit项目中安装并配置了该适配器。接下来我们要做的是创建一个netlify.toml 文件,并对其进行如下设置。
[build]
  command = "npm run build"
  publish = "build/"
  functions = "/functions/"

# Svelte requires node v12
[build.environment]
  NODE_VERSION = "12.20"

复制代码
我们在这里所做的是告诉Netlify。
- 构建这个网站所要运行的命令是
npm run build - 建成后的网站所在的目录是
/build - 找到我们自定义的Netlify函数的目录是
/functions(虽然我们在这个项目中没有使用任何Netlify函数) - 我们希望它能用Node v12.20来构建网站。
最后,把项目推送到Github,然后到你的Netlify仪表盘上,从你推送的GitHub仓库中部署你的网站。如果你需要帮助,这里有一个关于从GitHub部署到Netlify的一分钟指南来指导你。如果你想探索这个网站,演示也在Netlify上托管。
资源和接下来的步骤
现在我们已经完成了一个由Shopify后台支持的SvelteKit电子商务网站的建设。在下一个教程中,我们将把它与更多的Shopify功能联系起来,因为我们将在这个网站上添加购物车功能。到时见。
The postBuild an ecommerce site with SvelteKit and the Shopify Storefront APIappeared first onLogRocket Blog.