开源web框架django知识总结(八)
用户注册
sudo systemctl restart nginx
用户模型类
定义用户模型类
1. Django默认用户认证系统
- Django自带用户认证系统
- 它处理用户账号、组、权限以及基于cookie的用户会话。
- Django认证系统位置
django.contrib.auth包含认证框架的核心和默认的模型。django.contrib.contenttypes是Django内容类型系统,它允许权限与你创建的模型关联。
- Django认证系统同时处理认证和授权
- 认证:验证一个用户是否它声称的那个人,可用于账号登录。
- 授权:授权决定一个通过了认证的用户被允许做什么。
- Django认证系统包含的内容
- 用户:用户模型类、用户认证。
- 权限:标识一个用户是否可以做一个特定的任务,MIS系统常用到。
- 组:对多个具有相同权限的用户进行统一管理,MIS系统常用到。
- 密码:一个可配置的密码哈希系统,设置密码、密码校验。
2. Django默认用户模型类
-
Django认证系统中提供了用户模型类User保存用户的数据。
- User对象是认证系统的核心。
-
Django认证系统用户模型类位置
from django.contrib.auth.models import AbstractUser -
django.contrib.auth.models.User
-

父类AbstractUser介绍 -
User对象基本属性
- 创建用户(注册用户)必选:
username、password - 创建用户(注册用户)可选:
email、first_name、last_name、last_login、date_joined、is_active 、is_staff、is_superuse - 判断用户是否通过认证(是否登录):
is_authenticated
- 创建用户(注册用户)必选:
-
创建用户(注册用户)的方法
user = User.objects.create_user(username, email, password, **extra_fields)
用户认证(用户登录)的方法
from django.contrib.auth import authenticate
user = authenticate(username=username, password=password, **kwargs)
处理密码的方法
- 设置密码:
set_password(raw_password) - 校验密码:
check_password(raw_password)
3. 自定义用户模型类
思考:为什么要自定义用户模型类?
- 观察注册界面会发现,阿尔法商城
注册数据中必选用户mobile信息。 - 但是Django默认用户模型类中没有mobile字段,所以要自定义用户模型类。
如何自定义用户模型类?

-
继承自AbstractUser(可通过阅读Django默认用户模型类的源码得知) 。
-
新增
mobile字段。users/models.py
from django.db import models
from django.contrib.auth.models import AbstractUser

# Create your models here.


class User(AbstractUser):
    """自定义用户模型类"""
    mobile = models.CharField(max_length=11, unique=True, verbose_name='手机号')

    class Meta:
        db_table = 'tb_users'
        verbose_name = '用户'
        verbose_name_plural = verbose_name

    def __str__(self):
        return self.username
django 数据模型中 null=True 和 blank=True 有什么区别
null:
If True, Django will store empty values as NULL in the database. Default
is False.
如果为True,空值将会被存储为NULL,默认为False。
blank:
If True, the field is allowed to be blank. Default is False.
如果为True,字段允许为空,默认不允许。
django中models里面__str__有什么作用?
__str_是python的object基类的一个方法,也就是说python所有的类都有,当然django的modle类也有,我们平常创建一个类的对象,print这个对象时一般会是<main.TestClass object at 0x7f4126578828>,即这个对象的所属类和内存地址,我们改写类中的str__方法后可以在print时得到想要的易于人阅读的对象的信息
4. 知识要点
- Django自带用户认证系统,核心就是User对象,并封装了一系列可用的方法和属性。
- Django用户认证系统包含了一系列对用户的操作,比如:模型类,认证,权限,分组,密码处理等。
- Django用户认证系统中的用户模型类可以自定义,继承自AbstractUser。
- Django用户认证系统说明文档
5. 指定用户模型类
- Django用户模型类是通过全局配置项 AUTH_USER_MODEL 决定的
配置规则:
AUTH_USER_MODEL = 'app应用名.模型类名'
在dev.py文件中指定
# 指定本项目用户模型类
AUTH_USER_MODEL = 'users.User'
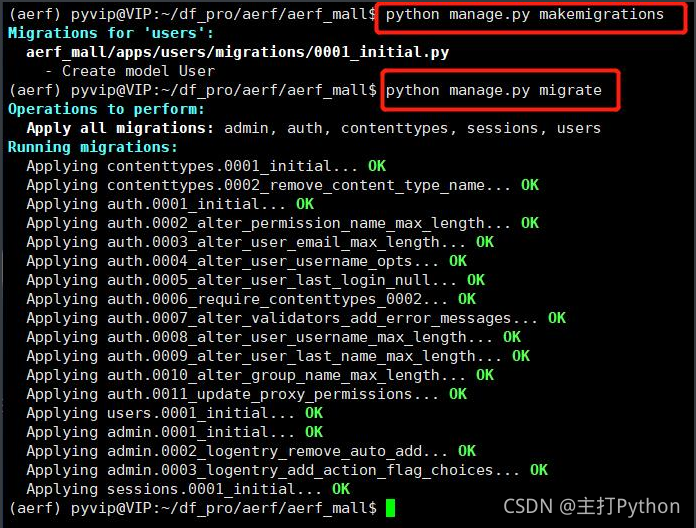
6、迁移用户模型类
1.创建迁移文件
python manage.py makemigrations
2.执行迁移文件
python manage.py migrate
用户注册前端简介
1、register.html
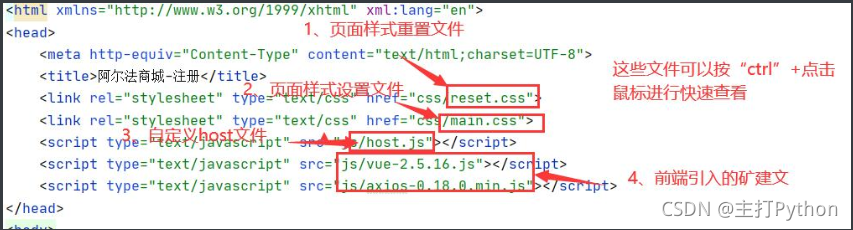
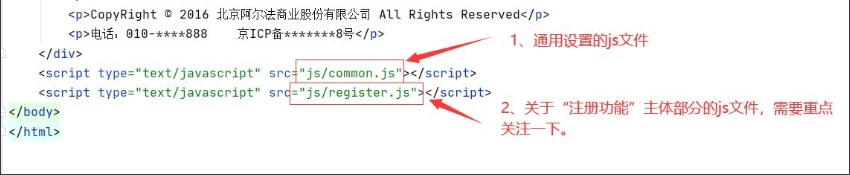
注意:common.js、register.js之所以不与上面的js文件放在一起,因为代码从上往下执行,需要整个页面加载后去执行。

2、 host.js
// 保存后端API服务器地址
var host = 'http://127.0.0.1:8000';
//var host = 'http://www.cctv.com:8000';
3、 common.js “通用js”,也就是在网站中会被多个页面调用的js部分代码,了解它有那几个模块就好
// 获取cookie
function getCookie(name) {


    var r = document.cookie.match("\\b" + name + "=([^;]*)\\b");
    return r ? r[1] : undefined;
}

// 提取地址栏中的查询字符串
function get_query_string(name) {


    var reg = new RegExp('(^|&)' + name + '=([^&]*)(&|$)', 'i');
    var r = window.location.search.substr(1).match(reg);
    if (r != null) {


        return decodeURI(r[2]);
    }
    return null;
}

// 生成uuid
function generateUUID() {


    var d = new Date().getTime();
    if(window.performance && typeof window.performance.now === "function"){


        d += performance.now(); //use high-precision timer if available
    }
    var uuid = 'xxxxxxxx-xxxx-4xxx-yxxx-xxxxxxxxxxxx'.replace(/[xy]/g, function(c) {


        var r = (d + Math.random()*16)%16 | 0;
        d = Math.floor(d/16);
        return (c=='x' ? r : (r&0x3|0x8)).toString(16);
    });
    return uuid;
}
4、register.js,这个重点。
var vm = new Vue({

        // 定义主函数 vm
    el: '#app',       // 标记app 接口
    data: {

               // 定义数据变量 vue的data数据类型全是json
        host: host,

        error_name: false,  // 设置css标记,如果为false,默认状态“不显示”
        error_password: false,
        error_check_password: false,
        error_phone: false,
        error_allow: false,
        error_sms_code: false,
        error_name_message: '',
        error_phone_message: '',
        error_sms_code_message: '',
        error_image_code:'',

        sms_code_tip: '获取短信验证码',
        sending_flag: false, // 正在发送短信标志

        // 图形验证码:
        image_code_id: '',
        image_code_url: '',

        username: '',
        password: '',
        password2: '',
        mobile: '',
        sms_code: '',
        allow: false,
        image_code:'',
        error_image_code_message:''
    },
    mounted: function(){


		// 向服务器获取图片验证码
		this.generate_image_code();
	},
    methods: {


        // 生成一个图片验证码的编号,并设置页面中图片验证码img标签的src属性
		generate_image_code: function(){


			// 生成一个编号 : 严格一点的使用uuid保证编号唯一, 不是很严谨的情况下,也可以使用时间戳
			this.image_code_id = generateUUID();
			// 设置页面中图片验证码img标签的src属性  字符串拼接 向后端请求接口"/image_codes/"
			this.image_code_url = this.host + "/image_codes/" + this.image_code_id + "/";
		},
        // 检查用户名
        check_username: function () {


            var re = /^[a-zA-Z0-9_-]{

    5,20}$/;   //定义校验规则
            var re2 = /^[0-9]+$/;
             //.test()调用js框架自带的校验函数,
            if (re.test(this.username) && !re2.test(this.username)) {


                this.error_name = false;
            } else {


                this.error_name_message = '请输入5-20个字符的用户名且不能为纯数字';
                this.error_name = true;
            }
            // 检查重名 需要向后端数据库发出请求,检查出的结果返回给前端
            if (this.error_name == false) {


                var url = this.host + '/usernames/' + this.username + '/count/';
                axios.get(url, {


                    responseType: 'json',
                    withCredentials:true,
                })
                    .then(response => {

      // .then()从获得数据,处理逻辑...
                        if (response.data.count > 0) {


                            this.error_name_message = '用户名已存在';
                            this.error_name = true;
                        } else {


                            this.error_name = false;
                        }
                    })
                    .catch(error => {

      // 后端获取失败,处理逻辑...
                        console.log(error.response);
                    })
            }
        },
        // 定义校验密码函数
        check_pwd: function () {


            var len = this.password.length;
            if (len < 8 || len > 20) {


                this.error_password = true;
            } else {


                this.error_password = false;
            }
        },
        // 定义重复密码函数
        check_cpwd: function () {


            if (this.password != this.password2) {


                this.error_check_password = true;
            } else {


                this.error_check_password = false;
            }
        },
        // 检查手机号
        check_phone: function () {


            var re = /^1[345789]\d{

    9}$/;

            if (re.test(this.mobile)) {


                this.error_phone = false;
            } else {


                this.error_phone_message = '您输入的手机号格式不正确';
                this.error_phone = true;
            }
            if (this.error_phone == false) {


                var url = this.host + '/mobiles/' + this.mobile + '/count/';
                // 向后端数据请求验证
                axios.get(url, {


                    responseType: 'json',
                     withCredentials:true, // 前端跨域设置
                })
                    .then(response => {


                        if (response.data.count > 0) {


                            this.error_phone_message = '手机号已存在';
                            this.error_phone = true;
                        } else {


                            this.error_phone = false;
                        }
                    })
                    .catch(error => {


                        console.log(error.response);
                    })
            }
        },
        // 检查图片验证码
		check_image_code: function (){


			if(!this.image_code) {


				this.error_image_code_message = '请填写图片验证码';
				this.error_image_code = true;
			} else {


				this.error_image_code = false;
			}
		},
		// 手机短信验证
        check_sms_code: function () {


            if (!this.sms_code) {


                this.error_sms_code_message = '请填写短信验证码';
                this.error_sms_code = true;
            } else {


                this.error_sms_code = false;
            }
        },
        // 检查是否“同意协议”
        check_allow: function () {


            if (!this.allow) {


                this.error_allow = true;
            } else {


                this.error_allow = false;
            }
        },
        // 发送手机短信验证码
        send_sms_code: function () {


            if (this.sending_flag == true) {

     //标记为true,说明已发验证码
                return;
            }
            this.sending_flag = true;

            // 校验参数,保证输入框有数据填写
            this.check_phone();

            if (this.error_phone == true) {


                this.sending_flag = false;
                return;
            }

            // 向后端接口发送请求,让后端发送短信验证码
            var url = this.host + '/sms_codes/' + this.mobile + '/' + '?image_code=' + this.image_code
                + '&image_code_id=' + this.image_code_id
            axios.get(url, {


                responseType: 'json',
                withCredentials:true,
            })
                .then(response => {


                    // 表示后端发送短信成功
                    // 倒计时60秒,60秒后允许用户再次点击发送短信验证码的按钮
                    var num = 60;
                    // 设置一个计时器
                    var t = setInterval(() => {


                        if (num == 1) {


                            // 如果计时器到最后, 清除计时器对象
                            clearInterval(t);
                            // 将点击获取验证码的按钮展示的文本回复成原始文本
                            this.sms_code_tip = '获取短信验证码';
                            // 将点击按钮的onclick事件函数恢复回去
                            this.sending_flag = false;
                        } else {


                            num -= 1;
                            // 展示倒计时信息
                            this.sms_code_tip = num + '秒';
                        }
                    }, 1000, 60)
                })
                .catch(error => {


                    if (error.response.status == 400) {


                        this.error_sms_code_message = error.response.data.message;
                        this.error_sms_code = true;
                    } else {


                        console.log(error.response.data);
                    }
                    this.sending_flag = false;
                })
        },
        // 注册 点击注册按钮时,触发下面校验函数
        on_submit: function () {


            this.check_username();
            this.check_pwd();
            this.check_cpwd();
            this.check_phone();
            this.check_sms_code();
            this.check_allow();


            // 点击注册按钮之后, 发送请求 (下面的代码是通过请求体传参的)
            if (this.error_name == false && this.error_password == false && this.error_check_password == false
                && this.error_phone == false && this.error_sms_code == false && this.error_allow == false) {


                // 想后端发送注册请求 构造ajax
                axios.post(this.host + '/register/', {


                    username: this.username,
                    password: this.password,
                    password2: this.password2,
                    mobile: this.mobile,
                    sms_code: this.sms_code,
                    allow: this.allow
                }, {


                    responseType: 'json',
                    withCredentials:true,
                })
                    .then(response => {


                        if (response.data.code==0) {


                           location.href = 'index.html'; //跳转首页
                        }
                        if (response.data.code == 400) {


                            alert(response.data.errmsg)
                        }
                    })
                    .catch(error => {


                        if (error.response.code == 400) {


                            if ('non_field_errors' in error) {


                                this.error_sms_code_message = error.response;
                            } else {


                                this.error_sms_code_message = '数据有误';
                            }
                            this.error_sms_code = true;
                        } else {


                            console.log(error);
                        }
                    })
            }
        }
    }
});
分析完register.js,请同学么思考,完成一个完成注册,前端一共向后端发送几次请求呢?
1、校验“用户名”是否已在数据库中存在? get
2、校验“手机号”是否已在数据库中存在? get
3、请求图形验证码 get
4、请求手机验证码 get
5、提交正式注册信息 post
用户名重复注册后端逻辑
from django.http import JsonResponse
from django.views import View
from .models import User
# Create your views here.
import logging
logger = logging.getLogger('django')

# 验证用户名重复
class UsernameCountView(View):

    def get(self, request, username):

        try:
            # 1、统计用户数量
            count = User.objects.filter(
                username=username
            ).count()
        except Exception as e:
            print(e)
            # 写日志
            logger.error(e)


        # 2、构建响应返回
        return JsonResponse({


            'code': 0,
            'errmsg': 'ok',
            'count': count
        })
在app子路由urls.py中,添加路由:
from django.urls import re_path
from users.views import *

re_path(r'^usernames/(?P<username>[a-zA-Z0-9_-]{5,20})/count/$', UsernameCountView.as_view()),
测试接口:http://127.0.0.1:8000/usernames/aaaaaa/count/
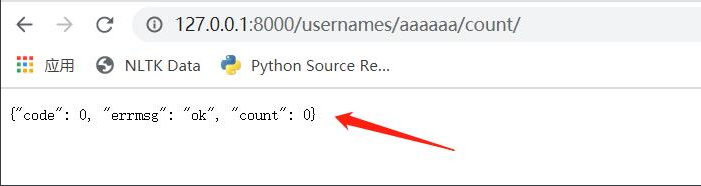
成功!
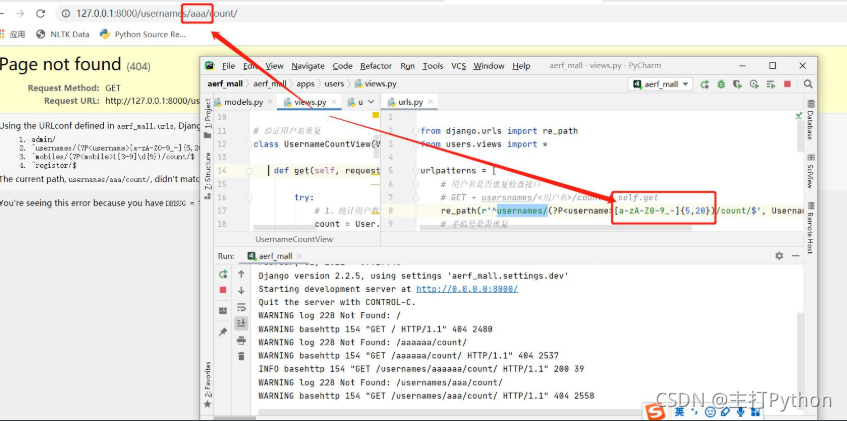
注意,测试接口时,因为不符合路由规则,虽然正确的接口,但也会报错的。
后端写接口小结:
1、确认前端是什么请求。get/post/put/…?
2、确定前端有什么需求发给后端?(查询数据库,用户名子是否存在)
#后端返回查询结构
count = User.objects.filter(username=username).count()


#js里,进行判断
// 检查重名
            if (this.error_name == false) {


                var url = this.host + '/usernames/' + this.username + '/count/';
                axios.get(url, {


                    responseType: 'json',
                    withCredentials:true,
                })
                    .then(response => {


                        if (response.data.count > 0) {


                            this.error_name_message = '用户名已存在';
                            this.error_name = true;
                        } else {


                            this.error_name = false;
                        }
                    })
 # 统计结果为0,表示用户名未注册,如果是1,表示:已注册
3、给前端返回查询结果。注意,返回结果得格式要求,本项目用的是json格式。注意,返回哪些参数?code /errmsg/count/
4、针对查询可能出现一些异常情况,进行异常处理。
try:
            # 1、统计用户数量
            count = User.objects.filter(
                username=username
            ).count()
        except Exception as e:
            print(e)
            # 写日志
            logger.error(e)
5、在完成views.py中写完接口后,添加对应的urls.py的子路由。
re_path(r'^usernames/(?P<username>[a-zA-Z0-9_-]{5,20})/count/$', UsernameCountView.as_view()),
解决跨域问题
什么是跨域?如何实现?
参考网址:https://www.jianshu.com/p/f049ac7e2220
django-cors-headers配置
安装
pip install django-cors-headers
配置dev.py
1.注册应用
INSTALLED_APPS = [
    ...
    'corsheaders',
    ...
]
2、添加中间层
MIDDLEWARE = [
    'corsheaders.middleware.CorsMiddleware',	# 放最前面
    ...
]
3、新增
CORS_ORIGIN_WHITELIST = [

    'http://192.168.235.129',
]

# 允许在不同主机之间传递cookie数据
CORS_ALLOW_CREDENTIALS = True
手机号重复注册验证接口
1、手机号重复注册后端逻辑
views.py
class MobileCountView(View):

    def get(self, request, mobile):

        try:
            # 1、根据手机号统计数量
            count = User.objects.filter(
                mobile=mobile
            )   .count()
        except Exception as e:
            print(e)
            # 写日志
            logger.error(e)

        # 2、构建响应
        return JsonResponse({


            'code': 0,
            'errmsg': 'ok',
            'count': count
        })
2、子路由urls.py
re_path(r'^mobiles/(?P<mobile>1[3-9]\d{9})/count/$', MobileCountView.as_view()),
3、测试接口:http://127.0.0.1:8000/mobiles/13335356666/count/