JDBC核心技术
文章目录
- 一、JDBC入门
- 二、JDBC基本操作
-
- 2.1、连接重点*****
- 2.2、数据库连接
- 2.3、Statement对象
- 2.4、ResultSet对象
- 2.5、PreparedStatement对象
- 2.6、编写JDBC工具类
- 三、用户登录功能
- 四、JDBC高级
- 五、JDBC事务
- 六、数据库连接池
- 七、JDBC_DAO模式
- 八、DbUtils工具
- 九、JAVA和Oracle
- 十、JDBC分页工具
- 总结
一、JDBC入门
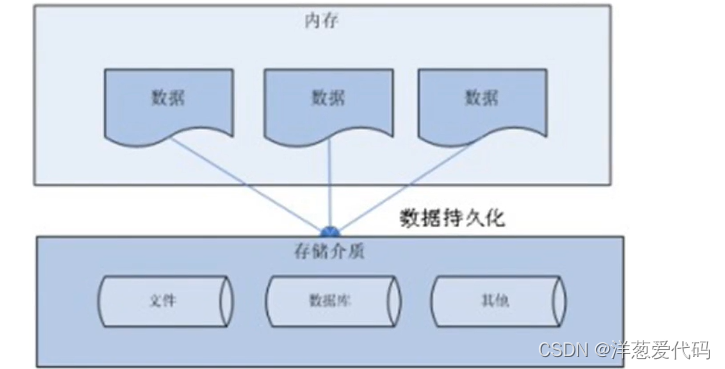
1.1、数据的持久化
1.1.1、持久化的概念
持久化(presitence):把数据保存到可掉电式存储设备中以供之后使用,

大多数情况下,特别企业级应用,数据持久化意味着将内存中的数据保存到硬盘上加以"固化",

而持久化的实现过程大多,通过各种关系数据库来完成
1.1.2、持久化的主要应用
持久化的主要应用是将内存中数据存储在关系型数据库中,也可以存储在磁盘文件、xml数据文件中
1.2、Java中的数据存储技术
a、 在Java中,数据库存取技术可分为如下几类:
 	  1.JDBC直接访问数据库
	  2.JDO(Java Data Object)技术
      3.第三方O/R工具,如Hibernate、Mybatis等
b、JDBC是java访问数据库的基石,JDO、Hibernate、Mybatis等只是更好的封装课JDBC
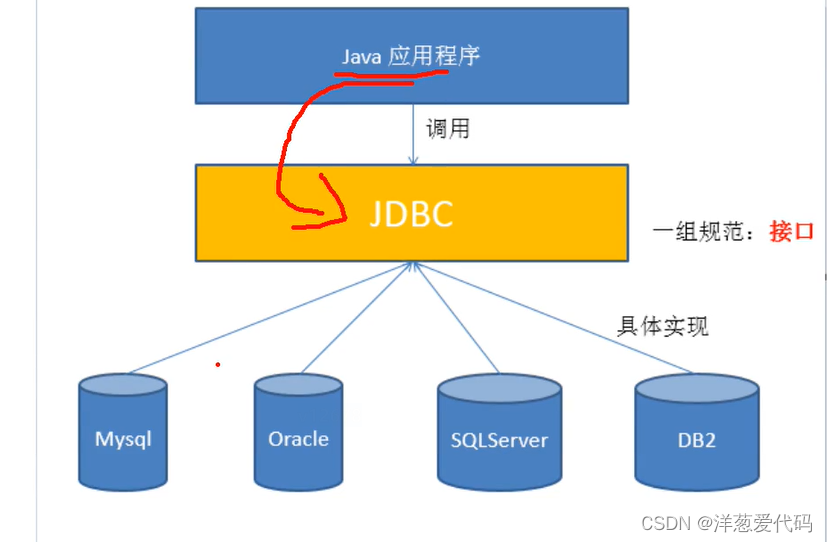
1.3、JDBC介绍
一、JDBC(java database connectivity)是一个独立特定数据管理系统、通用的SQL数据库存取和操作的共同接口(一组API),定义了用来访问数据库的标准Java类库,(java.sql,javax.sql)使用这些类可以以一种标准的方法,方便地访问数据源资源
二、JDBC为了访问不同的数据库提供了一种统一的途径,为开发者屏蔽了一些细节问题
三、JDBC的目标是使java程学院使用JDBC可以连接任务提供了JDBC驱动程序的数据库系统,这样就使得程序员无需对特定的数据库系统的特点有过多的了解,从而大大简化了开发过程
四、如果没有JDBC,那么Java程学院访问数据库是这样的:
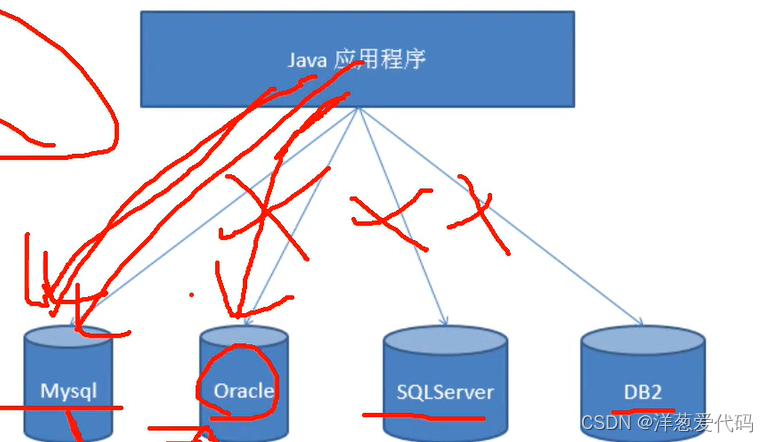
有了JDBC,Java程序访问数据库时是这样的:
2.1、JDBC编写步骤

编写步骤:

 1. 加载并且注册驱动程序
 2. 创建Connection对象
 3. 创建Statement对象
 4. 实行sql语句
 5. 使用和关闭ResultSet对象
 6. 关闭Statement对象
 7. 关闭Connection对象
 8. 关闭资源
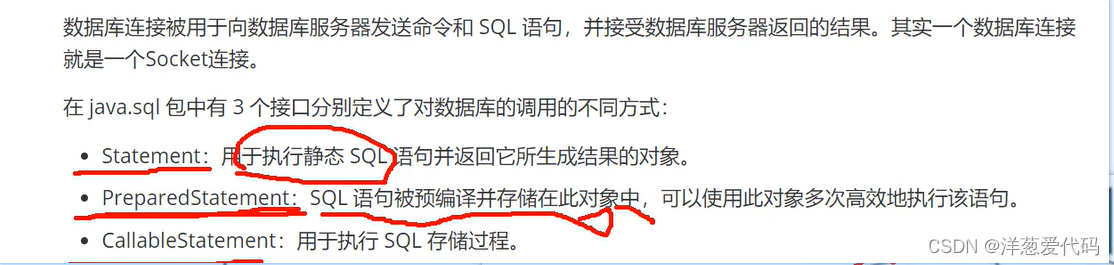
二、JDBC基本操作
2.1、连接重点*****
 1. Driver接口
		a、java.sql.Driver接口是所JDBC驱动程序需要实现的接口。这个接口是提供给数据库厂商使用的,不同数据库厂商提供不同的实现。
	    b、在程序中不需要直接去访问实现了Driver接口的类,二是由驱动程序管理类(java.sql.DriverManager)去调用这些Driver实现
	     			b1、Oracle的驱动 oracle.jdbc.driver.OracleDriver
	     			b2、MySQL的驱动 com.mysql.jdbc.Driver
 2. 加载与注册JDBC驱动
 		a、加载驱动:加载JDBC驱动需要调用Class类的静态方法forName(),向其传递要加载JDBC驱动的类名:Class.forName("com.mysql.jdbc.Driver");
 		b、注册驱动:DriverManager.registerDriver(com.mysql.jdbc.Driver)来注册驱动
 				b1、使用DriverManager.register("com.mysql.jdbc.Driver")来注册驱动
 				b2、通常不用显示调用DriverManager了的registerDriver()方法来注册驱动程序类的实例,因为Driver接口的驱动程序类都包含了静态代码块,在这个惊天代码块中,会调用DriverManager.registerDriver()方法来注册自身的一个实例
 3. URL
 		a、JDBC URL 用于标识一个被注册的驱动程序,驱动程序管理器通过这个URL选择正正确的驱动程序,从而建立到数据库的连接
 		b、JDBC URL的标准由三个部分组成,各部分用冒号分隔
 				b1、jdbc:子协议:子名称
 				b2、协议、JDBC URL中的协议总是jdbc
 				b3、子协议:一种标识数据库的方法。子名称可以依不同的子协议而变化,用子名称的目的是为了定位数据库提供足够的信息,包含主机名(对应服务器端的ip地址),端口号,数据库名
 				b4、MySQL的连接URL编写方式
 						b4.1:jdbc:mysql://主机名称:mysql服务端口号/数据库名称?参数=值&参数=值
 						b4.2:示例: jdbc:mysql://localhost/test
 						b4.3: jdbc:mysql://localhost/test?userSSL=false (在MySQL5.7以后,默认开启SSL,通过参数指定不适用SSL)
 						b4.4:jdbc:mysql://localhost/test?userUnicode=true$characterEncoding=utf8(如果JDBC程序与服务器端的字符集不一致,会导致乱码,那么可以通过参数指定服务器段的字符集)
 						b4.5:jdbc:mysql://localhost/test?user =root&password=root
2.2、数据库连接
2.2.1、第一种方法
package com.wr.oyc;

import java.sql.Connection;
import java.sql.Driver;
import java.sql.SQLException;
import java.util.Properties;

public class JdbcTest {


//    数据库连接
    public static void main(String[] args) throws SQLException {


        Driver driver = new com.mysql.jdbc.Driver();
        String url = "jdbc:mysql://localhost:3306/test" ;
        Properties properties = new Properties();
        properties.setProperty("user" , "root");
        properties.setProperty("password" , "root");
        Connection connection = driver.connect(url , properties);
        System.out.println(connection);
    }
}

2.2.2、第二种方法
package com.wr.oyc.sqlConection;

import java.sql.Connection;
import java.sql.Driver;
import java.sql.SQLException;
import java.util.Properties;

public class Con2 {


    public static void main(String[] args) throws ClassNotFoundException, IllegalAccessException, InstantiationException, SQLException {


		//使用反射进行实例化
        Class c = Class.forName("com.mysql.jdbc.Driver");

        Driver driver = (Driver)c.newInstance();

        String url = "jdbc:mysql://localhost:3306/test?userSSL=false";

        Properties properties = new Properties();

        properties.setProperty("user" , "root");
        properties.setProperty("password" , "root");

        Connection connection = driver.connect(url , properties);

        System.out.println(connection);
    }
}

2.2.3、第三种方法
package com.wr.oyc.sqlConection;

import java.sql.Connection;
import java.sql.Driver;
import java.sql.DriverManager;
import java.sql.SQLException;
import java.util.Properties;

public class Con3 {


    public static void main(String[] args) throws ClassNotFoundException, IllegalAccessException, InstantiationException, SQLException {


        Class c = Class.forName("com.mysql.jdbc.Driver");
        Driver driver = (Driver)c.newInstance();

        DriverManager.registerDriver(driver);

        String url = "jdbc:mysql://localhost:3306/test?userSSL=false";

        Properties properties = new Properties();

        properties.setProperty("user" , "root");
        properties.setProperty("password" , "root");

        Connection connection = DriverManager.getConnection(url , properties);


        System.out.println(connection);
    }
}

2.2.4、第四种方法
package com.wr.oyc.sqlConection;

import java.sql.Connection;
import java.sql.DriverManager;
import java.sql.SQLException;

public class Con4 {


    public static void main(String[] args) throws ClassNotFoundException, SQLException {


        Class.forName("com.mysql.jdbc.Driver");

        String url = "jdbc:mysql://localhost:3306/test?useSSL=false";
        String user = "root";
        String password = "root";
        Connection connection = DriverManager.getConnection(url , user , password);


        System.out.println(connection);
    }
}

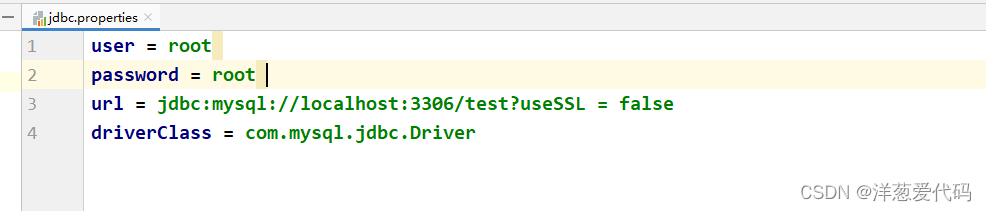
2.2.5、第五种方法
package com.wr.oyc.sqlConection;

import java.io.IOException;
import java.io.InputStream;
import java.util.Properties;

public class Con5 {


    public static void main(String[] args) throws IOException, ClassNotFoundException {


        InputStream inputStream  =
                Con5.class.getClassLoader().getResourceAsStream("jdbc.properties");

        Properties properties  = new Properties();

        properties.load(inputStream);

        String user = properties.getProperty("user");
        String password = properties.getProperty("passowrd");
        String url = properties.getProperty("url");
        String driverClass = properties.getProperty("driverClass");

        Class.forName(driverClass);


    }
}

2.26、连接的总结
 1. 普通方法
 2. 使用反射类
 3. 使用DriverManager注册Driver类
 4. 优化第四种
 5. 使用配置文件jdbc.properties
2.3、Statement对象

2.3.1步骤
- 调用Connection对象的createStatemen()方法创建Statement对象
- 写sql语句
- 调用以下方法执行SQL语句


package com.wr.oyc.sqlDo;
import com.wr.oyc.sqlConection.Con5;
import javafx.stage.Stage;
import java.io.IOException;
import java.io.InputStream;
import java.sql.Connection;
import java.sql.DriverManager;
import java.sql.SQLException;
import java.sql.Statement;
import java.util.Properties;
import java.util.Scanner;
public class Statement1 {
public static void main(String[] args) throws IOException, ClassNotFoundException, SQLException {
InputStream inputStream =
Con5.class.getClassLoader().getResourceAsStream("jdbc.properties");
Properties properties = new Properties();
properties.load(inputStream);
String url = properties.getProperty("url");
String user = properties.getProperty("user");
String password = properties.getProperty("password");
String driverClass = properties.getProperty("driverClass");
Class.forName(driverClass);
Connection connection = DriverManager.getConnection(url , user , password );
Statement statement = connection.createStatement();
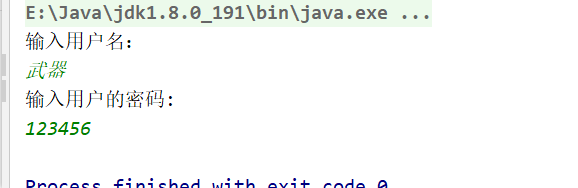
// INSERT INTO USER (username , userpassword) VALUES ('吴启明' , '123456');
Scanner scanner = new Scanner(System.in) ;
System.out.println("输入用户名:");
String username = scanner.next();
System.out.println("输入用户的密码:");
String userpassword = scanner.next();
String sql = "insert into USER (username , userpassword) values('"+username +"','" + userpassword+"') ";
statement.execute(sql);
connection.close();
statement.close();
connection.close();
}
}

2.4、ResultSet对象

package com.wr.oyc.sqlDo;
import com.wr.oyc.sqlConection.Con5;
import java.io.IOException;
import java.io.InputStream;
import java.sql.Connection;
import java.sql.DriverManager;
import java.sql.SQLException;
import java.sql.Statement;
import java.util.Properties;
import java.util.Scanner;

public class ResultSet {


    public static void main(String[] args) throws IOException, ClassNotFoundException, SQLException {


        InputStream inputStream  =
                Con5.class.getClassLoader().getResourceAsStream("jdbc.properties");

        Properties properties  = new Properties();

        properties.load(inputStream);


        String url = properties.getProperty("url");
        String user = properties.getProperty("user");
        String password = properties.getProperty("password");
        String driverClass = properties.getProperty("driverClass");

        Class.forName(driverClass);

        Connection connection = DriverManager.getConnection(url , user , password );


        Statement statement = connection.createStatement();

        String sql = "select * from  USER ";

        statement.execute(sql);

        java.sql.ResultSet resultSet = statement.executeQuery(sql) ;

        while (resultSet.next()){


            System.out.println(resultSet.getString("username") + "---" + resultSet.getString("userpassword"));
        }

        connection.close();
        statement.close();
        resultSet.close();


    }
}

2.5、PreparedStatement对象
2.5.1、PreparedStatement对象的优点
- PreparedStatement接口继承Statement
- PreparedStatement是预编译d,比Statement速度快
- 调用Connection对象的PreparedStatement(String sql)方法获取PreparedStatement对象
- 调用以下方法执行sql语句

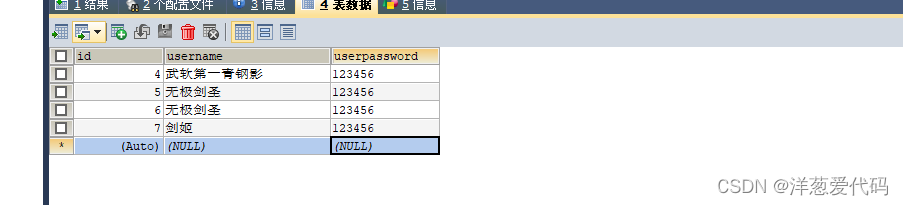
2.5.2、PreparedStatement添加
1. 创建PreparedStatement对象


2、填充占位符


package com.wr.oyc.sqlDo;

import com.wr.oyc.sqlConection.Con5;

import java.io.IOException;
import java.io.InputStream;
import java.sql.Connection;
import java.sql.DriverManager;
import java.sql.SQLException;
import java.sql.Statement;
import java.util.Properties;
import java.util.Scanner;

public class PreparedStatement {


    public static void main(String[] args) throws IOException, ClassNotFoundException, SQLException {


        InputStream inputStream  =
                Con5.class.getClassLoader().getResourceAsStream("jdbc.properties");

        Properties properties  = new Properties();

        properties.load(inputStream);


        String url = properties.getProperty("url");
        String user = properties.getProperty("user");
        String password = properties.getProperty("password");
        String driverClass = properties.getProperty("driverClass");

        Class.forName(driverClass);

        Connection connection = DriverManager.getConnection(url , user , password );


//        Statement statement = connection.createStatement();


        String sql
                = "insert into USER (username , userpassword) values(?,?) ";

       java.sql.PreparedStatement preparedStatement = connection.prepareStatement(sql);

       preparedStatement.setString(1 ,"无极剑圣");
       preparedStatement.setString(2,"123456");

//       执行预编译
       preparedStatement.executeUpdate();


        preparedStatement.close();
        connection.close();
    }
}

2.5.3、使用PreparedStatement去完成更新操作
package com.wr.oyc.sqlDo;
import com.wr.oyc.utils.JDBCUtils;
import java.io.IOException;
import java.sql.Connection;
import java.sql.SQLException;
public class PreparedStatement01 {


    public static void main(String[] args) throws SQLException, IOException, ClassNotFoundException {


        Connection connection = null ;

        connection = JDBCUtils.getConnection();

        String sql = "update user set username = ? where id = ?" ;

        java.sql.PreparedStatement preparedStatement = connection.prepareStatement(sql);
//        修改id为3的姓名为郑州科技大学第一青钢影
        preparedStatement.setString(1,"郑州科技大学第一青钢影");

        preparedStatement.setInt(2,3);

        preparedStatement.executeUpdate();

        JDBCUtils.close(connection, preparedStatement);
    }
}

2.5.4、使用PreparedStatement去完成删除
package com.wr.oyc.sqlDo;

import com.wr.oyc.utils.JDBCUtils;

import java.io.IOException;
import java.sql.Connection;
import java.sql.PreparedStatement;
import java.sql.SQLException;
import java.sql.Statement;

public class PreparedStatement02 {


//    第一步、获取连接
//    第二步、创建sqsl语句
    //第三步 创建预编译对象PreparedStatement
    //第四使用预编译对象的占位符
    //执行sql代码
    //关闭connectiob连接 prepared statement连接


    public static void main(String[] args) throws SQLException, IOException, ClassNotFoundException {


        Connection connection = null ;
        connection = JDBCUtils.getConnection();
//        删除id为3的用户
        String sql = "delete from user where id =  ?"  ;
        PreparedStatement preparedStatement = connection.prepareStatement(sql);
        //传入id为3
        preparedStatement.setInt(1,3);
        //执行sql语句
        preparedStatement.executeUpdate();
        JDBCUtils.close(connection,preparedStatement);
    }
}

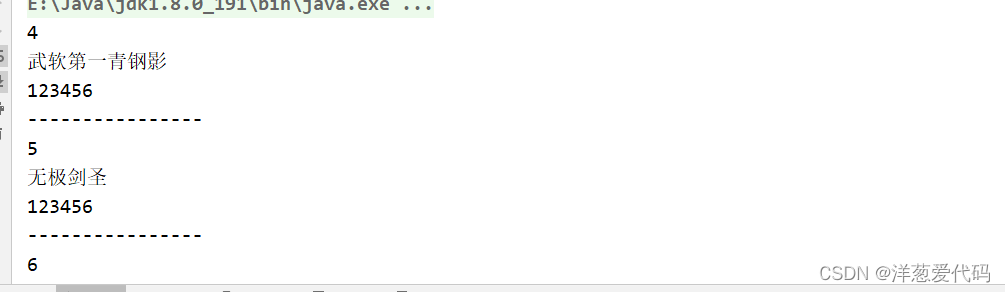
2.5.5、使用PreparedStatement去完成模糊查询操作
package com.wr.oyc.sqlDo;
import com.wr.oyc.utils.JDBCUtils;
import java.io.IOException;
import java.sql.Connection;
import java.sql.ResultSet;
import java.sql.SQLException;

public class PreparedStatement03 {


    public static void main(String[] args) throws SQLException, IOException, ClassNotFoundException {


            Connection connection = null ;
            ResultSet resultSet = null ;


        connection = JDBCUtils.getConnection();

            //模糊查询
            String sql = "select * from user where username like concat('%' ,?,'%' )";


            java.sql.PreparedStatement preparedStatement = connection.prepareStatement(sql);

            preparedStatement.setString(1,"剑");

            resultSet = preparedStatement.executeQuery();

            while (resultSet.next()){


                System.out.println(resultSet.getInt("id") + "-" +
                             resultSet.getString("username") + "-" +
                        resultSet.getString("userpassword"));

            }

            resultSet.close();
            JDBCUtils.close(connection,preparedStatement);
        }
}

2.5.6、使用PreparedStatement去完成通用的增删改操作(使用setObject方法实现)
//通用工具类
package com.wr.oyc.utils;
import java.io.IOException;
import java.sql.Connection;
import java.sql.PreparedStatement;
import java.sql.SQLException;

/*
通过的增加删改操作

 */
public class Update_Delete_insertSql {


    public static  void commonSql(String sql , Object...objects) throws SQLException, IOException, ClassNotFoundException {


        Connection connection =null ;
        PreparedStatement preparedStatement = null ;

        connection = JDBCUtils.getConnection();

        PreparedStatement preparedStatement1 = connection.prepareStatement(sql);

        for (int i = 0; i <objects.length ; i++) {


            preparedStatement1.setObject((i+1) , objects[i]);

        }
        preparedStatement1.executeUpdate();

        JDBCUtils.close(connection ,preparedStatement);

    }

}
package com.wr.oyc.sqlDo;

import com.wr.oyc.utils.Update_Delete_insertSql;

import java.io.IOException;
import java.sql.Connection;
import java.sql.SQLException;

public class Test01 {


    public static void main(String[] args) throws SQLException, IOException, ClassNotFoundException {


        String sql = "update user set username = ? where id = ?";


//        将id为2修改成武软第一青钢影
        Update_Delete_insertSql.commonSql(sql,"武软第一青钢影",4);
    }
}
2.5.7、使用PreparedStatement去完成通用的查询操作(使用setObject方法实现)
package com.wr.oyc.utils;
import java.io.IOException;
import java.sql.*;

public class SelectSql {


    public static void select (String sql , Object...objects) throws SQLException, IOException, ClassNotFoundException {


        Connection connection = JDBCUtils.getConnection();
        PreparedStatement preparedStatement = connection.prepareStatement(sql);
        for (int i = 0; i < objects.length; i++) {


            preparedStatement.setObject((i+1) ,objects[i] );
        }

        ResultSet resultSet  = preparedStatement.executeQuery();

        //获取ResultSet对象
        ResultSetMetaData resultSetMetaData = resultSet.getMetaData();

        //返回全部列的数量
         int columns =  resultSetMetaData.getColumnCount();


         while (resultSet.next()){


             for (int i = 0; i < columns ; i++) {


                 System.out.println(resultSet.getObject(i+1) + "");
             }
             System.out.println("----------------");
         }
    }
}
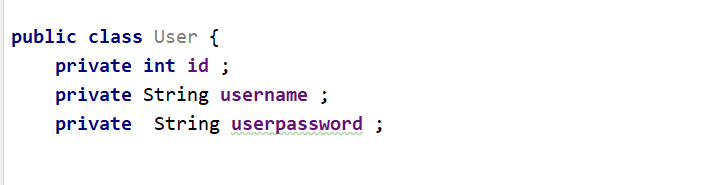
2.5.8、ORM思想
对象关系映射(英语 :Object Relational mapping,简称ORM,或O/RM,或O/R mapping)
 - 一个数据对应一个JAVA类
 - 表中的一条记录对应JAVA中的一个对象
 - 表中的一个字段(列)对应JAVA的一个属性(字段)
.JAVA典型的ORM框架:
 - hibernate:全自动的框架,强大、复杂、笨重、学习成本高
 - mybatis:半自动的框架(懂数据库的人才能操作) 必须自己写sql
 - JPA:JPA全称Java Persistence API ,JPA通过JDK5.0注解或XML描述对象-关系表的映射关系,是Java自带的框架
加粗样式
2.6、编写JDBC工具类
//工具类
package com.wr.oyc.utils;
import javax.swing.plaf.nimbus.State;
import java.io.IOException;
import java.io.InputStream;
import java.sql.Connection;
import java.sql.DriverManager;
import java.sql.SQLException;
import java.sql.Statement;
import java.util.Properties;

public class JDBCUtils {


    //获取数据库的连接
    public static Connection getConnection() throws IOException, ClassNotFoundException, SQLException {


        InputStream inputStream
                = JDBCUtils.class.getClassLoader().getResourceAsStream("jdbc.properties");

        Properties properties = new Properties();

        properties.load(inputStream);

        String user = properties.getProperty("user");
        String passowrd = properties.getProperty("password");
        String url = properties.getProperty("url");
        String driverClass = properties.getProperty("driverClass");
        Class.forName(driverClass);

        Connection connection = DriverManager.getConnection(url , user , passowrd);


        return connection;
    }

    public static void close(Connection connection , Statement statement ) throws SQLException {


        if(connection!=null){


            connection.close();

        }

        if(statement!=null ){


            statement.close();
        }
    }
}
package com.wr.oyc.sqlDo;
import com.wr.oyc.sqlConection.Con5;
import com.wr.oyc.utils.JDBCUtils;
import java.io.IOException;
import java.io.InputStream;
import java.sql.Connection;
import java.sql.DriverManager;
import java.sql.SQLException;
import java.sql.Statement;
import java.util.Properties;
import java.util.Scanner;

public class PreparedStatement {


    public static void main(String[] args) throws IOException, ClassNotFoundException, SQLException {


//        InputStream inputStream  =
//                Con5.class.getClassLoader().getResourceAsStream("jdbc.properties");
//
//        Properties properties  = new Properties();
//
//        properties.load(inputStream);
//
//
//        String url = properties.getProperty("url");
//        String user = properties.getProperty("user");
//        String password = properties.getProperty("password");
//        String driverClass = properties.getProperty("driverClass");
//
//        Class.forName(driverClass);
//
//
//        Connection connection = DriverManager.getConnection(url , user , password );
        Connection connection =null ;

        connection = JDBCUtils.getConnection();


//        Statement statement = connection.createStatement();


        String sql
                = "insert into USER (username , userpassword) values(?,?) ";

       java.sql.PreparedStatement preparedStatement = connection.prepareStatement(sql);

       preparedStatement.setString(1 ,"提莫");
       preparedStatement.setString(2,"123456");

//       执行预编译
       preparedStatement.executeUpdate();

       JDBCUtils.close(connection,preparedStatement);
    }
}

三、用户登录功能
3.1、业务介绍
例如:(在网上找的)
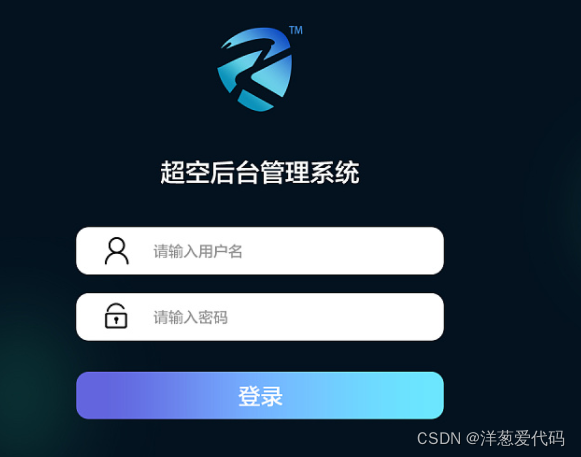
模拟用户登录功能实现
3.2、登录界面初始化
说明:当程序运行的时候 , 提供一个输入和输出的入口,可以让用户输入账号和密码,用户密码.用户输入之后,提交输入之后,提交信息后,根据Java程序收集用户信息,连接数据库验证用户名和密码是否正确
正确就显示登录成功
不合法就显示登录失败

3.3、登录实现
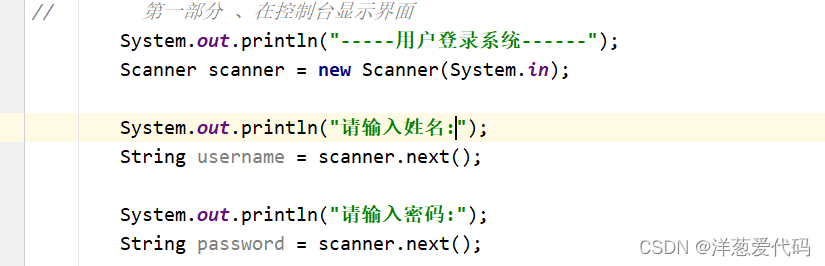
3.3.1、初始化
package com.wr.oyc.thing;

import java.util.HashMap;
import java.util.Scanner;

public class init {


    public static HashMap<String , String> init(){


        HashMap<String , String>name_password = new HashMap<>();
        //        第一部分 、在控制台显示界面
        System.out.println("-----用户登录系统------");
        Scanner scanner = new Scanner(System.in);

        System.out.println("请输入姓名:");
        String username = scanner.next();
        name_password.put("username" , username);
        System.out.println("请输入密码:");
        String userpassword = scanner.next();
        name_password.put("userpassword" , userpassword);


        return name_password;

    }
}
package com.wr.oyc.thing;

import com.wr.oyc.orm.User;
import com.wr.oyc.sqlDo.ResultSet;
import com.wr.oyc.utils.JDBCUtils;
import sun.security.krb5.internal.APReq;

import java.io.IOException;
import java.sql.Array;
import java.sql.Connection;
import java.sql.PreparedStatement;
import java.sql.SQLException;
import java.util.Arrays;
import java.util.HashMap;
import java.util.Scanner;

public class Login {


    public static void main(String[] args) throws SQLException, IOException, ClassNotFoundException {


//        第一部分 、在控制台显示界面
        HashMap <String ,String>  map =init.init();


//第二部分 连接数据库 (JDBC)

        //创建连接
        Connection connection =  JDBCUtils.getConnection();

        //sql语句
        String sql = "select username , userpassword  from user where username = ? and userpassword = ?  " ;

        //PreparedStatement 预编译对象
          PreparedStatement preparedStatement = connection.prepareStatement(sql);


        //占位符
          preparedStatement.setString(1,map.get("username"));

          preparedStatement.setString(2,map.get("userpassword"));

          java.sql.ResultSet resultSet = preparedStatement.executeQuery();


          String username_f = "" ;
          String userpassowrd_f = "" ;

          if(resultSet.next()){


               username_f  = resultSet.getString("username");

               userpassowrd_f = resultSet.getString("userpassword");
          }

          //三、用户输入和数据据进行核对

          if(map.get("username").equals( username_f ) && map.get("userpassword").equals(userpassowrd_f)){


              System.out.println("登录成功");
          }else{


              System.out.println("登录失败");
          }
    }
}

四、JDBC高级
4.1、SQL注入介绍

4.2、SQL注入解决方案

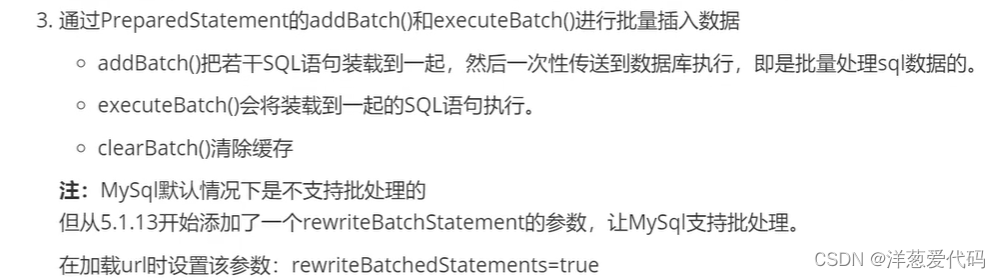
4.3、批量插入数据
4.3.1、第一个方法
package com.wr.oyc.highsql;

import com.wr.oyc.utils.JDBCUtils;

import java.io.IOException;
import java.sql.Connection;
import java.sql.PreparedStatement;
import java.sql.SQLException;
import java.sql.Statement;

public class Demo1_insert1 {


    public static void main(String[] args) throws SQLException, IOException, ClassNotFoundException {


        Connection connection = JDBCUtils.getConnection();


        Statement statement = connection.createStatement();

        Long start = System.currentTimeMillis();

        for (int i = 0; i <= 1000 ; i++) {


            String sql = "insert into user(username) values ('   name_ "+ i + "  ')";

            statement.execute(sql);
        }
        Long end = System.currentTimeMillis();

        JDBCUtils.close(connection ,statement);
        System.out.println("消耗了" +  (end - start)  + "毫秒");

    }
}

4.3.2、第二个方法

package com.wr.oyc.highsql;
import com.wr.oyc.utils.JDBCUtils;
import java.io.IOException;
import java.sql.Connection;
import java.sql.PreparedStatement;
import java.sql.SQLException;


//使用PreparedStatement对象添加数据
public class Demo2_insert2 {


    public static void main(String[] args) throws SQLException, IOException, ClassNotFoundException {


        Connection connection = JDBCUtils.getConnection();

        String sql = "insert into user(username) values (?)";

        PreparedStatement preparedStatement = connection.prepareStatement(sql);

        Long start = System.currentTimeMillis();

        for (int i = 0; i <= 1000 ; i++) {


            preparedStatement.setString(1,"name"+i);
            preparedStatement.executeUpdate();
        }
        Long end = System.currentTimeMillis();

        System.out.println("消耗了" +  (end - start) /1000 + "秒");


    }
}

4.3.3、第三个方法
package com.wr.oyc.highsql;

import com.wr.oyc.utils.JDBCUtils;

import java.io.IOException;
import java.sql.Connection;
import java.sql.PreparedStatement;
import java.sql.SQLException;

public class Demo3_insert3 {


    public static void main(String[] args) throws SQLException, IOException, ClassNotFoundException {


        Connection connection = JDBCUtils.getConnection();

        String sql = "insert into user(username) values (?)";

        PreparedStatement preparedStatement = connection.prepareStatement(sql);

        Long start = System.currentTimeMillis();

        for (int i = 0; i <= 1000 ; i++) {


            preparedStatement.setString(1,"name"+i);
            preparedStatement.addBatch();
            if(i%100 == 0 ){


                preparedStatement.executeUpdate();

                preparedStatement.clearBatch();
            }
        }
        Long end = System.currentTimeMillis();

        JDBCUtils.close(connection ,preparedStatement);
        System.out.println("消耗了" +  (end - start) /1000 + "秒");

    }
}

4.4、Blob类型数据
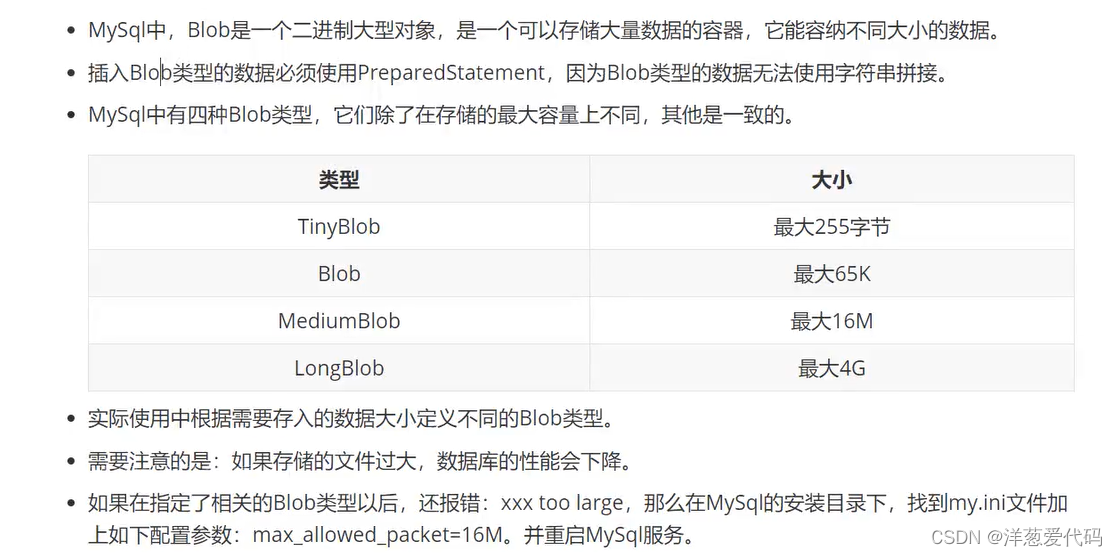
4.4.1、Blob数据读取
package com.wr.oyc.highBlob;

import com.wr.oyc.utils.JDBCUtils;
import jdk.internal.util.xml.impl.Input;

import java.io.File;
import java.io.FileInputStream;
import java.io.IOException;
import java.io.InputStream;
import java.sql.Connection;
import java.sql.PreparedStatement;
import java.sql.SQLException;

public class Blob1 {


    public static void main(String[] args) throws SQLException, IOException, ClassNotFoundException {


        Connection connection =
                JDBCUtils.getConnection();


        String sql = "insert into a (name , photo)values (? , ?)";

        PreparedStatement preparedStatement =
                connection.prepareStatement(sql) ;

        preparedStatement.setString(1,"图片1");

        InputStream is = new FileInputStream(new File("C:\\Users\\一生只爱一个人\\Pictures\\平时照片\\3.jpg"));

        preparedStatement.setBlob(2,is);

        preparedStatement.executeUpdate();

        JDBCUtils.close(connection , preparedStatement);


    }
}

4.4.2、Blob数据读取数据
package com.wr.oyc.highBlob;
import com.wr.oyc.utils.JDBCUtils;
import java.io.FileOutputStream;
import java.io.IOException;
import java.io.InputStream;
import java.sql.*;

public class ReadBlob {


    public static void main(String[] args) throws SQLException, IOException, ClassNotFoundException {


        Connection connection =
                JDBCUtils.getConnection();

        String sql = "select * from a where photo!=''";

        PreparedStatement preparedStatement = connection.prepareStatement(sql);

        ResultSet resultSet = preparedStatement.executeQuery();

        while (resultSet.next()){


            int id = resultSet.getInt("id");
            String name = resultSet.getString("name");
            Blob blob = resultSet.getBlob("photo");

            InputStream is = blob.getBinaryStream();

            FileOutputStream fileOutputStream = new FileOutputStream(id + "_" + name + ".jpg");

            byte [] buffer = new byte[1024];
            int len ;
            while (  (len = is.read(buffer))!=-1){


                fileOutputStream.write(buffer , 0 , len);

            }
            is.close();
            fileOutputStream.close();

        }
        JDBCUtils.close(connection,preparedStatement);


    }
}

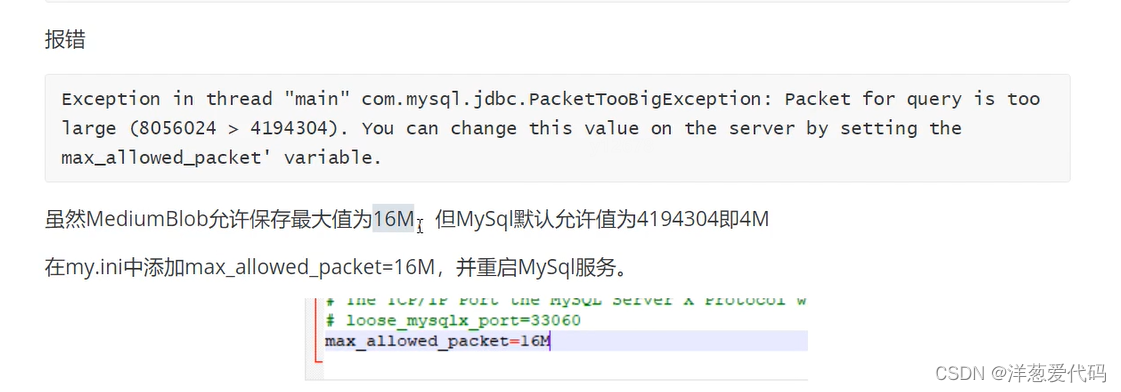
4.4.3、Blob数据特殊情况(图片太大)
五、JDBC事务
5.1、JDBC事务的概念
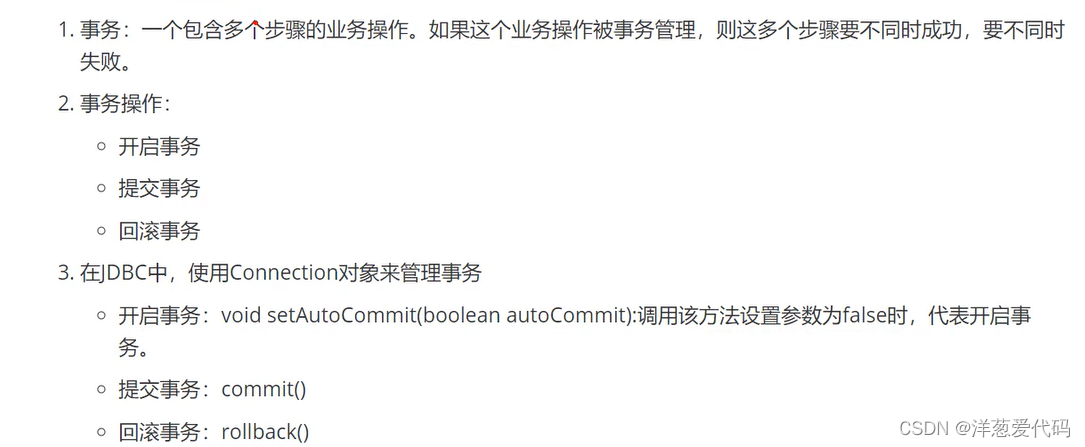
5.2、JDBC事务实现
package com.wr.oyc.jdbcthing;

import com.wr.oyc.utils.JDBCUtils;

import java.sql.Connection;
import java.sql.PreparedStatement;
import java.sql.SQLException;

public class Demo1 {


    public static void main(String[] args) throws SQLException {


        Connection connection = null ;
        PreparedStatement preparedStatement = null ;

        try{


            connection = JDBCUtils.getConnection();
            connection.setAutoCommit(false);
//            UPDATE bank SET balance = balance + 300  WHERE accountname = "李四"
            String sql =  " UPDATE bank SET balance = balance + ?  WHERE accountname = ? ";
            preparedStatement = connection.prepareStatement(sql);
            preparedStatement.setObject(1,500);
            preparedStatement.setObject(2,"张三");
            preparedStatement.executeUpdate();

            preparedStatement.setObject(1,-500);
            preparedStatement.setObject(2,"李四");
            preparedStatement.executeUpdate();

            connection.commit();


        }catch (Exception e){


            connection.rollback();
            e.printStackTrace();
        }finally {


            JDBCUtils.close(connection,preparedStatement);
        }
    }
}
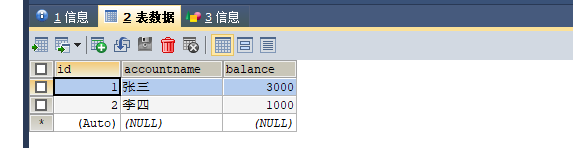
在catch语句中回滚、在try语句中提交事务(需要设置事务关闭自己提交)
六、数据库连接池
6.1、数据库连接概念
JDBC连接池的必要性

数据库连接池:
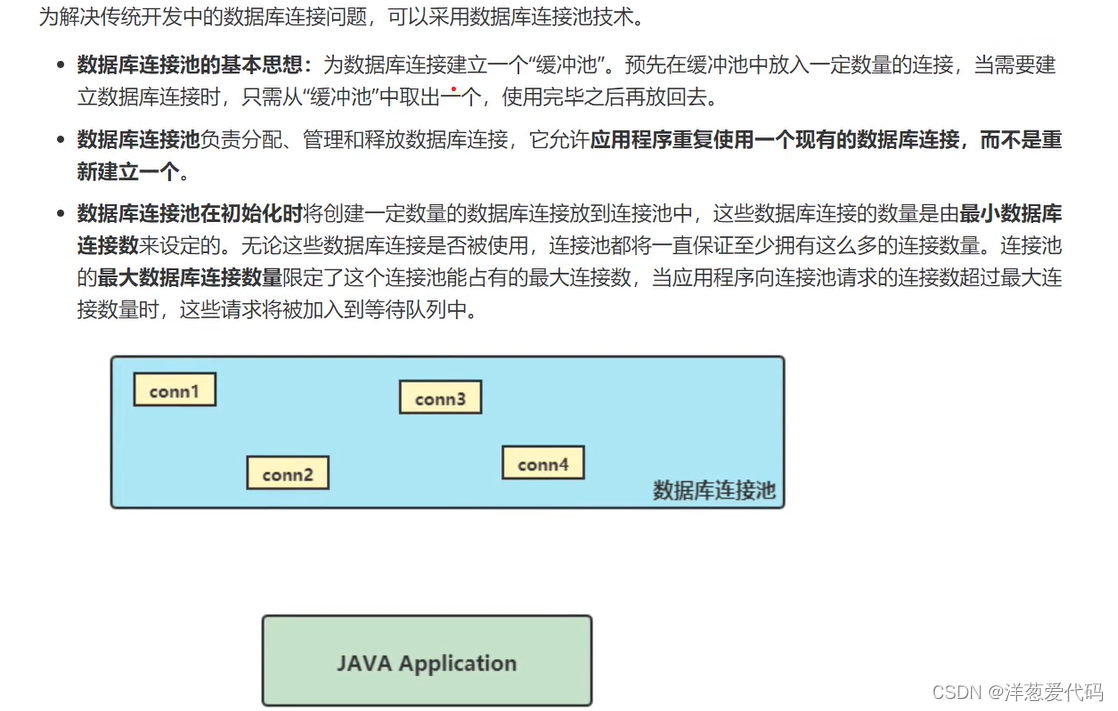
数据库连接池的优点:

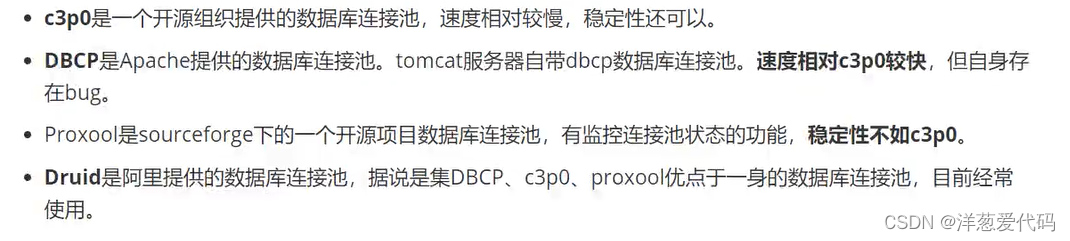
常用连接池
6.2、数据库连接池c3p0
6.2.1、基本使用
package com.wr.oyc.databasepool;

import com.mchange.v2.c3p0.ComboPooledDataSource;

import java.beans.PropertyVetoException;
import java.sql.Connection;
import java.sql.SQLException;

public class Demo1 {


    public static void main(String[] args) throws PropertyVetoException, SQLException {


        ComboPooledDataSource cps =
                new ComboPooledDataSource();


        cps.setDriverClass("com.mysql.jdbc.Driver");
        cps.setJdbcUrl("jdbc:mysql://localhost:3306/test");
        cps.setPassword("root");
        cps.setUser("root");
        cps.setInitialPoolSize(10);
        Connection connection = cps.getConnection();
        System.out.println(connection);


    }
}
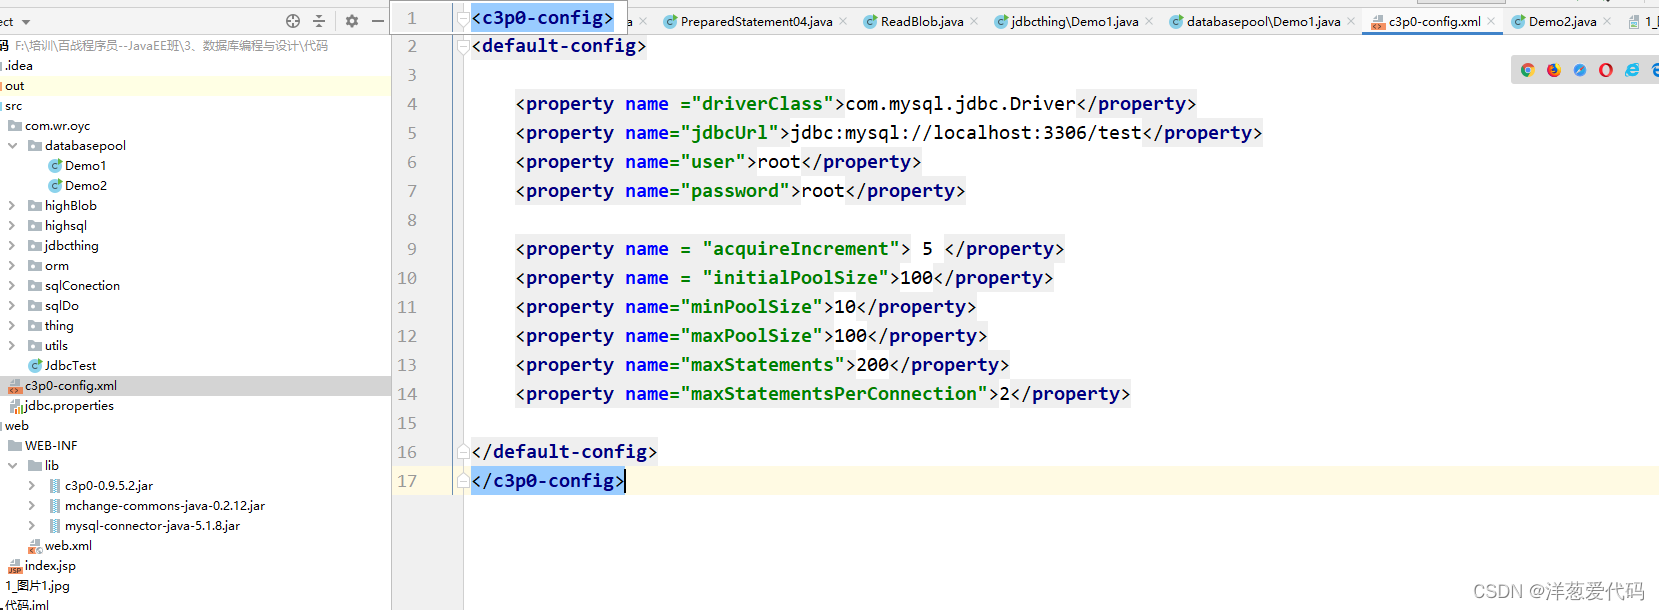
6.2.2、配置xml使用方式
xml的名字必须是c3p0-config.xml
package com.wr.oyc.databasepool;

import com.mchange.v2.c3p0.ComboPooledDataSource;

import java.sql.Connection;
import java.sql.SQLException;

public class Demo2 {


    public static void main(String[] args) throws SQLException {


        ComboPooledDataSource cbp =
                new ComboPooledDataSource();

        Connection conn = cbp.getConnection();

        System.out.println(conn);
    }
}

6.3、数据库连接池DBCP

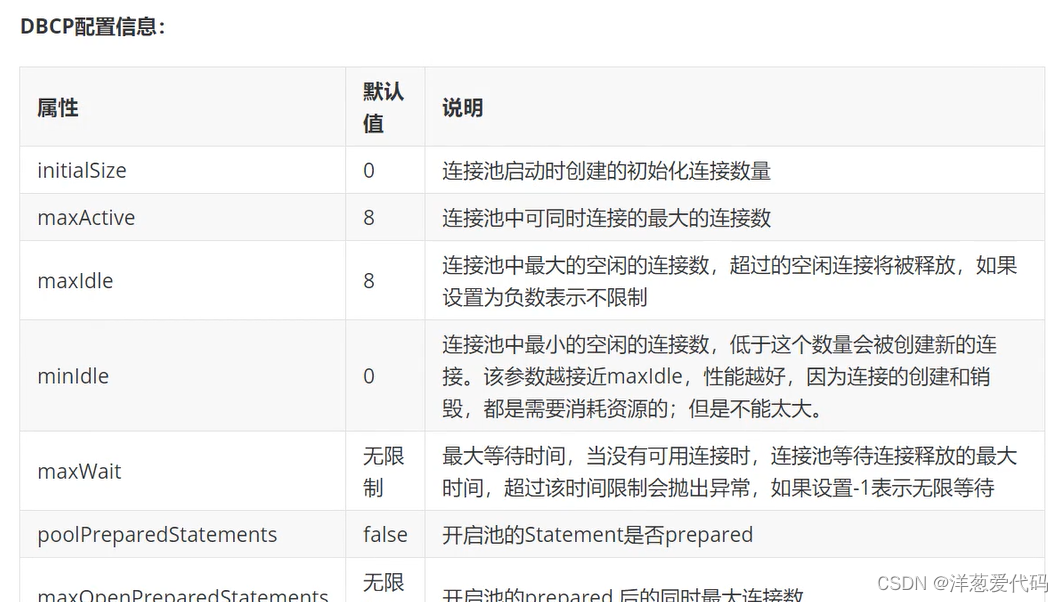

6.3.1、dbcp的基本使用


package com.wr.oyc.databasepool;

import org.apache.commons.dbcp2.BasicDataSource;

import java.sql.Connection;
import java.sql.SQLException;

public class DCPBDemo {


    public static void main(String[] args) throws SQLException {


        BasicDataSource source = new BasicDataSource();
        source.setDriverClassName("com.mysql.jdbc.Driver");
        source.setUrl("jdbc:mysql://localhost:3306/test");
        source.setUsername("root");
        source.setPassword("root");
        source.setInitialSize(10);
        Connection connection = source.getConnection();
        System.out.println(connection);
    }
}

6.3.2、dbcp的配置文件
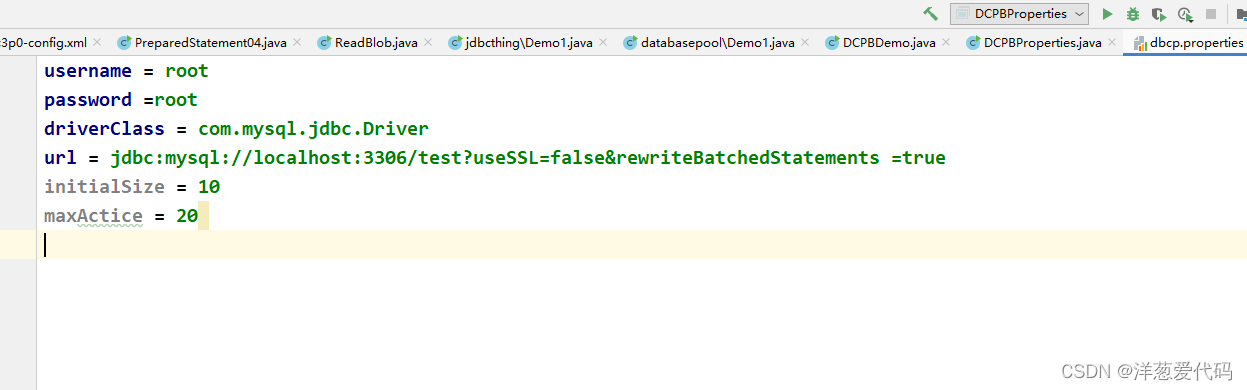
package com.wr.oyc.databasepool;

import org.apache.commons.dbcp2.BasicDataSourceFactory;

import javax.sql.DataSource;
import java.io.IOException;
import java.io.InputStream;
import java.sql.Connection;
import java.util.Properties;

public class DCPBProperties {


    public static void main(String[] args) throws Exception {


       //加载文件
        InputStream is =
                DCPBProperties.class.getClassLoader().getResourceAsStream("dbcp.properties");

        Properties properties = new Properties();

        properties.load(is);

        //获取连接对象 通过连接池对象获取连接

        DataSource ds = BasicDataSourceFactory.createDataSource(properties);

        Connection connection = ds.getConnection();

        System.out.println(connection);
    }
}

三个步骤:第一、写properties文件 第二、 加载文件 第三获取连接对象 通过连接池对象获取连接
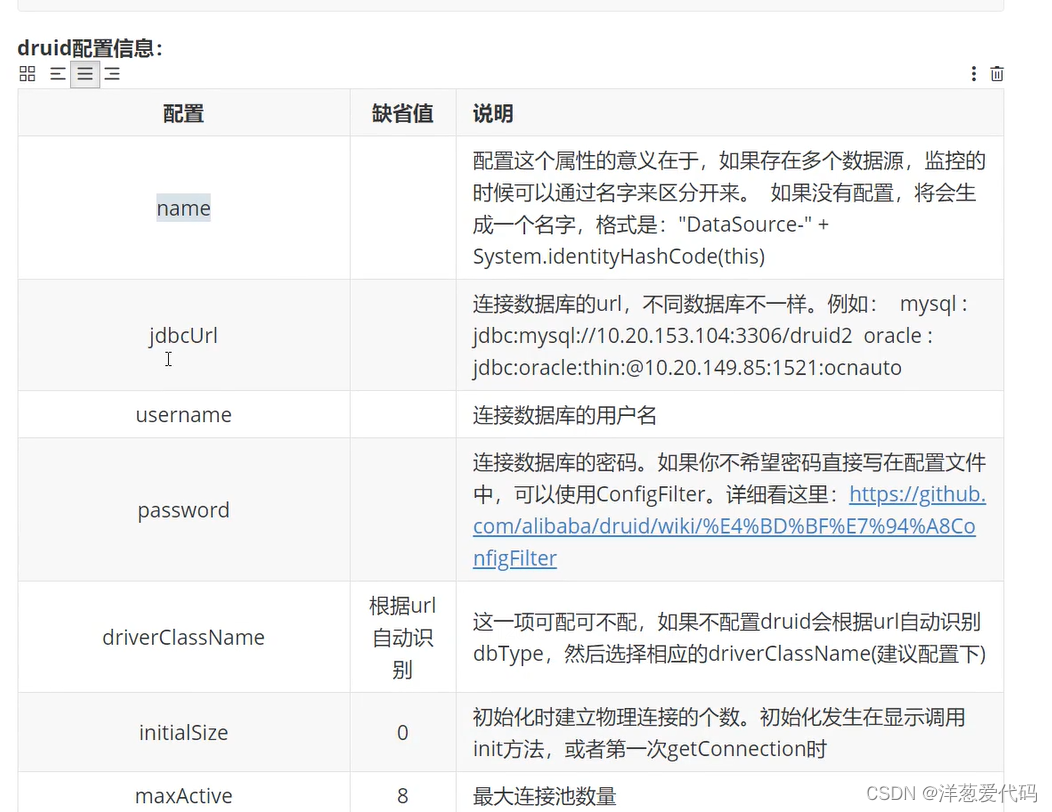
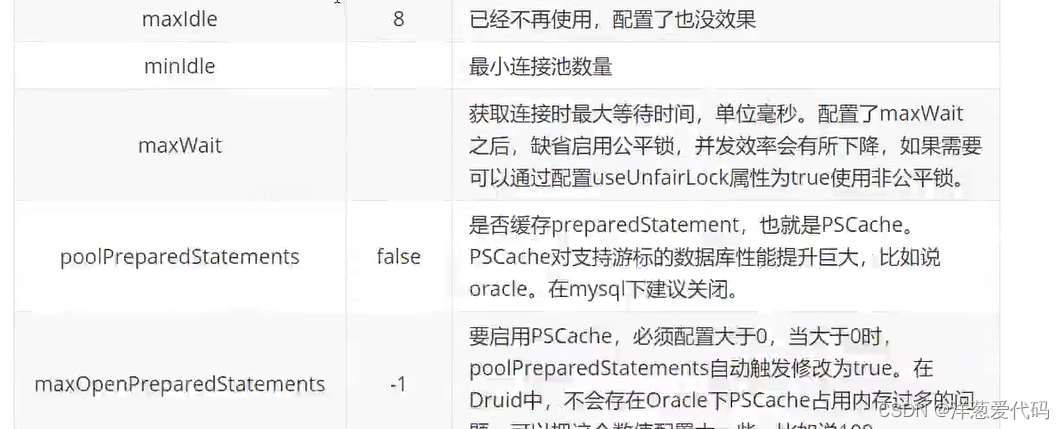
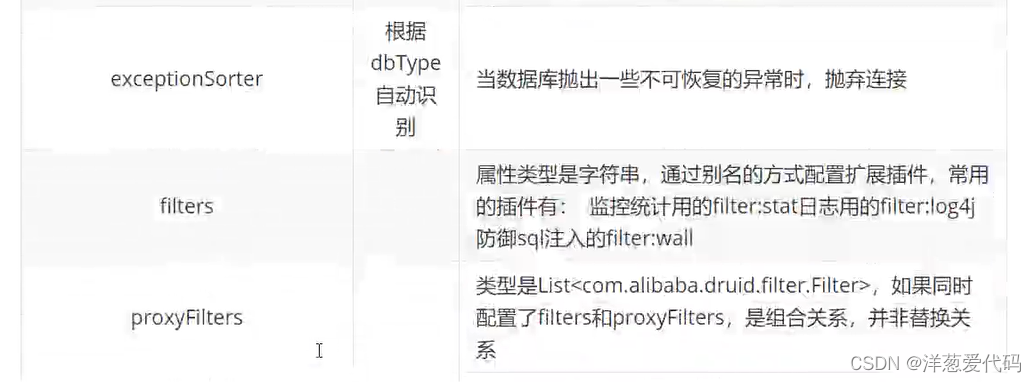
6.4、数据库连接池druid


package com.wr.oyc.databasepool;

import com.alibaba.druid.pool.DruidDataSourceFactory;

import javax.sql.DataSource;
import java.io.InputStream;
import java.sql.Connection;
import java.util.Properties;

public class DruidTest {


    public static void main(String[] args) throws Exception {


        InputStream is = DruidTest.class.getClassLoader().getResourceAsStream("druid.properties");

        Properties properties = new Properties();

        properties.load(is);

        DataSource dataSource = DruidDataSourceFactory.createDataSource(properties);

        Connection connection = dataSource.getConnection();

        System.out.println(connection);


        connection.close();
        is.close();
    }
}
6.4.1、通过druid重构JDBCUtils
package com.wr.oyc.utils;

import com.alibaba.druid.pool.DruidDataSourceFactory;
import com.wr.oyc.databasepool.DruidTest;

import javax.sql.DataSource;
import java.io.IOException;
import java.io.InputStream;
import java.sql.Connection;
import java.sql.SQLException;
import java.sql.Statement;
import java.util.Properties;

public class JDBCUtilsDruid {


    private static DataSource ds = null ;
    static {


        InputStream is = DruidTest.class.getClassLoader().getResourceAsStream("druid.properties");

        Properties properties = new Properties();

        try {


            properties.load(is);

            ds = DruidDataSourceFactory.createDataSource(properties);


        } catch (IOException e) {


            e.printStackTrace();
        } catch (Exception e) {


            e.printStackTrace();
        }

    }


    public static Connection getConnection() throws SQLException {


        Connection connection = ds.getConnection();

        return connection;

    }


    public static void close (Connection connection , Statement statement) throws SQLException {


        if(connection!=null){


            connection.close();
        }

        if(statement!=null){


            statement.close();
        }
    }
}
七、JDBC_DAO模式
7.1、应用程序分层
分为控制层、业务逻辑层、数据库操作、数据库实体类
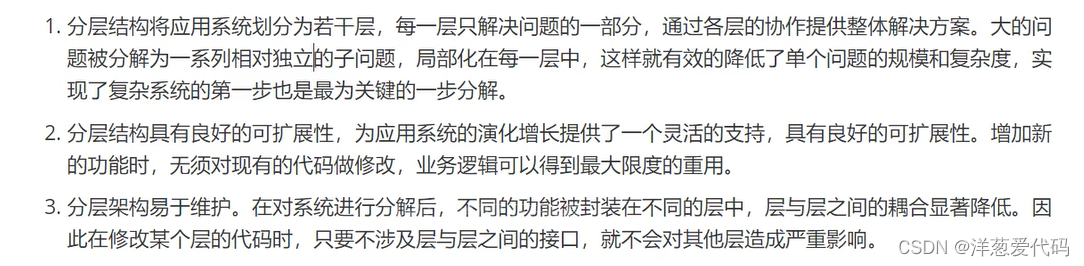
7.1.1、分层优点
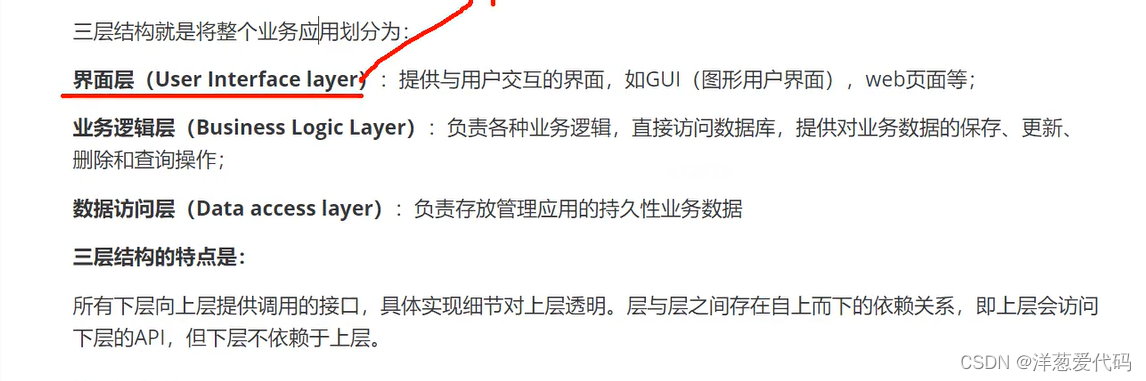
7.1.1、三层结构
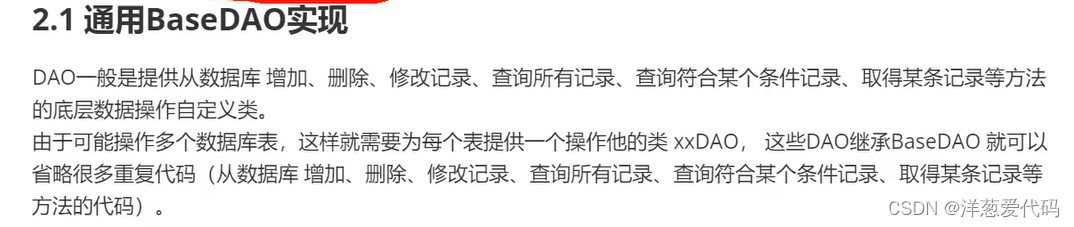
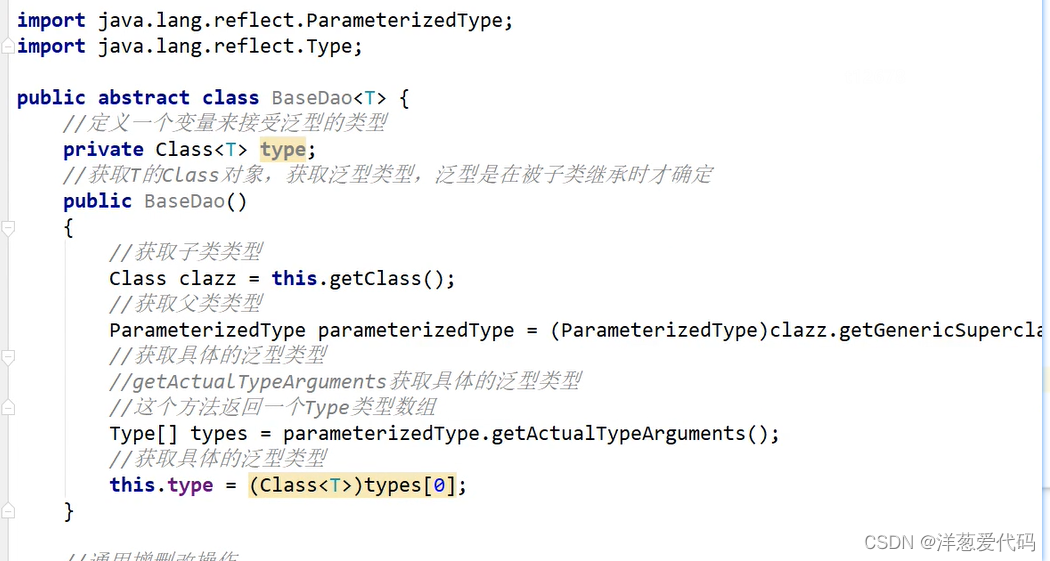
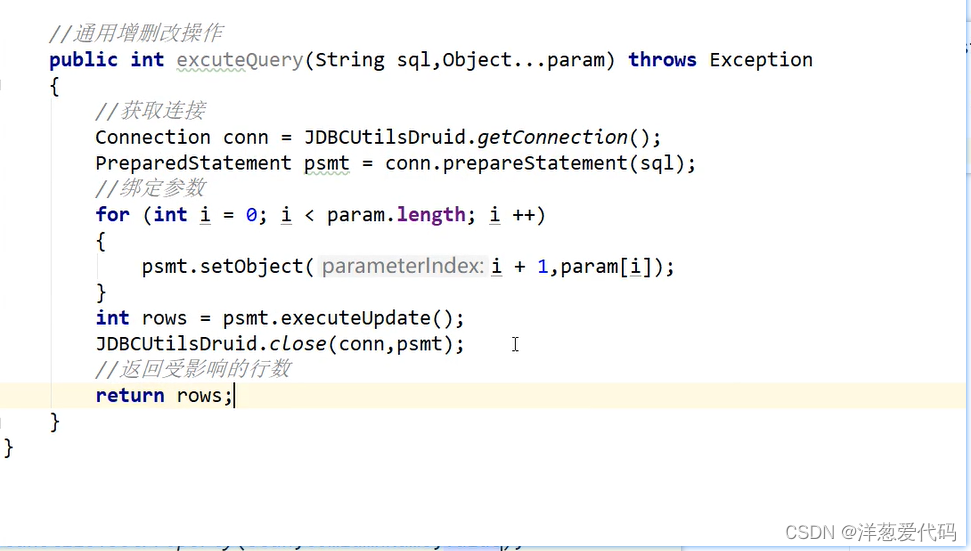
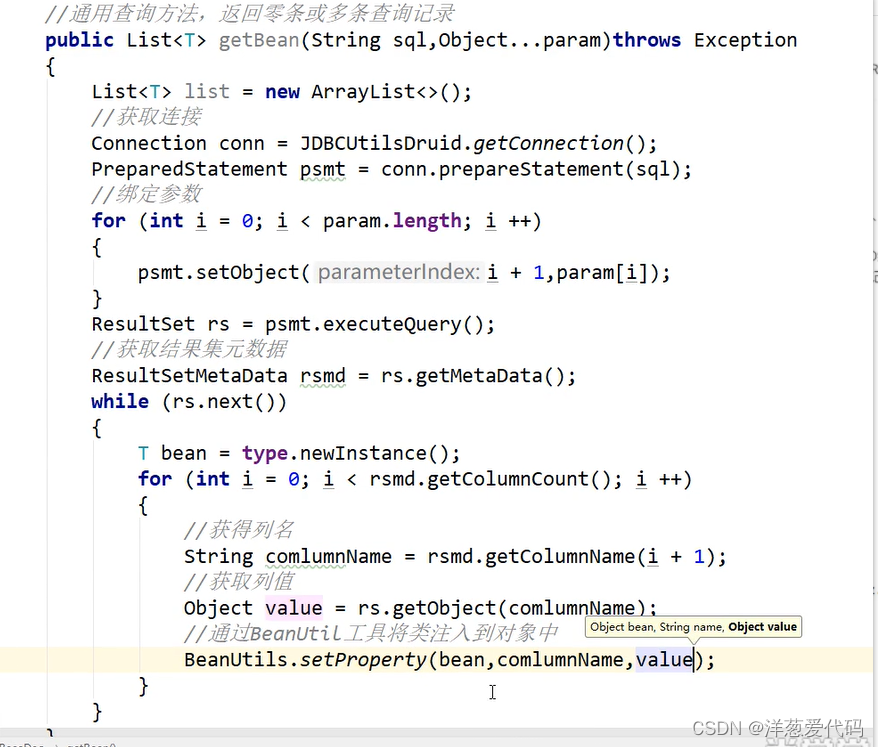
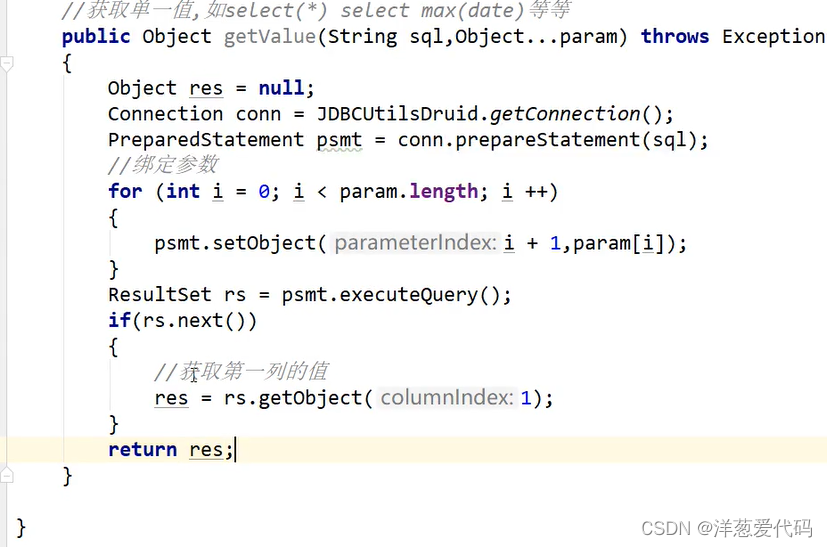
7.2、BaseDAO实现


7.3、UserDao实现
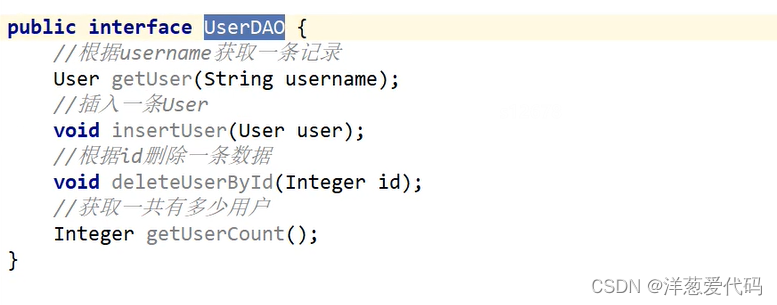
package com.bzcxy.dao;

import com.bzcxy.jdbc.User;

import java.util.List;

public class UserDAOImpl extends BaseDao<User> implements UserDAO {


    @Override
    public User getUser(String username) throws Exception {


        User u = null;
        String sql = "select * from user where username = ?";
        List<User> list = this.getBean(sql,username);
        if(list.size() != 0)
        {


            u = list.get(0);
        }
        return u;
    }

    @Override
    public void insertUser(User user) throws Exception {


        String sql = "insert into user(username,userpassword)values(?,?)";
        this.excuteQuery(sql,user.getUsername(),user.getUserpassword());
    }

    @Override
    public void deleteUserById(Integer id) throws Exception {


        String sql = "delete from user where id = ?";
        this.excuteQuery(sql,id);
    }

    @Override
    public Integer getUserCount() throws Exception {


        String sql = "select count(*) from user";
        Integer count = Integer.valueOf(this.getValue(sql).toString()) ;
        return count;
    }
}
八、DbUtils工具
8.1、DbUtils介绍
8.2、QueryRunner

用法:1、导入commons-dbutils-1.6.jar包引入工程 2、通过DataSource对象初始化QueryRunner对象
3、执行sql语句通过update执行
package com.bzcxy.dbutils;

import com.alibaba.druid.pool.DruidDataSourceFactory;
import org.apache.commons.dbutils.DbUtils;
import org.apache.commons.dbutils.QueryRunner;

import java.io.IOException;
import java.io.InputStream;
import java.util.Properties;

public class DBUtils_Test {


    public static void main(String[] args) throws Exception {


        InputStream is = DBUtils_Test.class.getClassLoader().getResourceAsStream("druid.properties");
        Properties properties = new Properties();
        properties.load(is);
        QueryRunner queryRunner = new QueryRunner(DruidDataSourceFactory.createDataSource(properties));
        String sql = "insert into user(username,userpassword)values(?,?)";
        int count =  queryRunner.update(sql,"QueryRunnerTest","QueryRunner");
        System.out.println(count);
    }
}
8.3、ResultSerHandler


使用步骤:
- 导入commons-dbutils-1.6.jar 并引入工程
- 通过DataSource对象初始化QueryRunner对象
- 编写sql通过update方法执行
- (实际quertRunner的update方法仍然是用PreparedStatement来实现)
package com.bzcxy.dbutils;

import com.alibaba.druid.pool.DruidDataSourceFactory;
import com.bzcxy.jdbc.User;
import org.apache.commons.dbutils.QueryRunner;
import org.apache.commons.dbutils.handlers.BeanHandler;
import org.apache.commons.dbutils.handlers.BeanListHandler;

import java.io.InputStream;
import java.util.List;
import java.util.Properties;

public class DBUtils_Test3 {


    public static void main(String[] args) throws Exception {


        InputStream is = DBUtils_Test3.class.getClassLoader().getResourceAsStream("druid.properties");
        Properties properties = new Properties();
        properties.load(is);
        QueryRunner queryRunner = new QueryRunner(DruidDataSourceFactory.createDataSource(properties));
        String sql = "select * from user";
        BeanListHandler<User> bh = new BeanListHandler<>(User.class);
        List<User> users = queryRunner.query(sql,bh);
        for(User u : users)
        {


            System.out.println(u.getUsername());
        }
    }
}
8.3.1、使用ResultSerHandler查特殊数据
package com.bzcxy.dbutils;

import com.alibaba.druid.pool.DruidDataSourceFactory;
import org.apache.commons.dbutils.QueryRunner;
import org.apache.commons.dbutils.handlers.ScalarHandler;

import java.io.InputStream;
import java.util.Properties;

public class DBUtils_Test4 {


    public static void main(String[] args) throws Exception {


        InputStream is = DBUtils_Test4.class.getClassLoader().getResourceAsStream("druid.properties");
        Properties properties = new Properties();
        properties.load(is);
        QueryRunner queryRunner = new QueryRunner(DruidDataSourceFactory.createDataSource(properties));
        String sql = "select count(*) from user";
        ScalarHandler sh = new ScalarHandler();
        Long count =  (Long)queryRunner.query(sql,sh);
        System.out.println(count);
    }
}

8.3.2、自定义ResultSerHandler
package com.bzcxy.dbutils;

import com.alibaba.druid.pool.DruidDataSourceFactory;
import org.apache.commons.dbutils.QueryRunner;
import org.apache.commons.dbutils.ResultSetHandler;

import java.io.InputStream;
import java.sql.ResultSet;
import java.sql.SQLException;
import java.util.HashMap;
import java.util.Map;
import java.util.Properties;

public class MyResultSetHandler implements ResultSetHandler {


    @Override
    public Object handle(ResultSet resultSet) throws SQLException {


        Map<String,String> map = null;
        if(resultSet.next())
        {


            map = new HashMap<>();
            map.put("id",resultSet.getString("id"));
            map.put("username",resultSet.getString("username"));
            map.put("userpassword",resultSet.getString("userpassword"));
        }
        return map;
    }
    public static void main(String[] args) throws Exception {


        InputStream is = DBUtils_Test.class.getClassLoader().getResourceAsStream("druid.properties");
        Properties properties = new Properties();
        properties.load(is);
        QueryRunner queryRunner = new QueryRunner(DruidDataSourceFactory.createDataSource(properties));
        String sql = "select * from user where id = ?";
        MyResultSetHandler msh = new MyResultSetHandler();
        Map<String,String> map = (Map<String,String>)queryRunner.query(sql,msh,7);
        System.out.println(map);
    }
}
九、JAVA和Oracle
连接oracle数据库:
Oracle的连接URL编写方式:
- jdbc:oracle:thin@主机名称:oracle服务端口:数据库名称
- jdbc:oracle:thin:@localhost:1521:test
步骤:
1、 导入ojdbc6.jar引入工程
2、加载驱动以及获取连接
3、 通过PreparedStatement查询数据
package com.bzcxy.oracle;

import java.sql.Connection;
import java.sql.DriverManager;
import java.sql.PreparedStatement;
import java.sql.ResultSet;

public class JDBCOracle_Test {


    public static void main(String[] args) throws Exception {


        String driver = "oracle.jdbc.driver.OracleDriver";
        String url = "jdbc:oracle:thin:@127.0.0.1:1521:orcl";
        String user = "system";
        String password = "root";
        Class.forName(driver);
        Connection conn = DriverManager.getConnection(url,user,password);
       // System.out.println(conn);
        String sql = "select * from orcl_user";
        PreparedStatement ps = conn.prepareStatement(sql);
        ResultSet rs = ps.executeQuery();
        while (rs.next())
        {


            System.out.println(
                    rs.getString("id") + ":" +
                            rs.getString("username") + ":" +
                            rs.getString("userpassword")
            );
        }
        conn.close();
        rs.close();
        ps.close();
    }
}
十、JDBC分页工具
10.1、分页概述
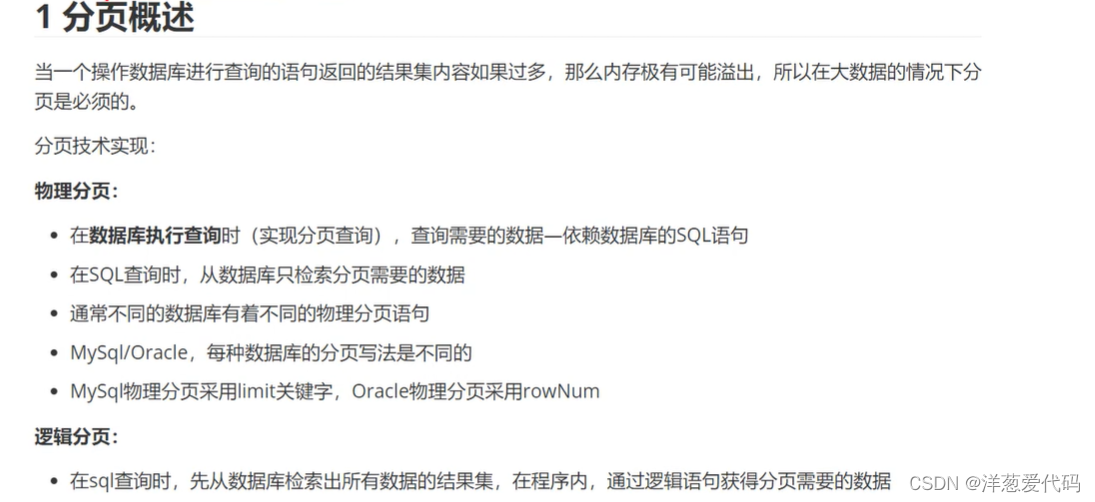
10.2、数据库中的分页使用
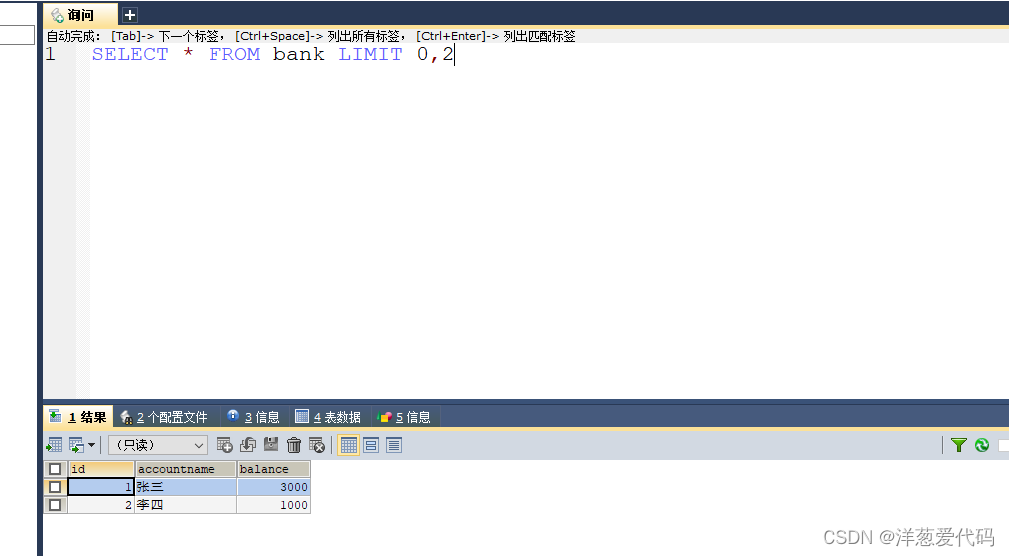
mysql:
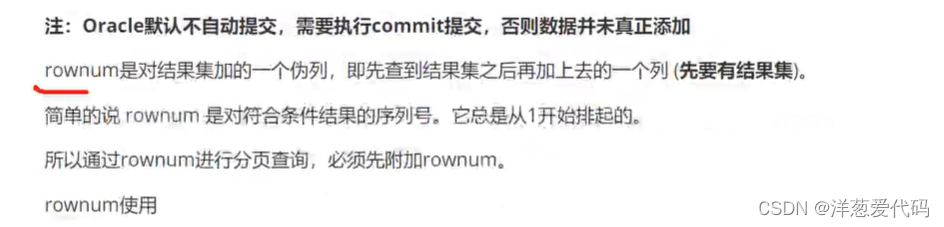
oracle:

10.3、JDBC分页
分页类:
package com.bzcxy.page;
import java.util.ArrayList;
import java.util.List;
import java.util.Map;

public class Page {


    //当前页数
    private Integer currPage;
    //每页显示的记录数
    private Integer pageSize;
    //总记录数
    private Integer totalCount;
    //总页数
    private Integer totalPage;
    //每页显示的数据
    private List<Map<String,Object>> list = new ArrayList<>();

    public Integer getCurrPage() {


        return currPage;
    }

    public void setCurrPage(Integer currPage) {


        this.currPage = currPage;
    }

    public Integer getPageSize() {


        return pageSize;
    }

    public void setPageSize(Integer pageSize) {


        this.pageSize = pageSize;
    }

    public Integer getTotalCount() {


        return totalCount;
    }

    public void setTotalCount(Integer totalCount) {


        this.totalCount = totalCount;
    }

    public Integer getTotalPage() {


        return totalPage;
    }

    public void setTotalPage(Integer totalPage) {


        this.totalPage = totalPage;
    }

    public List<Map<String, Object>> getList() {


        return list;
    }

    public void setList(List<Map<String, Object>> list) {


        this.list = list;
    }
}
Oracle分页:
package com.bzcxy.page;

import com.bzcxy.jdbc.JDBCUtilsDruid;

import java.sql.*;
import java.util.HashMap;
import java.util.Map;

public class OraclePage {


    public static void main(String[] args) throws Exception {


        Page page = new Page();
        //设置当前查询页数
        page.setCurrPage(2);
        //每页大小
        page.setPageSize(2);
        Page respage = selectPage(page);
        //输出总页数
        System.out.println(respage.getTotalPage());
        //输出总记录数
        System.out.println(respage.getTotalCount());
        //输出结果集
        System.out.println(respage.getList());
    }

    public static Page selectPage(Page page) throws Exception {


        String driver = "oracle.jdbc.driver.OracleDriver";
        String url = "jdbc:oracle:thin:@127.0.0.1:1521:orcl";
        String user = "system";
        String password = "root";
        Class.forName(driver);
        Connection conn = DriverManager.getConnection(url,user,password);
        String sql = "select ou.* from (select orcl_user.* , rownum rn from orcl_user) ou where rn > ? and rn <= ?";
        //预处理sql
        PreparedStatement ps = conn.prepareStatement(sql);
        //第一个rn (当前页-1)*每页数量
        ps.setInt(1,(page.getCurrPage() - 1) * page.getPageSize());
        //第二个rn 当前页*每页数量
        ps.setInt(2,page.getPageSize() * page.getCurrPage());
        //执行sql
        ResultSet rs = ps.executeQuery();
        //获取元数据
        ResultSetMetaData rsmd = rs.getMetaData();
        while (rs.next())
        {


            Map<String,Object> map = new HashMap<>();
            //根据元数据填充map
            for (int i = 0; i < rsmd.getColumnCount(); i ++)
            {


                String columnName = rsmd.getColumnName(i + 1);
                String columnValue = rs.getString(i + 1);
                map.put(columnName,columnValue);
            }
            page.getList().add(map);
        }
        //查询总记录数
        sql = "select count(*) from orcl_user";
        ps = conn.prepareStatement(sql);
        rs = ps.executeQuery();
        if (rs.next())
        {


            //获取总记录数
            int count = rs.getInt(1);
            //设置总记录数
            page.setTotalCount(count);
            //总页数=总数/每页数量  向上取整
            Double totalpage = Math.ceil((double) count / (double) page.getPageSize());
            page.setTotalPage(totalpage.intValue());
        }
        return page;
    }
}
MySQL分页:
package com.bzcxy.page;

import com.bzcxy.jdbc.JDBCUtilsDruid;

import java.sql.*;
import java.util.HashMap;
import java.util.Map;

public class MySqlPage {


    public static void main(String[] args) throws Exception {


        Page page = new Page();
        //设置当前查询页数
        page.setCurrPage(2);
        //每页大小
        page.setPageSize(2);
        Page respage = selectPage(page);
        //输出总页数
        System.out.println(respage.getTotalPage());
        //输出总记录数
        System.out.println(respage.getTotalCount());
        //输出结果集
        System.out.println(respage.getList());
    }

    public static Page selectPage(Page page) throws Exception {


        Connection conn = JDBCUtilsDruid.getConnection();
        String sql = "select * from user limit ?,?";
        //预处理sql
        PreparedStatement ps = conn.prepareStatement(sql);
        //设置查询页数 (当前页-1)*每页数量
        ps.setInt(1,(page.getCurrPage() - 1) * page.getPageSize());
        //设置每页数量
        ps.setInt(2,page.getPageSize());
        //执行sql
        ResultSet rs = ps.executeQuery();
        //获取元数据
        ResultSetMetaData rsmd = rs.getMetaData();
        while (rs.next())
        {


            Map<String,Object> map = new HashMap<>();
            //根据元数据填充map
            for (int i = 0; i < rsmd.getColumnCount(); i ++)
            {


                String columnName = rsmd.getColumnName(i + 1);
                String columnValue = rs.getString(i + 1);
                map.put(columnName,columnValue);
            }
            page.getList().add(map);
        }
        //查询总记录数
        sql = "select count(*) from user";
        ps = conn.prepareStatement(sql);
        rs = ps.executeQuery();
        if (rs.next())
        {


            //获取总记录数
            int count = rs.getInt(1);
            //设置总记录数
            page.setTotalCount(count);
            //总页数=总数/每页数量  向上取整
            Double totalpage = Math.ceil((double) count / (double) page.getPageSize());
            page.setTotalPage(totalpage.intValue());
        }
        return page;
    }
}
总结
从Jdbc的连接对象Connection(获取连接的物种方法)
到Statement执行sql语句的增删改语句
到ResultSet进行查询
使用jdbc技术完成用户的登录
关于bob类型数据的插入
再到批量插入
Jddbc的事务
数据库的连接池有c3po druid dcpb
分层
dbutils工具中两个对象
mysql和oracle连接数据库
分页技术的实现
知识点很多,数据库连接池前面的理解的很好到了后面的知识有点迷糊
先把笔记做好再说