效果图

vue2端
进入项目根目录使用npm安装两个依赖
//二维码
npm install  qrcodejs2 --save
//html转canvas图片
npm install --save html2canvas
在项目中引入
import QRCode from "qrcodejs2";
import html2canvas from "html2canvas";
HTML 部分
	<div class="qrcode" ref="qrCodeUrl" @click="downLoad">
        <img src="../../assets/ts.png" class="qrCodeIco" alt="" />
        <span class="qr-title">文本标题</span>
   </div>
js部分
 data() {


    return {


      qrcode: "https://www.w3school.com.cn",
      imageUrl: ''
    };
  },
  methods:{


    // 生成二维码
    creatQrCode() {


      var qrcode = new QRCode(this.$refs.qrCodeUrl, {


        text: this.qrcode, // 需要转换为二维码的内容
        width: 200,
        height: 200,
        typeNumber: -1, //计算模式
        correctLevel: 2, //二维码纠错级别
        colorDark: "#000000",
        colorLight: "#ffffff",
        correctLevel: QRCode.CorrectLevel.H
      });
    },
     // 保存二维码到本地
    downLoad() {


      html2canvas(this.$refs.qrCodeUrl).then(canvas => {


        let dataURL = canvas.toDataURL("image/png");
        this.imgUrl = dataURL;
        //回调创建a链接下载图片
        var link = document.createElement("a");
        link.href = this.imgUrl;
        link.download = "二维码"; //本地文件名
        // document.body.appendChild(link);
        link.click();
        // document.body.removeChild(link);
        this.$message({


          message: "正在进行下载保存",
          type: "success"
        });
      });
    },
    //清除二维码
    clserQr(){


       this.$refs.qrCodeUrl.innerHTML = "";
    }
  },
   mounted() {


    this.creatQrCode();
  },
css部分
.qrcode {


  display: inline-block;
  position: fixed;
  top: 70px;
  right: 20px;
  background-color: #fff; //设置白色背景色
  padding: 10px;
  border-radius: 10px;
  &:hover {


    cursor: pointer;
  }
}
.qrCodeIco {


  width: 60px;
  height: 60px;
  position: absolute;
  top: 33%;
  left: 35%;
  border-radius: 10%;
  background-color: aliceblue;
  padding: 3px;
  border: 3px double rgb(22, 23, 24);
}
.qr-title {


  margin-bottom: 10px;
  line-height: 24px;
  font-size: 15px;
  color: #000;
}
小程序部分
打开微信公众平台小程序后台管理网站。找到 开发
开发–开发管理–开发设置–滑到底部位置,看到扫普通链接二维码跳转小程序,在小程序里面配置好,就可以把那个链接放在我们js中了

上面的方法比较简单,二维码带参数的问题我还没解决。
·····································································································································
第二种生成小程序码,跳转小程序

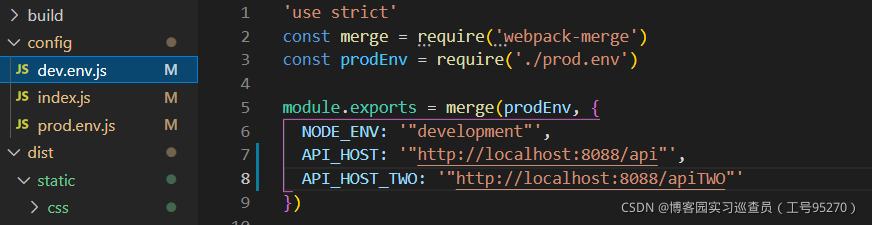
首先配置vue多个请求跨域的问题:在config的index.js里配置多个api即可,新配置的必须放在第一个。
    proxyTable: {

     //服务器代理,防止跨域
      '/apiTWO': {


        target: 'https://api.weixin.qq.com',
        changeOrigin: true,
        pathRewrite: {


          '^/apiTWO': ''
        }
      },
      '/api': {


        target: 'https://xxx.com', //开发
        // target: 'https://xxx.com', //生产
        changeOrigin: true,
        pathRewrite: {


          '^/api': ''
        }
      },

    },
有三个文件的话分别配置,具体看项目

在需要生成二维码的页面引入,单独请求设置
import axios from 'axios'
获取凭证的接口
GET https://api.weixin.qq.com/cgi-bin/token?grant_type=client_credential&appid=APPID&secret=APPSECRET
获取二维码的接口
POST https://api.weixin.qq.com/wxa/getwxacodeunlimit?access_token=ACCESS_TOKEN
点击发送请求生成二维码
  createQr(e) {


      var that = this;
      that.showQr = true;
      axios.defaults.baseURL = process.env.API_HOST_TWO;//如果项目设置的是这个,别忘了设置回去
      axios
        .get(
          "/cgi-bin/token?grant_type=client_credential&appid=小程序id&secret=小程序秘钥"
        )
        .then(function(res) {


       console.log("获取tokenscreen", res.access_token);
          that.accessToken = res.access_token;
        })
        .catch(resp => {


          console.log("请失败时:" + resp.status + "," + resp.statusText);
        });
      axios({


        method: "POST",
        url: "/wxa/getwxacodeunlimit?access_token=" + that.accessToken,
        data: {


          scene: "6666",
          page: "pages/logs/logs"
        },
        responseType: "arraybuffer" //设置响应类型
      })
        .then(res => {


          // 返回的数据转图片
          var binary = "";
          var bytes = new Uint8Array(res.data);
          var len = bytes.byteLength;
          for (var i = 0; i < len; i++) {


            binary += String.fromCharCode(bytes[i]);
          }
          that.imageUrls = `data:image/png;base64,${

      window.btoa(binary)}`;
        })
        .catch(e => {


          console.log("请求失败时:", e);
        });
html
<img :src="imageUrls" class="qr-images" alt="" />