Spring Cloud 简介
主要内容
微服务简介
SpringCloud 简介
SpringCloud 框架结构
SpringCloud 和 Dubbo 的对比
SpringCloud 版本号说明
Spring Cloud 简介
一、 微服务简介
1 什么是微服务?
微服务的概念最早是在 2014 年由 Martin Fowler 和 James Lewis 共同提出,他们定义了微服务是由单一应用程序构成的小服务,拥有自己的进程与轻量化处理,服务依业务功能设计,以全自动的方式部署,与其他服务使用 HTTP API 通讯。同时,服务会使用最小规模的集中管理 (例如 Docker)技术,服务可以用不同的编程语言与数据库等。
简单举例:看军事新闻的同学应该都知道,一艘航空母舰作战能力虽然很强,但是弱点太明显,就是防御能力太差,单艘的航空母舰很少单独行动,通常航空母舰战斗群才是主要军事力量,你可以把单艘航母理解为的单体应用(防御差,机动性不好),把航母战斗群(调度复杂,维护费用高)理解为微服务。
2 为什么使用微服务?
2.1单体应用特点
大部分的开发者经历和开发过单体应用,无论是传统的 Servlet + JSP,还是 SSM还是现在的SpringBoot,它们都是单体应用,那么长期陪伴我们的单体应用有什么弊端?
我们是面临了什么问题,导致我们要抛弃单体应用转向微服务架构?主要原因如下:
- 部署成本高(无论是修改 1 行代码,还是 10 行代码,都要全量替换)。
- 改动影响大,风险高(不论代码改动多小,成本都相同)。
- 因为成本高,风险高,所以导致部署频率低(无法快速交付客户需求)。
- 无法满足快速扩容,弹性伸缩,无法适应云环境特性等问题。
2.2微服务特点
微服务架构的特点:针对特定服务发布,影响小,风险小,成本低;频繁发布版本,快速交付需求;低成本扩容,弹性伸缩,适应云环境。
我们知道一个朴素的理念,没有任何事物是完美的,任何东西都有两面性,有得必有失,那么在选择微服务在解决了快速响应和弹性伸缩的问题同时,它又给我们带来了什么问题?简单总结如下:
- 分布式系统的复杂性
- 部署,测试和监控的成本问题
- 分布式事务和 CAP 的相关问题
系统应用由原来的单体变成几十到几百个不同的工程,会所产生例如包括服务间的依赖,服务如何拆封,内部接口规范,数据传递等等问题,尤其是服务拆分,需要团队熟悉业务流程,懂得取舍,要保证拆分的粒度服务既符合“高内聚,低耦合”的基本原则,还要兼顾业务的发展以及公司的愿景,要还要说服团队成员为之努力,并且积极投入,在多方中间取得平衡。
对于分布式系统,部署,测试和监控都需要大量的中间件来支撑,而且中间件本身也要维护,原先单体应用很简单的事务问题 ,转到分布式环境就变得很复杂,分布式事务是采用简单的重试 + 补偿机制,还是采用二阶段提交协议等强一致性方法来解决,就要取决对业务场景的熟悉加上反复的权衡了,相同问题还包括对 CAP 模型的权衡,总之微服务对团队整体的技术栈水平整体要求更高。
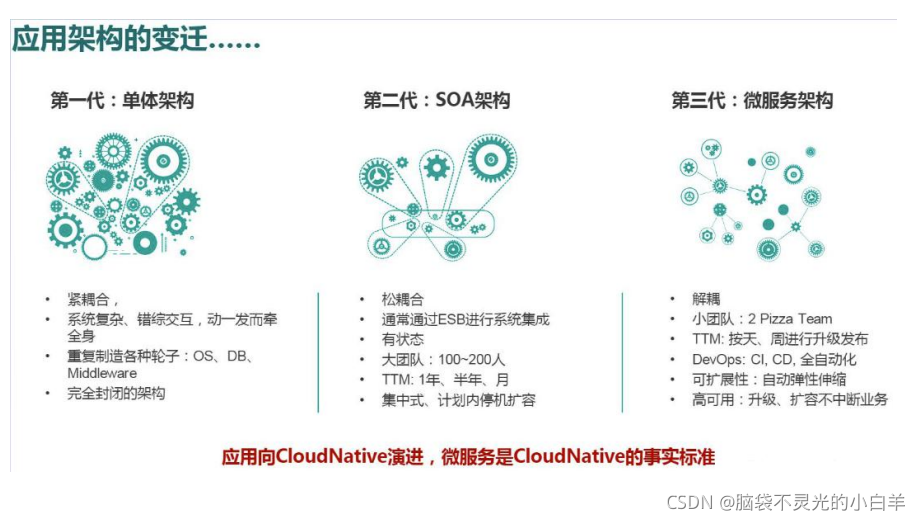
3 应用架构变迁图
二、 Spring Cloud 简介
Spring Cloud 是 Spring 旗下的一个顶级项目。
Spring Cloud 是一个服务治理平台,提供了一些服务框架。包含了:服务注册与发现、配置中心、消息中心 、负载均衡、数据监控等等。
Spring Cloud 是一系列框架的有序集合。它利用 Spring Boot 的开发便利性巧妙地简化了分布式系统基础设施的开发,如服务发现注册、配置中心、消息总线、负载均衡、断路器、数据监控等,都可以用 Spring Boot 的开发风格做到一键启动和部署。Spring Cloud 并没有重复制造轮子,它只是将目前各家公司开发的比较成熟、经得起实际考验的服务框架组合起来,通过 Spring Boot 风格进行再封装屏蔽掉了复杂的配置和实现原理,最终给开发者留出了一套简单易懂、易部署和易维护的分布式系统开发工具包。
Spring Cloud 是一个微服务框架,相比 RPC/SOA 框架而言,Spring Cloud 提供的全套的分布式系统解决方案。
Spring Cloud 对 Netflix 的多个微服务基础框架开源组件进行了封装,同时又实现了和云端平台以及和 Spring Boot 开发框架的集成。
Spring Cloud 为微服务架构开发涉及的配置管理,服务治理,熔断机制,智能路由,微代理,控制总线,一次性 token,全局一致性锁,leader 选举,分布式 session,集群状态管理等操作提供了一种简单的开发方式。
Spring Cloud 为开发者提供了快速构建分布式系统的工具,开发者可以快速的启动服务或构建应用、同时能够快速和云平台资源进行对接。
1 Netflix 简介
Netflix(Nasdaq NFLX) 成立于 1997 年,是一家在线影片租赁提供商,主要提供 Netflix超大数量的 DVD 并免费递送,总部位于美国加利福尼亚州洛斯盖图。
Netflix 经过几年的开源实践,推出最新开源改革计划,打造了全新的 Netflix 开源门户,并且会继续开源更多好项目,增加 Netflix 项目开源透明度。
互联网流媒体播放商 Netflix 在几年前就开始创建自己的开源门户 Netflix Open Source (别名 NetflixOSS,http://netflix.github.io/) 了,他们并不知道这会如何发展;也不知道开源贡献者是否会使用,改进或者是忽略;更没想到的是就这样拥有了公司的社区,开发者会给予反馈,一些中间供应商会把这些开源软件集成到他们的解决方案中。
到了今天,Netflix 拥有上百个开源软件,从基础设施平台到大数据工具,再到自动化部署软件。随着时间的发展,OSS 网站也由于越来越多的组件而变得越来越复杂。现在,Netflix 还会继续开源更多的软件。
Netflix 发布在 Github 中的项目库地址:https://github.com/netflix
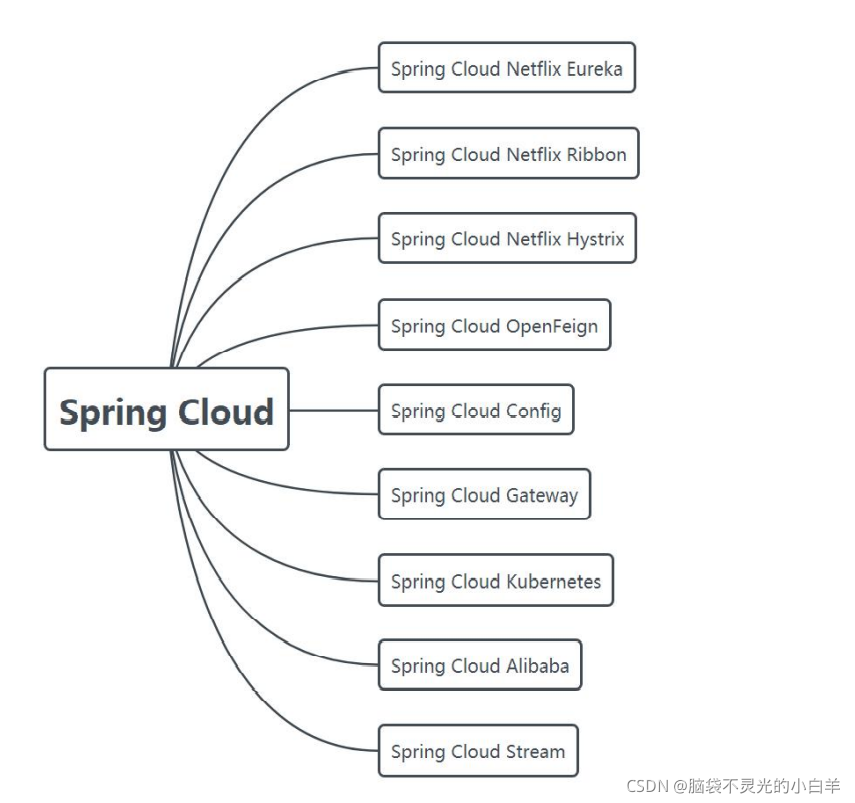
三、 Spring Cloud 框架结构
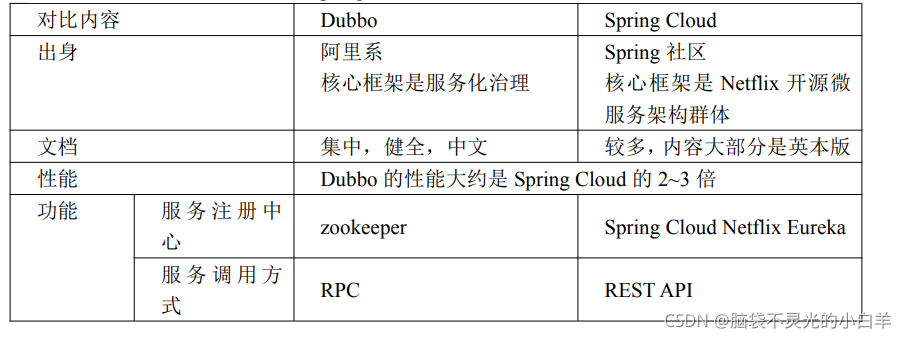
四、 Spring Cloud 和 Dubbo 的对比
Spring Cloud 和 Dubbo 都是微服务开发框架。不是新的技术就一定是好的技术。Dubbo优势在于开发简单,效率高。Spring Cloud 优势在于功能全面且可靠性高。

五、 Spring Cloud 版本号说明
1 常见版本号说明
开发中,使用的框架版本,最好是 RELEASE版本或 Final版本。常见版本号格式为:x.y.z.stage
x -数字格式主版本号,当功能模块有较大更新或者整体架构发生变化时,主版本号会更新。
y -数字格式次版本号,次版本表示只是局部的一些变动。
z - 数字格式修正版本号,一般是 bug 的修复或者是小的变动。
stage -希腊字母版本号,也称为阶段版本号。用于标注当前版本的软件处于哪个开发阶段。常用的阶段版本包括:BASE、ALPHA、BATE、RELEASE/FINAL。
BASE -设计阶段。只有相应的设计没有具体的功能实现。
ALPHA -软件的初级版本。存在较多的 bug。
BATE -表示相对 ALPHA 有了很大的进步,消除了严重的 bug,还存在一些潜在的bug。
RELEASE/FINAL -该版本表示最终版,即正式发布版本。
2 Spring Cloud 版本号说明
Spring Cloud 是一个包含若干子框架的框架集合体,是一个完整的微服务框架体系,如果使用场景版本号来进行标记,容易混淆主框架版本和子框架版本标记。所以 Spring Cloud 使用一种全新的版本号来对主框架进行版本标记,而子框架的版本标记大多还是使用常用版本号标记的。
Spring Cloud 版本格式如: 版本号命名.stage
版本号命名:Spring Cloud 主框架版本号是使用英国伦敦地铁站名称来进行标记的,并根据地铁站名称的首字母的英文自然升序排列来识别版本的递增。如:Angle、Brixton、Camden、Dalston、Edgware、Finchley 等。后续版本提升会继续根据首字母升序排列。
stage:阶段版本号。常用的阶段版本包括:BUILD-XXX[SNAPSHOT]、GA、PRE(M1、M2 等)、RC、SR。
BUILD-XXX[SNAPSHOT] -开发版本、一般是开发团队内部使用。
GA -稳定版,内部开发到一定阶段了,各个模块集成后,经过全面测试发现没有问题,可对外发行了。这个时候叫 GA(General Availability)。基本上可以使用了。没有严重
的 BUG 问题,但是有未测出的 BUG 隐患。不推荐商业使用。
PRE -里程碑版,由于 GA 还不属于公开发行版,里面还有些功能不完善或者 bug,于是就有了 milestone(里程碑版)。milestone 版主要修复了一些 bug。一个 GA 后,一般会有多个里程本版。例如 M1 M2 M3…。不推荐商业使用。
RC -候选发布版,从 BUILD 后到 GA 在到 M 基本上系统就算定型了,这个时候系统就进入 Release Candidate(候选发布版)。该阶段的软件类似于最终发行前的一个观察期,该期间只对一些发现的等级高的 bug 进行修复。发布 RC1 RC2 等版本。可以考虑 RC版本。
SR -正式发布版,公开正式发布。正式发布版一般也有多个发布,例如 SR1 SR2 SR3等等,一般是用来修复大 bug 或者优化。最好使用 SR 版本。
学习过程使用的版本是:Greenwich.SR4。当前版本中内部使用的 SpringBoot 是2.2.x.RELEASE 版本
Spring Cloud Netflix Eureka
主要内容
Eureka 简介
Eureka 和 Zookeeper 对比
搭建 Eureka 注册中心
Eureka 服务管理平台介绍
搭建高可用集群
集群原理
Eureka 优雅停
一、 Eureka 简介
Eureka 是 Netflix 开发的服务发现 框架,本身是一个基于 REST 的服务,主要用于定位运行在 AWS 域中的中间层 服务,以达到负载均衡和中间层服务故障转移的目的。SpringCloud 将它集成在其子项目 spring-cloud-netflix 中,以实现 SpringCloud 的服务发现功能。
1 Eureka 组件
Eureka 包含两个组件:Eureka Server 和 Eureka Client。
1.1 Eureka Server
Eureka Server 提供服务注册服务,各个节点启动后,会在 Eureka Server 中进行注册,这样 EurekaServer 中的服务注册表中将会存储所有可用服务节点的信息,服务节点的信息可以在界面中直观的看到。
Eureka Server 本身也是一个服务,默认情况下会自动注册到 Eureka 注册中心。
如果搭建单机版的 Eureka Server 注册中心,则需要配置取消 Eureka Server 的自动注册逻辑。毕竟当前服务注册到当前服务代表的注册中心中是一个说不通的逻辑。
Eureka Server 通过 Register、Get、Renew 等接口提供服务的注册、发现和心跳检测等服务。
1.2 Eureka Client
Eureka Client 是一个 java 客户端,用于简化与 Eureka Server 的交互,客户端同时也具备一个内置的、使用轮询(round-robin)负载算法的负载均衡器。在应用启动后,将会向Eureka Server 发送心跳,默认周期为 30 秒,如果 Eureka Server 在多个心跳周期内没有接收到某个节点的心跳,Eureka Server 将会从服务注册表中把这个服务节点移除(默认 90 秒)。
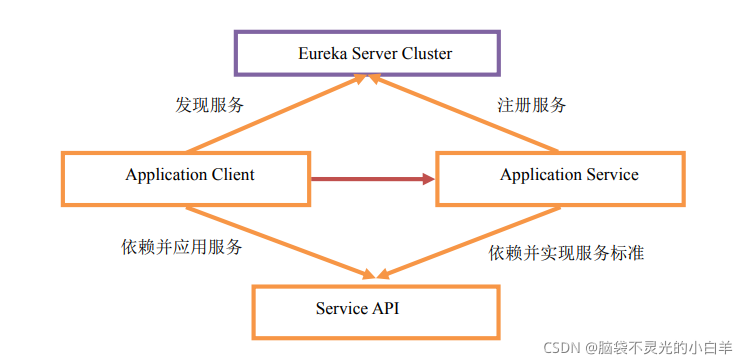
Eureka Client 分 为 两 个 角 色 , 分 别 是 : Application Service(Service Provider) 和Application Client(Service Consumer)
1.2.1 Application Service
服务提供方,是注册到 Eureka Server 中的服务。
1.2.2 Application Client
服务消费方,通过 Eureka Server 发现服务,并消费。
注意:在这里,Application Service 和 Application Client 不是绝对上的定义,因为Provider 在提供服务的同时,也可以消费其他 Provider 提供的服务;Consumer 在消费服务的同时,也可以提供对外服务。
二、 Eureka和 Zookeeper 对比
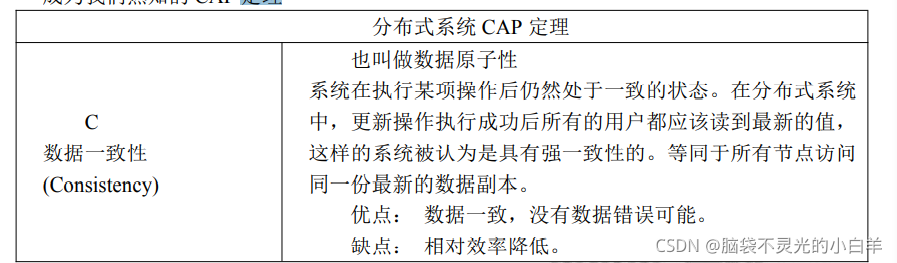
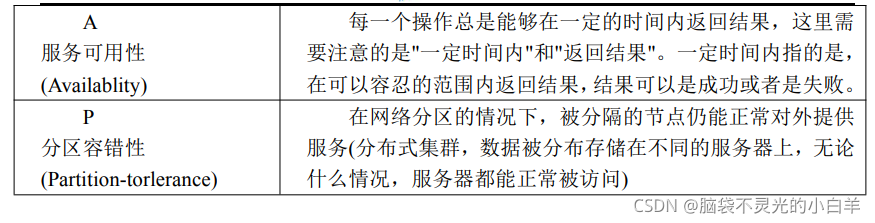
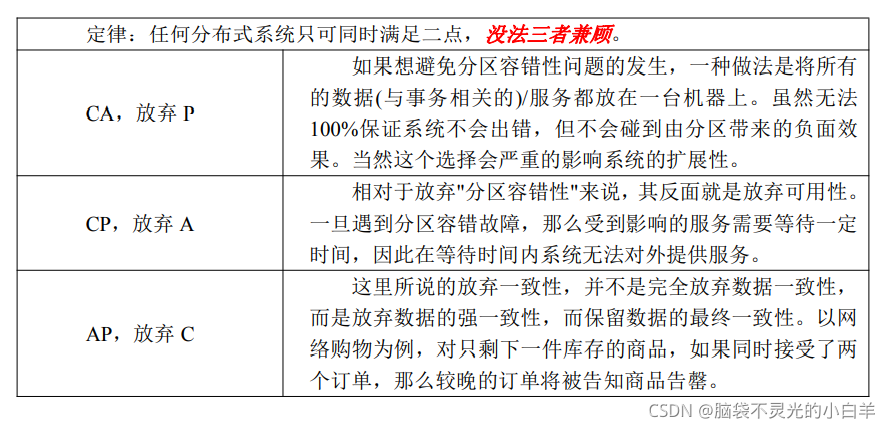
1 什么是 CAP 定理
CAP 原则又称 CAP 定理,指的是在一个分布式系统中,Consistency(数据一致性)、Availability(服务可用性)、Partition tolerance(分区容错性),三者不可兼得。
CAP 由 Eric Brewer 在 2000 年 PODC 会议上提出。该猜想在提出两年后被证明成立,成为我们熟知的 CAP定理
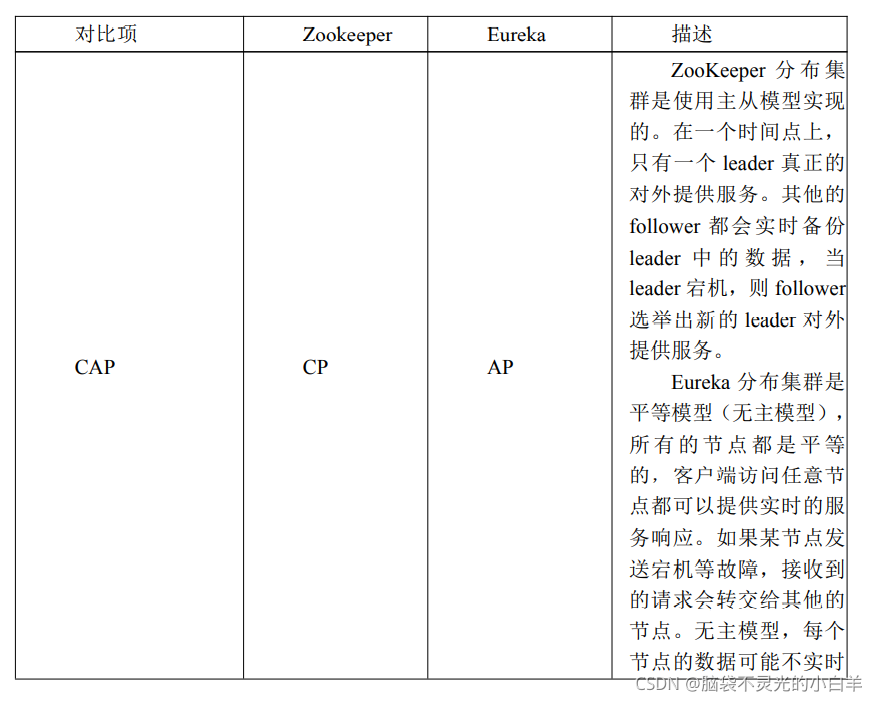
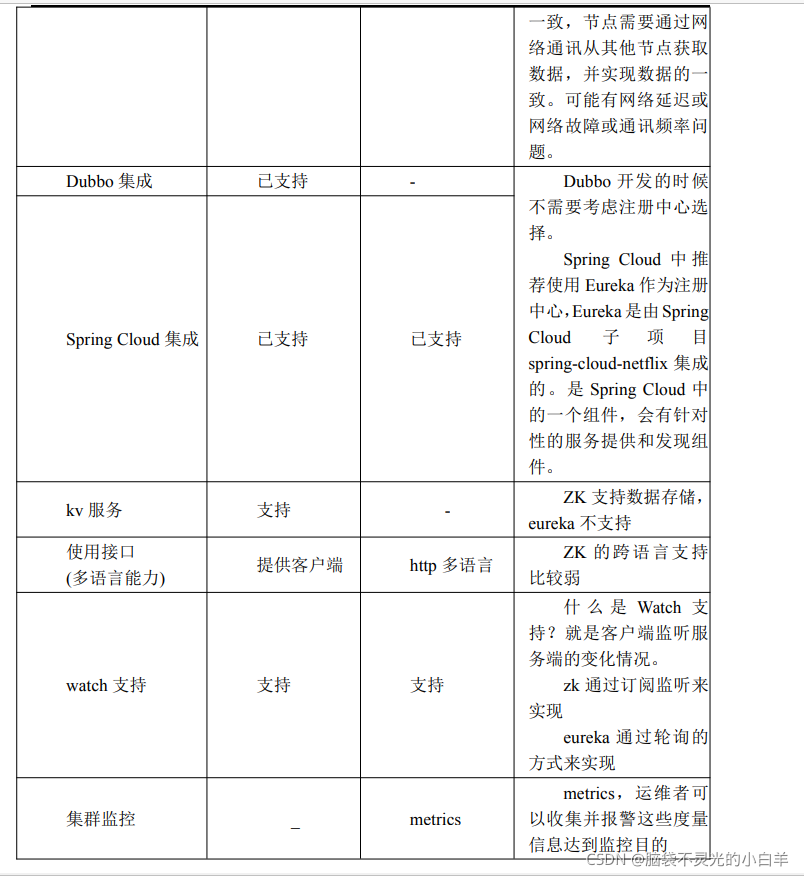
2 基于 CAP 定理比对 Eureka 和 Zookeeper
三、 搭建 Eureka 注册中心
Eureka Server 既是一个注册中心,同时也是一个服务。那么搭建 Eureka Server 的方式和以往搭建 Dubbo 注册中心 ZooKeeper 的方式必然不同,那么首先搭建一个单机版的Eureka Server 注册中心。
1 POM 文件
<?xml version="1.0" encoding="UTF-8"?>
<project xmlns="http://maven.apache.org/POM/4.0.0" xmlns:xsi="http://www.w3.org/2001/XMLSchema-instance"
         xsi:schemaLocation="http://maven.apache.org/POM/4.0.0 https://maven.apache.org/xsd/maven-4.0.0.xsd">
    <modelVersion>4.0.0</modelVersion>
    <parent>
        <groupId>org.springframework.boot</groupId>
        <artifactId>spring-boot-starter-parent</artifactId>
        <version>2.1.11.RELEASE</version>
        <relativePath/> <!-- lookup parent from repository -->
    </parent>
    <groupId>com.bjsxt</groupId>
    <artifactId>springcloud-00-eureka</artifactId>
    <version>0.0.1-SNAPSHOT</version>
    <name>springcloud-00-eureka</name>
    <description>Demo project for Spring Boot</description>

    <properties>
        <java.version>1.8</java.version>
        <spring-cloud.version>Greenwich.SR4</spring-cloud.version>
    </properties>

    <dependencies>
        <dependency>
            <groupId>org.springframework.cloud</groupId>
            <artifactId>spring-cloud-starter-netflix-eureka-server</artifactId>
        </dependency>

        <dependency>
            <groupId>org.springframework.boot</groupId>
            <artifactId>spring-boot-starter-test</artifactId>
            <scope>test</scope>
            <exclusions>
                <exclusion>
                    <groupId>org.junit.vintage</groupId>
                    <artifactId>junit-vintage-engine</artifactId>
                </exclusion>
            </exclusions>
        </dependency>
    </dependencies>

    <build>
        <plugins>
            <plugin>
                <groupId>org.springframework.boot</groupId>
                <artifactId>spring-boot-maven-plugin</artifactId>
            </plugin>
        </plugins>
    </build>

</project>
2 配置文件 application.yml
Eureka Server 本身也是一个服务,同时又是一个注册中心。在 Spring Cloud 中,启动的微服务会自动的搜索注册中心并注册服务,那么在单机版 Eureka Server 环境中,当前服务注册到当前服务中,明显是不合适的。所以搭建 Eureka Server 单机版时,需要提供特殊的全局配置,避免回路注册逻辑。
同理,Eureka Server 服务在注册中心中发现服务列表逻辑也是不必要的。毕竟注册中心是一个中立的服务管理平台,如果是单机版 Eureka Server 环境中,Eureka Server 服务再去发现服务列表,明显也是不必要的。也需要通过全局配置,避免回路发现逻辑。
server:
	# 设置 Eureka Server WEB 控制台端口、服务注册发现端口。Eureka Server 服务注册发现端口默认为 8761。
	port: 8761
spring:
	application:
	# 设置 spring 应用命名,默认为 null。同命名的应用会注册到同一个服务集群中。
	name: cloud-eureka
eureka:
	client:
	# 是否将自己注册到 Eureka-Server 中,默认的为 true
	register-with-eureka: false
	# 是否从 Eureka-Server 中获取服务注册信息,默认为 true
	fetch-registry: false
如果需要修改 Eureka Server 服务注册发现端口,具体配置如下:
server:
	# 设置 Eureka Server WEB 控制台端口、服务注册发现端口。Eureka Server 服务注册
发现端口默认为 8761。
	port: 8080
spring:
	application:
	# 设置 spring 应用命名,默认为 null。同命名的应用会注册到同一个服务集群中。
	name: cloud-eureka
eureka:
	client:
	# 是否将自己注册到 Eureka-Server 中,默认的为 true
	register-with-eureka: false
	# 是否从 Eureka-Server 中获取服务注册信息,默认为 true
	fetch-registry: false
	service-url:
		defaultZone: http://localhost:8080/eureka/
3 启动类
package com.bjsxt.eureka;
import org.springframework.boot.SpringApplication;
import org.springframework.boot.autoconfigure.SpringBootApplication;
import org.springframework.cloud.netflix.eureka.server.EnableEurekaServer;
/**
* @EnableEurekaServer - 启动时初始化 Eureka Server 注册中心。
*/
@SpringBootApplication
@EnableEurekaServer
public class EurekaApp {


	public static void main(String[] args) {


		SpringApplication.run(EurekaApp.class, args);
	}
}
4 访问 Eureka Server WEB 服务管理平台
访问服务管理平台地址为:http://ip:port/
四、 Eureka 服务管理平台介绍
1 Eureka Server 服务管理平台访问预览
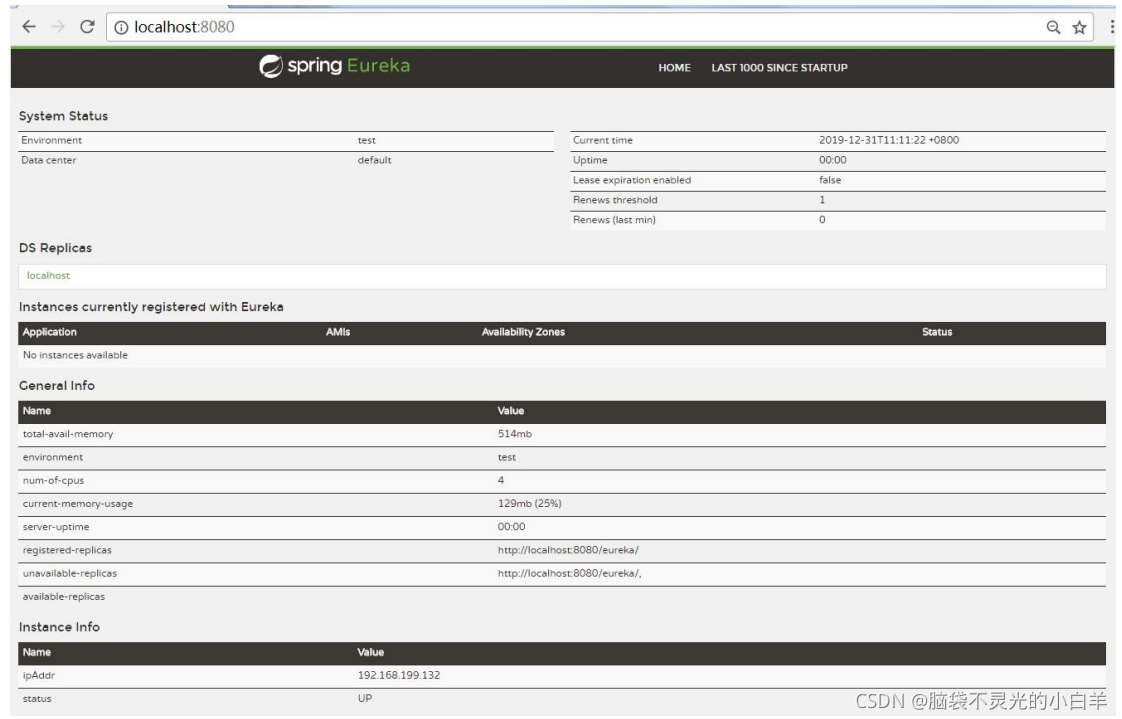
2 System Status
系统状态展示
3 DS Replicas
注册中心集群列表
4 Instances currently registered with Eureka
已在注册中心中注册的服务列表
5 General Info
当前注册中心相关信息展示
6 Instance Info
当前注册中心实例信息展示
五、 搭建高可用集群
1 在 Eureka 应用中定义多环境配置
1.1 application-eureka1.yml
#设置端口号
server:
	# 设置 Eureka Server WEB 控制台端口、服务注册发现端口。Eureka Server 服务注册发现端口默认为 8761。
	port: 8761
#设置应用名称
spring:
	application:
	# 设置 spring 应用命名,默认为 null。同命名的应用会注册到同一个服务集群中。
	name: cloud-eureka
#设置Eureka集群其他节点的地址
eureka:
	client:
		service-url:
			defaultZone:
				- http://eureka1:8761/eureka/,http://eureka2:8761/eureka/
	#设置注册中心实例主机名
	instance:
		hostname: eureka1
1.2 application-eureka2.yml
server:
	# 设置 Eureka Server WEB 控制台端口、服务注册发现端口。Eureka Server 服务注册发现端口默认为 8761。
	port: 8761
spring:
	application:
	# 设置 spring 应用命名,默认为 null。同命名的应用会注册到同一个服务集群中。
	name: cloud-eureka
eureka:
	client:
		service-url:
			defaultZone:
				- http://eureka1:8761/eureka/,http://eureka2:8761/eureka/
	#设置注册中心实例主机名
	instance:
		hostname: eureka2
2 打包工程
2.1 POM 依赖
增加 Spring Boot 打包插件
<?xml version="1.0" encoding="UTF-8"?>
<project xmlns="http://maven.apache.org/POM/4.0.0"
	xmlns:xsi="http://www.w3.org/2001/XMLSchema-instance"
	xsi:schemaLocation="http://maven.apache.org/POM/4.0.0
http://maven.apache.org/xsd/maven-4.0.0.xsd">
	<modelVersion>4.0.0</modelVersion>
	<parent>
		<groupId>org.springframework.boot</groupId>
		<artifactId>spring-boot-starter-parent</artifactId>
		<version>2.2.2.RELEASE</version>
	</parent>
	<groupId>com.bjsxt</groupId>
	<artifactId>cloudeureka</artifactId>
	<version>1.0-SNAPSHOT</version>
	<dependencyManagement>
		<dependencies>
			<dependency>
				<groupId>org.springframework.cloud</groupId>
				<artifactId>spring-cloud-dependencies</artifactId>
				<version>Hoxton.SR1</version>
				<type>pom</type>
				<scope>import</scope>
			</dependency>
		</dependencies>
	</dependencyManagement>
	<dependencies>
		<dependency>
			<groupId>org.springframework.cloud</groupId>
			<artifactId>spring-cloud-starter-netflix-eureka-server</artifactId>
		</dependency>
	</dependencies>
	<build>
		<plugins>
			<plugin>
				<groupId>org.springframework.boot</groupId>
				<artifactId>spring-boot-maven-plugin</artifactId>
			</plugin>
		</plugins>
	</build>
</project>
2.2 打包
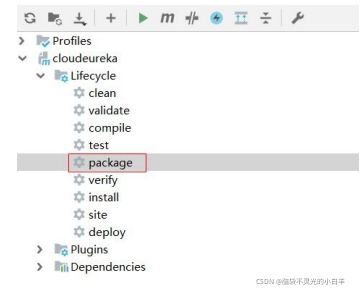
2.3 打包结果
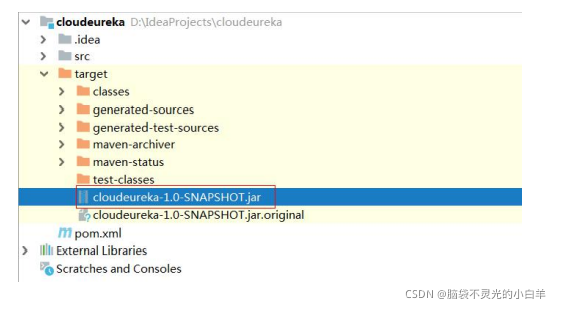
3 分别在两台虚拟机上,上传打包后的 jar 文件到 Linux系统
4 设置 Linux 主机域名
修改/etc/hosts文件,设置主机域名。将主机域名和 IP 进行绑定。
vi /etc/hosts
新增内容如下:两个 Linux 系统修改内容相同。(IP 根据具体环境配置)
192.168.17.10 eureka1
192.168.17.20 eureka2
5 启动 Eureka
5.1 使用 java 命令启动
java -jar -Dspring.profiles.active=eureka1 cloudeureka-1.0-SNAPSHOT.jar
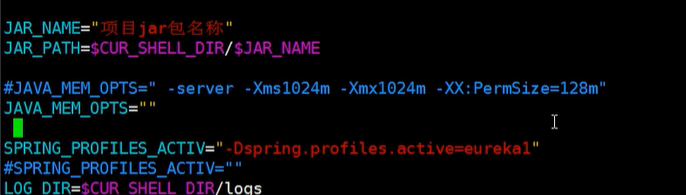
5.2 脚本启动
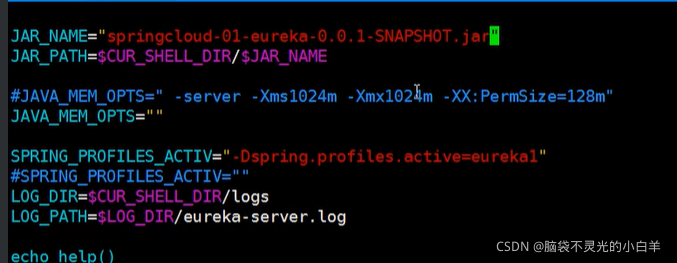
当然,每次通过命令来启动 Eureka Server 过于麻烦,可以定义一个 shell 文件来简化操作。(Java 程序员不必要掌握 shell 脚本的编写。建议对 shell 脚本有一定的了解,至少能够修改内部的必要参数值。Shell 脚本一般由运维或部署人员开发。也可能有系统工程师开发。)具体 shell 内容如下:
#!/bin/bash
cd `dirname $0` CUR_SHELL_DIR=`pwd` CUR_SHELL_NAME=`basename ${

    BASH_SOURCE}`

JAR_NAME="项目 jar 包名称"
JAR_PATH=$CUR_SHELL_DIR/$JAR_NAME

#JAVA_MEM_OPTS=" -server -Xms1024m -Xmx1024m -XX:PermSize=128m"
JAVA_MEM_OPTS=""

SPRING_PROFILES_ACTIV="-Dspring.profiles.active=配置文件变量名称"
#SPRING_PROFILES_ACTIV=""
LOG_DIR=$CUR_SHELL_DIR/logs
LOG_PATH=$LOG_DIR/eureka-server.log

echo_help()
{


	echo -e "syntax: sh $CUR_SHELL_NAME start|stop"
}

if [ -z $1 ];then
	echo_help
	exit 1
fi

if [ ! -d "$LOG_DIR" ];then
	mkdir "$LOG_DIR"
fi

if [ ! -f "$LOG_PATH" ];then
	touch "$LOG_DIR"
fi

if [ "$1" == "start" ];then
	# check server
	PIDS=`ps --no-heading -C java -f --width 1000 | grep $JAR_NAME | awk '{print $2}'`
	if [ -n "$PIDS" ]; then
		echo -e "ERROR: The $JAR_NAME already started and the PID is ${PIDS}."
		exit 1
	fi
	echo "Starting the $JAR_NAME..."

	# start
	nohup java $JAVA_MEM_OPTS -jar $SPRING_PROFILES_ACTIV $JAR_PATH >>
$LOG_PATH 2>&1 &

	COUNT=0
	while [ $COUNT -lt 1 ]; do
		sleep 1
		COUNT=`ps --no-heading -C java -f --width 1000 | grep "$JAR_NAME" | awk
'{print $2}' | wc -l`
		if [ $COUNT -gt 0 ]; then
			break
		fi
	done
	PIDS=`ps --no-heading -C java -f --width 1000 | grep "$JAR_NAME" | awk '{

    print
$2}'`
	echo "${JAR_NAME} Started and the PID is ${PIDS}."
	echo "You can check the log file in ${LOG_PATH} for details."
elif [ "$1" == "stop" ];then
	PIDS=`ps --no-heading -C java -f --width 1000 | grep $JAR_NAME | awk '{print $2}'`
	if [ -z "$PIDS" ]; then
		echo "ERROR:The $JAR_NAME does not started!"
		exit 1
	fi

	echo -e "Stopping the $JAR_NAME..."

	for PID in $PIDS; do
		kill $PID > /dev/null 2>&1
	done

	COUNT=0
	while [ $COUNT -lt 1 ]; do
		sleep 1
		COUNT=1
		for PID in $PIDS ; do
			PID_EXIST=`ps --no-heading -p $PID`
			if [ -n "$PID_EXIST" ]; then
				COUNT=0
				break
			fi
		done
	done

	echo -e "${JAR_NAME} Stopped and the PID is ${PIDS}." else
	echo_help
	exit 1
fi
设置好 shell 启动脚本后,需要提供可执行权限:shell 脚本文件名自己修改。
chmod 755 xxx.sh
脚本使用方式为:
启动 Eureka Server 命令:./xxx.sh start
关闭 Eureka Server 命令:./xxx.sh stop


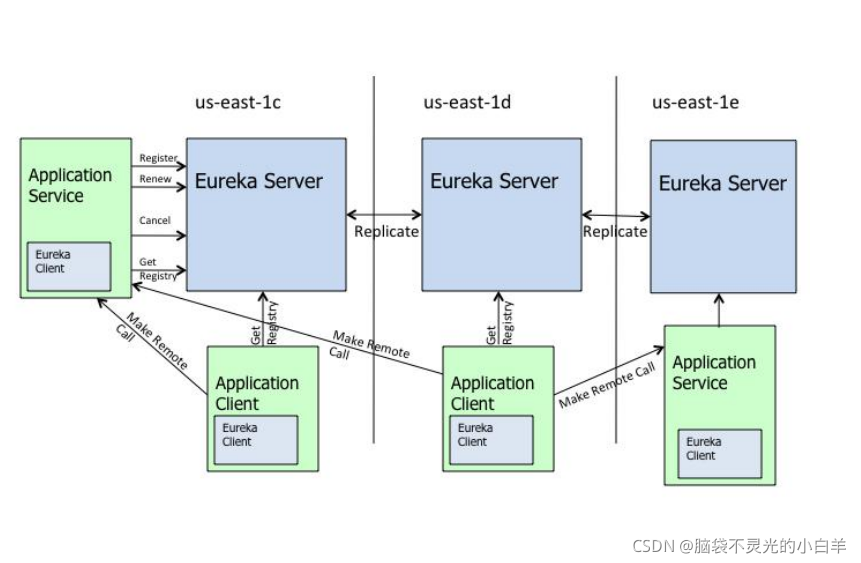
六、 集群原理
Eureka Server 注册中心的集群和 Dubbo 的 ZooKeeper 注册中心集群在结构上有很大的不同。
Eureka Server 注册中心集群中每个节点都是平等的,集群中的所有节点同时对外提供服务的发现和注册等功能。同时集群中每个 Eureka Server 节点又是一个微服务,也就是说,每个节点都可以在集群中的其他节点上注册当前服务。又因为每个节点都是注册中心,所以节点之间又可以相互注册当前节点中已注册的服务,并发现其他节点中已注册的服务。
1 Eureka 集群架构原
七、 Eureka 优雅停服
1 自我保护模式
一般情况下,微服务在 Eureka 上注册后,会每 30 秒发送心跳包,Eureka 通过心跳来判断服务是否健康,同时会定期删除超过 90 秒没有发送心跳服务。
有两种情况会导致 Eureka Server 收不到微服务的心跳:一是微服务自身的原因;二是微服务与 Eureka 之间的网络故障。
通常微服务自身的故障关闭只会导致个别服务出现故障,一般不会出现大面积故障,而网络故障通常会导致 Eureka Server 在短时间内无法收到大批心跳。考虑到这个区别,Eureka 设置了一个阀值,当判断离线服务的数量超过阀值时,Eureka Server 认为很大程度上出现了网络故障,将不再删除心跳过期的服务。
那么这个阀值是多少呢? 15 分钟之内是否低于 85%;Eureka Server 在运行期间,会统计心跳失败的比例在 15 分钟内是否低于 85%,这种算法叫做 Eureka Server 的自我保护模式。
2 为什么要自我保护
因为同时保留"好数据"与"坏数据"总比丢掉任何数据要更好,当网络故障恢复后,这个 Eureka 节点会退出"自我保护模式"。Eureka 还有客户端缓存功能(也就是微服务的缓存功能)。即便 Eureka 集群中所有节点都宕机失效,微服务的 Provider 和 Consumer 都能依托服务缓存正常通信。微服务的负载均衡策略会自动剔除离线的微服务节点。
3 关闭自我保护
修改 Eureka Server 中的核心配置文件 application.yml
server:
	# 设置 Eureka Server WEB 控制台端口、服务注册发现端口。Eureka Server 服务注册发现端口默认为 8761。
	port: 8761
spring:
	application:
	# 设置 spring 应用命名,默认为 null。同命名的应用会注册到同一个服务集群中。
	name: cloud-eureka
eureka:
	client:
		service-url:
			defaultZone:
				- http://eureka2:8761/eureka/
instance:
	hostname: eureka1
server:
	# 是否开启自我保护, 默认为 true
	enable-self-preservation: false
	# 清理缓存间隔,单位是毫秒。默认值为 1 分钟
	eviction-interval-timer-in-ms: 6000
Spring Cloud Netflix Ribbon
主要内容
Ribbon 简介
使用 Ribbon 开发微服务
集中式与进程内负载均衡区别
Ribbon 常见的负载均衡策略
Ribbon 的点对点直
一、 Ribbon 简介
Ribbon 是一个基于 Http 和 TCP 的 客服端 负载均衡工具,它是基于 Netflix Ribbon 实现的。它不像 spring cloud 服务注册中心、配置中心、API 网关那样独立部署,但是它几乎存在于每个 spring cloud 微服务中。包括 feign 提供的声明式服务调用也是基于该 Ribbon实现的。ribbon 默认提供很多种负载均衡算法,例如 轮询、随机 等等。甚至包含自定义的负载均衡算法。Ribbon 可以用于解决并提供微服务的负载均衡的问题。
二、 使用 Ribbon 开发微服务
在 Spring Cloud 中,使用 Ribbon 技术开发 Eureka Client 组件还是非常方便的。我们在开发过程中,不需要像Dubbo 那样关注服务的角色。无论是 Provider 还是Consumer 都是一个微服务客户端,只是在编码层面上,服务消费者代码的开发相对比较麻烦。我们通过简单案例测试一下 Spring Cloud 中的微服务开发过程。
因为现在的 Eureka Server 部署在 Linux 中,并已为 Linux 定义了新的主机域名,需要先 修 改 开 发 测 试 环 境 中 的 hosts 文 件 。 windows 中 的 hosts 文 件 位 于 :
C:\windows\system32\dirvers\etc\hosts。新增内容如下:(IP 根据具体情况配置)
192.168.2.115 eureka1
192.168.2.116 eureka2
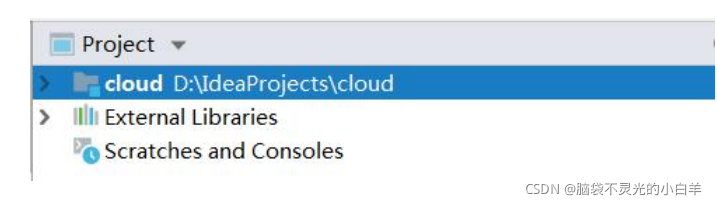
1 创建 Eureka Client 工程
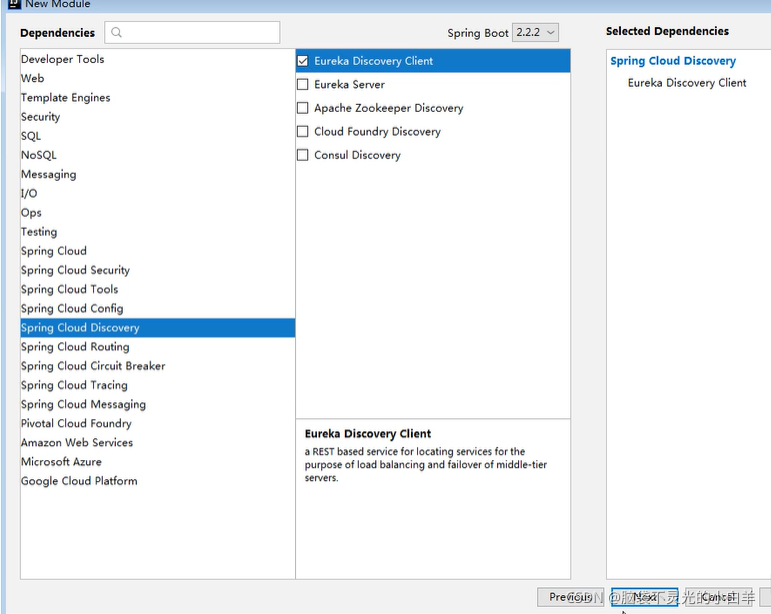
1.1 POM 依赖
<?xml version="1.0" encoding="UTF-8"?>
<project xmlns="http://maven.apache.org/POM/4.0.0" xmlns:xsi="http://www.w3.org/2001/XMLSchema-instance"
         xsi:schemaLocation="http://maven.apache.org/POM/4.0.0 https://maven.apache.org/xsd/maven-4.0.0.xsd">
    <modelVersion>4.0.0</modelVersion>
	<packaging>pom</packaging>
	<parent>
		<groupId>org.springframework.boot</groupId>
		<artifactId>spring-boot-starter-parent</artifactId>
		<version>2.2.2.RELEASE</version>
	</parent>
	<groupId>com.bjsxt</groupId>
	<artifactId>cloud</artifactId>
	<version>1.0-SNAPSHOT</version>
	<dependencyManagement>
		<dependencies>
			<dependency>
				<groupId>org.springframework.cloud</groupId>
				<artifactId>spring-cloud-dependencies</artifactId>
				<version>Hoxton.SR1</version>
				<type>pom</type>
				<scope>import</scope>
			</dependency>
		</dependencies>
	</dependencyManagement>
</project>
2 创建 Application Service 服务提供者 Module
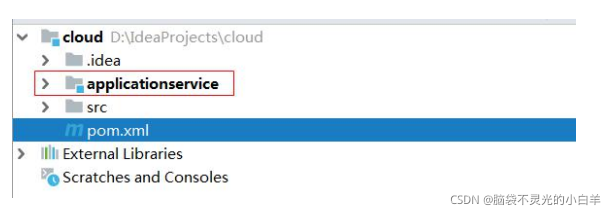
3 开发服务提供者 - Application Service
3.1 POM 依赖
<?xml version="1.0" encoding="UTF-8"?>
<project xmlns="http://maven.apache.org/POM/4.0.0"
	xmlns:xsi="http://www.w3.org/2001/XMLSchema-instance"
	xsi:schemaLocation="http://maven.apache.org/POM/4.0.0
http://maven.apache.org/xsd/maven-4.0.0.xsd">
	<parent>
		<artifactId>cloud</artifactId>
		<groupId>com.bjsxt</groupId>
		<version>1.0-SNAPSHOT</version>
	</parent>
	<modelVersion>4.0.0</modelVersion>
	<artifactId>applicationservice</artifactId>
	<dependencies>
		<dependency>
			<groupId>org.springframework.boot</groupId>
			<artifactId>spring-boot-starter-web</artifactId>
		</dependency>
		<dependency>
			<groupId>org.springframework.cloud</groupId>
			<artifactId>spring-cloud-starter-netflix-eureka-client</artifactId>
		</dependency>
	</dependencies>
</project>
3.2 服务提供者代码
package com.bjsxt.controller;

import org.springframework.web.bind.annotation.GetMapping;
import org.springframework.web.bind.annotation.RestController;

@RestController
public class ServiceController {


@GetMapping
public Object first(){


		return "测试 Spring Cloud Netflix Ribbon 开发服务提供者";
	}
}
3.3 配置文件 application.yml
#配置运行端口号
server:
	port: 8081
#配置应用名称
spring:
	application:
		name: application-service
#指定注册中心地址
eureka:
	client:
		service-url:
		# 配置注册中心地址。如果注册中心为多个,则配置多行地址。
		# 注册中心地址格式为: http://ip:port/eureka/
	defaultZone:
		- http://eureka1:8761/eureka/
		- http://eureka2:8761/eureka/
3.4 启动类
package com.bjsxt;

import org.springframework.boot.SpringApplication;
import org.springframework.boot.autoconfigure.SpringBootApplication;
import org.springframework.cloud.netflix.eureka.EnableEurekaClient;

/**
* @EnableEurekaClient 注解 - 在 Spring Cloud 低版本开发中,每个 Eureka Client
应用启动类上都必须增加此注解。
* 代表当前应用是一个 Eureka Client 应用,即需要通过 Eureka Server 注册或发现服务。
*/

@SpringBootApplication
public class ServiceApp {


	public static void main(String[] args) {


		SpringApplication.run(ServiceApp.class, args);
	}
}
3.5 检查 Eureka Server 中的服务注册情况


4 创建 Application Client 服务消费
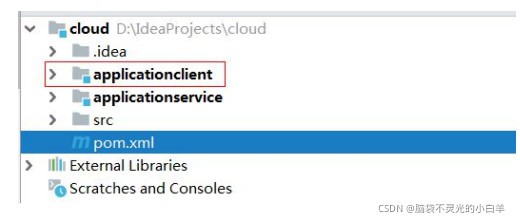
5 开发服务消费者 - Application Client
5.1 POM 依赖
<?xml version="1.0" encoding="UTF-8"?>
<project xmlns="http://maven.apache.org/POM/4.0.0"
	xmlns:xsi="http://www.w3.org/2001/XMLSchema-instance"
	xsi:schemaLocation="http://maven.apache.org/POM/4.0.0
http://maven.apache.org/xsd/maven-4.0.0.xsd">
	<parent>
		<artifactId>cloud</artifactId>
		<groupId>com.bjsxt</groupId>
		<version>1.0-SNAPSHOT</version>
	</parent>
	<modelVersion>4.0.0</modelVersion>
	<artifactId>applicationclient</artifactId>
	<dependencies>
		<dependency>
			<groupId>org.springframework.boot</groupId>
			<artifactId>spring-boot-starter-web</artifactId>
		</dependency>
		<dependency>
			<groupId>org.springframework.cloud</groupId>
			<artifactId>spring-cloud-starter-netflix-eureka-client</artifactId>
		</dependency>
	</dependencies>
</project>
5.2 服务消费者代码
5.2.1 服务接口
package com.bjsxt.service;
public interface ClientService {


    String getInfo();

}
5.2.2 服务实现
package com.bjsxt.service.impl;

import com.bjsxt.service.ClientService;
import org.springframework.beans.factory.annotation.Autowired;
import org.springframework.cloud.client.ServiceInstance;
import org.springframework.cloud.client.loadbalancer.LoadBalancerClient;
import org.springframework.core.ParameterizedTypeReference;
import org.springframework.http.HttpMethod;
import org.springframework.http.ResponseEntity;
import org.springframework.stereotype.Service;
import org.springframework.web.client.RestTemplate;

@Service
public class ClientServiceImpl implements ClientService {


	@Autowired
	private LoadBalancerClient loadBalancerClient;
	/**
	* ribbon 负载均衡器,其中记录了从 Eureka Server 中获取	的所有服务信息。
	*/
	@Override
	public String getInfo() {


	/*
	* ServiceInstance 封装了服务的基本信息,如 IP,端口
	* 在 Spring Cloud 中,对所有注册到 Eureka Server 中的服务都称为一个
	* service instance 服务实例。
	* 一个服务实例,就是一个有效的,可用的,服务单体实例或集群实例。
	* 每个 service instance 都和 spring application name 对应。
	* 可以通过 spring application name 查询 service instance
	*/
	ServiceInstance si =
		this.loadBalancerClient.choose("application-service");
        //创建RestTemplate对象
        RestTemplate restTemplate = new RestTemplate();
        // 拼接访问服务的URL  http://ip:port/
        StringBuilder sb = new StringBuilder();
        sb.append("http://").append(si.getHost()).append(":").append(si.getPort());
        System.out.println("本次访问的 service 是: " + sb.toString());

        ResponseEntity<String> response = restTemplate.exchange(sb.toString(), HttpMethod.GET, null, String.class);
        return response.getBody();
    }
}
5.2.3 控制器
package com.bjsxt.controller;

import com.bjsxt.service.ClientService;
import org.springframework.beans.factory.annotation.Autowired;
import org.springframework.web.bind.annotation.GetMapping;
import org.springframework.web.bind.annotation.RestController;

@RestController
public class ClientController {


    @Autowired
    private ClientService clientService;
    @GetMapping
    public String showInfo(){


        return clientService.getInfo();
    }
}
5.3 配置文件 application.yml
server:
	port: 8082
spring:
	application:
		name: application-client
eureka:
	client:
		service-url:
			defaultZone:
				- http://eureka1:8761/eureka/
				- http://eureka2:8761/eureka/
5.4 启动类
package com.bjsxt;

import org.springframework.boot.SpringApplication;
import org.springframework.boot.autoconfigure.SpringBootApplication;

@SpringBootApplication
public class ClientApp {


	public static void main(String[] args) {


		SpringApplication.run(ClientApp.class, args);
	}
}
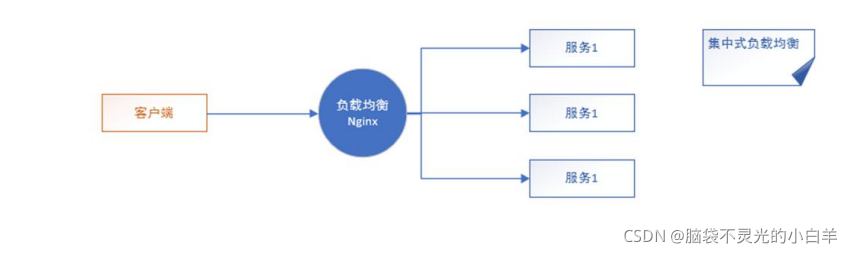
三、 集中式与进程内负载均衡区别
业界主流的负载均衡解决方案有:集中式负载均衡和进程内负载均衡。
1 集中式负载均衡
即在客户端和服务端之间使用独立的负载均衡设施(可以是硬件,如 F5, 也可以是软件,如 nginx), 由该设施负责把访问请求通过某种策略转发至服务端。
2 进程内负载均衡
将负载均衡逻辑集成到客户端组件中,客户端组件从服务注册中心获知有哪些地址可用,然后自己再从这些地址中选择出一个合适的服务端发起请求。Ribbon 就是一个进程内的负载均衡实现。
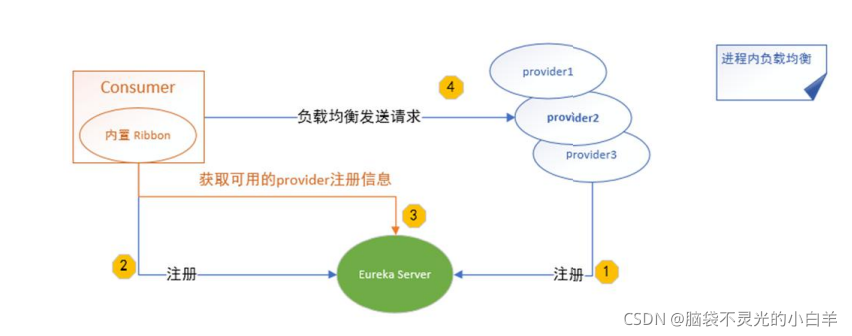
四、 Ribbon 常见的负载均衡策略
Ribbon 就属于进程内负载均衡,它只是一个类库,集成于 Eureka Client 进程,Eureka Client进程通过访问注册中心Eureka Server发现服务列表,发现的服务列表信息是由ribbon
来管理的。当访问 Application Service 的时候,Application Client 会通过 ribbon 来找到合适的 Application Service 地址信息,并发起远程调用请求。
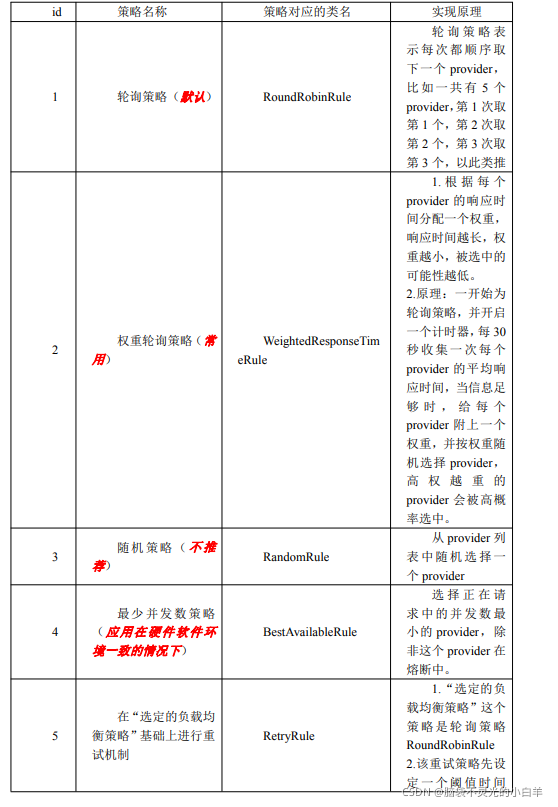
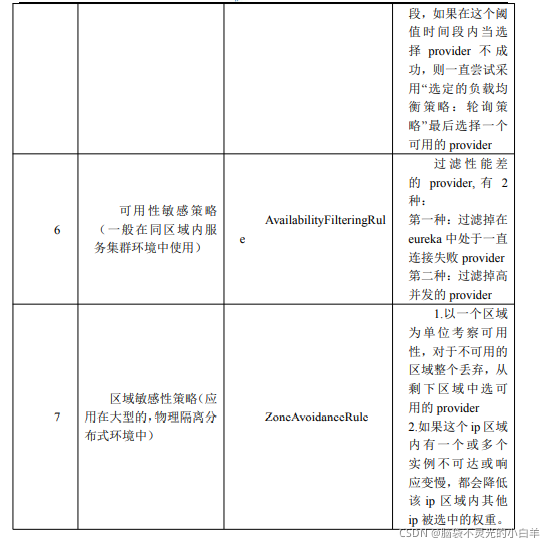
1 Ribbon 中的常用负载均衡简介
ribbon 的负载均衡策略是通过不同的类型来实现的,下表详细介绍一些常用负载均衡策略及对应的 Ribbon 策略类。
2 配置负载均衡策略
可以通过修改Application Client应用的全局配置文件来改变当前环境中使用的Ribbon负载均衡策略。
#配置运行端口号
server:
  port: 8082
#配置应用名称
spring:
  application:
    name: application-service
#指定注册中心地址
eureka:
  client:
    service-url:
      defaultZone: http://eureka1:8761/eureka/,http://eureka2:8761/eureka/


# 设置负载均衡策略。application-service 为设置负载均衡的服务名称
application-service:
	ribbon:
		NFLoadBalancerRuleClassName: com.netflix.loadbalancer.RandomRule
五、 Ribbon 的点对点直连
Ribbon 也可以脱离 Eureka Server 注册中心,通过配置的方式指定要调用的远程服务信息,实现 Ribbon 点对点直连。修改的配置内容如下:
server:
	port: 8082
spring:
	application:
		name: application-client
# application-service : 要点对点直连的远程服务命名
application-service:
	ribbon:
		# 远程服务地址
		listOfServers: localhost:8081
# 关闭 ribbon 自动访问 eureka server 的功能。
ribbon:
	eureka:
		enabled: fals
Spring Cloud Openfeign
主要内容
Openfeign 简介
Openfeign 的请求参数处理
Openfeign 的性能优化
配置 Openfeign 负载均衡请求超时时间
一、 Openfeign 简介
Openfeign 是一种声明式、模板化的 HTTP 客户端(仅在 Application Client中使用)。声明式调用是指,就像调用本地方法一样调用远程方法,无需感知操作远程 http 请求。
Spring Cloud 的声明式调用, 可以做到使用 HTTP 请求远程服务时能就像调用本地方法一样的体验,开发者完全感知不到这是远程方法,更感知不到这是个 HTTP 请求。Openfeign 的应用,让 Spring Cloud 微服务调用像 Dubbo 一样,Application Client 直接通过接口方法远程调用 Application Service,而不需要通过常规的 RestTemplate 构造请求再解析返回数据。它解决了让开发者调用远程接口就跟调用本地方法一样,无需关注与远程的交
互细节,更无需关注分布式环境开发。
1 使用 Feign 技术开发时的应用部署结构
在使用 Openfeign 技术开发 Spring Cloud 微服务时,需要先抽取要注册发布的服务标准,将这套标准通过接口的形式定义出来。
在 Application Service 端开发中,依赖抽取的服务标准接口工程,并对接口给予实现。
在 Application Client 端开发中,依赖抽取的服务标准接口工程,并应用接口信息和 Openfeign 技术,实现远程服务的调用。
在整体微服务开发中,Eureka Server 作为注册中心必不可少,注册中心的作用不变,仍旧是注册和发现服务。
二、 Openfeign 的请求参数处理
1 创建 Eureka Cl工程
1.1 POM 依赖
<?xml version="1.0" encoding="UTF-8"?>
<project xmlns="http://maven.apache.org/POM/4.0.0"
	xmlns:xsi="http://www.w3.org/2001/XMLSchema-instance"
	xsi:schemaLocation="http://maven.apache.org/POM/4.0.0
http://maven.apache.org/xsd/maven-4.0.0.xsd">
	<modelVersion>4.0.0</modelVersion>
	<packaging>pom</packaging>
	<modules>
		<module>serviceapi</module>
	</modules>
	<parent>
		<groupId>org.springframework.boot</groupId>
		<artifactId>spring-boot-starter-parent</artifactId>
		<version>2.2.2.RELEASE</version>
	</parent>
	<groupId>com.bjsxt</groupId>
	<artifactId>cloud</artifactId>
	<version>1.0-SNAPSHOT</version>
	<dependencyManagement>
		<dependencies>
			<dependency>
				<groupId>org.springframework.cloud</groupId>
				<artifactId>spring-cloud-dependencies</artifactId>
				<version>Hoxton.SR1</version>
				<type>pom</type>
				<scope>import</scope>
			</dependency>
		</dependencies>
	</dependencyManagement>
</project>
2 创建 Service API 服务标准 Module
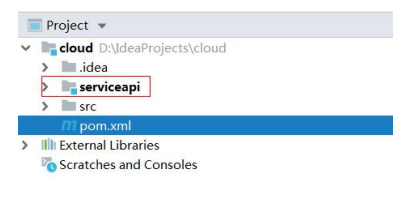
3 开发服务标准 - Service API
3.1 POM 依赖
<?xml version="1.0" encoding="UTF-8"?>
<project xmlns="http://maven.apache.org/POM/4.0.0"
	xmlns:xsi="http://www.w3.org/2001/XMLSchema-instance"
	xsi:schemaLocation="http://maven.apache.org/POM/4.0.0
http://maven.apache.org/xsd/maven-4.0.0.xsd">
	<parent>
		<artifactId>cloud</artifactId>
		<groupId>com.bjsxt</groupId>
		<version>1.0-SNAPSHOT</version>
	</parent>
	<modelVersion>4.0.0</modelVersion>

	<artifactId>serviceapi</artifactId>
	<dependencies>
		<dependency>
			<groupId>org.springframework.boot</groupId>
			<artifactId>spring-boot-starter-web</artifactId>
		</dependency>
	</dependencies>
</project>
3.2 测试自定义参数类型
package com.bjsxt.entity;

import java.io.Serializable;
import java.util.Objects;

public class User implements Serializable {


	private Integer id;
	private String username;
	private String remark;

	public User(){

    }

	@Override
	public boolean equals(Object o) {


		if (this == o) return true;
		if (o == null || getClass() != o.getClass()) return false;
		User user = (User) o;
		return Objects.equals(id, user.id) &&
			Objects.equals(username, user.username) &&
			Objects.equals(remark, user.remark);
	}
	@Override
	public int hashCode() {


		return Objects.hash(id, username, remark);
	}
	public Integer getId() {


		return id;
	}
	public void setId(Integer id) {


		this.id = id;
	}
	public String getUsername() {


		return username;
	}
	public void setUsername(String username) {


		this.username = username;
	}
	public String getRemark() {


		return remark;
	}
	public void setRemark(String remark) {


		this.remark = remark;
	}
}
3.3 服务接口定义
package com.bjsxt.serviceapi;

import com.bjsxt.entity.User;
import org.springframework.web.bind.annotation.*;

import java.util.List;

public interface FirstServiceAPI {


	/**
	* 测试 GET 请求的方法。
	* 请求不传递任何的参数。
	*/
	@RequestMapping(value="/test", method= RequestMethod.GET)
	public List<String> testFeign();
	/**
	* 测试 GET 请求传递一个普通的参数。 /get?id=xxx&name=yyy
	* 在为 Feign 定义服务标准接口的时候,处理请求参数的方法参数,必须使用@RequestParam 注解描述。
	* 且,无论方法参数名和请求参数名是否一致,都需要定义@RequestParam 注解的value/name 属性。
	*/
	@GetMapping(value="/get")
	public User getMultiParams(@RequestParam(value = "id") Integer id,
	@RequestParam("name") String name);
	/**
	* 测试使用 POST 请求传递普通参数
	* 如果使用 POST 方式发起请求,传递多个普通参数,是使用请求头传递的参数。可以使用@RequestParam 注解来处理请求参数。
	*/
	@PostMapping(value="/post")
	public User postMultiParams(@RequestParam(value = "id") Integer id,@RequestParam("name") String name);
	/**
	* 使用 POST 请求传递自定义类参数。
	* 必须使用@RequestBody 处理。
	*/
	@PostMapping(value="/postObjectParam")
	public User postObjectParam(@RequestBody User pojo);
}
4 创建 Application Service 服务提供者 Module
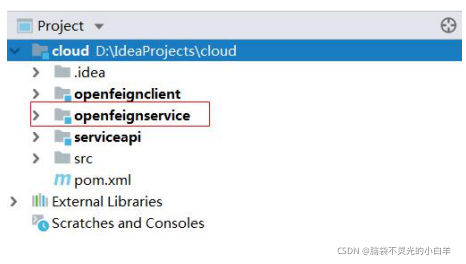
5 开发服务提供者 - Application Service
5.1 POM 依赖
<?xml version="1.0" encoding="UTF-8"?>
<project xmlns="http://maven.apache.org/POM/4.0.0"
	xmlns:xsi="http://www.w3.org/2001/XMLSchema-instance"
	xsi:schemaLocation="http://maven.apache.org/POM/4.0.0
http://maven.apache.org/xsd/maven-4.0.0.xsd">

	<parent>
		<artifactId>cloud</artifactId>
		<groupId>com.bjsxt</groupId>
		<version>1.0-SNAPSHOT</version>
	</parent>
	<modelVersion>4.0.0</modelVersion>

	<artifactId>openfeignservice</artifactId>
	<dependencies>
		<dependency>
			<groupId>org.springframework.boot</groupId>
			<artifactId>spring-boot-starter-web</artifactId>
		</dependency>
		<dependency>
			<groupId>org.springframework.cloud</groupId>
			<artifactId>spring-cloud-starter-netflix-eureka-client</artifactId>
		</dependency>
		<dependency>
			<groupId>com.bjsxt</groupId>
			<artifactId>serviceapi</artifactId>
			<version>1.0-SNAPSHOT</version>
		</dependency>
	</dependencies>
</project>
5.2 服务标准实现
package com.bjsxt.controller;

import com.bjsxt.entity.User;
import com.bjsxt.serviceapi.FirstServiceAPI;
import org.springframework.web.bind.annotation.RestController;

import java.util.Arrays;
import java.util.List;

/**
* 对外提供服务的 Application Service。
* 不能随便的定义服务。如果想让 Application Client 可以通过 Openfeign 技术访问当前类型提供的服务,
* 则必须遵循服务标准 - Service API
*/
@RestController
public class OpenfeignServiceController implements FirstServiceAPI {


	@Override
	public List<String> testFeign() {


		return Arrays.asList("测试 Openfeign", "此为返回结果");
	}
	@Override
	public User getMultiParams(Integer id, String name) {


		System.out.println("getMultiParams method run, parameters is [ id : " +
		id + " ; name : " + name + " ]");
		User user = new User();
		user.setId(id);
		user.setUsername(name);
		return user;
	}

	@Override
	public User postMultiParams(Integer id, String name) {


		System.out.println("postMultiParams method run, parameters is [ id : "
		+ id + " ; name : " + name + " ]");
		User user = new User();
		user.setId(id);
		user.setUsername(name);
		return user;
	}
	@Override
	public User postObjectParam(User pojo) {


		System.out.println("postObjectParam method run, parameters is [ " + pojo+ " ]");
		return pojo;
	}
}
5.3 配置文件 application.yml
server:
	port: 8081
spring:
	application:
		name: openfeign-service
eureka:
	client:
		service-url:
			- http://localhost:8761/eureka/
5.4 启动类
package com.bjsxt;

import org.springframework.boot.SpringApplication;
import org.springframework.boot.autoconfigure.SpringBootApplication;

@SpringBootApplication
public class OpenfeignServiceApp {


	public static void main(String[] args) {


		SpringApplication.run(OpenfeignServiceApp.class, args);
	}
}
6 创建 Application Client 服务消费者 Module
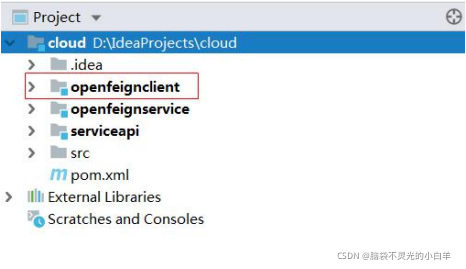
7 开发服务消费者 - Application Client
7.1 POM 依赖
<?xml version="1.0" encoding="UTF-8"?>
<project xmlns="http://maven.apache.org/POM/4.0.0"
	xmlns:xsi="http://www.w3.org/2001/XMLSchema-instance"
	xsi:schemaLocation="http://maven.apache.org/POM/4.0.0
http://maven.apache.org/xsd/maven-4.0.0.xsd">
	<parent>
		<artifactId>cloud</artifactId>
		<groupId>com.bjsxt</groupId>
		<version>1.0-SNAPSHOT</version>
	</parent>
	<modelVersion>4.0.0</modelVersion>
	<artifactId>openfeignclient</artifactId>
	<dependencies>
		<dependency>
			<groupId>org.springframework.boot</groupId>
			<artifactId>spring-boot-starter-web</artifactId>
		</dependency>
		<dependency>
			<groupId>org.springframework.cloud</groupId>
			<artifactId>spring-cloud-starter-netflix-eureka-client</artifactId>
		</dependency>
		<dependency>
			<groupId>org.springframework.cloud</groupId>
			<artifactId>spring-cloud-starter-openfeign</artifactId>
		</dependency>
		<dependency>
			<groupId>com.bjsxt</groupId>
			<artifactId>serviceapi</artifactId>
			<version>1.0-SNAPSHOT</version>
		</dependency>
	</dependencies>
</project>
7.2 本地服务接口
package com.bjsxt.service;

import com.bjsxt.serviceapi.FirstServiceAPI;
import org.springframework.cloud.openfeign.FeignClient;

/**
* 本地接口,继承服务标准接口。
* 在接口上增加注解@FeignClient,代表当前接口是一个 Openfeign 技术中的服务消费端。
* 属性 name|value - 代表当前的 FeignClient 在请求 application service 的时候,是访问哪一个服务
* 所谓的哪一个服务,就是 application service 全局配置文件中的spring.application.name 属性值。
*/
@FeignClient("openfeign-service")
public interface FirstClientService extends FirstServiceAPI {


}
7.3 控制器开发
package com.bjsxt.controller;

import com.bjsxt.entity.User;
import com.bjsxt.service.FirstClientService;
import org.springframework.beans.factory.annotation.Autowired;
import org.springframework.web.bind.annotation.GetMapping;
import org.springframework.web.bind.annotation.RestController;

import java.util.List;

@RestController
public class FirstClientController
	@Autowired
	private FirstClientService firstClientService;

	@GetMapping(value="/test")
	public List<String> testFeign() {


		return this.firstClientService.testFeign();
	}

	@GetMapping(value="/get")
	public User getMultiParams(Integer id, String name) {


		return this.firstClientService.getMultiParams(id, name);
	}

	@GetMapping(value="/post")
	public User postMultiParams(Integer id, String name) {


		return this.firstClientService.postMultiParams(id, name);
	}

	@GetMapping(value="/postObjectParam")
	public User postObjectParam(User pojo) {


		return this.firstClientService.postObjectParam(pojo);
	}
}
7.4 配置文件 application.yml
server:
	port: 8082
spring:
	application:
		name: openfeign-client
eureka:
	client:
	service-url:
		- http://localhost:8761/eureka/
7.5 启动类
package com.bjsx;

import org.springframework.boot.SpringApplication;
import org.springframework.boot.autoconfigure.SpringBootApplication;
import org.springframework.cloud.openfeign.EnableFeignClients;

/**
* @EnableFeignClients - 描述当前应用是一个使用 Openfeign 技术开发的服务消费端。
* 属性 backPackage - 扫描的包,即使用@FeignClient 描述的接口所在包。此属性可
省略,默认扫描当前工程所有包。
*/

@SpringBootApplication
@EnableFeignClients(basePackages = "com.bjsxt.service")
public class OpenfeignClientApp {


	public static void main(String[] args) {


		SpringApplication.run(OpenfeignClientApp.class, args);
	}
}
8 参数处理简单总结
在 Openfeign 处理远程服务调用时,传递参数是通过 HTTP 协议传递的,参数存在的位置是请求头或请求体中。请求头传递的参数必须依赖@RequestParam 注解来处理请求参数,请求体传递的参数必须依赖@RequestBody 注解来处理请求参数。
三、 Openfeign 的性能优化
1 GZIP 简介
gzip 介绍:gzip 是一种数据格式,采用用 deflate 算法压缩数据;gzip 是一种流行的数据压缩算法,应用十分广泛,尤其是在 Linux 平台。
gzip 能力:当 Gzip 压缩到一个纯文本数据时,效果是非常明显的,大约可以减少 70%以上的数据大小。
gzip 作用:网络数据经过压缩后实际上降低了网络传输的字节数,最明显的好处就是可以加快网页加载的速度。网页加载速度加快的好处不言而喻,除了节省流量,改善用户的浏览体验外,另一个潜在的好处是 Gzip 与搜索引擎的抓取工具有着更好的关系。例如Google 就可以通过直接读取 gzip 文件来比普通手工抓取更快地检索网页。
2 HTTP 协议中的压缩传输简介
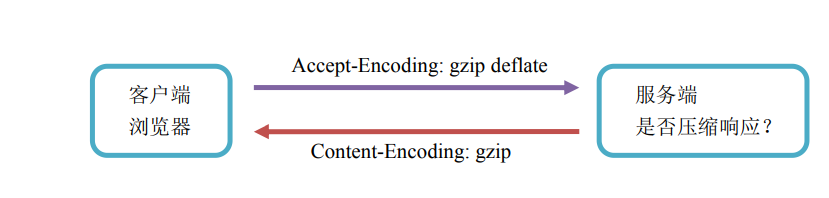
第一:客户端向服务器请求头中带有:Accept-Encoding:gzip, deflate 字段,向服务器表示,客户端支持的压缩格式(gzip 或者 deflate),如果不发送该消息头,服务器是不会压缩的。
第二:服务端在收到请求之后,如果发现请求头中含有 Accept-Encoding 字段,并且支持该类型的压缩,就对响应报文压缩之后返回给客户端,并且携带Content-Encoding:gzip消息头,表示响应报文是根据该格式压缩过的。
第三:客户端接收到响应之后,先判断是否有 Content-Encoding 消息头,如果有,按该格式解压报文。否则按正常报文处理。
3 在 Openfeign 技术中应用 GZIP 压缩
在 Spring Cloud 微服务体系中,一次请求的完整流程如下:
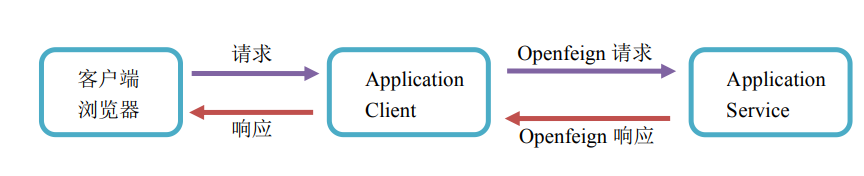
在整体流程中,如果使用 GZIP 压缩来传输数据,涉及到两次请求-应答。而这两次请求-应答的连接点是 Application Client,那么我们需要在 Application Client 中配置开启 GZIP压缩,来实现压缩数据传输。
3.1 只配置 Openfeign 请求-应答中的 GZIP 压缩
只开启 Feign 请求-应答过程中的 GZIP,也就是浏览器-Application Client 之间的请求应答不开启 GZIP 压缩。
在全局配置文件中,使用下述配置来实现 Openfeign 请求-应答的 GZIP 压缩
server:
	port: 8082
spring:
	application:
		name: openfeign-client
eureka:
	client:
		service-url:
			- http://localhost:8761/eureka/
#Feign性能优化(Gzip压缩)
feign:
	compression:
		request:
		# 开启请求 GZIP
		enabled: true
		# 设置支持 GZIP 压缩的 MIME 类型,即请求/响应类型。
		mime-types:
			- text/xml
			- application/xml
			- application/json
		# 配置启动压缩数据的最小阀值,单位字节。默认为 2048
		min-request-size: 512
	# 开启响应 GZIP
	response:
		enabled: true
3.2 配置全局 GZIP 压缩
在全局配置文件中配置下述内容,来开启所有请求-应答中的 GZIP 压缩,这里使用的是 Spring Boot 中的 GZIP 技术。在 Spring Boot 中已经集成了 GZIP 压缩技术,并对所有的请求-应答实现 GZIP 数据压缩。工程中已经依赖了 Spring Boot 技术,所以在配置文件中可以开启 Spring Boot 中的 GZIP 压缩技术,对完整流程中所有相关的请求-应答开启 GZIP压缩。
server:
	port: 8082
	compression:
	# 开启 GZIP
	enabled: true
	# 设置支持 GZIP 压缩的 MIME 类型,即请求/响应类型。
	mime-types:
		- application/json
		- application/xml
		- text/html
		- text/xml
		- text/plain
	# 配置启动压缩数据的最小阀值,单位字节。默认为 2048
	min-response-size: 512
spring:
	application:
		name: openfeign-client
eureka:
	client:
		service-url:
		- http://localhost:8761/eureka/
feign:
	compression:
		request:
			# 开启请求 GZIP
			enabled: true
			# 设置支持 GZIP 压缩的 MIME 类型,即请求/响应类型。
			mime-types:
				- text/xml
				- application/xml
				- application/json
			# 配置启动压缩数据的最小阀值,单位字节。默认为 2048
			min-request-size: 512
		# 开启响应 GZIP
		response:
			enabled: true
四、 配置 Openfeign 负载均衡请求超时时间
Openfeign 技术底层是通过 Ribbon 技术实现的,那么在负载均衡和超时时间配置上,主要对 Ribbon 的配置。具体配置如下:
1 超时时间配置
ribbon:
	# 请求连接的超时时间,单位毫秒,默认的时间为 1 秒
	ConnectTimeout: 1000
	# 请求处理的超时时间,单位毫秒,默认的时间为 1 秒
	ReadTimeout: 1000
2 负载均衡配置
# 设置负载均衡策略(随机,默认是轮询)。openfeign-service 为设置负载均衡的服务名称
openfeign-service:
	ribbon:
		NFLoadBalancerRuleClassName: com.netflix.loadbalancer.RandomRule
Spring Cloud Netflix Hystrix
主要内容
Hystrix 简介
服务降级
服务熔断
请求缓存
Feign 的雪崩处理
可视化的数据监控 Hystrix-dashboar
一、 Hystrix 简介
1 什么是灾难性雪崩效应
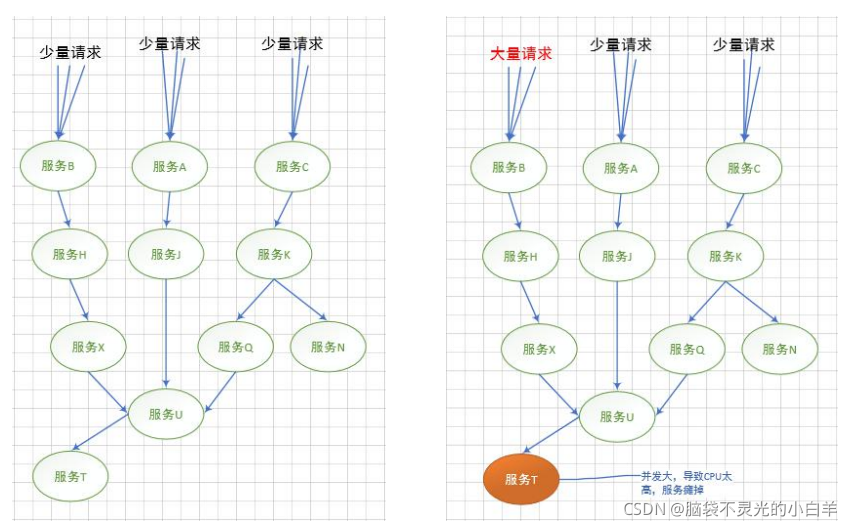
造成灾难性雪崩效应的原因,可以简单归结为下述三种:
- 服务提供者不可用。如:硬件故障、程序 BUG、缓存击穿、并发请求量过大等。
- 重试加大流量。如:用户重试、代码重试逻辑等。
- 服务调用者不可用。如:同步请求阻塞造成的资源耗尽等。
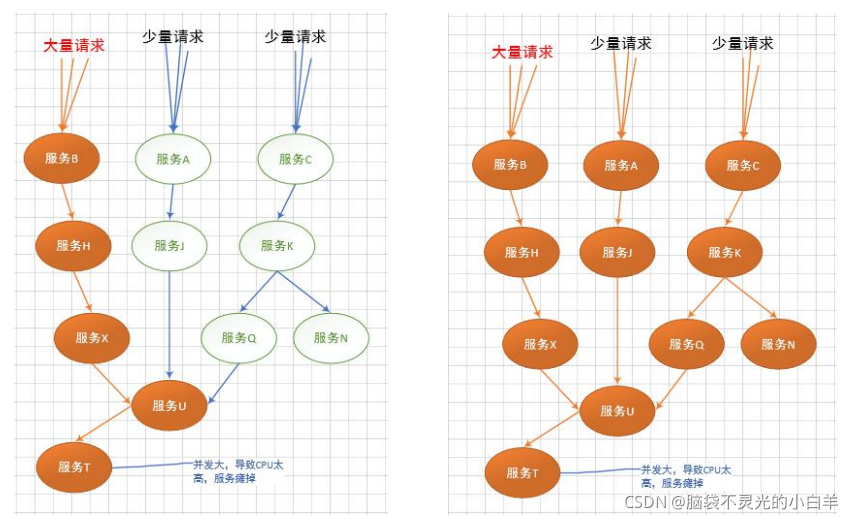
雪崩效应最终的结果就是:服务链条中的某一个服务不可用,导致一系列的服务不可用,最终造成服务逻辑崩溃。这种问题造成的后果,往往是无法预料的。
解决灾难性雪崩效应的方式通常有:降级、熔断和请求缓存。
2 什么是 Hystrix
Hystrix [hɪst’rɪks],中文含义是豪猪,因其背上长满棘刺,从而拥有了自我保护的能力。本文所说的 Hystrix 是 Netflix 开源的一款容错框架,同样具有自我保护能力。为了实现容错和自我保护,下面我们看看 Hystrix 如何设计和实现的。
Hystrix 设计目标:
1、 对来自依赖的延迟和故障进行防护和控制——这些依赖通常 都是通过网络访问的
2、 阻止故障的连锁反应
3、 快速失败并迅速恢复
4、 回退并优雅降级
5、 提供近实时的监控与告警
Hystrix 遵循的设计原则:
1、 防止任何单独的依赖耗尽资源(线程)
2、 过载立即切断并快速失败,防止排队
3、 尽可能提供回退以保护用户免受故障
4、 使用隔离技术(例如隔板,泳道和断路器模式)来限制任何一个依赖的影响
5、 通过近实时的指标,监控和告警,确保故障被及时发现
6、 通过动态修改配置属性,确保故障及时恢复
7、 防止整个依赖客户端执行失败,而不仅仅是网络通信
Hystrix 如何实现这些设计目标?
1、 使用命令模式将所有对外部服务(或依赖关系)的调用包装在 HystrixCommand或 HystrixObservableCommand 对象中,并将该对象放在单独的线程中执行;
2、 每个依赖都维护着一个线程池(或信号量),线程池被耗尽则拒绝请求(而不是让请求排队)。
3、 记录请求成功,失败,超时和线程拒绝。
4、 服务错误百分比超过了阈值,熔断器开关自动打开,一段时间内停止对该服务的所有请求。
5、 请求失败,被拒绝,超时或熔断时执行降级逻辑。
6、 近实时地监控指标和配置的修改
在 Spring cloud 中处理服务雪崩效应,都需要依赖 hystrix 组件。在 Application Client应用的 pom 文件中都需要引入下述依赖
<dependency>
	<groupId>org.springframework.cloud</groupId>
	<artifactId>spring-cloud-starter-netflix-hystrix</artifactId>
</dependency>
二、 服务降级
降级是指,当请求超时、资源不足等情况发生时进行服务降级处理,不调用真实服务逻辑,而是使用快速失败(fallback)方式直接返回一个托底数据,保证服务链条的完整,避免服务雪崩。
解决服务雪崩效应,都是避免 application client 请求 application service 时,出现服务调用错误或网络问题。处理手法都是在 application client 中实现。我们需要在 application client 相 关 工 程 中 导 入 hystrix 依 赖 信 息 。 并 在 对 应 的 启 动 类 上 增 加 新 的 注 解@EnableCircuitBreaker,这个注解是用于开启 hystrix 熔断器的,简言之,就是让代码中的hystrix 相关注解生效。
具体实现过程如下:
1 修改 application service 代码
修改 application service 工程中的代码,模拟超时错误。此模拟中,让服务端代码返回之前休眠 2000 毫秒,替代具体的复杂服务逻辑。
package com.bjsxt.controller;

import org.springframework.web.bind.annotation.GetMapping;
import org.springframework.web.bind.annotation.RestController;

@RestController
public class ServiceController {


	@GetMapping
	public Object first(){


		try {


			// 用于模拟远程服务调用延时。
			Thread.sleep(2000);
		} catch (InterruptedException e) {


			e.printStackTrace();
		}
		return "测试 Spring Cloud Netflix Ribbon 开发服务提供者";
	}
}
2 application client POM 依赖
<?xml version="1.0" encoding="UTF-8"?>
<project xmlns="http://maven.apache.org/POM/4.0.0"
	xmlns:xsi="http://www.w3.org/2001/XMLSchema-instance"
	xsi:schemaLocation="http://maven.apache.org/POM/4.0.0
http://maven.apache.org/xsd/maven-4.0.0.xsd">
	<parent>
		<artifactId>cloudhystrix</artifactId>
		<groupId>com.bjsxt</groupId>
		<version>1.0-SNAPSHOT</version>
	</parent>
	<modelVersion>4.0.0</modelVersion>
	<artifactId>applicationclient</artifactId>
	<dependencies>
		<dependency>
			<groupId>org.springframework.boot</groupId>
			<artifactId>spring-boot-starter-web</artifactId>
		</dependency>
		<dependency>
			<groupId>org.springframework.cloud</groupId>
			<artifactId>spring-cloud-starter-netflix-eureka-client</artifactId>
		</dependency>
		<dependency>
			<groupId>org.springframework.cloud</groupId>
			<artifactId>spring-cloud-starter-netflix-hystrix</artifactId>
		</dependency>
	</dependencies>
</project>
3 application client 容错处理代码
package com.bjsxt.service.impl;

import com.bjsxt.service.ClientService;
import com.netflix.hystrix.contrib.javanica.annotation.HystrixCommand;
import org.springframework.beans.factory.annotation.Autowired;
import org.springframework.cloud.client.ServiceInstance;
import org.springframework.cloud.client.loadbalancer.LoadBalancerClient;
import org.springframework.core.ParameterizedTypeReference;
import org.springframework.http.HttpMethod;
import org.springframework.http.ResponseEntity;
import org.springframework.stereotype.Service;
import org.springframework.web.client.RestTemplate;

@Service
public class ClientServiceImpl implements ClientService {


	@Autowired
	private LoadBalancerClient loadBalancerClient;
	/**
	* @HystrixCommand - 开启 Hystrix 容错处理的注解。代表当前方法如果出现服务调用问题,使用 Hystrix 容错处理逻辑来处理
	* 属性 fallbackMethod - 如果当前方法调用服务,远程服务出现问题的时候,调用本地的哪个方法得到托底数据。
	*/
	@HystrixCommand(fallbackMethod = "downgradeFallback")
	@Override
	public String first() {


		ServiceInstance si =
			this.loadBalancerClient.choose("application-service");
		StringBuilder sb = new StringBuilder();
		sb.append("http://").append(si.getHost())
			.append(":").append(si.getPort()).append("/");

		System.out.println("本次访问的 service 是: " + sb.toString());

		RestTemplate rt = new RestTemplate();

		ParameterizedTypeReference<String> type =
		new ParameterizedTypeReference<String>() {


		};

		ResponseEntity<String> response =
		rt.exchange(sb.toString(), HttpMethod.GET, null, type);
		String result = response.getBody();

		return result;
	}
	// 本地容错方法,只有远程服务调用过程出现问题的时候,才会调用此方法,获取托底数据。保证服务完整性。
	private String downgradeFallback(){


		return "服务降级方法返回托底数据";
	}
}
4 application client 配置文件 application.yml
server:
	port: 8082
spring:
	application:
		name: application-clien
eureka:
	client:
		service-url:
			defaultZone:
				- http://localhost:8761/eureka/
# hystrix服务降级
hystrix:
	command:
		default:
			execution:
				timeout:
					# 如果 enabled 设置为 false,则请求超时交给 ribbon 控制,为 true,则超时作为容错根据
					enabled: true
				isolation:
					thread:
						timeoutInMilliseconds: 1000 # 超时时间,默认 1000ms
5 application client 启动类
package com.bjsxt;

import org.springframework.boot.SpringApplication;
import org.springframework.boot.autoconfigure.SpringBootApplication;
import org.springframework.cloud.client.circuitbreaker.EnableCircuitBreaker;

/**
* @EnableCircuitBreaker - 开启 Hystrix 容错处理能力。
* 如果不使用此注解,服务代码中的@HystrixCommand 注解无效。
*/
@SpringBootApplication
@EnableCircuitBreaker
public class ClientApp {


	public static void main(String[] args) {


		SpringApplication.run(ClientApp.class, args);
	}
}
三、 服务熔断
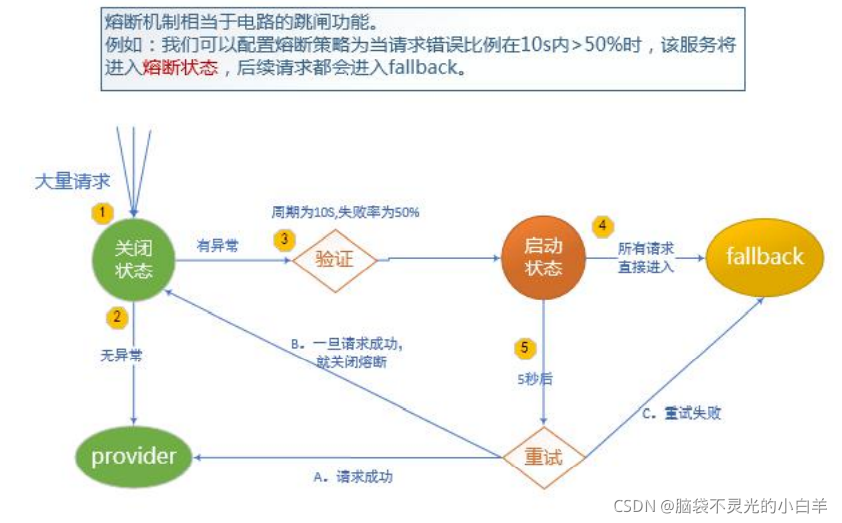
当一定时间内,异常请求比例(请求超时、网络故障、服务异常等)达到阀值时,启动熔断器,熔断器一旦启动,则会停止调用具体服务逻辑,通过 fallback 快速返回托底数据,保证服务链的完整。
熔断有自动恢复机制,如:当熔断器启动后,每隔 5 秒,尝试将新的请求发送给服务提供者,如果服务可正常执行并返回结果,则关闭熔断器,服务恢复。如果仍旧调用失败,则继续返回托底数据,熔断器持续开启状态。
具体实现过程如下:
1 application client POM 依赖
<?xml version="1.0" encoding="UTF-8"?>
<project xmlns="http://maven.apache.org/POM/4.0.0"
	xmlns:xsi="http://www.w3.org/2001/XMLSchema-instance"
	xsi:schemaLocation="http://maven.apache.org/POM/4.0.0
http://maven.apache.org/xsd/maven-4.0.0.xsd">
	<parent>
		<artifactId>cloudhystrix</artifactId>
		<groupId>com.bjsxt</groupId>
		<version>1.0-SNAPSHOT</version>
	</parent>
	<modelVersion>4.0.0</modelVersion>

	<artifactId>applicationclient</artifactId>
	<dependencies>
		<dependency>
			<groupId>org.springframework.boot</groupId>
			<artifactId>spring-boot-starter-web</artifactId>
		</dependency>
		<dependency>
			<groupId>org.springframework.cloud</groupId>
			<artifactId>spring-cloud-starter-netflix-eureka-client</artifactId>
		</dependency>
		<dependency>
			<groupId>org.springframework.cloud</groupId>
			<artifactId>spring-cloud-starter-netflix-hystrix</artifactId>
		</dependency>
	</dependencies>
</project>
2 application client 容错处理代码
package com.bjsxt.service.impl;

import com.bjsxt.service.ClientService;
import com.netflix.hystrix.contrib.javanica.annotation.HystrixCommand;
import com.netflix.hystrix.contrib.javanica.annotation.HystrixProperty;
import com.netflix.hystrix.contrib.javanica.conf.HystrixPropertiesManager;
import org.springframework.beans.factory.annotation.Autowired;
import org.springframework.cloud.client.ServiceInstance;
import org.springframework.cloud.client.loadbalancer.LoadBalancerClient;
import org.springframework.core.ParameterizedTypeReference;
import org.springframework.http.HttpMethod;
import org.springframework.http.ResponseEntity;
import org.springframework.stereotype.Service;
import org.springframework.web.client.RestTemplate;

@Service
public class ClientServiceImpl implements ClientService {


	@Autowired
	private LoadBalancerClient loadBalancerClient;

	/**
	* @HystrixCommand - 开启 Hystrix 容错处理的注解。代表当前方法如果出现服务调用问题,使用 Hystrix 容错处理逻辑来处理
	* 属性 fallbackMethod - 如果当前方法调用服务,远程服务出现问题的时候,调用本地的哪个方法得到托底数据。
	*/
	@HystrixCommand(fallbackMethod = "downgradeFallback",
		commandProperties = {


		// 默认 20 个;10s 内请求数大于 20 个时就启动熔断器,当请求符合熔断条件时将触发 fallback 逻辑
		@HystrixProperty(name = HystrixPropertiesManager.CIRCUIT_BREAKER_REQUEST_VOLUME_THRESHOLD, value ="10"),
		// 请求错误率大于 50%时就熔断,然后 for 循环发起请求,当请求符合熔断条件时将触发
		@HystrixProperty(name = HystrixPropertiesManager.CIRCUIT_BREAKER_ERROR_THRESHOLD_PERCENTAGE, value ="50"),
		// 默认 5 秒;熔断多少秒后去尝试请求
		@HystrixProperty(name = HystrixPropertiesManager.CIRCUIT_BREAKER_SLEEP_WINDOW_IN_MILLISECONDS, value ="5000")
		}
	)
	@Override
	public String first() {


		ServiceInstance si =
			this.loadBalancerClient.choose("application-service");
		StringBuilder sb = new StringBuilder();
		sb.append("http://").append(si.getHost())
			.append(":").append(si.getPort()).append("/");

		System.out.println("本次访问的 service 是: " + sb.toString());

		RestTemplate rt = new RestTemplate();

		ParameterizedTypeReference<String> type =
			new ParameterizedTypeReference<String>() {


		};
		ResponseEntity<String> response = rt.exchange(sb.toString(), HttpMethod.GET, null, type);
		String result = response.getBody();
		return result;
	}
	// 本地容错方法,只有远程服务调用过程出现问题的时候,才会调用此方法,获取托底数据。保证服务完整性。
	private String downgradeFallback(){


		return "服务降级方法返回托底数据";
	}
}
3 application client 配置文件application.yml
server:
	port: 8082
spring:
	application:
		name: application-client
eureka:
	client:
		service-url:
			defaultZone:
				- http://localhost:8761/eureka/
 hystrix:
	command:
		default:
			execution:
				timeout:
					# 如果 enabled 设置为 false,则请求超时交给 ribbon 控制,为 true,则超时作为容错根据
					enabled: true
				isolation:
					thread:
						timeoutInMilliseconds: 1000 # 超时时间,默认 1000ms
4 application client 启动类
package com.bjsxt;

import org.springframework.boot.SpringApplication;
import org.springframework.boot.autoconfigure.SpringBootApplication;
import org.springframework.cloud.client.circuitbreaker.EnableCircuitBreaker;

/**
* @EnableCircuitBreaker - 开启 Hystrix 容错处理能力。
* 如果不使用此注解,服务代码中的@HystrixCommand 注解无效。
*/
@SpringBootApplication
@EnableCircuitBreaker
public class ClientApp {


	public static void main(String[] args) {


		SpringApplication.run(ClientApp.class, args);
	}
}
四、 请求缓存
请求缓存:通常意义上说,就是将同样的 GET 请求结果缓存起来,使用缓存机制(如redis、mongodb)提升请求响应效率。
使用请求缓存时,需要注意非幂等性操作对缓存数据的影响。
请求缓存是依托某一缓存服务来实现的。在案例中使用 redis 作为缓存服务器,那么可以使用 spring-data-redis 来实现 redis 的访问操作。
1 修改 application service 代码
package com.bjsxt.controller;

import org.springframework.web.bind.annotation.GetMapping;
import org.springframework.web.bind.annotation.PostMapping;
import org.springframework.web.bind.annotation.RestController;

@RestController
public class ServiceController {


	@PostMapping("/testPost")
	public Object testPost(){


		System.out.println("testPost method run");
		return "写操作返回";
	}
	@GetMapping("/testGet")
	public Object testGet(){


		System.out.println("testGet method run");
		return "读操作返回";
	}
	@GetMapping
	public Object first(){


		System.out.println("run");
		try {


		// 用于模拟远程服务调用延时。
		Thread.sleep(2000);
		} catch (InterruptedException e) {


			e.printStackTrace();
		}
		return "测试 Spring Cloud Netflix Ribbon 开发服务提供者";
	}
}
2 application client POM依赖
<?xml version="1.0" encoding="UTF-8"?>
<project xmlns="http://maven.apache.org/POM/4.0.0"
	xmlns:xsi="http://www.w3.org/2001/XMLSchema-instance"
	xsi:schemaLocation="http://maven.apache.org/POM/4.0.0
http://maven.apache.org/xsd/maven-4.0.0.xsd">
	<parent>
		<artifactId>cloudhystrix</artifactId>
		<groupId>com.bjsxt</groupId>
		<version>1.0-SNAPSHOT</version>
	</parent>
	<modelVersion>4.0.0</modelVersion>

	<artifactId>applicationclient</artifactId>
	<dependencies>
		<dependency>
			<groupId>org.springframework.boot</groupId>
			<artifactId>spring-boot-starter-web</artifactId>
		</dependency>
		<dependency>
			<groupId>org.springframework.cloud</groupId>
			<artifactId>spring-cloud-starter-netflix-eureka-client</artifactId>
		</dependency>
		<dependency>
			<groupId>org.springframework.boot</groupId>
			<artifactId>spring-boot-starter-data-redis</artifactId>
		</dependency>
		<dependency>
			<groupId>org.springframework.cloud</groupId>
			<artifactId>spring-cloud-starter-netflix-hystrix</artifactId>
		</dependency>
	</dependencies>
</project>
3 application client 容错处理代码
package com.bjsxt.service.impl;

import com.bjsxt.service.ClientService;
import com.netflix.hystrix.contrib.javanica.annotation.HystrixCommand;
import com.netflix.hystrix.contrib.javanica.annotation.HystrixProperty;
import com.netflix.hystrix.contrib.javanica.conf.HystrixPropertiesManager;
import org.springframework.beans.factory.annotation.Autowired;
import org.springframework.cache.annotation.CacheConfig;
import org.springframework.cache.annotation.CacheEvict;
import org.springframework.cache.annotation.Cacheable;
import org.springframework.cloud.client.ServiceInstance;
import org.springframework.cloud.client.loadbalancer.LoadBalancerClient;
import org.springframework.core.ParameterizedTypeReference;
import org.springframework.http.HttpMethod;
import org.springframework.http.ResponseEntity;
import org.springframework.stereotype.Service;
import org.springframework.web.client.RestTemplate;

/**
* 在类上,增加@CacheConfig 注解,用来描述当前类型可能使用 cache 缓存。
* 如果使用缓存,则缓存数据的 key 的前缀是 cacheNames。
* cacheNames 是用来定义一个缓存集的前缀命名的,相当于分组。
*/
@CacheConfig(cacheNames = "test.hystrix.caches")
@Service
public class ClientServiceImpl implements ClientService {


	@Autowired
	private LoadBalancerClient loadBalancerClient;
	/**
	* @HystrixCommand - 开启 Hystrix 容错处理的注解。代表当前方法如果出现服务调用问题,使用 Hystrix 容错处理逻辑来处理
	* 属性 fallbackMethod - 如果当前方法调用服务,远程服务出现问题的时候,调用本地的哪个方法得到托底数据。
	*/
	@HystrixCommand(fallbackMethod = "downgradeFallback",
		commandProperties = {


		// 默认 20 个;10s 内请求数大于 20 个时就启动熔断器,当请求符合熔断条件时将触发 fallback 逻辑
	@HystrixProperty(name = HystrixPropertiesManager.CIRCUIT_BREAKER_REQUEST_VOLUME_THRESHOLD, value = "10"),
	// 请求错误率大于 50%时就熔断,然后 for 循环发起请求,当请求符合熔断条件时将触发
	@HystrixProperty(name = HystrixPropertiesManager.CIRCUIT_BREAKER_ERROR_THRESHOLD_PERCENTAGE, value = "50"),
	// 默认 5 秒;熔断多少秒后去尝试请求
	@HystrixProperty(name = HystrixPropertiesManager.CIRCUIT_BREAKER_SLEEP_WINDOW_IN_MILLISECONDS,value = "5000")
		}
	)
	@Override
	public String first() {


		ServiceInstance si =
			this.loadBalancerClient.choose("application-service");
		StringBuilder sb = new StringBuilder();
		sb.append("http://").append(si.getHost())
			.append(":").append(si.getPort()).append("/");
		System.out.println("本次访问的 service 是: " + sb.toString());
		RestTemplate rt = new RestTemplate();
		ParameterizedTypeReference<String> type =
			new ParameterizedTypeReference<String>() {


			};
		ResponseEntity<String> response =
			rt.exchange(sb.toString(), HttpMethod.GET, null, type);
		String result = response.getBody();
		return result;
	}
	/**
	* @Cacheable - 将当期方法的返回值缓存到 cache 中。
	* 只要方法增加了@Cacheable 注解,每次调用当前方法的时候,spring cloud都会先访问 cache 获取数据,
	* 如果 cache 中没有数据,则访问远程服务获取数据。远程服务返回数据,先保存在 cache 中,再返回给客户端。
	* 如果 cache 中有数据,则直接返回 cache 中的数据,不会访问远程服务。
	* 请求缓存会有缓存数据不一致的可能。缓存数据过期、失效、脏数据等情况。
	* 一旦使用了请求缓存来处理幂等性请求操作。则在非幂等性请求操作中必须管理缓存。避免缓存数据的错误。
	* @return
	*/
	@Override
	@Cacheable("myCache")
	public String testGet() {


		ServiceInstance si =
			this.loadBalancerClient.choose("application-service");
		StringBuilder sb = new StringBuilder();
		sb.append("http://").append(si.getHost())
			.append(":").append(si.getPort()).append("/testGet");
		System.out.println("本次访问的 service 是: " + sb.toString());
		RestTemplate rt = new RestTemplate();
		ParameterizedTypeReference<String> type =
			new ParameterizedTypeReference<String>() {


			};
		ResponseEntity<String> response =
			rt.exchange(sb.toString(), HttpMethod.GET, null, type);
		String result = response.getBody();
		return result;
	}
	/**
	* @CacheEvict - 管理缓存。根据参数 key 删除缓存中对应的缓存数据。
	* @return
	*/
	@Override
	@CacheEvict("myCache")
	public String testPost() {


		ServiceInstance si =
			this.loadBalancerClient.choose("application-service");
		StringBuilder sb = new StringBuilder();
		sb.append("http://").append(si.getHost())
			.append(":").append(si.getPort()).append("/testPost");
		System.out.println("本次访问的 service 是: " + sb.toString());
		RestTemplate rt = new RestTemplate();
		ParameterizedTypeReference<String> type =
			new ParameterizedTypeReference<String>() {


			};
		ResponseEntity<String> response =
			rt.exchange(sb.toString(), HttpMethod.POST, null, type);
		String result = response.getBody();
		return result;
		}
		// 本地容错方法,只有远程服务调用过程出现问题的时候,才会调用此方法,获取托底数据。保证服务完整性。
	private String downgradeFallback(){


		return "服务降级方法返回托底数据";
	}
}
4 application client 配置文件 application.yml

server:
	port: 8082
spring:
	application:
		name: application-client
	redis:
		host: 192.168.17.40
eureka:
	client:
		service-url:
			defaultZone:
				- http://localhost:8761/eureka/
hystrix:
	command:
		default: # default 全局有效,service id 指定应用有效,如:application-service
			execution:
				timeout:
					# 如果 enabled 设置为 false,则请求超时交给 ribbon 控制,为 true,则超时作为容错根据
					enabled: true
				isolation:
					thread:
						timeoutInMilliseconds: 1000 # 超时时间,默认 1000ms
5 application client 启动类
package com.bjsxt;

import org.springframework.boot.SpringApplication;
import org.springframework.boot.autoconfigure.SpringBootApplication;
import org.springframework.cache.annotation.EnableCaching;
import org.springframework.cloud.client.circuitbreaker.EnableCircuitBreaker;

/**
* @EnableCircuitBreaker - 开启 Hystrix 容错处理能力。
* 如果不使用此注解,服务代码中的@HystrixCommand 注解无效。
* @EnableCaching - 开启 spring cloud 对 cache 的支持。
* 可以自动的使用请求缓存,访问 redis 等 cache 服务。
*/
@EnableCaching
@SpringBootApplication
@EnableCircuitBreaker
public class ClientApp {


	public static void main(String[] args) {


		SpringApplication.run(ClientApp.class, args);
	}
}
五、 Openfeign 的雪崩处理
在声明式远程服务调用 Openfeign 中,实现服务灾难性雪崩效应处理也是通过 Hystrix实现的。而 feign 启动器 spring-cloud-starter-openfeign 中是包含 Hystrix 相关依赖的。如果只使用服务降级功能则不需要做独立依赖。如果需要使用 Hystrix 其他服务容错能力,需要依赖 spring-cloud-starter-netflix-hystrix 资源。从 Dalston 版本后,feign 默认关闭 Hystrix支持。所以必须在全局配置文件中开启 feign 技术中的 Hystrix 支持。具体实现如下:
1 服务降级
1.1 POM 依赖
Openfeign 的启动器依赖 spring-cloud-starter-openfeign 中,自带 Hystrix 处理相关依赖,所以不需要修改 POM 依赖,直接通过配置即可开启容错处理机制。
1.2 application client 接口
package com.bjsxt.service;

import com.bjsxt.service.impl.FirstClientServiceImpl;
import com.bjsxt.serviceapi.FirstServiceAPI;
import org.springframework.cloud.openfeign.FeignClient;

/**
* 注解属性 fallback - 当前接口远程调用服务发生问题时,使用哪一个对象中的对应方法用于实现容错逻辑。
* Openfeign 技术中,容错处理是使用当前接口的实现类实现的。
* 实现类中的方法实现,就是对应的容错 fallback 处理逻辑。
*/
@FeignClient(name="openfeign-service", fallback =
FirstClientServiceImpl.class)
public interface FirstClientService extends FirstServiceAPI {


}
1.3 application client 接口实现
package com.bjsxt.service.impl;

import com.bjsxt.entity.User;
import com.bjsxt.service.FirstClientService;
import org.springframework.stereotype.Component;

import java.util.Arrays;
import java.util.List;

/**
* 当前类型的实例必须由 Spring 容器管理,需要使用@Component 注解描述。
* 每个实现方法对应远程服务调用的容错处理逻辑。
*/
@Component
public class FirstClientServiceImpl implements FirstClientService {


	@Override
	public List<String> testFeign() {


		return Arrays.asList("Openfeign 返回托底数据");
	}
	@Override
	public User getMultiParams(Integer id, String name) {


		User user = new User();
		user.setId(0);
		user.setUsername("托底数据");
		user.setRemark("getMultiParams");
		return user;
	}
	@Override
	public User postMultiParams(Integer id, String name) {


		User user = new User();
		user.setId(0);
		user.setUsername("托底数据");
		user.setRemark("postMultiParams");
		return user;
	}
	@Override
	public User postObjectParam(User pojo) {


		User user = new User();
		user.setId(0);
		user.setUsername("托底数据");
		user.setRemark("postObjectParam");
		return user;
	}
}
1.4 application client 配置文件 application.yml
server:
	port: 8082
spring:
	application:
	name: openfeign-client
eureka:
	client:
		service-url:
			- http://localhost:8761/eureka/

 # 开启 feign 技术中的 Hystrix 容错处理机制
feign:
	hystrix:
		enabled: true
hystrix:
	command:
		default:
			execution:
				timeout:
					enable: true
				isolation:
					thread:
						timeoutInMilliseconds: 1000
1.5 applicaiton client 启动类
package com.bjsxt;

import org.springframework.boot.SpringApplication;
import org.springframework.boot.autoconfigure.SpringBootApplication;
import org.springframework.cloud.openfeign.EnableFeignClients;

/**
* @EnableCircuitBreaker - 在 Openfeign 开发的 application client 应用的启动类中,不需要使用此注解开启容错处理逻辑。
* Openfeign 的启动器 spring-cloud-starter-openfeign 中,依赖的是 Hystrix 相关jar 包,不是完整的 spring-cloud-starter-netflix-hystrix 启动器。
* 如果使用此注解,在启动的时候,会抛出 ClassNotFoundException。
*/
@SpringBootApplication
@EnableFeignClients(basePackages = "com.bjsxt.service")
public class OpenfeignClientApp {


	public static void main(String[] args) {


		SpringApplication.run(OpenfeignClientApp.class, args);
	}
}
2 服务熔断
在 Openfeign 技术中,服务熔断对代码和依赖没有其他任何要求,只需要增加对应的配置即可,具体配置如下:
server:
	port: 8082
spring:
	application:
		name: openfeign-client
eureka:
	client:
		service-url:
			- http://localhost:8761/eureka/
feign:
	hystrix:
		enabled: tru
hystrix:
	command:
		default:
			execution:
				timeout:
					enable: true
				isolation:
					thread:
						timeoutInMilliseconds: 1000
				fallback:
					enabled: true # 当远程调用失败或者请求被拒绝,是否会尝试调用 fallback方法 。默认 true
				circuitBreaker: # 服务熔断(Circuit Breaker)相关配置属性
					enabled: true # 是否开启熔断器。默认 true
					requestVolumeThreshold: 20 # 默认 20 个;10s 内请求数大于 20 个时就启动熔断器,当请求符合熔断条件时将触发 fallback 逻辑
					errorThresholdPercentage: 50 # 请求错误率大于 50%时就熔断,然后 for 循环发起请求,当请求符合熔断条件时将触发
					sleepWindowInMilliseconds: 5000 # 默认 5 秒;熔断多少秒后去尝试请求
					forceOpen: false # 是否强制打开熔断器, 默认 false
					forceClosed: false # 是否强制关闭熔断器, 默认 false
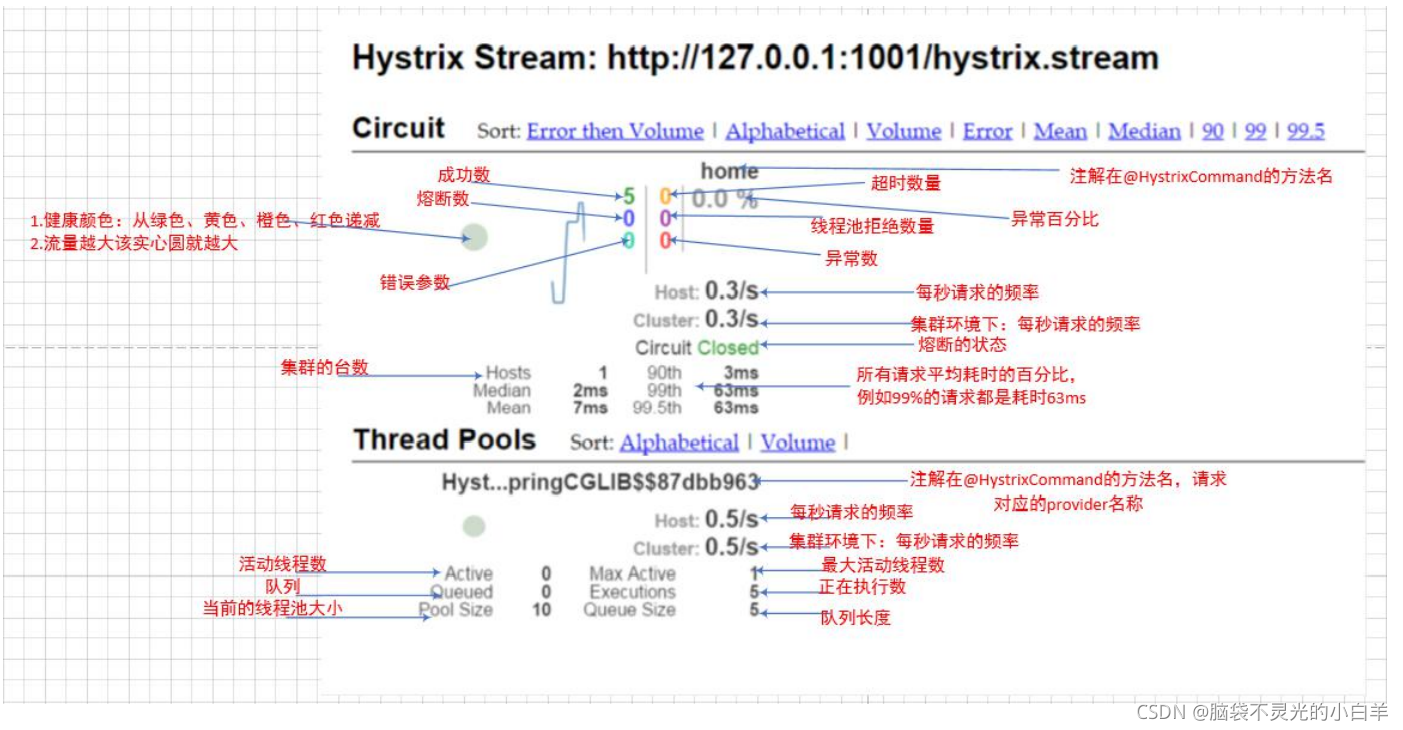
六、 可视化的数据监控 Hystrix-dashboard
Hystrix Dashboard 是一款针对 Hystrix 进行实时监控的工具,通过 Hystrix Dashboard我们可以在直观地看到各 Hystrix Command 的请求响应时间, 请求成功率等数据。
具体开启方式如下:
1 POM 依赖
Hystrix Dashboard 是针对 Hystrix 容错处理相关数据的监控工具。只要在使用了 Hystrix技术的应用工程中导入对应依赖即可。注意:如果在 Openfeign 技术中开启 Hystrix Dashboard 监控,则需要将 spring-cloud-starter-netflix-hystrix 启动器导入 POM 文件,否则无法在启动类上使用@EnableCircuitBreaker 注解
<?xml version="1.0" encoding="UTF-8"?>
<project xmlns="http://maven.apache.org/POM/4.0.0"
	xmlns:xsi="http://www.w3.org/2001/XMLSchema-instance"
	xsi:schemaLocation="http://maven.apache.org/POM/4.0.0
http://maven.apache.org/xsd/maven-4.0.0.xsd">
	<parent>
		<artifactId>cloudhystrix</artifactId>
		<groupId>com.bjsxt</groupId>
		<version>1.0-SNAPSHOT</version>
	</parent>
	<modelVersion>4.0.0</modelVersion>

	<artifactId>applicationclient</artifactId>
	<dependencies>
		<dependency>
			<groupId>org.springframework.boot</groupId>
			<artifactId>spring-boot-starter-web</artifactId>
		</dependency>
		<dependency>
			<groupId>org.springframework.cloud</groupId>
			<artifactId>spring-cloud-starter-netflix-eureka-client</artifactId>
		</dependency>
		<dependency>
			<groupId>org.springframework.boot</groupId>
			<artifactId>spring-boot-starter-data-redis</artifactId>
		</dependency>
		<dependency>
			<groupId>org.springframework.cloud</groupId>
			<artifactId>spring-cloud-starter-netflix-hystrix</artifactId>
		</dependency>
		<dependency>
			<groupId>org.springframework.boot</groupId>
			<artifactId>spring-boot-starter-actuator</artifactId>
		</dependency>
		<dependency>
			<groupId>org.springframework.cloud</groupId>
			<artifactId>spring-cloud-starter-netflix-hystrix-dashboard</artifactId>
		</dependency>
	</dependencies>
</project>
2 配置文件 application.yml
server:
	port: 8082
spring:
	application:
		name: application-client
	redis:
		host: 192.168.89.12
eureka:
	client:
		service-url:
			defaultZone:
				- http://localhost:8761/eureka/
hystrix:
	command:
		default: # default 全局有效,service id 指定应用有效,如:application-service
			execution:
				timeout:
					# 如果 enabled 设置为 false,则请求超时交给 ribbon 控制,为 true,则超时作为容错根据
					enabled: true
				isolation:
					thread:
						timeoutInMilliseconds: 1000 # 超时时间,默认 1000ms
management:
	endpoints:
		web:
			exposure:
				include: # 开启的 actuator 监控路径,默认开启 info 和 health。其他需要手工增加,使用*代表开启所有监控路径。
				- info
				- health
				- hystrix.stream
3 启动类
package com.bjsxt;

import org.springframework.boot.SpringApplication;
import org.springframework.boot.autoconfigure.SpringBootApplication;
import org.springframework.cache.annotation.EnableCaching;
import org.springframework.cloud.client.circuitbreaker.EnableCircuitBreaker;
import org.springframework.cloud.netflix.hystrix.dashboard.EnableHystrixDashboard;

/**
* @EnableCircuitBreaker - 开启 Hystrix 容错处理能力。
* 如果不使用此注解,服务代码中的@HystrixCommand 注解无效。
* 且 Hystrix 相关监控数据无法收集。
* @EnableCaching - 开启 spring cloud 对 cache 的支持。
* 可以自动的使用请求缓存,访问 redis 等 cache 服务。
* @EnableHystrixDashboard - 开启 Hystrix Dashboard 监控仪表盘。
*/
@EnableHystrixDashboard
@EnableCaching
@SpringBootApplication
@EnableCircuitBreaker
public class ClientApp {


	public static void main(String[] args) {


		SpringApplication.run(ClientApp.class, args);
	}
}
4 访问 Hystrix 监控数据
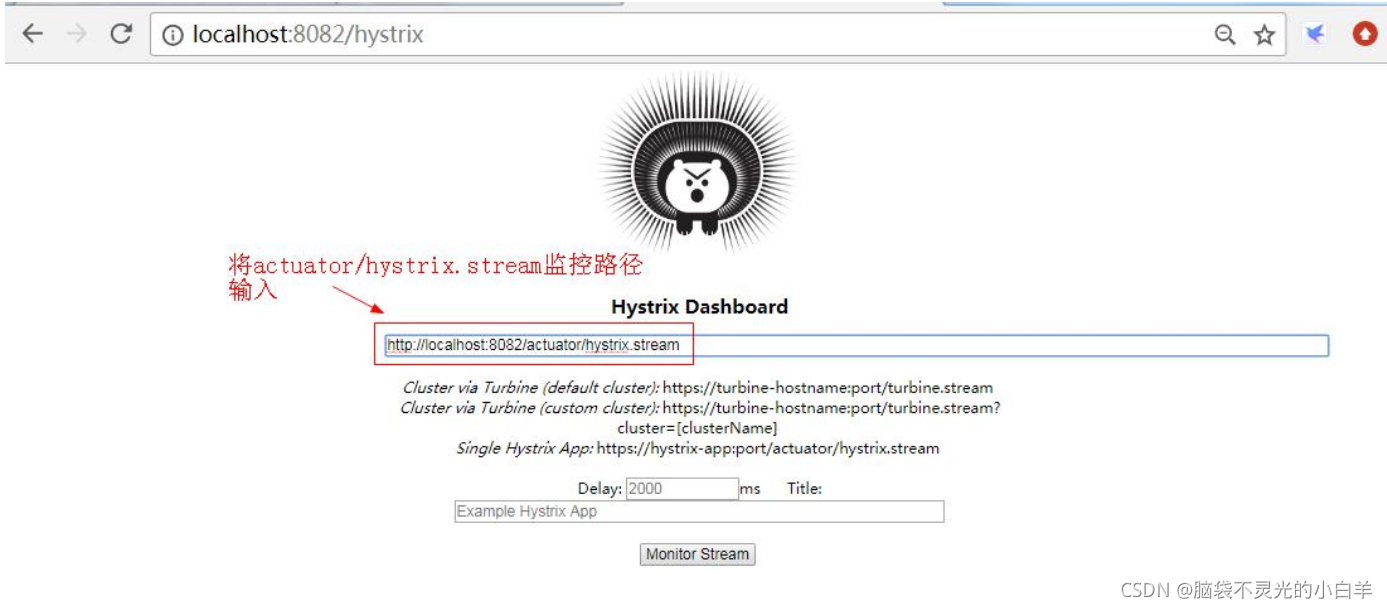
通过浏览器访问提供监控访问路径的应用,具体地址为:
http://ip:port/actuator/hystrix.stream
得到的监控结果如下:

这种监控数据的获取都是 JSON 数据。且数据量级较大。不易于查看。可以使用 Hystrix Dashboard 提供的视图界面来观察监控结果。视图界面访问路径为: http://ip:port/hystrix。
进入后的监控视图界面具体含义如下:
Spring Cloud Config
主要内容
分布式配置中心介绍
基于 Gitee 管理配置文件
搭建分布式配置中心服务端
搭建分布式配置中心客户端
配置热刷新
分布式配置中心的安全认证
一、 分布式配置中心介绍
1 什么是分布式配置中心
在常规的开发中,每个微服务都包含代码和配置。其配置包含服务配置、各类开关和业务配置。如果系统结构中的微服务节点较少,那么常规的代码+配置的开发方式足以解决问题。当系统逐步迭代,其微服务会越来越复杂,慢慢演化成网状依赖结构,这个时候常规的代码+配置的开发方式就并不合适了,因为还要考虑整体系统的扩展性、伸缩性和耦合性等。这些问题中,配置的管理也是非常麻烦的。
如果还是以常规开发形式管理配置,则要承担反复修改编译代码、重启系统、重新打包等风险。所以,一个可以集中管理,带有版本控制的配置中心应运而生。
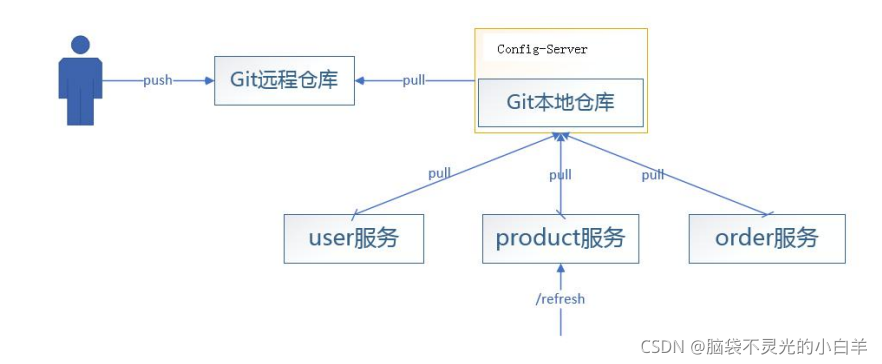
spring cloud config 就是一个配置中心。其采用集中式管理每个微服务的配置信息,并使用 GIT 等版本仓库统一存储配置内容,实现版本化管理控制。微服务与配置中心使用 rest方式交互来实现可扩展的配置服务。
spring cloud config 配置中心解决了微服务系统的配置中心化、配置版本控制、平台独立、语言独立等问题,其特性如下:
- 提供服务端和客户端支持(spring cloud config server 和 spring cloud config client)
- 集中式管理分布式环境中的配置信息
- 基于 spring 环境提供配置管理,与 spring 系列框架无缝结合
- 可用于任何语言开发环境
- 默认基于 GIT 仓库实现版本控制
2 分布式配置中心结构图
二、 基于 Gitee 管理配置文件
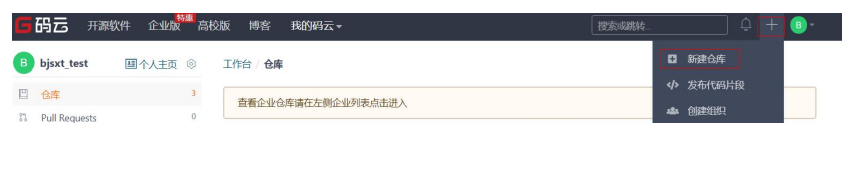
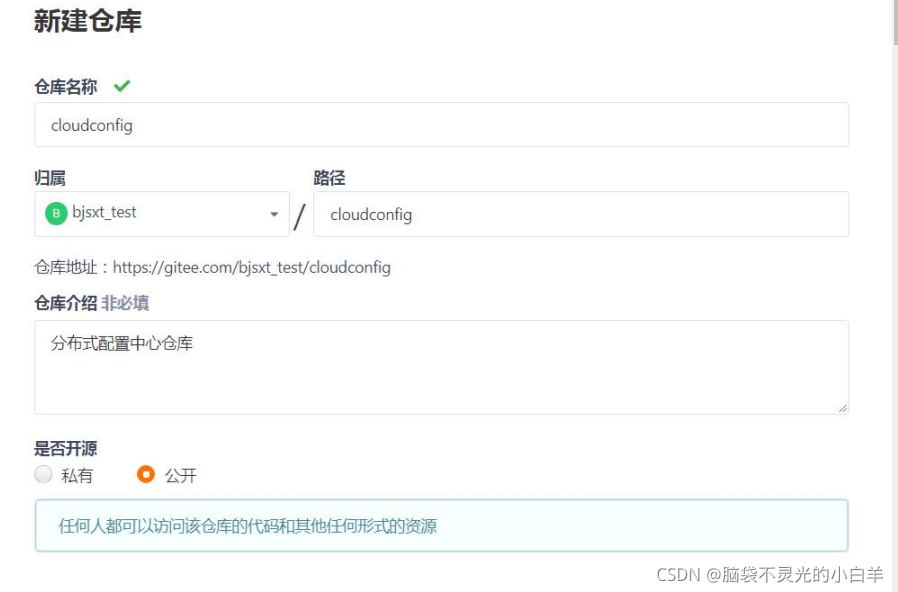
在 Gitee 中集中管理配置文件,为保证文件集中化管理,独立创建仓库。具体过程如下:
1 创建仓库
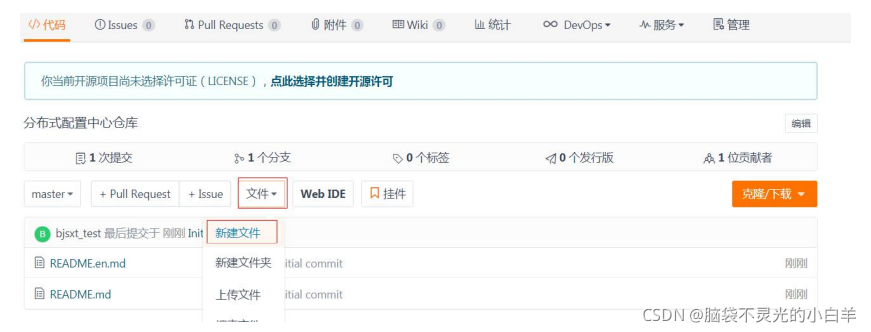
2 创建文件并编辑内容
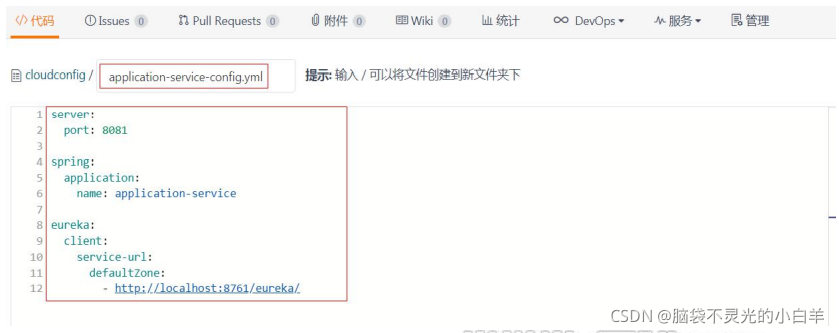
2.1 application-service-config.yml 配置文件
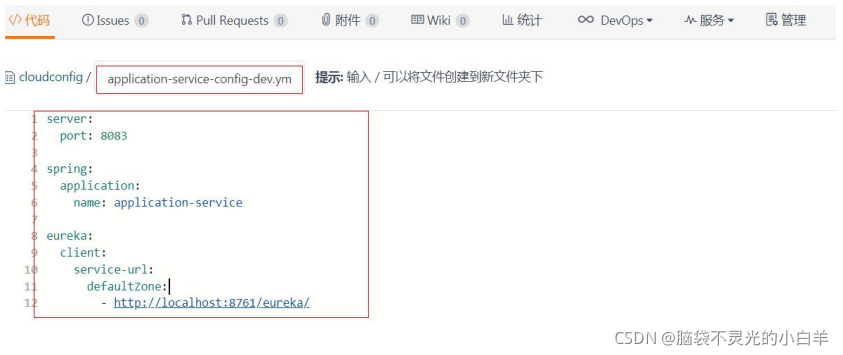
2.2 application-service-config-dev.yml 配置文件
三、 搭建分布式配置中心服务端
1 POM 依赖
<?xml version="1.0" encoding="UTF-8"?>
<project xmlns="http://maven.apache.org/POM/4.0.0"
	xmlns:xsi="http://www.w3.org/2001/XMLSchema-instance"
	xsi:schemaLocation="http://maven.apache.org/POM/4.0.0
http://maven.apache.org/xsd/maven-4.0.0.xsd">
	<modelVersion>4.0.0</modelVersion>
	<parent>
		<groupId>org.springframework.boot</groupId>
		<artifactId>spring-boot-starter-parent</artifactId>
		<version>2.2.2.RELEASE</version>
	</parent>
	<groupId>com.bjsxt</groupId>
	<artifactId>configserver</artifactId>
	<version>1.0-SNAPSHOT</version>
	<dependencyManagement>
		<dependencies>
			<dependency>
			<groupId>org.springframework.cloud</groupId>
				<artifactId>spring-cloud-dependencies</artifactId>
				<version>Hoxton.SR1</version>
				<type>pom</type>
				<scope>import</scope>
			</dependency>
		</dependencies>
	</dependencyManagement>
	<dependencies>
		<dependency>
			<groupId>org.springframework.cloud</groupId>
			<artifactId>spring-cloud-config-server</artifactId>
		</dependency>
		<dependency>
			<groupId>org.springframework.cloud</groupId>
			<artifactId>spring-cloud-starter-netflix-eureka-client</artifactId>
		</dependency>
	</dependencies>
</project>
2 配置文件 application.yml
# 设置运行端口号
server:
port: 8082
# 设置应用名称
spring:
	application:
		name: config-server

	# 设置远程仓库链接信息
	cloud: # 配置 Spring Cloud Config 服务端相关信息
		config:
			server:
				git:
					uri: https://gitee.com/bjsxt_test/cloudconfig.git # 访问的远程仓库uri
					username: bjsxt_test # Gitee 用户名
					password: enter_your_password # Gitee 密码
3 启动类
package com.bjsxt;

import org.springframework.boot.SpringApplication;
import org.springframework.boot.autoconfigure.SpringBootApplication;
import org.springframework.cloud.config.server.EnableConfigServer;
import org.springframework.cloud.netflix.eureka.EnableEurekaClient;

/**
* @EnableConfigServer - 开启配置中心服务端。
* 应用会根据全局配置文件访问GIT远程仓库,并将远程仓库中的配置内容下载到本地。
*/
@SpringBootApplication
@EnableConfigServer
@EnableEurekaClient
public class ConfigServerApp {


	public static void main(String[] args) {


		SpringApplication.run(ConfigServerApp.class, args);
	}
}
4 浏览器测试获取 Gitee 中的配置文件
当配置中心服务端启动后,可以通过浏览器访问配置中心服务端应用,获取我们保存在 Gitee 中的配置文件内容,具体访问路径格式如下:
http://config-server-ip:port/name/profile/label
name - Gitee 中保存的配置文件核心命名
profile - Gitee 中保存的配置文件扩展环境命名
label - Gitee 中的仓库分支
如访问: http://localhost:8888/application-service-config/default/master
代 表 在 Gitee 中 master 分 支 下 , 查 找 命 名 为 application-service-config.yml |application-service-config.properties 配置文件。

如访问: http://localhost:8888/application-service-config/dev/master
代 表 在 Gitee 中 master 分 支 下 , 查 找 命 名 为 application-service-config-dev.yml | application-service-config-dev.properties 配置文件

四、 搭建分布式配置中心客户端
每个 Spring Cloud 微服务应用(除 Eureka 和 Config 配置中心服务端)都可以看做是Spring Cloud Config 客户端应用,都可以通过 Spring Cloud Config 服务端动态获取保存在Gitee 中的配置文件。
1 POM 依赖
<?xml version="1.0" encoding="UTF-8"?>
<project xmlns="http://maven.apache.org/POM/4.0.0"
	xmlns:xsi="http://www.w3.org/2001/XMLSchema-instance"
	xsi:schemaLocation="http://maven.apache.org/POM/4.0.0
http://maven.apache.org/xsd/maven-4.0.0.xsd">
	<parent>
		<artifactId>cloudhystrix</artifactId>
		<groupId>com.bjsxt</groupId>
		<version>1.0-SNAPSHOT</version>
	</parent>
	<modelVersion>4.0.0</modelVersion>

	<artifactId>applicationservice</artifactId>
	<dependencies>
		<dependency>
			<groupId>org.springframework.boot</groupId>
			<artifactId>spring-boot-starter-web</artifactId>
		</dependency>
		<dependency>
			<groupId>org.springframework.cloud</groupId>
			<artifactId>spring-cloud-starter-netflix-eureka-client</artifactId>
		</dependency>
		<dependency>
			<groupId>org.springframework.cloud</groupId>
			<artifactId>spring-cloud-starter-config</artifactId>
		</dependency>
	</dependencies>
</project>
2 配置文件 bootstrap.yml
使用优先级最高的全局配置文件 bootstrap.properties 来配置当前应用启动时访问哪一个分布式配置中心服务端获取配置文件。
# 设置连接中心的配置管理中心服务端地址
spring:
	cloud:
		config:
			uri: http://localhost:8888/ # 分布式配置中心服务端访问地址,默认为http://localhost:8888/
			name: application-service-config # 要读取的配置文件主体命名
			profile: default # 要读取的配置文件扩展环境名, 默认 default
			label: master # 在 Gitee 仓库的哪一个分支中读取配置文件, 默认 null, 即在 master 分支中读取
五、 配置热刷新
通过 spring-boot-starter-actuator 可以实现配置中心客户端应用不重启,当某事件触发时,重新访问配置中心服务端,获取新的配置文件,并重新初始化本地环境。这种不重启应用实现环境刷新的方式称为热刷新。
具体实现过程如下:
1 POM 依赖
<?xml version="1.0" encoding="UTF-8"?>
<project xmlns="http://maven.apache.org/POM/4.0.0"
	xmlns:xsi="http://www.w3.org/2001/XMLSchema-instance"
	xsi:schemaLocation="http://maven.apache.org/POM/4.0.0
http://maven.apache.org/xsd/maven-4.0.0.xsd">
	<parent>
		<artifactId>cloudhystrix</artifactId>
		<groupId>com.bjsxt</groupId>
		<version>1.0-SNAPSHOT</version>
	</parent>
	<modelVersion>4.0.0</modelVersion>

	<artifactId>applicationservice</artifactId>
	<dependencies>
		<dependency>
			<groupId>org.springframework.boot</groupId>
			<artifactId>spring-boot-starter-web</artifactId>
		</dependency>
		<dependency>
			<groupId>org.springframework.cloud</groupId>
			<artifactId>spring-cloud-starter-netflix-eureka-client</artifactId>
		</dependency>
		<dependency>
			<groupId>org.springframework.cloud</groupId>
			<artifactId>spring-cloud-starter-config</artifactId>
		</dependency>
		<dependency>
			<groupId>org.springframework.boot</groupId>
			<artifactId>spring-boot-starter-actuator</artifactId>
		</dependency>
	</dependencies>
</project>
2 配置文件
spring:
	cloud:
		config:
			uri: http://localhost:8888/ # 分布式配置中心服务端访问地址,默认为http://localhost:8888/
			name: application-service-config # 要读取的配置文件主体命名
			profile: default # 要读取的配置文件扩展环境名, 默认 default
			label: master # 在 Gitee 仓库的哪一个分支中读取配置文件, 默认 null, 即在 master 分支中读取
management:
	endpoints:
		web:
			exposure:
				include:
					- refresh # 开启热刷新服务, 也可以在 Gitee 中的配置文件内定义。
					- info
					- health
3 测试热刷新环境
发送 POST 请求到http://ip:port/actuator/refresh,应用会重新访问配置中心服务端,加载最新的配置文件内容,并刷新当前应用环境。
4 代码中使用远程配置内容
如果代码中使用了 Gitee 中保存的配置文件内容,那么希望热刷新的时候,重新初始化对象属性值,则需要在对应类型上增加注解@RefreshScope,通知 Spring 容器,当前类型的对象,在环境刷新时,需要重新初始化对象。
package com.bjsxt.controller;

import org.springframework.beans.factory.annotation.Value;
import org.springframework.cloud.context.config.annotation.RefreshScope;
import org.springframework.web.bind.annotation.GetMapping;
import org.springframework.web.bind.annotation.PostMapping;
import org.springframework.web.bind.annotation.RestController;

@RestController
@RefreshScope
public class ServiceController {


	@Value("${test.str}")
	private String str;
	@PostMapping("/testPost")
	public Object testPost(){


		System.out.println("testPost method run");
		return "写操作返回";
	}
	@GetMapping("/testGet")
	public Object testGet(){


		System.out.println("testGet method run");
		return "读操作返回";
	}
	@GetMapping
	public Object first(){


		System.out.println("run");
		try {


			// 用于模拟远程服务调用延时。
			Thread.sleep(2000);
		} catch (InterruptedException e) {


			e.printStackTrace();
		}
		return "测试 Spring Cloud Netflix Ribbon 开发服务提供者";
	}
}
Spring Cloud Gateway
主要内容
Spring Cloud Gateway 简介
使用 Spring Cloud Gateway 实现路由功能
使用 Spring Cloud Gateway 实现过滤器功能
使用 Spring Cloud Gateway 实现熔断功能
一、 Spring Cloud Gateway 简介
1 概述
Spring cloud gateway 是 spring 官方基于 Spring 5.0、Spring Boot2.0 和 Project Reactor等技术开发的网关,Spring Cloud Gateway 旨在为微服务架构提供简单、有效和统一的 API
路由管理方式,Spring Cloud Gateway 作为 Spring Cloud 生态系统中的网关,目标是替代Netflix Zuul,其不仅提供统一的路由方式,并且还基于 Filer 链的方式提供了网关基本的功能,例如:安全、监控/埋点、限流等。
2 核心概念
2.1 API 网关
API 网关出现的原因是微服务架构的出现,不同的微服务一般会有不同的网络地址,而外部客户端可能需要调用多个服务的接口才能完成一个业务需求,如果让客户端直接与各个微服务通信,会有以下的问题:
- 客户端会多次请求不同的微服务,增加了客户端的复杂性。
- 存在跨域请求,在一定场景下处理相对复杂。
- 认证复杂,每个服务都需要独立认证。
难以重构,随着项目的迭代,可能需要重新划分微服务。例如,可能将多个服务合并成一个或者将一个服务拆分成多个。如果客户端直接与微服务通信,那么重构将会很难实施。
某些微服务可能使用了防火墙 / 浏览器不友好的协议,直接访问会有一定的困难。
以上这些问题可以借助 API 网关解决。API 网关是介于客户端和服务器端之间的中间层,所有的外部请求都会先经过 API 网关这一层。也就是说,API 的实现方面更多的考虑业务逻辑,而安全、性能、监控可以交由 API 网关来做,这样既提高业务灵活性又不缺安全性。
使用 API 网关后示意图:
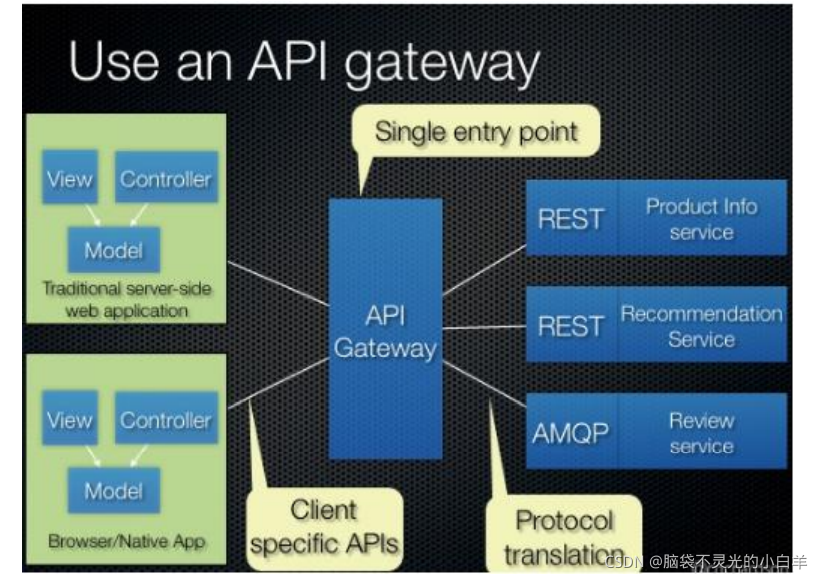
使用 API 网关后的优点如下:
- 易于监控。可以在网关收集监控数据并将其推送到外部系统进行分析。
- 易于认证。可以在网关上进行认证,然后再将请求转发到后端的微服务,而无须在每个微服务中进行认证。
- 统一接入。减少了客户端与各个微服务之间的交互次数。
2.2 路由
路由是网关最基础的部分,路由信息有一个 ID、一个目的 URL、一组断言和一组 Filter组成。如果断言路由为真,则说明请求的 URL 和配置匹配。
2.3 过滤器
一个标准的 Spring webFilter。Spring cloud gateway 中的 filter 分为两种类型的 Filter,分别是 Gateway Filter 和 Global Filter。过滤器 Filter 将会对请求和响应进行修改处理。执行示意图如下:
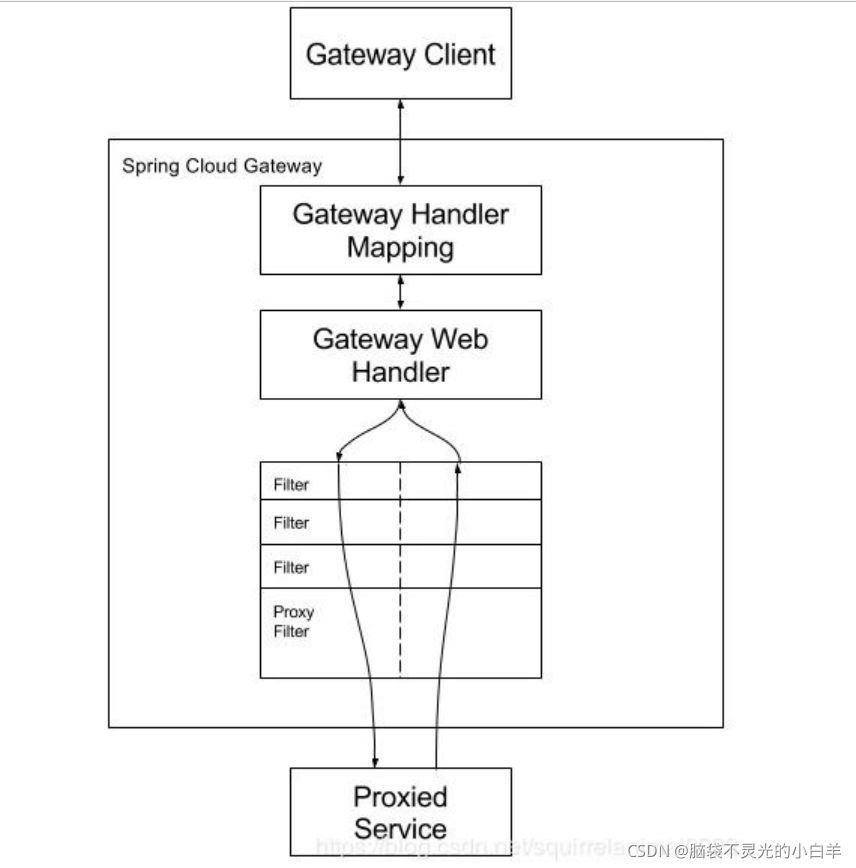
如上图所示,Spring cloudGateway 发出请求。然后再由 Gateway Handler Mapping 中找到与请求相匹配的路由,将其发送到 Gateway web handler。Handler 再通过指定的过滤
器链将请求发送到我们实际的服务执行业务逻辑,然后返回。
二、 使用 Spring Cloud Gateway 实现路由功能
1 入门案例
1.1 创建 Gateway 项目
1.1.1 POM 文件
<?xml version="1.0" encoding="UTF-8"?>
<project xmlns="http://maven.apache.org/POM/4.0.0"
	xmlns:xsi="http://www.w3.org/2001/XMLSchema-instance"
	xsi:schemaLocation="http://maven.apache.org/POM/4.0.0
http://maven.apache.org/xsd/maven-4.0.0.xsd">
	<modelVersion>4.0.0</modelVersion>
	<parent>
		<groupId>org.springframework.boot</groupId>
		<artifactId>spring-boot-starter-parent</artifactId>
		<version>2.2.2.RELEASE</version>
	</parent>
	<groupId>com.bjsxt</groupId>
	<artifactId>cloudgateway</artifactId>
	<version>1.0-SNAPSHOT</version>
	<dependencyManagement>
		<dependencies>
			<dependency>
				<groupId>org.springframework.cloud</groupId>
				<artifactId>spring-cloud-dependencies</artifactId>
				<version>Hoxton.SR1</version>
				<type>pom</type>
				<scope>import</scope>
			</dependency>
		</dependencies>
	</dependencyManagement>
	<dependencies>
		<dependency>
			<groupId>org.springframework.cloud</groupId>
			<artifactId>spring-cloud-starter-gateway</artifactId>
		</dependency>
		<dependency>
			<groupId>org.springframework.cloud</groupId>
			<artifactId>spring-cloud-starter-netflix-eureka-client</artifactId>
		</dependency>
	</dependencies>
</project>
1.1.2 配置文件
# 设置运行端口号
server:
	port: 9000
# 设置应用名称
spring:
	application:
		name: cloud-gateway
	cloud:
		gateway:
			discovery:
				locator:
					enabled: true # 开启 Gateway 服务注册和发现的功能
					lower-case-service-id: true # 将请求路径上的服务名配置为小写
# 设置注册中心连接信息
eureka:
	client:
		service-url:
			defaultZone: http://localhost:8761/eureka/
1.1.3 启动类
package com.bjsxt;

import org.springframework.boot.SpringApplication;
import org.springframework.boot.autoconfigure.SpringBootApplication;

@SpringBootApplication
public class GatewayApp {


	public static void main(String[] args) {


		SpringApplication.run(GatewayApp.class, args);
	}
}
2 配置文件手工绑定路由规则
2.1 POM 文件
不需要修改。
2.2 配置文件
server:
	port: 9000
spring:
	application:
		name: cloud-gateway
cloud:
	gateway:
		discovery:
			locator:
				enabled: false # 开启 Gateway 自动服务注册和发现的功能
				lower-case-service-id: true # 将请求路径上的服务名配置为小写
			# 手动绑定路由规则
			routes:
				- id: openfeign-client # 唯一命名
					uri: lb://openfeign-client # 转发路径,lb 代表 loadbalance,即从 Eureka中获取的服务列表负载均衡器。 openfeign-client 即服务名称,相当于http://localhost:8082/
					predicates: # 定义映射
						- Path=/client/**  # 发送到 Gateway 网关上的请求路径映射,此映射匹配的路径都会转发到 uri 上。 具体地址为: lb://openfeign-client/client/**
					filters:
						- StripPrefix=1 # 请求转发时,会自动过滤请求转发的第一节地址,即client。最终地址为:lb://openfeign-client/**

				- id: openfeign-service
					uri: lb://openfeign-service
					predicates:
						- Path=/service/**
					filters:
						- StripPrefix=1
eureka:
	client:
		service-url:
			defaultZone: http://localhost:8761/eureka/
2.3 启动类
不需要修改。
三、 使用 Spring Cloud Gateway 实现过滤器功能
Spring Cloud gateway 的 filter 分为两种:GatewayFilter 和 Globalfilter。GlobalFilter 会应用到所有的路由上,而 Gatewayfilter 将应用到单个路由或者一个分组的路由上。
多个过滤器会根据配置文件中的定义来决定执行顺序。
如果提供的自定义过滤器实现了 Ordered 接口,则可以通过接口中的方法 getOrder 来决定执行顺序。具体顺序由 getOrder 方法返回结果升序排列。
1 Spring Cloud Gateway 内置过滤器
GatewayFilter 是一个接口,通过查看源码,其有很多实现类,不同的实现类实现不同的过滤功能。具体如下:
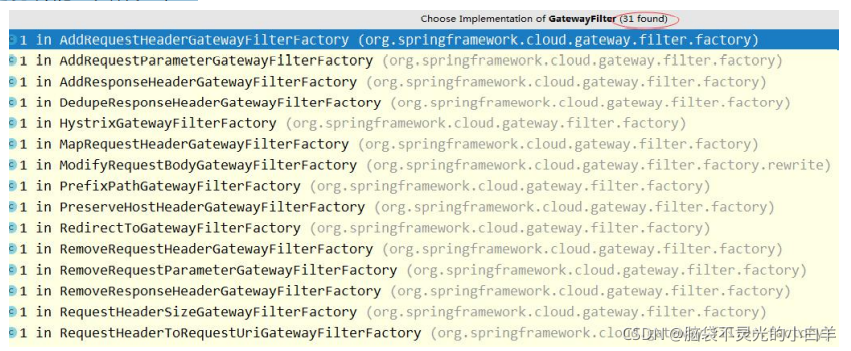
常用过滤器有:
- AddRequestParameterGatewayFilterFactory - 在指定请求中增加请求参数的过滤器。
- AddRequestHeaderGatewayFilterFactory - 在指定请求中增加请求头参数的过滤器。
- StripPrefixGatewayFilterFactory - 在指定请求中处理路径前缀的过滤器。
在 Gateway 中使用过滤器的方式非常简单,只要在配置文件中通过过滤器命名前缀即可 快 速 使 用 , 如 使 用AddRequestParameterGatewayFilterFactory , 可 以 通 过
AddRequestParameter 在配置文件中配置使用;如使用 StripPrefixGatewayFilterFactory,可以通过 StripPrefix 在配置文件中配置使用。
具体配置过程如下:
server:
	port: 9000
spring:
	application:
		name: cloud-gateway
	cloud:
		gateway:
	discovery:
		locator:
			enabled: false # 开启 Gateway 自动服务注册和发现的功能
			lower-case-service-id: true # 将请求路径上的服务名配置为小写
		routes:
			- id: openfeign-client # 唯一命名
				uri: lb://openfeign-client # 转发路径,lb 代表 loadbalance,即从 Eureka中获取的服务列表负载均衡器。 openfeign-client 即服务名称,相当于http://localhost:8082/
				predicates: # 定义映射
					- Path=/client/** # 发送到 Gateway 网关上的请求路径映射,此映射匹配的路径都会转发到 uri 上。 具体地址为: lb://openfeign-client/client/**
				filters:
					- StripPrefix=1 # 请求转发时,会自动过滤请求转发的第一节地址,即client。最终地址为: lb://openfeign-client/**
					- AddRequestParameter=id, 0 # 在请求中自动增加一个请求参数,参数名为 id,参数值为 0。可以用于提供固定参数。
					- AddRequestParameter=name, testFilter # 每个 AddRequestParameter过滤器,只能提供一个请求参数,提供多请求参数,需要定义多个过滤器。
					- AddRequestHeader=my-header, test-header-value # 在请求中自动增加一个请求头参数,参数名为 my-header,参数值为 test-header-value。

			- id: openfeign-service
				uri: lb://openfeign-service
				predicates:
					- Path=/service/**
				filters:
					- StripPrefix=1
eureka:
	client:
		service-url:
			defaultZone: http://localhost:8761/eureka/
2 自定义过滤器
2.1 自定义 GatewayFilter - 网关过滤器
2.1.1 自定义过滤
package com.bjsxt.filter;

import org.springframework.cloud.gateway.filter.GatewayFilter;
import org.springframework.cloud.gateway.filter.GatewayFilterChain;
import org.springframework.cloud.gateway.filter.factory.AbstractGatewayFilterFactory;
import org.springframework.http.HttpStatus;
import org.springframework.stereotype.Component;
import org.springframework.web.server.ServerWebExchange;
import reactor.core.publisher.Mono;

import java.util.Arrays;
import java.util.List;

/**
* 登录校验过滤器工厂
* 泛型是此工厂构造时自动注入的配置对象。此配置对象由 Spring 容器提供。
* 根据配置文件中提供的后置配置内容,自动进行配置。
* 如: 当前类型中定义 Config 有一个属性 token,此属性为字符串类型。那么对应的配置是, Authentication=xxx,xxx 就是要传递的 token 属性值。
* 在当前实现中,Config 中的 token 属性即是请求参数中用于标明登录标记的请求参数名。
*/
@Component
public class AuthenticationGatewayFilterFactory extends
AbstractGatewayFilterFactory<AuthenticationGatewayFilterFactory.Config> {


	/**
	* 构造方法,此方法调用父类型中的构造,定义构造当前过滤器工厂时,配置参数的具体类型。
	*/
	public AuthenticationGatewayFilterFactory() {


		super(AuthenticationGatewayFilterFactory.Config.class);
	}
	/**
	* Spring 构造 Config 对象时,读取的配置文件数据对应 Config 对象中的哪一个属性,即 property 命名。
	* @return
	*/
	@Override
	public List<String> shortcutFieldOrder() {


		return Arrays.asList("tokenName");
	}
	/**
	* 返回过滤器对象。
	* @param config
	* @return
	*/
	@Override
	public GatewayFilter apply(Config config) {


		System.out.println("token name is : " + config.getTokenName());
		return new GatewayFilter() {


	//ServerWebExchange 命名为服务网络交换器,存放着重要的请求-响应属性、请求实例和响应实例等等
	@Override
	public Mono<Void> filter(ServerWebExchange exchange,
	GatewayFilterChain chain) {


		String token =
		exchange.getRequest().getQueryParams().getFirst(config.getTokenName());
		System.out.println(exchange.getRequest().getQueryParams());
		if(null == token || token.isEmpty()){


			// 请求头中不存在 token,用户未登录,返回登录。
			exchange.getResponse().setStatusCode(HttpStatus.UNAUTHORIZED);
			// 直接返回,提示错误。
			return exchange.getResponse().setComplete();
		}
			// 用户已登录,进入后续执行流程
			return chain.filter(exchange);
		}
	};
}
public static class Config {


	private String tokenName;
	public Config() {


	}
	public String getTokenName() {


		return this.tokenName;
	}
	public void setTokenName(String tokenName) {


		this.tokenName = tokenName;
		}
	}
}
2.1.2 配置文件
server:
	port: 9000
spring:
	application:
		name: cloud-gateway
	cloud:
		gateway:
			discovery:
				locator:
					enabled: false # 开启 Gateway 自动服务注册和发现的功能
					lower-case-service-id: true # 将请求路径上的服务名配置为小写
				routes:
					- id: openfeign-client # 唯一命名
						uri: lb://openfeign-client # 转发路径,lb 代表 loadbalance,即从 Eureka中获取的服务列表负载均衡器。 openfeign-client 即服务名称,相当于http://localhost:8082/
						predicates: # 定义映射
							- Path=/client/** # 发送到 Gateway 网关上的请求路径映射,此映射匹配的路径都会转发到 uri 上。 具体地址为: lb://openfeign-client/client/**
						filters:
							- StripPrefix=1 # 请求转发时,会自动过滤请求转发的第一节地址,即client。最终地址为: lb://openfeign-client/**
							- AddRequestParameter=id, 0 # 在请求中自动增加一个请求参数,参数名为 id,参数值为 0。可以用于提供固定参数。
							- AddRequestParameter=name, testFilter # 每个 AddRequestParameter过滤器,只能提供一个请求参数,提供多请求参数,需要定义多个过滤器。
							- AddRequestHeader=my-header, test-header-value # 在请求中自动增加一个请求头参数,参数名为 my-header,参数值为 test-header-value。
							- Authentication=token

					- id: openfeign-service
						uri: lb://openfeign-service
						predicates:
							- Path=/service/**
						filters:
							- StripPrefix=1
eureka:
	client:
	service-url:
		defaultZone: http://localhost:8761/eureka/
2.2 自定义 GlobalFilter - 全局过滤器
GlobalFilter:全局过滤器,不需要在配置文件中配置,作用在所有的路由上,最终通过GatewayFilterAdapter 包装成GatewayFilterChain 可识别的过滤器,它为请求业务以及路由
的 URI 转换为真实业务服务的请求地址的核心过滤器,不需要配置,系统初始化时加载,并作用在每个路由上。
全局过滤器无需创建工厂类,也无需在配置文件中进行注册。因为其对所有的网关代理的路径都生效。
2.2.1 自定义过滤器
package com.bjsxt.filter;

import org.slf4j.Logger;
import org.slf4j.LoggerFactory;
import org.springframework.cloud.gateway.filter.GatewayFilterChain;
import org.springframework.cloud.gateway.filter.GlobalFilter;
import org.springframework.stereotype.Component;
import org.springframework.web.server.ServerWebExchange;
import reactor.core.publisher.Mono;

/**
* 定义全局日志过滤器
*/
@Component
public class LoggerGlobalFilter implements GlobalFilter {


	private Logger logger = LoggerFactory.getLogger(LoggerGlobalFilter.class);
	@Override
	public Mono<Void> filter(ServerWebExchange exchange, GatewayFilterChain
	chain) {


		logger.info("LoggerGlobalFilter run");
		return chain.filter(exchange);
	}
}
四、 使用 Spring Cloud Gateway 实现熔断功能
Spring Cloud Gateway 也可以利用 Hystrix 的熔断特性,在流量过大时进行服务降级。
1 POM 依赖
<?xml version="1.0" encoding="UTF-8"?>
<project xmlns="http://maven.apache.org/POM/4.0.0"
	xmlns:xsi="http://www.w3.org/2001/XMLSchema-instance"
	xsi:schemaLocation="http://maven.apache.org/POM/4.0.0
http://maven.apache.org/xsd/maven-4.0.0.xsd">
	<modelVersion>4.0.0</modelVersion>
	<parent>
		<groupId>org.springframework.boot</groupId>
		<artifactId>spring-boot-starter-parent</artifactId>
		<version>2.2.2.RELEASE</version>
	</parent>
	<groupId>com.bjsxt</groupId>
	<artifactId>cloudgateway</artifactId>
	<version>1.0-SNAPSHOT</version>
	<dependencyManagement>
		<dependencies>
			<dependency>
				<groupId>org.springframework.cloud</groupId>
				<artifactId>spring-cloud-dependencies</artifactId>
				<version>Hoxton.SR1</version>
				<type>pom</type>
				<scope>import</scope>
			</dependency>
		</dependencies>
	</dependencyManagement>
	<dependencies>
		<dependency>
			<groupId>org.springframework.cloud</groupId>
			<artifactId>spring-cloud-starter-gateway</artifactId>
		</dependency>
		<dependency>
			<groupId>org.springframework.cloud</groupId>
			<artifactId>spring-cloud-starter-netflix-eureka-client</artifactId>
		</dependency>
		<dependency>
			<groupId>org.springframework.cloud</groupId>
			<artifactId>spring-cloud-starter-netflix-hystrix</artifactId>
		</dependency>
	</dependencies>
</project>
2 熔断处理代码
package com.bjsxt.fallback;

import org.springframework.web.bind.annotation.RequestMapping;
import org.springframework.web.bind.annotation.RestController;

@RestController
public class MyFallbackHandler {


	@RequestMapping("/fallback")
	public Object fallback(){


		return "Gateway 熔断处理逻辑";
	}
}
3 配置文件
server:
	port: 9000
spring:
	application:
		name: cloud-gateway
	cloud:
		gateway:
			discovery:
				locator:
					enabled: false # 开启 Gateway 自动服务注册和发现的功能
					lower-case-service-id: true # 将请求路径上的服务名配置为小写
				routes:
					- id: openfeign-client # 唯一命名
						uri: lb://openfeign-client # 转发路径,lb 代表 loadbalance,即从 Eureka中获取的服务列表负载均衡器。 openfeign-client 即服务名称,相当于http://localhost:8082/
						predicates: # 定义映射
							- Path=/client/** # 发送到 Gateway 网关上的请求路径映射,此映射匹配的路径都会转发到 uri 上。 具体地址为: lb://openfeign-client/client/**
						filters:
							- StripPrefix=1 # 请求转发时,会自动过滤请求转发的第一节地址,即client。最终地址为: lb://openfeign-client/**
							- AddRequestParameter=id, 0 # 在请求中自动增加一个请求参数,参数名为 id,参数值为 0。可以用于提供固定参数。
							- AddRequestParameter=name, testFilter # 每个 AddRequestParameter过滤器,只能提供一个请求参数,提供多请求参数,需要定义多个过滤器。
							- AddRequestHeader=my-header, test-header-value # 在请求中自动增加一个请求头参数,参数名为 my-header,参数值为 test-header-value。
							- Authentication=token
							- name: Hystrix # 开启 Hystrix 容错过滤器
								args:
									name: fallbackcmd # 熔断错误
									fallbackUri: forward:/fallback # 出现服务调用问题,访问的本地路径是什么,也就是本地熔断处理逻辑
					- id: openfeign-service
						uri: lb://openfeign-service
						predicates:
							- Path=/service/**
						filters:
							- StripPrefix=1

eureka:
	client:
		service-url:
			defaultZone: http://localhost:8761/eureka/
hystrix:
	command:
		default:
			execution:
				timeout:
					# 如果 enabled 设置为 false,则请求超时交给 ribbon 控制,为 true,则超时作为容错根据
					enabled: true
				isolation:
					thread:
						timeoutInMilliseconds: 1000 # 超时时间,默认 1000ms
4 启动类
package com.bjsxt;

import org.springframework.boot.SpringApplication;
import org.springframework.boot.autoconfigure.SpringBootApplication;
import org.springframework.cloud.client.circuitbreaker.EnableCircuitBreaker;

@SpringBootApplication
@EnableCircuitBreaker
public class GatewayApp {


public static void main(String[] args) {


		SpringApplication.run(GatewayApp.class, args);
	}
}