
前言
在了解@Autowired之前,需要知道先提出几个问题:
1、InstantiationAwareBeanPostProcessor 这个接口是干嘛的,字面上理解是感知Bean实例话的处理器,这篇请看Spring之InstantiationAwareBeanPostProcessor 理解
2、什么是依赖注入?
依赖注入:Dependency Injection,简称DI,说白了就是利用反射机制为类的属性赋值的操作。
3、什么是注入,注到哪里?
注入就是为某个对象的外部资源赋值,注入某个对象所需要的外部资源(包括对象、资源、常量数据等)。IOC容器注入应用程序某个对象,应用程序所依赖的对象。
4、 什么时候注入的?
在完成对象的实例化之后(postProcessAfterInstantiation之后),为对象变量进行赋值的时候进行注入(populate)。
5、@Autowired注解是如何实现自动装配的?
看下文一步一步分析。
6、当为类型为A的Bean装配类型为B的属性时,如果此时Spring容器中存在多个类型为B的bean,此时Spring是如何处理的?
看下文一步一步分析。
看个demo
@ComponentScan
@Configuration
public class AutowiredBootstrap {


    public static void main(String[] args) {


        AnnotationConfigApplicationContext applicationContext = new AnnotationConfigApplicationContext(AutowiredBootstrap.class);
        A a = applicationContext.getBean(A.class);
        a.test();
        applicationContext.registerShutdownHook();
    }

    @Component
    public class A {


        @Autowired
        private B b;

        public void test() {


            System.out.println(b);
        }

    }

    @Component
    public class B {


    }

}
运行main()方法
fast.boot.autoconfigure.autowired.AutowiredBootstrap$B@233fe9b6
AutowiredAnnotationBeanPostProcessor原理
通过上面的demo我们完成了对A的自动装配,为其属性B完成了赋值操作,那么Spring是如何通过@Autowired来实现赋值的呢?我们知道,Spring在容器启动阶段,会先实例化bean,然后再对bean进行初始化操作。在初始化阶段,会通过调用Bean后置处理来完成对属性的赋值等操作,那么同理,要想实现@Autowired的功能,肯定也是通过后置处理器来完成的。这个后置处理器就是AutowiredAnnotationBeanPostProcessor。接下来我们就来看看这个类的源码。
何时被加入
1. org.springframework.context.annotation.AnnotationConfigApplicationContext#AnnotationConfigApplicationContext()
2. org.springframework.context.annotation.AnnotatedBeanDefinitionReader#AnnotatedBeanDefinitionReader(org.springframework.beans.factory.support.BeanDefinitionRegistry)
3. org.springframework.context.annotation.AnnotatedBeanDefinitionReader#AnnotatedBeanDefinitionReader(org.springframework.beans.factory.support.BeanDefinitionRegistry, org.springframework.core.env.Environment)
4. org.springframework.context.annotation.AnnotationConfigUtils#registerAnnotationConfigProcessors(org.springframework.beans.factory.support.BeanDefinitionRegistry)

何时被调用
Spring之InstantiationAwareBeanPostProcessor 理解 这里边分析的时候,会有一个org.springframework.beans.factory.support.AbstractAutowireCapableBeanFactory#doCreateBean 方法,该方法有个org.springframework.beans.factory.support.AbstractAutowireCapableBeanFactory#populateBean调用,从字面上理解就是属性填充,是在属性填充的时候去注入,下图可以看到获取所有的BeanPostProcessor,其中就有AutowiredAnnotationBeanPostProcessor,调用了它的
postProcessProperties方法。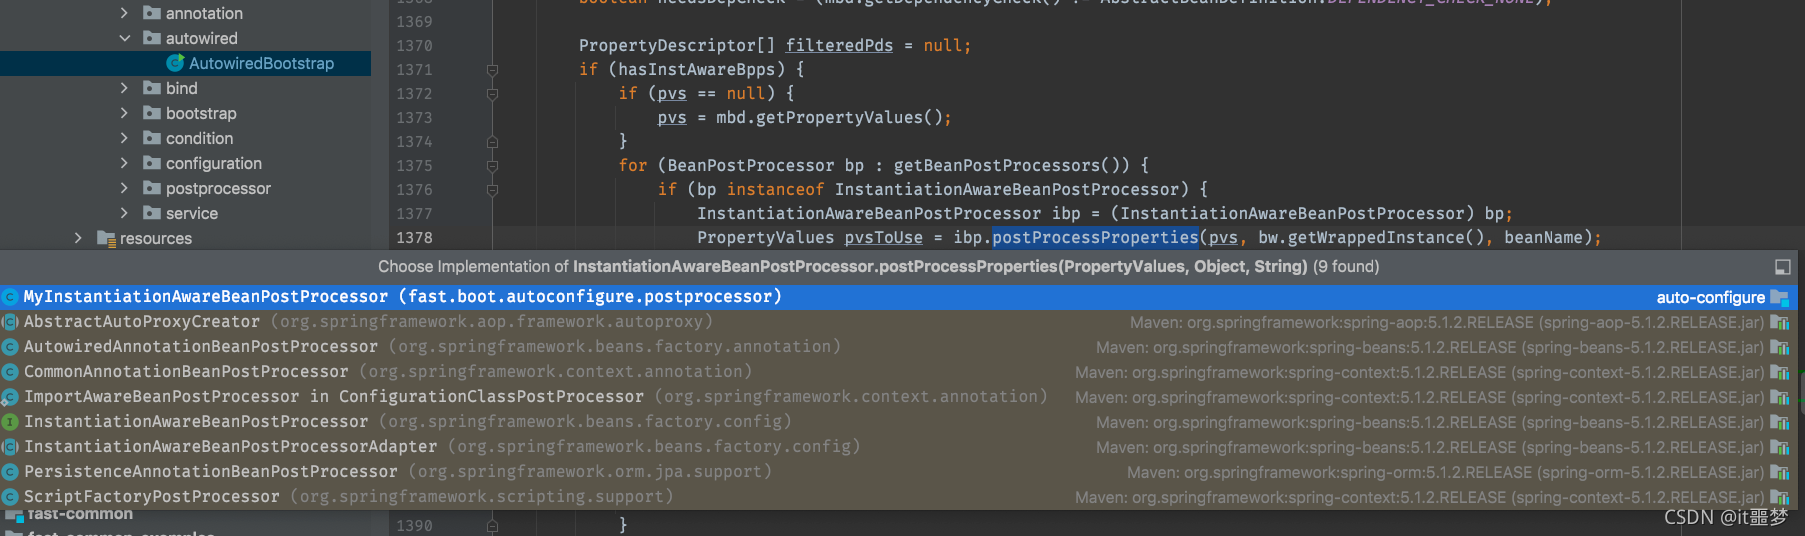
分析下org.springframework.beans.factory.annotation.AutowiredAnnotationBeanPostProcessor#findAutowiringMetadata
private InjectionMetadata findAutowiringMetadata(String beanName, Class<?> clazz, @Nullable PropertyValues pvs) {


		// Fall back to class name as cache key, for backwards compatibility with custom callers.
		String cacheKey = (StringUtils.hasLength(beanName) ? beanName : clazz.getName());
		// Quick check on the concurrent map first, with minimal locking.
		InjectionMetadata metadata = this.injectionMetadataCache.get(cacheKey);
		if (InjectionMetadata.needsRefresh(metadata, clazz)) {


			synchronized (this.injectionMetadataCache) {


				metadata = this.injectionMetadataCache.get(cacheKey);
				if (InjectionMetadata.needsRefresh(metadata, clazz)) {


					if (metadata != null) {


						metadata.clear(pvs);
					}
					//查找需要注入的bean,然后放入缓存
					metadata = buildAutowiringMetadata(clazz);
					this.injectionMetadataCache.put(cacheKey, metadata);
				}
			}
		}
		return metadata;
	}
这里需要注意的是buildAutowiringMetadata,这个方法,最终只会解析出Autowired注解、@Inject和@Value,这几个注解
private final Set<Class<? extends Annotation>> autowiredAnnotationTypes = new LinkedHashSet<>(4);
这个全局变量在AutowiredAnnotationBeanPostProcessor的构造方法中进行了初始化。初始化时,只向这个set集合中添加了三个元素:@Autowired、@Inject、@Value。其中@Inject注解是JSR-330规范中的注解。当调用findAutowiringMetadata()方法时,会根据autowiredAnnotationTypes这个全局变量中的元素类型来进行注解的解析
public AutowiredAnnotationBeanPostProcessor() {


		this.autowiredAnnotationTypes.add(Autowired.class);
		this.autowiredAnnotationTypes.add(Value.class);
		try {


			this.autowiredAnnotationTypes.add((Class<? extends Annotation>)
					ClassUtils.forName("javax.inject.Inject", AutowiredAnnotationBeanPostProcessor.class.getClassLoader()));
			logger.trace("JSR-330 'javax.inject.Inject' annotation found and supported for autowiring");
		}
		catch (ClassNotFoundException ex) {


			// JSR-330 API not available - simply skip.
		}
	}
metadata.inject()
- 对于属性上加了Autowired注解的,经过上一步解析后,会将字段解析为AutowiredFieldElement类型;如果是方法上加了Autowired注解,则会解析为AutowiredMethodElement类型。它们均是InjectedElement类的子类,里面封装了属性名,属性类型等信息。对于@Resource,@LookUp等注解被解析后,也会解析成对应的InjectedElement的子类:ResourceElement、LookUpElement,但是这两个注解是在其他后置处理器中被解析出来的,并不是在AutowiredAnnotationBeanPostProcessor中解析的。
- metadata.inject()方法最终会调用InjectedElement类的inject()方法。对于本文中的demo,此时B属性被解析后对应的InjectedElement是AutowiredFieldElement类,所以在此时会调用AutowiredFieldElement.inject()方法。
- 下面是AutowiredFieldElement.inject()方法的源码。在源码中加了部分注释,从源码中可以发现,核心代码是beanFactory.resolveDependency()。
protected void inject(Object bean, @Nullable String beanName, @Nullable PropertyValues pvs) throws Throwable {


		Field field = (Field) this.member;
		Object value;
		// 判断缓存(第一次注入B的时候,肯定没有缓存,所以会进入到else里面)
		// 当第一次注入完成后,会将B缓存到cachedFieldValue这个属性中,
		// 这样当其他的类同样需要注入B时,就会从这儿的缓存当中读取了。
		if (this.cached) {


			value = resolvedCachedArgument(beanName, this.cachedFieldValue);
		}
		else {


			DependencyDescriptor desc = new DependencyDescriptor(field, this.required);
			desc.setContainingClass(bean.getClass());
			Set<String> autowiredBeanNames = new LinkedHashSet<>(1);
			TypeConverter typeConverter = beanFactory.getTypeConverter();
			try {


				// 通过beanFactory.resolveDependency()方法,来从容器中找到B属性对应的值。
				value = beanFactory.resolveDependency(desc, beanName, autowiredBeanNames, typeConverter);
			}
			catch (BeansException ex) {


				throw new UnsatisfiedDependencyException(null, beanName, new InjectionPoint(field), ex);
			}
			// 省略部分代码...
			// 省略的这部分代码就是将value进行缓存,缓存到cachedFieldValue属性中
		}
		if (value != null) {


			// 通过Java的反射,为属性进行复制
			ReflectionUtils.makeAccessible(field);
			field.set(bean, value);
		}
	}
}
- 在beanFactory.resolveDependency()方法中主要调用了doResolveDependency()方法,下面我们重点分析一下doResolveDependency()这个方法,这个方法的代码很长。源码如下:
public Object doResolveDependency(DependencyDescriptor descriptor, @Nullable String beanName,
			@Nullable Set<String> autowiredBeanNames, @Nullable TypeConverter typeConverter) throws BeansException {


	InjectionPoint previousInjectionPoint = ConstructorResolver.setCurrentInjectionPoint(descriptor);
	try {


		Object shortcut = descriptor.resolveShortcut(this);
		if (shortcut != null) {


			return shortcut;
		}
		// 省略部分不重要的代码...

		// 属性的类型可能是数组、集合、Map类型,所以这一步是处理数组类型、Collection、Map类型的属性
		Object multipleBeans = resolveMultipleBeans(descriptor, beanName, autowiredBeanNames, typeConverter);
		if (multipleBeans != null) {


			return multipleBeans;
		}
		// 根据需要注入的类型type,从容器中找到有哪些匹配的Bean。
		Map<String, Object> matchingBeans = findAutowireCandidates(beanName, type, descriptor);
		// 如果从容器中没有找到,且@Autowired的required属性为true,那么则会抛出异常
		if (matchingBeans.isEmpty()) {


			if (isRequired(descriptor)) {


				raiseNoMatchingBeanFound(type, descriptor.getResolvableType(), descriptor);
			}
			return null;
		}

		String autowiredBeanName;
		Object instanceCandidate;

		// 先根据类型匹配出可以依赖注入的bean的Class,如果匹配出多个,则再根据属性名匹配
		if (matchingBeans.size() > 1) {


			autowiredBeanName = determineAutowireCandidate(matchingBeans, descriptor);
			if (autowiredBeanName == null) {


				if (isRequired(descriptor) || !indicatesMultipleBeans(type)) {


					// 当匹配到多个bean的Class,但是却不知道要选择哪一个注入时,就会抛出异常
					return descriptor.resolveNotUnique(type, matchingBeans);
				}
				else {


					// In case of an optional Collection/Map, silently ignore a non-unique case:
					// possibly it was meant to be an empty collection of multiple regular beans
					// (before 4.3 in particular when we didn't even look for collection beans).
					return null;
				}
			}
			instanceCandidate = matchingBeans.get(autowiredBeanName);
		}
		else {


			// We have exactly one match.
			// 只匹配到一个,则就使用匹配到这个类型
			Map.Entry<String, Object> entry = matchingBeans.entrySet().iterator().next();
			autowiredBeanName = entry.getKey();
			instanceCandidate = entry.getValue();
		}

		if (autowiredBeanNames != null) {


			autowiredBeanNames.add(autowiredBeanName);
		}
		// 此处instanceCandidate = B.class
		if (instanceCandidate instanceof Class) {


			// instanceCandidate是注入属性的类型,这个需要根据Class,通过FactoryBean的getBean()方法,创建该类型的单例bean
			instanceCandidate = descriptor.resolveCandidate(autowiredBeanName, type, this);
		}
		Object result = instanceCandidate;
		if (result instanceof NullBean) {


			// 如果没从容器中找到对应的bean,则需要判断属性值是否是必须注入的,
			// 即@Autowired(required=false/true),如果为true,则抛异常,这就是经常项目启动时,我们看到的异常
			if (isRequired(descriptor)) {


				raiseNoMatchingBeanFound(type, descriptor.getResolvableType(), descriptor);
			}
			result = null;
		}
		if (!ClassUtils.isAssignableValue(type, result)) {


			throw new BeanNotOfRequiredTypeException(autowiredBeanName, type, instanceCandidate.getClass());
		}
		return result;
	}
	finally {


		ConstructorResolver.setCurrentInjectionPoint(previousInjectionPoint);
	}
}
在上面的源码中,我们看到调用了resolveMultipleBeans(),这个方法是为了处理属性时数组、集合、Map的情况的,这个时候,resolveMultipleBeans()方法就会从容器中找到所有的B类型的Bean。resolveMultipleBeans()方法中会调用findAutowireCandidate()方法,从容器中找到对应类型的bean,实际上最终会调用getBean()方法,这样当B类型的对象还没被创建时,就会去创建。
- resolveMultipleBeans()方法的部分源码
private Object resolveMultipleBeans(DependencyDescriptor descriptor, @Nullable String beanName,
			@Nullable Set<String> autowiredBeanNames, @Nullable TypeConverter typeConverter) {


	Class<?> type = descriptor.getDependencyType();
    // 处理数组类型
	if (type.isArray()) {


        // findAutowireCandidates最终会调用getBean()方法
		Map<String, Object> matchingBeans = findAutowireCandidates(beanName, componentType,
				new MultiElementDescriptor(descriptor));
		return result;
	}
    // 处理集合类型
	else if (Collection.class.isAssignableFrom(type) && type.isInterface()) {


        // findAutowireCandidates最终会调用getBean()方法
		Map<String, Object> matchingBeans = findAutowireCandidates(beanName, elementType,
				new MultiElementDescriptor(descriptor));
		return result;
	}
    // 处理Map类型
	else if (Map.class == type) {


        // findAutowireCandidates最终会调用getBean()方法
		Map<String, Object> matchingBeans = findAutowireCandidates(beanName, valueType,
				new MultiElementDescriptor(descriptor));
		return matchingBeans;
	}
	else {


		return null;
	}
}
- 如果需要注入的属性是普通类型(非数组、集合、Map),那么方法会继续向下执行,会调用下面一行代码,根据属性的类型来查找bean
Map<String, Object> matchingBeans = findAutowireCandidates(beanName, type, descriptor);
可以看到又是调用findAutowireCandidates()方法,该方法最终会调用getBean()方法,所以它会从容器中找到对应类型的bean,即B类型的Bean。如果容器没有找到对应类型的Bean,且属性是必须注入的,即Autowired注解的required属性为true,那么就会抛出异常,这个异常就是我们经常看见的:NoSuchBeanDefinitionException。
// 如果容器汇总没有找到指定类型的bean,那么matchingBeans属性就是空的
if (matchingBeans.isEmpty()) {


	if (isRequired(descriptor)) {


        // 抛出异常
		raiseNoMatchingBeanFound(type, descriptor.getResolvableType(), descriptor);
	}
	return null;
}
matchingBeans这个map的大小可能大于1,因为从容器中找到了多个满足类型的Bean,即可能找到多个B类型的bean,那么这个时候就需要判断这多个bean中,究竟应该注入哪一个
if (matchingBeans.size() > 1) {


    // 判断应该使用哪一个bean
	autowiredBeanName = determineAutowireCandidate(matchingBeans, descriptor);
	if (autowiredBeanName == null) {


		if (isRequired(descriptor) || !indicatesMultipleBeans(type)) {


			// 当匹配到多个bean的Class,但是却不知道要选择哪一个注入时,就会抛出异常
			return descriptor.resolveNotUnique(type, matchingBeans);
		}
		else {


			return null;
		}
	}
	instanceCandidate = matchingBeans.get(autowiredBeanName);
}
在上面的代码中,会调用determineAutowireCandidate()方法,判断应该使用哪一个bean。如果determineAutowireCandidate()方法也无法决定使用哪一个,determineAutowireCandidate()就会返回null。这个时候如果属性又是必须注入的,即@Autowired的required=true,那么就会抛出异常(因为required=true表示这个属性是必须注入的,但是程序又不知道需要注入哪一个,所以就会出错),这个异常也是我们经常见到的:NoUniqueBeanDefinitionException。
"expected single matching bean but found " + beanNamesFound.size() + ": " + StringUtils.collectionToCommaDelimitedString(beanNamesFound)
那么determineAutowireCandidate()又是如何判断应该决定使用哪一个bean的呢?Spring会先找到加了@Primary注解的bean,比如Spring找到了两个B类型的Bean,分别为B1和B2,如果B1的类上加了@Primary注解,那么就会优先使用userServiceImpl1类型的Bean进行注入。如果都没有加@Primary注解,那么就会找加了@Priority注解的bean,优先级最高的会被优先选中。如果都没有加@Priority,那么就会根据属性的名称和Spring中beanName来判断,例如:B1和B2在Spring容器中beanName分别是B1和B2。如果此时A中需要注入的B类型的属性名是b1,那么Spring就会为其注入B1类型的单例对象;如果属性名是b2,那么Spring就会为其注入B2。如果属性名与b1不相等,也与b2不相等,那么就会返回null,那么在方法的调用处,就会抛出NoUniqueBeanDefinitionException异常。
这就是我们平常所说的@Autowired注解是先根据类型注入,当碰到多个相同类型时,就会根据属性名注入。它的实现原理就是在如下代码中实现的。
protected String determineAutowireCandidate(Map<String, Object> candidates, DependencyDescriptor descriptor) {


	Class<?> requiredType = descriptor.getDependencyType();
	// 根据Primary注解来决定优先注入哪个bean
	String primaryCandidate = determinePrimaryCandidate(candidates, requiredType);
	if (primaryCandidate != null) {


		return primaryCandidate;
	}
	// 根据@Priority注解的优先级来决定注入哪个bean
	String priorityCandidate = determineHighestPriorityCandidate(candidates, requiredType);
	if (priorityCandidate != null) {


		return priorityCandidate;
	}
	// 如果既没有指定@Primary,也没有指定@Priority,那么就会根据属性的名称来决定注入哪个bean
	// 如果要注入的属性的名称与Bean的beanName相同或者别名相同,那么会就会优先注入这个Bean
	for (Map.Entry<String, Object> entry : candidates.entrySet()) {


		String candidateName = entry.getKey();
		Object beanInstance = entry.getValue();
		if ((beanInstance != null && this.resolvableDependencies.containsValue(beanInstance)) ||
				matchesBeanName(candidateName, descriptor.getDependencyName())) {


			return candidateName;
		}
	}
	// 前面三种情况都没有确定要注入哪个bean,那么就返回null。当返回null时,那么就会再调用该方法出抛出异常。
	return null;
}
- 当matchingBeans大于1,且通过determineAutowireCandidate()方法确认了使用哪个bean注入时,或者当matchingBeans=1时,后面就会根据确定的beanName,来从容器中找到对应的Bean,然后将Bean返回,最后在AutowiredFeildElement.inject()方法中,通过反射进行注入,完成自动装配。
- 至此,AutowiredAnnotationBeanPostProcessor就通过postProcessPropertyValues()方法完成了自动装配。以上就是@Autowired注解的实现原理。