SRE运维工程师笔记-Linux基础入门
1. Linux基础
1.1 用户类型
- root用户
一个特殊的管理账户
也被称为超级用户
root已接近完整的系统控制
对系统损害几乎有无限的能力
除非必要,不要登录为root - 普通(非特权)用户
权限有限
造成损害的能力比较有限
1.2 终端terminal

设备终端:键盘、鼠标、显示器
1.2.1 终端类型
- 控制台终端: /dev/console
- 串行终端:/dev/ttyS#
- 虚拟终端:tty:teletypewriters, /dev/tty#,tty 可有n个,Ctrl+Alt+F#
- 图形终端:startx, xwindows
CentOS 6: Ctrl + Alt + F7
CentOS 7: 在哪个终端启动,即位于哪个虚拟终端 - 伪终端:pty:pseudo-tty , /dev/pts/# 如:SSH远程连接
1.2.2 查看当前的终端设备
tty命令可以查看当前所在终端
范例:
[root@Centos-8 ~]# tty
/dev/pts/1

dws@ubuntu1804:~$ tty
/dev/pts/0
1.3 交互式接口
交互式接口:启动终端后,在终端设备附加一个交互式应用程序
1.3.1 交互式接口类型
- GUI:Graphic User Interface
X protocol, window manager, desktop
Desktop:
GNOME (C, 图形库gtk),
KDE (C++,图形库qt)
XFCE (轻量级桌面) - CLI:Command Line Interface
shell程序
1.3.2 什么是shell
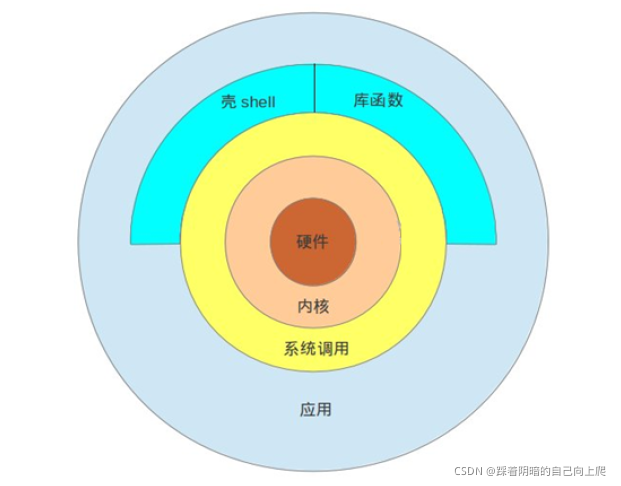
Shell 是Linux系统的用户界面,提供了用户与内核进行交互操作的一种接口。它接收用户输入的命令并
把它送入内核去执行
shell也被称为LINUX的命令解释器(command interpreter),Shell 本身是一个程序。将用户输入的
命令行拆解为”命令名“与”参数“。接着,根据命令名找到对应要执行的程序,对被执行的程序进行初始
化,然后将刚才解析出来的参数传给该程序并执行
shell是一种高级程序设计语言,提供了变量,函数,条件判断,循环等开发语言的功能
由于Shell本身是个程序,所以它可以被任何用户自己开发的各种Shell所代替
1.3.3 各种shell

- sh:Steve Bourne
- bash:Bourne-Again Shell,GPL,CentOS 和 Ubuntu 默认使用
- csh:c shell , C 语言风格
- tcsh
- ksh :Korn Shell, AIX 默认 shell
- zsh: MacOS默认shell
1.3.4 bash shell
GNU Bourne-Again Shell(bash)是GNU计划中重要的工具软件之一,目前也是 Linux标准的shell,与sh兼容
显示当前使用的shell
[root@Centos-8 ~]# echo ${SHELL}
/bin/bash

dws@ubuntu1804:~$ echo ${SHELL}
/bin/bash
1.4 设置主机名
# 临时生效
hostname  NAME

#持久生效,支持Centos7和Ubuntu18.04以上版本
hostnamectl set-hostname NAME
范例:
[root@Centos-8 ~]# hostname bj-yz-k8s-node1-100-10.magedu.local
注意:
- 主机名不支持使用下划线,但支持横线,可使用字母,横线或数字组合
- 有些软件对主机名有特殊要求
范例:
[root@Centos-8 ~]# hostnamectl set-hostname centos8.1
[root@Centos-8 ~]# systemctl restart postfix
Job for postfix.service failed because the control process exited with error code.
See "systemctl status postfix.service" and "journalctl -xe" for details.

1.5 命令提示符 prompt
登录Linux后,默认的系统命令提示符毫无没有个性,无法明显辨别生产和测试环境,而导致误操作。可以通过修改PS1变量实现个性的提示符格式,避免这种低级错误
范例:#管理员 $普通用户
#Centos默认提示符
[root@Centos-8 ~]#
[user@centos8 ~]$

#Ubuntu默认提示符
root@ubuntu1804:~#
dws@ubuntu1804:~$
显示提示符格式
[root@Centos-8 ~]# echo $PS1
[\u@\h \W]\$

root@ubuntu1804:~# echo $PS1
\[\e]0;\u@\h: \w\a\]${debian_chroot:+($debian_chroot)}\u@\h:\w\$
修改提示符格式范例
[root@Centos-8 ~]#PS1="\[\e[1;5;41;33m\][\u@\h \W]\\$\[\e[0m\]"
[root@Centos-8 ~]#PS1="\[\e[1;32m\][\t \[\e[1;33m\]\u\[\e[35m\]@\h\[\e[1;31m\] \W\[\e[1;32m\]]\[\e[0m\]\\$"


提示符格式说明:
- \e 控制符\033
- \u 当前用户
- \h 主机名简称
- \H 主机名
- \w 当前工作目录
- \W 当前工作目录基名
- \t 24小时时间格式
- \T 12小时时间格式
- ! 命令历史数
- #开机后命令历史数
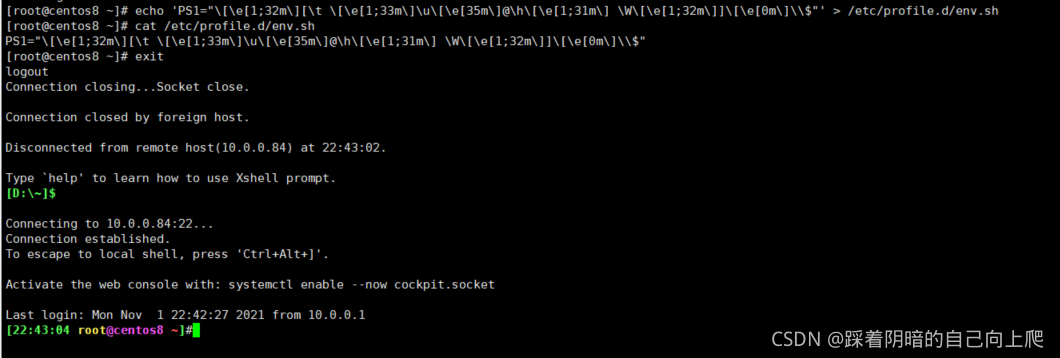
范例:在CentOS系统实现持久保存提示符格式
[root@centos8 ~]# echo 'PS1="\[\e[1;32m\][\t \[\e[1;33m\]\u\[\e[35m\]@\h\[\e[1;31m\]\W\[\e[1;32m\]]\[\e[0m\]\\$"' > /etc/profile.d/env.sh
[root@centos8 ~]# cat /etc/profile.d/env.sh
PS1="\[\e[1;32m\][\t \[\e[1;33m\]\u\[\e[35m\]@\h\[\e[1;31m\] \W\[\e[1;32m\]]\[\e[0m\]\\$"
 范例:实现Ubuntu系统持久保存提示符格式
root@ubuntu1804:~# echo "PS1='\[\e[1;35m\][\u@\h \W]\\$\[\e[0m\]'" >> .bashrc
root@ubuntu1804:~# tail -1 .bashrc
PS1='\[\e[1;35m\][\u@\h \W]\$\[\e[0m\]'

1.6 执行命令
1.6.1 执行命令过程
输入命令后回车,提请shell程序找到键入命令所对应的可执行程序或代码,并由其分析后提交给内核分配资源将其运行起来
1.6.2 shell中可执行的两类命令
- 内部命令:由shell自带的,而且通过某命令形式提供, ,用户登录后自动加载并常驻内存中
- 外部命令:在文件系统路径下有对应的可执行程序文件,当执行命令时才从磁盘加载至内存中,执行完毕后从内存中删除
区别指定的命令是内部或外部命令
type COMMAND
范例: 查看是否存在对应内部和外部命令
[root@centos8 ~]#type -a echo
echo is a shell builtin
echo is /usr/bin/echo

1.6.2.1 内部命令相关
help 内部命令列表
enable 管理内部命令
- enable cmd 启用内部命令
- enable –n cmd 禁用内部命令
- enable –n 查看所有禁用的内部命令
1.6.2.2 执行外部命令
查看外部命令路径:
which -a
which --skip-alias
whereis
Hash缓存表
系统初始hash表为空,当外部命令执行时,默认会从PATH路径下寻找该命令,找到后会将这条命令的路径记录到hash表中,当再次使用该命令时,shell解释器首先会查看hash表,存在将执行之,如果不存在,将会去PATH路径下寻找,利用hash缓存表可大大提高命令的调用速率
hash 命令常见用法
- hash 显示hash缓存
- hash -l 显示hash缓存,可作为输入使用
- hash -p path name 将命令全路径path起别名为name
- hash -t name 打印缓存中name的路径
- hash -d name 清除name缓存
- hash -r 清除缓存
1.6.3 命令别名
对于经常执行的较长的命令,可以将其定义成较短的别名,以方便执行显示当前shell进程所有可用的命令别名
alias
定义别名NAME,其相当于执行命令VALUE
alias NAME=‘VALUE’
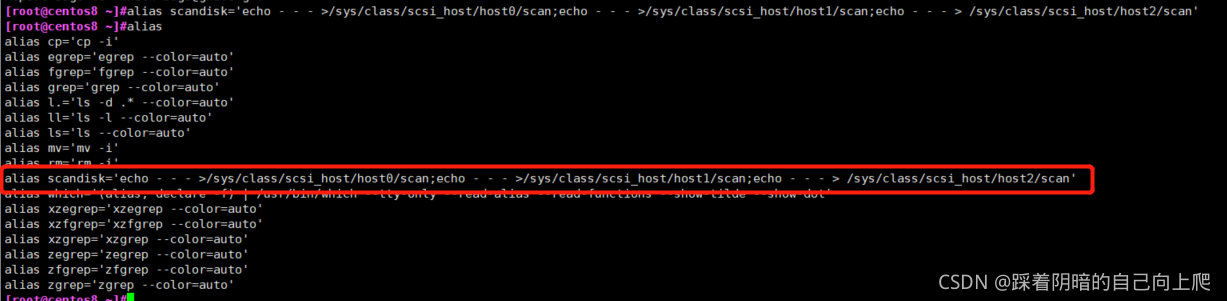
范例:扫描新加的磁盘
[root@centos8 ~]#alias scandisk='echo - - - >/sys/class/scsi_host/host0/scan;echo - - - >/sys/class/scsi_host/host1/scan;echo - - - > /sys/class/scsi_host/host2/scan'
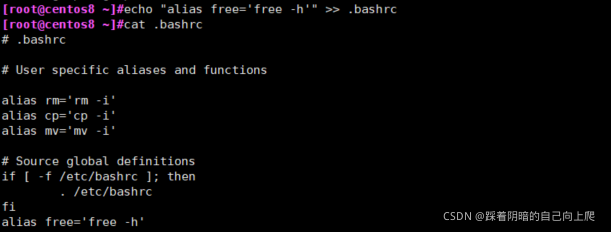
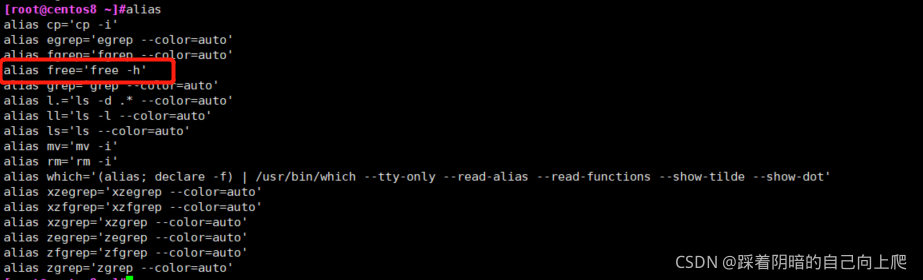
 范例: 持久保存别名
[root@centos8 ~]#echo "alias free='free -h'" >> .bashrc
[root@centos8 ~]#cat .bashrc
# .bashrc

# User specific aliases and functions

alias rm='rm -i'
alias cp='cp -i'
alias mv='mv -i'

# Source global definitions
if [ -f /etc/bashrc ]; then
	. /etc/bashrc
fi
alias free='free -h'
设置完以后要登出再登陆才能生效
 撤消别名:unalias
unalias [-a] name [name …]
unalias -a #取消所有别名
注意:在命令行中定义的别名,仅对当前shell进程有效;如果想永久有效,要定义在配置文件中
- 仅对当前用户:~/.bashrc
- 对所有用户有效:/etc/bashrc
编辑配置给出的新配置不会立即生效,bash进程重新读取配置文件
source /path/to/config_file
. /path/to/config_file
如果别名同原命令同名,如果要执行原命令,可使用
\ALIASNAME
“ALIASNAME”
‘ALIASNAME’
command ALIASNAME
/path/commmand #只适用于外部命令
1.6.4 命令格式
COMMAND [OPTIONS…] [ARGUMENTS…]
COMMAND [COMMAND] [COMMAND] …
选项:用于启用或关闭命令的某个或某些功能
- 短选项:UNIX 风格选项,-c 例如:-l, -h
- 长选项:GNU风格选项,–word 例如:–all, --human
- BSD风格选项: 一个字母,例如:a,使用相对较少
参数:命令的作用对象,比如:文件名,用户名等
范例:
[root@centos8 ~]#id -u user
1000

[root@centos8 ~]#ls -a
.   anaconda-ks.cfg  .bash_logout   .bashrc  .config  .dbus    Documents  .esd_auth      initial-setup-ks.cfg  Music     .pki    .tcshrc    Videos
..  .bash_history    .bash_profile  .cache   .cshrc   Desktop  Downloads  .ICEauthority  .local                Pictures  Public  Templates  .Xauthority
[root@centos8 ~]#ls -all
total 48
dr-xr-x---. 15 root root 4096 Oct 31 21:25 .
dr-xr-xr-x. 18 root root  236 Oct 25 22:45 ..
-rw-------.  1 root root 1442 Oct 25 22:55 anaconda-ks.cfg
-rw-------.  1 root root 1398 Nov  1 23:05 .bash_history
-rw-r--r--.  1 root root   18 May 11  2019 .bash_logout
-rw-r--r--.  1 root root  176 May 11  2019 .bash_profile
-rw-r--r--.  1 root root  197 Nov  1 23:03 .bashrc
drwx------. 10 root root  236 Oct 31 21:19 .cache
drwx------. 11 root root  215 Oct 31 21:19 .config
-rw-r--r--.  1 root root  100 May 11  2019 .cshrc
drwx------.  3 root root   25 Oct 25 23:02 .dbus
drwxr-xr-x.  2 root root    6 Oct 31 21:18 Desktop
drwxr-xr-x.  2 root root    6 Oct 31 21:18 Documents
drwxr-xr-x.  2 root root    6 Oct 31 21:18 Downloads
-rw-------.  1 root root   16 Oct 31 21:18 .esd_auth
-rw-------.  1 root root  310 Oct 31 21:18 .ICEauthority
-rw-r--r--.  1 root root 1806 Oct 25 23:33 initial-setup-ks.cfg
drwx------.  3 root root   19 Oct 31 21:18 .local
drwxr-xr-x.  2 root root    6 Oct 31 21:18 Music
drwxr-xr-x.  2 root root    6 Oct 31 21:18 Pictures
drwxr-----.  3 root root   19 Oct 31 21:18 .pki
drwxr-xr-x.  2 root root    6 Oct 31 21:18 Public
-rw-r--r--.  1 root root  129 May 11  2019 .tcshrc
drwxr-xr-x.  2 root root    6 Oct 31 21:18 Templates
drwxr-xr-x.  2 root root    6 Oct 31 21:18 Videos
-rw-------.  1 root root   56 Oct 31 21:25 .Xauthority

[root@centos8 ~]#free -h
              total        used        free      shared  buff/cache   available
Mem:          1.7Gi       434Mi       430Mi       9.0Mi       925Mi       1.2Gi
Swap:         2.0Gi       1.0Mi       2.0Gi
[root@centos8 ~]#free -human
free: invalid option -- 'u'

Usage:
 free [options]

Options:
 -b, --bytes         show output in bytes
     --kilo          show output in kilobytes
     --mega          show output in megabytes
     --giga          show output in gigabytes
     --tera          show output in terabytes
     --peta          show output in petabytes
 -k, --kibi          show output in kibibytes
 -m, --mebi          show output in mebibytes
 -g, --gibi          show output in gibibytes
     --tebi          show output in tebibytes
     --pebi          show output in pebibytes
 -h, --human         show human-readable output
     --si            use powers of 1000 not 1024
 -l, --lohi          show detailed low and high memory statistics
 -t, --total         show total for RAM + swap
 -s N, --seconds N   repeat printing every N seconds
 -c N, --count N     repeat printing N times, then exit
 -w, --wide          wide output

     --help     display this help and exit
 -V, --version  output version information and exit

For more details see free(1).


[root@centos8 ~]#ps a
    PID TTY      STAT   TIME COMMAND
   3352 tty1     Ss+    0:00 /sbin/agetty -o -p -- \u --noclear tty1 linux
  47468 pts/0    Ss     0:00 -bash
  47604 pts/0    R+     0:00 ps a
注意:
- 多个选项以及多参数和命令之间使用空白字符分隔
- 取消和结束命令执行:Ctrl+c,Ctrl+d
- 多个命令可以用 “;” 符号分开
- 一个命令可以用\分成多行
1.7 常见命令
1.7.1 查看硬件信息
1.7.1.1 查看CPU
lscpu命令可以查看cpu信息
cat /proc/cpuinfo也可看查看到
范例 :
[root@CentOS-8 ~]#lscpu
Architecture:        x86_64
CPU op-mode(s):      32-bit, 64-bit
Byte Order:          Little Endian
CPU(s):              4
On-line CPU(s) list: 0-3
Thread(s) per core:  1
Core(s) per socket:  2
Socket(s):           2
NUMA node(s):        1
Vendor ID:           GenuineIntel
CPU family:          6
Model:               142
Model name:          Intel(R) Core(TM) i5-8250U CPU @ 1.60GHz
Stepping:            10
CPU MHz:             1800.001
BogoMIPS:            3600.00
Hypervisor vendor:   VMware
Virtualization type: full
L1d cache:           32K
L1i cache:           32K
L2 cache:            256K
L3 cache:            6144K
NUMA node0 CPU(s):   0-3
Flags:               fpu vme de pse tsc msr pae mce cx8 apic sep mtrr pge mca cmov pat pse36 clflush mmx fxsr sse sse2 ss ht syscall nx pdpe1gb rdtscp lm constant_tsc arch_perfmon nopl xtopology tsc_reliable nonstop_tsc cpuid pni pclmulqdq ssse3 fma cx16 pcid sse4_1 sse4_2 x2apic movbe popcnt tsc_deadline_timer xsave avx f16c rdrand hypervisor lahf_lm abm 3dnowprefetch cpuid_fault invpcid_single pti ssbd ibrs ibpb stibp fsgsbase tsc_adjust bmi1 avx2 smep bmi2 invpcid mpx rdseed adx smap clflushopt xsaveopt xsavec xsaves arat md_clear flush_l1d arch_capabilities

[root@CentOS-8 ~]#cat /proc/cpuinfo
1.7.1.2 查看内存大小
[root@CentOS-8 ~]#free
              total        used        free      shared  buff/cache   available
Mem:        1996236      781604      720956       10824      493676     1038368
Swap:       2097148           0     2097148
[root@CentOS-8 ~]#cat /proc/meminfo
MemTotal:        1996236 kB
MemFree:          721196 kB
MemAvailable:    1038608 kB
Buffers:            3276 kB
Cached:           422136 kB
SwapCached:            0 kB
Active:           424028 kB
Inactive:         348408 kB
Active(anon):     349048 kB
Inactive(anon):     8800 kB
Active(file):      74980 kB
Inactive(file):   339608 kB
Unevictable:           0 kB
Mlocked:               0 kB
SwapTotal:       2097148 kB
SwapFree:        2097148 kB
Dirty:                 4 kB
Writeback:             0 kB
AnonPages:        328796 kB
Mapped:           191304 kB
Shmem:             10824 kB
KReclaimable:      68264 kB
Slab:             213252 kB
SReclaimable:      68264 kB
SUnreclaim:       144988 kB
KernelStack:        8848 kB
PageTables:        23732 kB
NFS_Unstable:          0 kB
Bounce:                0 kB
WritebackTmp:          0 kB
CommitLimit:     3095264 kB
Committed_AS:    1748092 kB
VmallocTotal:   34359738367 kB
VmallocUsed:           0 kB
VmallocChunk:          0 kB
Percpu:            96256 kB
HardwareCorrupted:     0 kB
AnonHugePages:    129024 kB
ShmemHugePages:        0 kB
ShmemPmdMapped:        0 kB
HugePages_Total:       0
HugePages_Free:        0
HugePages_Rsvd:        0
HugePages_Surp:        0
Hugepagesize:       2048 kB
Hugetlb:               0 kB
DirectMap4k:      212864 kB
DirectMap2M:     1884160 kB
DirectMap1G:           0 kB
1.7.1.3 查看硬盘和分区情况
[root@CentOS-8 ~]#lsblk
NAME   MAJ:MIN RM  SIZE RO TYPE MOUNTPOINT
sda      8:0    0   20G  0 disk
├─sda1   8:1    0    1G  0 part /boot
├─sda2   8:2    0   10G  0 part /
├─sda3   8:3    0    2G  0 part [SWAP]
├─sda4   8:4    0    1K  0 part
└─sda5   8:5    0    7G  0 part /home
sr0     11:0    1  8.6G  0 rom
[root@CentOS-8 ~]#cat /proc/partitions
major minor  #blocks  name

   8        0   20971520 sda
   8        1    1048576 sda1
   8        2   10485760 sda2
   8        3    2097152 sda3
   8        4          1 sda4
   8        5    7337984 sda5
  11        0    9047040 sr0
1.7.2 查看系统版本信息
1.7.2.1 查看系统架构
root@ubuntu2004:~# arch
x86_64

[root@centos8 ~]# arch
x86_64

[root@rhel5 ~]# arch
i686
1.7.2.2 查看内核版本
[root@centos8 ~]#uname -r
4.18.0-147.el8.x86_64

[root@centos7 ~]#uname -r
3.10.0-1062.el7.x86_64

[root@centos6 ~]# uname -r
2.6.32-754.el6.x86_64

[root@ubuntu1804 ~]#uname -r
4.15.0-29-generic
1.7.2.3 查看操作系统发行版本
#CentOS8 查看发行版本
[root@CentOS-8 ~]#cat /etc/redhat-release
CentOS Linux release 8.3.2011

[15:29:52 root@CentOS-8 ~]#cat /etc/os-release
NAME="CentOS Linux"
VERSION="8"
ID="centos"
ID_LIKE="rhel fedora"
VERSION_ID="8"
PLATFORM_ID="platform:el8"
PRETTY_NAME="CentOS Linux 8"
ANSI_COLOR="0;31"
CPE_NAME="cpe:/o:centos:centos:8"
HOME_URL="https://centos.org/"
BUG_REPORT_URL="https://bugs.centos.org/"
CENTOS_MANTISBT_PROJECT="CentOS-8"
CENTOS_MANTISBT_PROJECT_VERSION="8"

[15:32:30 root@CentOS-8 ~]#lsb_release -a
LSB Version:    :core-4.1-amd64:core-4.1-noarch
Distributor ID: CentOS
Description:    CentOS Linux release 8.3.2011
Release:        8.3.2011
Codename:       n/a

#Ubuntu查看发行版本
du@ubuntu1804:~$ cat /etc/os-release
NAME="Ubuntu"
VERSION="18.04.5 LTS (Bionic Beaver)"
ID=ubuntu
ID_LIKE=debian
PRETTY_NAME="Ubuntu 18.04.5 LTS"
VERSION_ID="18.04"
HOME_URL="https://www.ubuntu.com/"
SUPPORT_URL="https://help.ubuntu.com/"
BUG_REPORT_URL="https://bugs.launchpad.net/ubuntu/"
PRIVACY_POLICY_URL="https://www.ubuntu.com/legal/terms-and-policies/privacy-policy"
VERSION_CODENAME=bionic
UBUNTU_CODENAME=bionic

du@ubuntu1804:~$ cat /etc/issue
Ubuntu 18.04.5 LTS \n \l

du@ubuntu1804:~$ lsb_release -a
No LSB modules are available.
Distributor ID: Ubuntu
Description:    Ubuntu 18.04.5 LTS
Release:        18.04
Codename:       bionic
范例:查看OS版本
[root@centos8 ~]#lsb_release -is
CentOS
[root@centos8 ~]#lsb_release -cs
Core
[root@centos8 ~]#lsb_release -rs
8.2.2004

[root@centos7 ~]#lsb_release -is
CentOS
[root@centos7 ~]#lsb_release -cs
Core
[root@centos7 ~]#lsb_release -rs
7.9.2009

[root@centos6 ~]#lsb_release -is
CentOS
[root@centos6 ~]#lsb_release -cs
Final
[root@centos6 ~]#lsb_release -rs
6.10

root@ubuntu2004:~# lsb_release -is
Ubuntu
root@ubuntu2004:~# lsb_release -cs
focal
root@ubuntu2004:~# lsb_release -rs
20.04

[root@ubuntu1804 ~]#lsb_release -is
Ubuntu
[root@ubuntu1804 ~]#lsb_release -cs
bionic
[root@ubuntu1804 ~]#lsb_release -rs
18.04
1.7.3 时间和日期
Linux的两种时钟
- 系统时钟:由Linux内核通过CPU的工作频率进行的
- 硬件时钟:主板
相关命令
- date 显示和设置系统时间
范例:
[root@CentOS-8 ~]#date +%s
1619336385
[root@CentOS-8 ~]#date -d @`date +%s`
Sun Apr 25 15:40:34 CST 2021

[root@CentOS-8 ~]#date -d @1619336385
Sun Apr 25 15:39:45 CST 2021

[root@CentOS-8 ~]#date -d @1619336385 +%F_%T
2021-04-25_15:39:45
- clock,hwclock: 显示硬件时钟
-s, --hctosys 以硬件时钟为准,校正系统时钟
-w, --systohc 以系统时钟为准,校正硬件时钟
范例:
[root@centos8 ~]#ll /usr/sbin/clock
lrwxrwxrwx. 1 root root 7 Apr 25  2021 /usr/sbin/clock -> hwclock
时区:
/etc/localtime
范例:
[root@centos8 ~]#timedatectl set-timezone Asia/Shanghai

[root@centos8 ~]#timedatectl status
               Local time: Mon 2020-07-27 17:20:56 CST
           Universal time: Mon 2020-07-27 09:20:56 UTC
                 RTC time: Mon 2020-07-27 09:20:56
               Time zone: Asia/Shanghai (CST, +0800)
System clock synchronized: yes
             NTP service: active
         RTC in local TZ: no

[root@centos8 ~]#ll /etc/localtime
lrwxrwxrwx. 1 root root 35 Dec 11 11:19 /etc/localtime ->
../usr/share/zoneinfo/Asia/Shanghai

root@ubuntu1804:~# cat /etc/timezone
Asia/Shanghai
显示日历:
cal –y
范例:
[15:41:25 root@CentOS-8 ~]#cal 9 1752
   September 1752
Su Mo Tu We Th Fr Sa
       1  2 14 15 16
17 18 19 20 21 22 23
24 25 26 27 28 29 30
1.7.4 关机和重启
关机:
- halt
- poweroff
重启
reboot
-f:强制,不调用shutdown
-p:切断电源
关机或重启:shutdown
shutdown [OPTION]... [TIME] [MESSAGE]
-r: reboot
-h: halt
-c:cancel
TIME:无指定,默认相当于+1(CentOS7)
- now: 立刻,相当于+0
- +#: 相对时间表示法,几分钟之后;例如 +3
- hh:mm: 绝对时间表示,指明具体时间
1.7.5 用户登录信息查看命令
- whoami: 显示当前登录有效用户
- who: 系统当前所有的登录会话
- w: 系统当前所有的登录会话及所做的操作
1.7.6 文本编辑
- nano 工具可以实现文本的编辑,上手容易,适合初学者
- gedit 工具是图形工具
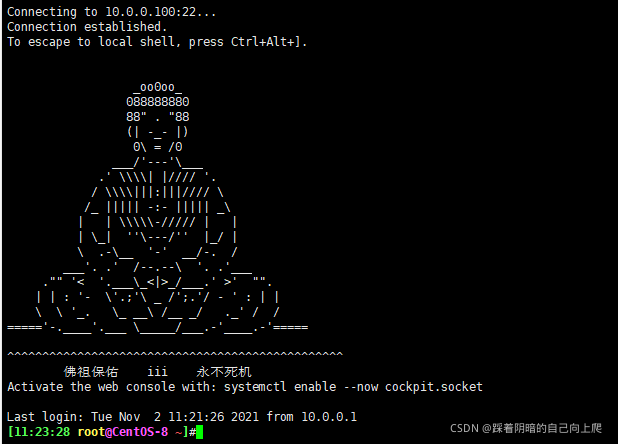
范例: 创建登录提示文件 /etc/motd
参考网站链接: link.
[root@CentOS-8 ~]#cat /etc/motd
1.7.7 会话管理
命令行的典型使用方式是,打开一个终端窗口(terminal window,以下简称"窗口"),在里面输入命令。用户与计算机的这种临时的交互,称为一次"会话"(session)
会话的一个重要特点是,窗口与其中启动的进程是连在一起的。打开窗口,会话开始;关闭窗口,会话结束,会话内部的进程也会随之终止,不管有没有运行完
一个典型的例子就是,SSH 登录远程计算机,打开一个远程窗口执行命令。这时,网络突然断线,再次登录的时候,是找不回上一次执行的命令的。因为上一次 SSH 会话已经终止了,里面的进程也随之消失了。为了解决这个问题,会话与窗口可以"解绑":窗口关闭时,会话并不终止,而是继续运行,等到以后需要的时候,再让会话"绑定"其他窗口
终端复用器软件就是会话与窗口的"解绑"工具,将它们彻底分离。
(1)它允许在单个窗口中,同时访问多个会话。这对于同时运行多个命令行程序很有用。
(2)它可以让新窗口"接入"已经存在的会话。
(3)它允许每个会话有多个连接窗口,因此可以多人实时共享会话。
(4)它还支持窗口任意的垂直和水平拆分。
类似的终端复用器还有Screen,Tmux
1.7.7.1 screen
利用screen 可以实现会话管理,如:新建会话,共享会话等
注意:CentOS7 来自于base源,CentOS8 来自于epel源
范例:安装 screen
#CentOS7 安装screen
[root@centos7 ~]#yum -y install screen

#CentOS8 安装screen
[root@centos8 ~]#dnf -y install epel-release
[root@centos8 ~]#dnf -y install screen
screen命令常见用法:
- 创建新screen会话
screen –S [SESSION] - 加入screen会话
screen –x [SESSION] - 退出并关闭screen会话
exit - 剥离当前screen会话
Ctrl+a,d - 显示所有已经打开的screen会话
screen -ls - 恢复某screen会话
screen -r [SESSION]
1.7.7.2 tmux
Tmux 是一个终端复用器(terminal multiplexer),类似 screen,但是更易用,也更强大
Tmux 就是会话与窗口的"解绑"工具,将它们彻底分离,功能如下
- 它允许在单个窗口中,同时访问多个会话。这对于同时运行多个命令行程序很有用。
- 它可以让新窗口"接入"已经存在的会话。
- 它允许每个会话有多个连接窗口,因此可以多人实时共享会话。
- 它还支持窗口任意的垂直和水平拆分
安装
yum install tmux
启动与退出
[root@centos8 ~]#tmux
[root@centos8 ~]#exit
logout
mux 窗口有大量的快捷键。所有快捷键都要通过前缀键唤起。默认的前缀键是 Ctrl+b,即先按下Ctrl+b,快捷键才会生效。帮助命令的快捷键是 Ctrl+b ? 然后,按下 q 键,就可以退出帮助
新建会话
第一个启动的 Tmux 窗口,编号是0,第二个窗口的编号是1,以此类推。这些窗口对应的会话,就是 0号会话、1 号会话。使用编号区分会话,不太直观,更好的方法是为会话起名。下面命令新建一个指定名称的会话。
tmux new -s <session-name>
tmux ls或Ctrl+b,s 可以查看当前所有的 Tmux 会话
tmux ls
tmux list-session
分离会话
在 Tmux 窗口中,按下Ctrl+b d或者输入tmux detach命令,就会将当前会话与窗口分离。
tmux detach
接入会话
tmux attach 命令用于重新接入某个已存在的会话。
tmux attach -t <session-name>
范例:
tmux attach -t 0
杀死会话
tmux kill-session命令用于杀死某个会话。
tmux kill-session -t <session-name>
切换会话
tmux switch命令用于切换会话
tmux switch -t <session-name>
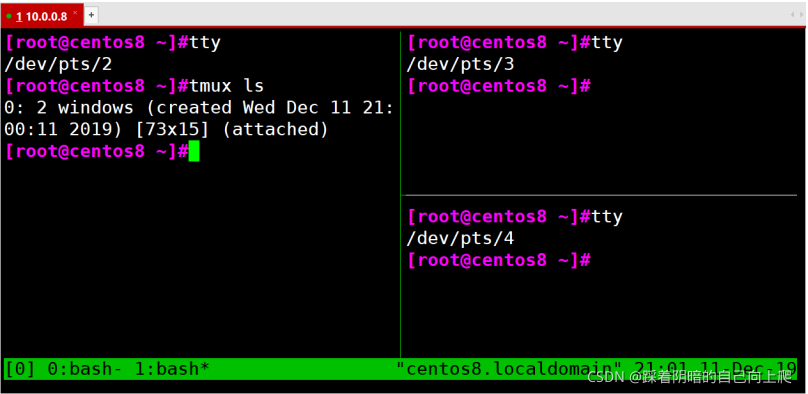
可以将窗口分成多个窗格(pane),每个窗格运行不同的命令
上下分窗格
tmux split-window
ctrl+b,"
左右分窗格
tmux split-window -h
ctrl+b,%
窗格快捷键
Ctrl+b %:划分左右两个窗格
Ctrl+b ":划分上下两个窗格
Ctrl+b <arrow key>:光标切换到其他窗格。<arrow key>是指向要切换到的窗格的方向键,比如切换到下方窗格,就按方向键↓
Ctrl+b ;:光标切换到上一个窗格
Ctrl+b o:光标切换到下一个窗格。
Ctrl+b {

    :当前窗格左移
Ctrl+b }:当前窗格右移
Ctrl+b Ctrl+o:当前窗格上移
Ctrl+b Alt+o:当前窗格下移
Ctrl+b x:关闭当前窗格
Ctrl+b !:将当前窗格拆分为一个独立窗口
Ctrl+b z:当前窗格全屏显示,再使用一次会变回原来大小
Ctrl+b Ctrl+<arrow key>:按箭头方向调整窗格大小
Ctrl+b q:显示窗格编号
窗口管理
除了将一个窗口划分成多个窗格,Tmux 也允许新建多个窗口
新建窗口
tmux new-window命令用来创建新窗口
tmux new-window
新建一个指定名称的窗口
tmux new-window -n <window-name>
切换窗口
tmux select-window命令用来切换窗口
切换到指定编号的窗口
tmux select-window -t <window-number>
切换到指定名称的窗口
tmux select-window -t <window-name>
窗口快捷键
Ctrl+b c:创建一个新窗口,状态栏会显示多个窗口的信息。
Ctrl+b p:切换到上一个窗口(按照状态栏上的顺序)。
Ctrl+b n:切换到下一个窗口。
Ctrl+b <number>:切换到指定编号的窗口,其中的<number>是状态栏上的窗口编号
Ctrl+b w:从列表中选择窗口
Ctrl+b ,:窗口重命名
列出所有快捷键,及其对应的 Tmux 命令
tmux list-keys
列出所有 Tmux 命令及其参数
tmux list-commands
1.7.8 输出信息echo
1.7.8.1 echo基本用法
echo 命令可以将后面跟的字符进行输出
功能:显示字符,echo会将输入的字符串送往标准输出。输出的字符串间以空白字符隔开, 并在最后加上换行号
语法:
echo [-neE][字符串]
选项:
- -E (默认)不支持 \ 解释功能
- -n 不自动换行
- -e 启用 \ 字符的解释功能
显示变量:
echo "$VAR_NAME” #用变量值替换,弱引用
echo '$VAR_NAME’ #变量不会替换,强引用
启用命令选项-e,若字符串中出现以下字符,则特别加以处理,而不会将它当成一般文字输出
- \a 发出警告声
- \b 退格键
- \c 最后不加上换行符号
- \e escape,相当于\033
- \n 换行且光标移至行首
- \r 回车,即光标移至行首,但不换行
- \t 插入ta b
- \ 插入\字符
- \0nnn 插入nnn(八进制)所代表的ASCII字符
- \xHH插入HH(十六进制)所代表的ASCII数字(man 7 ascii)
范例:
[root@centos8 ~]#echo -e 'a\x0Ab'
a
b
[root@centos8 ~]#echo -e '\033[43;31;1;5mmagedu\e[0m'
magedu

[root@centos8 ~]#echo -e '\x57\x41\x4E\x47'
WANG

[root@centos8 ~]#echo \$PATH
$PATH

[root@centos8 ~]#echo \
[root@centos8 ~]#echo \\
\
[root@centos8 ~]#echo \\\
>
[root@centos8 ~]#echo \\\\
\\

[root@centos8 ~]#echo "$PATH"
/usr/local/sbin:/usr/local/bin:/usr/sbin:/usr/bin:/root/bin
[root@centos8 ~]#echo '$PATH'
$PATH
1.7.8.2 echo 高级用法
在终端中,ANSI定义了用于屏幕显示的Escape屏幕控制码
具有颜色的字符,其格式如下:
"\033[字符背景颜色;字体颜色m字符串\033[0m"
\033[30m – \033[37m 设置前景色
\033[40m – \033[47m 设置背景色
#字符背景颜色范围: 40--47
40:黑
41:红
42:绿
43:黄
44:蓝
45:紫
46:深绿
47:白色
#字体颜色: 30--37
30: 黑
31: 红
32: 绿
33: 黄
34: 蓝
35: 紫
36: 深绿
37: 白色
加颜色只是以下控制码中的一种,下面是常见的一些ANSI控制码:
\033[0m 关闭所有属性
\033[1m 设置高亮度
\033[4m 下划线
\033[5m 闪烁
\033[7m 反显
\033[8m 消隐
\033[nA 光标上移n行
\033[nB 光标下移n行
\033[nC 光标右移n列
\033[nD 光标左移n列
\033[x;yH 设置光标位置x行y列
\033[2J 清屏
\033[K 清除从光标到行尾的内容
\033[s 保存光标位置
\033[u 恢复光标位置
\033[?25l 隐藏光标
\033[?25h 显示光标
\033[2J\033[0;0H 清屏且将光标置顶
1.8 字符集和编码
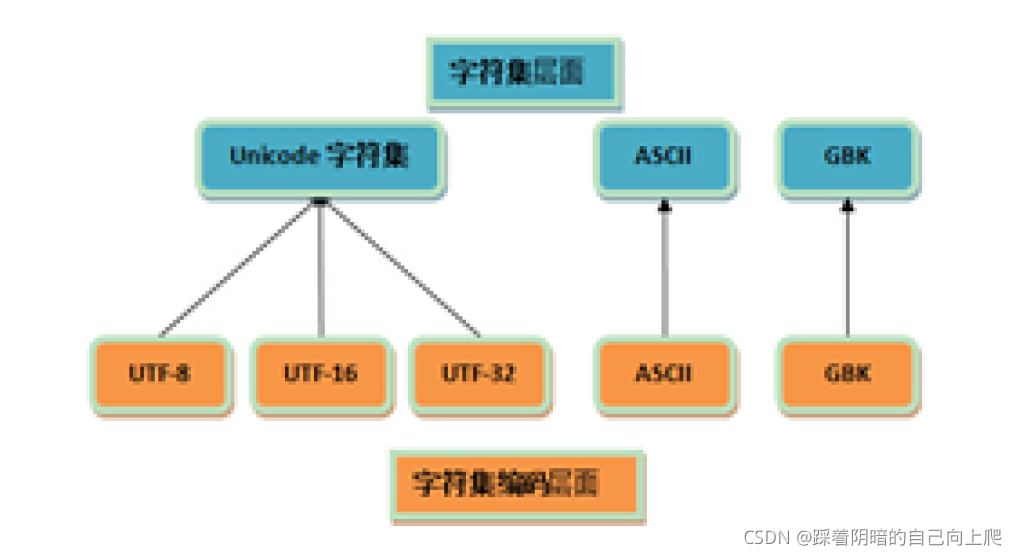
许多场合下,字符集与编码这两个概念常被混为一谈,但两者是有差别的。字符集与字符集编码是两个不同层面的概念
charset是character set的简写,即字符集,即二进制和字符的对应关系,不关注最终的存储形式
encoding是charset encoding的简写,即字符集编码,简称编码,实现如何将字符转化为实际的二进制进行存储或相反,编码决定了空间的使用的大小
1.8.1 ASCII码
计算机内部,所有信息最终都是一个二进制值。上个世纪60年代,美国制定了一套字符编码,对英语字符与二进制位之间的关系,做了统一规定,即ASCII(American Standard Code for Information
Interchange) 码
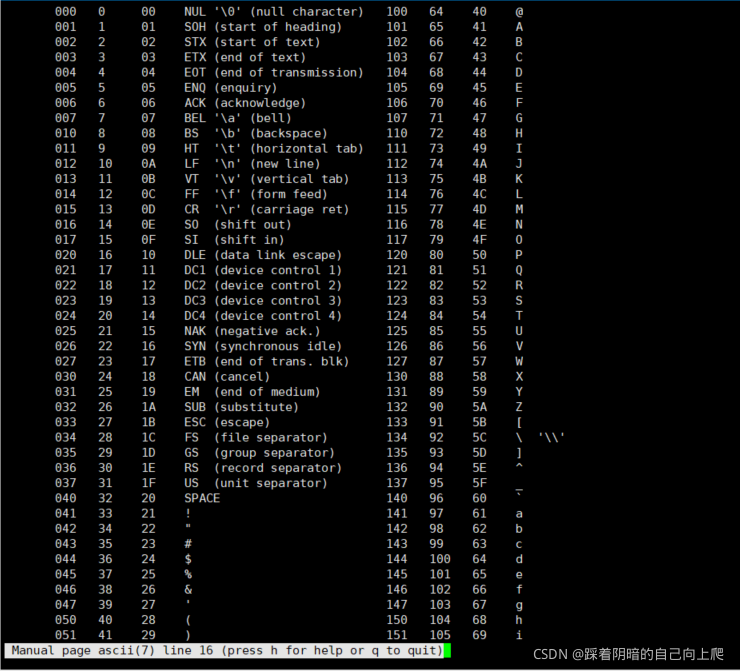
ASCII 码一共规定了128个字符的编码,占用了一个字节的后面7位,最前面的一位统一规定为 0

范例:查看ASCII表
[root@centos8 ~]#dnf -y install man-pages
[root@centos8 ~]#man ascii
1.8.2 Unicode
由于计算机是美国人发明的,因此,最早只有127个字母被编码到计算机里,即ASCII编码,但是要处理中文显然一个字节是不够的,至少需要两个字节,而且还不能和ASCII编码冲突,所以,中国制定了GB2312编码,用来把中文编进去。
全世界有上百种语言,日本把日文编到Shift_JIS里,韩国把韩文编到Euc-kr里,各国有各国的标准,就会不可避免地出现冲突,结果就是,在多语言混合的文本中,显示出来会有乱码
为了表示世界上所有语言中的所有字符。每一个符号都给予一个独一无二的编码数字,Unicode 是一个很大的集合,现在的规模可以容纳100多万个符号。Unicode 仅仅只是一个字符集,规定了每个字符对应的二进制代码,至于这个二进制代码如何存储则没有规定 。
Unicode编码方案
- UTF-8:变长,1到4个字节
- UTF-16:变长,2或4个字节
- UTF-32:固定长度,4个字节
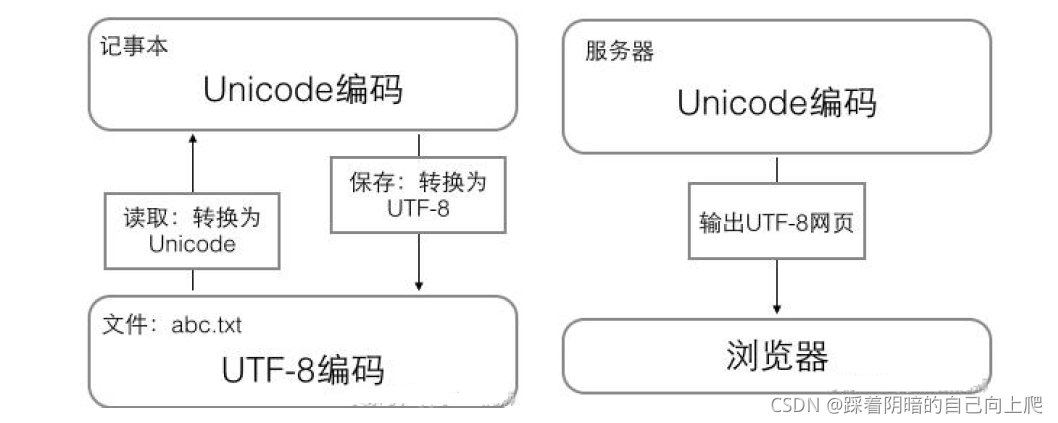
UTF-8 是目前互联网上使用最广泛的一种 Unicode 编码方式,可变长存储。使用 1 - 4 个字节表示一个字符,根据字符的不同变换长度。编码规则如下:
对于单个字节的字符,第一位设为 0,后面的 7 位对应这个字符的 Unicode 码。因此,对于英文中的 0- 127 号字符,与 ASCII 码完全相同。这意味着 ASCII 码的文档可用 UTF-8 编码打开
对于需要使用 N 个字节来表示的字符(N > 1),第一个字节的前 N 位都设为 1,第 N + 1 位设为0,剩余的 N - 1 个字节的前两位都设位 10,剩下的二进制位则使用这个字符的 Unicode 码来填充
编码转换和查询:
https://home.unicode.org/
https://unicode.yunser.com/unicode
http://www.chi2ko.com/tool/CJK.htm
https://www.bejson.com/convert/unicode_chinese/
https://javawind.net/tools/native2ascii.jsp?action=transform
http://tool.oschina.net/encode
http://web.chacuo.net/charsetescape
Unicode和UTF-8
| Unicode符号范围(十六进制) | UTF-8编码方式二进制) |
|---|---|
| 0000 0000-0000 007F | 0xxxxxxx |
| 0000 0080-0000 07FF | 110xxxxx 10xxxxxx |
| 0000 0800-0000 FFFF | 1110xxxx 10xxxxxx 10xxxxxx |
| 0001 0000-0010 FFFF | 11110xxx 10xxxxxx 10xxxxxx 10xxxxxx |
范例:Unicode 转换为 UTF-8
“汉”的 Unicode 码 0x6C49(110 110001 001001),需要三个字节存储,格式为: 1110xxxx 10xxxxxx 10xxxxxx,从后向前依次填充对应格式中的 x,多出的 x 用 0 补,得出UTF-8 编码为11100110 10110001 10001001

“马”的 Unicode 码 0x9A6C(1001 101001 101100),需要三个字节存储,格式为: 1110xxxx 10xxxxxx 10xxxxxx,从后向前依次填充对应格式中的 x,多出的 x 用 0 补,得出UTF-8 编码为11101001 10101001 10101100
范例:修改LANG变量实现中文语言提示
[root@centos7 ~]#xxx
bash: xxx: command not found...
[root@centos7 ~]#echo $LANG
en_US.UTF-8
[root@centos7 ~]#LANG=zh_CN.UTF-8
[root@centos7 ~]#echo $LANG
zh_CN.UTF-8
[root@centos7 ~]#xxx
bash: xxx: 未找到命令...
1.9 命令行扩展和被括起来的集合
1.9.1 命令行扩展:``和$ ()
把一个命令的输出打印给另一个命令的参数
$(COMMAND) 或 `COMMAND`
范例:比较 “ ” ,‘ ’, ``三者区别
[root@centos8 ~]#echo "echo $HOSTNAME"
echo centos8.localdomain
[root@centos8 ~]#echo 'echo $HOSTNAME'
echo $HOSTNAME
[root@centos8 ~]#echo `echo $HOSTNAME`
centos8.localdomain

#结论:
单引号:强引用,六亲不认,变量和命令都不识别,都当成了普通的字符串,"最傻"
双引号:弱引用,不能识别命令,可以识别变量,"半傻不精"
反向单引号:里面的内容必须是能执行的命令并且有输出信息,变量和命令都识别,并且会将反向单引号的内容当成命令进行执行后,再交给调用反向单引号的命令继续,"最聪明"
范例:
[root@centos8 data]#echo "This system's name is $(hostname)"
This system's name is centos8.magedu.org
[root@centos8 data]#echo "I am `whoami`"
I am root
[root@centos8 data]#touch $(date +%F).log
[root@centos8 data]#ls
2019-12-13.log
[root@centos8 data]#ll
total 0
-rw-r--r--. 1 root root 0 Dec 13 09:16 2019-12-13.log
[root@centos8 data]#touch `date +%F`.txt
[root@centos8 data]#ll
total 0
-rw-r--r--. 1 root root 0 Dec 13 09:16 2019-12-13.log
-rw-r--r--. 1 root root 0 Dec 13 09:17 2019-12-13.txt
[root@centos8 data]#touch `hostname`-`date +%F`.log
[root@centos8 data]#ll
total 0
-rw-r--r--. 1 root root 0 Dec 13 09:16 2019-12-13.log
-rw-r--r--. 1 root root 0 Dec 13 09:17 2019-12-13.txt
-rw-r--r--. 1 root root 0 Dec 13 09:18 centos8.magedu.org-2019-12-13.log
[root@centos8 ~]#touch `date +%F_%H-%M-%S`.log
[root@centos8 ~]#touch `date -d '-1 day' +%F`.log
范例:$( ) 和 ``
[root@centos8 ~]#ll `echo `date +%F`.txt`
-bash: .txt: command not found
ls: cannot access 'date': No such file or directory
ls: cannot access '+%F': No such file or directory

[root@centos8 ~]#ll $(echo $(date +%F).txt)
-rw-r--r-- 1 root root 0 Mar 20 09:55 2020-03-20.txt

[root@centos8 ~]#ll `echo $(date +%F).txt`
-rw-r--r-- 1 root root 0 Mar 20 09:55 2020-03-20.txt

[root@centos8 ~]#ll $(echo `date +%F`.txt)
-rw-r--r-- 1 root root 0 Mar 20 09:55 2020-03-20.txt
1.9.2 括号扩展:{ }
{} 可以实现打印重复字符串的简化形式
范例:
{

    元素1,元素2,元素3}
{

    元素1..元素2}
echo file{

    1,3,5} 结果为:file1 file3 file5
rm -f file{

    1,3,5}
echo {

    1..10}
echo {

    a..z}
echo {

    1..10..2}
echo {

    000..20..2}
范例:
[root@centos8 ~]#echo {000..20..2}
000 002 004 006 008 010 012 014 016 018 020

[root@centos8 ~]#echo {a..z..2}
a c e g i k m o q s u w y

[root@centos8 ~]#echo {A..z}
A B C D E F G H I J K L M N O P Q R S T U V W X Y Z [ ] ^ _ ` a b c d e f g h i
j k l m n o p q r s t u v w x y z
范例: 关闭和启用{}的扩展功能
[root@centos8 ~]#echo $-
himBHs
[root@centos8 ~]#echo {1..10}
1 2 3 4 5 6 7 8 9 10
[root@centos8 ~]#set +B
[root@centos8 ~]#echo $-
himHs
[root@centos8 ~]#echo {1..10}
{

    1..10}
[root@centos8 ~]#set -B
[root@centos8 ~]#echo $-
himBHs
[root@centos8 ~]#echo {1..10}
1 2 3 4 5 6 7 8 9 10
1.10 tab键补全
tab 键可以实现命令及路径等补全,提高输入效率,避免出错
1.10.1 命令补全
- 内部命令:
- 外部命令:bash根据PATH环境变量定义的路径,自左而右在每个路径搜寻以给定命令名命名的文件,第一次找到的命令即为要执行的命令
- 命令的子命令补全,需要安装 bash-completion
注意:用户给定的字符串只有一条惟一对应的命令,直接补全,否则,再次Tab会给出列表
范例:
[root@centos8 ~]#nmcli connection 2TAB
add delete edit help load monitor show
clone down export import modify reload up
1.10.2 路径补全
把用户给出的字符串当做路径开头,并在其指定上级目录下搜索以指定的字符串开头的文件名如果惟一:则直接补全,否则:再次Tab给出列表
1.10.3 双击Tab键
- command 2Tab 所有子命令或文件补全
- string2Tab 以string开头命令
- /2Tab 显示所有根目录下一级目录,包括隐藏目录
- ./2Tab 当前目录下子目录,包括隐藏目录
- *2Tab 当前目录下子目录,不包括隐藏目录
- ~2Tab 所有用户列表
- $2Tab 所有变量
- @2Tab /etc/hosts记录 (centos7 不支持)
- =2Tab 相当于ls –A (centos7不支持)
1.11 命令行历史
当执行命令后,系统默认会在内存记录执行过的命令
当用户正常退出时,会将内存的命令历史存放对应历史文件中,默认是 ~/.bash_history
登录shell时,会读取命令历史文件中记录下的命令加载到内存中
登录进shell后新执行的命令只会记录在内存的缓存区中;这些命令会用户正常退出时“追加”至命令历史文件中
利用命令历史。可以用它来重复执行命令,提高输入效率
命令:history
history [-c] [-d offset] [n]
history -anrw [filename]
history -ps arg [arg...]
- -c: 清空命令历史
- -d offset: 删除历史中指定的第offset个命令
- n: 显示最近的n条历史
- -a: 追加本次会话新执行的命令历史列表至历史文件
- -r: 读历史文件附加到历史列表
- -w: 保存历史列表到指定的历史文件
- -n: 读历史文件中未读过的行到历史列表
- -p: 展开历史参数成多行,但不存在历史列表中
- -s: 展开历史参数成一行,附加在历史列表后
命令历史相关环境变量
HISTSIZE:命令历史记录的条数
HISTFILE:指定历史文件,默认为~/.bash_history
HISTFILESIZE:命令历史文件记录历史的条数
HISTTIMEFORMAT="%F %T `whoami`" 显示时间和用户
HISTIGNORE="str1:str2*:…" 忽略str1命令,str2开头的历史
HISTCONTROL:控制命令历史的记录方式

ignoredups 是默认值,可忽略重复的命令,连续且相同为“重复”
ignorespace 忽略所有以空白开头的命令
ignoreboth 相当于ignoredups, ignorespace的组合
erasedups 删除重复命令
持久保存变量
- 以上变量可以 export 变量名=“值” 形式存放在 /etc/profile 或 ~/.bash_profile
范例:
[root@centos8 ~]#cat .bash_profile
# .bash_profile

# Get the aliases and functions
if [ -f ~/.bashrc ]; then
. ~/.bashrc
fi

# User specific environment and startup programs

PATH=$PATH:$HOME/bin

export PATH
export HISTCONTROL=ignoreboth
export HISTTIMEFORMAT="%F %T "

[root@centos8 ~]#history
1 2019-12-13 08:39:05 ls /data
2 2019-12-13 08:39:05 date
3 2019-12-13 08:39:05 vie0
4 2019-12-13 08:39:05 nano .bash_profile
5 2019-12-13 08:39:05 exit
1.12 调用命令行历史
#重复前一个命令方法
重复前一个命令使用上方向键,并回车执行
按 !! 并回车执行
输入 !-1 并回车执行
按 Ctrl+p 并回车执行

!:0 执行前一条命令(去除参数)
!n 执行history命令输出对应序号n的命令
!-n 执行history历史中倒数第n个命令
!string 重复前一个以“string”开头的命令
!?string 重复前一个包含string的命令
!string:p 仅打印命令历史,而不执行
!$:p 打印输出 !$ (上一条命令的最后一个参数)的内容
!*:p 打印输出 !*(上一条命令的所有参数)的内容
^string 删除上一条命令中的第一个string
^string1^string2 将上一条命令中的第一个string1替换为string2
!:gs/string1/string2 将上一条命令中所有的string1都替换为 string2
使用up(向上)和down(向下)键来上下浏览从前输入的命令
ctrl-r来在命令历史中搜索命令
(reverse-i-search)`’:
Ctrl+g:从历史搜索模式退出

#要重新调用前一个命令中最后一个参数
!$ 表示
Esc, . 点击Esc键后松开,然后点击 . 键
Alt+ . 按住Alt键的同时点击 . 键

command !^ 利用上一个命令的第一个参数做command的参数
command !$ 利用上一个命令的最后一个参数做command的参数
command !* 利用上一个命令的全部参数做command的参数
command !:n 利用上一个命令的第n个参数做command的参数
command !n:^ 调用第n条命令的第一个参数
command !n:$ 调用第n条命令的最后一个参数
command !n:m 调用第n条命令的第m个参数
command !n:* 调用第n条命令的所有参数
command !string:^ 从命令历史中搜索以 string 开头的命令,并获取它的第一个参数
command !string:$ 从命令历史中搜索以 string 开头的命令,并获取它的最后一个参数
command !string:n 从命令历史中搜索以 string 开头的命令,并获取它的第n个参数
command !string:* 从命令历史中搜索以 string 开头的命令,并获取它的所有参数
1.13 bash的快捷键
Ctrl + l 清屏,相当于clear命令
Ctrl + o 执行当前命令,并重新显示本命令
Ctrl + s 阻止屏幕输出,锁定
Ctrl + q 允许屏幕输出,解锁
Ctrl + c 终止命令
Ctrl + z 挂起命令
Ctrl + a 光标移到命令行首,相当于Home
Ctrl + e 光标移到命令行尾,相当于End
Ctrl + f 光标向右移动一个字符
Ctrl + b 光标向左移动一个字符
Alt + f 光标向右移动一个单词尾
Alt + b 光标向左移动一个单词首
Ctrl + xx 光标在命令行首和光标之间移动
Ctrl + u 从光标处删除至命令行首
Ctrl + k 从光标处删除至命令行尾
Alt + r 删除当前整行
Ctrl + w 从光标处向左删除至单词首
Alt + d 从光标处向右删除至单词尾
Ctrl + d 删除光标处的一个字符
Ctrl + h 删除光标前的一个字符
Ctrl + y 将删除的字符粘贴至光标后
Alt + c 从光标处开始向右更改为首字母大写的单词
Alt + u 从光标处开始,将右边一个单词更改为大写
Alt + l 从光标处开始,将右边一个单词更改为小写
Ctrl + t 交换光标处和之前的字符位置
Alt + t 交换光标处和之前的单词位置
Alt + # 提示输入指定字符后,重复显示该字符#次
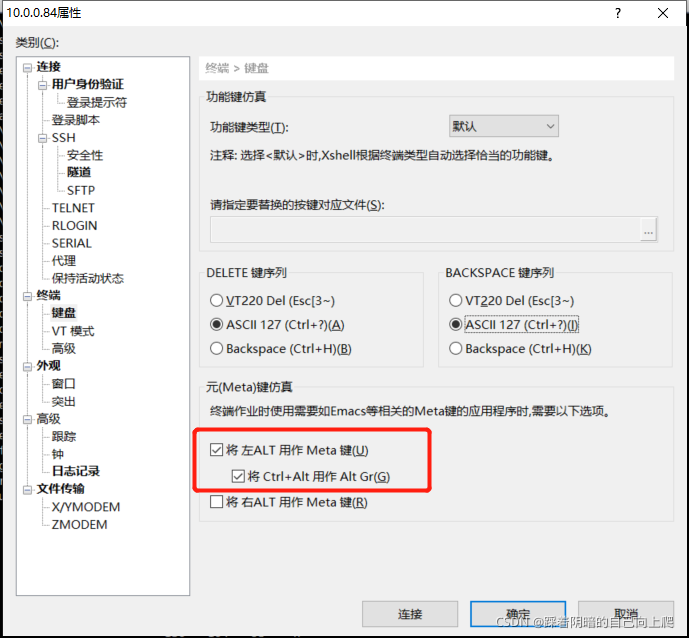
注意:Alt组合快捷键经常和其它软件冲突
范例:xshell中启动 alt 键
2. 获得帮助
获取帮助的能力决定了技术的能力!
多层次的帮助
- whatis
- command --help
- man and info
- /usr/share/do c/
- Red Hat documentation 、Ubuntu documentation
- 软件项目网站
- 其它网站
- 搜索
2.1 whatis
whatis 使用数据库来显示命令的简短描述
此工具在系统刚安装后,不可立即使用,需要制作数据库后才可使用
执行下面命令生成数据库
#CentOS 7 版本以后
mandb
#CentOS 6 版本之前
makewhatis
范例:
[root@centos8 ~]#whatis cal
cal (1) - display a calendar
cal (1p) - print a calendar
[root@centos8 ~]#man -f cal
cal (1) - display a calendar
cal (1p) - print a calendar
范例:
[root@centos8 ~]#whatis ls
ls: nothing appropriate.
#生成man相关数据库
[root@centos8 ~]#mandb
Processing manual pages under /usr/share/man...
Updating index cache for path `/usr/share/man/mann'. Wait...done.
Checking for stray cats under /usr/share/man...
...省略...
0 old database entries were purged.
[root@centos8 ~]#whatis ls
ls (1) - list directory contents
2.2 查看命令的帮助
2.2.1 内部命令帮助
- help COMMAND
- man bash
范例:
[root@centos8 ~]#type history
history is a shell builtin
[root@centos8 ~]#help history
history: history [-c] [-d offset] [n] or history -anrw [filename] or history -ps
arg [arg...]
    Display or manipulate the history list.

    Display the history list with line numbers, prefixing each modified
    entry with a `*'. An argument of N lists only the last N entries.

    Options:
       -c clear the history list by deleting all of the entries
       -d offset delete the history entry at position OFFSET.

       -a append history lines from this session to the history file
       -n read all history lines not already read from the history file and                 append them to the history list
       -r read the history file and append the contents to the history list
       -w write the current history to the history file
       -p perform history expansion on each ARG and display the result without             storing it in the history list
       -s append the ARGs to the history list as a single entry
    If FILENAME is given, it is used as the history file. Otherwise,
    if HISTFILE has a value, that is used, else ~/.bash_history.

    If the HISTTIMEFORMAT variable is set and not null, its value is used as a       format string for strftime(3) to print the time stamp associated with each       displayed history entry. No time stamps are printed otherwise.

    Exit Status:
    Returns success unless an invalid option is given or an error occurs.
2.2.2 外部命令及软件帮助
- COMMAND --help 或 COMMAND -h
- 使用 man 手册(manual): man COMMAND
- 信息页:info COMMAND
- 程序自身的帮助文档:README、INSTALL、ChangeLog
- 程序官方文档
- 相关网站,如:技术论坛
- 搜索引擎
2.3 外部命令的–help 或 -h 选项
显示用法总结和参数列表,大多数命令使用,但并非所有的
范例:
[root@centos8 ~]#date --help
Usage: date [OPTION]... [+FORMAT]
  or: date [-u|--utc|--universal] [MMDDhhmm[[CC]YY][.ss]]
Display the current time in the given FORMAT, or set the system date.

[root@centos8 ~]#cal -h
Usage:
  cal [options] [[[day] month] year]
  cal [options] <timestamp|monthname>

[root@centos8 ~]#openssl --help
Invalid command '--help'; type "help" for a list.

[root@centos8 ~]#date -h
date: invalid option -- 'h'
Try 'date --help' for more information.

[root@centos8 ~]#shutdown -h
Shutdown scheduled for Fri 2020-03-20 08:26:27 CST, use 'shutdown -c' to cancel.
格式说明:
- [] 表示可选项
- CAPS或 <> 表示变化的数据
- … 表示一个列表
- x |y| z 的意思是“ x 或 y 或 z ”
- -abc的 意思是 -a -b –c
- { } 表示分组
练习:
1、显示当前时间,格式:2016-06-18 10:20:30
2、显示前天是星期几
3、设置当前日期为2019-08-07 06:05:10
1、显示当前时间,格式:2016-06-18 10:20:30
[root@centos8 ~]#date "+%Y-%m-%d %H:%M:%S"
2021-11-02 23:25:33

2、显示前天是星期几
[root@centos8 ~]#date -d '-2 day' +%A
Sunday

3、设置当前日期为2019-08-07 06:05:10
[root@centos8 ~]#date -s "08/07/2019 06:05:10"
Wed Aug  7 06:05:10 CST 2019
2.4 man 命令
man 提供命令帮助的文件,手册页存放在/usr/share/man
几乎每个命令都有man的“页面”
中文man需安装包
- man-pages
- man-pages-zh-CN
man 页面分组
不同类型的帮助称为不同的“章节”,统称为Linux手册,man 1 man
- 1:用户命令
- 2:系统调用
- 3:C库调用
- 4:设备文件及特殊文件
- 5:配置文件格式
- 6:游戏
- 7:杂项
- 8:管理类的命令
- 9:Linux 内核API
man命令的配置文件:
#CentOS 6 之前版 man 的配置文件
/etc/man.config
#CentOS 7 之后版 man 的配置文件
/etc/man_db.conf
#ubuntu man 的配置文件
/etc/manpath.config
格式:
MANPATH /PATH/TO/SOMEWHERE #指明man文件搜索位置
也可以指定位置下搜索COMMAND命令的手册页并显示
man -M /PATH/TO/SOMEWHERE COMMAND
查看man手册页
man [OPTION...] [SECTION] PAGE...
man [章节] keyword
man 帮助段落说明
- NAME 名称及简要说明
- SYNOPSIS 用法格式说明
- [] 可选内容
- <> 必选内容
- a|b 二选一
- { } 分组
- … 同一内容可出现多次
- DESCRIPTION 详细说明
- OPTIONS 选项说明
- EXAMPLES 示例
- FILES 相关文件
- AUTHOR 作者
- COPYRIGHT 版本信息
- REPORTING BUGS bug信息
- SEE ALSO 其它帮助参考
man命令的操作方法:使用less命令实现
- space, ^v, ^f, ^F: 向文件尾翻屏
- b, ^b: 向文件首部翻屏
- d, ^d: 向文件尾部翻半屏
- u, ^u: 向文件首部翻半屏
- RETURN, ^N, e, ^E or j or ^J: 向文件尾部翻一行
- y or ^Y or ^P or k or ^K:向文件首部翻一行
- q: 退出
- #:跳转至第#行
- 1G: 回到文件首部
- G:翻至文件尾部
- /KEYWORD
以KEYWORD指定的字符串为关键字,从当前位置向文件尾部搜索;不区分字符大小写
n:下一个
N:上一个 - ?KEYWORD
以KEYWORD指定的字符串为关键字,从当前位置向文件首部搜索;不区分字符大小写
n:跟搜索命令同方向,下一个
N:跟搜索命令反方向,上一个
常用选项
- 列出所有帮助
man -a keyword
- 搜索man手册
#列出所有匹配的页面,使用 whatis 数据库
man -k keyword
- 相当于 whatis
man -f keyword
- 打印man帮助文件的路径
man -w [章节] keyword
范例:
[root@centos8 ~]#dnf install man-pages
[root@centos8 ~]#man -w 1 passwd
/usr/share/man/man1/passwd.1.gz
[root@centos8 ~]#whatis passwd
openssl-passwd (1ssl) - compute password hashes
passwd (1) - update user's authentication tokens
[root@centos8 ~]#man 1ssl openssl-passwd
[root@centos8 ~]#dnf install man-pages
[root@centos8 ~]#man 7 ascii
[root@centos8 ~]#man 7 utf8
范例: 查看passwd相关命令和文件,man帮助文件路径
[root@centos8 ~]#whereis passwd
passwd: /usr/bin/passwd /etc/passwd /usr/share/man/man1/passwd.1.gz /usr/share/man/man5/passwd.5.gz
范例:
1、在本机字符终端登录时,除显示原有信息外,再显示当前登录终端号,主机名和当前时间
2、今天18:30自动关机,并提示用户
1、在本机字符终端登录时,除显示原有信息外,再显示当前登录终端号,主机名和当前时间
[root@lianxi01 ~ ]# cat /etc/issue
\S
Kernel \r on an \m Hostname:\n TTY:\l Time:\t

2、今天18:30自动关机,并提示用户
[root@centos8 ~]#shutdown -P 18:30 "Shut down at 18:30"
Shutdown scheduled for Wed 2019-08-07 18:30:00 CST, use 'shutdown -c' to cancel.

2.5 info
man常用于命令参考 ,GNU工具 info 适合通用文档参考
没有参数,列出所有的页面
info 页面的结构就像一个网站
每一页分为“节点”
链接节点之前 *
info 命令格式
info [ 命令 ]
导航info页
- 方向键,PgUp,PgDn 导航
- Tab键 移动到下一个链接
- d 显示主题目录
- Home 显示主题首部
- Enter进入 选定链接
- n/p/u/l 进入下/前/上一层/最后一个链接
- s 文字 文本搜索
- q 退出 info
2.6 命令自身提供的官方使用指南
/usr/share/doc
多数安装了的软件包的子目录,包括了这些软件的相关原理说明
常见文档:README INSTALL CHANGES
不适合其它地方的文档的位置
配置文件范例
HTML/PDF/PS 格式的文档
授权书详情
2.7 系统及第三方应用官方文档
2.7.1 通过在线文档获取帮助
http://www.github.com
https://www.kernel.org/doc/html/latest/
http://httpd.apache.org
http://www.nginx.org
https://mariadb.com/kb/en
https://dev.mysql.com/doc/
http://tomcat.apache.org
https://jenkins.io/zh/doc/
https://kubernetes.io/docs/home/
https://docs.openstack.org/train/
http://www.python.org
http://php.net
2.7.2 Linux官方在线文档和知识库
通过发行版官方的文档光盘或网站可以获得安装指南、部署指南、虚拟化指南等
http://kbase.redhat.com
http://www.redhat.com/docs
http://access.redhat.com
https://help.ubuntu.com/lts/serverguide/index.html
http://tldp.org
2.7.3 红帽全球技术支持服务
rhn.redhat.com或者本地卫星服务器/代理服务器
RHN账户为及其注册和基于网络管理的RHN用户
sosreport 收集所有系统上的日志信息的工具,并自动打成压缩包,方便技术支持人员和红帽全球支持提供分析问题依据
范例:
[root@centos8 ~]#dnf -y install sos
[root@centos8 ~]# sosreport
sosreport (version 3.6)
This command will collect diagnostic and configuration information from
this CentOS Linux system and installed applications.

An archive containing the collected information will be generated in /var/tmp/sos.8fs1kg3w and may be provided to a CentOS support
representative.

Any information provided to CentOS will be treated in accordance with
the published support policies at:

https://wiki.centos.org/

The generated archive may contain data considered sensitive and its
content should be reviewed by the originating organization before being
passed to any third party.

No changes will be made to system configuration.

Press ENTER to continue, or CTRL-C to quit.

Please enter the case id that you are generating this report for []: 2

  Setting up archive ...
  Setting up plugins ...
  Running plugins. Please wait ...

  Finishing plugins [Running: processor]
  Finished running plugins
Creating compressed archive...

Your sosreport has been generated and saved in:
   /var/tmp/sosreport-centos8-2-2020-03-20-xllummc.tar.xz

The checksum is: ffbbe6fa9f009f4024e272fbce500bff

Please send this file to your support representative.

[root@centos8 sysconfig]#ll /var/tmp/sosreport-centos8-2-2020-03-20-
xllummc.tar.xz
-rw------- 1 root root 4409596 Mar 20 18:57 /var/tmp/sosreport-centos8-2-2020-
03-20-xllummc.tar.xz
[root@centos8 sysconfig]#cd
[root@centos8 ~]#ll /var/tmp/sosreport-centos8-2-2020-03-20-xllummc.tar.xz
2.8 网站和搜索
http://www.google.com
Openstack filetype:pdf
rhca site:redhat.com/docs
http://bing.com
http://www.baidu.com
http://www.slideshare.net