协调布局CoordinatorLayout
概况
- CoordinatorLayout中文翻译为协调布局,它可以协调子布局之间交互,当触摸改变孩子View的时候会影响布局从而产生联动效果,产生的根源在于Behavior类
- CoordinatorLayout自己并不控制View,所有的控制权都在Behavior这个类
- 系统里Behavior有FloatingActionButton.Behavior和AppBarLayout.Behavior等等;我们平时用户那些联动都是靠系统定义的Behavior来实现
- 系统里面Behavoir有些实现了复杂的控制功能。但是毕竟有限,我们可以通过自定义的方式来实现自己的Behavior
自定义Behavior
自定义Behavior有两种方式
第一种方式
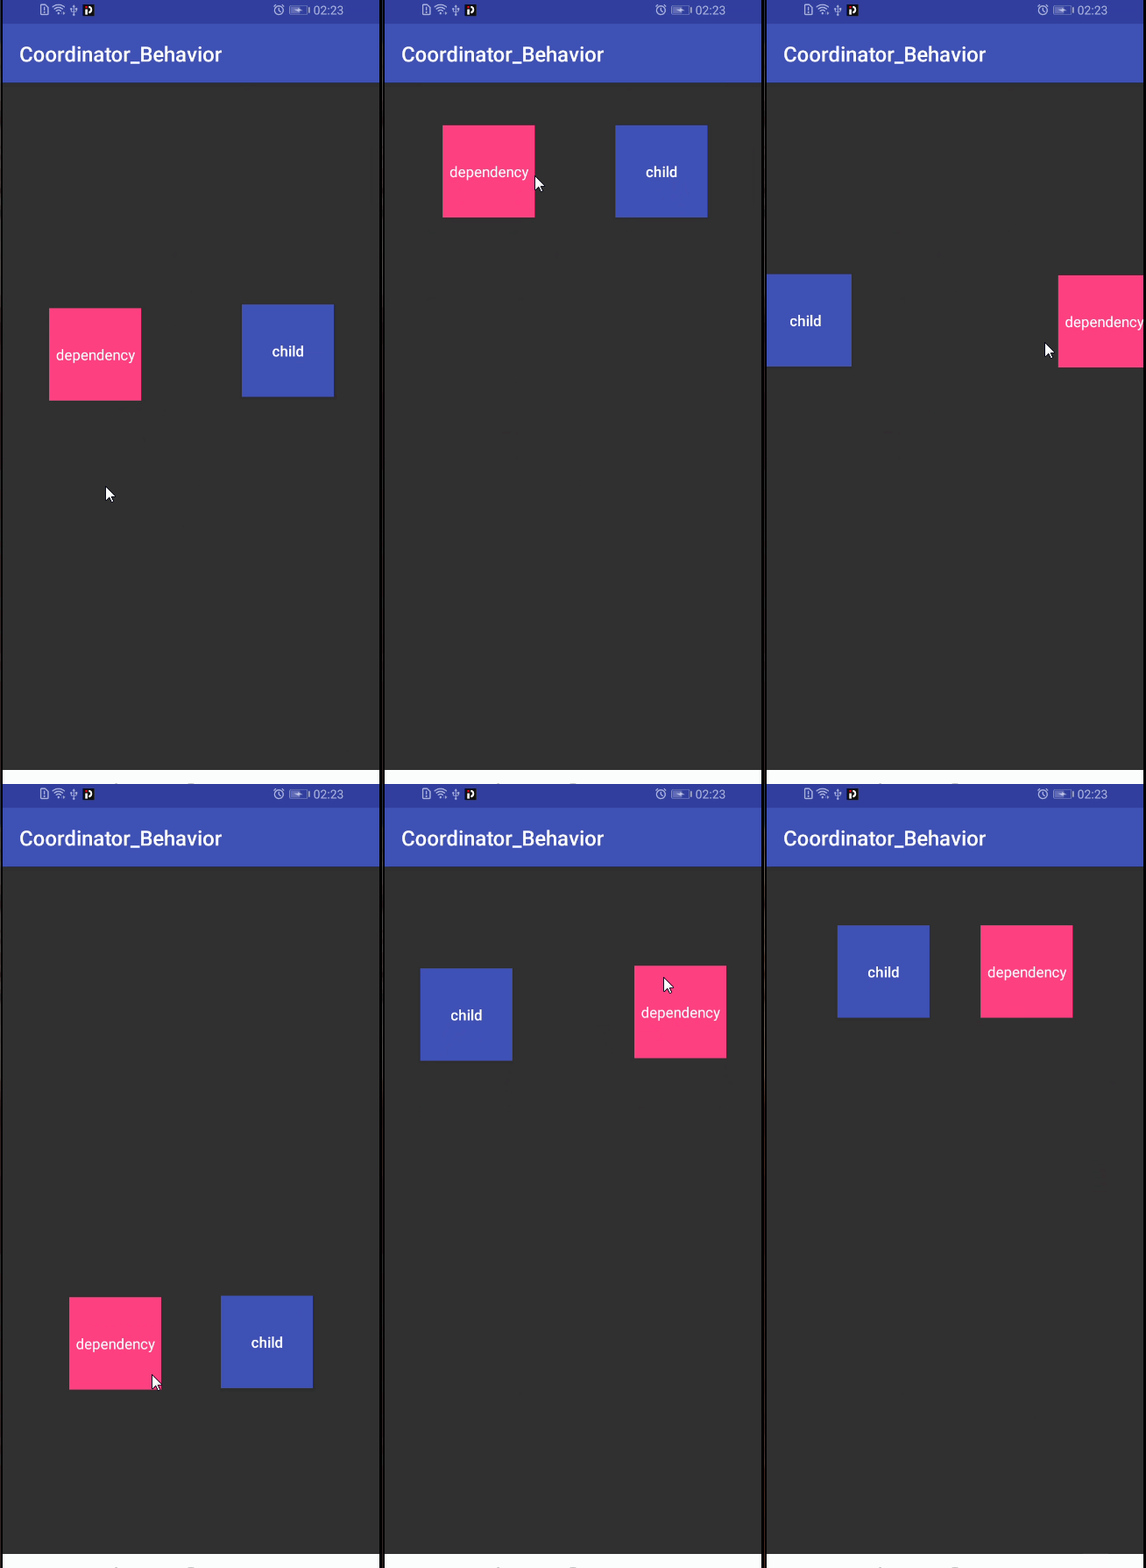
一个View监听另一个View的状态变化,实现方式如下
1.继承CoordinatorLayout.Behavior类
/**
 * 第一种自定义Behavior方式
 */
public class DependencyBehavior extends CoordinatorLayout.Behavior<Button> {
2.重写Behavior两个参数的构造方法
    /**
     * 这个构造方法必须重载,因为在CoordinatorLayout里利用反射去获取
     * Behavior的时候就是拿的这个构造
     */
    public DependencyBehavior(Context context, AttributeSet attrs) {


        super(context, attrs);
        width = context.getResources().getDisplayMetrics().widthPixels;
    }
3.重写layoutDependsOn和onDependentViewChanged方法
    /**
     * 确定依赖关系
     *
     * @param parent
     * @param child      要执行动作的View
     * @param dependency child要依赖的View,,,也就是Child要监听的View
     * @return 根据逻辑确定依赖关系
     */
    @Override
    public boolean layoutDependsOn(CoordinatorLayout parent, Button child, View dependency) {


        Log.e("Behavior", "----child: " + child.toString());
        Log.e("Behavior", "----dependency: " + dependency.toString());
        return dependency instanceof DragTextView;
    }

    /**
     * 状态(大小、位置、显示与否等)发生变化时该方法执行
     * 在这里我们定义child要执行的具体动作
     *
     * @param parent
     * @param child
     * @param dependency
     * @return
     */
    @Override
    public boolean onDependentViewChanged(CoordinatorLayout parent, Button child, View dependency) {


        int top = dependency.getTop();
        int left = dependency.getLeft();

        int x = width - left - child.getWidth();
        int y = top;
        setPosition(child, x, y);
        return true;
    }
4.在xml文件中引用app:layout_behavior
<?xml version="1.0" encoding="utf-8"?>
<androidx.coordinatorlayout.widget.CoordinatorLayout xmlns:android="http://schemas.android.com/apk/res/android"
    xmlns:app="http://schemas.android.com/apk/res-auto"
    android:id="@+id/activity_main"
    android:layout_width="match_parent"
    android:layout_height="match_parent">

    <Button
        android:layout_width="88dp"
        android:layout_height="88dp"
        android:background="@color/colorPrimary"
        android:gravity="center"
        android:text="child"
        android:textAllCaps="false"
        android:textColor="@android:color/white"
        app:layout_behavior="com.coordinator.behavior.first.DependencyBehavior" />

    <com.coordinator.behavior.first.DragTextView
        android:layout_width="88dp"
        android:layout_height="88dp"
        android:background="@color/colorAccent"
        android:gravity="center"
        android:text="dependency"
        android:textAllCaps="false"
        android:textColor="@android:color/white" />

</androidx.coordinatorlayout.widget.CoordinatorLayout>
5.运行效果

第二种方式
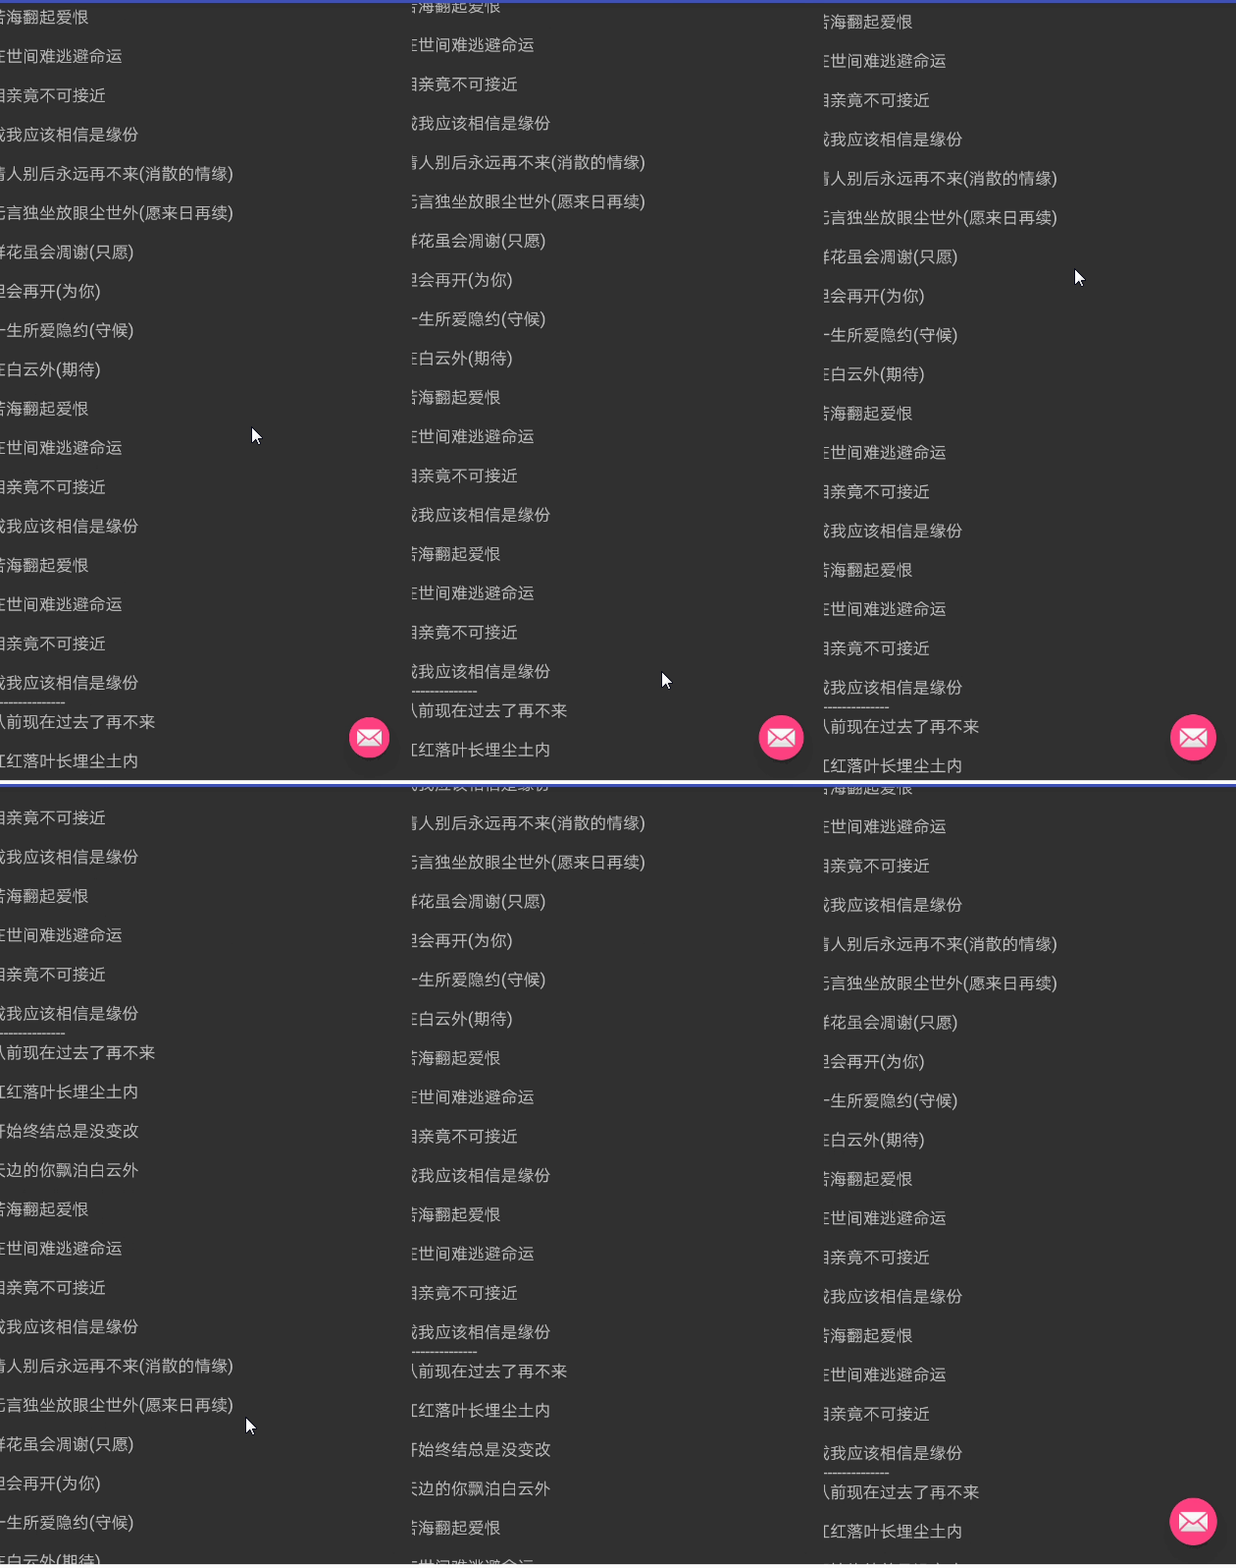
View监听CoordinatorLayout里的滑动状态,这个要求里面要有滑动的控件,最少要实现了NestedScrollingChild接口,比如RecyclerView,NestScrollView等滑动控件;
1.继承CoordinatorLayout.Behavior类或者系统的Behavior类
/**
 * 第二种自定义Behavior方式
 */
public class ScrollBehavior extends CoordinatorLayout.Behavior<FloatingActionButton> {
2.重写Behavior两个参数的构造方法
    /**
     * 这个构造方法必须重载,因为在CoordinatorLayout里利用反射去获取
     * Behavior的时候就是拿的这个构造
     */
    public ScrollBehavior(Context context, AttributeSet attrs) {


        super(context, attrs);
    }
3.至少重写onStartNestedScroll和onNestedScroll方法,当然还有其他也可以重写
    /**
     * 当子View调用NestedScrollingChild的方法startNestedScroll时,会调用该方法。
     * 一定要按照自己的需求返回true,该方法决定了当前控件是否能接收到其内部View(并非是直接子View)滑动时的参数
     *
     * @param coordinatorLayout
     * @param child             这个是要依赖其他滚动View的另一个View,这里是FloatingActionButton
     * @param directTargetChild 直接触发嵌套滚动的view的对象
     * @param target            触发嵌套滚动的view (在这里如果不涉及多层嵌套的话,target和directTargetChild是相同的)
     * @param nestedScrollAxes  嵌套滑动的方向标志
     * @return 根据返回值确定我们关心那个方向的滑动(x轴 / y轴),这里我们关心的是y轴方向
     */
    @Override
    public boolean onStartNestedScroll(CoordinatorLayout coordinatorLayout,
                                       FloatingActionButton child,
                                       View directTargetChild,
                                       View target,
                                       int nestedScrollAxes) {


        Log.e("123", "directTargetChild: " + directTargetChild);
        Log.e("123", "target: " + target);//在这里directTargetChild和target都是NestedScrollView
        return (nestedScrollAxes & ViewCompat.SCROLL_AXIS_VERTICAL) != 0;
    }

    /**
     * 当子View调用dispatchNestedPreScroll时会调用该方法
     * 该方法会传入内部View移动的dx,dy,如果你需要消耗一定的dx,dy,就会通过最后一个参数consumed
     * 进行指定。例如我要消耗一半的dy,就可以写consumed[1]=dy/2
     * dx表示本次滚动x方向产生的总距离
     *
     * @param coordinatorLayout
     * @param child             此处是FloatingActionButton
     * @param target            同上
     * @param dxConsumed        target已经消费的x方向的距离
     * @param dyConsumed        target已经消费的x方向的距离
     * @param dxUnconsumed      x方向剩下的滑动距离
     * @param dyUnconsumed      y方向剩下的滑动距离
     */
    @Override
    public void onNestedScroll(CoordinatorLayout coordinatorLayout,
                               FloatingActionButton child,
                               View target,
                               int dxConsumed,
                               int dyConsumed,
                               int dxUnconsumed,
                               int dyUnconsumed) {


        //Log.e("234", "===============dxConsumed: " + dxConsumed);
        Log.e("234", "===============dyConsumed: " + dyConsumed);
        //Log.e("234","===============dxUnconsumed: "+dxUnconsumed);
        Log.e("234", "===============dyUnconsumed: " + dyUnconsumed);
        if (((dyConsumed > 0 && dyUnconsumed == 0)
                || (dyConsumed == 0 && dyUnconsumed > 0))
        ) {

    //上滑隐藏
            child.animate()
                    .scaleY(0).scaleX(0)
                    .setDuration(200)
                    .start();
        } else if (((dyConsumed < 0 && dyUnconsumed == 0)
                || (dyConsumed == 0 && dyUnconsumed < 0))
        ) {

    //下滑显示
            child.animate()
                    .scaleY(1).scaleX(1)
                    .setDuration(200)
                    .start();
        }
    }
4.在xml文件中引用app:layout_behavior
<?xml version="1.0" encoding="utf-8"?>
<androidx.coordinatorlayout.widget.CoordinatorLayout xmlns:android="http://schemas.android.com/apk/res/android"
    xmlns:app="http://schemas.android.com/apk/res-auto"
    android:layout_width="match_parent"
    android:layout_height="match_parent"
    android:orientation="vertical">

    <androidx.core.widget.NestedScrollView
        android:layout_width="match_parent"
        android:layout_height="wrap_content">

        <TextView
            android:layout_width="match_parent"
            android:layout_height="wrap_content"
            android:text="@string/text" />

    </androidx.core.widget.NestedScrollView>

    <com.google.android.material.floatingactionbutton.FloatingActionButton
        android:id="@+id/fab"
        android:layout_width="wrap_content"
        android:layout_height="wrap_content"
        android:layout_gravity="end|bottom"
        android:layout_margin="16dp"
        android:src="@android:drawable/ic_dialog_email"
        app:backgroundTint="@color/colorAccent"
        app:elevation="8dp"
        app:fabSize="mini"
        app:layout_behavior="com.coordinator.behavior.second.ScrollBehavior"
        app:pressedTranslationZ="16dp"
        app:rippleColor="@color/colorPrimary" />

</androidx.coordinatorlayout.widget.CoordinatorLayout>
5.运行效果

原理
1.子View如何拿到Behavior
比如下面的xml文件中是怎么拿到Behavior的呢?

CoordinatorLayout有一个过程是要添加孩子View,我们就先从哪里入手吧,

这里的LayoutParam肯定是CoordinatorLayout.LayoutParam生成的吧;

这里明显Behavior就是在LayoutParams里面解析得来的,就是解析的app:layout_behavior属性;

2.Behavior是怎么接到事件的

上面只是代码一种特殊的情况,其实在事件传递中,你会发现,所有出现Behavior的地方Behavior都会去接管处理!这里不想云里雾里一点点分析,那样容易只见树木不见森林。你就从
dispatchTouchEvent,
onInterception,
onTouchEvent,
这些事件往代码里面分析,就能够看到代码段;
Behavior b = lp.getBehavior()
你懂得,就是把所有的事件处理都转给它;
仿效系统协调布局实现方式
1.实现自己的协调布局BehaviorCoordinatorLayout
public class BehaviorCoordinatorLayout extends RelativeLayout implements NestedScrollingParent,
        ViewTreeObserver.OnGlobalLayoutListener {


    public BehaviorCoordinatorLayout(Context context, AttributeSet attrs) {


        super(context, attrs);
        getViewTreeObserver().addOnGlobalLayoutListener(this);
    }

    @Override
    public boolean onStartNestedScroll(View child, View target, int nestedScrollAxes) {


        return true;
    }

    @Override
    public void onNestedScroll(View target, int dxConsumed, int dyConsumed, int dxUnconsumed, int dyUnconsumed) {


        int count = getChildCount();
        for (int i = 0; i < count; i++) {


            View v = getChildAt(i);
            LP lp = (LP) v.getLayoutParams();
            BeHavior mBehavior = lp.mBehavior;
            if (mBehavior != null) {


                mBehavior.onNestedScroll(this, v, target, dxConsumed, dyConsumed, dxUnconsumed, dyUnconsumed);
            }
        }
    }

    @Override
    public void onGlobalLayout() {


        int count = getChildCount();
        for (int i = 0; i < count; i++) {


            View v = getChildAt(i);
            LP lp = (LP) v.getLayoutParams();
            BeHavior mBehavior = lp.mBehavior;
            if (mBehavior != null) {


                mBehavior.onLayoutChild(this, v, 0);
            }
        }
    }

    @Override
    public LayoutParams generateLayoutParams(AttributeSet attrs) {


        return new LP(getContext(), attrs);
    }
2.实现自己的LayoutParams
    @Override
    public LayoutParams generateLayoutParams(AttributeSet attrs) {


        return new LP(getContext(), attrs);
    }


    public static class LP extends RelativeLayout.LayoutParams {


        BeHavior mBehavior;

        public LP(Context c, AttributeSet attrs) {


            super(c, attrs);

            TypedArray ta = c.obtainStyledAttributes(attrs, R.styleable.BehaviorCoordinatorLayout_Layout);

            if (ta.hasValue(R.styleable.BehaviorCoordinatorLayout_Layout_custom_layout_behavior)) {


                String clStr = ta.getString(R.styleable.BehaviorCoordinatorLayout_Layout_custom_layout_behavior);
                Log.e("tag", clStr);
                mBehavior = parseBehavior(c, attrs, clStr);
                Log.e("tag", (mBehavior == null) + " ");
            }
            ta.recycle();
        }


        public BeHavior parseBehavior(Context context, AttributeSet attrs, String name) {


            try {


                Class<?> clazz = Class.forName(name, false, context.getClassLoader());
                Constructor c = clazz.getConstructor(Context.class, AttributeSet.class);
                c.setAccessible(true);
                return (BeHavior) c.newInstance(context, attrs);
            } catch (Exception e) {


                e.printStackTrace();
                return null;
            }
        }


    }
3.实现自己的Behavior类
public class BeHavior<V extends View> {


    public BeHavior(Context context, AttributeSet attrs) {


    }

    public boolean onLayoutChild(BehaviorCoordinatorLayout parent, V child,
                                 int layoutDirection) {


        return false;
    }


    public void onNestedScroll(BehaviorCoordinatorLayout coordinatorLayout, V child,
                               View target, int dxConsumed, int dyConsumed, int dxUnconsumed,
                               int dyUnconsumed) {


    }

}
4.实现自己的Behavior子类
ublic class ImageViewBehavior extends BeHavior<ImageView> {


    public ImageViewBehavior(Context context, AttributeSet attrs) {


        super(context, attrs);
    }

    int maxHeight = 400;
    int originHeight = 0;

    @Override
    public boolean onLayoutChild(BehaviorCoordinatorLayout parent, ImageView child, int layoutDirection) {


        if (originHeight == 0) {


            originHeight = child.getHeight();
        }
        return super.onLayoutChild(parent, child, layoutDirection);
    }

    @Override
    public void onNestedScroll(BehaviorCoordinatorLayout coordinatorLayout, ImageView child,
                               View scrollview, int dxConsumed, int dyConsumed,
                               int dxUnconsumed, int dyUnconsumed) {


        if (scrollview.getScrollY() > 0) {


            BehaviorCoordinatorLayout.LP lp = (BehaviorCoordinatorLayout.LP) child.getLayoutParams();
            lp.height = lp.height - Math.abs(dyConsumed);
            if (lp.height <= originHeight) {


                lp.height = originHeight;
            }
            child.setLayoutParams(lp);
        } else if (scrollview.getScrollY() == 0) {


            BehaviorCoordinatorLayout.LP lp = (BehaviorCoordinatorLayout.LP) child.getLayoutParams();
            lp.height = lp.height + Math.abs(dyUnconsumed);
            if (lp.height >= maxHeight) {


                lp.height = maxHeight;
            }
            child.setLayoutParams(lp);
        }

    }
}
public class ToolbarBehavior extends BeHavior<Toolbar> {


    public ToolbarBehavior(Context context, AttributeSet attrs) {


        super(context, attrs);
    }

    int maxHeight = 400;

    @Override
    public void onNestedScroll(BehaviorCoordinatorLayout coordinatorLayout, Toolbar child, View scrollView,
                               int dxConsumed, int dyConsumed,
                               int dxUnconsumed, int dyUnconsumed) {


        if (scrollView.getScrollY() <= maxHeight) {


            child.setAlpha(scrollView.getScrollY() * 1.0f / maxHeight);
        } else if (scrollView.getScrollY() == 0) {


            child.setAlpha(0);
        }
    }

}
5.xml布局中引用
<?xml version="1.0" encoding="utf-8"?>
<com.coordinator.behavior.custom.BehaviorCoordinatorLayout xmlns:android="http://schemas.android.com/apk/res/android"
    xmlns:app="http://schemas.android.com/apk/res-auto"
    android:layout_width="match_parent"
    android:layout_height="match_parent">

    <ImageView
        android:id="@+id/img"
        android:layout_width="match_parent"
        android:layout_height="50dp"
        android:adjustViewBounds="true"
        android:scaleType="fitXY"
        android:contentDescription="@string/app_name"
        android:src="@mipmap/london"
        app:custom_layout_behavior="com.coordinator.behavior.custom.ImageViewBehavior" />


    <androidx.core.widget.NestedScrollView
        android:layout_width="match_parent"
        android:layout_height="wrap_content"
        android:layout_below="@id/img">

        <TextView
            android:layout_width="match_parent"
            android:layout_height="wrap_content"
            android:text="@string/text" />

    </androidx.core.widget.NestedScrollView>


    <androidx.appcompat.widget.Toolbar
        android:id="@+id/toolbar"
        android:layout_width="match_parent"
        android:layout_height="50dp"
        android:background="@color/colorPrimary"
        app:custom_layout_behavior="com.coordinator.behavior.custom.ToolbarBehavior" />
</com.coordinator.behavior.custom.BehaviorCoordinatorLayout>
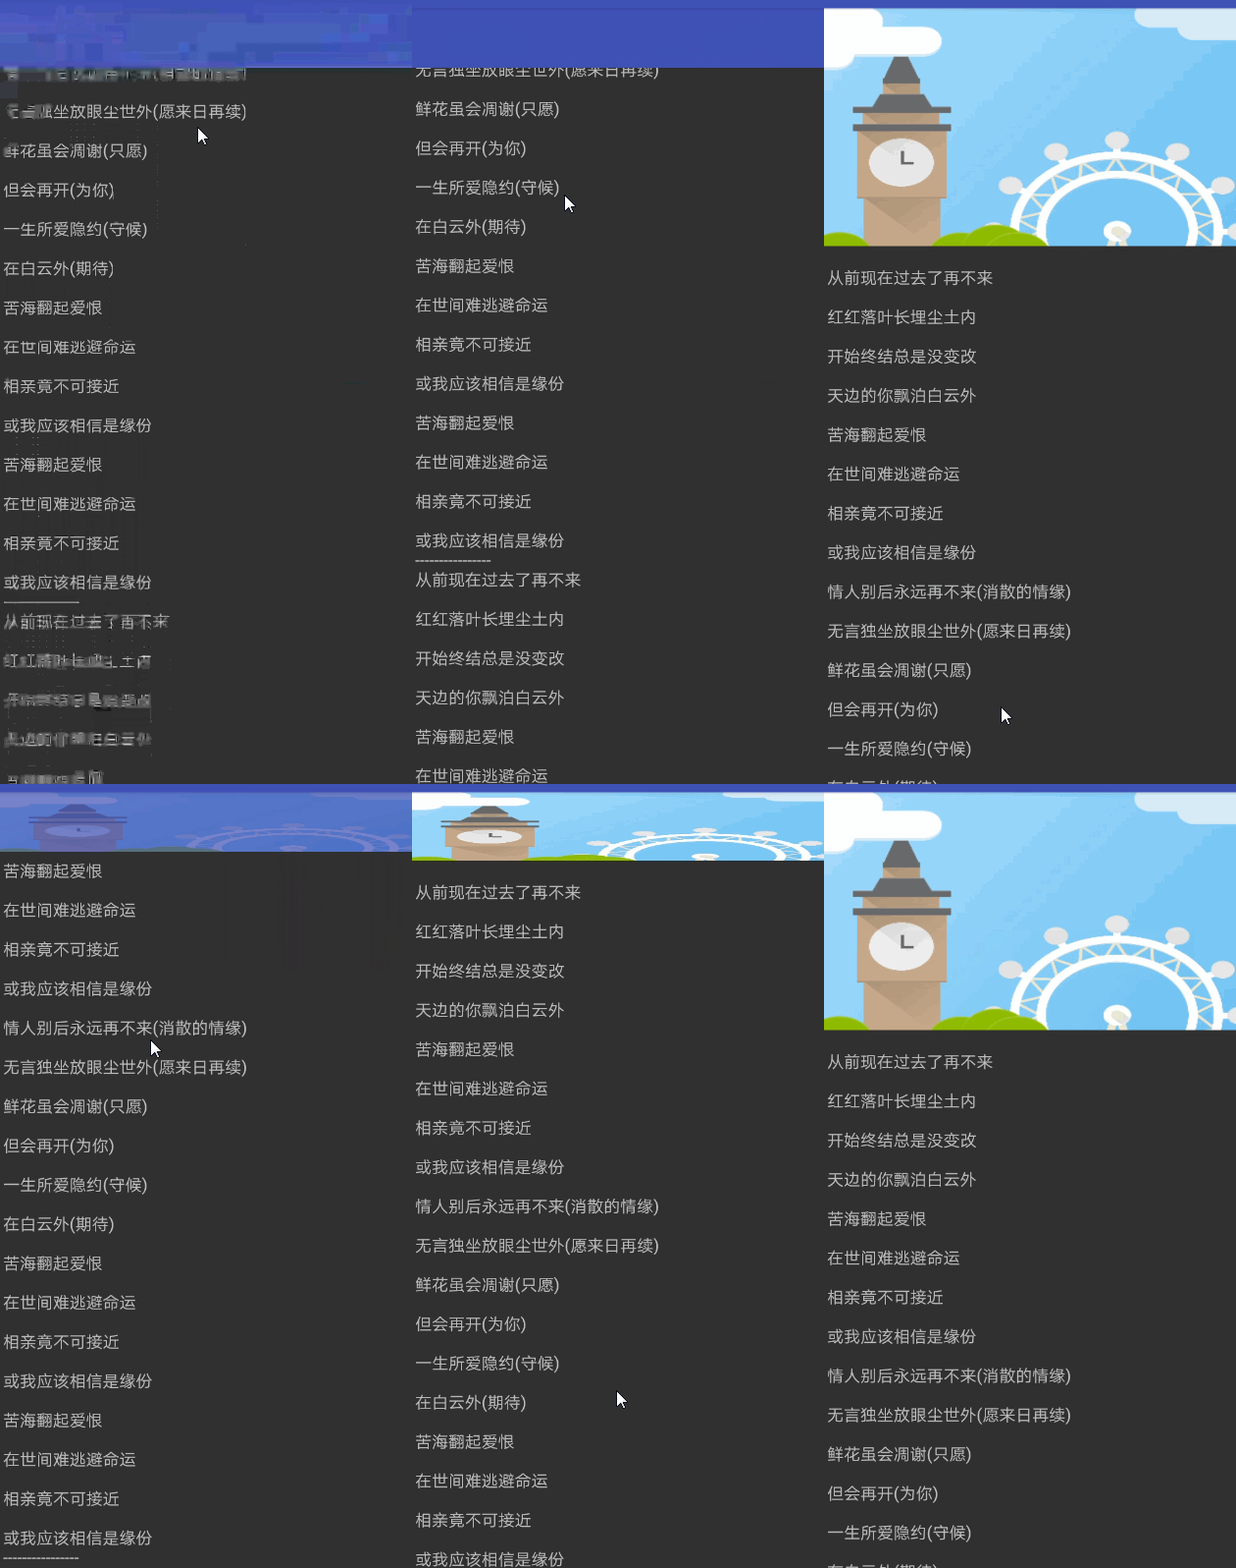
6.运行效果
