- 这是我的第一篇文章,希望能帮助到你,以后我会继续努力的
首先开启POP3/SMTP服务
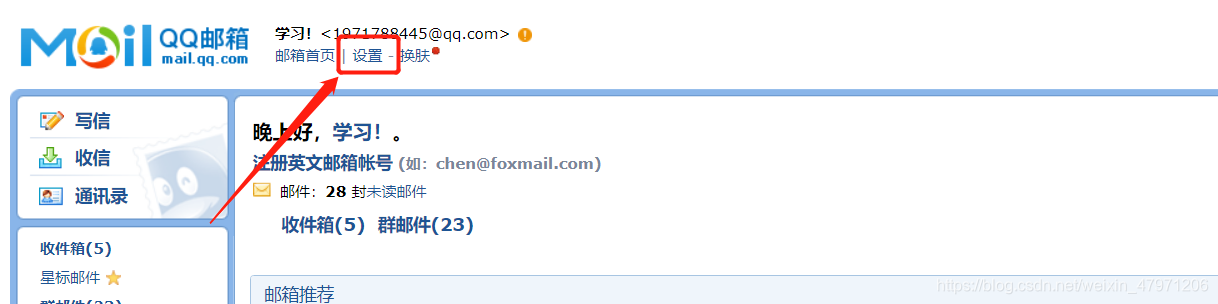
- 这里以我自己的QQ为例,打开QQ空间,点击设置
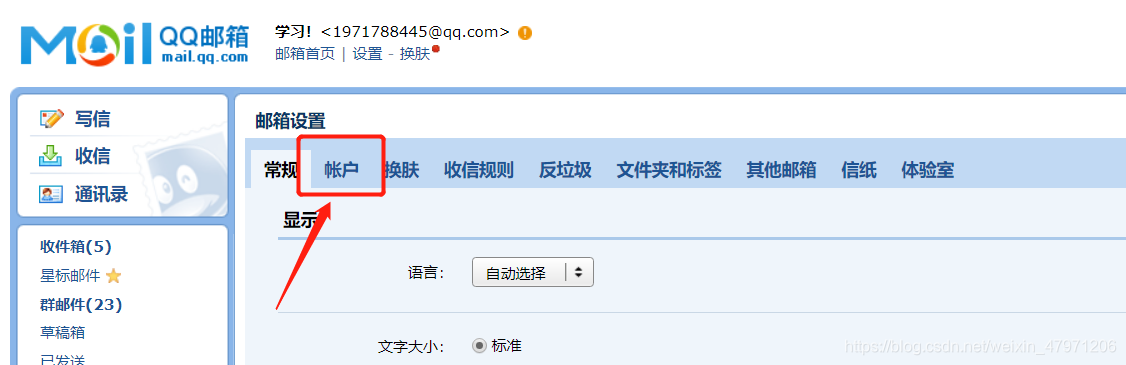
- 点击账户
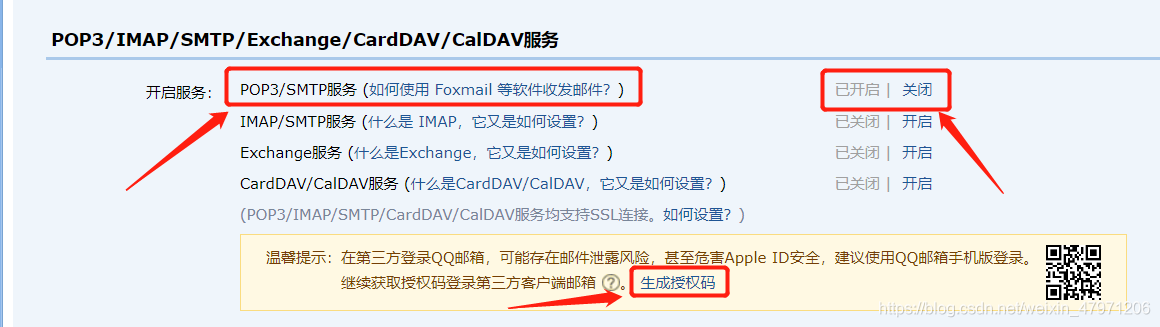
- 向下拉找到POP3/IMAP/SMTP/Exchange/CardDAV/CalDAV服务选项设置
- 找到POP3/SMTP服务,在右边设置开启
- 点击下方的 生成授权码
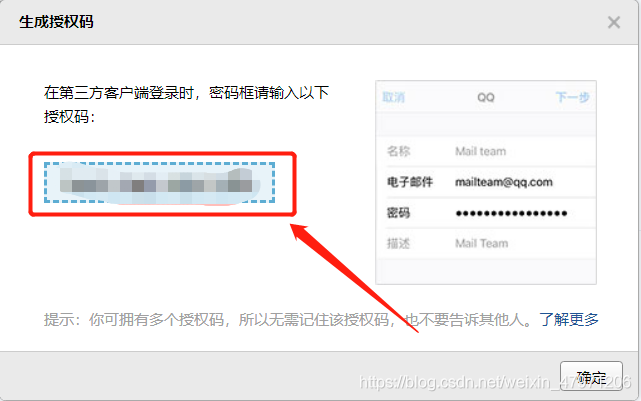
- 复制生成的授权码(后面代码会需要)
接下来上代码
import re #匹配邮箱,检验是否正确
import smtplib #发送邮箱
from email.header import Header #设置邮箱头信息
from email.mime.text import MIMEText #设置邮箱内容

class Send_EMail():
    #服务器
    Smtp_Server = "smtp.qq.com"
    #授权码(在QQ空间获取到的授权码)
    License_Key = "×××××××××××××"
    def __init__(self,Send_Mail,Receive_Mail,Title,content):
        #发件人
        self.Send_Mail = Send_Mail
        #收件人
        self.Receive_Mail = Receive_Mail
        #邮箱标题
        self.Title = Title
        #邮箱内容
        self.content = content

        #正文设置,第一个参数为内容,第二个参数为内容格式,第三个参数是编码格式
        self.Email = MIMEText(content,"plain","utf-8")
        self.Email["From"] = Header(Send_Mail)
        self.Email["To"] = Header(Receive_Mail)
        self.Email["Subject"] = Header(Title)

    def Send(self):
        #开启服务,使用SSL加密传输
        server = smtplib.SMTP_SSL(self.Smtp_Server)
        server.connect(self.Smtp_Server,465)
        #登陆
        server.login(self.Send_Mail, self.License_Key)
        #发送
        server.sendmail(self.Send_Mail, self.Receive_Mail, self.Email.as_string())
        #关闭服务
        server.quit()

if __name__ == "__main__":
    while(True):
        Send_Mail = input("请输入发件人QQ邮箱:")
        #检验邮箱
        if not re.compile(r"^[1-9][0-9]{4,10}@qq.com").match(Send_Mail):
            print("格式错误···请重新输入···")
            continue
        break;

    while(True):
        Receive_Mail = input("请输入收件人QQ邮箱:")
        #检验邮箱
        if not re.compile(r"^[1-9][0-9]{4,10}@qq.com").match(Receive_Mail):
            print("格式错误···请重新输入···")
            continue
        break;

    Title = input("请输入发送的邮箱标题:")
    content = input("请输入发送的邮箱内容:")
    SE = Send_EMail(Send_Mail,Receive_Mail,Title,content)
    SE.Send()
测试结果


- 本次分享到这里就结束了,感谢阅读