natty 请求过程源码
在之前的笔记中有记录netty的内部处理图:netty模型原理
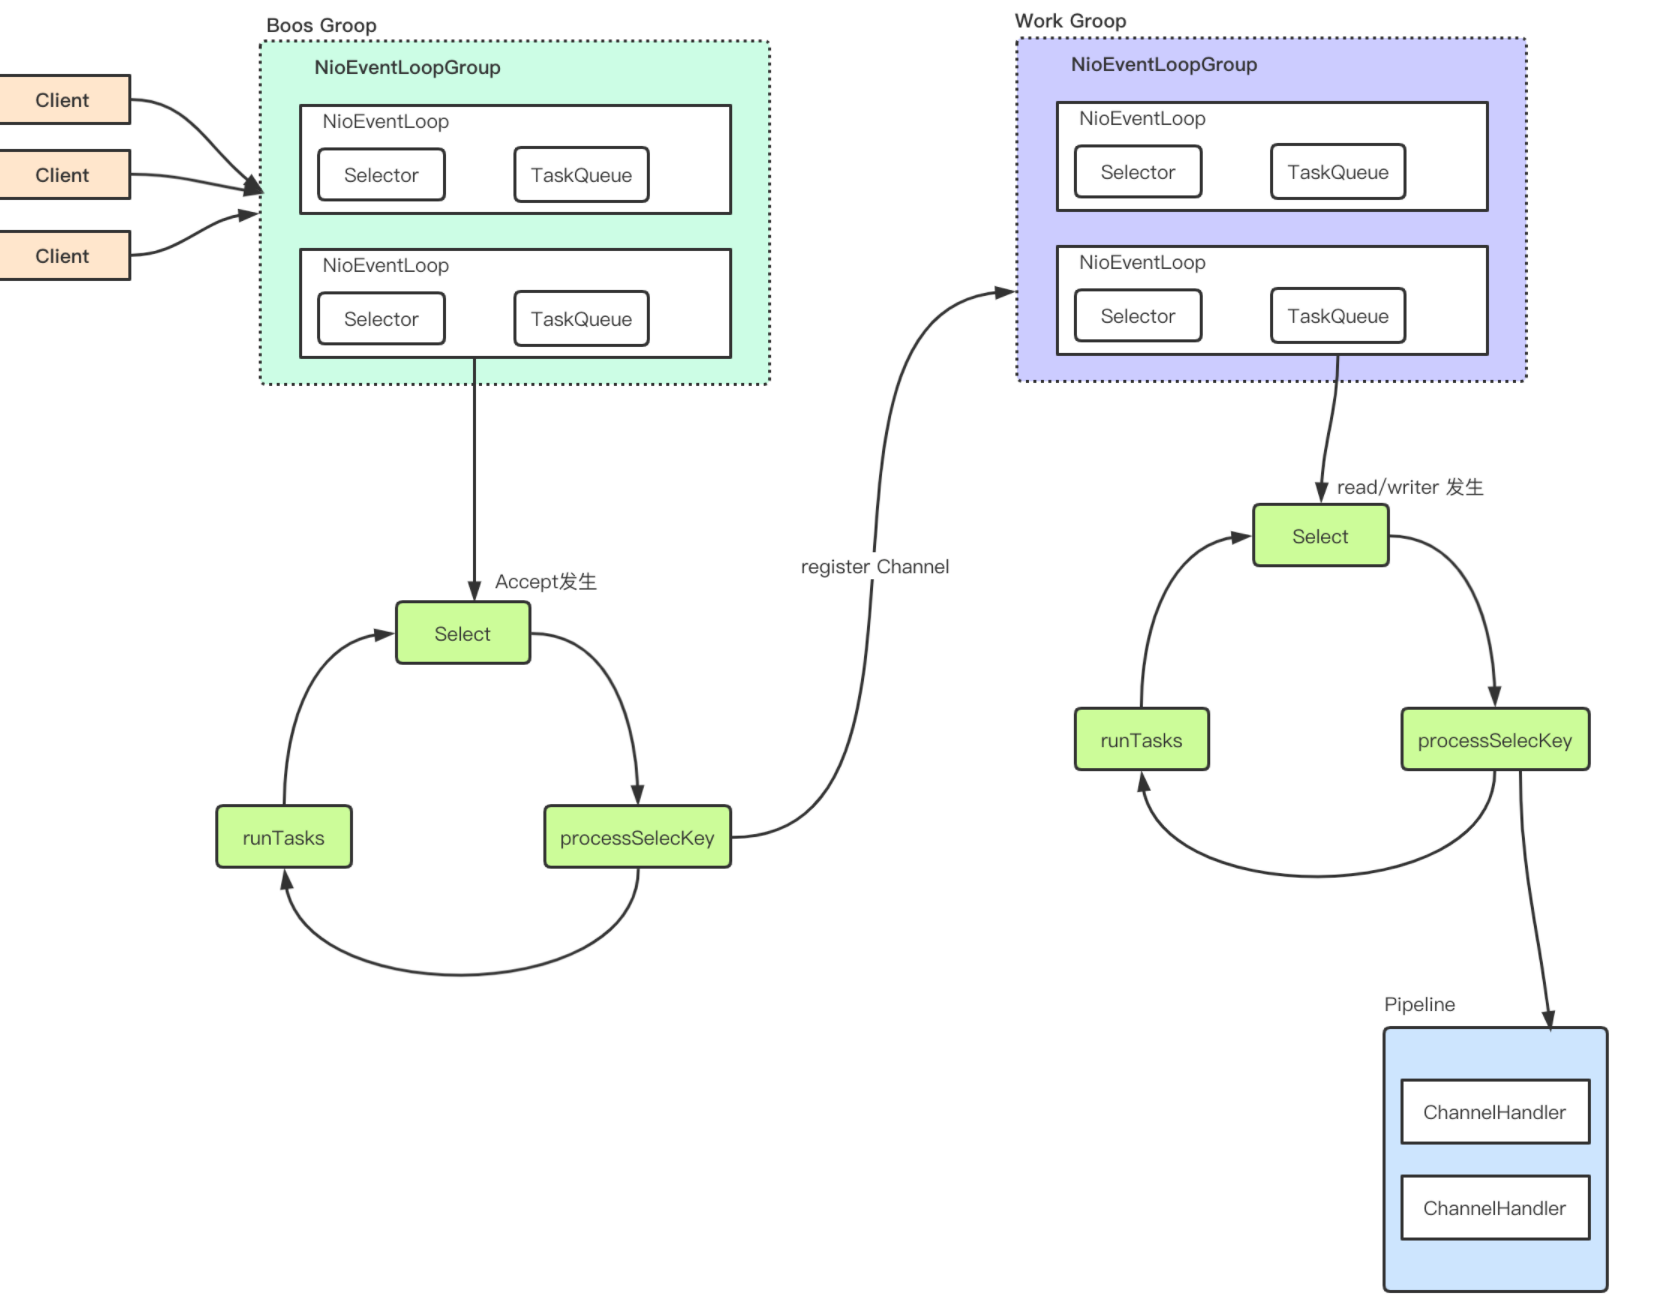
现在就在源码中找到这模型的基本实现:
先介绍一下:EventLoop是一个死循环主要是循环处理3件事情:1、等待NIO事件发生 2、处理NIO事件 3、处理任务事件
- NioEventLoop代码如下:
   @Override
   // 部分代码节选....
    protected void run() {


        int selectCnt = 0;
      // 这是一个死循环处理
        for (;;) {


            try {


              // 等待处理

                      try {


                            if (!hasTasks()) {


                               // 核心流程1: select 等待事件发生
                                strategy = select(curDeadlineNanos);
                            }

                if (ioRatio == 100) {


                    try {


                        if (strategy > 0) {


                          // 核心流程2: 创建channel并注册到 workerEventLoop当中
                            processSelectedKeys();
                        }
                    } finally {


                      // 核心流程3: 处理任务
                        ranTasks = runAllTasks();
                    }
流程1:select(curDeadlineNanos)
调用selector 的select 方法,默认阻塞一秒钟, 如果有定时任务,则在定时任务剩余时间的基础上在加上0.5秒进行阻塞。当执行execute 方法的时候,也就是添加任务的时候,唤醒selecor, 防止selecotr 阻塞时间长
// 内部也是调用selector的select方法
private int select(long deadlineNanos) throws IOException {


        if (deadlineNanos == NONE) {


            return selector.select();
        }
        //
        long timeoutMillis = deadlineToDelayNanos(deadlineNanos + 995000L) / 1000000L;
        return timeoutMillis <= 0 ? selector.selectNow() : selector.select(timeoutMillis);
    }
流程2:processSelectedKeys()
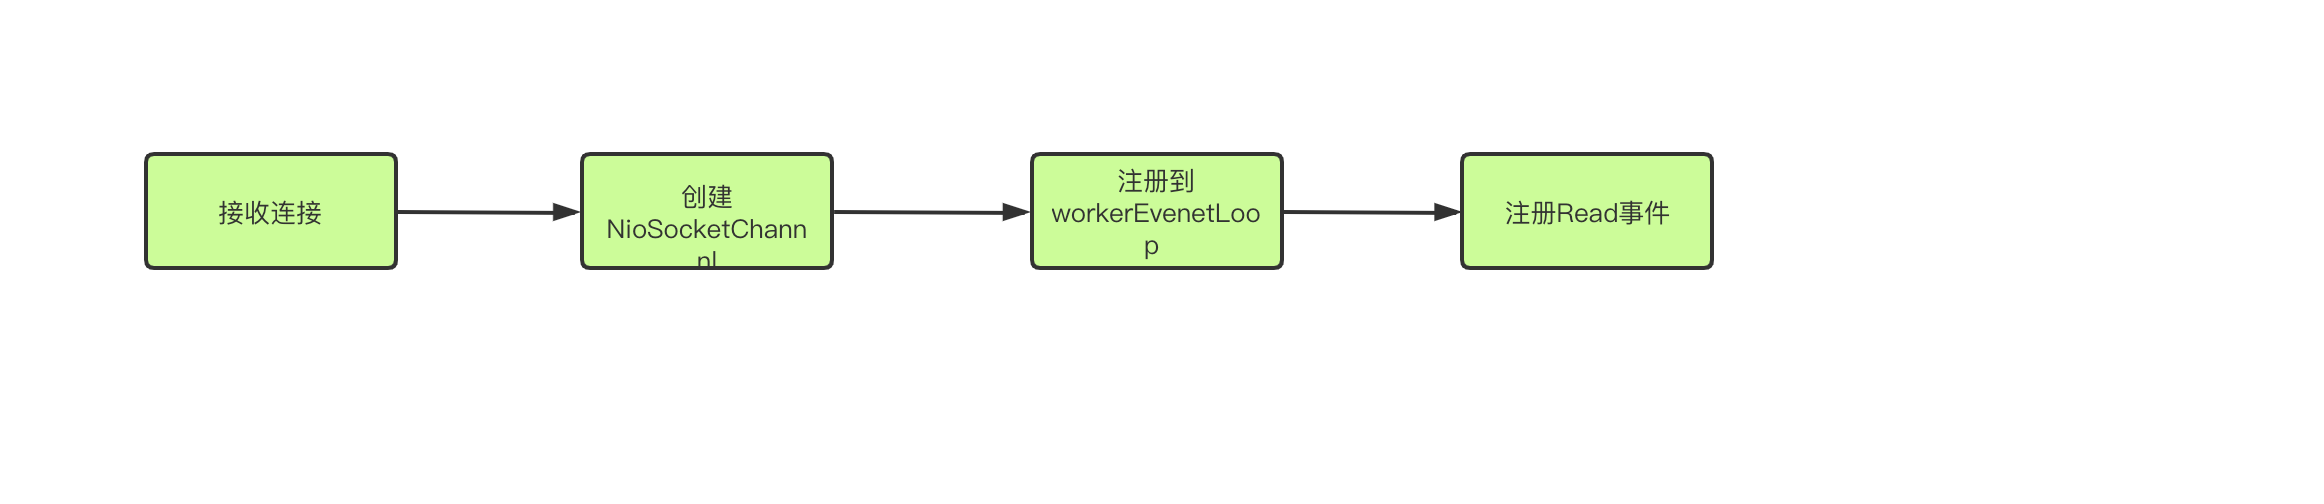
创建Channel并将其注册到workeventloop上
   private void processSelectedKeys() {


        if (selectedKeys != null) {


            processSelectedKeysOptimized();
        } else {


            processSelectedKeysPlain(selector.selectedKeys());
        }
    }
继续进入下一层代码2.1 read()方法
  // 读的事件发生后调用read方法
 if ((readyOps & (SelectionKey.OP_READ | SelectionKey.OP_ACCEPT)) != 0 || readyOps == 0) {


                unsafe.read();
            }
//           ||
//           ||
//            V

// 部分关键代码节选
@Override
        public void read() {


            assert eventLoop().inEventLoop();
            final ChannelConfig config = config();
            final ChannelPipeline pipeline = pipeline();
            final RecvByteBufAllocator.Handle allocHandle = unsafe().recvBufAllocHandle();
            allocHandle.reset(config);

            boolean closed = false;
            Throwable exception = null;
            try {


                try {


                    do {


                        // 这行incMessagesRead 创建一个SocketChannel并把他包装成一个NioSocketChannel 放到localRead容器当中
                        /**
                        * incMessagesRead内部逻辑
                        * SocketChannel ch = SocketUtils.accept(javaChannel());
                        * buf.add(new NioSocketChannel(this, ch));
                        */
                        allocHandle.incMessagesRead(localRead);
                    } while (allocHandle.continueReading());
                } catch (Throwable t) {


                    exception = t;
                }
                int size = readBuf.size();
                for (int i = 0; i < size; i ++) {


                    readPending = false;
                    // 这里会执行pipeline 中所有Handler的fireChannelRead方法 其中有一个
                    // ServerBootStrapAcceptor 的Handler这里执行了关键的步骤
                    pipeline.fireChannelRead(readBuf.get(i));
                }
核心流程2.1.1 : SrverBootStrapAcceptor的fireChannelRead方法
- 将该NioSocketChannel注册到childGroup 中的-一个EventLoop. 上, 并添加一个监听器。
public void channelRead(ChannelHandlerContext ctx, Object msg) {


            // msg强转成Channel
            final Channel child = (Channel) msg;
            child.pipeline().addLast(childHandler);

  	        // 设置各种属性
            setChannelOptions(child, childOptions, logger);
            setAttributes(child, childAttrs);

            try {


                // 将channal注册到childGroup中 并添加监听器 (就是WorkEventLoop)
                childGroup.register(child).addListener(new ChannelFutureListener() {


                    @Override
                    public void operationComplete(ChannelFuture future) throws Exception {


                        if (!future.isSuccess()) {


                            forceClose(child, future.cause());
                        }
                    }
                });
            } catch (Throwable t) {


                forceClose(child, t);
            }
        }
流程3:runAllTasks()
这里就是执行处理一系列任务
四、小结
总体流程