谷粒学院学习笔记
- 部分勘误
- 数据库设计规约
- 模块说明
- 环境搭建
-
- 创建一个Spring Boot 的父工程,版本使用:2.2.1.RELEASE
- 父工程pom.xml里面添加
- 在pom.xml中添加依赖的版本
- 搭建service模块
- 搭建service-edu模块
- 编写eduteacher后台管理api接口
- 跨域
- 整合swagger2
- 统一返回数据格式
- 讲师分页功能
- 条件查询带分页方法
- 添加讲师
- 统一异常处理
- 日志
- es6和vue基础知识点
- vue-element-admin
- vue-admin-template
- 前端项目的创建和基本配置
- 修改模拟登录
- 讲师列表前端实现
- 删除讲师
- 添加讲师
- 修改讲师
- 对象存储OSS
- 配置nginx反向代理
- 前端整合图片上传组件
- EasyExcel
- 课程分类管理接口
- 课程分类前端
- 分类列表展示后端
- 分类列表展示前端
- 课程发布步骤导航
- 讲师下拉列表
- 课程分类多级联动
- 课程封面
- Tinymce可视化编辑器
- 章节小节列表显示
- 课程信息回显
- 更新课程信息
- 完整版info.vue
- 章节管理
- 小节管理
- 注意
学习尚硅谷的谷粒学院的一些笔记,主要是谷粒学院的笔记不好翻我这里重新整理一下
这里跳过了建表分析的,感觉应该是很重要的一步,一个项目要花很多时间在建库建表
部分勘误
为了防止入坑,这里指出一些错误,每个人的错误可能不一样,一定要细心
- p93 出现跨域问题,检查controller是否加了@CrossOrigin注解,检查前端的路径和后端是否一致,可能是路径错了,也有可能是nginx配置文件错了,或者没有重启nginx
- p108 subject_parent_id丢失,手动在CourseInfoVo类中添加subjectParentId属性
- P125不能点击编辑的,e-form挡住了编辑的位置,改为div的就没问题了
- p141 依赖爆红,手动下载依赖,或者直接使用老师的maven仓库
- p143和p144视频顺序反了
- p145 如果上传视频一直显示id为null,检查下是不是读取配置文件初始化静态变量的工具类是不是没加@Component
- p147和p148视频反了
- P168中的npm install vue-awesome-swiper下载的是最新4.x版本,直接npm install [email protected]下载,如果已经下载了就package.json文件中把对应的组件修改为^3.1.3版本,重新npm install就行
- p174 图片什么的记得改一下数据库的路径不然前端后端都有可能报错
- p197出现对象传递错误的 ,guli_ucenter 后面的数据response.data.data.userInfo 再对它JSON.stringify(response.data.data.userInfo)进行转换就好了
- p201微信扫码 redirect_url报错的解决方案如下
- 第一 修改项目启动端口号为 8160
- 把回调地址改为 wx.open.redirect_url=http://localhost:8160/api/ucenter/wx/callback
数据库设计规约
以下规约只针对本模块,更全面的文档参考《阿里巴巴Java开发手册》:
五、MySQL数据库
1、库名与应用名称尽量一致
2、表名、字段名必须使用小写字母或数字,禁止出现数字开头,
3、表名不使用复数名词
4、表的命名最好是加上“业务名称_表的作用”。如,edu_teacher
5、表必备三字段:id, gmt_create, gmt_modified
说明:

其中 id 必为主键,类型为 bigint unsigned、单表时自增、步长为 1。
(如果使用分库分表集群部署,则id类型为verchar,非自增,业务中使用分布式id生成器)
gmt_create, gmt_modified 的类型均为 datetime 类型,前者现在时表示主动创建,后者过去分词表示被 动更新。
6、单表行数超过 500 万行或者单表容量超过 2GB,才推荐进行分库分表。 说明:如果预计三年后的数据量根本达不到这个级别,请不要在创建表时就分库分表。
7、表达是与否概念的字段,必须使用 is_xxx 的方式命名,数据类型是 unsigned tinyint (1 表示是,0 表示否)。
说明:任何字段如果为非负数,必须是 unsigned。
注意:POJO 类中的任何布尔类型的变量,都不要加 is 前缀。数据库表示是与否的值,使用 tinyint 类型,坚持 is_xxx 的 命名方式是为了明确其取值含义与取值范围。
正例:表达逻辑删除的字段名 is_deleted,1 表示删除,0 表示未删除。
8、小数类型为 decimal,禁止使用 float 和 double。 说明:float 和 double 在存储的时候,存在精度损失的问题,很可能在值的比较时,得到不 正确的结果。如果存储的数据范围超过 decimal 的范围,建议将数据拆成整数和小数分开存储。
9、如果存储的字符串长度几乎相等,使用 char 定长字符串类型。
10、varchar 是可变长字符串,不预先分配存储空间,长度不要超过 5000,如果存储长度大于此值,定义字段类型为 text,独立出来一张表,用主键来对应,避免影响其它字段索 引效率。
11、唯一索引名为 uk_字段名;普通索引名则为 idx_字段名。
说明:uk_ 即 unique key;idx_ 即 index 的简称
12、不得使用外键与级联,一切外键概念必须在应用层解决。外键与级联更新适用于单机低并发,不适合分布式、高并发集群;级联更新是强阻塞,存在数据库更新风暴的风险;外键影响数据库的插入速度。
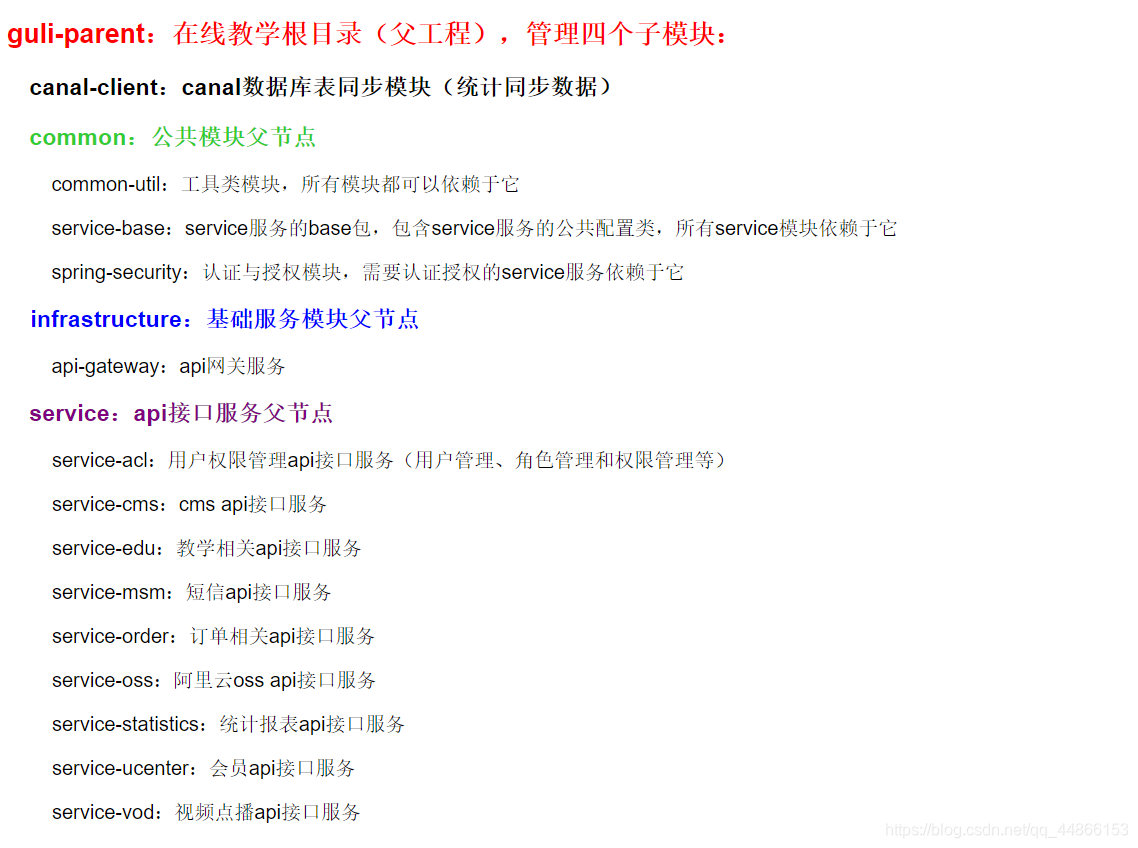
模块说明
环境搭建
创建一个Spring Boot 的父工程,版本使用:2.2.1.RELEASE

父工程pom.xml里面添加
<packaging>pom</packaging>
在pom.xml中添加依赖的版本
删除pom.xml中的内容
    <dependencies>
        <dependency>
            <groupId>org.springframework.boot</groupId>
            <artifactId>spring-boot-starter</artifactId>
        </dependency>

        <dependency>
            <groupId>org.springframework.boot</groupId>
            <artifactId>spring-boot-starter-test</artifactId>
            <scope>test</scope>
        </dependency>
    </dependencies>
添加 确定依赖的版本
这里我换了swagger和mybatisplus的版本
<properties>
        <java.version>1.8</java.version>
        <guli.version>0.0.1-SNAPSHOT</guli.version>
        <mybatis-plus.version>3.4.2</mybatis-plus.version>
        <velocity.version>2.0</velocity.version>
        <swagger.version>2.9.2</swagger.version>
        <aliyun.oss.version>2.8.3</aliyun.oss.version>
        <jodatime.version>2.10.1</jodatime.version>
        <poi.version>3.17</poi.version>
        <commons-fileupload.version>1.3.1</commons-fileupload.version>
        <commons-io.version>2.6</commons-io.version>
        <httpclient.version>4.5.1</httpclient.version>
        <jwt.version>0.7.0</jwt.version>
        <aliyun-java-sdk-core.version>4.3.3</aliyun-java-sdk-core.version>
        <aliyun-sdk-oss.version>3.1.0</aliyun-sdk-oss.version>
        <aliyun-java-sdk-vod.version>2.15.2</aliyun-java-sdk-vod.version>
        <aliyun-java-vod-upload.version>1.4.11</aliyun-java-vod-upload.version>
        <aliyun-sdk-vod-upload.version>1.4.11</aliyun-sdk-vod-upload.version>
        <fastjson.version>1.2.28</fastjson.version>
        <gson.version>2.8.2</gson.version>
        <json.version>20170516</json.version>
        <commons-dbutils.version>1.7</commons-dbutils.version>
        <canal.client.version>1.1.0</canal.client.version>
        <docker.image.prefix>zx</docker.image.prefix>
        <cloud-alibaba.version>0.2.2.RELEASE</cloud-alibaba.version>
    </properties>
配置 锁定依赖的版本
<dependencyManagement>
        <dependencies>
            <!--Spring Cloud-->
            <dependency>
                <groupId>org.springframework.cloud</groupId>
                <artifactId>spring-cloud-dependencies</artifactId>
                <version>Hoxton.RELEASE</version>
                <type>pom</type>
                <scope>import</scope>
            </dependency>

            <dependency>
                <groupId>org.springframework.cloud</groupId>
                <artifactId>spring-cloud-alibaba-dependencies</artifactId>
                <version>${cloud-alibaba.version}</version>
                <type>pom</type>
                <scope>import</scope>
            </dependency>
            <!--mybatis-plus 持久层-->
            <dependency>
                <groupId>com.baomidou</groupId>
                <artifactId>mybatis-plus-boot-starter</artifactId>
                <version>${mybatis-plus.version}</version>
            </dependency>

            <!-- velocity 模板引擎, Mybatis Plus 代码生成器需要 -->
            <dependency>
                <groupId>org.apache.velocity</groupId>
                <artifactId>velocity-engine-core</artifactId>
                <version>${velocity.version}</version>
            </dependency>

            <!--swagger-->
            <dependency>
                <groupId>io.springfox</groupId>
                <artifactId>springfox-swagger2</artifactId>
                <version>${swagger.version}</version>
            </dependency>
            <!--swagger ui-->
            <dependency>
                <groupId>io.springfox</groupId>
                <artifactId>springfox-swagger-ui</artifactId>
                <version>${swagger.version}</version>
            </dependency>

            <!--aliyunOSS-->
            <dependency>
                <groupId>com.aliyun.oss</groupId>
                <artifactId>aliyun-sdk-oss</artifactId>
                <version>${aliyun.oss.version}</version>
            </dependency>

            <!--日期时间工具-->
            <dependency>
                <groupId>joda-time</groupId>
                <artifactId>joda-time</artifactId>
                <version>${jodatime.version}</version>
            </dependency>

            <!--xls-->
            <dependency>
                <groupId>org.apache.poi</groupId>
                <artifactId>poi</artifactId>
                <version>${poi.version}</version>
            </dependency>
            <!--xlsx-->
            <dependency>
                <groupId>org.apache.poi</groupId>
                <artifactId>poi-ooxml</artifactId>
                <version>${poi.version}</version>
            </dependency>

            <!--文件上传-->
            <dependency>
                <groupId>commons-fileupload</groupId>
                <artifactId>commons-fileupload</artifactId>
                <version>${commons-fileupload.version}</version>
            </dependency>

            <!--commons-io-->
            <dependency>
                <groupId>commons-io</groupId>
                <artifactId>commons-io</artifactId>
                <version>${commons-io.version}</version>
            </dependency>

            <!--httpclient-->
            <dependency>
                <groupId>org.apache.httpcomponents</groupId>
                <artifactId>httpclient</artifactId>
                <version>${httpclient.version}</version>
            </dependency>

            <dependency>
                <groupId>com.google.code.gson</groupId>
                <artifactId>gson</artifactId>
                <version>${gson.version}</version>
            </dependency>

            <!-- JWT -->
            <dependency>
                <groupId>io.jsonwebtoken</groupId>
                <artifactId>jjwt</artifactId>
                <version>${jwt.version}</version>
            </dependency>

            <!--aliyun-->
            <dependency>
                <groupId>com.aliyun</groupId>
                <artifactId>aliyun-java-sdk-core</artifactId>
                <version>${aliyun-java-sdk-core.version}</version>
            </dependency>
            <dependency>
                <groupId>com.aliyun.oss</groupId>
                <artifactId>aliyun-sdk-oss</artifactId>
                <version>${aliyun-sdk-oss.version}</version>
            </dependency>
            <dependency>
                <groupId>com.aliyun</groupId>
                <artifactId>aliyun-java-sdk-vod</artifactId>
                <version>${aliyun-java-sdk-vod.version}</version>
            </dependency>
            <dependency>
                <groupId>com.aliyun</groupId>
                <artifactId>aliyun-java-vod-upload</artifactId>
                <version>${aliyun-java-vod-upload.version}</version>
            </dependency>
            <dependency>
                <groupId>com.aliyun</groupId>
                <artifactId>aliyun-sdk-vod-upload</artifactId>
                <version>${aliyun-sdk-vod-upload.version}</version>
            </dependency>
            <dependency>
                <groupId>com.alibaba</groupId>
                <artifactId>fastjson</artifactId>
                <version>${fastjson.version}</version>
            </dependency>
            <dependency>
                <groupId>org.json</groupId>
                <artifactId>json</artifactId>
                <version>${json.version}</version>
            </dependency>

            <dependency>
                <groupId>commons-dbutils</groupId>
                <artifactId>commons-dbutils</artifactId>
                <version>${commons-dbutils.version}</version>
            </dependency>

            <dependency>
                <groupId>com.alibaba.otter</groupId>
                <artifactId>canal.client</artifactId>
                <version>${canal.client.version}</version>
            </dependency>
        </dependencies>
    </dependencyManagement>
删除src目录
搭建service模块
在父工程guli-parent下面创建模块service
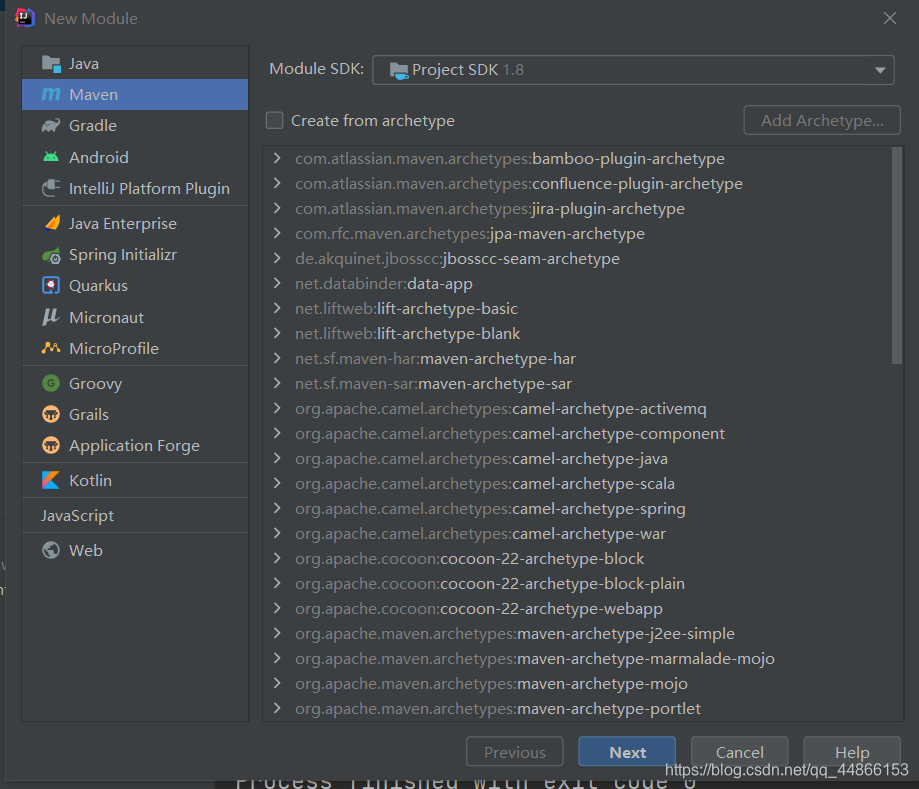
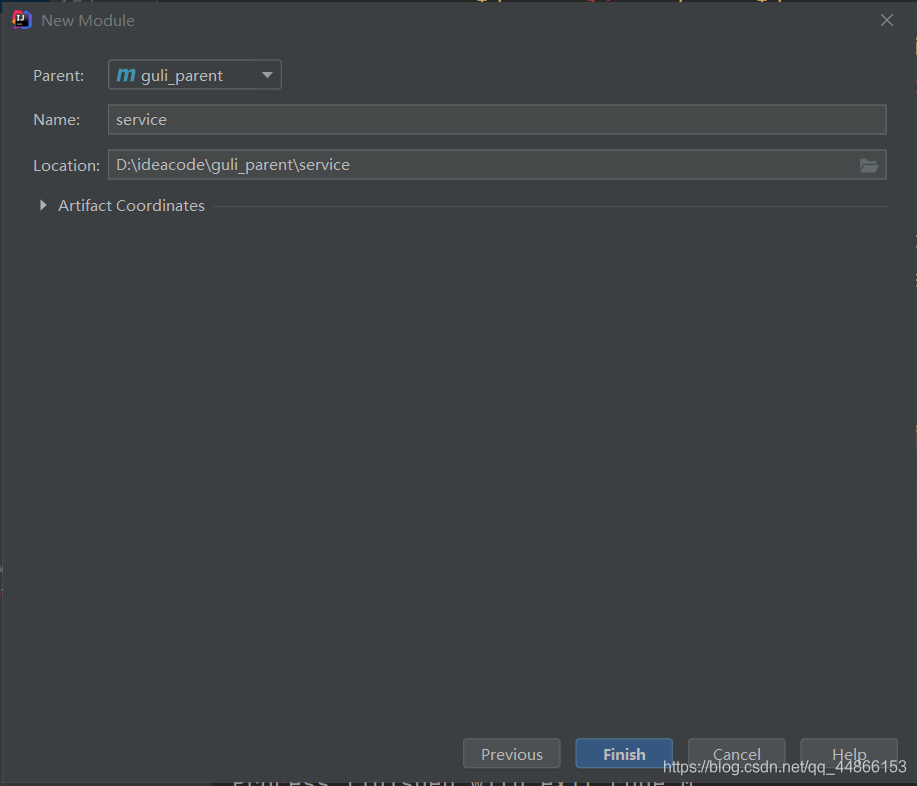
添加模块类型是pom
因为service下面还要再建子模块的
<artifactId>service</artifactId>
    <packaging>pom</packaging>
添加项目需要的依赖
注意把springcloud的一些依赖给注释掉
<dependencies>
    <!--<dependency>
           <groupId>org.springframework.cloud</groupId>
           <artifactId>spring-cloud-starter-netflix-ribbon</artifactId>
       </dependency>-->

    <!--hystrix依赖,主要是用  @HystrixCommand -->
    <!--<dependency>
        <groupId>org.springframework.cloud</groupId>
        <artifactId>spring-cloud-starter-netflix-hystrix</artifactId>
    </dependency>-->

    <!--服务注册-->
    <!-- <dependency>
         <groupId>org.springframework.cloud</groupId>
         <artifactId>spring-cloud-starter-alibaba-nacos-discovery</artifactId>
     </dependency>-->
    <!--服务调用-->
    <!-- <dependency>
         <groupId>org.springframework.cloud</groupId>
         <artifactId>spring-cloud-starter-openfeign</artifactId>
     </dependency>-->

    <dependency>
        <groupId>org.springframework.boot</groupId>
        <artifactId>spring-boot-starter-web</artifactId>
    </dependency>

    <!--mybatis-plus-->
    <dependency>
        <groupId>com.baomidou</groupId>
        <artifactId>mybatis-plus-boot-starter</artifactId>
    </dependency>

    <!--mysql-->
    <dependency>
        <groupId>mysql</groupId>
        <artifactId>mysql-connector-java</artifactId>
    </dependency>

    <!-- velocity 模板引擎, Mybatis Plus 代码生成器需要 -->
    <dependency>
        <groupId>org.apache.velocity</groupId>
        <artifactId>velocity-engine-core</artifactId>
    </dependency>

    <!--swagger-->
    <dependency>
        <groupId>io.springfox</groupId>
        <artifactId>springfox-swagger2</artifactId>
    </dependency>
    <dependency>
        <groupId>io.springfox</groupId>
        <artifactId>springfox-swagger-ui</artifactId>
    </dependency>

    <!--lombok用来简化实体类:需要安装lombok插件-->
    <dependency>
        <groupId>org.projectlombok</groupId>
        <artifactId>lombok</artifactId>
    </dependency>

    <!--xls-->
    <dependency>
        <groupId>org.apache.poi</groupId>
        <artifactId>poi</artifactId>
    </dependency>

    <dependency>
        <groupId>org.apache.poi</groupId>
        <artifactId>poi-ooxml</artifactId>
    </dependency>

    <dependency>
        <groupId>commons-fileupload</groupId>
        <artifactId>commons-fileupload</artifactId>
    </dependency>

    <!--httpclient-->
    <dependency>
        <groupId>org.apache.httpcomponents</groupId>
        <artifactId>httpclient</artifactId>
    </dependency>
    <!--commons-io-->
    <dependency>
        <groupId>commons-io</groupId>
        <artifactId>commons-io</artifactId>
    </dependency>
    <!--gson-->
    <dependency>
        <groupId>com.google.code.gson</groupId>
        <artifactId>gson</artifactId>
    </dependency>

    <dependency>
        <groupId>junit</groupId>
        <artifactId>junit</artifactId>
        <version>4.12</version>
    </dependency>
</dependencies>
删掉service的src
搭建service-edu模块
在父工程service模块下面创建子模块service-edu,也是普通的maven项目
resources目录下创建文件 application.yml
#服务端口
server:
  port: 8080

spring:
  application:
    name: service-edu
  profiles:
    active: dev
  datasource:
    driver-class-name: com.mysql.cj.jdbc.Driver
    url: jdbc:mysql://localhost:3306/gulischool?useUnicode=true&characterEncoding=UTF-8&serverTimezone=UTC
    username: root
    password: 123456
mybatis-plus:
  configuration:
    log-impl: org.apache.ibatis.logging.stdout.StdOutImpl
创建MP代码生成器
在test/java目录下创建包com.atguigu.eduservice,创建代码生成器:CodeGenerator.java
package com.atguigu.demo;


import com.baomidou.mybatisplus.annotation.DbType;
import com.baomidou.mybatisplus.annotation.IdType;
import com.baomidou.mybatisplus.generator.AutoGenerator;
import com.baomidou.mybatisplus.generator.config.DataSourceConfig;
import com.baomidou.mybatisplus.generator.config.GlobalConfig;
import com.baomidou.mybatisplus.generator.config.PackageConfig;
import com.baomidou.mybatisplus.generator.config.StrategyConfig;
import com.baomidou.mybatisplus.generator.config.rules.DateType;
import com.baomidou.mybatisplus.generator.config.rules.NamingStrategy;
import org.junit.Test;

/**
 * @author
 * @since 2018/12/13
 */
public class CodeGenerator {


    @Test
    public void run() {


        // 1、创建代码生成器
        AutoGenerator mpg = new AutoGenerator();

        // 2、全局配置
        GlobalConfig gc = new GlobalConfig();
        String projectPath = System.getProperty("user.dir");
        gc.setOutputDir("D:\\ideacode\\guli_parent\\service\\service_edu" + "/src/main/java");

        gc.setAuthor("dyk");
        gc.setOpen(false); //生成后是否打开资源管理器
        gc.setFileOverride(false); //重新生成时文件是否覆盖

        //UserServie
        gc.setServiceName("%sService");	//去掉Service接口的首字母I

        gc.setIdType(IdType.ASSIGN_ID); //主键策略
        gc.setDateType(DateType.ONLY_DATE);//定义生成的实体类中日期类型
        gc.setSwagger2(true);//开启Swagger2模式

        mpg.setGlobalConfig(gc);

        // 3、数据源配置
        DataSourceConfig dsc = new DataSourceConfig();
        dsc.setUrl("jdbc:mysql://localhost:3306/gulischool?useUnicode=true&characterEncoding=UTF-8&serverTimezone=UTC");
        dsc.setDriverName("com.mysql.cj.jdbc.Driver");
        dsc.setUsername("root");
        dsc.setPassword("123456");
        dsc.setDbType(DbType.MYSQL);
        mpg.setDataSource(dsc);

        // 4、包配置
        PackageConfig pc = new PackageConfig();
        pc.setModuleName("eduservice"); //模块名
        //包  com.atguigu.eduservice
        pc.setParent("com.atguigu");
        //包  com.atguigu.eduservice.controller
        pc.setController("controller");
        pc.setEntity("entity");
        pc.setService("service");
        pc.setMapper("mapper");
        mpg.setPackageInfo(pc);

        // 5、策略配置
        StrategyConfig strategy = new StrategyConfig();

        strategy.setInclude("edu_teacher");

        strategy.setNaming(NamingStrategy.underline_to_camel);//数据库表映射到实体的命名策略
        strategy.setTablePrefix(pc.getModuleName() + "_"); //生成实体时去掉表前缀

        strategy.setColumnNaming(NamingStrategy.underline_to_camel);//数据库表字段映射到实体的命名策略
        strategy.setEntityLombokModel(true); // lombok 模型 @Accessors(chain = true) setter链式操作

        strategy.setRestControllerStyle(true); //restful api风格控制器
        strategy.setControllerMappingHyphenStyle(true); //url中驼峰转连字符

        mpg.setStrategy(strategy);


        // 6、执行
        mpg.execute();
    }
}
创建SpringBoot配置类
注意启动类的位置
@SpringBootApplication
public class EduApplication {


    public static void main(String[] args) {


        SpringApplication.run(EduApplication.class,args);
    }
}
创建SpringBoot配置类
@Configuration
@MapperScan("com.atguigu.eduservice.mapper")
public class EduConfig {


}
统一返回的json时间格式
#返回json的全局时间格式
spring:
 jackson:
  date-format: yyyy-MM-dd HH:mm:ss
  time-zone: GMT+8
编写eduteacher后台管理api接口
查询所有
@RestController
@RequestMapping("/eduservice/teacher")
public class EduTeacherController {


       @Autowired
        private EduTeacherService eduTeacherService;

       @GetMapping("findAll")
    public List<EduTeacher>findAllTeacher(){


           //调用service方法实现查询所有
           List<EduTeacher> list = eduTeacherService.list(null);
           return list;
       }
}
逻辑删除讲师
@DeleteMapping("{id}")
    public boolean removeTeacher(@PathVariable("id") String id){


        boolean flag = eduTeacherService.removeById(id);
        return flag;
    }
跨域
浏览器从一个域名的网页去请求另一个域名的资源时,域名、端口、协议任一不同,都是跨域 。前后端分离开发中,需要考虑ajax跨域的问题。
这里我们可以从服务端解决这个问题
配置
在Controller类上添加注解
@CrossOrigin //跨域
或者跨域添加配置类
整合swagger2
创建common模块
在guli-parent下创建模块common
在common中引入相关依赖
<dependencies>
        <dependency>
            <groupId>org.springframework.boot</groupId>
            <artifactId>spring-boot-starter-web</artifactId>
            <scope>provided </scope>
        </dependency>

        <!--mybatis-plus-->
        <dependency>
            <groupId>com.baomidou</groupId>
            <artifactId>mybatis-plus-boot-starter</artifactId>
            <scope>provided </scope>
        </dependency>

        <!--lombok用来简化实体类:需要安装lombok插件-->
        <dependency>
            <groupId>org.projectlombok</groupId>
            <artifactId>lombok</artifactId>
            <scope>provided </scope>
        </dependency>

        <!--swagger-->
        <dependency>
            <groupId>io.springfox</groupId>
            <artifactId>springfox-swagger2</artifactId>
            <scope>provided </scope>
        </dependency>
        <dependency>
            <groupId>io.springfox</groupId>
            <artifactId>springfox-swagger-ui</artifactId>
            <scope>provided </scope>
        </dependency>

        <!-- redis -->
        <dependency>
            <groupId>org.springframework.boot</groupId>
            <artifactId>spring-boot-starter-data-redis</artifactId>
        </dependency>

        <!-- spring2.X集成redis所需common-pool2
        <dependency>
            <groupId>org.apache.commons</groupId>
            <artifactId>commons-pool2</artifactId>
            <version>2.6.0</version>
        </dependency>-->
    </dependencies>
在模块service-base中,创建swagger的配置类
创建包com.atguigu.servicebase.config,创建类SwaggerConfig
package com.atguigu.servicebase;

import com.google.common.base.Predicates;
import org.springframework.context.annotation.Bean;
import org.springframework.context.annotation.Configuration;
import springfox.documentation.builders.ApiInfoBuilder;
import springfox.documentation.builders.PathSelectors;
import springfox.documentation.service.ApiInfo;
import springfox.documentation.service.Contact;
import springfox.documentation.spi.DocumentationType;
import springfox.documentation.spring.web.plugins.Docket;
import springfox.documentation.swagger2.annotations.EnableSwagger2;

@Configuration//配置类
@EnableSwagger2 //swagger注解
public class SwaggerConfig {


    @Bean
    public Docket webApiConfig(){


        return new Docket(DocumentationType.SWAGGER_2)
                .groupName("webApi")
                .apiInfo(webApiInfo())
                .select()
                .paths(Predicates.not(PathSelectors.regex("/admin/.*")))
                .paths(Predicates.not(PathSelectors.regex("/error.*")))
                .build();

    }

    private ApiInfo webApiInfo(){


        return new ApiInfoBuilder()
                .title("网站-课程中心API文档")
                .description("本文档描述了课程中心微服务接口定义")
                .version("1.0")
                .contact(new Contact("dyk", "https://blog.csdn.net/qq_44866153", "[email protected]"))
                .build();
    }
}
在模块service模块中引入service-base
因为要使用swagger
<dependency>
        <groupId>com.atguigu</groupId>
        <artifactId>service_base</artifactId>
        <version>0.0.1-SNAPSHOT</version>
    </dependency>
在service-edu启动类上添加注解
因为swaggerconfig使用了@Configuration,要使启动类扫描到,要加注解,不然只扫描当前包下的内容
@SpringBootApplication
@ComponentScan(basePackages = {

    "com.atguigu"})
public class EduApplication {


    public static void main(String[] args) {


        SpringApplication.run(EduApplication.class,args);
    }
}
swagger访问地址
http://localhost:8001/swagger-ui.html
统一返回数据格式
项目中我们会将响应封装成json返回,一般我们会将所有接口的数据格式统一, 使前端(iOS Android, Web)对数据的操作更一致、轻松。
一般情况下,统一返回数据格式没有固定的格式,只要能描述清楚返回的数据状态以及要返回的具体数据就可以。但是一般会包含状态码、返回消息、数据这几部分内容
{


        "success": 布尔, //响应是否成功
        "code": 数字, //响应码
        "message": 字符串, //返回消息
        "data": HashMap //返回数据,放在键值对中

}
在common模块下创建子模块common-utils
创建接口定义返回码
package com.atguigu.commonutils;

public interface ResultCode {


    public static Integer SUCCESS = 20000;

    public static Integer ERROR = 20001;
}
创建统一结果返回类
构造方法私有,是为了让别人无法new对象
方法返回this,返回的是当前类对象,以后返回结果可以链式调用
package com.atguigu.commonutils;

import io.swagger.annotations.ApiModelProperty;
import lombok.Data;

import java.util.HashMap;
import java.util.Map;

@Data
//统一返回结果
public class ResultVo {


    @ApiModelProperty(value = "是否成功")
    private Boolean success;

    @ApiModelProperty(value = "返回码")
    private Integer code;

    @ApiModelProperty(value = "返回消息")
    private String message;

    @ApiModelProperty(value = "返回数据")
    private Map<String, Object> data = new HashMap<String, Object>();

    //构造方法私有
    private ResultVo(){

    }

    //成功静态方法
    public static ResultVo ok(){


        ResultVo resultVo=new ResultVo();
        resultVo.setSuccess(true);
        resultVo.setCode(ResultCode.SUCCESS);
        resultVo.setMessage("成功");
        return resultVo;
    }
    //失败静态方法
    public static ResultVo error(){


        ResultVo resultVo=new ResultVo();
        resultVo.setSuccess(false);
        resultVo.setCode(ResultCode.ERROR);
        resultVo.setMessage("失败");
        return resultVo;
    }

    public ResultVo success(Boolean success){


        this.setSuccess(success);
        return this;

    }
    public ResultVo message(String message){


        this.setMessage(message);
        return this;
    }

    public ResultVo code(Integer code){


        this.setCode(code);
        return this;
    }

    public ResultVo data(String key,Object value){


        this.data.put(key,value);
        return this;
    }

    public ResultVo data(Map<String,Object> map){


        this.setData(map);
        return this;
    }

}
统一返回结果使用
在service模块中添加common_utils依赖
<dependency>
        <groupId>com.atguigu</groupId>
        <artifactId>common_utils</artifactId>
        <version>0.0.1-SNAPSHOT</version>
    </dependency>
修改Controller中的返回结果
//查询讲师表所有数据
    @ApiOperation(value = "所有讲师列表")
    @GetMapping("/findAll")
    public ResultVo findAllTeacher(){


           //调用service方法实现查询所有
           List<EduTeacher> list = eduTeacherService.list(null);
           return ResultVo.ok().data("items",list);
       }

    //逻辑删除讲师
    @ApiOperation(value = "根据ID删除讲师")
    @DeleteMapping("{id}")
    public ResultVo removeTeacher(@PathVariable("id") String id){


        boolean flag = eduTeacherService.removeById(id);
        if(flag){


            return ResultVo.ok();
        }
        else{


            return ResultVo.error();
        }
    }
讲师分页功能
分页插件
在配置类 EduConfig添加
新版
@Configuration
@MapperScan("com.atguigu.eduservice.mapper")
public class EduConfig {


    @Bean
    public MybatisPlusInterceptor mybatisPlusInterceptor() {


        MybatisPlusInterceptor interceptor = new MybatisPlusInterceptor();
        interceptor.addInnerInterceptor(new PaginationInnerInterceptor(DbType.MYSQL));
        return interceptor;
    }


}
旧版
@Bean
public PaginationInterceptor paginationInterceptor() {


    return new PaginationInterceptor();

}
讲师分页Controller
//分页查询讲师
    //curremt 当前页
    //limit 每页记录
    @ApiOperation(value = "分页查询讲师")
    @ApiImplicitParams({


            @ApiImplicitParam(name="current",value = "当前页"),
            @ApiImplicitParam(name="limit",value = "每页记录")
    })
    @GetMapping("/pageTeacher/{current}/{limit}")
    public ResultVo pageListTeacher(@PathVariable Long current,@PathVariable Long limit){


        //创建page对象
        Page<EduTeacher> teacherPage =new Page<>(current,limit);
        //调用方法实现分页
        //调用方法时,底层封装,把分页所有数据封装到teacherPage对象里面
        eduTeacherService.page(teacherPage,null);
        //总记录数
        long total = teacherPage.getTotal();
        //数据list集合
        List<EduTeacher> records = teacherPage.getRecords();
        Map map=new HashMap();
        map.put("total",total);
        map.put("rows",records);
        return ResultVo.ok().data(map);
    }
条件查询带分页方法
根据讲师名称name,讲师头衔level、讲师入驻时间gmt_create(时间段)查询
在entity下面新建一个vo包,创建TeacherQueryVo
package com.atguigu.eduservice.entity.vo;

import io.swagger.annotations.ApiModel;
import io.swagger.annotations.ApiModelProperty;
import lombok.AllArgsConstructor;
import lombok.Data;
import lombok.NoArgsConstructor;

@Data
@NoArgsConstructor
@AllArgsConstructor
@ApiModel(value = "Teacher查询对象", description = "讲师查询对象封装")
public class TeacherQueryVo {


    @ApiModelProperty(value = "教师名称,模糊查询")
    private String name;

    @ApiModelProperty(value = "头衔 1高级讲师 2首席讲师")
    private Integer level;

    @ApiModelProperty(value = "查询开始时间", example = "2019-01-01 10:10:10")
    private String begin;//注意,这里使用的是String类型,前端传过来的数据无需进行类型转换

    @ApiModelProperty(value = "查询结束时间", example = "2019-12-01 10:10:10")
    private String end;
}
带条件分页查询讲师
注意这里条件可以为空,那么就和不带条件一样了,但是要加上 @RequestBody(required = false)否则会报错
// 带条件分页查询讲师
    @ApiOperation(value = "带条件分页查询讲师")
    @ApiImplicitParams({


            @ApiImplicitParam(name="current",value = "当前页"),
            @ApiImplicitParam(name="limit",value = "每页记录")
    })
    @PostMapping("pageTeacherCondition/{current}/{limit}")
    public ResultVo pageTeacherCondition(@PathVariable Long current, @PathVariable Long limit, @RequestBody(required = false) TeacherQueryVo teacherQueryVo){


        //创建page对象
        Page<EduTeacher> teacherPage =new Page<>(current,limit);
        //构建条件
        QueryWrapper<EduTeacher> wrapper = new QueryWrapper<>();
        //多条件组合查询
        String name = teacherQueryVo.getName();
        Integer level = teacherQueryVo.getLevel();
        String begin = teacherQueryVo.getBegin();
        String end = teacherQueryVo.getEnd();
        //判断条件值是否为空,如果不为空拼接条件
        if(!StringUtils.isEmpty(name)){


            wrapper.like("name",name);
        }
        if(!StringUtils.isEmpty(level)){


            wrapper.eq("level",level);
        }
        if(!StringUtils.isEmpty(begin)){


            wrapper.ge("gmt_create", begin);
        }
        if(!StringUtils.isEmpty(end)){


           wrapper.le("gmt_create", end);
        }
        //调用方法实现分页
        //调用方法时,底层封装,把分页所有数据封装到teacherPage对象里面
        eduTeacherService.page(teacherPage,wrapper);
        //总记录数
        long total = teacherPage.getTotal();
        //数据list集合
        List<EduTeacher> records = teacherPage.getRecords();
        Map map=new HashMap();
        map.put("total",total);
        map.put("rows",records);
        return ResultVo.ok().data(map);
    }
添加讲师
在service-base模块中添加
创建包handler,创建自动填充类 MyMetaObjectHandler
注意这里的是实体类的属性名字而不是数据库的字段名字
package com.atguigu.servicebase.handler;

import com.baomidou.mybatisplus.core.handlers.MetaObjectHandler;
import org.apache.ibatis.reflection.MetaObject;
import org.springframework.stereotype.Component;

import java.util.Date;
@Component
public class MyMetaObjectHandler implements MetaObjectHandler {


    @Override
    public void insertFill(MetaObject metaObject) {


        //gmtCreate传的是类中的属性名
        this.setFieldValByName("gmtCreate",new Date(),metaObject);
        this.setFieldValByName("gmtModified",new Date(),metaObject);
    }

    @Override
    public void updateFill(MetaObject metaObject) {


        this.setFieldValByName("gmtModified",new Date(),metaObject);
    }
}
在实体类添加自动填充注解
	@ApiModelProperty(value = "创建时间")
    @TableField(fill = FieldFill.INSERT)
    private Date gmtCreate;

    @ApiModelProperty(value = "更新时间")
    @TableField(fill = FieldFill.INSERT_UPDATE)
    private Date gmtModified;
添加讲师controller
//添加讲师接口
    @PostMapping("addTeacher")
    public ResultVo addTeacher(@RequestBody EduTeacher eduTeacher){


        boolean save = eduTeacherService.save(eduTeacher);
        if(save){


            return ResultVo.ok();
        }else {


            return ResultVo.error();
        }
    }
根据id查询 controller
//根据讲师id进行查询
    @ApiOperation(value = "根据讲师id进行查询")
    @ApiImplicitParam(name="id",value = "讲师id",dataType = "string")
    @GetMapping("/{id}")
    public ResultVo getTeacher(@PathVariable String id){


        EduTeacher eduTeacher = eduTeacherService.getById(id);
        return ResultVo.ok().data("teacher",eduTeacher);
    }
根据id修改 controller
//讲师修改功能
    @ApiOperation(value = "讲师修改功能")
    @PutMapping("/updateTeacher")
    public ResultVo updateTeacher(@RequestBody EduTeacher eduTeacher){


        boolean flag=eduTeacherService.updateById(eduTeacher);
        if(flag){


            return ResultVo.ok();
        }
        else{


            return ResultVo.error();
        }
    }
统一异常处理
什么是统一异常处理
我们想让异常结果也显示为统一的返回结果对象,并且统一处理系统的异常信息,那么需要统一异常处理
创建统一异常处理器
在service-base中创建包ExceptionHandler再创建统一异常处理类GlobalExceptionHandler.java
@ControllerAdvice

public class GloablExceptonHandler {


  //指定出现什么异常执行这个方法
   @ExceptionHandler(Exception.class)
   @ResponseBody
   public ResultVo error(Exception e){


      e.printStackTrace();
      return ResultVo.error().message(e.getMessage());
   }
}
删除service模块中common_utils的gav坐标
注意这里使用了ResultVo,所有需要service-base引入common_utils的gav坐标,但是在service模块中当时同时引入了两个service-base,common_utils的gav坐标,就会有冲突,所有要删除service模块中common_utils的gav坐标
自定义异常
创建自定义异常类
@Data
@NoArgsConstructor
@AllArgsConstructor
@Api(tags = "自定义异常类")
public class GuliException extends RuntimeException{


   @ApiModelProperty(value = "状态码")
   private Integer code; //状态码

   private String msg;//异常信息


}
添加异常处理方法
//自定义异常
    @ExceptionHandler(GuliException.class)
    @ResponseBody
    public ResultVo error(GuliException e){


        e.printStackTrace();
        return ResultVo.error().code(e.getCode()).message(e.getMsg());
    }
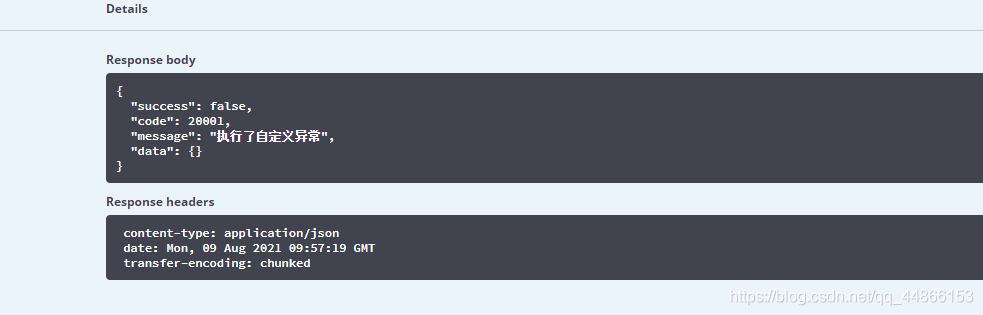
业务中需要的位置抛出GuliException
try {


            int i=1/0;

        }catch (Exception e){


            //执行自定义异常
            throw new GuliException(20001,"执行了自定义异常");
        }
日志
配置日志级别
日志记录器(Logger)的行为是分等级的。如下表所示:
分为:OFF、FATAL、ERROR、WARN、INFO、DEBUG、ALL
默认情况下,spring boot从控制台打印出来的日志级别只有INFO及以上级别,可以配置日志级别
# 设置日志级别
logging.level.root=WARN
这种方式只能将日志打印在控制台上
配置logback日志
删除application.yml中原有的mybatisplus日志配置,不然有冲突会报错
resources 中创建 logback-spring.xml
日后根据自己情况修改日志打印的位置,和包名
<?xml version="1.0" encoding="UTF-8"?>
<configuration  scan="true" scanPeriod="10 seconds">
    <!-- 日志级别从低到高分为TRACE < DEBUG < INFO < WARN < ERROR < FATAL,如果设置为WARN,则低于WARN的信息都不会输出 -->
    <!-- scan:当此属性设置为true时,配置文件如果发生改变,将会被重新加载,默认值为true -->
    <!-- scanPeriod:设置监测配置文件是否有修改的时间间隔,如果没有给出时间单位,默认单位是毫秒。当scan为true时,此属性生效。默认的时间间隔为1分钟。 -->
    <!-- debug:当此属性设置为true时,将打印出logback内部日志信息,实时查看logback运行状态。默认值为false。 -->

    <contextName>logback</contextName>
    <!-- name的值是变量的名称,value的值时变量定义的值。通过定义的值会被插入到logger上下文中。定义变量后,可以使“${}”来使用变量。 -->
    <property name="log.path" value="D:/java项目/gulischool/edu" />

    <!-- 彩色日志 -->
    <!-- 配置格式变量:CONSOLE_LOG_PATTERN 彩色日志格式 -->
    <!-- magenta:洋红 -->
    <!-- boldMagenta:粗红-->
    <!-- cyan:青色 -->
    <!-- white:白色 -->
    <!-- magenta:洋红 -->
    <property name="CONSOLE_LOG_PATTERN"
              value="%yellow(%date{yyyy-MM-dd HH:mm:ss}) |%highlight(%-5level) |%blue(%thread) |%blue(%file:%line) |%green(%logger) |%cyan(%msg%n)"/>


    <!--输出到控制台-->
    <appender name="CONSOLE" class="ch.qos.logback.core.ConsoleAppender">
        <!--此日志appender是为开发使用,只配置最底级别,控制台输出的日志级别是大于或等于此级别的日志信息-->
        <!-- 例如:如果此处配置了INFO级别,则后面其他位置即使配置了DEBUG级别的日志,也不会被输出 -->
        <filter class="ch.qos.logback.classic.filter.ThresholdFilter">
            <level>INFO</level>
        </filter>
        <encoder>
            <Pattern>${CONSOLE_LOG_PATTERN}</Pattern>
            <!-- 设置字符集 -->
            <charset>UTF-8</charset>
        </encoder>
    </appender>


    <!--输出到文件-->

    <!-- 时间滚动输出 level为 INFO 日志 -->
    <appender name="INFO_FILE" class="ch.qos.logback.core.rolling.RollingFileAppender">
        <!-- 正在记录的日志文件的路径及文件名 -->
        <file>${log.path}/log_info.log</file>
        <!--日志文件输出格式-->
        <encoder>
            <pattern>%d{yyyy-MM-dd HH:mm:ss.SSS} [%thread] %-5level %logger{50} - %msg%n</pattern>
            <charset>UTF-8</charset>
        </encoder>
        <!-- 日志记录器的滚动策略,按日期,按大小记录 -->
        <rollingPolicy class="ch.qos.logback.core.rolling.TimeBasedRollingPolicy">
            <!-- 每天日志归档路径以及格式 -->
            <fileNamePattern>${log.path}/info/log-info-%d{yyyy-MM-dd}.%i.log</fileNamePattern>
            <timeBasedFileNamingAndTriggeringPolicy class="ch.qos.logback.core.rolling.SizeAndTimeBasedFNATP">
                <maxFileSize>100MB</maxFileSize>
            </timeBasedFileNamingAndTriggeringPolicy>
            <!--日志文件保留天数-->
            <maxHistory>15</maxHistory>
        </rollingPolicy>
        <!-- 此日志文件只记录info级别的 -->
        <filter class="ch.qos.logback.classic.filter.LevelFilter">
            <level>INFO</level>
            <onMatch>ACCEPT</onMatch>
            <onMismatch>DENY</onMismatch>
        </filter>
    </appender>

    <!-- 时间滚动输出 level为 WARN 日志 -->
    <appender name="WARN_FILE" class="ch.qos.logback.core.rolling.RollingFileAppender">
        <!-- 正在记录的日志文件的路径及文件名 -->
        <file>${log.path}/log_warn.log</file>
        <!--日志文件输出格式-->
        <encoder>
            <pattern>%d{yyyy-MM-dd HH:mm:ss.SSS} [%thread] %-5level %logger{50} - %msg%n</pattern>
            <charset>UTF-8</charset> <!-- 此处设置字符集 -->
        </encoder>
        <!-- 日志记录器的滚动策略,按日期,按大小记录 -->
        <rollingPolicy class="ch.qos.logback.core.rolling.TimeBasedRollingPolicy">
            <fileNamePattern>${log.path}/warn/log-warn-%d{yyyy-MM-dd}.%i.log</fileNamePattern>
            <timeBasedFileNamingAndTriggeringPolicy class="ch.qos.logback.core.rolling.SizeAndTimeBasedFNATP">
                <maxFileSize>100MB</maxFileSize>
            </timeBasedFileNamingAndTriggeringPolicy>
            <!--日志文件保留天数-->
            <maxHistory>15</maxHistory>
        </rollingPolicy>
        <!-- 此日志文件只记录warn级别的 -->
        <filter class="ch.qos.logback.classic.filter.LevelFilter">
            <level>warn</level>
            <onMatch>ACCEPT</onMatch>
            <onMismatch>DENY</onMismatch>
        </filter>
    </appender>


    <!-- 时间滚动输出 level为 ERROR 日志 -->
    <appender name="ERROR_FILE" class="ch.qos.logback.core.rolling.RollingFileAppender">
        <!-- 正在记录的日志文件的路径及文件名 -->
        <file>${log.path}/log_error.log</file>
        <!--日志文件输出格式-->
        <encoder>
            <pattern>%d{yyyy-MM-dd HH:mm:ss.SSS} [%thread] %-5level %logger{50} - %msg%n</pattern>
            <charset>UTF-8</charset> <!-- 此处设置字符集 -->
        </encoder>
        <!-- 日志记录器的滚动策略,按日期,按大小记录 -->
        <rollingPolicy class="ch.qos.logback.core.rolling.TimeBasedRollingPolicy">
            <fileNamePattern>${log.path}/error/log-error-%d{yyyy-MM-dd}.%i.log</fileNamePattern>
            <timeBasedFileNamingAndTriggeringPolicy class="ch.qos.logback.core.rolling.SizeAndTimeBasedFNATP">
                <maxFileSize>100MB</maxFileSize>
            </timeBasedFileNamingAndTriggeringPolicy>
            <!--日志文件保留天数-->
            <maxHistory>15</maxHistory>
        </rollingPolicy>
        <!-- 此日志文件只记录ERROR级别的 -->
        <filter class="ch.qos.logback.classic.filter.LevelFilter">
            <level>ERROR</level>
            <onMatch>ACCEPT</onMatch>
            <onMismatch>DENY</onMismatch>
        </filter>
    </appender>

    <!--
        <logger>用来设置某一个包或者具体的某一个类的日志打印级别、以及指定<appender>。
        <logger>仅有一个name属性,
        一个可选的level和一个可选的addtivity属性。
        name:用来指定受此logger约束的某一个包或者具体的某一个类。
        level:用来设置打印级别,大小写无关:TRACE, DEBUG, INFO, WARN, ERROR, ALL 和 OFF,
              如果未设置此属性,那么当前logger将会继承上级的级别。
    -->
    <!--
        使用mybatis的时候,sql语句是debug下才会打印,而这里我们只配置了info,所以想要查看sql语句的话,有以下两种操作:
        第一种把<root level="INFO">改成<root level="DEBUG">这样就会打印sql,不过这样日志那边会出现很多其他消息
        第二种就是单独给mapper下目录配置DEBUG模式,代码如下,这样配置sql语句会打印,其他还是正常DEBUG级别:
     -->
    <!--开发环境:打印控制台-->
    <springProfile name="dev">
        <!--可以输出项目中的debug日志,包括mybatis的sql日志-->
        <logger name="com.guli" level="INFO" />

        <!--
            root节点是必选节点,用来指定最基础的日志输出级别,只有一个level属性
            level:用来设置打印级别,大小写无关:TRACE, DEBUG, INFO, WARN, ERROR, ALL 和 OFF,默认是DEBUG
            可以包含零个或多个appender元素。
        -->
        <root level="INFO">
            <appender-ref ref="CONSOLE" />
            <appender-ref ref="INFO_FILE" />
            <appender-ref ref="WARN_FILE" />
            <appender-ref ref="ERROR_FILE" />
        </root>
    </springProfile>


    <!--生产环境:输出到文件-->
    <springProfile name="pro">

        <root level="INFO">
            <appender-ref ref="CONSOLE" />
            <appender-ref ref="DEBUG_FILE" />
            <appender-ref ref="INFO_FILE" />
            <appender-ref ref="ERROR_FILE" />
            <appender-ref ref="WARN_FILE" />
        </root>
    </springProfile>

</configuration>
将错误日志输出到文件
GlobalExceptionHandler.java 中
类上添加注解 @Slf4j 这个是lombok的注解,用来打印日志用的
异常输出语句 : log.error(e.getMessage());
package com.atguigu.servicebase.exceptionhandler;

import com.atguigu.commonutils.ResultVo;
import lombok.extern.slf4j.Slf4j;
import org.springframework.web.bind.annotation.ControllerAdvice;
import org.springframework.web.bind.annotation.ExceptionHandler;
import org.springframework.web.bind.annotation.ResponseBody;

@ControllerAdvice
@Slf4j
public class GloablExceptonHandler {


  //指定出现什么异常执行这个方法
   @ExceptionHandler(Exception.class)
   @ResponseBody
   public ResultVo error(Exception e){


      e.printStackTrace();
      return ResultVo.error().message(e.getMessage());
   }


    //自定义异常
    @ExceptionHandler(GuliException.class)
    @ResponseBody
    public ResultVo error(GuliException e){


       log.error(e.getMessage());
        e.printStackTrace();
        return ResultVo.error().code(e.getCode()).message(e.getMsg());
    }
}
更详细的记录错误信息
common_utils模块commonutils 创建ExceptionUtil.java工具类
package com.atguigu.commonutils.utils;

import java.io.IOException;
import java.io.PrintWriter;
import java.io.StringWriter;

public class ExceptionUtil {


    public static String getMessage(Exception e) {


        StringWriter sw = null;
        PrintWriter pw = null;
        try {


            sw = new StringWriter();

            pw = new PrintWriter(sw);

// 将出错的栈信息输出到printWriter中
            e.printStackTrace(pw);
            pw.flush();
            sw.flush();

        } finally {


            if (sw != null) {


                try {


                    sw.close();
                } catch (IOException e1) {


                    e1.printStackTrace();
                }
            }
            if (pw != null) {


                pw.close();
            }
        }
        return sw.toString();
    }

}
log.error(ExceptionUtil.getMessage(e));
GuliException中创建toString方法,或者直接lombok@tostring
@Override
   public String toString() {


      return "GuliException{" +
              "code=" + code +
              ", msg='" + msg + '\'' +
              '}';
   }
es6和vue基础知识点
es6语法新特性博客链接
vue基础知识点博客链接
axios博客链接
npm,webpack博客链接
vue-element-admin
而vue-element-admin是基于element-ui 的一套后台管理系统集成方案。
功能:https://panjiachen.github.io/vue-element-admin-site/zh/guide/#功能
GitHub地址:https://github.com/PanJiaChen/vue-element-admin
项目在线预览:https://panjiachen.gitee.io/vue-element-admin
安装
# 解压压缩包
# 进入目录
cd vue-element-admin-master


# 安装依赖
npm install

# 启动。执行后,浏览器自动弹出并访问http://localhost:9527/
npm run dev
vue-admin-template
ueAdmin-template是基于vue-element-admin的一套后台管理系统基础模板(最少精简版),可作为模板进行二次开发。
GitHub地址:https://github.com/PanJiaChen/vue-admin-template
建议:你可以在 vue-admin-template 的基础上进行二次开发,把 vue-element-admin当做工具箱,想要什么功能或者组件就去 vue-element-admin 那里复制过来
# 解压压缩包
# 进入目录
cd vue-admin-template-master

# 安装依赖
npm install

# 启动。执行后,浏览器自动弹出并访问http://localhost:9528/
npm run dev
前端项目的创建和基本配置
将vue-admin-template-master重命名为guli-admin
修改端口号
config/index.js中修改
port: 9528,
关闭语法检查
config/index.js中修改
useEslint: false

项目的目录结构
├── build // 构建脚本
├── config // 全局配置
├── node_modules // 项目依赖模块
├── src //项目源代码
├── static // 静态资源
└── package.jspon // 项目信息和依赖配置
src

├── api // 各种接口
├── assets // 图片等资源
├── components // 各种公共组件,非公共组件在各自view下维护
├── icons //svg icon
├── router // 路由表
├── store // 存储
├── styles // 各种样式
├── utils // 公共工具,非公共工具,在各自view下维护
├── views // 各种layout
├── App.vue //***项目顶层组件***
├── main.js //***项目入口文件***
└── permission.js //认证入口
运行项目
npm run dev
修改模拟登录
前端
config下的dev.env.js的 BASE_API的路径换成本地
module.exports = merge(prodEnv, {


  NODE_ENV: '"development"',
  // BASE_API: '"https://easy-mock.com/mock/5950a2419adc231f356a6636/vue-admin"',

  BASE_API: '"http://localhost:8001"'
})
src/api/login.js的路径换成接口的路径
export function login(username, password) {


  return request({


    url: '/eduservice/user/login',
    method: 'post',
    data: {


      username,
      password
    }
  })
}

export function getInfo(token) {


  return request({


    url: '/eduservice/user/info',
    method: 'get',
    params: {

     token }
  })
}

export function logout() {


  return request({


    url: '/eduservice/user/logout',
    method: 'post'
  })
}
后端
EduLoginController
@RestController
@RequestMapping("/eduservice/user")
@Api(tags="登录管理")
@CrossOrigin
public class EduLoginController {


    //login
    @PostMapping("/login")
    public ResultVo login(){


        return ResultVo.ok().data("token","admin");
    }
    //info
    @GetMapping("/info")
    public  ResultVo info(){


        return ResultVo.ok().data("roles","[admin]").data("name","admin").data("avatar","https://wpimg.wallstcn.com/f778738c-e4f8-4870-b634-56703b4acafe.gif");
    }
}
启动前端和后端
跨域问题

解决跨域问题
在接口上面添加
@CrossOrigin
讲师列表前端实现
创建路由页面
在src/views 下新建edu/teacher 文件夹
并新建 list.vue save.vue

list.vue
<template>

  <div class="app-container">
    讲师列表
  </div>
</template>
add.vue
<template>

  <div class="app-container">
    讲师添加
  </div>
</template>
添加路由
在src/router/index.js 添加
{


    path: '/teacher',
    component: Layout,
    redirect: '/teacher/table',
    name: '讲师管理',
    meta: {

     title: '讲师管理', icon: 'example' },
    children: [
      {


        path: 'list',
        name: '讲师列表',
        component: () => import('@/views/edu/teacher/list'),
        meta: {

     title: '讲师列表', icon: 'table' }
      },
      {


        path: 'save',
        name: '添加讲师',
        component: () => import('@/views/edu/teacher/save'),
        meta: {

     title: '添加讲师', icon: 'tree' }
      }
    ]
  },
定义teacher.js
在src/api下创建 edu/teacher.js
import request from '@/utils/request'

export default{


  //讲师列表(条件查询分页)
  //current 当前页 limit每页记录数  teacherQuery条件对象
  getTeacherListPage(current,limit,teacherQuery){


    return request({


      url: `/eduservice/teacher/pageTeacherCondition/${

      current}/${

      limit}`, //这里用的是es6的``不是单引号
      method: 'post',
      //teacherQuery条件对象,后端使用RequestBody获取数据
      //data表示把对象转换json进行传递到接口
      data: teacherQuery
    })
  }

}
初始化vue组件
src/views/edu/teacher/list.vue
<template>

  <div class="app-container">
    讲师列表
  </div>
</template>

<script>

//引入teacher.js
import teacher from '@/api/edu/teacher'
export default {


    //写核心代码
   data(){

      //定义变量和初始值
     return{


     }
   },
   created(){

    //页面渲染之前执行,一般调用methods定义的方法

   },
   methods:{

    //创建具体的方法,调用teacher.js定义的方法

   }
}
</script>
定义data
data(){

      //定义变量和初始值
     return{


       list:null, //查询之后接口返回的集合
       page:1, //当前页
       limit:10, //每页记录数
       total:0, //总记录数
       teacherQuery:{

    } //条件封装对象

     }
定义methods
methods:{

    //创建具体的方法,调用teacher.js定义的方法
        //讲师列表方法
        getList(){


          teacher.getTeacherListPage(this.page,this.limit,this.teacherQuery)
          .then(response =>{


              // console.log(response.data.rows)
              this.list=response.data.rows;
              this.total=response.data.total;
          })
          .catch(error => {


            console.log(error)//请求失败
          })
        }

   }
完整版
<template>

  <div class="app-container">
    讲师列表
  </div>
</template>

<script>

//引入teacher.js
import teacher from '@/api/edu/teacher'
export default {


    //写核心代码
   data(){

      //定义变量和初始值
     return{


       list:null, //查询之后接口返回的集合
       page:1, //当前页
       limit:10, //每页记录数
       total:0, //总记录数
       teacherQuery:{

    } //条件封装对象

     }
   },
   created(){

    //页面渲染之前执行,一般调用methods定义的方法
      this.getList()
   },
   methods:{

    //创建具体的方法,调用teacher.js定义的方法
        //讲师列表方法
        getList(){


          teacher.getTeacherListPage(this.page,this.limit,this.teacherQuery)
          .then(response =>{


              // console.log(response.data.rows)
              this.list=response.data.rows;
              this.total=response.data.total;
          })
          .catch(error => {


            console.log(error)//请求失败
          })
        }

   }
}
</script>
表格渲染
<!-- 表格 -->
    <el-table
      :data="list"
      border
      fit
      highlight-current-row>

      <el-table-column
        label="序号"
        width="70"
        align="center">
        <template slot-scope="scope">
          {

   { (page - 1) * limit + scope.$index + 1 }}
        </template>
      </el-table-column>

      <el-table-column prop="name" label="名称" width="80" />

      <el-table-column label="头衔" width="80">
        <template slot-scope="scope">
          {

   { scope.row.level===1?'高级讲师':'首席讲师' }}
        </template>
      </el-table-column>

      <el-table-column prop="intro" label="资历" />

      <el-table-column prop="gmtCreate" label="添加时间" width="160"/>

      <el-table-column prop="sort" label="排序" width="60" />

      <el-table-column label="操作" width="200" align="center">
        <template slot-scope="scope">
          <router-link :to="'/teacher/edit/'+scope.row.id">
            <el-button type="primary" size="mini" icon="el-icon-edit">修改</el-button>
          </router-link>
          <el-button type="danger" size="mini" icon="el-icon-delete" @click="removeDataById(scope.row.id)">删除</el-button>
        </template>
      </el-table-column>
    </el-table>
分页
<!-- 分页 -->
    <el-pagination
      :current-page="page"
      :page-size="limit"
      :total="total"
      style="padding: 30px 0; text-align: center;"
      layout="total, prev, pager, next, jumper"
      @current-change="getList"/>
修改getList方法
因为默认current是1,只能查第一页,
methods:{

    //创建具体的方法,调用teacher.js定义的方法
        //讲师列表方法
        getList(page=1){


          this.page = page
          teacher.getTeacherListPage(this.page,this.limit,this.teacherQuery)
          .then(response =>{


              // console.log(response.data.rows)
              this.list=response.data.rows;
              this.total=response.data.total;
          })
          .catch(error => {


            console.log(error)//请求失败
          })
        }

   }
并且 @current-change=“getList”/>里面不要加参数,封装好了,会自己帮忙传
查询表单
注意:
element-ui的 date-picker组件默认绑定的时间值是默认世界标准时间,和中国时间差8小时
设置 value-format=“yyyy-MM-dd HH:mm:ss” 改变绑定的值
  <!--查询表单-->
    <el-form :inline="true" class="demo-form-inline">
      <el-form-item>
        <el-input v-model="teacherQuery.name" placeholder="讲师名"/>
      </el-form-item>

      <el-form-item>
        <el-select v-model="teacherQuery.level" clearable placeholder="讲师头衔">
          <el-option :value="1" label="高级讲师"/>
          <el-option :value="2" label="首席讲师"/>
        </el-select>
      </el-form-item>

      <el-form-item label="添加时间">
        <el-date-picker
          v-model="teacherQuery.begin"
          type="datetime"
          placeholder="选择开始时间"
          value-format="yyyy-MM-dd HH:mm:ss"
          default-time="00:00:00"
        />
      </el-form-item>
      <el-form-item>
        <el-date-picker
          v-model="teacherQuery.end"
          type="datetime"
          placeholder="选择截止时间"
          value-format="yyyy-MM-dd HH:mm:ss"
          default-time="00:00:00"
        />
      </el-form-item>

      <el-button type="primary" icon="el-icon-search" @click="getList()">查询</el-button>
      <el-button type="default" @click="resetData()">清空</el-button>
    </el-form>
清空功能
清空表单输入条件数据
查询所有的数据
	resetData(){


          //表单输入项数据清空
          this.teacherQuery={

    }
          //查询所有讲师数据
          this.getList();
        }
删除讲师
定义api
src/api/edu/teacher.js
 //删除讲师
  deleteTeacherById(id){


    return request({


      url: `/eduservice/teacher/${

      id}`,
      method: 'delete'
    })
  }
定义methods
src/views/edu/teacher/list.vue
使用MessageBox 弹框组件
removeDataById(id){


            this.$confirm('此操作将永久删除讲师记录, 是否继续?', '提示', {


                confirmButtonText: '确定',
                cancelButtonText: '取消',
                type: 'warning'
            }).then(() => {

      //点击确定,执行then方法
                //调用删除的方法
               teacher.deleteTeacherById(id)
                    .then(response =>{

    //删除成功
                    //提示信息
                    this.$message({


                        type: 'success',
                        message: '删除成功!'
                    });
                    //回到列表页面
                    this.getList(this.page)
                })
            }) //点击取消,执行catch方法
        }
添加讲师
定义api
src/api/edu/teacher.js
//添加讲师
  addTeacher(teacher){


    return request({


      url:'/eduservice/teacher/addTeacher',
      method:'post',
      data: teacher
    })
  }
初始化组件
src/views/edu/teacher/save.vue
<template>
  <div class="app-container">
    讲师添加

    <el-form label-width="120px">
      <el-form-item label="讲师名称">
        <el-input v-model="teacher.name" />
      </el-form-item>
      <el-form-item label="讲师排序">
        <el-input-number
          v-model="teacher.sort"
          controls-position="right"
          :min="0"
        />
      </el-form-item>
      <el-form-item label="讲师头衔">
        <el-select v-model="teacher.level" clearable placeholder="请选择">
          <el-option :value="1" label="高级讲师" />
          <el-option :value="2" label="首席讲师" />
        </el-select>
      </el-form-item>
      <el-form-item label="讲师资历">
        <el-input v-model="teacher.career" />
      </el-form-item>
      <el-form-item label="讲师简介">
        <el-input v-model="teacher.intro" :rows="10" type="textarea" />
      </el-form-item>

      <!-- 讲师头像:TODO -->

      <el-form-item>
        <el-button
          :disabled="saveBtnDisabled"
          type="primary"
          @click="saveOrUpdate"
          >保存</el-button
        >
      </el-form-item>
    </el-form>
  </div>
</template>
js
<script>

import teacherApi from '@/api/edu/teacher'
export default {


  data(){


    return {


       teacher:{


        name: '',
        sort: 0,
        level: 1,
        career: '',
        intro: '',
        avatar: ''
       },
       saveBtnDisabled: false // 保存按钮是否禁用,
    }
  },
  created(){

    },

methods:{


     saveOrUpdate(){


       //添加
       this.saveTeacher()
     },
     //添加讲师的方法
     saveTeacher(){


       teacherApi.addTeacher(this.teacher)
       .then((response) => {


         //提示信息
          this.$message({


              type: 'success',
              message: '添加成功!'
          });

          //回到列表页面 ,路由跳转
          this.$router.push({

    path:'/teacher/list'})
       }).catch((err) => {


       });
     }
}
}
</script>
修改讲师
通过路由跳转数据回显页面,再由路由index页面添加路由,并且是隐藏路由
添加和修改是同一个页面
隐藏路由
:id 是占位符
hidden: true 是隐藏
{


        path: 'edit/:id',
        name: '修改讲师',
        component: () => import('@/views/edu/teacher/save'),
        meta: {


          title: '修改讲师',
          noCache: 'tree'
        },
        hidden: true
      }
路由跳转
<router-link :to="'/teacher/edit/'+scope.row.id">
            <el-button type="primary" size="mini" icon="el-icon-edit">修改</el-button>
</router-link>
数据回显
在表单页面实现数据回显
在 src/api/edu/teacher.js
getTeacherInfoById(id) {


    return request({


      url: `/eduservice/teacher/${

      id}`,
      method: 'get',

    })
  }
页面调用回显
因为添加和修改页面使用save页面
区别添加还是修改,只有修改时候查询数据回显
判断路径里面是否有讲师id值,如果有id值修改,没有id值直接添加
根据路径是否有id决定回显
 created() {


    //判断路径有id值,做修改
    if (this.$route.params && this.$route.params.id) {


      //从路径获取id值
      const id = this.$route.params.id;

      this.getInfo(id);
    }

  },
修改讲师
在 src/api/edu/teacher.js
//修改讲师
  updateTeacher(teacher) {


    return request({


      url: '/eduservice/teacher/updateTeacher',
      method: 'put',
      data: teacher
    })
  },
 updateTeacherInfo() {


      teacherApi
        .updateTeacher(this.teacher)
        .then((response) => {


          //提示信息
          this.$message({


            type: "success",
            message: "修改成功!",
          });

          //回到列表页面 ,路由跳转
          this.$router.push({

     path: "/teacher/list" });
        })
        .catch((err) => {

    });
    },
saveOrUpdate
saveOrUpdate() {


      //判断修改还是添加
      //根据teacher是否有id
      if (!this.teacher.id) {


        //添加
        this.saveTeacher();
      } else {


        //修改
        this.updateTeacherInfo();
      }
    }
问题bug
如果先点了讲师列表里面的修改,再点击添加讲师,会发现,数据回显还是会存在
表单页面还是现实修改回显的数据,正确 效果应该是表单数据清空
vue-router导航切换 时,如果两个路由都渲染同个组件,组件会重(chong)用,
组件的生命周期钩子(created)不会再被调用, 使得组件的一些数据无法根据 path的改变得到更新
因此:
1、我们可以在watch中监听路由的变化,当路由变化时,重新调用created中的内容
2、在init方法中我们判断路由的变化,如果是修改路由,则从api获取表单数据,
如果是新增路由,则重新初始化表单数据
完整版
<template>
  <div class="app-container">
    讲师添加

    <el-form label-width="120px">
      <el-form-item label="讲师名称">
        <el-input v-model="teacher.name" />
      </el-form-item>
      <el-form-item label="讲师排序">
        <el-input-number
          v-model="teacher.sort"
          controls-position="right"
          :min="0"
        />
      </el-form-item>
      <el-form-item label="讲师头衔">
        <el-select v-model="teacher.level" clearable placeholder="请选择">
          <el-option :value="1" label="高级讲师" />
          <el-option :value="2" label="首席讲师" />
        </el-select>
      </el-form-item>
      <el-form-item label="讲师资历">
        <el-input v-model="teacher.career" />
      </el-form-item>
      <el-form-item label="讲师简介">
        <el-input v-model="teacher.intro" :rows="10" type="textarea" />
      </el-form-item>

      <!-- 讲师头像:TODO -->

      <el-form-item>
        <el-button
          :disabled="saveBtnDisabled"
          type="primary"
          @click="saveOrUpdate"
          >保存</el-button
        >
      </el-form-item>
    </el-form>
  </div>
</template>


<script>
import teacherApi from "@/api/edu/teacher";
export default {


  data() {


    return {


      teacher: {


        name: "",
        sort: 0,
        level: 1,
        career: "",
        intro: "",
        avatar: "",
      },
      saveBtnDisabled: false, // 保存按钮是否禁用,
    };
  },

  watch: {


    $route(to, from) {


      this.init();
    },
  },
  created() {


    this.init();
  },

  methods: {


    init() {


      //判断路径有id值,做修改
      if (this.$route.params && this.$route.params.id) {


        //从路径获取id值
        const id = this.$route.params.id;

        this.getInfo(id);
      } else {


        //路径没有id值,做添加
        //清空表单
        this.teacher = {

    };
      }
    },

    //根据讲师id查询方法
    getInfo(id) {


      teacherApi.getTeacherInfoById(id).then((response) => {


        this.teacher = response.data.teacher;
      });
    },
    saveOrUpdate() {


      //判断修改还是添加
      //根据teacher是否有id
      if (!this.teacher.id) {


        //添加
        this.saveTeacher();
      } else {


        //修改
        this.updateTeacherInfo();
      }
    },
    //添加讲师的方法
    saveTeacher() {


      teacherApi
        .addTeacher(this.teacher)
        .then((response) => {


          //提示信息
          this.$message({


            type: "success",
            message: "添加成功!",
          });

          //回到列表页面 ,路由跳转
          this.$router.push({

     path: "/teacher/list" });
        })
        .catch((err) => {

    });
    },

    updateTeacherInfo() {


      teacherApi
        .updateTeacher(this.teacher)
        .then((response) => {


          //提示信息
          this.$message({


            type: "success",
            message: "修改成功!",
          });

          //回到列表页面 ,路由跳转
          this.$router.push({

     path: "/teacher/list" });
        })
        .catch((err) => {

    });
    },
  },
};
</script>
对象存储OSS
在service模块下创建子模块service_oss
依赖
service-oss上级模块service已经引入service的公共依赖,所以service-oss模块只需引入阿里云oss相关依赖即可
<dependencies>
        <!-- 阿里云oss依赖 -->
        <dependency>
            <groupId>com.aliyun.oss</groupId>
            <artifactId>aliyun-sdk-oss</artifactId>
        </dependency>

        <!-- 日期工具栏依赖 -->
        <dependency>
            <groupId>joda-time</groupId>
            <artifactId>joda-time</artifactId>
        </dependency>
    </dependencies>
配置文件
#服务端口
server.port=8002
#服务名
spring.application.name=service-oss
#环境设置:dev、test、prod
spring.profiles.active=dev
#阿里云 OSS
#不同的服务器,地址不同
aliyun.oss.file.endpoint=oss-cn-beijing.aliyuncs.com
aliyun.oss.file.keyid=your accessKeyId
aliyun.oss.file.keysecret=your accessKeySecret
#bucket可以在控制台创建,也可以使用java代码创建
aliyun.oss.file.bucketname=gulischool-dyk
启动报错
启动时,会自动找数据库的配置,但是当前模块不用操作数据库,只是上传功能,没有配置数据库

解决启动报错
在@SpringBootApplication注解上加上exclude,解除自动加载DataSourceAutoConfiguration
@SpringBootApplication(exclude = DataSourceAutoConfiguration.class)
@ComponentScan(basePackages = {

    "com.atguigu"})
public class OssApplication {


    public static void main(String[] args) {


        SpringApplication.run(OssApplication.class,args);
    }
}
读取配置文件工具类
创建常量读取工具类:ConstantPropertiesUtil.java
使用@Value读取application.properties里的配置内容
用spring的 InitializingBean 的 afterPropertiesSet 来初始化配置信息,这个方法将在所有的属性被初始化后调用。
package com.atguigu.oss.utils;

import org.springframework.beans.factory.InitializingBean;
import org.springframework.beans.factory.annotation.Value;
import org.springframework.context.annotation.ComponentScan;
import org.springframework.stereotype.Component;

@Component
// 常量类,读取配置文件application.properties中的配置
public class AliyunPropertiesUtils implements InitializingBean {


    @Value("${aliyun.oss.file.endpoint}")
    private String endpoint;
    @Value("${aliyun.oss.file.keyid}")
    private String keyId;
    @Value("${aliyun.oss.file.keysecret}")
    private String keySecret;
    @Value("${aliyun.oss.file.bucketname}")
    private String bucketName;
    public static String END_POINT;
    public static String ACCESS_KEY_ID;
    public static String ACCESS_KEY_SECRET;
    public static String BUCKET_NAME;


    @Override

    public void afterPropertiesSet() throws Exception {


        END_POINT = endpoint;
        ACCESS_KEY_ID = keyId;
        ACCESS_KEY_SECRET = keySecret;
        BUCKET_NAME = bucketName;


    }
}
文件上传
创建Service接口:OssService
public interface OssService {


    //文件上传至阿里云
    String uploadFileAvatar(MultipartFile file);
}
OssServiceImpl
package com.atguigu.oss.service.impl;

import com.aliyun.oss.OSS;
import com.aliyun.oss.OSSClientBuilder;
import com.atguigu.oss.service.OssService;
import com.atguigu.oss.utils.AliyunPropertiesUtils;
import org.joda.time.DateTime;
import org.springframework.stereotype.Service;
import org.springframework.web.multipart.MultipartFile;

import java.io.FileInputStream;
import java.io.IOException;
import java.io.InputStream;
import java.util.UUID;

@Service
public class OssServiceImpl implements OssService {


    //上传头像到oss
    @Override
    public String uploadFileAvatar(MultipartFile file) {


        //工具类获取值
        String endpoint = AliyunPropertiesUtils.END_POINT;
        String accessKeyId = AliyunPropertiesUtils.ACCESS_KEY_ID;
        String accessKeySecret = AliyunPropertiesUtils.ACCESS_KEY_SECRET;
        String backetName = AliyunPropertiesUtils.BUCKET_NAME;

        try {


            // 创建OSSClient实例。
            OSS ossClient = new OSSClientBuilder().build(endpoint, accessKeyId, accessKeySecret);

            // 填写本地文件的完整路径。如果未指定本地路径,则默认从示例程序所属项目对应本地路径中上传文件流。
            InputStream inputStream = file.getInputStream();
            //获取文件名
            String filename= file.getOriginalFilename();
            //在文件名称里添加随机唯一的值
            String uuid= UUID.randomUUID().toString().replace("-","");
            filename=uuid+filename;

            //把文件按日期分类
            String datePath = new DateTime().toString("yyyy/MM/dd");

            //第一个参数 Backet名称
            //第二个参数 上传到oss文件路径和文件名称
            //第三个参数 上传文件输入流

            //拼接路径
            filename=datePath+"/"+filename;
            ossClient.putObject(backetName, filename, inputStream);
            // 关闭OSSClient。
            ossClient.shutdown();
            //需要把上传文件到阿里云的路径手动拼接出来
           // https://gulischool-dyk.oss-cn-beijing.aliyuncs.com/1.png
            String url="https://"+backetName+"."+endpoint+"/"+filename;

            return url;
        } catch (IOException ioException) {


            ioException.printStackTrace();
            return null;
        }
    }
}
controller
@RestController
@RequestMapping("/eduoss/fileoss")
@CrossOrigin
@Api(tags="阿里云文件管理")
public class OssController {


    @Autowired
    private OssService ossService;
    //上传头像的方法
    @ApiOperation(value = "文件上传")
    @PostMapping("/upload")
    public ResultVo uploadOssFile(@ApiParam(name = "file", value = "文件", required = true)MultipartFile file){


          //获取上传文件 MultipartFile
        //返回上传路径
       String url= ossService.uploadFileAvatar(file);

        return ResultVo.ok().message("文件上传成功").data("url",url);
    }
}
测试

配置nginx反向代理
config/dev.env.js,只有一个api地址的配置位置,而我们实际的后端有很多微服务,所以接口地址有很多,
我们可以使用nginx反向代理让不同的api路径分发到不同的api服务器中
在Nginx中配置对应的微服务服务器地址即可
注意应该放在http块里面
  server{


        listen 9001;
        server_name localhost;

        location ~ /eduservice/{


            proxy_pass http://localhost:8001;
        }

        location ~ /eduoss/ {


            proxy_pass http://localhost:8002;
        }
        location ~ /eduvod/ {


            proxy_pass http://localhost:8003;
        }
        location ~ /cmsservice/ {


            proxy_pass http://localhost:8004;
        }
        location ~ /edumsm/ {


            proxy_pass http://localhost:8005;
        }
        location ~ /ucenterservice/ {


            proxy_pass http://localhost:8006;
        }
        location ~ /orderservice/ {


            proxy_pass http://localhost:8007;
        }
        location ~ /staservice/ {


            proxy_pass http://localhost:8001;
        }

    }
重启nginx
进入nginx目录
nginx -s reload
修改前端的BASE_API
config里的dev.env.js
BASE_API: '"http://localhost:9001"'
前端整合图片上传组件
复制头像上传组件
从vue-element-admin复制组件:
vue-element-admin/src/components/ImageCropper
vue-element-admin/src/components/PanThumb
前端添加文件上传组件
 <!-- 讲师头像 -->
      <el-form-item label="讲师头像">
        <!-- 头衔缩略图 -->
        <pan-thumb :image="String(teacher.avatar)" />
        <!-- 文件上传按钮 -->
        <el-button
          type="primary"
          icon="el-icon-upload"
          @click="imagecropperShow = true"
          >更换头像
        </el-button>

        <!--
      v-show:是否显示上传组件
      :key:类似于id,如果一个页面多个图片上传控件,可以做区分
      :url:后台上传的url地址
      @close:关闭上传组件
      @crop-upload-success:上传成功后的回调
       这里field的值必须和后端接口MultipartFile file的形参名相同
        <input type="file" name="file"/>
      -->
        <image-cropper
          v-show="imagecropperShow"
          :width="300"
          :height="300"
          :key="imagecropperKey"
          :url="BASE_API + '/eduoss/fileoss/upload'"
          field="file"
          @close="close"
          @crop-upload-success="cropSuccess"
        />
      </el-form-item>
引入组件模块,声明初始变量
<script>
import teacherApi from "@/api/edu/teacher";

import ImageCropper from "@/components/ImageCropper";
import PanThumb from "@/components/PanThumb";
export default {


  components: {

     ImageCropper, PanThumb },
  data() {


    return {


      teacher: {


        name: "",
        sort: 0,
        level: 1,
        career: "",
        intro: "",
        avatar: "",
      },
      //上传弹框组件是否显示
      imagecropperShow: false,
      imagecropperKey: 0, //上传组件key值
      BASE_API: process.env.BASE_API, //获取dev.env.js里面地址
      saveBtnDisabled: false, // 保存按钮是否禁用,
    };
  },
 close() {


      //关闭上传弹框的办法
      this.imagecropperShow = false;
      // 上传失败后,重新打开上传组件时初始化组件,否则显示上一次的上传结果
      this.imagecropperKey = this.imagecropperKey + 1;
    },
    //上传成功方法
    cropSuccess(data) {


      //这个方法封装好了返回值
      this.imagecropperShow = false;
      //上传之后接口返回图片地址
      this.teacher.avatar = data.url;
      this.imagecropperKey = this.imagecropperKey + 1;
    },
完整版
<template>
  <div class="app-container">
    讲师添加

    <el-form label-width="120px">
      <el-form-item label="讲师名称">
        <el-input v-model="teacher.name" />
      </el-form-item>
      <el-form-item label="讲师排序">
        <el-input-number
          v-model="teacher.sort"
          controls-position="right"
          :min="0"
        />
      </el-form-item>
      <el-form-item label="讲师头衔">
        <el-select v-model="teacher.level" clearable placeholder="请选择">
          <el-option :value="1" label="高级讲师" />
          <el-option :value="2" label="首席讲师" />
        </el-select>
      </el-form-item>
      <el-form-item label="讲师资历">
        <el-input v-model="teacher.career" />
      </el-form-item>
      <el-form-item label="讲师简介">
        <el-input v-model="teacher.intro" :rows="10" type="textarea" />
      </el-form-item>

      <!-- 讲师头像:TODO -->
      <!-- 讲师头像 -->
      <el-form-item label="讲师头像">
        <!-- 头衔缩略图 -->
        <pan-thumb :image="teacher.avatar" />
        <!-- 文件上传按钮 -->
        <el-button
          type="primary"
          icon="el-icon-upload"
          @click="imagecropperShow = true"
          >更换头像
        </el-button>

        <!--
      v-show:是否显示上传组件
      :key:类似于id,如果一个页面多个图片上传控件,可以做区分
      :url:后台上传的url地址
      @close:关闭上传组件
      @crop-upload-success:上传成功后的回调
       这里field的值必须和后端接口MultipartFile file的形参名相同
        <input type="file" name="file"/>
      -->
        <image-cropper
          v-show="imagecropperShow"
          :width="300"
          :height="300"
          :key="imagecropperKey"
          :url="BASE_API + '/eduoss/fileoss/upload'"
          field="file"
          @close="close"
          @crop-upload-success="cropSuccess"
        />
      </el-form-item>
      <el-form-item>
        <el-button
          :disabled="saveBtnDisabled"
          type="primary"
          @click="saveOrUpdate"
          >保存</el-button
        >
      </el-form-item>
    </el-form>
  </div>
</template>


<script>
import teacherApi from "@/api/edu/teacher";

import ImageCropper from "@/components/ImageCropper";
import PanThumb from "@/components/PanThumb";
export default {


  components: {

       ImageCropper, PanThumb },
  data() {


    return {


      teacher: {


        name: "",
        sort: 0,
        level: 1,
        career: "",
        intro: "",
        avatar:
          "https://wpimg.wallstcn.com/f778738c-e4f8-4870-b634-56703b4acafe.gif",
      },
      //上传弹框组件是否显示
      imagecropperShow: false,
      imagecropperKey: 0, //上传组件key值
      BASE_API: process.env.BASE_API, //获取dev.env.js里面地址
      saveBtnDisabled: false, // 保存按钮是否禁用,
    };
  },

  watch: {


    $route(to, from) {


      this.init();
    },
  },
  created() {


    this.init();
  },

  methods: {


    init() {


      //判断路径有id值,做修改
      if (this.$route.params && this.$route.params.id) {


        //从路径获取id值
        const id = this.$route.params.id;

        this.getInfo(id);
      } else {


        //路径没有id值,做添加
        //清空表单
        this.teacher = {

      };
      }
    },

    //根据讲师id查询方法
    getInfo(id) {


      teacherApi.getTeacherInfoById(id).then((response) => {


        this.teacher = response.data.teacher;
      });
    },
    saveOrUpdate() {


      //判断修改还是添加
      //根据teacher是否有id
      if (!this.teacher.id) {


        //添加
        this.saveTeacher();
      } else {


        //修改
        this.updateTeacherInfo();
      }
    },
    //添加讲师的方法
    saveTeacher() {


      teacherApi
        .addTeacher(this.teacher)
        .then((response) => {


          //提示信息
          this.$message({


            type: "success",
            message: "添加成功!",
          });

          //回到列表页面 ,路由跳转
          this.$router.push({

       path: "/teacher/list" });
        })
        .catch((err) => {

      });
    },

    updateTeacherInfo() {


      teacherApi
        .updateTeacher(this.teacher)
        .then((response) => {


          //提示信息
          this.$message({


            type: "success",
            message: "修改成功!",
          });

          //回到列表页面 ,路由跳转
          this.$router.push({

       path: "/teacher/list" });
        })
        .catch((err) => {

      });
    },

    close() {


      //关闭上传弹框的办法
      this.imagecropperShow = false;
      // 上传失败后,重新打开上传组件时初始化组件,否则显示上一次的上传结果
      this.imagecropperKey = this.imagecropperKey + 1;
    },
    //上传成功方法
    cropSuccess(data) {


      //这个方法封装好了返回值
      this.imagecropperShow = false;
      //上传之后接口返回图片地址
      this.teacher.avatar = data.url;
      this.imagecropperKey = this.imagecropperKey + 1;
    },
  },
};
</script>
注意
这一段我卡了很久如果有报错可能是nginx配置错误,或者前端里面路径有错误仔细检查几遍
ps如果觉得前端那个上传图片旋转不好想去掉只需
/src/components/PanThumb/index.vue 代码最后面的三个 hover 注释掉就没有旋转效果了
EasyExcel
EasyExcel是阿里巴巴开源的一个excel处理框架,以使用简单、节省内存著称。EasyExcel能大大减少占用内存的主要原因是在解析Excel时没有将文件数据一次性全部加载到内存中,而是从磁盘上一行行读取数据,逐个解析。
EasyExcel采用一行一行的解析模式,并将一行的解析结果以观察者的模式通知处理(AnalysisEventListener)
Excel导入导出的应用场景
1、数据导入:减轻录入工作量
2、数据导出:统计信息归档
3、数据传输:异构系统之间数据传输
引入依赖
<dependencies>
    <!-- https://mvnrepository.com/artifact/com.alibaba/easyexcel -->
    <dependency>
        <groupId>com.alibaba</groupId>
        <artifactId>easyexcel</artifactId>
        <version>2.1.1</version>
    </dependency>
</dependencies>
这个又依赖与poi的依赖,而且版本也一定要对应
<dependency>
        <groupId>org.apache.poi</groupId>
        <artifactId>poi</artifactId>
        <version>3.17</version>
    </dependency>

    <dependency>
        <groupId>org.apache.poi</groupId>
        <artifactId>poi-ooxml</artifactId>
        <version>3.17</version>
    </dependency>
创建实体类
和excel数据对应
@Data
public class ExcelData {


    //设置excel表头名称
    @ExcelProperty("学生编号")
    private Integer sno;
    @ExcelProperty("学生姓名")
    private String sname;
    /**
     * 忽略这个字段
     */
    @ExcelIgnore
    private String ignore;


}
EasyExcel对Excel写操作
public static void main(String[] args) throws Exception {


        //实现excel写的操作
        // 设置写入文件夹地址和excel文件名
        String fileName = "D:\\java.xlsx";
        // 这里 需要指定写用哪个class去写,然后写到第一个sheet,名字为模板 然后文件流会自动关闭
        //write方法两个参数 ,第一个参数文件路径名称,第二个参数实体类class
        EasyExcel.write(fileName, ExcelData.class).sheet("第一个sheet").doWrite(data());
    }

    //循环设置要添加的数据,最终封装到list集合中
    private static List<ExcelData> data() {


        List<ExcelData> list = new ArrayList<ExcelData>();
        for (int i = 0; i < 10; i++) {


            ExcelData data = new ExcelData();
            data.setSno(i);
            data.setSname("dyk"+i);
            list.add(data);
        }
        return list;
    }

EasyExcel对Excel读操作
@Data
public class ExcelData {


    //设置excel表头名称,index设置列对应的属性
    @ExcelProperty(value = "学生编号",index = 0)
    private Integer sno;
    @ExcelProperty(value = "学生姓名",index = 1)
    private String sname;

}
创建读取操作的监听器
package com.atguigu.excel;

import com.alibaba.excel.context.AnalysisContext;
import com.alibaba.excel.event.AnalysisEventListener;
import com.alibaba.excel.exception.ExcelDataConvertException;
import com.sun.scenario.effect.impl.sw.sse.SSEBlend_SRC_OUTPeer;
import java.util.ArrayList;
import java.util.List;
import java.util.Map;

//创建读取excel监听器
public class ExcelListener extends AnalysisEventListener<ExcelData> {


    //创建list集合封装最终的数据
    List<ExcelData> list = new ArrayList<ExcelData>();
    private final ArrayList<ExcelData> ExcelData = new ArrayList<ExcelData>();

    //一行一行去读取excle内容
    @Override
    public void invoke(ExcelData user, AnalysisContext analysisContext) {


       System.out.println("***"+user);
        list.add(user);
    }

    //读取excel表头信息
    @Override
    public void invokeHeadMap(Map<Integer, String> headMap, AnalysisContext context) {


        System.out.println("表头信息:"+headMap);
    }

    //读取完成后执行
    @Override
    public void doAfterAllAnalysed(AnalysisContext analysisContext) {


    }
}
读取
public static void main(String[] args) {


        String fileName = "D:\\java.xlsx";
        // 这里 需要指定读用哪个class去读,然后读取第一个sheet 文件流会自动关闭
        EasyExcel.read(fileName, ExcelData.class, new ExcelListener()).sheet().doRead();
    }

课程分类管理接口
service-edu模块配置依赖
		<dependency>
            <groupId>com.alibaba</groupId>
            <artifactId>easyexcel</artifactId>
            <version>2.1.6</version>
        </dependency>
创建和Excel对应的实体类
在entity下新建一个excel包,在excel包下新建一个SubjectData类
@Data
public class SubjectData {


    @ExcelProperty(index = 0)
    private String oneSubjectName;
    @ExcelProperty(index = 1)
    private String twoSubjectName;
}
EduSubjectController
@RestController
@Api(tags="课程分类管理")
@RequestMapping("/eduservice/subject")
@CrossOrigin
public class EduSubjectController {


    @Autowired
    private EduSubjectService subjectService;

    //添加课程分类
    //获取上传过来的文件,把内容读取出来,就不用上传到服务器
    @ApiOperation(value = "Excel批量导入")
    @PostMapping("addSubject")
    public ResultVo addSubject(MultipartFile file){


        // 获取上传的excel文件 MultipartFile
    subjectService.saveSubject(file,subjectService);

        return ResultVo.ok();
    }


}
EduSubjectService
public interface EduSubjectService extends IService<EduSubject> {


    void saveSubject(MultipartFile file,EduSubjectService subjectService);
}
EduSubjectServiceImpl
@Service
public class EduSubjectServiceImpl extends ServiceImpl<EduSubjectMapper, EduSubject> implements EduSubjectService {


    //添加课程分类
    @Override
    public void saveSubject(MultipartFile file,EduSubjectService subjectService) {


        try {


            //文件输入流
            InputStream in= file.getInputStream();
            //调用方法进行读取

            EasyExcel.read(in, SubjectData.class,new SubjectExcelListener(subjectService)).sheet().doRead();
        }catch (Exception e){


            throw new GuliException(20002,"添加课程分类失败");
        }
    }
}
创建读取Excel监听器
在eduservice下新建一个listener包,SubjectExcelListener 类
package com.atguigu.eduservice.listener;

import com.alibaba.excel.context.AnalysisContext;
import com.alibaba.excel.event.AnalysisEventListener;
import com.atguigu.eduservice.entity.EduSubject;
import com.atguigu.eduservice.entity.excel.SubjectData;
import com.atguigu.eduservice.service.EduSubjectService;
import com.atguigu.servicebase.exceptionhandler.GuliException;
import com.baomidou.mybatisplus.core.conditions.query.QueryWrapper;

public class SubjectExcelListener extends AnalysisEventListener<SubjectData> {


    public EduSubjectService subjectService;

    public SubjectExcelListener() {


    }
    //创建有参数构造,传递subjectService用于操作数据库
    public SubjectExcelListener(EduSubjectService subjectService) {


        this.subjectService = subjectService;
    }

    @Override
    public void invoke(SubjectData subjectData, AnalysisContext analysisContext) {


          if(subjectData==null){


              throw new GuliException(20001,"文件数据为空");
          }
          //一行一行读取,每次读取有两个值,第一个值一级分类,第二个值二级分类
        EduSubject existOneSubject = this.existOneSubject(subjectService, subjectData.getOneSubjectName());
          if(existOneSubject==null){


              //没有相同的一级分类就进行添加
             existOneSubject=new EduSubject();
             existOneSubject.setParentId("0");
             existOneSubject.setTitle(subjectData.getOneSubjectName());//设置一级分类名称
             subjectService.save(existOneSubject);
          }
          //获取一级分类id值
          String pid=existOneSubject.getId();
          //添加二级分类
        //判断二级分类是否重复

        EduSubject existTwoSubject = this.existTwoSubject(subjectService, subjectData.getTwoSubjectName(), pid);
        if(existTwoSubject==null){


            //没有相同的一级分类就进行添加
            existTwoSubject=new EduSubject();
            existTwoSubject.setParentId(pid);
            existTwoSubject.setTitle(subjectData.getTwoSubjectName());//设置二级分类名称
            subjectService.save(existTwoSubject);
        }
    }


    //判断一级分类不能重复添加
    private EduSubject existOneSubject(EduSubjectService subjectService,String name){


        QueryWrapper<EduSubject> wrapper=new QueryWrapper<>();
        wrapper.eq("title",name);
        wrapper.eq("parent_id","0");
        EduSubject oneSubject = subjectService.getOne(wrapper);
        return oneSubject;

    }

    //判断二级分类不能重复添加
    private EduSubject existTwoSubject(EduSubjectService subjectService,String name,String pid){


        QueryWrapper<EduSubject> wrapper=new QueryWrapper<>();
        wrapper.eq("title",name);
        wrapper.eq("parent_id",pid);
        EduSubject twoSubject = subjectService.getOne(wrapper);
        return twoSubject;

    }
    @Override
    public void doAfterAllAnalysed(AnalysisContext analysisContext) {


    }
}
课程分类前端
添加路由
{


    path: '/subject',
    component: Layout,
    redirect: '/subject/list',
    name: '课程分类管理',
    meta: {


      title: '课程分类管理',
      icon: 'example'
    },
    children: [{


        path: 'list',
        name: '课程分类列表',
        component: () => import('@/views/edu/subject/list'),
        meta: {


          title: '课程分类列表',
          icon: 'table'
        }
      },
      {


        path: 'save',
        name: '添加课程分类',
        component: () => import('@/views/edu/subject/save'),
        meta: {


          title: '添加课程分类',
          icon: 'tree'
        }
      },
    ]
  },
save.vue
js定义数据
<script>
export default {


  data() {


    return {


      BASE_API: process.env.BASE_API, // 接口API地址
      importBtnDisabled: false, // 按钮是否禁用,
      loading: false,
    };
  }
 }
template
<template>
  <div class="app-container">
    <el-form label-width="120px">
      <el-form-item label="信息描述">
        <el-tag type="info">excel模版说明</el-tag>
        <el-tag>
          <i class="el-icon-download" />
          <a :href="'/static/01.xlsx'">点击下载模版</a>
        </el-tag>
      </el-form-item>

      <el-form-item label="选择Excel">
        <el-upload
          ref="upload"
          :auto-upload="false"
          :on-success="fileUploadSuccess"
          :on-error="fileUploadError"
          :disabled="importBtnDisabled"
          :limit="1"
          :action="BASE_API + '/eduservice/subject/addSubject'"
          name="file"
          accept="application/vnd.ms-excel"
        >
          <el-button slot="trigger" size="small" type="primary"
            >选取文件</el-button
          >
          <el-button
            :loading="loading"
            style="margin-left: 10px"
            size="small"
            type="success"
            @click="submitUpload"
            >上传到服务器</el-button
          >
        </el-upload>
      </el-form-item>
    </el-form>
  </div>
</template>
回调函数
methods: {


    //点击按钮上传文件到接口里面
    submitUpload() {


      this.importBtnDisabled = true;
      this.loading = true;
      // js: document.getElementById("upload").submit()
      this.$refs.upload.submit();
    },
    //上传成功
    fileUploadSuccess(response) {


      //提示信息
      this.loading = false;
      this.$message({


        type: "success",
        message: "添加课程分类成功",
      });
      //跳转课程分类列表
      //路由跳转
      this.$router.push({

     path: "/subject/list" });
    },
    //上传失败
    fileUploadError() {


      this.loading = false;
      this.$message({


        type: "error",
        message: "添加课程分类失败",
      });
    },
  },
完整版
<template>
  <div class="app-container">
    <el-form label-width="120px">
      <el-form-item label="信息描述">
        <el-tag type="info">excel模版说明</el-tag>
        <el-tag>
          <i class="el-icon-download" />
          <a :href="'/static/01.xlsx'">点击下载模版</a>
        </el-tag>
      </el-form-item>

      <el-form-item label="选择Excel">
        <el-upload
          ref="upload"
          :auto-upload="false"
          :on-success="fileUploadSuccess"
          :on-error="fileUploadError"
          :disabled="importBtnDisabled"
          :limit="1"
          :action="BASE_API + '/eduservice/subject/addSubject'"
          name="file"
          accept="application/vnd.ms-excel"
        >
          <el-button slot="trigger" size="small" type="primary"
            >选取文件</el-button
          >
          <el-button
            :loading="loading"
            style="margin-left: 10px"
            size="small"
            type="success"
            @click="submitUpload"
            >上传到服务器</el-button
          >
        </el-upload>
      </el-form-item>
    </el-form>
  </div>
</template>
<script>
export default {


  data() {


    return {


      BASE_API: process.env.BASE_API, // 接口API地址
      importBtnDisabled: false, // 按钮是否禁用,
      loading: false,
    };
  },
  created() {

    },
  methods: {


    //点击按钮上传文件到接口里面
    submitUpload() {


      this.importBtnDisabled = true;
      this.loading = true;
      // js: document.getElementById("upload").submit()
      this.$refs.upload.submit();
    },
    //上传成功
    fileUploadSuccess(response) {


      //提示信息
      this.loading = false;
      this.$message({


        type: "success",
        message: "添加课程分类成功",
      });
      //跳转课程分类列表
      //路由跳转
      this.$router.push({

     path: "/subject/list" });
    },
    //上传失败
    fileUploadError() {


      this.loading = false;
      this.$message({


        type: "error",
        message: "添加课程分类失败",
      });
    },
  },
};
</script>
分类列表展示后端
一级分类实体类
@Data
public class OneSubject {


    private String id;
    private String title;

    //一个一级分类有多个二级分类
    private List<TwoSubject> children=new ArrayList<>();
}
二级分类实体类
@Data
public class TwoSubject {


    private String id;
    private String title;
}
controller
 @ApiOperation(value = "嵌套数据列表")
    @GetMapping("/getAllSubject")
    //课程分类列表(树形)
    public ResultVo getAllSubject(){


        //list集合泛型是一级分类,因为一级分类有他本身和二级分类的集合
      List<OneSubject> list= subjectService.getAllOneTwoSubject();
        return ResultVo.ok().data("list",list);
    }
service
List<OneSubject> getAllOneTwoSubject();
impl
@Override
    public List<OneSubject> getAllOneTwoSubject() {


        //查询所有一级分类 parentid=0
        QueryWrapper<EduSubject> wrapperOne = new QueryWrapper<>();
        wrapperOne.eq("parent_id","0");
        List<EduSubject> oneSubjectList = baseMapper.selectList(wrapperOne);
        //查询所有二级分类 parentid!=0

        QueryWrapper<EduSubject> wrapperTwo = new QueryWrapper<>();
        wrapperOne.ne("parent_id","0");
        List<EduSubject> twoSubjectList = baseMapper.selectList(wrapperTwo);
        //创建list集合,用于存放最终封装的数据
        List<OneSubject> finalSubjectList=new ArrayList<>();
        //封装一级分类
        //查询出来所有的一级分类list集合遍历,得到每一级分类对象,获得每个一级分类对象值
        //封装到要求的list集合里面
        for (int i = 0; i < oneSubjectList.size(); i++) {


            EduSubject eduSubject = oneSubjectList.get(i);
            OneSubject oneSubject = new OneSubject();
//            oneSubject.setId(eduSubject.getId());
//            oneSubject.setTitle(eduSubject.getTitle());
            //把eduSubject值复制到对应的oneSubject对象里面,两个对象里面的属性相同对应的的自动赋值
            BeanUtils.copyProperties(eduSubject,oneSubject);

            //在一级分类循环遍历查询所有的二级分类
            //创建list集合封装每个一级分类的二级分类
            List<TwoSubject> twoFinalSubjectList=new ArrayList<>();
            //遍历二级分类list集合
            for (int j = 0; j < twoSubjectList.size(); j++) {


                EduSubject tSubject = twoSubjectList.get(j);
                //如果二级分类的parentid和一级分类的id一样,就把它加入到一级分类
                if(tSubject.getParentId().equals(eduSubject.getId())){


                    TwoSubject twoSubject = new TwoSubject();
                    BeanUtils.copyProperties(tSubject,twoSubject);
                    twoFinalSubjectList.add(twoSubject);
                }
            }

            //把一级下面所有的二级分类放到一级分类里面
            oneSubject.setChildren(twoFinalSubjectList);
            finalSubjectList.add(oneSubject);

        }

        return finalSubjectList;
    }
分类列表展示前端
创建api
api/edu/subject.js
import request from '@/utils/request'
export default {


  //1 课程分类列表
  getSubjectList() {


    return request({


      url: '/eduservice/subject/getAllSubject',
      method: 'get'
    })
  }
}
list.vue
<template>
  <div class="app-container">
    <el-input
      v-model="filterText"
      placeholder="Filter keyword"
      style="margin-bottom: 30px"
    />

    <el-tree
      ref="tree2"
      :data="data2"
      :props="defaultProps"
      :filter-node-method="filterNode"
      class="filter-tree"
      default-expand-all
    />
  </div>
</template>

<script>
import subject from "@/api/edu/subject";
export default {


  data() {


    return {


      filterText: "",
      data2: [], //返回所有分类数据
      defaultProps: {


        children: "children",
        label: "title",
      },
    };
  },
  created() {


    this.getAllSubjectList();
  },
  watch: {


    filterText(val) {


      this.$refs.tree2.filter(val);
    },
  },

  methods: {


    getAllSubjectList() {


      subject.getSubjectList().then((response) => {


        this.data2 = response.data.list;
      });
    },
    filterNode(value, data) {


      if (!value) return true;
      return data.title.toLowerCase().indexOf(value.toLowerCase()) !== -1;
    },
  },
};
</script>
优化前端过滤功能
不区分大小写
filterNode(value, data) {


      if (!value) return true;
      return data.title.toLowerCase().indexOf(value.toLowerCase()) !== -1;
    },
课程发布步骤导航
后台接口
CourseInfoVo
因为课程基本信息和课程简介不在一张表上,
package com.atguigu.eduservice.entity.vo;

import io.swagger.annotations.ApiModelProperty;
import lombok.Data;

import java.math.BigDecimal;

@Data
public class CourseInfoVo {


    @ApiModelProperty(value = "课程ID")
    private String id;

    @ApiModelProperty(value = "课程讲师ID")
    private String teacherId;

    @ApiModelProperty(value = "课程专业ID")
    private String subjectId;

    @ApiModelProperty(value = "课程标题")
    private String title;

    @ApiModelProperty(value = "课程销售价格,设置为0则可免费观看")
    // 0.01
    private BigDecimal price;

    @ApiModelProperty(value = "总课时")
    private Integer lessonNum;

    @ApiModelProperty(value = "课程封面图片路径")
    private String cover;

    @ApiModelProperty(value = "课程简介")
    private String description;
}
修改CourseDescription主键生成策略
因为课程简介的id和课程信息的id是对应的,需要自己手动设置成课程信息的id不能自动生成
@ApiModelProperty(value = "课程ID")
      @TableId(value = "id", type = IdType.INPUT)
    private String id;
EduCourseController
@RestController
@RequestMapping("/eduservice/course")
@CrossOrigin

@Api(tags="课程管理")
public class EduCourseController {


    @Autowired
    private EduCourseService courseService;

    //添加课程基本信息
    @ApiOperation(value = "新增课程")
    @PostMapping("/addCourseInfo")
    public ResultVo addCourseInfo(@RequestBody CourseInfoVo courseInfoVo){


        String id = courseService.saveCourseInfo(courseInfoVo);
        return ResultVo.ok().data("courseId",id);
    }

}
定义业务层方法
String saveCourseInfo(CourseInfoVo courseInfoVo);
 @Autowired
    private EduCourseDescriptionService courseDescriptionService;
    @Override
    public String saveCourseInfo(CourseInfoVo courseInfoVo) {


        //1.向课程表添加课程基本信息
        //将courseInfoVo对象转化成eduCourse对象
        EduCourse eduCourse=new EduCourse();
        BeanUtils.copyProperties(courseInfoVo,eduCourse);
        int insert = baseMapper.insert(eduCourse);
        if(insert==0){


            //添加失败
            throw new GuliException(20001,"添加课程信息失败");
        }
        //获取添加之后的课程id
        String cid=eduCourse.getId();

        //向课程简介表添加课程介绍
        EduCourseDescription CourseDescription = new EduCourseDescription();
        BeanUtils.copyProperties(courseInfoVo,CourseDescription);
        //设置描述id就是课程id
        CourseDescription.setId(cid);
        courseDescriptionService.save(CourseDescription);

        return cid;
    }
前端实现
路由
{


    path: '/course',
    component: Layout,
    redirect: '/course/list',
    name: '课程管理',
    meta: {


      title: '课程管理',
      icon: 'example'
    },
    children: [{


        path: 'list',
        name: '课程列表',
        component: () => import('@/views/edu/course/list'),
        meta: {


          title: '课程列表',
          icon: 'table'
        }
      },
      {


        path: 'info',
        name: '添加课程',
        component: () => import('@/views/edu/course/info'),
        meta: {


          title: '添加课程',
          icon: 'tree'
        }
      },
      {


        path: 'info/:id',
        name: 'EduCourseInfoEdit',
        component: () => import('@/views/edu/course/info'),
        meta: {


          title: '编辑课程基本信息',
          noCache: true
        },
        hidden: true
      },
      {


        path: 'chapter/:id',
        name: 'EduCourseChapterEdit',
        component: () => import('@/views/edu/course/chapter'),
        meta: {


          title: '编辑课程大纲',
          noCache: true
        },
        hidden: true
      },
      {


        path: 'publish/:id',
        name: 'EduCoursePublishEdit',
        component: () => import('@/views/edu/course/publish'),
        meta: {


          title: '发布课程',
          noCache: true
        },
        hidden: true
      }
    ]
  },
定义api
import request from '@/utils/request'
export default {


    //1 添加课程信息
    addCourseInfo(courseInfo) {


        return request({


            url: '/eduservice/course/addCourseInfo',
            method: 'post',
            data:courseInfo
          })
    },

}
课程信息页面info.vue
<template>
  <div class="app-container">
    <h2 style="text-align: center">发布新课程</h2>

    <el-steps
      :active="1"
      process-status="wait"
      align-center
      style="margin-bottom: 40px"
    >
      <el-step title="填写课程基本信息" />

      <el-step title="创建课程大纲" />

      <el-step title="提交审核" />
    </el-steps>

    <el-form label-width="120px">
      <el-form-item>
        <el-button :disabled="saveBtnDisabled" type="primary" @click="next"
          >保存并下一步</el-button
        >
      </el-form-item>
    </el-form>
  </div>
</template>

<script>
export default {


  data() {


    return {


      saveBtnDisabled: false, // 保存按钮是否禁用
    };
  },

  created() {


    console.log("info created");
  },

  methods: {


    next() {


      console.log("next");

      this.$router.push({


          path: "/course/chapter/" + response.data.courseId,
        });
    },
  },
};
</script>
课程大纲页面 chapter.vue
<template>
  <div class="app-container">
    <h2 style="text-align: center">发布新课程</h2>

    <el-steps
      :active="2"
      process-status="wait"
      align-center
      style="margin-bottom: 40px"
    >
      <el-step title="填写课程基本信息" />

      <el-step title="创建课程大纲" />

      <el-step title="提交审核" />
    </el-steps>

    <el-form label-width="120px">
      <el-form-item>
        <el-button @click="previous">上一步</el-button>

        <el-button :disabled="saveBtnDisabled" type="primary" @click="next"
          >下一步</el-button
        >
      </el-form-item>
    </el-form>
  </div>
</template>


<script>
export default {


  data() {


    return {


      saveBtnDisabled: false, // 保存按钮是否禁用
    };
  },

  created() {


    console.log("chapter created");
  },

  methods: {


    previous() {


      console.log("previous");

      this.$router.push({

     path: "/edu/course/info/1" });
    },

    next() {


      console.log("next");

      this.$router.push({

     path: "/edu/course/publish/1" });
    },
  },
};
</script>
课程发布页面 publish.vue
<template>
  <div class="app-container">
    <h2 style="text-align: center">发布新课程</h2>

    <el-steps
      :active="3"
      process-status="wait"
      align-center
      style="margin-bottom: 40px"
    >
      <el-step title="填写课程基本信息" />

      <el-step title="创建课程大纲" />

      <el-step title="提交审核" />
    </el-steps>

    <el-form label-width="120px">
      <el-form-item>
        <el-button @click="previous">返回修改</el-button>

        <el-button :disabled="saveBtnDisabled" type="primary" @click="publish"
          >发布课程</el-button
        >
      </el-form-item>
    </el-form>
  </div>
</template>


<script>
export default {


  data() {


    return {


      saveBtnDisabled: false, // 保存按钮是否禁用
    };
  },

  created() {


    console.log("publish created");
  },

  methods: {


    previous() {


      console.log("previous");

      this.$router.push({

     path: "/edu/course/chapter/1" });
    },

    publish() {


      console.log("publish");

      this.$router.push({

     path: "/edu/course/list" });
    },
  },
};
</script>
讲师下拉列表
前端实现
组件模板
 <!-- 课程讲师 -->
      <el-form-item label="课程讲师">
        <el-select v-model="courseInfo.teacherId" placeholder="请选择">
          <el-option
            v-for="teacher in teacherList"
            :key="teacher.id"
            :label="teacher.name"
            :value="teacher.id"
          />
        </el-select>
      </el-form-item>
定义api
api/edu/course.js
import request from '@/utils/request'
export default {


    //1 添加课程信息
    addCourseInfo(courseInfo) {


        return request({


            url: '/eduservice/course/addCourseInfo',
            method: 'post',
            data:courseInfo
          })
    },
    //2 查询所有讲师
    getListTeacher() {


        return request({


            url: '/eduservice/teacher/findAll',
            method: 'get'
          })
    }
}
引入course
import course from "@/api/edu/course";
定义data
teacherList: [], //封装所有的讲师
定义方法
//查询所有的讲师
    getListTeacher() {


      course.getListTeacher().then((response) => {


        this.teacherList = response.data.items;
      });
    },
调用方法
created() {


    //初始化所有讲师
    this.getListTeacher();
    //初始化一级分类
    this.getOneSubject();
  }
课程分类多级联动
获取一级分类
组件模板
 <!-- 所属分类 TODO -->
      <el-form-item label="课程分类">
        <el-select
          v-model="courseInfo.subjectParentId"
          placeholder="一级分类"
          @change="subjectLevelOneChanged"
        >
          <el-option
            v-for="subject in subjectOneList"
            :key="subject.id"
            :label="subject.title"
            :value="subject.id"
          />
        </el-select>
组件数据定义
定义在data中
subjectOneList: [], //一级分类
subjectTwoList: [], //二级分类
定义方法
表单初始化时获取一级分类嵌套列表,引入subject api
import subject from "@/api/edu/subject";
 //查询所有的一级分类
    getOneSubject() {


      subject.getSubjectList().then((response) => {


        this.subjectOneList = response.data.list;
      });
级联显示二级分类
组件模板
<!-- 二级分类 -->
        <el-select v-model="courseInfo.subjectId" placeholder="二级分类">
          <el-option
            v-for="subject in subjectTwoList"
            :key="subject.id"
            :label="subject.title"
            :value="subject.id"
          />
        </el-select>
      </el-form-item>
注册change事件
在一级分类的组件中注册change事件
<el-select @change="subjectLevelOneChanged" ......
定义change事件方法
//点击某个一级分类,触发change,显示对应二级分类
    subjectLevelOneChanged(value) {


      //value就是一级分类id值
      //遍历所有的分类,包含一级和二级
      for (var i = 0; i < this.subjectOneList.length; i++) {


        //每个一级分类
        var oneSubject = this.subjectOneList[i];
        //判断:所有一级分类id 和 点击一级分类id是否一样
        if (value === oneSubject.id) {


          //从一级分类获取里面所有的二级分类
          this.subjectTwoList = oneSubject.children;
        }
      }
      //把二级分类id值清空
      this.courseInfo.subjectId = "";
    },
课程封面
组件
 <!-- 课程封面-->
      <el-form-item label="课程封面">
        <el-upload
          :show-file-list="false"
          :on-success="handleAvatarSuccess"
          :before-upload="beforeAvatarUpload"
          :action="BASE_API + '/eduoss/fileoss/upload'"
          class="avatar-uploader"
        >
          <img :src="courseInfo.cover" />
        </el-upload>
      </el-form-item>
定义data数据
BASE_API: process.env.BASE_API, // 接口API地址
上传方法
//上传封面成功调用的方法
    handleAvatarSuccess(res, file) {


      this.courseInfo.cover = res.data.url;
    },
    //上传之前调用的方法
    beforeAvatarUpload(file) {


      const isJPG = file.type === "image/jpeg";
      const isLt2M = file.size / 1024 / 1024 < 2;

      if (!isJPG) {


        this.$message.error("上传头像图片只能是 JPG 格式!");
      }
      if (!isLt2M) {


        this.$message.error("上传头像图片大小不能超过 2MB!");
      }
      return isJPG && isLt2M;
    },
Tinymce可视化编辑器
Tinymce是一个传统javascript插件,默认不能用于Vue.js因此需要做一些特殊的整合步骤
复制脚本库
将脚本库复制到项目的static目录下(在vue-element-admin-master的static路径下)

配置html变量
在 guli-admin/build/webpack.dev.conf.js 中添加配置
使在html页面中可是使用这里定义的BASE_URL变量
templateParameters: {


        BASE_URL: config.dev.assetsPublicPath + config.dev.assetsSubDirectory
      }
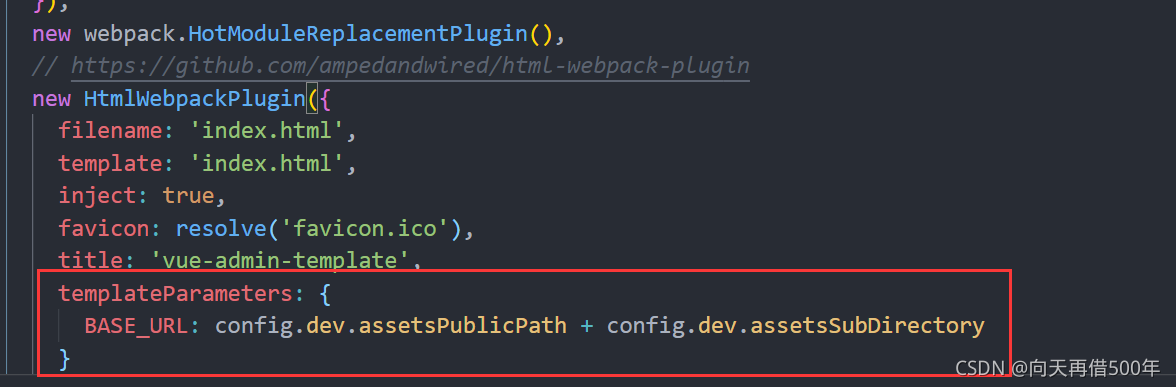
引入js脚本
在guli-admin/index.html 中引入js脚本
<script src=<%= BASE_URL %>/tinymce4.7.5/tinymce.min.js></script>

<script src=<%= BASE_URL %>/tinymce4.7.5/langs/zh_CN.js></script>
组件引入
为了让Tinymce能用于Vue.js项目,vue-element-admin-master对Tinymce进行了封装,下面我们将它引入到我们的课程信息页面
复制组件
src/components/Tinymce
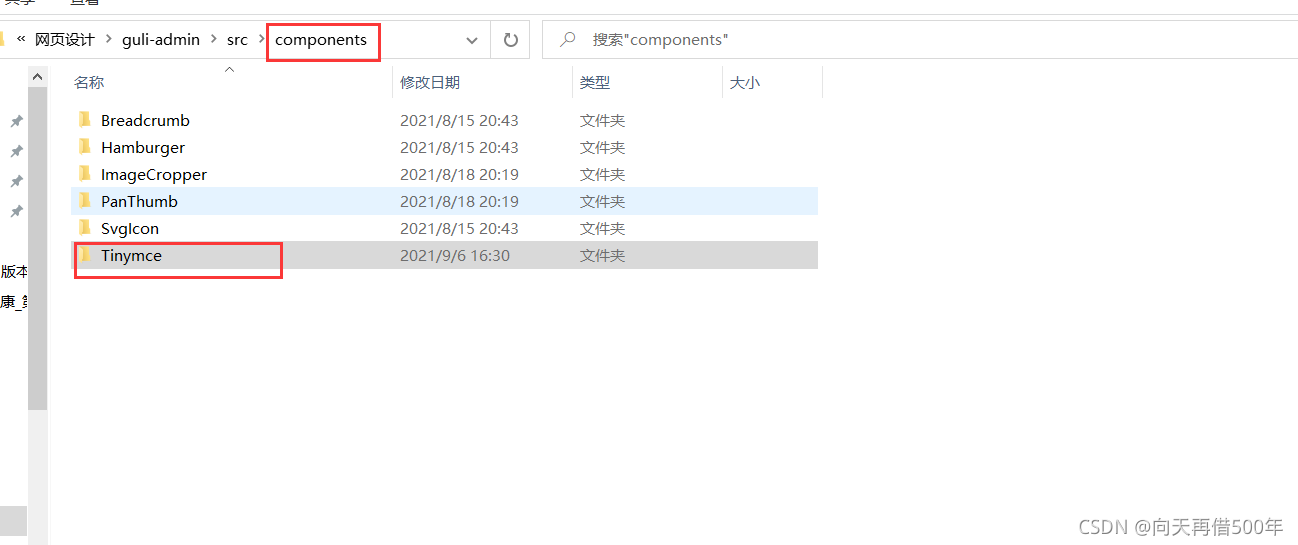
引入组件
课程信息组件中引入 Tinymce
import Tinymce from '@/components/Tinymce'
export default {


  components: {

     Tinymce },

  ......

}
组件模板
<!-- 课程简介-->

      <el-form-item label="课程简介">
        <tinymce :height="300" v-model="courseInfo.description" />
      </el-form-item>
组件样式
在info.vue文件的最后添加如下代码,调整上传图片按钮的高度
<style scoped>
.tinymce-container {


  line-height: 29px;
}

</style>
章节小节列表显示
后端
在service_edu下面的entity下新建一个chapter包
定义vo
@Data
@NoArgsConstructor
@AllArgsConstructor
@ApiModel(value = "章节信息")
public class ChapterVo {


    private String id;
    private String title;
    //小结
    private List<VideoVo> children = new ArrayList<>();
}
@ApiModel(value = "小结信息")
@Data
@NoArgsConstructor
@AllArgsConstructor
public class VideoVo {


    private String id;
    private String title;
}
service
public interface EduChapterService extends IService<EduChapter> {


    List<ChapterVo> getChapterVideoByCourseId(String courseId);
}
impl
@Autowired
    private EduVideoService videoService;//注入小节service

    @Override
    public List<ChapterVo> getChapterVideoByCourseId(String courseId) {


       //根据课程id查询课程里面所有章节
        QueryWrapper<EduChapter> eduChapterQueryWrapper = new QueryWrapper<EduChapter>();
        eduChapterQueryWrapper.eq("course_id",courseId);
        List<EduChapter> eduChapterList = baseMapper.selectList(eduChapterQueryWrapper);

        //根据课程id查询课程里面所有的小节
        QueryWrapper<EduVideo> eduVideoQueryWrapper = new QueryWrapper<>();
        eduVideoQueryWrapper.eq("course_id",courseId);
        List<EduVideo> eduVideoList = videoService.list(eduVideoQueryWrapper);

        List<ChapterVo> finalList=new ArrayList<>();

        //遍历查询章节list集合进行封装
        for (int i = 0; i < eduChapterList.size(); i++) {


            //每个章节
            ChapterVo chapterVo = new ChapterVo();
            EduChapter eduChapter = eduChapterList.get(i);
            BeanUtils.copyProperties(eduChapter,chapterVo);
            //创建集合,用于封装章节的小节
            List<VideoVo> videoList=new ArrayList<>();
            for (int j = 0; j < eduVideoList.size(); j++) {


                EduVideo eduVideo = eduVideoList.get(j);
                //判断 小节里面的chapterid和章节里面的id是否一样
                if(eduVideo.getChapterId().equals(eduChapter.getId())){


                        //进行封装
                        VideoVo videoVo=new VideoVo();
                        BeanUtils.copyProperties(eduVideo,videoVo);
                        //放到封装到小节集合
                        videoList.add(videoVo);
                }
            }
            chapterVo.setChildren(videoList);
            finalList.add(chapterVo);

        }
        //遍历查询小结list集合进行封装
        return finalList;
    }
前端
定义api
import request from '@/utils/request'
export default {


    //1 根据课程id获取章节和小节数据列表
    getAllChapterVideo(courseId) {


        return request({


            url: '/eduservice/chapter/getChapterVideo/'+courseId,
            method: 'get'
          })
    },
}
定义组件脚本
courseId: '', // 所属课程
chapterNestedList: [] // 章节嵌套课时列表
//根据课程id查询章节和小节
    getChapterVideo() {


      chapter.getAllChapterVideo(this.courseId).then((response) => {


        this.chapterVideoList = response.data.allChapterVideo;
      });
    },
created() {


    //获取路由的id值
    if (this.$route.params && this.$route.params.id) {


      this.courseId = this.$route.params.id;
      //根据课程id查询章节和小节
      this.getChapterVideo();
    }
  },
组件模板
  <el-button type="text" @click="openChapterDialog()">添加章节</el-button>

    <!-- 章节 -->
    <ul class="chanpterList">
      <li v-for="chapter in chapterVideoList" :key="chapter.id">
        <p>
          {

    {

     chapter.title }}

          <span class="acts">
            <el-button style="" type="text" @click="openVideo(chapter.id)"
              >添加小节</el-button
            >
            <el-button style="" type="text" @click="openEditChatper(chapter.id)"
              >编辑</el-button
            >
            <el-button type="text" @click="removeChapter(chapter.id)"
              >删除</el-button
            >
          </span>
        </p>

        <!-- 视频 -->
        <ul class="chanpterList videoList">
          <li v-for="video in chapter.children" :key="video.id">
            <p>
              {

    {

     video.title }}

              <span class="acts">
                <el-button style="" type="text">编辑</el-button>
                <el-button type="text" @click="removeVideo(video.id)"
                  >删除</el-button
                >
              </span>
            </p>
          </li>
        </ul>
      </li>
    </ul>
    <div>
      <el-button @click="previous">上一步</el-button>
      <el-button :disabled="saveBtnDisabled" type="primary" @click="next"
        >下一步</el-button
      >
    </div>
定义样式
将样式的定义放在页面的最后
scope表示这里定义的样式只在当前页面范围内生效,不会污染到其他的页面
<style scoped>
.chanpterList {


  position: relative;
  list-style: none;
  margin: 0;
  padding: 0;
}
.chanpterList li {


  position: relative;
}
.chanpterList p {


  float: left;
  font-size: 20px;
  margin: 10px 0;
  padding: 10px;
  height: 70px;
  line-height: 50px;
  width: 100%;
  border: 1px solid #ddd;
}
.chanpterList .acts {


  float: right;
  font-size: 14px;
}

.videoList {


  padding-left: 50px;
}
.videoList p {


  float: left;
  font-size: 14px;
  margin: 10px 0;
  padding: 10px;
  height: 50px;
  line-height: 30px;
  width: 100%;
  border: 1px dotted #ddd;
}
</style>
课程信息回显
后端
controller
//根据课程id查询课程基本信息

    @ApiOperation(value = "根据ID查询课程")
    @GetMapping("getCourseInfo/{courseId}")
    public ResultVo getCourseInfo(@PathVariable String courseId){


         CourseInfoVo courseInfoVo=courseService.getCourseInfo(courseId);
         return ResultVo.ok().data("courseInfoVo",courseInfoVo);
    }
service
//通过id查询课程信息
    @Override
    public CourseInfoVo getCourseInfo(String courseId) {


        //查询课程表
        EduCourse eduCourse=baseMapper.selectById(courseId);
        CourseInfoVo courseInfoVo = new CourseInfoVo();
        BeanUtils.copyProperties(eduCourse,courseInfoVo);

        //查询描述表
        EduCourseDescription courseDescription=courseDescriptionService.getById(courseId);
        BeanUtils.copyProperties(courseDescription,courseInfoVo);


        return courseInfoVo;
    }
前端
定义api
api/edu/course.js
//根据课程id查询课程基本信息
  getCourseInfoId(id) {


    return request({


      url: '/eduservice/course/getCourseInfo/' + id,
      method: 'get'
    })
  },
修改created方法
created() {


    //获取路由id值
    if (this.$route.params && this.$route.params.id) {


      this.courseId = this.$route.params.id;
      //调用根据id查询课程的方法
      this.getInfo();
    } else {


      //初始化所有讲师
      this.getListTeacher();
      //初始化一级分类
      this.getOneSubject();
    }
  },
修改getInfo()
 //根据课程id查询
    getInfo() {


      course.getCourseInfoId(this.courseId).then((response) => {


        //在courseInfo课程基本信息,包含 一级分类id 和 二级分类id
        this.courseInfo = response.data.courseInfoVo;
        //1 查询所有的分类,包含一级和二级
        subject.getSubjectList().then((response) => {


          //2 获取所有一级分类
          this.subjectOneList = response.data.list;
          //3 把所有的一级分类数组进行遍历,
          for (var i = 0; i < this.subjectOneList.length; i++) {


            //获取每个一级分类
            var oneSubject = this.subjectOneList[i];
            //比较当前courseInfo里面一级分类id和所有的一级分类id
            if (this.courseInfo.subjectParentId == oneSubject.id) {


              //获取一级分类所有的二级分类
              this.subjectTwoList = oneSubject.children;
            }
          }
        });
        //初始化所有讲师
        this.getListTeacher();
      });
    },
更新课程信息
后端
service
public void updateCourseInfo(CourseInfoVo courseInfoVo) {


         //修改课程表
        EduCourse eduCourse=new EduCourse();
        BeanUtils.copyProperties(courseInfoVo,eduCourse);
        int i = baseMapper.updateById(eduCourse);
        if(i==0){


            throw new GuliException(20001,"修改课程信息失败");

        }
        EduCourseDescription courseDescription = new EduCourseDescription();
        BeanUtils.copyProperties(courseInfoVo,courseDescription);

        courseDescriptionService.updateById(courseDescription);

    }
controller
@ApiOperation(value = "更新课程")
    @PostMapping("/updateCourseInfo")
    public ResultVo updateCourseInfo(@RequestBody CourseInfoVo courseInfoVo){


        courseService.updateCourseInfo(courseInfoVo);
        return ResultVo.ok();
    }
前端
api
//修改课程信息
  updateCourseInfo(courseInfo) {


    return request({


      url: '/eduservice/course/updateCourseInfo',
      method: 'post',
      data: courseInfo
    })
  }
updateCourse方法
//修改课程
    updateCourse() {


      course.updateCourseInfo(this.courseInfo).then((response) => {


        //提示
        this.$message({


          type: "success",
          message: "修改课程信息成功!",
        });
        //跳转到第二步
        this.$router.push({

     path: "/course/chapter/" + this.courseId });
      });
    },
完整版info.vue
<template>
  <div class="app-container">
    <h2 style="text-align: center">发布新课程</h2>

    <el-steps
      :active="1"
      process-status="wait"
      align-center
      style="margin-bottom: 40px"
    >
      <el-step title="填写课程基本信息" />
      <el-step title="创建课程大纲" />
      <el-step title="最终发布" />
    </el-steps>

    <el-form label-width="120px">
      <el-form-item label="课程标题">
        <el-input
          v-model="courseInfo.title"
          placeholder=" 示例:机器学习项目课:从基础到搭建项目视频课程。专业名称注意大小写"
        />
      </el-form-item>

      <!-- 所属分类 TODO -->
      <el-form-item label="课程分类">
        <el-select
          v-model="courseInfo.subjectParentId"
          placeholder="一级分类"
          @change="subjectLevelOneChanged"
        >
          <el-option
            v-for="subject in subjectOneList"
            :key="subject.id"
            :label="subject.title"
            :value="subject.id"
          />
        </el-select>

        <!-- 二级分类 -->
        <el-select v-model="courseInfo.subjectId" placeholder="二级分类">
          <el-option
            v-for="subject in subjectTwoList"
            :key="subject.id"
            :label="subject.title"
            :value="subject.id"
          />
        </el-select>
      </el-form-item>

      <!-- 课程讲师 TODO -->
      <!-- 课程讲师 -->
      <el-form-item label="课程讲师">
        <el-select v-model="courseInfo.teacherId" placeholder="请选择">
          <el-option
            v-for="teacher in teacherList"
            :key="teacher.id"
            :label="teacher.name"
            :value="teacher.id"
          />
        </el-select>
      </el-form-item>

      <el-form-item label="总课时">
        <el-input-number
          :min="0"
          v-model="courseInfo.lessonNum"
          controls-position="right"
          placeholder="请填写课程的总课时数"
        />
      </el-form-item>

      <!-- 课程简介 TODO -->
      <!-- 课程简介-->
      <el-form-item label="课程简介">
        <tinymce :height="300" v-model="courseInfo.description" />
      </el-form-item>

      <!-- 课程封面 TODO -->
      <!-- 课程封面-->
      <el-form-item label="课程封面">
        <el-upload
          :show-file-list="false"
          :on-success="handleAvatarSuccess"
          :before-upload="beforeAvatarUpload"
          :action="BASE_API + '/eduoss/fileoss'"
          class="avatar-uploader"
        >
          <img :src="courseInfo.cover" />
        </el-upload>
      </el-form-item>

      <el-form-item label="课程价格">
        <el-input-number
          :min="0"
          v-model="courseInfo.price"
          controls-position="right"
          placeholder="免费课程请设置为0元"
        />
        元
      </el-form-item>

      <el-form-item>
        <el-button
          :disabled="saveBtnDisabled"
          type="primary"
          @click="saveOrUpdate"
          >保存并下一步</el-button
        >
      </el-form-item>
    </el-form>
  </div>
</template>
<script>
import course from "@/api/edu/course";
import subject from "@/api/edu/subject";
import Tinymce from "@/components/Tinymce"; //引入组件

export default {


  //声明组件
  components: {

     Tinymce },
  data() {


    return {


      saveBtnDisabled: false,
      courseInfo: {


        title: "",
        subjectId: "", //二级分类id
        subjectParentId: "", //一级分类id
        teacherId: "",
        lessonNum: 0,
        description: "",
        cover: "/static/01.jpg",
        price: 0,
      },
      courseId: "",
      BASE_API: process.env.BASE_API, // 接口API地址
      teacherList: [], //封装所有的讲师
      subjectOneList: [], //一级分类
      subjectTwoList: [], //二级分类
    };
  },
  created() {


    //获取路由id值
    if (this.$route.params && this.$route.params.id) {


      this.courseId = this.$route.params.id;
      //调用根据id查询课程的方法
      this.getInfo();
    } else {


      //初始化所有讲师
      this.getListTeacher();
      //初始化一级分类
      this.getOneSubject();
    }
  },
  methods: {


    //根据课程id查询
    getInfo() {


      course.getCourseInfoId(this.courseId).then((response) => {


        //在courseInfo课程基本信息,包含 一级分类id 和 二级分类id
        this.courseInfo = response.data.courseInfoVo;
        //1 查询所有的分类,包含一级和二级
        subject.getSubjectList().then((response) => {


          //2 获取所有一级分类
          this.subjectOneList = response.data.list;
          //3 把所有的一级分类数组进行遍历,
          for (var i = 0; i < this.subjectOneList.length; i++) {


            //获取每个一级分类
            var oneSubject = this.subjectOneList[i];
            //比较当前courseInfo里面一级分类id和所有的一级分类id
            if (this.courseInfo.subjectParentId == oneSubject.id) {


              //获取一级分类所有的二级分类
              this.subjectTwoList = oneSubject.children;
            }
          }
        });
        //初始化所有讲师
        this.getListTeacher();
      });
    },
    //上传封面成功调用的方法
    handleAvatarSuccess(res, file) {


      this.courseInfo.cover = res.data.url;
    },
    //上传之前调用的方法
    beforeAvatarUpload(file) {


      const isJPG = file.type === "image/jpeg";
      const isLt2M = file.size / 1024 / 1024 < 2;

      if (!isJPG) {


        this.$message.error("上传头像图片只能是 JPG 格式!");
      }
      if (!isLt2M) {


        this.$message.error("上传头像图片大小不能超过 2MB!");
      }
      return isJPG && isLt2M;
    },
    //点击某个一级分类,触发change,显示对应二级分类
    subjectLevelOneChanged(value) {


      //value就是一级分类id值
      //遍历所有的分类,包含一级和二级
      for (var i = 0; i < this.subjectOneList.length; i++) {


        //每个一级分类
        var oneSubject = this.subjectOneList[i];
        //判断:所有一级分类id 和 点击一级分类id是否一样
        if (value === oneSubject.id) {


          //从一级分类获取里面所有的二级分类
          this.subjectTwoList = oneSubject.children;
          //把二级分类id值清空
          this.courseInfo.subjectId = "";
        }
      }
    },
    //查询所有的一级分类
    getOneSubject() {


      subject.getSubjectList().then((response) => {


        this.subjectOneList = response.data.list;
      });
    },
    //查询所有的讲师
    getListTeacher() {


      course.getListTeacher().then((response) => {


        this.teacherList = response.data.items;
      });
    },
    //添加课程
    addCourse() {


      course.addCourseInfo(this.courseInfo).then((response) => {


        //提示
        this.$message({


          type: "success",
          message: "添加课程信息成功!",
        });
        //跳转到第二步
        this.$router.push({


          path: "/course/chapter/" + response.data.courseId,
        });
      });
    },
    //修改课程
    updateCourse() {


      course.updateCourseInfo(this.courseInfo).then((response) => {


        //提示
        this.$message({


          type: "success",
          message: "修改课程信息成功!",
        });
        //跳转到第二步
        this.$router.push({

     path: "/course/chapter/" + this.courseId });
      });
    },
    saveOrUpdate() {


      //判断添加还是修改
      if (!this.courseInfo.id) {


        //添加
        this.addCourse();
      } else {


        this.updateCourse();
      }
    },
  },
};
</script>
<style scoped>
.tinymce-container {


  line-height: 29px;
}
</style>
章节管理
后端
controller
新增章节
//添加章节
    @ApiOperation(value = "新增章节")
    @PostMapping("addChapter")
    @ApiParam(name = "eduChapter", value = "章节对象", required = true)
    public ResultVo addChapter(@RequestBody EduChapter eduChapter){


        chapterService.save(eduChapter);
        return ResultVo.ok();

    }
根据id查询
//根据章节id查询
    @ApiOperation(value = "根据ID查询章节")
    @ApiParam(name = "chapterId", value = "章节ID", required = true)
    @GetMapping("getChapterInfo/{chapterId}")
    public ResultVo getChapterInfo(@PathVariable String chapterId){


        EduChapter eduChapter= chapterService.getById(chapterId);
        return ResultVo.ok().data("chapter",eduChapter);
    }
更新
//修改章节

    @ApiOperation(value = "根据ID修改章节")
    @ApiParam(name = "eduChapter", value = "章节对象", required = true)
    @GetMapping("updateChapter")

    public ResultVo updateChapter(@RequestBody EduChapter eduChapter){


        chapterService.updateById(eduChapter);
        return ResultVo.ok();
    }
删除
//删除章节

    @ApiOperation(value = "根据ID删除章节")
    @ApiParam(name = "chapterId", value = "章节ID", required = true)
    @DeleteMapping("{chapterId}")
    public ResultVo deleteChapter(@PathVariable String chapterId){


        boolean flag=chapterService.deleteChapter(chapterId);
        if(flag){


            return ResultVo.ok();
        }
        else{


            return ResultVo.error();
        }

    }
Service
ChapterService层:接口
boolean deleteChapter(String chapterId);
实现类
//删除章节
    @Override
    public boolean deleteChapter(String chapterId) {


        //根据chapterId章节id查询小节表,如果查询数据,不进行删除
        QueryWrapper<EduVideo> QueryWrapper = new QueryWrapper<>();
        QueryWrapper.eq("chapter_id",chapterId);
        int count = videoService.count(QueryWrapper);
        //判断
        if(count>0){

    //能查询出来小节,不进行删除
            throw new GuliException(20001,"不能删除");
        }else {

     //没有查询到数据,进行删除
            //删除章节
            int result=baseMapper.deleteById(chapterId);
            return result>0;
        }

    }
前端
定义api
//添加章节
    addChapter(chapter) {


        return request({


            url: '/eduservice/chapter/addChapter',
            method: 'post',
            data: chapter
          })
    },
    //根据id查询章节
    getChapter(chapterId) {


        return request({


            url: '/eduservice/chapter/getChapterInfo/'+chapterId,
            method: 'get'
          })
    },
    //修改章节
    updateChapter(chapter) {


        return request({


            url: '/eduservice/chapter/updateChapter',
            method: 'post',
            data: chapter
          })
    },
    //删除章节
    deleteChapter(chapterId) {


        return request({


            url: '/eduservice/chapter/'+chapterId,
            method: 'delete'
          })
    },
定义data数据
chapter: {


        //封装章节数据
        title: "",
        sort: 0,
      },
dialogChapterFormVisible: false, //章节弹框
章节表单dialog
<!-- 添加和修改章节表单 -->
    <el-dialog :visible.sync="dialogChapterFormVisible" title="添加章节">
      <el-form :model="chapter" label-width="120px">
        <el-form-item label="章节标题">
          <el-input v-model="chapter.title" />
        </el-form-item>
        <el-form-item label="章节排序">
          <el-input-number
            v-model="chapter.sort"
            :min="0"
            controls-position="right"
          />
        </el-form-item>
      </el-form>
      <div slot="footer" class="dialog-footer">
        <el-button @click="dialogChapterFormVisible = false">取 消</el-button>
        <el-button type="primary" @click="saveOrUpdate">确 定</el-button>
      </div>
    </el-dialog>
添加章节按钮
<el-button type="text" @click="openChapterDialog()">添加章节</el-button>
添加章节methods
//添加章节
    addChapter() {


      //设置课程id到chapter对象里面
      this.chapter.courseId = this.courseId;
      chapter.addChapter(this.chapter).then((response) => {


        //关闭弹框
        this.dialogChapterFormVisible = false;
        //提示
        this.$message({


          type: "success",
          message: "添加章节成功!",
        });
        //刷新页面
        this.getChapterVideo();
      });
    },
修改章节信息
<el-button style="" type="text" @click="openEditChatper(chapter.id)">编辑</el-button>
定义编辑方法
//修改章节弹框数据回显
    openEditChatper(chapterId) {


      //弹框
      this.dialogChapterFormVisible = true;
      //调用接口
      chapter.getChapter(chapterId).then((response) => {


        this.chapter = response.data.chapter;
      });
    },
定义更新方法
//修改章节的方法
    updateChapter() {


      chapter.updateChapter(this.chapter).then((response) => {


        //关闭弹框
        this.dialogChapterFormVisible = false;
        //提示
        this.$message({


          type: "success",
          message: "修改章节成功!",
        });
        //刷新页面
        this.getChapterVideo();
      });
    },
删除章节按钮
<el-button type="text" @click="removeChapter(chapter.id)">删除</el-button>
定义删除方法
//删除章节
    removeChapter(chapterId) {


      this.$confirm("此操作将删除章节, 是否继续?", "提示", {


        confirmButtonText: "确定",
        cancelButtonText: "取消",
        type: "warning",
      }).then(() => {


        //点击确定,执行then方法
        //调用删除的方法
        chapter.deleteChapter(chapterId).then((response) => {


          //删除成功
          //提示信息
          this.$message({


            type: "success",
            message: "删除成功!",
          });
          //刷新页面
          this.getChapterVideo();
        });
      }); //点击取消,执行catch方法
    },
弹出添加章节页面清空
//弹出添加章节页面
    openChapterDialog() {


      //弹框
      this.dialogChapterFormVisible = true;
      //表单数据清空
      this.chapter.title = "";
      this.chapter.sort = 0;
    },
小节管理
后端
定义VideoInfoVo对象
但是我偷懒了没有使用这个对象,直接用的EduVideo
package com.atguigu.eduservice.entity.video;

import io.swagger.annotations.ApiModel;
import io.swagger.annotations.ApiModelProperty;
import lombok.Data;

@ApiModel(value = "课时基本信息", description = "编辑课时基本信息的表单对象")

@Data
public class VideoInfoVo {


    @ApiModelProperty(value = "视频ID")
    private String id;

    @ApiModelProperty(value = "节点名称")
    private String title;

    @ApiModelProperty(value = "课程ID")
    private String courseId;

    @ApiModelProperty(value = "章节ID")
    private String chapterId;

    @ApiModelProperty(value = "视频资源")
    private String videoSourceId;

    @ApiModelProperty(value = "显示排序")
    private Integer sort;

    @ApiModelProperty(value = "是否可以试听:0默认 1免费")
    private Boolean free;
}
controller
新增课时
 //添加小节
     @ApiOperation(value = "新增课时")
   @PostMapping("/addVideo")
    public ResultVo addVideo(@RequestBody EduVideo eduVideo){


       boolean save = videoService.save(eduVideo);
       if(save){


           return ResultVo.ok();
       }
       else{


           return ResultVo.error();
       }
   }
课时的修改
//根据ID查询课时
    @ApiParam(name = "id", value = "课时ID", required = true)
    @ApiOperation(value = "根据ID查询课时")
    @GetMapping("getVideoInfo/{id}")
    public ResultVo getVideoInfo(@PathVariable String id){


        EduVideo video = videoService.getById(id);
        return ResultVo.ok().data("video",video);
    }
    //修改小节
    @ApiOperation(value = "更新课时")
    @PostMapping("updateVideo")
    public ResultVo updateCourseInfo(@RequestBody EduVideo eduVideo){


        boolean update = videoService.updateById(eduVideo);
        if(update){


            return ResultVo.ok();
        }
        else{


            return ResultVo.error();
        }
    }
课时的删除
//删除小节

    @PostMapping("{id}")
    @ApiOperation(value = "根据ID删除课时")
    @ApiParam(name = "id", value = "课时ID", required = true)
    public ResultVo deleteVideo(@PathVariable String id){


        boolean b = videoService.removeById(id);
        if(b){


            return ResultVo.ok();
        }
        else{


            return ResultVo.error();
        }
    }
前端
定义api
import request from '@/utils/request'
export default {


  //添加小节
  addVideo(video) {


    return request({


      url: '/eduservice/video/addVideo',
      method: 'post',
      data: video
    })
  },

  //获取小节信息
  getVideoInfo(id) {


    return request({


      url: '/eduservice/video/getVideoInfo/' + id,
      method: 'get',

    })
  },

  updateVideoInfo(video) {


    return request({


      url: '/eduservice/video/updateVideo',
      method: 'post',
      data: video
    })
  },

  //删除小节
  deleteVideo(id) {


    return request({


      url: '/eduservice/video/' + id,
      method: 'post'
    })
  },
}
定义data数据
video: {


        title: "",
        sort: 0,
        free: 0,
        videoSourceId: "",
      },
      dialogChapterFormVisible: false, //章节弹框
      dialogVideoFormVisible: false, //小节弹框
添加课时按钮
<el-button style="" type="text" @click="openVideo(chapter.id)" >添加小节</el-button>
课时表单dialog
<!-- 添加和修改课时表单 -->
    <el-dialog :visible.sync="dialogVideoFormVisible" title="添加课时">
      <el-form :model="video" label-width="120px">
        <el-form-item label="课时标题">
          <el-input v-model="video.title" />
        </el-form-item>
        <el-form-item label="课时排序">
          <el-input-number
            v-model="video.sort"
            :min="0"
            controls-position="right"
          />
        </el-form-item>
        <el-form-item label="是否免费">
          <el-radio-group v-model="video.free">
            <el-radio :label="true">免费</el-radio>
            <el-radio :label="false">默认</el-radio>
          </el-radio-group>
        </el-form-item>
        <el-form-item label="上传视频">
          <!-- TODO -->
        </el-form-item>
      </el-form>
      <div slot="footer" class="dialog-footer">
        <el-button @click="dialogVideoFormVisible = false">取 消</el-button>
        <el-button type="primary" @click="saveOrUpdateVideo">确 定</el-button>
      </div>
    </el-dialog>
引入video模块
import video1 from "@/api/edu/video";
//添加小节弹框的方法
    openVideo(chapterId) {


      //弹框
      this.dialogVideoFormVisible = true;
      //设置章节id
      this.video.chapterId = chapterId;
    },
    //添加小节
    addVideo() {


      //设置课程id
      this.video.courseId = this.courseId;
      video1.addVideo(this.video).then((response) => {


        //关闭弹框
        this.dialogVideoFormVisible = false;
        //提示
        this.$message({


          type: "success",
          message: "添加小节成功!",
        });
        //刷新页面
        this.getChapterVideo();
      });
    },
    openEditVideo(videoId) {


      //弹框
      this.dialogVideoFormVisible = true;
      //调用接口
      video1.getVideoInfo(videoId).then((response) => {


        this.video = response.data.video;
      });
    },
    updateDataVideo() {


      video1.updateVideoInfo(this.video).then((response) => {


        //关闭弹框
        this.dialogChapterFormVisible = false;
        //提示
        this.$message({


          type: "success",
          message: "修改小节成功!",
        });
        //刷新页面
        this.getChapterVideo();
      });
    },
    saveOrUpdateVideo() {


      // this.saveVideoBtnDisabled = true;

      if (!this.video.id) {


        this.addVideo();
      } else {


        this.updateDataVideo();
      }
    },
编辑课时按钮
<el-button style="" type="text" @click="openEditVideo(video.id)">编辑</el-button>
定义编辑方法
openEditVideo(videoId) {


      //弹框
      this.dialogVideoFormVisible = true;
      //调用接口
      video1.getVideoInfo(videoId).then((response) => {


        this.video = response.data.video;
      });
    },
    updateDataVideo() {


      video1.updateVideoInfo(this.video).then((response) => {


        //关闭弹框
        this.dialogChapterFormVisible = false;
        //提示
        this.$message({


          type: "success",
          message: "修改小节成功!",
        });
        //刷新页面
        this.getChapterVideo();
      });
    },
删除按钮
<el-button type="text" @click="removeChapter(chapter.id)">删除</el-button>
定义删除方法
//删除小节
    removeVideo(id) {


      this.$confirm("此操作将删除小节, 是否继续?", "提示", {


        confirmButtonText: "确定",
        cancelButtonText: "取消",
        type: "warning",
      }).then(() => {


        //点击确定,执行then方法
        //调用删除的方法
        video1.deleteVideo(id).then((response) => {


          //删除成功
          //提示信息
          this.$message({


            type: "success",
            message: "删除小节成功!",
          });
          //刷新页面
          this.getChapterVideo();
        });
      }); //点击取消,执行catch方法
    },
注意
加了nginx后,put和delete请求都会出现跨域问题,需要修改nginx配置,由于我没有解决,所以我把put和delete改成了post请求,也有可能是我用的最新版的nginx的原因
课程最终发布
后端
定义vo
@ApiModel(value = "课程发布信息")
@Data
public class CoursePublishVo {


    private String id;
    private String title;
    private String cover;
    private Integer lessonNum;
    private String subjectLevelOne;
    private String subjectLevelTwo;
    private String teacherName;
    private String price;//只用于显示
}
CourseMapper.java
public interface EduCourseMapper extends BaseMapper<EduCourse> {


    public CoursePublishVo getPublishCourseInfo(String courseId);
}
CourseMapper.xml
 <select id="getPublishCourseInfo" resultType="com.atguigu.eduservice.entity.vo.CoursePublishVo">
        SELECT ec.id,ec.`title`,ec.`price`,ec.`lesson_num` AS lessonNum,ec.`cover`,
               et.`name` AS teacherName,
               es1.`title` AS subjectLevelOne,
               es2.title AS subjectLevelTwo

        FROM edu_course ec LEFT JOIN edu_course_description ecd ON ec.id=ecd.id
                           LEFT JOIN edu_teacher et ON ec.`teacher_id`=et.`id`
                           LEFT JOIN edu_subject es1 ON ec.`subject_parent_id`=es1.id
                           LEFT JOIN edu_subject es2 ON ec.subject_id=es2.`id`
        WHERE ec.`id`=#{courseId}
    </select>
CourseService.java
 @Override
    public CoursePublishVo publishCourseInfo(String id) {


        CoursePublishVo publishCourseInfo = baseMapper.getPublishCourseInfo(id);

        return publishCourseInfo;
    }
EduCourseController
 //根据课程id查询课程确认信息
    @GetMapping("/getPublishCourseInfo/{id}")
    public ResultVo getPublishCourseInfo(@PathVariable String id){


        CoursePublishVo coursePublishVo= courseService.publishCourseInfo(id);
        return ResultVo.ok().data("publishCourse",coursePublishVo);
    }
测试:报告异常
AbstractHandlerExceptionResolver.java:194 |org.springframework.web.servlet.mvc.method.annotation.ExceptionHandlerExceptionResolver |Resolved exception caused by handler execution: org.apache.ibatis.binding.BindingException: Invalid bound statement (not found): com.guli.edu.mapper.CourseMapper.getCoursePublishVoById
问题分析:
dao层编译后只有class文件,没有mapper.xml,因为maven工程在默认情况下src/main/java目录下的所有资源文件是不发布到target目录下的,
解决方案
在service的pom.xml中
<!-- 项目打包时会将java目录中的*.xml文件也进行打包 -->

    <build>
        <resources>
            <resource>
                <directory>src/main/java</directory>
                <includes>
                    <include>**/*.xml</include>
                </includes>
                <filtering>false</filtering>
            </resource>
        </resources>
    </build>
重新打包项目会发现target目录下出现了xml文件夹
如果target目录里没有生成需要把target目录删除掉重新编译
在Spring Boot配置文件中添加配置
在eduservice的配置文件中添加
mybatis-plus:
  mapper-locations: classpath:com/atguigu/eduservice/mapper/xml/*.xml
修改课程状态
//课程最终发布
    //修改课程状态
    @PostMapping("publishCourse/{id}")
    public ResultVo publishCourse(@PathVariable String id){


        EduCourse eduCourse = new EduCourse();
        eduCourse.setId(id);
        eduCourse.setStatus("Normal");//设置课程发布状态
        boolean b = courseService.updateById(eduCourse);
        if (b){


            return ResultVo.ok();
        }
        else {


            return ResultVo.error();
        }


    }
前端
定义api
分析这个页面一共有两个远程方法:一个是根基课程id获取课程基本预览信息,第二个是发布课程
//课程确认信息显示
  getPublihCourseInfo(id) {


    return request({


      url: '/eduservice/course/getPublishCourseInfo/' + id,
      method: 'get'
    })
  },
  //课程最终发布
  publihCourse(id) {


    return request({


      url: '/eduservice/course/publishCourse/' + id,
      method: 'post'
    })
  },
定义数据模型
data() {


    return {


      saveBtnDisabled: false, // 保存按钮是否禁用
      courseId: "",
      coursePublish: {

    },
    };
  },
完善步骤导航
previous() {


      //console.log("previous");
      this.$router.push({

     path: "/course/chapter/" + this.courseId });
    },
发布函数
publish() {


      course.publihCourse(this.courseId).then((response) => {


        //提示
        this.$message({


          type: "success",
          message: "课程发布成功!",
        });
        //跳转课程列表页面
        this.$router.push({

     path: "/course/list" });
      });
    },
created
created() {


    //获取路由课程id值
    if (this.$route.params && this.$route.params.id) {


      this.courseId = this.$route.params.id;
      //调用接口方法根据课程id查询
      this.getCoursePublishId();
    }
  },
获取数据的方法
//根据课程id查询
    getCoursePublishId() {


      course.getPublihCourseInfo(this.courseId).then((response) => {


        this.coursePublish = response.data.publishCourse;
      });
    },
组件模板
<template>
  <div class="app-container">
    <h2 style="text-align: center">发布新课程</h2>

    <el-steps
      :active="3"
      process-status="wait"
      align-center
      style="margin-bottom: 40px"
    >
      <el-step title="填写课程基本信息" />
      <el-step title="创建课程大纲" />
      <el-step title="发布课程" />
    </el-steps>

    <div class="ccInfo">
      <img :src="coursePublish.cover" />
      <div class="main">
        <h2>{

   { coursePublish.title }}</h2>
        <p class="gray">
          <span>共{

   { coursePublish.lessonNum }}课时</span>
        </p>
        <p>
          <span
            >所属分类:{

   { coursePublish.subjectLevelOne }} —
            {

   { coursePublish.subjectLevelTwo }}</span
          >
        </p>
        <p>课程讲师:{

   { coursePublish.teacherName }}</p>
        <h3 class="red">¥{

   { coursePublish.price }}</h3>
      </div>
    </div>

    <div>
      <el-button @click="previous">返回修改</el-button>
      <el-button :disabled="saveBtnDisabled" type="primary" @click="publish"
        >发布课程</el-button
      >
    </div>
  </div>
</template>
css样式
<style scoped>
.ccInfo {


  background: #f5f5f5;
  padding: 20px;
  overflow: hidden;
  border: 1px dashed #ddd;
  margin-bottom: 40px;
  position: relative;
}
.ccInfo img {


  background: #d6d6d6;
  width: 500px;
  height: 278px;
  display: block;
  float: left;
  border: none;
}
.ccInfo .main {


  margin-left: 520px;
}

.ccInfo .main h2 {


  font-size: 28px;
  margin-bottom: 30px;
  line-height: 1;
  font-weight: normal;
}
.ccInfo .main p {


  margin-bottom: 10px;
  word-wrap: break-word;
  line-height: 24px;
  max-height: 48px;
  overflow: hidden;
}

.ccInfo .main p {


  margin-bottom: 10px;
  word-wrap: break-word;
  line-height: 24px;
  max-height: 48px;
  overflow: hidden;
}
.ccInfo .main h3 {


  left: 540px;
  bottom: 20px;
  line-height: 1;
  font-size: 28px;
  color: #d32f24;
  font-weight: normal;
  position: absolute;
}
</style>
课程列表显示
后端
定义搜索对象
CourseQuery
@ApiModel(value = "Course查询对象", description = "课程查询对象封装")
@Data
public class CourseQueryVo {


    @ApiModelProperty(value = "课程名称")
    private String title;

    @ApiModelProperty(value = "课程状态 Draft未发布  Normal已发布")
    private String status;

    @ApiModelProperty(value = "讲师id")
    private String teacherId;

    @ApiModelProperty(value = "一级类别id")
    private String subjectParentId;

    @ApiModelProperty(value = "二级类别id")
    private String subjectId;
}
定义service方法
void pageQuery(Page<EduCourse> eduCoursePage, CourseQueryVo courseQuery);
@Override
    public void pageQuery(Page<EduCourse> eduCoursePage, CourseQueryVo courseQuery) {


        QueryWrapper<EduCourse> queryWrapper = new QueryWrapper<>();
        queryWrapper.orderByDesc("gmt_create");
        if(courseQuery==null){


            this.page(eduCoursePage,queryWrapper);
            return;
        }
        String title = courseQuery.getTitle();
        String teacherId = courseQuery.getTeacherId();
        String subjectId = courseQuery.getSubjectId();
        String subjectParentId = courseQuery.getSubjectParentId();
        String status = courseQuery.getStatus();

        if(!StringUtils.isEmpty(title)){


            queryWrapper.like("title",title);
        }
        if(!StringUtils.isEmpty(teacherId)){


            queryWrapper.eq("teacher_id",teacherId);
        }
        if(!StringUtils.isEmpty(status)){


            queryWrapper.eq("status",status);
        }
        if(!StringUtils.isEmpty(subjectId)){


            queryWrapper.eq("subject_id", subjectId);
        }
        if(!StringUtils.isEmpty(subjectParentId)){


            queryWrapper.eq("subject_parent_id", subjectParentId);
        }
        this.page(eduCoursePage,queryWrapper);

    }
controller
public ResultVo getCourseList(@PathVariable long page,@PathVariable long limit,@RequestBody(required = false) CourseQueryVo courseQuery){


        Page<EduCourse> eduCoursePage = new Page<>(page, limit);
        courseService.pageQuery(eduCoursePage,courseQuery);
        List<EduCourse> list = eduCoursePage.getRecords();
        long total = eduCoursePage.getTotal();
        return ResultVo.ok().data("list",list).data("rows",total);
    }
前端
<template>
  <div class="app-container">
    课程列表

    <!--查询表单-->
    <el-form :inline="true" class="demo-form-inline">
      <el-form-item>
        <el-input v-model="courseQuery.title" placeholder="课程名称" />
      </el-form-item>

      <el-form-item>
        <el-select
          v-model="courseQuery.status"
          clearable
          placeholder="课程状态"
        >
          <el-option value="Normal" label="已发布" />
          <el-option value="Draft" label="未发布" />
        </el-select>
      </el-form-item>
      <el-form-item>
        <el-input v-model="courseQuery.teacherId" placeholder="教师id" />
      </el-form-item>

      <el-button type="primary" icon="el-icon-search" @click="getList()"
        >查询</el-button
      >
      <el-button type="default" @click="resetData()">清空</el-button>
    </el-form>

    <!-- 表格 -->
    <el-table :data="list" border fit highlight-current-row>
      <el-table-column label="序号" width="70" align="center">
        <template slot-scope="scope">
          {

   { (page - 1) * limit + scope.$index + 1 }}
        </template>
      </el-table-column>

      <el-table-column prop="title" label="课程名称" align="center" />

      <el-table-column label="课程状态" width="80" align="center">
        <template slot-scope="scope">
          {

   { scope.row.status === "Normal" ? "已发布" : "未发布" }}
        </template>
      </el-table-column>

      <el-table-column
        prop="lessonNum"
        label="课时数"
        width="60"
        align="center"
      />

      <el-table-column prop="gmtCreate" label="添加时间" width="160" />

      <el-table-column
        prop="viewCount"
        label="浏览数量"
        width="60"
        align="center"
      />

      <el-table-column label="操作" width="150" align="center">
        <template slot-scope="scope">
          <router-link :to="'/course/info/' + scope.row.id">
            <el-button type="primary" size="mini" icon="el-icon-edit"
              >编辑课程基本信息</el-button
            >
          </router-link>
          <router-link :to="'/course/chapter/' + scope.row.id">
            <el-button type="primary" size="mini" icon="el-icon-edit"
              >编辑课程大纲息</el-button
            >
          </router-link>
          <el-button
            type="danger"
            size="mini"
            icon="el-icon-delete"
            @click="removeDataById(scope.row.id)"
            >删除课程信息</el-button
          >
        </template>
      </el-table-column>
    </el-table>

    <!-- 分页 -->
    <el-pagination
      :current-page="page"
      :page-size="limit"
      :total="total"
      style="padding: 30px 0; text-align: center"
      layout="total, prev, pager, next, jumper"
      @current-change="getList"
    />
  </div>
</template>
<script>
//引入调用teacher.js文件
import course from "@/api/edu/course";

export default {


  //写核心代码位置
  // data:{


  // },
  data() {


    //定义变量和初始值
    return {


      list: null, //查询之后接口返回集合
      page: 1, //当前页
      limit: 10, //每页记录数
      total: 0, //总记录数
      courseQuery: {

      }, //条件封装对象
    };
  },
  created() {


    //页面渲染之前执行,一般调用methods定义的方法
    //调用
    this.getList();
  },
  methods: {


    //创建具体的方法,调用teacher.js定义的方法
    //讲师列表的方法
    getList(page = 1) {


      this.page = page;
      course
        .getListCourse(this.page, this.limit, this.courseQuery)
        .then((response) => {


          //请求成功
          //response接口返回的数据
          this.list = response.data.list;
          this.total = response.data.rows;
        });
    },
    resetData() {


      //清空的方法
      //表单输入项数据清空
      this.courseQuery = {

      };
      //查询所有讲师数据
      this.getList();
    },
    removeDataById(id) {


      this.$confirm(
        "此操作将永久删除该课程,以及该课程下的章节和视频,是否继续?",
        "提示",
        {


          confirmButtonText: "确定",
          cancelButtonText: "取消",
          type: "warning",
        }
      ).then(() => {


        //点击确定,执行then方法
        //调用删除的方法
        course.deleteCourseById(id).then((response) => {


          //删除成功
          //提示信息
          this.$message({


            type: "success",
            message: "删除成功!",
          });
          //回到列表页面
          this.getList(this.page);
        });
      }); //点击取消,执行catch方法
    },
  },
};
</script>
删除课程
后端
controller
//删除课程
    @ApiOperation(value = "根据ID删除课程")
    @PostMapping("deleteCourse/{courseId}")
    public ResultVo deleteCourse(@PathVariable String courseId){


        boolean remove = courseService.removeCourse(courseId);
        if(remove){


            return ResultVo.ok();
        }
        else{


            return ResultVo.error();
        }
    }
service
如果用户确定删除,则首先删除video记录,然后删除chapter记录,最后删除Course记录
在VideoService中定义根据courseId删除video业务方法
接口
void removeVideoByCourseId(String courseId);
实现
@Override
    public void removeVideoByCourseId(String courseId) {


        QueryWrapper<EduVideo> QueryWrapper = new QueryWrapper<>();
        QueryWrapper.eq("course_id",courseId);
        baseMapper.delete(QueryWrapper);
    }
在ChapterService中定义根据courseId删除chapter业务方法
接口
void removeChapterByCourseId(String courseId);
实现
@Override
public void removeChapterByCourseId(String courseId) {
QueryWrapper<EduChapter> queryWrapper = new QueryWrapper<>();
queryWrapper.eq("course_id",courseId);
baseMapper.delete(queryWrapper);
}
删除当前course记录
注意这里传递的是课程id所有删除小节和章节时不能直接通过removeById的方式删除
@Override
public boolean removeCourse(String courseId) {
//根据课程id删除小节
eduVideoService.removeVideoByCourseId(courseId);
//根据课程id删除章节
chapterService.removeChapterByCourseId(courseId);
//根据课程id删除描述
courseDescriptionService.removeById(courseId);
//根据课程id删除课程本身
int i = baseMapper.deleteById(courseId);
if(i==0){
throw new GuliException(20001,"删除失败");
}
return true;
}
前端
定义api
course.js中添加删除方法
deleteCourseById(id) {
return request({
url: '/eduservice/course/deleteCourse/' + id,
method: 'post'
})
}
修改删除按钮
<el-button type="text" size="mini" icon="el-icon-delete" @click="removeDataById(scope.row.id)">删除</el-button>
编写删除方法
removeDataById(id) {
this.$confirm("此操作将永久删除该课程,以及该课程下的章节和视频,是否继续?", "提示", {
confirmButtonText: "确定",
cancelButtonText: "取消",
type: "warning",
}).then(() => {
//点击确定,执行then方法
//调用删除的方法
course.deleteCourseById(id).then((response) => {
//删除成功
//提示信息
this.$message({
type: "success",
message: "删除成功!",
});
//回到列表页面
this.getList(this.page);
});
}); //点击取消,执行catch方法
},
阿里云视频点播
视频点播(ApsaraVideo for VoD)是集音视频采集、编辑、上传、自动化转码处理、媒体资源管理、分发加速于一体的一站式音视频点播解决方案。
在service下面新建service_vod模块
依赖
<dependencies>
<dependency>
<groupId>com.aliyun</groupId>
<artifactId>aliyun-java-sdk-core</artifactId>
</dependency>
<dependency>
<groupId>com.aliyun.oss</groupId>
<artifactId>aliyun-sdk-oss</artifactId>
</dependency>
<dependency>
<groupId>com.aliyun</groupId>
<artifactId>aliyun-java-sdk-vod</artifactId>
</dependency>
<dependency>
<groupId>com.aliyun</groupId>
<artifactId>aliyun-sdk-vod-upload</artifactId>
</dependency>
<dependency>
<groupId>com.alibaba</groupId>
<artifactId>fastjson</artifactId>
</dependency>
<dependency>
<groupId>org.json</groupId>
<artifactId>json</artifactId>
</dependency>
<dependency>
<groupId>com.google.code.gson</groupId>
<artifactId>gson</artifactId>
</dependency>
<dependency>
<groupId>joda-time</groupId>
<artifactId>joda-time</artifactId>
</dependency>
</dependencies>
application.properties
# 服务端口
server.port=8003
# 服务名
spring.application.name=service-vod
# 环境设置:dev、test、prod
spring.profiles.active=dev
#阿里云 vod
#不同的服务器,地址不同
aliyun.vod.file.keyid=
aliyun.vod.file.keysecret=
# 最大上传单个文件大小:默认1M
spring.servlet.multipart.max-file-size=1024MB
# 最大置总上传的数据大小 :默认10M
spring.servlet.multipart.max-request-size=1024MB
启动类
@SpringBootApplication(exclude = DataSourceAutoConfiguration.class)
@ComponentScan(basePackages = {
"com.atguigu"})
public class VodApplicaton {
public static void main(String[] args) {
SpringApplication.run(VodApplicaton.class,args);
}
}
阿里云视频点播测试
初始化
import com.aliyun.oss.ClientException;
import com.aliyuncs.DefaultAcsClient;
import com.aliyuncs.profile.DefaultProfile;
public class InitObject {
public static DefaultAcsClient initVodClient(String accessKeyId, String accessKeySecret) throws ClientException {
String regionId = "cn-shanghai"; // 点播服务接入区域
DefaultProfile profile = DefaultProfile.getProfile(regionId, accessKeyId, accessKeySecret);
DefaultAcsClient client = new DefaultAcsClient(profile);
return client;
}
}
获取视频播放地址
public static void main(String[] args) throws ClientException {
//根据视频id获取视频播放地址
//创建初始化对象
DefaultAcsClient client =InitObject.initVodClient("LTAI5tM89q3RBzKxsDh6b8", "rXd2Ze5DzS9C2izYF6ISoX9fI3I");
GetPlayInfoResponse response = new GetPlayInfoResponse();
GetPlayInfoRequest request=new GetPlayInfoRequest();
//向request对象里面设置视频id
request.setVideoId("e9aff412746a4868958bc4f5f4ba771e");
//调用初始化对象里面的方法,传递request,获取数据
response = client.getAcsResponse(request);
List<GetPlayInfoResponse.PlayInfo> playInfoList = response.getPlayInfoList();
//播放地址
for (GetPlayInfoResponse.PlayInfo playInfo : playInfoList) {
System.out.print("PlayInfo.PlayURL = " + playInfo.getPlayURL() + "\n");
}
//Base信息
System.out.print("VideoBase.Title = " + response.getVideoBase().getTitle() + "\n");
}
获取视频播放凭证
public static void main(String[] args) throws ClientException {
//根据视频id获取视频播放地址
//创建初始化对象
DefaultAcsClient client =InitObject.initVodClient("LTAI5tM89q3RBzKxDh6b8", "rXd2Ze5DzS9C2izYF6ISoX9fI3I");
//创建获取视频凭证request和response对象
GetVideoPlayAuthRequest request = new GetVideoPlayAuthRequest();
GetVideoPlayAuthResponse response = new GetVideoPlayAuthResponse();
//向request对象里面设置视频id
request.setVideoId("e9aff412746a4868958bc4f5f4ba771e");
//调用初始化对象里面的方法,传递request,获取凭证
response = client.getAcsResponse(request);
//播放凭证
System.out.print("PlayAuth = " + response.getPlayAuth() + "\n");
//VideoMeta信息
System.out.print("VideoMeta.Title = " + response.getVideoMeta().getTitle() + "\n");
}
安装非开源jar包

在本地Maven仓库中安装jar包:
下载视频上传SDK,解压,命令行进入lib目录,执行以下代码
mvn install:install-file -DgroupId=com.aliyun -DartifactId=aliyun-sdk-vod-upload -Dversion=1.4.11 -Dpackaging=jar -Dfile=aliyun-java-vod-upload-1.4.11.jar
然后在pom中引入jar包
<dependency>
<groupId>com.aliyun</groupId>
<artifactId>aliyun-sdk-vod-upload</artifactId>
<version>1.4.11</version>
</dependency>
测试本地文件上传
public static void main(String[] args) {
String accessKeyId = "LTAI4FvvVEWiTJ3GNJJqJnk7";
String accessKeySecret = "9st82dv7EvFk9mTjYO1XXbM632fRbG";
String title = "6 - What If I Want to Move Faster - upload by sdk"; //上传之后文件名称
String fileName = "F:/6 - What If I Want to Move Faster.mp4"; //本地文件路径和名称
//上传视频的方法
UploadVideoRequest request = new UploadVideoRequest(accessKeyId, accessKeySecret, title, fileName);
/* 可指定分片上传时每个分片的大小,默认为2M字节 */
request.setPartSize(2 * 1024 * 1024L);
/* 可指定分片上传时的并发线程数,默认为1,(注:该配置会占用服务器CPU资源,需根据服务器情况指定)*/
request.setTaskNum(1);
UploadVideoImpl uploader = new UploadVideoImpl();
UploadVideoResponse response = uploader.uploadVideo(request);
if (response.isSuccess()) {
System.out.print("VideoId=" + response.getVideoId() + "\n");
} else {
/* 如果设置回调URL无效,不影响视频上传,可以返回VideoId同时会返回错误码。其他情况上传失败时,VideoId为空,此时需要根据返回错误码分析具体错误原因 */
System.out.print("VideoId=" + response.getVideoId() + "\n");
System.out.print("ErrorCode=" + response.getCode() + "\n");
System.out.print("ErrorMessage=" + response.getMessage() + "\n");
}
}
整合阿里云vod实现视频上传
创建常量类
一定要注意注入容器不然后面返回的视频id一直会为空
@Component
public class ConstantVodUtils implements InitializingBean {
@Value("${aliyun.vod.file.keyid}")
private String keyId;
@Value("${aliyun.vod.file.keysecret}")
private String keySecret;
public static String ACCESS_KEY_ID;
public static String ACCESS_KEY_SECRET;
@Override
public void afterPropertiesSet() throws Exception {
ACCESS_KEY_ID = keyId;
ACCESS_KEY_SECRET = keySecret;
}
}
创建service
public interface VodService {
String uploadVideoAly(MultipartFile file);
}
VideoServiceImpl
package com.atguigu.vod.service.Impl;
import com.aliyun.vod.upload.impl.UploadVideoImpl;
import com.aliyun.vod.upload.req.UploadStreamRequest;
import com.aliyun.vod.upload.resp.UploadStreamResponse;
import com.atguigu.vod.service.VodService;
import com.atguigu.vod.utils.ConstantVodUtils;
import org.springframework.stereotype.Service;
import org.springframework.web.multipart.MultipartFile;
import java.io.InputStream;
@Service
public class VodServiceImpl implements VodService {
@Override
public String uploadVideoAly(MultipartFile file) {
try {
//accessKeyId, accessKeySecret
//fileName:上传文件原始名称
// 01.03.09.mp4
String fileName = file.getOriginalFilename();
//title:上传之后显示名称
String title = fileName.substring(0, fileName.lastIndexOf("."));
//inputStream:上传文件输入流
InputStream inputStream = file.getInputStream();
UploadStreamRequest request = new UploadStreamRequest(ConstantVodUtils.ACCESS_KEY_ID,ConstantVodUtils.ACCESS_KEY_SECRET, title, fileName, inputStream);
UploadVideoImpl uploader = new UploadVideoImpl();
UploadStreamResponse response = uploader.uploadStream(request);
String videoId = null;
if (response.isSuccess()) {
videoId = response.getVideoId();
} else {
//如果设置回调URL无效,不影响视频上传,可以返回VideoId同时会返回错误码。其他情况上传失败时,VideoId为空,此时需要根据返回错误码分析具体错误原因
videoId = response.getVideoId();
}
return videoId;
}catch(Exception e) {
e.printStackTrace();
return null;
}
}
}
创建controller
@RestController
@RequestMapping("/eduvod/video")
@CrossOrigin
public class VodController {
@Autowired
private VodService vodService;
@PostMapping("uploadAlyiVideo")
public ResultVo uploadAlyiVideo(MultipartFile file){
// 返回上传视频id
String videoId= vodService.uploadVideoAly(file);
return ResultVo.ok().data("videoId",videoId);
}
//上传视频到阿里云
}
整合视频前端
配置nginx反向代理
location ~ /eduvod/ {
proxy_pass http://localhost:8003;
}
配置nginx上传文件大小,否则上传时会有 413 (Request Entity Too Large) 异常
打开nginx主配置文件nginx.conf,找到http{},添加
client_max_body_size 1024m;

重启nginx
nginx -s reload
数据定义
fileList: [], //上传文件列表
BASE_API: process.env.BASE_API, // 接口API地址
整合上传组件
<el-form-item label="上传视频">
<el-upload
:on-success="handleVodUploadSuccess"
:on-remove="handleVodRemove"
:before-remove="beforeVodRemove"
:on-exceed="handleUploadExceed"
:file-list="fileList"
:action="BASE_API + '/eduvod/video/uploadAlyiVideo'"
:limit="1"
class="upload-demo"
>
<el-button size="small" type="primary">上传视频</el-button>
<el-tooltip placement="right-end">
<div slot="content">
最大支持1G,<br />
支持3GP、ASF、AVI、DAT、DV、FLV、F4V、<br />
GIF、M2T、M4V、MJ2、MJPEG、MKV、MOV、MP4、<br />
MPE、MPG、MPEG、MTS、OGG、QT、RM、RMVB、<br />
SWF、TS、VOB、WMV、WEBM 等视频格式上传
</div>
<i class="el-icon-question" />
</el-tooltip>
</el-upload>
</el-form-item>
</el-form>
方法定义
//上传视频成功调用的方法
handleVodUploadSuccess(response, file, fileList) {
//上传视频id赋值
this.video.videoSourceId = response.data.videoId;
//上传视频名称赋值
this.video.videoOriginalName = file.name;
},
handleUploadExceed() {
this.$message.warning("想要重新上传视频,请先删除已上传的视频");
},
删除云端视频
后端
controller
@DeleteMapping("removeAlyVideo/{id}")
public ResultVo removeAlyVideo(@PathVariable String id){
try {
//初始化对象
DefaultAcsClient client = InitVodClient.initVodClient(ConstantVodUtils.ACCESS_KEY_ID, ConstantVodUtils.ACCESS_KEY_SECRET);
//创建删除视频的request对象
DeleteVideoRequest request=new DeleteVideoRequest();
//向request设置删除的视频id
request.setVideoIds(id);
client.getAcsResponse(request);
return ResultVo.ok();
}catch (Exception e){
e.printStackTrace();
throw new GuliException(20001,"删除视频失败");
}
}
前端
定义api
//删除视频
deleteAliyunvod(id) {
return request({
url: '/eduvod/video/removeAlyVideo/' + id,
method: 'delete'
})
}
组件方法
//点击确定调用的方法
handleVodRemove() {
//调用接口的删除视频的方法
video.deleteAliyunvod(this.video.videoSourceId).then((response) => {
//提示信息
this.$message({
type: "success",
message: "删除视频成功!",
});
//把文件列表清空
this.fileList = [];
//把video视频id和视频名称值清空
//上传视频id赋值
this.video.videoSourceId = "";
//上传视频名称赋值
this.video.videoOriginalName = "";
});
},
//点击×调用这个方法
beforeVodRemove(file, fileList) {
return this.$confirm(`确定移除 ${
file.name}?`);
},
springcloud&&springcloudalibaba
springcloud笔记链接
springcloudalibaba笔记链接
服务注册
把service-edu微服务注册到注册中心中,service-vod步骤相同
在service模块配置pom
原先依赖是注释掉的打开即可
<dependency>
<groupId>org.springframework.cloud</groupId>
<artifactId>spring-cloud-starter-alibaba-nacos-discovery</artifactId>
</dependency>
cloud:
nacos:
discovery:
server-addr: localhost:8848
添加服务配置信息
配置application.properties,在客户端微服务中添加注册Nacos服务的配置信息
# nacos服务地址
spring.cloud.nacos.discovery.server-addr=127.0.0.1:8848
添加Nacos客户端注解
在客户端微服务启动类中添加注解
@EnableDiscoveryClient
实现服务调用
删除课时的同时删除云端视频
在service模块添加pom依赖
<!--服务调用-->
<dependency>
<groupId>org.springframework.cloud</groupId>
<artifactId>spring-cloud-starter-openfeign</artifactId>
</dependency>
在调用端的启动类添加注解
@EnableFeignClients
@SpringBootApplication
@ComponentScan(basePackages = {
"com.atguigu"})
@EnableDiscoveryClient
@EnableFeignClients
public class EduApplication {
public static void main(String[] args) {
SpringApplication.run(EduApplication.class,args);
}
}
创建包和接口
创建feignclient包
@FeignClient注解用于指定从哪个服务中调用功能 ,名称与被调用的服务名保持一致。
@GetMapping注解用于对被调用的微服务进行地址映射。
@PathVariable注解一定要指定参数名称,否则出错
@Component注解防止,在其他位置注入CodClient时idea报错
@FeignClient("service-vod")
@Component
public interface VodClient {
@DeleteMapping("/eduvod/video/removeAlyVideo/{id}")
public ResultVo removeAlyVideo(@PathVariable("id") String id);
}
注入
@Autowired
private VodClient vodClient;
调用微服务
@PostMapping("{id}")
@ApiOperation(value = "根据ID删除课时")
@ApiParam(name = "id", value = "课时ID", required = true)
public ResultVo deleteVideo(@PathVariable String id){
//根据小节id获取视频id,调用方法实现视频删除
EduVideo eduVideo = videoService.getById(id);
String videoSourceId = eduVideo.getVideoSourceId();
//判断小节里面是否有视频id
if(!StringUtils.isEmpty(videoSourceId)){
vodClient.removeAlyVideo(videoSourceId);
}
boolean b = videoService.removeById(id);
if(b){
return ResultVo.ok();
}
else{
return ResultVo.error();
}
}
完善删除课程业务
删除课程的同时删除云端视频
VideoService
void removeMoreAlyVideo(List videoIdList);
VideoServiceImpl
@Override
public void removeMoreAlyVideo(List videoIdList) {
try {
//初始化对象
DefaultAcsClient client = InitVodClient.initVodClient(ConstantVodUtils.ACCESS_KEY_ID, ConstantVodUtils.ACCESS_KEY_SECRET);
//创建删除视频的request对象
DeleteVideoRequest request=new DeleteVideoRequest();
//向request设置删除的视频id
String ids = StringUtils.join(videoIdList.toArray(), ",");
request.setVideoIds(ids);
client.getAcsResponse(request);
}catch (Exception e){
e.printStackTrace();
throw new GuliException(20001,"删除视频失败");
}
}
controller
//删除多个阿里云视频的方法
//参数多个视频id list
@DeleteMapping("delete-batch")
public ResultVo deleteBatch(@RequestParam("videoIdList") List<String> videoIdList){
vodService.removeMoreAlyVideo(videoIdList);
return ResultVo.ok();
}
VodClient.
@DeleteMapping("/eduvod/video/delete-batch")
public ResultVo deleteBatch(@RequestParam("videoIdList") List<String> videoIdList);
EduVideoServiceImpl
@Autowired
private VodClient vodClient;
@Override
public void removeVideoByCourseId(String courseId) {
//根据课程id查询所有视频id
QueryWrapper<EduVideo> Wrapper = new QueryWrapper<>();
Wrapper.eq("course_id",courseId);
Wrapper.select("video_source_id");
List<EduVideo> videoList = baseMapper.selectList(Wrapper);
//List<EduVideo>变成List<string>
List<String> videoIds=new ArrayList<>();
for (int i = 0; i < videoList.size(); i++) {
EduVideo eduVideo = videoList.get(i);
if(!StringUtils.isEmpty(eduVideo)){
String videoSourceId = eduVideo.getVideoSourceId();
videoIds.add(videoSourceId);
}
}
if(videoIds.size()>0){
vodClient.deleteBatch(videoIds);
}
QueryWrapper<EduVideo> QueryWrapper = new QueryWrapper<>();
QueryWrapper.eq("course_id",courseId);
baseMapper.delete(QueryWrapper);
}
EduCourseServiceImpl
@Override
public boolean removeCourse(String courseId) {
//根据课程id删除小节
eduVideoService.removeVideoByCourseId(courseId);
//根据课程id删除章节
chapterService.removeChapterByCourseId(courseId);
//根据课程id删除描述
courseDescriptionService.removeById(courseId);
//根据课程id删除课程本身
int i = baseMapper.deleteById(courseId);
if(i==0){
throw new GuliException(20001,"删除失败");
}
return true;
}
整合Hystrix
在service的pom中添加依赖
<dependency>
<groupId>org.springframework.cloud</groupId>
<artifactId>spring-cloud-starter-netflix-ribbon</artifactId>
</dependency>
<!--hystrix依赖,主要是用 @HystrixCommand -->
<dependency>
<groupId>org.springframework.cloud</groupId>
<artifactId>spring-cloud-starter-netflix-hystrix</artifactId>
</dependency>
<!--服务注册-->
<dependency>
<groupId>org.springframework.cloud</groupId>
<artifactId>spring-cloud-starter-alibaba-nacos-discovery</artifactId>
</dependency>
<!--服务调用-->
<dependency>
<groupId>org.springframework.cloud</groupId>
<artifactId>spring-cloud-starter-openfeign</artifactId>
</dependency>
在配置文件中添加hystrix配置
#开启熔断机制
feign.hystrix.enabled=true
# 设置hystrix超时时间,默认1000ms
hystrix.command.default.execution.isolation.thread.timeoutInMilliseconds=6000
feign:
hystrix:
enabled: true
设置超时时间yml好像没有提示
在service-edu的client包里面创建熔断器的实现类
@Component
public class VodFileDegradeFeignClient implements VodClient{
@Override
public ResultVo removeAlyVideo(String id) {
return ResultVo.error().message("删除视频出错了");
}
@Override
public ResultVo deleteBatch(List<String> videoIdList) {
return ResultVo.error().message("删除多个视频出错了");
}
}
修改VodClient接口的注解
@FeignClient(name="service-vod",fallback = VodFileDegradeFeignClient.class)
public interface VodClient {
@DeleteMapping("/eduvod/video/removeAlyVideo/{id}")
public ResultVo removeAlyVideo(@PathVariable("id") String id);
@DeleteMapping("/eduvod/video/delete-batch")
public ResultVo deleteBatch(@RequestParam("videoIdList") List<String> videoIdList);
}
测试熔断
//删除小节
@PostMapping("{id}")
@ApiOperation(value = "根据ID删除课时")
@ApiParam(name = "id", value = "课时ID", required = true)
public ResultVo deleteVideo(@PathVariable String id){
//根据小节id获取视频id,调用方法实现视频删除
EduVideo eduVideo = videoService.getById(id);
String videoSourceId = eduVideo.getVideoSourceId();
//判断小节里面是否有视频id
if(!StringUtils.isEmpty(videoSourceId)){
ResultVo result = vodClient.removeAlyVideo(videoSourceId);
if (result.getCode()==20001){
throw new GuliException(20001,"删除视频失败,熔断器...");
}
}
boolean b = videoService.removeById(id);
if(b){
return ResultVo.ok();
}
else{
return ResultVo.error();
}
}
服务端渲染技术NUXT
什么是服务端渲染
服务端渲染又称SSR (Server Side Render)是在服务端完成页面的内容,而不是在客户端通过AJAX获取数据。
服务器端渲染(SSR)的优势主要在于:更好的 SEO,由于搜索引擎爬虫抓取工具可以直接查看完全渲染的页面。
如果你的应用程序初始展示 loading 菊花图,然后通过 Ajax 获取内容,抓取工具并不会等待异步完成后再进行页面内容的抓取。也就是说,如果 SEO 对你的站点至关重要,而你的页面又是异步获取内容,则你可能需要服务器端渲染(SSR)解决此问题。
另外,使用服务器端渲染,我们可以获得更快的内容到达时间(time-to-content),无需等待所有的 JavaScript 都完成下载并执行,产生更好的用户体验,对于那些「内容到达时间(time-to-content)与转化率直接相关」的应用程序而言,服务器端渲染(SSR)至关重要。
什么是NUXT
Nuxt.js 是一个基于 Vue.js 的轻量级应用框架,可用来创建服务端渲染 (SSR) 应用,也可充当静态站点引擎生成静态站点应用,具有优雅的代码结构分层和热加载等特性。
下载压缩包
https://github.com/nuxt-community/starter-template/archive/master.zip
解压
修改package.json
name、description、author(必须修改这里,否则项目无法安装)两个大括号也要去掉
"name": "guli",
"version": "1.0.0",
"description": "谷粒学院前台网站",
"author": "dyk",
修改nuxt.config.js
head: {
title: '谷粒学院 - Java视频|HTML5视频|前端视频|Python视频|大数据视频-自学拿1万+月薪的IT在线视频课程,谷粉力挺,老学员为你推荐',
meta: [{
charset: 'utf-8'
},
{
name: 'viewport',
content: 'width=device-width, initial-scale=1'
},
{
hid: 'keywords',
name: 'keywords',
content: '谷粒学院,IT在线视频教程,Java视频,HTML5视频,前端视频,Python视频,大数据视频'
},
{
hid: 'description',
name: 'description',
content: '谷粒学院是国内领先的IT在线视频学习平台、职业教育平台。截止目前,谷粒学院线上、线下学习人次数以万计!会同上百个知名开发团队联合制定的Java、HTML5前端、大数据、Python等视频课程,被广大学习者及IT工程师誉为:业界最适合自学、代码量最大、案例最多、实战性最强、技术最前沿的IT系列视频课程!'
}
],
link: [{
rel: 'icon',
type: 'image/x-icon',
href: '/favicon.ico'
}]
},
在命令提示终端中运行
npm install
NUXT目录结构
(1)资源目录 assets
用于组织未编译的静态资源如 LESS、SASS 或 JavaScript。
(2)组件目录 components
用于组织应用的 Vue.js 组件。Nuxt.js 不会扩展增强该目录下 Vue.js 组件,即这些组件不会像页面组件那样有 asyncData 方法的特性。
(3)布局目录 layouts
用于组织应用的布局组件。
(4)页面目录 pages
用于组织应用的路由及视图。Nuxt.js 框架读取该目录下所有的 .vue 文件并自动生成对应的路由配置。
(5)插件目录 plugins
用于组织那些需要在 根vue.js应用 实例化之前需要运行的 Javascript 插件。
(6)nuxt.config.js 文件
nuxt.config.js 文件用于组织Nuxt.js 应用的个性化配置,以便覆盖默认配置。
安装幻灯片插件
P168中的npm install vue-awesome-swiper下载的是最新4.x版本,视频中用的是3.1.3版本,已下载各位去package.json文件中把对应的组件修改为^3.1.3版本,重新npm install就行
npm install vue-awesome-swiper@3.1.3
配置插件
在 plugins 文件夹下新建文件 nuxt-swiper-plugin.js,内容是
import Vue from 'vue'
import VueAwesomeSwiper from 'vue-awesome-swiper/dist/ssr'
Vue.use(VueAwesomeSwiper)
在 nuxt.config.js 文件中配置插件
将 plugins 和 css节点 复制到 module.exports节点下
plugins: [
{
src: '~/plugins/nuxt-swiper-plugin.js',
ssr: false
}
],
css: [
'swiper/dist/css/swiper.css'
],
页面布局
复制静态资源
将静态原型中的css、img、js、photo目录拷贝至assets目录下
将favicon.ico复制到static目录下
修改layouts目录下default.vue,从静态页面中复制首页,修改了原始文件中的资源路径为~/assets/,将主内容区域的内容替换成
default.vue
<template>
<div class="in-wrap">
<!-- 公共头引入 -->
<header id="header">
<section class="container">
<h1 id="logo">
<a href="#" title="谷粒学院">
<img src="~/assets/img/logo.png" width="100%" alt="谷粒学院" />
</a>
</h1>
<div class="h-r-nsl">
<ul class="nav">
<router-link to="/" tag="li" active-class="current" exact>
<a>首页</a>
</router-link>
<router-link to="/course" tag="li" active-class="current">
<a>课程</a>
</router-link>
<router-link to="/teacher" tag="li" active-class="current">
<a>名师</a>
</router-link>
<router-link to="/article" tag="li" active-class="current">
<a>文章</a>
</router-link>
<router-link to="/qa" tag="li" active-class="current">
<a>问答</a>
</router-link>
</ul>
<!-- / nav -->
<ul class="h-r-login">
<li id="no-login">
<a href="/sing_in" title="登录">
<em class="icon18 login-icon"> </em>
<span class="vam ml5">登录</span>
</a>
|
<a href="/sign_up" title="注册">
<span class="vam ml5">注册</span>
</a>
</li>
<li class="mr10 undis" id="is-login-one">
<a href="#" title="消息" id="headerMsgCountId">
<em class="icon18 news-icon"> </em>
</a>
<q class="red-point" style="display: none"> </q>
</li>
<li class="h-r-user undis" id="is-login-two">
<a href="#" title>
<img
src="~/assets/img/avatar-boy.gif"
width="30"
height="30"
class="vam picImg"
alt
/>
<span class="vam disIb" id="userName"></span>
</a>
<a
href="javascript:void(0)"
title="退出"
onclick="exit();"
class="ml5"
>退出</a
>
</li>
<!-- /未登录显示第1 li;登录后显示第2,3 li -->
</ul>
<aside class="h-r-search">
<form action="#" method="post">
<label class="h-r-s-box">
<input
type="text"
placeholder="输入你想学的课程"
name="queryCourse.courseName"
value
/>
<button type="submit" class="s-btn">
<em class="icon18"> </em>
</button>
</label>
</form>
</aside>
</div>
<aside class="mw-nav-btn">
<div class="mw-nav-icon"></div>
</aside>
<div class="clear"></div>
</section>
</header>
<!-- /公共头引入 -->
<nuxt />
<!-- 公共底引入 -->
<footer id="footer">
<section class="container">
<div class>
<h4 class="hLh30">
<span class="fsize18 f-fM c-999">友情链接</span>
</h4>
<ul class="of flink-list">
<li>
<a href="http://www.atguigu.com/" title="尚硅谷" target="_blank"
>尚硅谷</a
>
</li>
</ul>
<div class="clear"></div>
</div>
<div class="b-foot">
<section class="fl col-7">
<section class="mr20">
<section class="b-f-link">
<a href="#" title="关于我们" target="_blank">关于我们</a>|
<a href="#" title="联系我们" target="_blank">联系我们</a>|
<a href="#" title="帮助中心" target="_blank">帮助中心</a>|
<a href="#" title="资源下载" target="_blank">资源下载</a>|
<span>服务热线:010-56253825(北京) 0755-85293825(深圳)</span>
<span>Email:[email protected]</span>
</section>
<section class="b-f-link mt10">
<span>©2018课程版权均归谷粒学院所有 京ICP备17055252号</span>
</section>
</section>
</section>
<aside class="fl col-3 tac mt15">
<section class="gf-tx">
<span>
<img src="~/assets/img/wx-icon.png" alt />
</span>
</section>
<section class="gf-tx">
<span>
<img src="~/assets/img/wb-icon.png" alt />
</span>
</section>
</aside>
<div class="clear"></div>
</div>
</section>
</footer>
<!-- /公共底引入 -->
</div>
</template>
<script>
import "~/assets/css/reset.css";
import "~/assets/css/theme.css";
import "~/assets/css/global.css";
import "~/assets/css/web.css";
export default {
};
</script>
首页面index.vue
修改pages/index.vue:
修改了原始文件中的资源路径为~/assets/
<template>
<div>
<!-- 幻灯片 开始 -->
<div v-swiper:mySwiper="swiperOption">
<div class="swiper-wrapper">
<div v-for="banner in bannerList" :key="banner.id" class="swiper-slide" style="background: #040B1B;">
<a target="_blank" :href="banner.linkUrl">
<img :src="banner.imageUrl" :alt="banner.title">
</a>
</div>
</div>
<div class="swiper-pagination swiper-pagination-white"></div>
<div class="swiper-button-prev swiper-button-white" slot="button-prev"></div>
<div class="swiper-button-next swiper-button-white" slot="button-next"></div>
</div>
<!-- 幻灯片 结束 -->
<div id="aCoursesList">
<!-- 网校课程 开始 -->
<div>
<section class="container">
<header class="comm-title">
<h2 class="tac">
<span class="c-333">热门课程</span>
</h2>
</header>
<div>
<article class="comm-course-list">
<ul class="of" id="bna">
<li v-for="course in eduList" :key="course.id">
<div class="cc-l-wrap">
<section class="course-img">
<img
:src="course.cover"
class="img-responsive"
:alt="course.title"
>
<div class="cc-mask">
<a href="#" title="开始学习" class="comm-btn c-btn-1">开始学习</a>
</div>
</section>
<h3 class="hLh30 txtOf mt10">
<a href="#" :title="course.title" class="course-title fsize18 c-333">{
{course.title}}</a>
</h3>
<section class="mt10 hLh20 of">
<span class="fr jgTag bg-green" v-if="Number(course.price) === 0">
<i class="c-fff fsize12 f-fA">免费</i>
</span>
<span class="fl jgAttr c-ccc f-fA">
<i class="c-999 f-fA">9634人学习</i>
|
<i class="c-999 f-fA">9634评论</i>
</span>
</section>
</div>
</li>
</ul>
<div class="clear"></div>
</article>
<section class="tac pt20">
<a href="#" title="全部课程" class="comm-btn c-btn-2">全部课程</a>
</section>
</div>
</section>
</div>
<!-- /网校课程 结束 -->
<!-- 网校名师 开始 -->
<div>
<section class="container">
<header class="comm-title">
<h2 class="tac">
<span class="c-333">名师大咖</span>
</h2>
</header>
<div>
<article class="i-teacher-list">
<ul class="of">
<li v-for="teacher in teacherList" :key="teacher.id">
<section class="i-teach-wrap">
<div class="i-teach-pic">
<a href="/teacher/1" :title="teacher.name">
<img :alt="teacher.name" :src="teacher.avatar">
</a>
</div>
<div class="mt10 hLh30 txtOf tac">
<a href="/teacher/1" :title="teacher.name" class="fsize18 c-666">{
{teacher.name}}</a>
</div>
<div class="hLh30 txtOf tac">
<span class="fsize14 c-999">{
{teacher.career}}</span>
</div>
<div class="mt15 i-q-txt">
<p
class="c-999 f-fA"
>{
{teacher.intro}}</p>
</div>
</section>
</li>
</ul>
<div class="clear"></div>
</article>
<section class="tac pt20">
<a href="#" title="全部讲师" class="comm-btn c-btn-2">全部讲师</a>
</section>
</div>
</section>
</div>
<!-- /网校名师 结束 -->
</div>
</div>
</template>
幻灯片插件
<!-- 幻灯片 开始 -->
<div v-swiper:mySwiper="swiperOption">
<div class="swiper-wrapper">
<div
v-for="banner in bannerList"
:key="banner.id"
class="swiper-slide"
style="background: #040b1b"
>
<a target="_blank" :href="banner.linkUrl">
<img :src="banner.imageUrl" :alt="banner.title" />
</a>
</div>
</div>
<div class="swiper-pagination swiper-pagination-white"></div>
<div
class="swiper-button-prev swiper-button-white"
slot="button-prev"
></div>
<div
class="swiper-button-next swiper-button-white"
slot="button-next"
></div>
</div>
<script>
export default {
data () {
return {
swiperOption: {
//配置分页
pagination: {
el: '.swiper-pagination'//分页的dom节点
},
//配置导航
navigation: {
nextEl: '.swiper-button-next',//下一页dom节点
prevEl: '.swiper-button-prev'//前一页dom节点
}
}
}
}
}
</script>
路由
固定路由
使用router-link构建路由,地址是/course
在page目录创建文件夹course ,在course目录创建index.vue
动态路由
如果我们需要根据id查询一条记录,就需要使用动态路由。NUXT的动态路由是以下划线开头的vue文件,参数名为下划线后边的文件名
在pages下的course目录下创建_id.vue
其他的静态页面我都省略了太多了而且删序号好麻烦
首页显示banner数据
在service模块下创建子模块service-cms
执行sql脚本

配置文件
使用代码生成器生成banner代码
在service_cms的pom.xml里面添加
<dependency>
<groupId>com.baomidou</groupId>
<artifactId>mybatis-plus-generator</artifactId>
<version>3.4.1</version>
<scope>test</scope>
</dependency>
package codedemo;
import com.baomidou.mybatisplus.annotation.DbType;
import com.baomidou.mybatisplus.annotation.IdType;
import com.baomidou.mybatisplus.generator.AutoGenerator;
import com.baomidou.mybatisplus.generator.config.DataSourceConfig;
import com.baomidou.mybatisplus.generator.config.GlobalConfig;
import com.baomidou.mybatisplus.generator.config.PackageConfig;
import com.baomidou.mybatisplus.generator.config.StrategyConfig;
import com.baomidou.mybatisplus.generator.config.rules.DateType;
import com.baomidou.mybatisplus.generator.config.rules.NamingStrategy;
import org.junit.Test;
/**
* @author
* @since 2018/12/13
*/
public class CodeGenerator {
@Test
public void run() {
// 1、创建代码生成器
AutoGenerator mpg = new AutoGenerator();
// 2、全局配置
GlobalConfig gc = new GlobalConfig();
String projectPath = System.getProperty("user.dir");
gc.setOutputDir("D:\\ideacode\\guli_parent\\service\\service_cms" + "/src/main/java");
gc.setAuthor("dyk");
gc.setOpen(false); //生成后是否打开资源管理器
gc.setFileOverride(false); //重新生成时文件是否覆盖
//UserServie
gc.setServiceName("%sService"); //去掉Service接口的首字母I
gc.setIdType(IdType.ASSIGN_ID); //主键策略
gc.setDateType(DateType.ONLY_DATE);//定义生成的实体类中日期类型
gc.setSwagger2(true);//开启Swagger2模式
mpg.setGlobalConfig(gc);
// 3、数据源配置
DataSourceConfig dsc = new DataSourceConfig();
dsc.setUrl("jdbc:mysql://localhost:3306/gulischool?useUnicode=true&characterEncoding=UTF-8&serverTimezone=UTC");
dsc.setDriverName("com.mysql.cj.jdbc.Driver");
dsc.setUsername("root");
dsc.setPassword("123456");
dsc.setDbType(DbType.MYSQL);
mpg.setDataSource(dsc);
// 4、包配置
PackageConfig pc = new PackageConfig();
pc.setModuleName("educms"); //模块名
//包 com.atguigu.eduservice
pc.setParent("com.atguigu");
//包 com.atguigu.eduservice.controller
pc.setController("controller");
pc.setEntity("entity");
pc.setService("service");
pc.setMapper("mapper");
mpg.setPackageInfo(pc);
// 5、策略配置
StrategyConfig strategy = new StrategyConfig();
strategy.setInclude("crm_banner");
strategy.setNaming(NamingStrategy.underline_to_camel);//数据库表映射到实体的命名策略
strategy.setTablePrefix(pc.getModuleName() + "_"); //生成实体时去掉表前缀
strategy.setColumnNaming(NamingStrategy.underline_to_camel);//数据库表字段映射到实体的命名策略
strategy.setEntityLombokModel(true); // lombok 模型 @Accessors(chain = true) setter链式操作
strategy.setRestControllerStyle(true); //restful api风格控制器
strategy.setControllerMappingHyphenStyle(true); //url中驼峰转连字符
mpg.setStrategy(strategy);
// 6、执行
mpg.execute();
}
}
创建启动类
创建CmsApplication.java
@SpringBootApplication
@ComponentScan(basePackages = {
"com.atguigu"})//指定扫描位置
@MapperScan("com.atguigu.educms.mapper.CrmBannerMapper")
public class CmsApplication {
public static void main(String[] args) {
SpringApplication.run(CmsApplication.class,args);
}
}
banner服务接口
banner后台管理接口
banner后台分页查询、添加、修改、删除接口
package com.atguigu.educms.controller;
import com.atguigu.commonutils.ResultVo;
import com.atguigu.educms.entity.CrmBanner;
import com.atguigu.educms.service.CrmBannerService;
import com.baomidou.mybatisplus.extension.plugins.pagination.Page;
import io.swagger.annotations.ApiOperation;
import org.springframework.beans.factory.annotation.Autowired;
import org.springframework.web.bind.annotation.*;
/**
* <p>
* 首页banner表 后台
* </p>
*
* @author dyk
* @since 2021-09-27
*/
@RestController
@RequestMapping("/educms/banneradmin")
@CrossOrigin
public class BannerAdminController {
@Autowired
private CrmBannerService crmBannerService;
//分页查询banner
@GetMapping("pageBanner/{page}/{limt}")
@ApiOperation(value = "获取Banner分页列表")
public ResultVo pageBanner(@PathVariable long page,@PathVariable long limit){
Page<CrmBanner> crmBannerPage = new Page<CrmBanner>(page, limit);
crmBannerService.page(crmBannerPage,null);
return ResultVo.ok().data("items",crmBannerPage.getRecords()).data("total",crmBannerPage.getTotal());
}
//添加banner
@ApiOperation(value = "新增Banner")
@PostMapping("/addBanner")
public ResultVo addBanner(@RequestBody CrmBanner crmBanner){
boolean save = crmBannerService.save(crmBanner);
if(save){
return ResultVo.ok();
}
else{
return ResultVo.error();
}
}
//通过id获取信息
@ApiOperation(value = "获取Banner")
@GetMapping("get/{id}")
public ResultVo getById(@PathVariable String id){
CrmBanner crmBanner = crmBannerService.getById(id);
return ResultVo.ok().data("item",crmBanner);
}
//修改banner
@PutMapping("update")
@ApiOperation(value = "修改Banner")
public ResultVo updateBanner(@RequestBody CrmBanner crmBanner){
boolean b = crmBannerService.updateById(crmBanner);
if(b){
return ResultVo.ok();
}
else{
return ResultVo.error();
}
}
@DeleteMapping("remove/{id}")
@ApiOperation(value = "删除Banner")
public ResultVo remove(@PathVariable String id){
boolean b = crmBannerService.removeById(id);
if(b){
return ResultVo.ok();
}
else{
return ResultVo.error();
}
}
}
banner前台查询接口
@Autowired
private CrmBannerService bannerService;
//查询所有banner
@GetMapping("getAllBanner")
@ApiOperation(value = "获取首页banner")
public ResultVo getAllBanner(){
List<CrmBanner> list= bannerService.selectAllBanner();
return ResultVo.ok().data("list",list);
}
service
@Override
public List<CrmBanner> selectAllBanner() {
//根据id进行降序排序,显示排列之后的前两条记录
QueryWrapper<CrmBanner> queryWrapper = new QueryWrapper<>();
queryWrapper.orderByDesc("id");
queryWrapper.last("limit 2");
List<CrmBanner> list = baseMapper.selectList(null);
return list;
}
首页显示课程名师数据
后端
在service-edu模块的controller下面创建front包
@RestController
@CrossOrigin
@RequestMapping("/eduservice/indexfront")
public class IndexFrontController {
@Autowired
private EduCourseService courseService;
@Autowired
private EduTeacherService teacherService;
//查看前8条热门课程,查询前4条名师
@GetMapping("index")
public ResultVo index(){
QueryWrapper<EduCourse> courseQueryWrapper = new QueryWrapper<EduCourse>();
courseQueryWrapper.orderByDesc("id");
courseQueryWrapper.last("limit 8");
List<EduCourse> courseList = courseService.list(courseQueryWrapper);
QueryWrapper<EduTeacher> eduTeacherQueryWrapper = new QueryWrapper<>();
eduTeacherQueryWrapper.orderByDesc("id");
eduTeacherQueryWrapper.last("limit 4");
List<EduTeacher> teacherList= teacherService.list(eduTeacherQueryWrapper);
return ResultVo.ok().data("eduList",courseList).data("teacherList",teacherList);
}
}
前端
下载axios
npm install axios
封装axios
创建utils文件夹,utils下创建request.js
import axios from 'axios'
// 创建axios实例
const service = axios.create({
baseURL: 'http://localhost:9001', // api的base_url
timeout: 20000 // 请求超时时间
})
export default service
创建api文件夹,创建banner.js文件
import request from '@/utils/request'
export default {
//查询前两条banner数据
getListBanner() {
return request({
url: '/educms/bannerfront/getAllBanner',
method: 'get'
})
}
}
<template>
<div>
<!-- 幻灯片 开始 -->
<div v-swiper:mySwiper="swiperOption">
<div class="swiper-wrapper">
<div
v-for="banner in bannerList"
:key="banner.id"
class="swiper-slide"
style="background: #040b1b"
>
<a target="_blank" :href="banner.linkUrl">
<img :src="banner.imageUrl" :alt="banner.title" />
</a>
</div>
</div>
<div class="swiper-pagination swiper-pagination-white"></div>
<div
class="swiper-button-prev swiper-button-white"
slot="button-prev"
></div>
<div
class="swiper-button-next swiper-button-white"
slot="button-next"
></div>
</div>
<!-- 幻灯片 结束 -->
<div id="aCoursesList">
<!-- 网校课程 开始 -->
<div>
<section class="container">
<header class="comm-title">
<h2 class="tac">
<span class="c-333">热门课程</span>
</h2>
</header>
<div>
<article class="comm-course-list">
<ul class="of" id="bna">
<li v-for="course in eduList" :key="course.id">
<div class="cc-l-wrap">
<section class="course-img">
<img
:src="course.cover"
class="img-responsive"
:alt="course.title"
/>
<div class="cc-mask">
<a href="#" title="开始学习" class="comm-btn c-btn-1"
>开始学习</a
>
</div>
</section>
<h3 class="hLh30 txtOf mt10">
<a
href="#"
:title="course.title"
class="course-title fsize18 c-333"
>{
{
course.title }}</a
>
</h3>
<section class="mt10 hLh20 of">
<span
class="fr jgTag bg-green"
v-if="Number(course.price) === 0"
>
<i class="c-fff fsize12 f-fA">免费</i>
</span>
<span class="fl jgAttr c-ccc f-fA">
<i class="c-999 f-fA">9634人学习</i>
|
<i class="c-999 f-fA">9634评论</i>
</span>
</section>
</div>
</li>
</ul>
<div class="clear"></div>
</article>
<section class="tac pt20">
<a href="#" title="全部课程" class="comm-btn c-btn-2">全部课程</a>
</section>
</div>
</section>
</div>
<!-- /网校课程 结束 -->
<!-- 网校名师 开始 -->
<div>
<section class="container">
<header class="comm-title">
<h2 class="tac">
<span class="c-333">名师大咖</span>
</h2>
</header>
<div>
<article class="i-teacher-list">
<ul class="of">
<li v-for="teacher in teacherList" :key="teacher.id">
<section class="i-teach-wrap">
<div class="i-teach-pic">
<a href="/teacher/1" :title="teacher.name">
<img :alt="teacher.name" :src="teacher.avatar" />
</a>
</div>
<div class="mt10 hLh30 txtOf tac">
<a
href="/teacher/1"
:title="teacher.name"
class="fsize18 c-666"
>{
{
teacher.name }}</a
>
</div>
<div class="hLh30 txtOf tac">
<span class="fsize14 c-999">{
{
teacher.career }}</span>
</div>
<div class="mt15 i-q-txt">
<p class="c-999 f-fA">{
{
teacher.intro }}</p>
</div>
</section>
</li>
</ul>
<div class="clear"></div>
</article>
<section class="tac pt20">
<a href="#" title="全部讲师" class="comm-btn c-btn-2">全部讲师</a>
</section>
</div>
</section>
</div>
<!-- /网校名师 结束 -->
</div>
</div>
</template>
<script>
import banner from "@/api/banner";
import index from "@/api/index";
export default {
data() {
return {
swiperOption: {
//配置分页
pagination: {
el: ".swiper-pagination", //分页的dom节点
},
//配置导航
navigation: {
nextEl: ".swiper-button-next", //下一页dom节点
prevEl: ".swiper-button-prev", //前一页dom节点
},
},
//banner数组
bannerList: [],
eduList: [],
teacherList: [],
};
},
created() {
//调用查询banner的方法
this.getBannerList();
//调用查询热门课程和名师的方法
this.getHotCourseTeacher();
},
methods: {
//查询热门课程和名师
getHotCourseTeacher() {
index.getIndexData().then((response) => {
this.eduList = response.data.data.eduList;
this.teacherList = response.data.data.teacherList;
});
},
//查询banner数据
getBannerList() {
banner.getListBanner().then((response) => {
this.bannerList = response.data.data.list;
});
},
},
};
</script>
项目集成Redis
在common模块添加依赖
由于redis缓存是公共应用,所以我们把依赖与配置添加到了common模块下面,在common模块pom.xml下添加以下依赖
<!-- redis -->
<dependency>
<groupId>org.springframework.boot</groupId>
<artifactId>spring-boot-starter-data-redis</artifactId>
</dependency>
<!-- spring2.X集成redis所需common-pool2-->
<dependency>
<groupId>org.apache.commons</groupId>
<artifactId>commons-pool2</artifactId>
<version>2.6.0</version>
</dependency>
RedisConfig.java
package com.atguigu.servicebase.config;
import com.fasterxml.jackson.annotation.JsonAutoDetect;
import com.fasterxml.jackson.annotation.PropertyAccessor;
import com.fasterxml.jackson.databind.ObjectMapper;
import com.fasterxml.jackson.databind.jsontype.impl.LaissezFaireSubTypeValidator;
import org.springframework.cache.CacheManager;
import org.springframework.cache.annotation.CachingConfigurationSelector;
import org.springframework.cache.annotation.EnableCaching;
import org.springframework.context.annotation.Bean;
import org.springframework.context.annotation.Configuration;
import org.springframework.data.redis.cache.RedisCacheConfiguration;
import org.springframework.data.redis.cache.RedisCacheManager;
import org.springframework.data.redis.connection.RedisConnectionFactory;
import org.springframework.data.redis.core.RedisTemplate;
import org.springframework.data.redis.serializer.Jackson2JsonRedisSerializer;
import org.springframework.data.redis.serializer.RedisSerializationContext;
import org.springframework.data.redis.serializer.RedisSerializer;
import org.springframework.data.redis.serializer.StringRedisSerializer;
import java.time.Duration;
@Configuration
@EnableCaching //开启缓存
public class RedisConfig extends CachingConfigurationSelector {
@Bean
public RedisTemplate<String, Object> redisTemplate(RedisConnectionFactory factory) {
RedisTemplate<String, Object> template = new RedisTemplate<>();
RedisSerializer<String> redisSerializer = new StringRedisSerializer();
Jackson2JsonRedisSerializer jackson2JsonRedisSerializer = new Jackson2JsonRedisSerializer(Object.class);
ObjectMapper om = new ObjectMapper();
om.setVisibility(PropertyAccessor.ALL, JsonAutoDetect.Visibility.ANY);
om.activateDefaultTyping(LaissezFaireSubTypeValidator.instance,ObjectMapper.DefaultTyping.NON_FINAL);
jackson2JsonRedisSerializer.setObjectMapper(om);
template.setConnectionFactory(factory);
//key序列化方式
template.setKeySerializer(redisSerializer);
//value序列化
template.setValueSerializer(jackson2JsonRedisSerializer);
//value hashmap序列化
template.setHashValueSerializer(jackson2JsonRedisSerializer);
return template;
}
@Bean
public CacheManager cacheManager(RedisConnectionFactory factory) {
RedisSerializer<String> redisSerializer = new StringRedisSerializer();
Jackson2JsonRedisSerializer jackson2JsonRedisSerializer = new Jackson2JsonRedisSerializer(Object.class);
//解决查询缓存转换异常的问题
ObjectMapper om = new ObjectMapper();
om.setVisibility(PropertyAccessor.ALL, JsonAutoDetect.Visibility.ANY);
om.activateDefaultTyping(LaissezFaireSubTypeValidator.instance,ObjectMapper.DefaultTyping.NON_FINAL);
jackson2JsonRedisSerializer.setObjectMapper(om);
// 配置序列化(解决乱码的问题),过期时间600秒
RedisCacheConfiguration config = RedisCacheConfiguration.defaultCacheConfig()
.entryTtl(Duration.ofSeconds(600))
.serializeKeysWith(RedisSerializationContext.SerializationPair.fromSerializer(redisSerializer))
.serializeValuesWith(RedisSerializationContext.SerializationPair.fromSerializer(jackson2JsonRedisSerializer))
.disableCachingNullValues();
RedisCacheManager cacheManager = RedisCacheManager.builder(factory)
.cacheDefaults(config)
.build();
return cacheManager;
}
}
在接口中添加redis缓存
由于首页数据变化不是很频繁,而且首页访问量相对较大,所以我们有必要把首页接口数据缓存到redis缓存中,减少数据库压力和提高访问速度。
改造service-cms模块首页banner接口,首页课程与讲师接口类似
Spring Boot缓存注解
缓存@Cacheable
根据方法对其返回结果进行缓存,下次请求时,如果缓存存在,则直接读取缓存数据返回;如果缓存不存在,则执行方法,并把返回的结果存入缓存中。一般用在查询方法上。
查看源码,属性值如下:
| 属性/方法名 | 解释 |
|---|---|
| value | 缓存名,必填,它指定了你的缓存存放在哪块命名空间 |
| cacheNames | 与 value 差不多,二选一即可 |
| key | 可选属性,可以使用 SpEL 标签自定义缓存的key |
缓存@CachePut
使用该注解标志的方法,每次都会执行,并将结果存入指定的缓存中。其他方法可以直接从响应的缓存中读取缓存数据,而不需要再去查询数据库。一般用在新增方法上。
查看源码,属性值如下:
| 属性/方法名 | 解释 |
|---|---|
| value | 缓存名,必填,它指定了你的缓存存放在哪块命名空间 |
| cacheNames | 与 value 差不多,二选一即可 |
| key | 可选属性,可以使用 SpEL 标签自定义缓存的key |
缓存@CacheEvict
使用该注解标志的方法,会清空指定的缓存。一般用在更新或者删除方法上
查看源码,属性值如下
| 属性/方法名 | 解释 |
|---|---|
| value | 缓存名,必填,它指定了你的缓存存放在哪块命名空间 |
| cacheNames | 与 value 差不多,二选一即可 |
| key | 可选属性,可以使用 SpEL 标签自定义缓存的key |
| allEntries | 是否清空所有缓存,默认为 false。如果指定为 true,则方法调用后将立即清空所有的缓存 |
| beforeInvocation | 是否在方法执行前就清空,默认为 false。如果指定为 true,则在方法执行前就会清空缓存 |
启动redis服务
./redis-server myredisconfig/redisbak.conf
连接redis服务可能遇到的问题
1.关闭liunx防火墙
2.找到redis配置文件, 注释一行配置
# bind 127.0.0.1
3.修改protected-mode yes
改为
protected-mode no
4.设置为守护线程
daemonize yes
在service-cms模块配置文件添加redis配置
spring.redis.host=124.57.252.81
spring.redis.port=6379
spring.redis.database= 0
spring.redis.timeout=1800000
spring.redis.lettuce.pool.max-active=20
spring.redis.lettuce.pool.max-wait=-1
#最大阻塞等待时间(负数表示没限制)
spring.redis.lettuce.pool.max-idle=5
spring.redis.lettuce.pool.min-idle=0
修改CrmBannerServiceImpl,添加redis缓存注解
@Override
@Cacheable(value = "banner",key="'selectIndexList'")
public List<CrmBanner> selectAllBanner() {
//根据id进行降序排序,显示排列之后的前两条记录
QueryWrapper<CrmBanner> queryWrapper = new QueryWrapper<>();
queryWrapper.orderByDesc("id");
queryWrapper.last("limit 2");
List<CrmBanner> list = baseMapper.selectList(null);
return list;
}
用户登录业务
单点登录(Single Sign On),简称SSO. 用户只需要登陆一次就可以访问所有相互信任的应用系统
单点登录三种常见方式
- session广播机制实现
- 使用redis+cookie实现
- 使用token实现
session广播机制实现
其实就是session复制,从一个模块登录后,存入session复制到其他模块中,但是复制会消耗资源
适合模块数小的项目
使用redis+cookie实现
在项目中任何一个模块登录后,把数据存放到两个地方
1.redis 在key:生成唯一随机值(is,用户id等等),在value:用户数据
2.cookie:把redis里面生成key值放到cookie里面
访问项目其他模块,发送请求带着cookie进行发送,获取cookie值,拿着cookie做事,
把cookie获取值,到redis进行查询,根据key进行查询,如果查询到数据就是登陆
使用token实现
在项目某个模块进行登陆,登陆后,按照某种规则生成字符串,把登陆之后用户包含到生成字符串里面,把字符串返回
1.可以把字符串通过cookie返回
2.可以把支持通过地址栏返回
在去访问项目其他模块,每次访问在地址栏都带着生成字符串,在访问模块你获取地址栏字符串,根据字符串获取用户信息,如果获取到就是登陆
在common_utils模块中添加jwt工具依赖
<dependency>
<groupId>io.jsonwebtoken</groupId>
<artifactId>jjwt</artifactId>
<version>0.9.1</version>
</dependency>
创建JWT工具类
package com.atguigu.commonutils.utils;
import io.jsonwebtoken.Claims;
import io.jsonwebtoken.Jws;
import io.jsonwebtoken.Jwts;
import io.jsonwebtoken.SignatureAlgorithm;
import org.springframework.http.server.reactive.ServerHttpRequest;
import org.springframework.util.StringUtils;
import javax.servlet.http.HttpServletRequest;
import java.util.Date;
/**
* @author helen
* @since 2019/10/16
*/
public class JwtUtils {
public static final long EXPIRE = 1000 * 60 * 60 * 24;
public static final String APP_SECRET = "ukc8BDbRigUDaY6pZFfWus2jZWLPHO";
//生成token字符串的方法
public static String getJwtToken(String id, String nickname){
String JwtToken = Jwts.builder()
.setHeaderParam("typ", "JWT")
.setHeaderParam("alg", "HS256")
.setSubject("guli-user")
.setIssuedAt(new Date())
.setExpiration(new Date(System.currentTimeMillis() + EXPIRE))
.claim("id", id)//设置token主题部分,存储用户信息
.claim("nickname", nickname)
.signWith(SignatureAlgorithm.HS256, APP_SECRET)
.compact();
return JwtToken;
}
/**
* 判断token是否存在与有效
* @param jwtToken
* @return
*/
public static boolean checkToken(String jwtToken) {
if(StringUtils.isEmpty(jwtToken)) return false;
try {
Jwts.parser().setSigningKey(APP_SECRET).parseClaimsJws(jwtToken);
} catch (Exception e) {
e.printStackTrace();
return false;
}
return true;
}
/**
* 判断token是否存在与有效
* @param request
* @return
*/
public static boolean checkToken(HttpServletRequest request) {
try {
String jwtToken = request.getHeader("token");
if(StringUtils.isEmpty(jwtToken)) return false;
Jwts.parser().setSigningKey(APP_SECRET).parseClaimsJws(jwtToken);
} catch (Exception e) {
e.printStackTrace();
return false;
}
return true;
}
/**
* 根据token获取会员id
* @param request
* @return
*/
public static String getMemberIdByJwtToken(HttpServletRequest request) {
String jwtToken = request.getHeader("token");
if(StringUtils.isEmpty(jwtToken)) return "";
Jws<Claims> claimsJws = Jwts.parser().setSigningKey(APP_SECRET).parseClaimsJws(jwtToken);
Claims claims = claimsJws.getBody();
return (String)claims.get("id");
}
}
新建短信微服务
在service模块下创建子模块service-msm
创建controller和service代码
启动类
@SpringBootApplication(exclude = DataSourceAutoConfiguration.class)
@ComponentScan("com.atguigu")
public class MsmApplication {
public static void main(String[] args) {
SpringApplication.run(MsmApplication.class,args);
}
}
配置文件
# 服务端口
server.port=8005
# 服务名
spring.application.name=service-msm
# mysql数据库连接
spring.datasource.driver-class-name=com.mysql.cj.jdbc.Driver
spring.datasource.url=jdbc:mysql://localhost:3306/gulischool?serverTimezone=GMT%2B8
spring.datasource.username=root
spring.datasource.password=123456
# 环境设置:dev、test、prod
spring.profiles.active=dev
spring.cloud.nacos.discovery.server-addr=127.0.0.1:8848
spring.redis.host=123.57.252.81
spring.redis.port=6379
spring.redis.database= 0
spring.redis.timeout=1800000
spring.redis.lettuce.pool.max-active=20
spring.redis.lettuce.pool.max-wait=-1
#最大阻塞等待时间(负数表示没限制)
spring.redis.lettuce.pool.max-idle=5
spring.redis.lettuce.pool.min-idle=0
#最小空闲
#返回json的全局时间格式
spring.jackson.date-format=yyyy-MM-dd HH:mm:ss
spring.jackson.time-zone=GMT+8
#mybatis日志
mybatis-plus.configuration.log-impl=org.apache.ibatis.logging.stdout.StdOutImpl
在service-msm的pom中引入依赖
<dependencies>
<dependency>
<groupId>com.alibaba</groupId>
<artifactId>fastjson</artifactId>
</dependency>
<dependency>
<groupId>com.aliyun</groupId>
<artifactId>aliyun-java-sdk-core</artifactId>
</dependency>
</dependencies>
编写controller,根据手机号发送短信
生成验证码工具类
package com.atguigu.msmservice.utils;
import java.text.DecimalFormat;
import java.util.ArrayList;
import java.util.HashMap;
import java.util.List;
import java.util.Random;
/**
* 获取随机数
*
* @author qianyi
*
*/
public class RandomUtil {
private static final Random random = new Random();
private static final DecimalFormat fourdf = new DecimalFormat("0000");
private static final DecimalFormat sixdf = new DecimalFormat("000000");
public static String getFourBitRandom() {
return fourdf.format(random.nextInt(10000));
}
public static String getSixBitRandom() {
return sixdf.format(random.nextInt(1000000));
}
/**
* 给定数组,抽取n个数据
* @param list
* @param n
* @return
*/
public static ArrayList getRandom(List list, int n) {
Random random = new Random();
HashMap<Object, Object> hashMap = new HashMap<Object, Object>();
// 生成随机数字并存入HashMap
for (int i = 0; i < list.size(); i++) {
int number = random.nextInt(100) + 1;
hashMap.put(number, i);
}
// 从HashMap导入数组
Object[] robjs = hashMap.values().toArray();
ArrayList r = new ArrayList();
// 遍历数组并打印数据
for (int i = 0; i < n; i++) {
r.add(list.get((int) robjs[i]));
System.out.print(list.get((int) robjs[i]) + "\t");
}
System.out.print("\n");
return r;
}
}
@RestController
@CrossOrigin
@RequestMapping("/edumsm/msm")
public class MsmController {
@Autowired
private MsmService msmService;
@Autowired
private RedisTemplate<String,String> redisTemplate;
//发送短信的方法
@GetMapping("send/{phone}")
public ResultVo sendMsm(@RequestParam String phone){
//先从redis获取验证码,如果获取到直接返回
String code= redisTemplate.opsForValue().get(phone);
if(!StringUtils.isEmpty(code)){
return ResultVo.ok();
}
//如果redis获取不到,进行阿里云发送
//生成随机值,传递阿里云进行发送
code= RandomUtil.getFourBitRandom();
HashMap<Object, Object> param = new HashMap<>();
param.put("code",code);
//调用service发送短信的方法
boolean isSend=msmService.send(param,phone);
if(isSend){
redisTemplate.opsForValue().set(phone,code,5, TimeUnit.MINUTES);
return ResultVo.ok();
}
else{
return ResultVo.error().message("短信发送失败");
}
}
}
@Override
public boolean send(HashMap<Object, Object> param, String phone) {
if(StringUtils.isEmpty(phone)){
return false;
}
DefaultProfile profile = DefaultProfile.getProfile("cn-hangzhou", "<accessKeyId>", "<accessSecret>");//自己账号的AccessKey信息
IAcsClient client = new DefaultAcsClient(profile);
CommonRequest request = new CommonRequest();
request.setSysMethod(MethodType.POST);
request.setSysDomain("dysmsapi.aliyuncs.com");//短信服务的服务接入地址
request.setSysVersion("2017-05-25");//API的版本号
request.setSysAction("SendSms");//API的名称
request.putQueryParameter("PhoneNumbers", "1503871****");//接收短信的手机号码
request.putQueryParameter("SignName", "阿里大于测试专用");//短信签名名称
request.putQueryParameter("TemplateCode", "SMS_209335004");//短信模板ID
request.putQueryParameter("TemplateParam", JSONObject.toJSONString(param));//短信模板变量对应的实际值
try {
CommonResponse response = client.getCommonResponse(request);
System.out.println(response.getData());
boolean success = response.getHttpResponse().isSuccess();
return success;
} catch (ServerException e) {
e.printStackTrace();
} catch (ClientException e) {
e.printStackTrace();
}
return false;
}
登录和注册
在service模块下创建子模块service-ucenter
使用代码生成器生成代码
创建ucenter_member表
配置文件
# 服务端口
server.port=8006
# 服务名
spring.application.name=service-ucenter
# 环境设置:dev、test、prod
spring.profiles.active=dev
spring.cloud.nacos.discovery.server-addr=127.0.0.1:8848
# mysql数据库连接
spring.datasource.driver-class-name=com.mysql.cj.jdbc.Driver
spring.datasource.url=jdbc:mysql://localhost:3306/gulischool?serverTimezone=GMT%2B8
spring.datasource.username=root
spring.datasource.password=123456
spring.redis.host=123.57.252.81
spring.redis.port=6379
spring.redis.database= 0
spring.redis.timeout=1800000
spring.redis.lettuce.pool.max-active=20
spring.redis.lettuce.pool.max-wait=-1
#最大阻塞等待时间(负数表示没限制)
spring.redis.lettuce.pool.max-idle=5
spring.redis.lettuce.pool.min-idle=0
#最小空闲
#返回json的全局时间格式
spring.jackson.date-format=yyyy-MM-dd HH:mm:ss
spring.jackson.time-zone=GMT+8
#配置mapper xml文件的路径
mybatis-plus.mapper-locations=classpath:com/atguigu/educenter/mapper/xml/*.xml
#mybatis日志
mybatis-plus.configuration.log-impl=org.apache.ibatis.logging.stdout.StdOutImpl
创建启动类
@SpringBootApplication
@ComponentScan({
"com.atguigu"})
@MapperScan("com.atguigu.educenter.mapper")
public class UcenterApplication {
public static void main(String[] args) {
SpringApplication.run(UcenterApplication.class,args);
}
}
RegisterVo用于数据封装
@Data
@ApiModel(value="注册对象", description="注册对象")
public class RegisterVo {
@ApiModelProperty(value = "昵称")
private String nickname;
@ApiModelProperty(value = "手机号")
private String mobile;
@ApiModelProperty(value = "密码")
private String password;
@ApiModelProperty(value = "验证码")
private String code;
}
创建controller编写登录和注册方法
@RestController
@CrossOrigin
@RequestMapping("/educenter/member")
public class UcenterMemberController {
@Autowired
private UcenterMemberService memberService;
//登录
@PostMapping("/login")
public ResultVo login(@RequestBody UcenterMember member){
//调用service方法实现登录
//返回token值,使用jwt生成
String token=memberService.login(member);
return ResultVo.ok().data("token",token);
}
//注册
@PostMapping("register")
public ResultVo register(@RequestBody RegisterVo registerVo){
memberService.register(registerVo);
return ResultVo.ok();
}
//根据token获取用户信息
@GetMapping("getMemberInfo")
public ResultVo getMemberInfo(HttpServletRequest request){
//调用jwt工具类方法,根据request对象获取头信息,返回用户id
String id = JwtUtils.getMemberIdByJwtToken(request);
//查询数据库用户id获取用户信息
UcenterMember member = memberService.getById(id);
return ResultVo.ok().data("userIno",member);
}
}
创建service接口和实现类
@Service
public class UcenterMemberServiceImpl extends ServiceImpl<UcenterMemberMapper, UcenterMember> implements UcenterMemberService {
@Autowired
private RedisTemplate<String,String> redisTemplate;
//登录
@Override
public String login(UcenterMember member) {
String mobile = member.getMobile();
String password = member.getPassword();
//判断手机号和密码是否为空
if(StringUtils.isEmpty(mobile)||StringUtils.isEmpty(password)){
throw new GuliException(20001,"登录失败");
}
//判断手机号是否正确
QueryWrapper<UcenterMember> queryWrapper = new QueryWrapper<>();
queryWrapper.eq("mobile",mobile);
UcenterMember ucenterMember = baseMapper.selectOne(queryWrapper);
//判断查询对象是否为空
if(ucenterMember==null){
//没有这个手机号
throw new GuliException(20001,"登录失败");
}
//判断密码
//把输入的密码进行加密,再和数据库密码进行比较
if(!MD5.encrypt(password).equals(ucenterMember.getPassword())){
throw new GuliException(20001,"登录失败");
}
//判断用户是否禁用
if(ucenterMember.getIsDisabled()){
throw new GuliException(20001,"登录失败");
}
//登录成功
//生成token字符串,使用jwt工具类
String jwtToken = JwtUtils.getJwtToken(ucenterMember.getId(), ucenterMember.getNickname());
return jwtToken;
}
//注册
@Override
public void register(RegisterVo registerVo) {
//获取注册的数据
String code=registerVo.getCode();//验证码
String mobile = registerVo.getMobile(); //手机号
String nickname = registerVo.getNickname(); //昵称
String password = registerVo.getPassword(); //密码
//非空判断
if (StringUtils.isEmpty(mobile) || StringUtils.isEmpty(password) || StringUtils.isEmpty(code)||StringUtils.isEmpty(nickname)){
throw new GuliException(20001,"注册失败");
}
//判断验证码
//获取redis验证码
String rediscode = redisTemplate.opsForValue().get(mobile);
if(!code.equals(rediscode)){
throw new GuliException(20001,"注册失败");
}
//判断手机是否重复,表里面存在相同手机号不进行添加
QueryWrapper<UcenterMember> queryWrapper = new QueryWrapper<>();
queryWrapper.eq("mobile",mobile);
Integer count = baseMapper.selectCount(queryWrapper);
if(count>0){
throw new GuliException(20001,"注册失败");
}
UcenterMember ucenterMember = new UcenterMember();
ucenterMember.setMobile(mobile);
ucenterMember.setNickname(nickname);
ucenterMember.setPassword(MD5.encrypt(password));
ucenterMember.setIsDisabled(false);
ucenterMember.setAvatar("https://wpimg.wallstcn.com/f778738c-e4f8-4870-b634-56703b4acafe.gif");
baseMapper.insert(ucenterMember);
}
}