---恢复内容开始---
使用命令行打开Android 模拟器
使用android avd
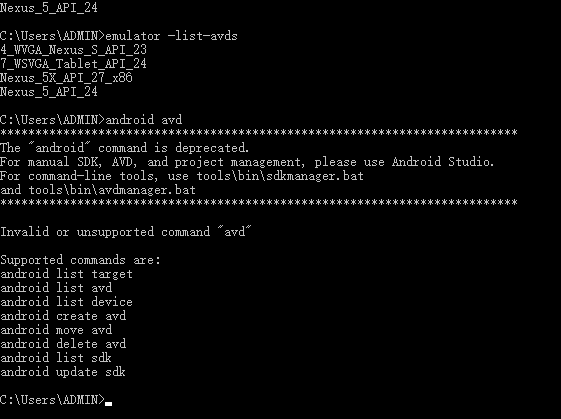
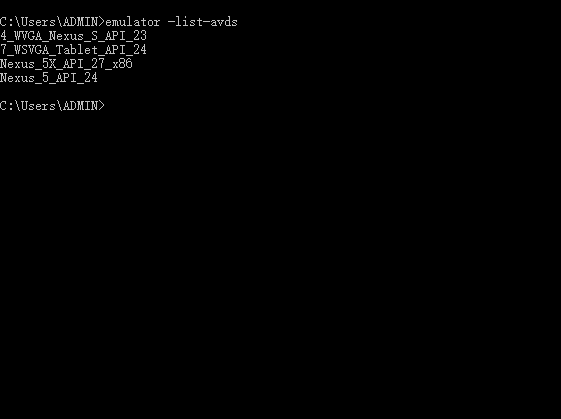
使用 emulator -list-avds
可以显示出所有可用模拟器类型
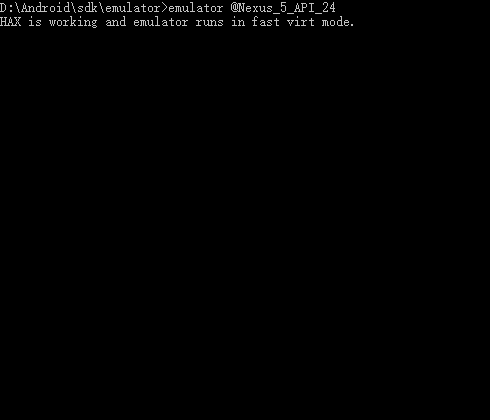
通过 emulator @模拟器名字
如emulator @Nexus_5_API_24 来启动模拟器
在 ios/AppDelegate.m 中声名根视图

[[RCTRootView alloc] initWithBundleURL:jsCodeLocation
                                                      moduleName:@"demo01"
                                               initialProperties:nil
                                                   launchOptions:launchOptions];
getInitialState 可以让我们创建React组件的初始化状态(state)
创建render函数前加上
getInitialState: function() {
   return {
         zip: ''
    };
}
紧接着 在<Text> 组件中的内容为this.state.zip
<Text style={styles.welcome}>
You input {this.state.zip}
<Text>
同样 需要一个TextInput 组件 进行输入
import React , {Component} from 'react';
import {
    StyleSheet,
    Text,
    View,
    TextInput,
    Image,
    TouchableOpacity,
    Alert
} from 'react-native';

class WeatherProject extends Component{
    constructor(props) {
        super(props);
        this.state = {
            showValue: ''
        }
    }
    showData() {
        alert(this.state.showValue); //展示输入框的内容
    }
    clickBtn(){
        Alert.alert(this.state.showValue);
    }
    render(){
        return (
            <View style={styles.container}>
                <Text style={styles.welcome}>
                    You input {
                        this.state.showValue
                    }
                </Text>
                < TextInput style = {
                    styles.input
                }
                onChangeText = {(text) =>
                    this.setState({
                        showValue: text
                    })
                } value={this.state.showValue}></TextInput>
                <TouchableOpacity onPress={() => this.clickBtn()}>
                    <View>
                        <Text>点击</Text>
                    </View>
                </TouchableOpacity>
            </View>
        )
    }
}

const styles={
    container: {
        flex: 1,
        justifyContent: 'center',
        alignItems: 'center',
        backgroundColor: '#f5fcff',
    },
    welcome: {
        fontSize: 20,
        textAlign: 'center',
        margin: 10
    },
    input: {
        fontSize: 20,
        borderWidth: 2,
        height: 40,
    }
}

export default WeatherProject;
TextInput 常用方法
class TextInputDemo extends React.Component {
// constructor(props) {
//   super(props);
//   this.state = { text: 'url Placeholder'};
// }
    _onChangeText(text) {
        console.log('_onChangeText called and text is', text);
    }

    _onChange(text) {
        console.log('_onChange called and text is', text);
    }

    _onEndEditing(text) {
        console.log('_onEndEditing called and text is', text);
    }

    _onFocus() {
        //点击某一个item,获得焦点就会调用这个方法
        console.log('_onFocus called');
    }

    _onSelectionChange(range) {
        //当在item中选择的位置发生变化时就会调用这个方法,比如第一次选择第二个字符的位置,第二次更改为点击第一个字符位置
        var rangeText = range;
        console.log('_onSelectionChange called and range is', rangeText);
    }

    _onSubmitEditing(text) {
        console.log('_onSubmitEditing called and text is', text);
    }

render() {
  return(
      <View>
      <TextInput
      ref = 'URLTEXTINPUT'
      style = {{height: 40, borderColor: 'gray', borderWidth: 1}}
      placeholder = 'URL'
      onChangeText={(text) => this._onChangeText(text)}
      onChange = {(event)=>this._onChange('onChange text: ' + event.nativeEvent.text)}
      //onEndEditing 在文本输入结束后会调用,时机为在某个框体内输入文字后选择键盘上的完成键或者输入文字后将焦点手动点换到其它item上,或者输入文字后选择return按钮来切换都会调用
      onEndEditing = {(event)=>this._onEndEditing('onEndEditing text: ' + event.nativeEvent.text)}
      //如果属性设置了clearTextOnFocus为true,意思是第二次回到同一个itme的时候自动清空里面的内容,那么onChangeText就不会被重新调用,那么保存的还是上一次的值。当判断值不为空的情况下就会出错。
      //这种情况下就需要判断onSelectionChange中的range是否为0来判断了
      clearTextOnFocus = {true}
      onFocus = {(event) =>this._onFocus}
      returnKeyType = 'next'
      onSelectionChange = {(event) =>this._onSelectionChange(event.nativeEvent.selection.start + event.nativeEvent.selection.end)}
      //此回调函数当软键盘的确定/提交按钮被按下的时候调用此函数。如果multiline={true},此属性不可用。还有就是输入文字后选择enter键也会调用此函数,和onEndEditing唯一不同的是,它在输入框
     // 焦点切换成另外一个输入框焦点时候不会被调用
     //所以如果想实现类似选择next按钮后将焦点自动切换到下一个item项的功能就可以在这个回调函数中实现
      onSubmitEditing = {(event)=>this.refs.USERNAMETEXTINPUT.focus()}
      />

    <TextInput
    ref = 'USERNAMETEXTINPUT'
    style = {{height: 40, borderColor: 'gray', borderWidth: 1}}
    placeholder = 'Username'
    //当文本框内容变化的时候调用此回调函数,改变后的文字内容会作为参数来传递, onChange一样的情况调用,唯一不同的是参数不支持直接的text字符串来传递而已
    onChangeText={(text) => this._onChangeText(text)}
    onChange = {(event)=>this._onChange('onChange text: ' + event.nativeEvent.text)}
    onEndEditing = {(event)=>this._onEndEditing('onEndEditing text: ' + event.nativeEvent.text)}
    //如果属性设置了clearTextOnFocus为true,意思是第二次回到同一个itme的时候自动清空里面的内容,那么onChangeText就不会被重新调用,那么保存的还是上一次的值。当判断值不为空的情况下就会出错。
    //这种情况下就需要判断onSelectionChange中的range是否为0来判断了
    clearTextOnFocus = {true}
    onFocus = {(event) =>this._onFocus}
    returnKeyType = 'next'
    //onSelectionChange 当在文本框中的选择内容发生变化的时候会调用这个方法, 简单点儿就是光标位置和上次不同,就会调用。 调用时机包括: 选择文本, 长点击重新定位光标位置, 输入和删除文字, 光标focus到不同的item时
    //这个特性就可以使用在一种使用场景下,比如 设置了clearTextOnFocus = {true}属性,清空内容后选择登录按钮,此时需要监测各个输入框是否已经有内容,那么用textchange之类的是无法判断出来的,
    onSelectionChange = {(event) =>this._onSelectionChange(event.nativeEvent.selection.start + event.nativeEvent.selection.end)}
    onSubmitEditing = {(event)=>this.refs.PASSWORDTEXTINPUT.focus()}
/>

    <TextInput
    ref = 'PASSWORDTEXTINPUT'
    style = {{height: 40, borderColor: 'gray', borderWidth: 1}}
    placeholder = 'Password'
    onChangeText={(text) => this._onChangeText(text)}
    onChange = {(event)=>this._onChange('onChange text: ' + event.nativeEvent.text)}
    onEndEditing = {(event)=>this._onEndEditing('onEndEditing text: ' + event.nativeEvent.text)}
    //如果属性设置了clearTextOnFocus为true,意思是第二次回到同一个itme的时候自动清空里面的内容,那么onChangeText就不会被重新调用,那么保存的还是上一次的值。当判断值不为空的情况下就会出错。
    //这种情况下就需要判断onSelectionChange中的range是否为0来判断了。如果使用其它的例如changetext方法来判断结果会得到上次存储的结果,因为这种情况下是不会调用诸如此类text改变的方法的
    clearTextOnFocus = {true}
    onFocus = {(event) =>this._onFocus}
    enablesReturnKeyAutomatically = {true}
    returnKeyType = 'go'
    onSelectionChange = {(event) =>this._onSelectionChange(event.nativeEvent.selection.start + event.nativeEvent.selection.end)}
    onSubmitEditing = {(event)=>this._onSubmitEditing('onSubmitEditing text: ' + event.nativeEvent.text)}

/>

    </View>
  );
}
}
展现数据
this.state = {
            showValue: '',
            forecast: {
                main: 'Clouds',
                description: 'few clouds',
                temp: 30
            }
        }
import React , {Component} from 'react';
import {StyleSheet , Text , View } from 'react-native';

class Forecast extends Component{
    render(){
        return(
            <View>
                <Text style={styles.bigText}>
                    {this.props.main}
                </Text>
                <Text style={styles.mainText}>
                    Current conditions: {this.props.description}
                </Text>
                <Text style={styles.bigText}>
                    {this.props.temp} ℃
                </Text>
            </View>
        )
    }
}

var styles = StyleSheet.create({
    bigText: {
        fontSize: 20,
        textAlign: 'center',
        margin: 10,
        color: '#FFFFFF'
    },
    mainText: {
        fontSize: 16,
        textAlign: 'center',
        color: '#FFFFFF'
    }
})

export default Forecast;
<Forecast main={this.state.forecast.main} description={this.state.forecast.description} temp={this.state.forecast.temp}/>
import React , {Component} from 'react';
import {
    StyleSheet,
    Text,
    View,
    TextInput,
    Image,
    TouchableOpacity,
    Alert
} from 'react-native';
import Forecast from './Forecast';

class WeatherProject extends Component{
    constructor(props) {
        super(props);
        this.state = {
            showValue: '',
            forecast: {
                main: 'Clouds',
                description: 'few clouds',
                temp: 30
            }
        }
    }
    showData() {
        alert(this.state.showValue); //展示输入框的内容
    }
    clickBtn(){
        Alert.alert(this.state.showValue);
    }
    render(){
        return (
            <View style={styles.container}>
                <Text style={styles.welcome}>
                    You input {
                        this.state.showValue
                    }
                </Text>
                <Forecast main={this.state.forecast.main} description={this.state.forecast.description} temp={this.state.forecast.temp}/>
                < TextInput style = {
                    styles.input
                }
                onChangeText = {(text) =>
                    this.setState({
                        showValue: text
                    })
                } value={this.state.showValue}></TextInput>
                <TouchableOpacity onPress={() => this.clickBtn()}>
                    <View style={styles.searchBtn}>
                        <Text>点击</Text>
                    </View>
                </TouchableOpacity>
            </View>
        )
    }
}

const styles={
    container: {
        flex: 1,
        justifyContent: 'center',
        alignItems: 'center',
        backgroundColor: '#4D4D4D',
    },
    welcome: {
        fontSize: 20,
        textAlign: 'center',
        margin: 10
    },
    input: {
        width: 234,
        fontSize: 20,
        borderWidth: 2,
        height: 40,
    },
    searchBtn:{
        padding: 3,
    }
}

export default WeatherProject;
添加背景图片
使用 ImageBackground组件
ImageBackground
import {
    StyleSheet,
    Text,
    View,
    TextInput,
    Image,
    TouchableOpacity,
    Alert,
    ImageBackground
} from 'react-native';
<ImageBackground source={require('./images/bg.png')} resizeModel='cover' style={styles.backdrop}>
.......
</ImageBackground>
import React , {Component} from 'react';
import {
    StyleSheet,
    Text,
    View,
    TextInput,
    Image,
    TouchableOpacity,
    Alert,
    ImageBackground
} from 'react-native';
import Forecast from './Forecast';

class WeatherProject extends Component{
    constructor(props) {
        super(props);
        this.state = {
            showValue: '',
            forecast: {
                main: 'Clouds',
                description: 'few clouds',
                temp: 30
            }
        }
    }
    showData() {
        alert(this.state.showValue); //展示输入框的内容
    }
    clickBtn(){
        Alert.alert(this.state.showValue);
    }
    render(){
        return (
            <ImageBackground source={require('./images/bg.png')} resizeModel='cover' style={styles.backdrop}>
                <View style={styles.container}>
                    <Text style={styles.welcome}>
                        You input {
                            this.state.showValue
                        }
                    </Text>
                    <Forecast main={this.state.forecast.main} description={this.state.forecast.description} temp={this.state.forecast.temp}/>
                    < TextInput style = {
                        styles.input
                    }
                    onChangeText = {(text) =>
                        this.setState({
                            showValue: text
                        })
                    } value={this.state.showValue}></TextInput>
                    <TouchableOpacity onPress={() => this.clickBtn()}>
                        <View style={styles.searchBtn}>
                            <Text>点击</Text>
                        </View>
                    </TouchableOpacity>
                </View>
            </ImageBackground>
        )
    }
}

const styles={
    container: {
        flex: 1,
        justifyContent: 'center',
        alignItems: 'center',
    },
    backdrop: {
        flex: 1,
        flexDirection: 'column',
    },
    welcome: {
        fontSize: 20,
        textAlign: 'center',
        margin: 10
    },
    input: {
        width: 234,
        fontSize: 20,
        borderWidth: 2,
        height: 40,
    },
    searchBtn:{
        padding: 3,
    }
}

export default WeatherProject;
从web获取数据
使用fetch接口
fetch('http://www.baidu.com').then((response) => response.text()).then((responseText) => {console.log(responseText);})
fetch('http://tj.nineton.cn/Heart/index/all?city=CHSH000000').then((response) => response.json()).then((responseJSON) => {
            console.log(responseJSON.weather[0].now);
            this.setState({
                forecast: {
                    main: responseJSON.weather[0].city_name,
                    description: responseJSON.weather[0].now.text,
                    temp: responseJSON.weather[0].now.temperature
                }
            })
        }).then((error) => {
            console.log(error);
        })
import React , {Component} from 'react';
import {
    StyleSheet,
    Text,
    View,
    TextInput,
    Image,
    TouchableOpacity,
    Alert,
    ImageBackground
} from 'react-native';
import Forecast from './Forecast';

class WeatherProject extends Component{
    constructor(props) {
        super(props);
        this.state = {
            showValue: '',
            forecast: {
                main: '-',
                description: '-',
                temp: ''
            }
        }
    }
    clickBtn(){
        // Alert.alert(this.state.showValue);
        var city = this.state.showValue;
        fetch('http://tj.nineton.cn/Heart/index/all?city=CH' + city).then((response) => response.json()).then((responseJSON) => {
            console.log(responseJSON.weather[0].now);
            this.setState({
                forecast: {
                    main: responseJSON.weather[0].city_name,
                    description: responseJSON.weather[0].now.text,
                    temp: responseJSON.weather[0].now.temperature
                }
            })
        }).then((error) => {
            console.log(error);
        })
    }
    render(){
        return (
            <ImageBackground source={require('./images/bg.png')} resizeModel='cover' style={styles.backdrop}>
                <View style={styles.container}>
                    <Text style={styles.welcome}>
                        You input {
                            this.state.showValue
                        }
                    </Text>
                    <Forecast main={this.state.forecast.main} description={this.state.forecast.description} temp={this.state.forecast.temp}/>
                    < TextInput underlineColorAndroid='transparent' style = {
                        styles.input
                    }
                    onChangeText = {(text) =>
                        this.setState({
                            showValue: text
                        })
                    } value={this.state.showValue}></TextInput>
                    <TouchableOpacity onPress={() => this.clickBtn()}>
                        <View style={styles.searchBtn}>
                            <Text style={styles.searchBtnText}>Search</Text>
                        </View>
                    </TouchableOpacity>
                </View>
            </ImageBackground>
        )
    }
}

const styles={
    container: {
        flex: 1,
        justifyContent: 'center',
        alignItems: 'center',
    },
    backdrop: {
        flex: 1,
        flexDirection: 'column',
    },
    welcome: {
        fontSize: 20,
        textAlign: 'center',
        margin: 10
    },
    input: {
        width: 234,
        fontSize: 20,
        borderBottomWidth: 0.5,
        borderBottomColor: '#fff',
        height: 40,
    },
    searchBtn:{
        padding: 10,
    },
    searchBtnText:{
        fontSize: 18,
        color: '#fff',
    }
}

export default WeatherProject;