一、过滤器
Vue.js 允许你自定义过滤器,可被用于一些常见的文本格式化。过滤器可以用在两个地方:双花括号插值和 v-bind 表达式 (后者从 2.1.0+ 开始支持)。过滤器应该被添加在 JavaScript 表达式的尾部,由“管道”符号指示:
{

   { 变量       |        格式化函数   }}
          管道符号

<!-- 在双花括号中 -->
{

   { message | capitalize }}

<!-- 在 `v-bind` 中 -->
<div v-bind:id="rawId | formatId"></div>
范例:显示价格使用货币符号
1.1 你可以在一个组件的选项中定义本地的过滤器:
<div >
	{

    {

    item.price | currency() }}
</div>

filters: {


  currency: function (value) {


    if (!value) return "";

    return    "¥" + value  ;
  }
}
1.2 在创建 Vue 实例之前全局定义过滤器
<div >
	{

    {

    item.name}}- {

    {

    item.price | currency('$') }}
</div>


Vue.filter("currency", function (value,symbol = '¥') {


	if (!value) return "";
	return    symbol + value  ;
});
二、自定义指令
除了核心功能默认内置的指令 (v-model 和 v-show),Vue 也允许注册自定义指令。注意,在 Vue2.0 中,代码复用和抽象的主要形式是组件。然而,有的情况下,你仍然需要对普通 DOM 元素进行底层操作,这时候就会用到自定义指令。
通常情况下,没有必要自定义指令
但是在一些特别的情况下是需要的,
比如说我们有一些复用的功能
这些复用的功能是对普通 DOM元素进行底层操作的时候

vue从设计理念来讲是对数据驱动,尽量情况下不要对接触底层DOM操作
如果要做,最好用自定义指令去做这个事情
范例:输入框获得焦点
<input type="text" ref="inp" />

<script>
const app = new Vue({


	el: "#app",
	mounted () {


		this.$refs.inp.focus(); //可以自动获得焦点,但是不能复用
	},
});
</script>
自定义指令的方式去实现
	//实现自定义指令
	//注册一个全局自定义指令 `v-focus`
	Vue.directive("focus", {


		// 当被绑定的元素插入到 DOM 中时……
		inserted(el) {


			// 聚焦元素
			el.focus();
		},
	});
使用,v-focus
<input type="text" ref="inp" v-focus />
范例:按钮权限控制
//模拟一个用户的角色
const role = "admin";
//v-permission="'admin'"
Vue.directive("permission", {
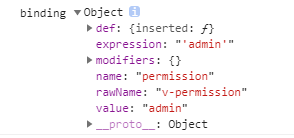
inserted(el,binding) {
console.log("binding",binding);
//若指定的用户角色和当前用户角色不匹配则删除当前指令绑定的元素
//el: .toolbar
if(role !== binding.value){
el.parentElement.removeChild(el)//找到老爹把自己移除
}
},
});
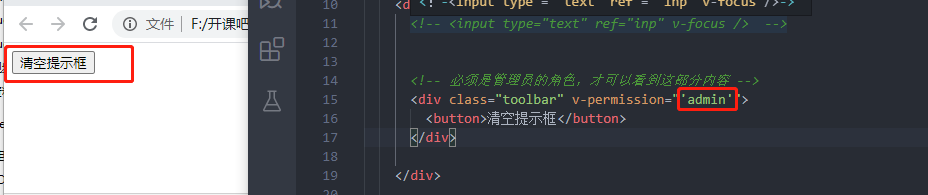
 <!-- 必须是管理员的角色,才可以看到这部分内容 -->
<div class="toolbar" v-permission="'admin'">
	<button>清空提示框</button>
</div>
结果:

打印的binding

三、渲染函数
Vue 推荐在绝大多数情况下使用模板来创建你的 HTML。然而在一些场景中,你真的需要 JavaScript 的完全编程的能力。这时你可以用渲染函数,它比模板更接近编译器。
3.1 基础
 render: function (createElement) {


    // createElement函数返回结果是VNode

    return createElement(
      tag,	   //标签名称
      data,    //传递数据
      children //子节点数组
    )
  }
范例:用render实现heading组件
 <!-- 使用render方法实现heading组件 -->
 <heading :title="title" level="1"  > {

   {title}} </heading>
//heading组件
// <heading    :title="title"  icon="cart" > {

    {title}}</heading>
// <h2 title="">  {

    {title}} </h2>

Vue.component("heading", {


	props: {


		level: {


			 type: String,
			 required: true,
		},
		title: {


			 type: String,
			 default: "",
		},
	},
	render(h) {


		const vnode = h(
		 "h" + this.level, //参数1:tagname
		 this.$slots.default //参数3:子节点数组

		);

		console.log(vnode);
		return vnode;
	},
});
3.2 虚拟DOM
Vue 通过建立一个虚拟 DOM 来追踪自己要如何改变真实 DOM。
范例:输出虚拟DOM观察期结构
	const vnode = h(
		"h" + this.level, //参数1:tagname
		{

     attrs: {

     title: this.title } }, //参数2 { ...  }   //之前省略了title的处理
		this.$slots.default //参数3:子节点数组
	);

	console.log(vnode);

3.3 createElement参数
接下来你需要熟悉的是如何在 createElement 函数中使用模板中的那些功能。这里是 createElement 接受的参数:
// @returns {VNode}
createElement(
  // {String | Object | Function}
  // 一个 HTML 标签名、组件选项对象,或者
  // resolve 了上述任何一种的一个 async 函数。必填项。
  'div',

  // {Object}
  // 一个与模板中 attribute 对应的数据对象。可选。
  {


    // (详情见下一节)
  },

  // {String | Array}
  // 子级虚拟节点 (VNodes),由 `createElement()` 构建而成,
  // 也可以使用字符串来生成“文本虚拟节点”。可选。
  [
    '先写一些文字',
    createElement('h1', '一则头条'),
    createElement(MyComponent, {


      props: {


        someProp: 'foobar'
      }
    })
  ]
)
范例:处理title、添加icon
<!-- 使用render方法实现heading组件 -->
<heading :title="title" level="1"  icon="iconcart"> {

   {title}} </heading>
//heading组件
// <heading    :title="title"  icon="cart" > {

    {title}}</heading>
// <h2 title="">  <svg> <use xlink:href="#icon-cart"></svg>  </h2>

Vue.component("heading", {


	props: {


		level: {


			type: String,
			required: true,
		},
		title: {


			type: String,
			default: "",
		},
		icon: String,
	},
	render(h) {


		//子节点数组
		let children = [];

		//icon属性处理逻辑
		if (this.icon) {


			//<svg> <use xlink:href="#icon-cart"></svg>
			children.push(
				h(
				"svg", //参数1:tagname
				{

    class: "icon"}, //参数2
				[h("use", {

     attrs: {

     "xlink:href": "#" + this.icon } })]
				)
			);
		}

		//将 icon 拼接 默认插槽的内容  this.$slots.default
		children = children.concat(this.$slots.default);

		const vnode = h(
				"h" + this.level, //参数1:tagname
				{

     attrs: {

     title: this.title } }, //参数2 { ...  }
				// this.$slots.default //参数3:子节点数组
				children
		);

		console.log(vnode);
		return vnode;
	}
});
结果

图标iconfont
1.选择加入购物车

2.点击购物车,添加至项目

3.点击更新代码
使用symbol

4.将地址复制到地址栏


5.用法
下载至本地

打开demo_index.html文件

三种方式的用法

3.4 函数式组件
组件没有管理任何状态,也没有监听任何传递给它的状态,也没有生命周期方法时,可以将组件标记为 functional,这意味它无状态 (没有 响应式数据),也没有实例 (没有 this 上下文)。
//函数式组件
//1. functional: true,
//2. render中接受一个上下文
// 为了弥补缺少的实例
// 提供第二个参数作为上下文
//3.属性获取的变更
//  //属性获取
// const {level,title,icon} = context.props;
//所有涉及到this都要修改

Vue.component("heading", {


	functional: true,
	props: {


		level: {


			type: String,
			required: true,
		},
		title: {


			type: String,
			default: "",
		},
		icon: String,
	},
	render(h,context) {


		//子节点数组
		let children = [];

		console.log(context)
		//属性获取
		const {

    level,title,icon} = context.props;

		//icon属性处理逻辑
		if (icon) {


			children.push(
				h(
				"svg",
				{


					class: "icon",
				},
				[  h("use", {

     attrs: {

     "xlink:href": "#" + icon } })  ]
				)
			);
		}


		//children = children.concat(this.$slots.default);
		children = children.concat(context.children);

		const vnode = h(
			"h" + this.level,
			{


				attrs: {

     title: title },
			},

			children
		);
		console.log(vnode);
		return vnode;
	},
});
四、混入
混入 (mixin) 提供了一种非常灵活的方式,来分发 Vue 组件中的可复用功能。一个混入对象可以包含任意组件选项。当组件使用混入对象时,所有混入对象的选项将被“混合”进入该组件本身的选项。
<message> 新增成功! </message>
<message> hello </message>
//1.定义一个混入对象
//混入:组件的各种选项都可以设置
const helloMixin = {


	data() {


		return {


			helloMixin: 'helloMixin',
		};
	},
	created() {


		//this表示组件实例
		this.hello();
	},
	methods: {


		hello() {


			console.log("say hello form mixin");
		},
	},
};


//2.定义一个使用混入对象的组件
//弹窗组件
Vue.component("message", {


	mixins: [helloMixin], //按顺序做多个混入

});
结果:

设计思想
比如说在这个组件中,有一个方法,
这个方法很常用,
除了当前组件,另外的几个组件中也会用
怎么做?能不能把这个方法提取出来,放在一个公用的地方
将来,大家想用的时候,就把它注入进来直接用

我们用import的方式 或者 script的方式引入。
这样存在一致性问题,你只能调用这个方法名,
而且,要把当前的实例传进入,才能去操作它


混入就比较漂亮
这种方式可以保证一致性
自定义选项合并策略
const helloMixin = {


	data() {


		return {


			helloMixin: 'helloMixin',
		};
	},
};

//弹窗组件
Vue.component("message", {


	mixins: [helloMixin], //按顺序做多个混入

	created() {


		//this表示组件实例
		this.hello2();
	},
	methods: {


		hello2() {


			console.log(this.helloMixin);
		},
	},

});

五、插件
插件通常用来为 Vue 添加全局功能。插件的功能范围没有严格的限制——一般有下面几种:
1.添加全局方法或者 property。如: vue-custom-element
2.添加全局资源:指令/过滤器/过渡等。如 vue-touch
3.通过全局混入来添加一些组件选项。如 vue-router
4.添加 Vue 实例方法,通过把它们添加到 Vue.prototype 上实现。
5.一个库,提供自己的 API,同时提供上面提到的一个或多个功能。如 vue-router
5.1 开发插件
Vue.js 的插件应该暴露一个 install 方法。这个方法的第一个参数是 Vue 构造器,第二个参数是一个可选的选项对象:
MyPlugin.install = function (Vue, options) {


  // 1. 添加全局方法或 property
  Vue.myGlobalMethod = function () {


    // 逻辑...
  }

  // 2. 添加全局资源
  Vue.directive('my-directive', {


    bind (el, binding, vnode, oldVnode) {


      // 逻辑...
    }
    ...
  })

  // 3. 注入组件选项
  Vue.mixin({


    created: function () {


      // 逻辑...
    }
    ...
  })

  // 4. 添加实例方法
  Vue.prototype.$myMethod = function (methodOptions) {


    // 逻辑...
  }
}
范例:修改heading组件为插件
//插件需要实现install
const MyPlugin = {


    install(Vue, options){


      Vue.component("heading", {

    ......});
    }
}


if (typeof window !== 'undefined' && window.Vue) {


    // 使用插件使用Vue.use()
    window.Vue.use(MyPlugin)
}
结果:
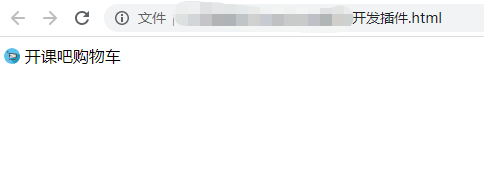
5.2 插件使用
使用Vue.use即可引入插件
Vue.use(MyPlugin);
