Hardhat是一个便于在以太坊上进行构建的开发环境。它帮助开发人员管理和自动化构建智能合约和dApp的过程中固有的重复任务,以及轻松地围绕此工作流程引入更多功能,并且内置了开发专用以太坊网络,这意味着从根本上进行编译和测试。本教程涵盖从Hardhat开发环境配置到以太坊智能合约部署的完整流程,适合正在准备从头开始快速构建以太坊项目的开发者。

用自己熟悉的语言学习 以太坊DApp开发 :Java | Php | Python | .Net / C# | Golang | Node.JS | Flutter / Dart
在本教程中,我们将指导你完成以下操作:
- 为以太坊开发设置Node.js环境
- 创建和配置Hardhat项目
- 实现令牌的Solidity智能合约的基础
- 使用Ethers.js和Waffle为合同编写自动化测试
- 使用Hardhat Network调试Solidity
- 将你的合约部署到Hardhat网络和以太坊测试网
1、Hardhat开发环境搭建
大多数以太坊库和工具都是用JavaScript编写的,Hardhat也是如此。Node.js是基于Chrome的V8 JavaScript引擎构建的JavaScript运行时。它是在Web浏览器之外运行JavaScript的最受欢迎的解决方案,而Hardhat则建立在此之上。
如果已经安装了Node.js>=12.0,则可以跳过本节。如果没有,请按照以下步骤在Ubuntu,MacOS和Windows上安装它。
Linux :
将以下命令复制并粘贴到终端中:
sudo apt update
sudo apt install curl git
curl -sL https://deb.nodesource.com/setup_12.x | sudo -E bash -
sudo apt install nodejs
如果你的Node.js版本早于12.0,请按照以下说明进行升级:
- 在终端中运行以删除Node.js:
sudo apt remove nodejs - 在此处找到要安装的Node.js版本,然后按照说明进行操作。
- 在终端中运行
sudo apt update && sudo apt install nodejs,以再次安装Node.js。
MacOS :
确保已安装git。否则,请按照以下说明进行操作。
在MacOS上有多种安装Node.js的方法。我们将使用Node Version Manager(nvm)。将以下命令复制并粘贴到终端中:
curl -o- https://raw.githubusercontent.com/creationix/nvm/v0.35.2/install.sh | bash
nvm install 12
nvm use 12
nvm alias default 12
npm install npm --global # Upgrade npm to the latest version
如果你的Node.js版本早于12.0,可以使用nvm更改Node.js版本。要升级到Node.js 12.x,请在终端中运行以下命令:
nvm install 12
nvm use 12
nvm alias default 12
npm install npm --global # Upgrade npm to the latest version
Windows :
在Windows上安装Node.js需要一些手动步骤。我们将安装git,Node.js 12.x和npm。下载并运行以下命令:
如果你的Node.js版本早于12.0,只能按上述步骤重新安装,你可以在此处
查看所有可用版本的列表。
2、创建一个新的Hardhat项目
我们将使用npm CLI安装安全帽。npm是node.js的包管理器和JavaScript代码在线仓库。
打开一个新的终端并运行以下命令:
mkdir hardhat-tutorial
cd hardhat-tutorial
npm init --yes
npm install --save-dev hardhat
由于上述过程将安装一些依赖包,因此请耐心等待。
安装完毕后,在安装Hardhat的目录中运行:
npx hardhat
用键盘选择Create an empty hardhat.config.js,然后按Enter:
$ npx hardhat
888    888                      888 888               888
888    888                      888 888               888
888    888                      888 888               888
8888888888  8888b.  888d888 .d88888 88888b.   8888b.  888888
888    888     "88b 888P"  d88" 888 888 "88b     "88b 888
888    888 .d888888 888    888  888 888  888 .d888888 888
888    888 888  888 888    Y88b 888 888  888 888  888 Y88b.
888    888 "Y888888 888     "Y88888 888  888 "Y888888  "Y888

Welcome to Hardhat v2.0.0

? What do you want to do? …
  Create a sample project
> Create an empty hardhat.config.js
  Quit
当Hardhat运行时,它将从当前工作目录开始搜索最近的hardhat.config.js文件。该文件通常位于项目的根目录中,并且一个空白hardhat.config.js足以使Hardhat正常工作。整个安装过程都包含在此文件中。
Hardhat是围绕任务和插件的概念设计的。Hardhat的功能大部分来自插件,作为开发人员,你可以自由选择要使用的插件。
任务 :
每次从CLI运行Hardhat时,你都在运行任务。例如npx hardhat compile正在运行compile任务。要查看项目中当前可用的任务,请运行npx hardhat。运行npx hardhat help [task]可以查看任务的帮助信息。
插件 :
在最终使用哪种工具方面,Hardhat并未受到质疑,但它确实具有一些内置默认值。所有这些都可以覆盖。大多数时候,使用给定工具的方法是使用将其集成到Hardhat中的插件。
在本教程中,我们将使用Ethers.js和Waffle插件。他们将允许你与以太坊进行交互并测试你的合约。稍后我们将解释它们的用法。要安装它们,请在你的项目目录中运行:
npm install --save-dev @nomiclabs/hardhat-ethers ethers @nomiclabs/hardhat-waffle ethereum-waffle chai
将突出显示的行添加到你的hardhat.config.js中,使其如下所示:
require("@nomiclabs/hardhat-waffle");

/**
 * @type import('hardhat/config').HardhatUserConfig
 */
module.exports = {
  solidity: "0.7.3",
};
4、开发、编译智能合约
我们将创建一个简单的智能合约,该合约实现可以转让的代币。代币合约最常用于交换或存储价值。在本教程中,我们不会深入探讨合约的Solidity代码,但是我们实现了一些你应该知道的逻辑:
- 有固定的代币总供应量,无法更改。
- 整个供应都分配给部署合约的地址。
- 任何人都可以接收代币。
- 拥有至少一个代币的任何人都可以转让代币。
你可能听说过ERC20,这是以太坊中的代币标准。DAI,USDC,MKR和ZRX之类的代币都遵循ERC20标准,使它们可以与任何可以处理ERC20代币的软件兼容。为了简单起见,我们要构建的代币不是ERC20。
TIPS:可以使用TokenDIY在以太坊、币安智能链或火币生态链上一键发币。
首先创建一个名为contracts的新目录,然后该目录内创建一个文件Token.sol。
将下面的代码粘贴到文件中,花一点时间阅读代码。它很简单,并且包含了解释Solidity基础知识的注释。
// Solidity files have to start with this pragma.
// It will be used by the Solidity compiler to validate its version.
pragma solidity ^0.7.0;


// This is the main building block for smart contracts.
contract Token {
    // Some string type variables to identify the token.
    // The `public` modifier makes a variable readable from outside the contract.
    string public name = "My Hardhat Token";
    string public symbol = "MBT";

    // The fixed amount of tokens stored in an unsigned integer type variable.
    uint256 public totalSupply = 1000000;

    // An address type variable is used to store ethereum accounts.
    address public owner;

    // A mapping is a key/value map. Here we store each account balance.
    mapping(address => uint256) balances;

    /**
     * Contract initialization.
     *
     * The `constructor` is executed only once when the contract is created.
     */
    constructor() {
        // The totalSupply is assigned to transaction sender, which is the account
        // that is deploying the contract.
        balances[msg.sender] = totalSupply;
        owner = msg.sender;
    }

    /**
     * A function to transfer tokens.
     *
     * The `external` modifier makes a function *only* callable from outside
     * the contract.
     */
    function transfer(address to, uint256 amount) external {
        // Check if the transaction sender has enough tokens.
        // If `require`'s first argument evaluates to `false` then the
        // transaction will revert.
        require(balances[msg.sender] >= amount, "Not enough tokens");

        // Transfer the amount.
        balances[msg.sender] -= amount;
        balances[to] += amount;
    }

    /**
     * Read only function to retrieve the token balance of a given account.
     *
     * The `view` modifier indicates that it doesn't modify the contract's
     * state, which allows us to call it without executing a transaction.
     */
    function balanceOf(address account) external view returns (uint256) {
        return balances[account];
    }
}
要编译合约,只需要在你的终端运行npx hardhat compile。该compile任务是内置任务之一。
$ npx hardhat compile
Compiling 1 file with 0.7.3
Compilation finished successfully
合约已成功编译,可以使用了。
5、测试合约
开发智能合约时编写自动化测试至关重要,因为用户的资金安全是重要的问题。为此,我们将使用Hardhat Network,这是一个内置的以太坊网络,专门为开发而设计,是Hardhat中的默认网络,无需进行任何设置即可使用它。
在我们的测试中,我们将使用ethers.js与上一节中构建的以太坊合约进行交互,并使用Mocha作为我们的测试运行器。
在我们的项目的根目录中创建一个名为test的新目录,并创建一个名为Token.js的新文件。
让我们从下面的代码开始。接下来,我们将对其进行解释,但现在将其粘贴到Token.js:
const { expect } = require("chai");

describe("Token contract", function() {
  it("Deployment should assign the total supply of tokens to the owner", async function() {
    const [owner] = await ethers.getSigners();

    const Token = await ethers.getContractFactory("Token");

    const hardhatToken = await Token.deploy();

    const ownerBalance = await hardhatToken.balanceOf(owner.address);
    expect(await hardhatToken.totalSupply()).to.equal(ownerBalance);
  });
});
在终端运行npx hardhat test,你应该看到以下输出:
$ npx hardhat test

  Token contract
    ✓ Deployment should assign the total supply of tokens to the owner (654ms)


  1 passing (663ms)
这意味着测试通过了。现在让我们逐行解释代码:
const [owner] = await ethers.getSigners();
ethers.js中Signer是代表以太坊账户的对象,它用于将交易发送到合同和其他帐户。在这里,我们获得了所连接节点中的帐户列表,在本例中为Hardhat Network,仅保留第一个帐户。
该ethers变量在全局范围内可用。如果您希望代码始终是明确的,则可以在顶部添加以下行:
const { ethers } = require("hardhat");
要了解更多信息Signer,可以查看Signers文档。
const Token = await ethers.getContractFactory("Token");
ethers.js中ContractFactory用于部署新智能合约的抽象,因此这是代币合约实例的工厂。
const hardhatToken = await Token.deploy();
调用ContractFactory的deploy()将开始部署合约,并返回一个解析为Contract对象的Promise。该对象具有用于你的智能合约功能的全部方法。
const ownerBalance = await hardhatToken.balanceOf(owner.address);
部署合约后,我们可以调用合约方法balanceOf()来获取所有者帐户的余额。
请记住,获得全部供应的代币所有者是进行部署的帐户,并且在使用hardhat-ethers插件 ContractFactory和Contract实例时,默认情况下将其连接到第一个Signer。这意味着owner变量中的帐户执行了部署,并且balanceOf()应返回全部供应量。
expect(await hardhatToken.totalSupply()).to.equal(ownerBalance);
在这里,我们再次使用Contract实例在Solidity代码中调用智能合约功能。totalSupply()返回代币供应量,
我们检查它是否等于ownerBalance。
为此,我们使用的是Chai,这是一个断言库。这些断言函数称为“匹配器”,而实际上我们在这里使用的是Waffle。这就是我们使用hardhat-waffle插件的原因,它使从以太坊声明值变得更加容易。请查看Waffle文档中的说明,以获取以太坊特定匹配器的完整列表。
如果你需要使用默认帐户以外的其他帐户发送交易来测试代码,则可以使用ethers.js中Contract的connect()方法将其连接到其他帐户。像这样:
const { expect } = require("chai");

describe("Transactions", function () {

  it("Should transfer tokens between accounts", async function() {
    const [owner, addr1, addr2] = await ethers.getSigners();

    const Token = await ethers.getContractFactory("Token");

    const hardhatToken = await Token.deploy();

    // Transfer 50 tokens from owner to addr1
    await hardhatToken.transfer(addr1.address, 50);
    expect(await hardhatToken.balanceOf(addr1.address)).to.equal(50);

    // Transfer 50 tokens from addr1 to addr2
    await hardhatToken.connect(addr1).transfer(addr2.address, 50);
    expect(await hardhatToken.balanceOf(addr2.address)).to.equal(50);
  });
});
我们已经介绍了测试合约所需的基础知识,下面是代币的完整测试用力,其中包含有关Mocha以及如何构建测试的许多其他信息。我们建议你通读:
// We import Chai to use its asserting functions here.
const { expect } = require("chai");

// `describe` is a Mocha function that allows you to organize your tests. It's
// not actually needed, but having your tests organized makes debugging them
// easier. All Mocha functions are available in the global scope.

// `describe` receives the name of a section of your test suite, and a callback.
// The callback must define the tests of that section. This callback can't be
// an async function.
describe("Token contract", function () {
  // Mocha has four functions that let you hook into the the test runner's
  // lifecyle. These are: `before`, `beforeEach`, `after`, `afterEach`.

  // They're very useful to setup the environment for tests, and to clean it
  // up after they run.

  // A common pattern is to declare some variables, and assign them in the
  // `before` and `beforeEach` callbacks.

  let Token;
  let hardhatToken;
  let owner;
  let addr1;
  let addr2;
  let addrs;

  // `beforeEach` will run before each test, re-deploying the contract every
  // time. It receives a callback, which can be async.
  beforeEach(async function () {
    // Get the ContractFactory and Signers here.
    Token = await ethers.getContractFactory("Token");
    [owner, addr1, addr2, ...addrs] = await ethers.getSigners();

    // To deploy our contract, we just have to call Token.deploy() and await
    // for it to be deployed(), which happens onces its transaction has been
    // mined.
    hardhatToken = await Token.deploy();
  });

  // You can nest describe calls to create subsections.
  describe("Deployment", function () {
    // `it` is another Mocha function. This is the one you use to define your
    // tests. It receives the test name, and a callback function.

    // If the callback function is async, Mocha will `await` it.
    it("Should set the right owner", async function () {
      // Expect receives a value, and wraps it in an Assertion object. These
      // objects have a lot of utility methods to assert values.

      // This test expects the owner variable stored in the contract to be equal
      // to our Signer's owner.
      expect(await hardhatToken.owner()).to.equal(owner.address);
    });

    it("Should assign the total supply of tokens to the owner", async function () {
      const ownerBalance = await hardhatToken.balanceOf(owner.address);
      expect(await hardhatToken.totalSupply()).to.equal(ownerBalance);
    });
  });

  describe("Transactions", function () {
    it("Should transfer tokens between accounts", async function () {
      // Transfer 50 tokens from owner to addr1
      await hardhatToken.transfer(addr1.address, 50);
      const addr1Balance = await hardhatToken.balanceOf(addr1.address);
      expect(addr1Balance).to.equal(50);

      // Transfer 50 tokens from addr1 to addr2
      // We use .connect(signer) to send a transaction from another account
      await hardhatToken.connect(addr1).transfer(addr2.address, 50);
      const addr2Balance = await hardhatToken.balanceOf(addr2.address);
      expect(addr2Balance).to.equal(50);
    });

    it("Should fail if sender doesn’t have enough tokens", async function () {
      const initialOwnerBalance = await hardhatToken.balanceOf(owner.address);

      // Try to send 1 token from addr1 (0 tokens) to owner (1000 tokens).
      // `require` will evaluate false and revert the transaction.
      await expect(
        hardhatToken.connect(addr1).transfer(owner.address, 1)
      ).to.be.revertedWith("Not enough tokens");

      // Owner balance shouldn't have changed.
      expect(await hardhatToken.balanceOf(owner.address)).to.equal(
        initialOwnerBalance
      );
    });

    it("Should update balances after transfers", async function () {
      const initialOwnerBalance = await hardhatToken.balanceOf(owner.address);

      // Transfer 100 tokens from owner to addr1.
      await hardhatToken.transfer(addr1.address, 100);

      // Transfer another 50 tokens from owner to addr2.
      await hardhatToken.transfer(addr2.address, 50);

      // Check balances.
      const finalOwnerBalance = await hardhatToken.balanceOf(owner.address);
      expect(finalOwnerBalance).to.equal(initialOwnerBalance - 150);

      const addr1Balance = await hardhatToken.balanceOf(addr1.address);
      expect(addr1Balance).to.equal(100);

      const addr2Balance = await hardhatToken.balanceOf(addr2.address);
      expect(addr2Balance).to.equal(50);
    });
  });
});
这是执行npx hardhat test的输出结果:
$ npx hardhat test

  Token contract
    Deployment
      ✓ Should set the right owner
      ✓ Should assign the total supply of tokens to the owner
    Transactions
      ✓ Should transfer tokens between accounts (199ms)
      ✓ Should fail if sender doesn’t have enough tokens
      ✓ Should update balances after transfers (111ms)


  5 passing (1s)
请记住,当你运行npx hardhat test时,如果合约自上次运行测试以来已发生更改,则将对其进行编译。
6、使用Hardhat网络进行调试
Hardhat内置有Hardhat Network,Hardhat Network是为开发而设计的本地以太坊网络。它允许你部署合约、运行测试和调试代码。这是Hardhat连接的默认网络,因此无需进行任何设置即可正常工作。只需运行你的测试。
在Hardhat Network上运行和测试合约时,你可以使用console.log()打印记录消息y以及Solidity代码调用的合约变量。要使用它,你必须在你的合约代码输入console.log。
看起来是这样的:
pragma solidity ^0.6.0;

import "hardhat/console.sol";

contract Token {
  //...
}
console.log向transfer()函数添加一些内容,就像在JavaScript中使用它一样:
function transfer(address to, uint256 amount) external {
    console.log("Sender balance is %s tokens", balances[msg.sender]);
    console.log("Trying to send %s tokens to %s", amount, to);

    require(balances[msg.sender] >= amount, "Not enough tokens");

    balances[msg.sender] -= amount;
    balances[to] += amount;
}
运行测试时将显示日志记录输出:
$ npx hardhat test

  Token contract
    Deployment
      ✓ Should set the right owner
      ✓ Should assign the total supply of tokens to the owner
    Transactions
Sender balance is 1000 tokens
Trying to send 50 tokens to 0xead9c93b79ae7c1591b1fb5323bd777e86e150d4
Sender balance is 50 tokens
Trying to send 50 tokens to 0xe5904695748fe4a84b40b3fc79de2277660bd1d3
      ✓ Should transfer tokens between accounts (373ms)
      ✓ Should fail if sender doesn’t have enough tokens
Sender balance is 1000 tokens
Trying to send 100 tokens to 0xead9c93b79ae7c1591b1fb5323bd777e86e150d4
Sender balance is 900 tokens
Trying to send 100 tokens to 0xe5904695748fe4a84b40b3fc79de2277660bd1d3
      ✓ Should update balances after transfers (187ms)


  5 passing (2s)
可以查看文档以了解有关此功能的更多信息
7、部署合约
准备好与其他人共享dApp后,你可能要做的就是将其部署到实时网络中。这样,其他人可以访问不在系统上本地运行的实例。
有一个处理真实货币的以太坊网络称为“主网”,然后还有一些不处理真实货币但是很好地模仿现实世界场景的实时网络,并且可以被其他人用作共享阶段环境。这些被称为“测试网”,以太坊有多个:Ropsten,Kovan,Rinkeby和Goerli。我们建议你将合约部署到Ropsten测试网。
在软件层面,部署到测试网与部署到主网是一样的。唯一的区别是你连接到哪个网络。让我们看一下使用ethers.js部署合约的代码是什么样的。
使用的主要概念Signer,ContractFactory而Contract这是我们在后面解释的测试部分。与测试相比,没有什么新的需要做,因为当你测试合约时,实际上是在向开发网络进行部署。这使代码非常相似或相同。
让我们在项目根目录下创建一个新目录scripts,并将以下内容粘贴到deploy.js文件中:
async function main() {

  const [deployer] = await ethers.getSigners();

  console.log(
    "Deploying contracts with the account:",
    deployer.address
  );

  console.log("Account balance:", (await deployer.getBalance()).toString());

  const Token = await ethers.getContractFactory("Token");
  const token = await Token.deploy();

  console.log("Token address:", token.address);
}

main()
  .then(() => process.exit(0))
  .catch(error => {
    console.error(error);
    process.exit(1);
  });
要指示Hardhat在运行任务时连接到特定的以太坊网络,可以使用--network参数。像这样:
npx hardhat run scripts/deploy.js --network <network-name>
在这种情况下,不带--network参数运行时,代码将针对Hardhat Network的嵌入式实例运行,因此当Hardhat完成运行时,部署实际上会丢失,但是测试我们的部署代码是否仍然有用:
$ npx hardhat run scripts/deploy.js
Deploying contracts with the account: 0xf39Fd6e51aad88F6F4ce6aB8827279cffFb92266
Account balance: 10000000000000000000000
Token address: 0x5FbDB2315678afecb367f032d93F642f64180aa3
要部署到诸如主网或任何测试网之类的远程网络,你需要在hardhat.config.js文件中添加一个network条目。在此示例中,我们将使用Ropsten,但你可以类似地添加任何网络:
require("@nomiclabs/hardhat-waffle");

// Go to https://www.alchemyapi.io, sign up, create
// a new App in its dashboard, and replace "KEY" with its key
const ALCHEMY_API_KEY = "KEY";

// Replace this private key with your Ropsten account private key
// To export your private key from Metamask, open Metamask and
// go to Account Details > Export Private Key
// Be aware of NEVER putting real Ether into testing accounts
const ROPSTEN_PRIVATE_KEY = "YOUR ROPSTEN PRIVATE KEY";

module.exports = {
  solidity: "0.7.3",
  networks: {
    ropsten: {
      url: `https://eth-ropsten.alchemyapi.io/v2/${ALCHEMY_API_KEY}`,
      accounts: [`0x${ROPSTEN_PRIVATE_KEY}`]
    }
  }
};
我们正在使用Alchemy,但是指向url任何以太坊节点或网关都可以。
要在Ropsten上进行部署,需要将ropsten-ETH发送到将要进行部署的地址中。你可以从Faucet获得一些用于测试网的ETH,该服务是免费分发测试ETH的服务。这是Ropsten的一个faucet,
你必须在进行交易之前将Metamask的网络更改为Ropsten。
你可以通过以下链接为其他测试网获取一些ETH:
最后,运行:
npx hardhat run scripts/deploy.js --network ropsten
如果一切顺利,你应该看到已部署的合约地址。
8、Hardhat示例DApp项目
如果你想快速开始使用dApp或使用前端查看整个项目的外观,可以使用我们的hackathon样板库:
https://github.com/nomiclabs/hardhat-hackathon-boilerplat
该项目中包含以下内容:
- 我们在本教程中使用的Solidity合约
- 使用ethers.js和Waffle的测试套件
- 使用ethers.js与合约进行交互的最小前端
在仓库的根目录中,你将找到我们将本教程与Token合约放在一起的Hardhat项目。要刷新其实现的记忆,请执行以下操作:
- 有固定的代币总供应量,无法更改。
- 整个供应都分配给部署合约的地址。
- 任何人都可以接收代币。
- 拥有至少一个代币的任何人都可以转让代币。
- 代币不可分割。你可以转让1、2、3或37个代币,但不能转让2.5个代币。
在frontend/目录中,你将找到一个简单的应用程序,该应用程序允许用户执行以下两项操作:
- 查看已连接钱包的余额
- 将代币发送到地址
这是一个单独的npm项目,它是使用create-react-app创建的,因此这意味着它使用了webpack和babel。
其他目录说明如下:
- src/ 包含所有代码
- src/components 包含react组件
- Dapp.js是唯一具有业务逻辑的文件。如果要将其用作样板,请在此处用自己的代码替换代码
- 每个其他组件仅呈现HTML,没有逻辑。
- src/contracts 包含合约的ABI和地址,这些由部署脚本自动生成
如何使用
首先克隆存储库,然后部署合约:
cd hardhat-hackathon-boilerplate/
npm install
npx hardhat node
在这里,我们仅安装npm项目的依赖项,然后通过运行npx hardhat node我们启动一个Hardhat Network实例,你可以使用MetaMask连接到该实例。在同一目录中的另一个终端中,运行:
npx hardhat --network localhost run scripts/deploy.js
这会将合同部署到Hardhat Network。完成此运行后:
cd hardhat-hackathon-boilerplate/frontend/
npm install
npm run start
启动React Web应用程序。在浏览器中打开http://localhost:3000/,你应该看到以下内容:

在MetaMask中设置网络为localhost:8545,然后单击按钮。然后,你应该看到以下内容:
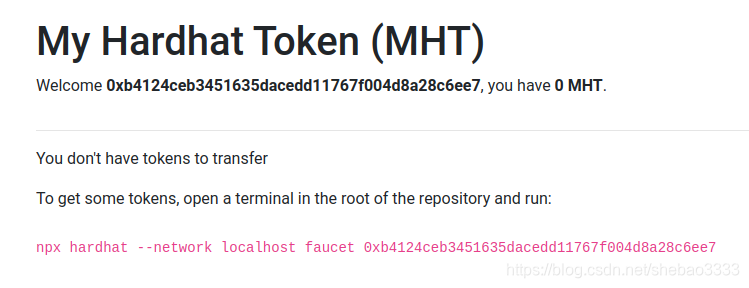
这里用于显示当前钱包余额的前端代码正在检测到余额为0,因此你将无法尝试转账功能。通过运行:
npx hardhat --network localhost faucet <your address>
你将运行一个包含的自定义hardhat任务,该任务使用部署帐户的余额将100 MBT和1 ETH发送到你的地址。这将允许你将代币发送到另一个地址。
$ npx hardhat --network localhost faucet 0x0987a41e73e69f60c5071ce3c8f7e730f9a60f90
Transferred 1 ETH and 100 tokens to 0x0987a41e73e69f60c5071ce3c8f7e730f9a60f90
在终端中运行npx hardhat node还应该看到:
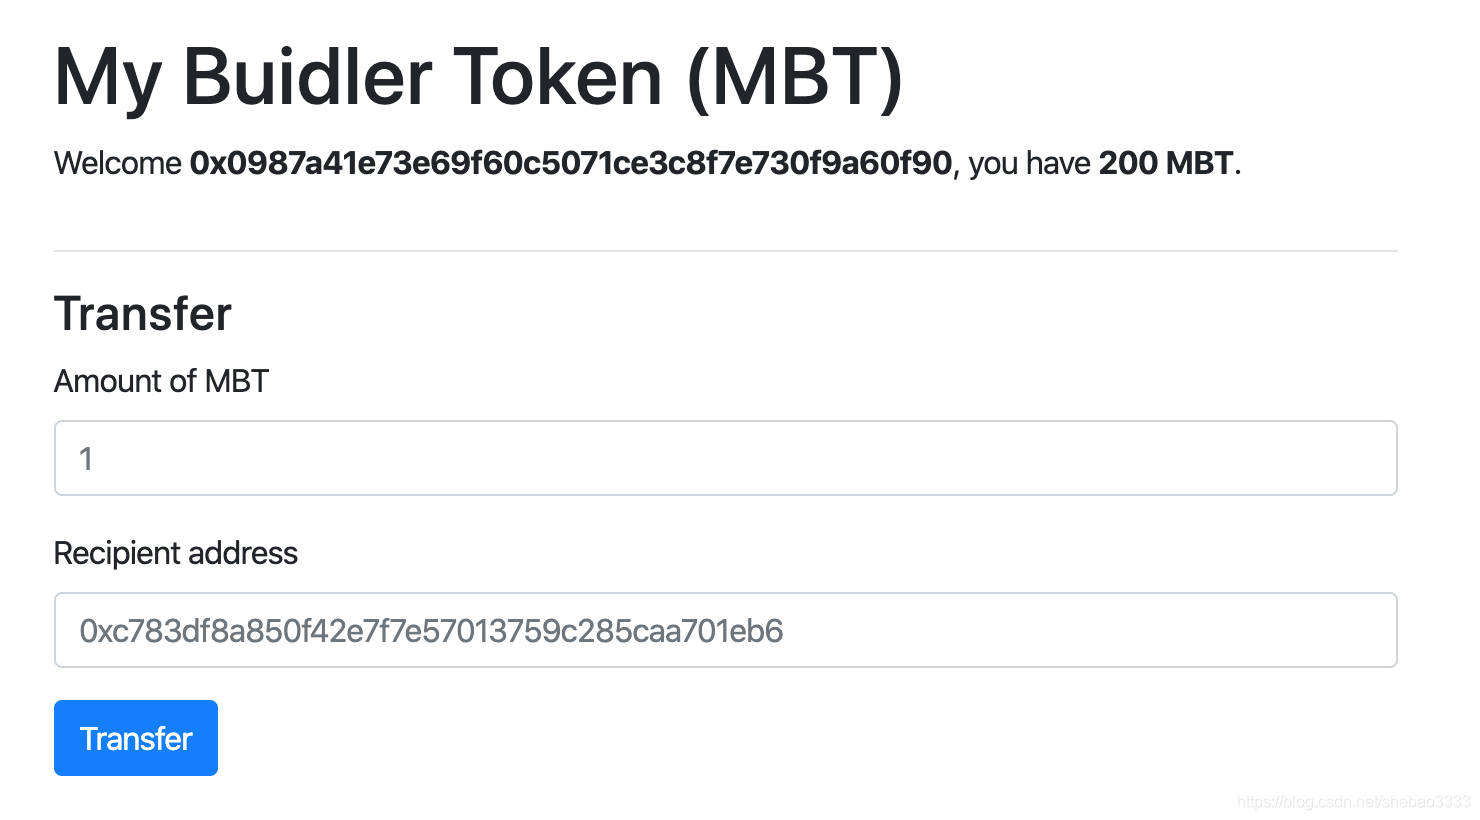
eth_sendTransaction
  Contract call:       Token#transfer
  Transaction:         0x460526d98b86f7886cd0f218d6618c96d27de7c745462ff8141973253e89b7d4
  From:                0xc783df8a850f42e7f7e57013759c285caa701eb6
  To:                  0x7c2c195cd6d34b8f845992d380aadb2730bb9c6f
  Value:               0 ETH
  Gas used:            37098 of 185490
  Block #8:            0x6b6cd29029b31f30158bfbd12faf2c4ac4263068fd12b6130f5655e70d1bc257

  console.log:
    Transferring from 0xc783df8a850f42e7f7e57013759c285caa701eb6 to 0x0987a41e73e69f60c5071ce3c8f7e730f9a60f90 100 tokens
在合约中显示该函数的console.log输出,这是运行faucet任务后Web应用程序的外观:
9、结束语
恭喜你完成了本教程!
原文链接:Hardhat新手教程 — 汇智网