写在前面的话
读者您好,本人目前同时在经营CSDN和微信公众号,希望小伙伴们能够给予支持,关注一下我的微信公众号,公众号是每天都会推送新文章,CSDN不定期发表新文章。
文末有公众号二维码,可以扫码关注,或者微信直接搜索“波波Tea”,带哪吒头像的那个就是我,谢谢!
1、什么是spring的缓存抽象?
众所周知,spring为了方便缓存的使用,提供了一层缓存抽象,而譬如ehcache、redis等第三方缓存框架,spring则为它们提供了实现。
spring的缓存抽象主要依靠org.springframework.cache.Cache接口和org.springframework.cache.CacheManager接口。对于不同的缓存框架,对应不同的CacheManager实现。
举个例子,这里暂时不谈ehcache和redis(二者都是成熟的缓存框架),只谈一下ConcurrentMapCacheManager类。因为缓存都是key-value形式的,所以Map能够用于缓存的实现。顾名思义ConcurrentMapCacheManager这种实现是将缓存数据存储在JDK的ConcurrentMap中。
2、缓存使用实例
由于缓存抽象是spring的,并且spring默认提供了ConcurrentMapCacheManager实现,@EnableCaching也是spring提供的,所以搭建的springboot项目(搭建springboot项目而不是使用普通的spring项目是因为springboot为缓存做了自动配置)不需要任何额外依赖,只需要spring-boot-starter-web依赖即可。
下面以最精简的例子来介绍一下如何利用spring的缓存抽象将缓存集成到应用中的。
首先是service实现类,@Cacheable注解用于将方法的返回值缓存起来。
import com.bobo.group.springbootmybatisbase.entity.Book;
import com.bobo.group.springbootmybatisbase.mapper.*;
import com.bobo.group.springbootmybatisbase.service.BookService;
import org.springframework.beans.factory.annotation.Autowired;
import org.springframework.cache.annotation.*;
import org.springframework.stereotype.Service;
import java.util.List;

@Service
public class BookServiceImpl implements BookService {
    @Autowired
    private BookMapper bookMapper;

    @Override
    @Cacheable(cacheNames = {"allbooks"},key = "listBooks")
    public List<Book> listBooks() {
        return bookMapper.selectBooks();
    }
}
然后是controller类,这里我注入了CacheManager,目的是为了看看springboot为我们默认提供的实现类是什么。
@RestController
@RequestMapping("/book")
public class BookController {
    @Autowired
    private BookService bookService;

    @Autowired(required = false)
    private CacheManager cacheManager;

    @GetMapping("/list")
    public List<Book> listBooks(){
        return bookService.listBooks();
    }
}
最后启动类打上@EnableCaching注解,启动项目,并访问Http接口,如下图所示。

可以看到,默认的实现就是ConcurrentMapCacheManager。
如果将@EnableCaching注解去掉再启动项目,则如下图所示。

是的,CacheManager为null,这至少证明了一点,@EnableCaching可以为我们配置好CacheManager。
3、@EnableCaching源码解读
好了,接下来说正式话题,@EnableCaching是怎么工作的?
首先看一下@EnableCaching的源码
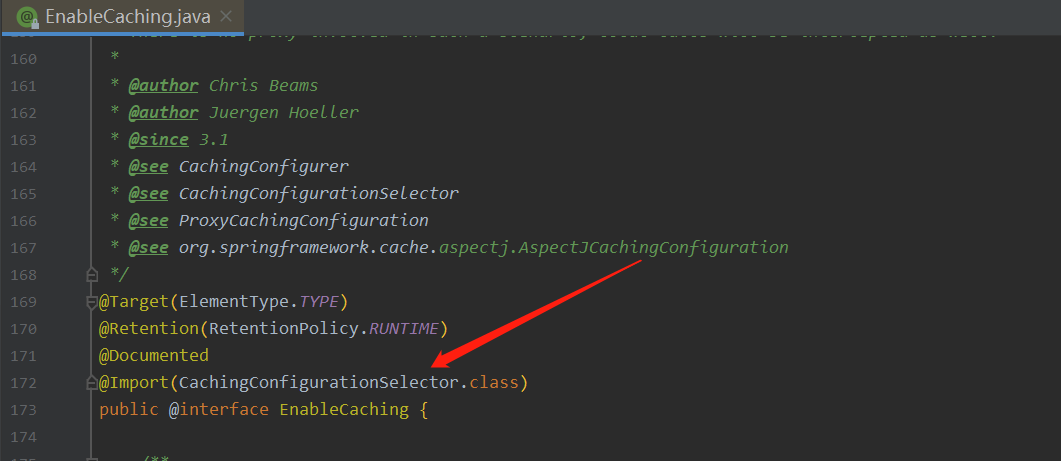
发现导入了CachingConfigurationSelector这个类,点进去,发现CachingConfigurationSelector类的声明信息如下
public class CachingConfigurationSelector extends AdviceModeImportSelector<EnableCaching>而AdviceModeImportSelector又实现了ImportSelector,关于ImportSelector的用处可以看我的这篇文章Spring中@Import注解的作用
下面主要看看CachingConfigurationSelector的selectImports方法,这个方法是重写ImportSelector类的。下面看看是如何重写的。
@Override
public String[] selectImports(AdviceMode adviceMode) {
    switch (adviceMode) {
        case PROXY:
            return getProxyImports();
        case ASPECTJ:
            return getAspectJImports();
        default:
            return null;
    }
}
这里的通知模式(adviceMode)默认是代理(proxy),如果是aspectj还需要做额外配置,下面看看getProxyImports方法。
private String[] getProxyImports() {
    List<String> result = new ArrayList<>(3);
  result.add(AutoProxyRegistrar.class.getName());
  result.add(ProxyCachingConfiguration.class.getName());
  if (jsr107Present && jcacheImplPresent) {
      result.add(PROXY_JCACHE_CONFIGURATION_CLASS);
  }
  return StringUtils.toStringArray(result);
}
这个方法的作用是注册了两个Bean,即AutoProxyRegistrar和ProxyCachingConfiguration,而PROXY_JCACHE_CONFIGURATION_CLASS是需要jcache存在才生效的,因此忽略。
那为什么这两个Bean都有代理(proxy)这个字眼呢?因为spring缓存抽象是基于注解(比如@Cacheable、@CacheEvict等)实现的,所以会在实际运行的时候生成代理类。
下面主要看看ProxyCachingConfiguration这个Bean
@Configuration
@Role(BeanDefinition.ROLE_INFRASTRUCTURE)
public class ProxyCachingConfiguration extends AbstractCachingConfiguration {

@Bean(name = CacheManagementConfigUtils.CACHE_ADVISOR_BEAN_NAME)
@Role(BeanDefinition.ROLE_INFRASTRUCTURE)
public BeanFactoryCacheOperationSourceAdvisor cacheAdvisor() {
    BeanFactoryCacheOperationSourceAdvisor advisor = new BeanFactoryCacheOperationSourceAdvisor();
    advisor.setCacheOperationSource(cacheOperationSource());
    advisor.setAdvice(cacheInterceptor());
if (this.enableCaching != null) {
      advisor.setOrder(this.enableCaching.<Integer>getNumber("order"));
    }
return advisor;
  }

@Bean
@Role(BeanDefinition.ROLE_INFRASTRUCTURE)
public CacheOperationSource cacheOperationSource() {
return new AnnotationCacheOperationSource();
  }

@Bean
@Role(BeanDefinition.ROLE_INFRASTRUCTURE)
public CacheInterceptor cacheInterceptor() {
    CacheInterceptor interceptor = new CacheInterceptor();
    interceptor.configure(this.errorHandler, this.keyGenerator, this.cacheResolver, this.cacheManager);
    interceptor.setCacheOperationSource(cacheOperationSource());
return interceptor;
  }

}
该类提供了BeanFactoryCacheOperationSourceAdvisor 、CacheOperationSource 、CacheInterceptor 三个Bean,重点是CacheInterceptor ,没有它就不能拦截@Cacheable注解标注的方法。
下面再研究一下为什么@EnableCaching会默认提供CacheManager的实现。
springboot提供了一个配置类为SimpleCacheConfiguration,该类源码如下。
@Configuration(proxyBeanMethods = false)
@ConditionalOnMissingBean(CacheManager.class)
@Conditional(CacheCondition.class)
class SimpleCacheConfiguration {

@Bean
  ConcurrentMapCacheManager cacheManager(CacheProperties cacheProperties,
      CacheManagerCustomizers cacheManagerCustomizers) {

      ConcurrentMapCacheManager cacheManager = new ConcurrentMapCacheManager();
      List<String> cacheNames = cacheProperties.getCacheNames();
      if (!cacheNames.isEmpty()) {
          cacheManager.setCacheNames(cacheNames);
      }
      return cacheManagerCustomizers.customize(cacheManager);
  }

}
SimpleCacheConfiguration提供了一个Bean为ConcurrentMapCacheManager,答案已经浮现了一半。但是别急,该Bean生效的条件是需要有CacheProperties和CacheManagerCustomizers 这两个Bean的支持,这两个Bean又在哪里呢?
springboot还提供了一个自动配置类为CacheAutoConfiguration,如下图。
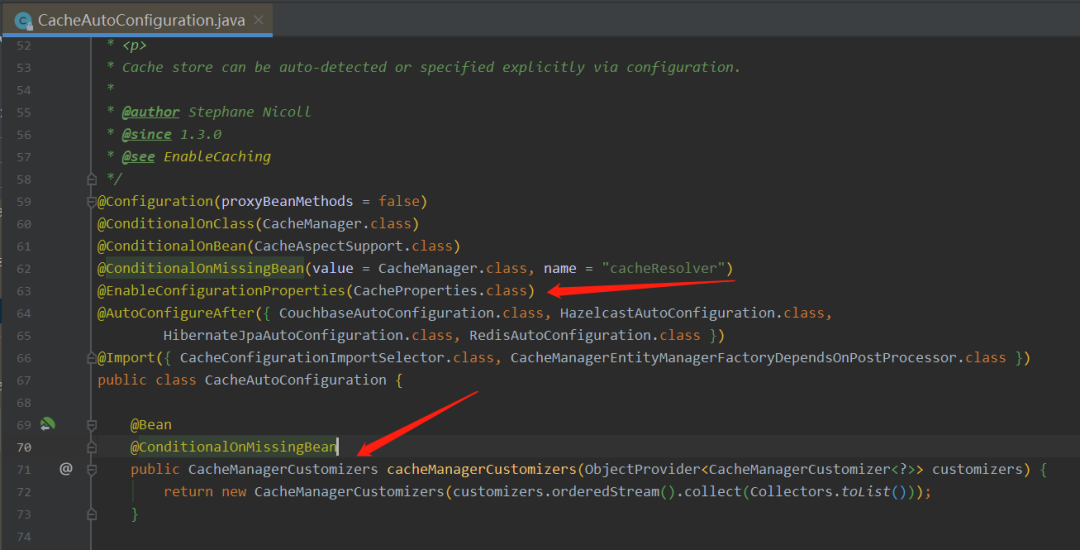
CacheAutoConfiguration正好提供了CacheProperties和CacheManagerCustomizers,并且该类是自动配置类,会被自动加载,但是请注意,该类上方有一个注解如下。
@ConditionalOnBean(CacheAspectSupport.class)表示CacheAutoConfiguration生效需要CacheAspectSupport这个Bean的支持,而CacheAspectSupport这个Bean在哪里呢?
其实上面讲的CacheInterceptor就是CacheAspectSupport的子类,CacheInterceptor类的声明信息如下。
public class CacheInterceptor extends CacheAspectSupport implements MethodInterceptor, Serializable4、总结
-
正是有了EnableCaching,才有了CacheInterceptor
-
而有了CacheInterceptor,CacheAutoConfiguration就会生效
-
CacheAutoConfiguration会提供CacheProperties和CacheManagerCustomizers
-
而有了CacheProperties和CacheManagerCustomizers,ConcurrentMapCacheManager就会生效