QML的结构有点类似于javascript的json表达式的写法。
第一部分:共有属性
由于QML里的各个可视化对象均继承于Item类,因此共有属性也就是Item的属性(Item本身确是不可视化的)
1、id
这个是用来唯一标识各个资源的,以小写字母开头,注意这只是一个标识,不是QString类型的一个值,同时这个属性可以省略。例如:
Text { id: myText; ... }
如果在其他资源里需要引用他,只要使用id的值就可以了,例如:
Text { text: myText.text }
附:使用myText.id没有任何意义,且运行时会给出这样子的警告Unable to assign [undefined] to QString text,另,如果项目里id不唯一,运行时会报这样的警告:id is not unique
注意:形如SomeProperty:SomeValue这样的属性时 SomeValue类型一般未知(可能是int、bool等基本类型),如果将其赋值给一个QString类型的属性时时会报undefined警告,但是如果是SomeProperty:"SomeValue",则明确表明了SomeValue是一个string的字符串
2、
x : real
y : real
width : real
height : real
从字面上我们可以看出这个是表述当前资源在界面上的位置和大小,他是相对于父界面而言的,例如:
Item { x: 100; y: 100; width: 100; height: 100 }
再如:
import Qt 4.7
Rectangle { id: page width: 150 height: 150 color: "red" border.color : "black" border.width : 5 radius : 13 //表示矩形区域四个转角的弧度(rounded rectangle) opacity : 0.5 rotation: 45//rotation设置为顺时针旋转,后面的参数值为旋转的度数 smooth:true scale:1.1//scale为设置缩放属性,scale值小于1,表示缩小,等于1表示无变化,大于1表示放大。 transformOrigin:Item.Center//缩放和旋转时的基点 Text { id: myText text: "HELLO QT" font.pointSize: 10; font.bold: true; y: 30; anchors.verticalCenter : page.verticalCenter anchors.horizontalCenter : page.horizontalCenter }}
这个里面关于myText的y属性就是相对于page而言的。
3、z : real
这个属性类似于css里面的z-index属性,默认值是0,当不设置这个值的时候,或者两个元素的属性z值都相同时,默认是,后面一个在前面一个的上面,子元素在父元素的上面,所以我们可以通过改变z属性值来设置两个元素的层次,一般来讲,值越大,越处于上层。这里分为两种情况:
第一:兄弟关系
Item {
Rectangle { id: firstItem; width:100; height:100; x:0; y: 0; color: "blue"; } Rectangle { id: secondItem; width: 100; height: 100; x: 50; y: 50; color: "red"; }
}
secondItem位于firstItem的上面,所以运行可见firstItem和secondItem重叠的部分,显示的是secondItem的颜色。如果重叠部分我们要显示firstItem的颜色,则至少可以有两种方法,一是设置firstItem的z值为1,而是设置secondItem的值为-1。两种方法效果一样。
第二:父子关系
Item {
Rectangle { id: parentItem; width:100; height:100; x:0; y: 0; z: 0; color: "blue"; Rectangle { id: sonItem; width:100;height:100; x: 50; y: 50; color: "black"; } } }
parentItem和sonItem重叠的部分显示成了sonItem的颜色(黑色),怎样才能够显示parentItem的颜色呢,设置sonItem的item值为负值。
注意:这里父子层次关系的设定,与父元素的z属性值没有关系,只要是子元素的z属性值<0,父元素就位于子元素的上面,子元素的属性值>=0,子元素就位于父元素的上面。如果有多个子元素,子元素之间的关系按照兄弟关系的z属性值来设定。
4、visible :
这个属性用于设置元素的可见性,为true时,元素可见,false时,元素不可见,默认为true。
注意:如果父元素visiable属性设置为了false,则子元素的visiable属性不再起任何作用,均为不可见
5、scale :
这个属性是用来设置元素缩放大小的。默认值为1。一般来讲,当scale值大于1时,显示的大小比正常大,当scale值小于1大于0时,显示的值比正常小。当scale值等于0时,元素不可见,效果类似于visible值为false。当scale的值为负值时,相当于元素旋转了180°再缩放(此时rotation值相当于为180)。
注意,scale一般是配合属性transformOrigin一起使用的。
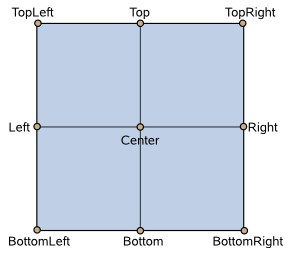
6、transformOrigin :
这个属性是描述一个基点,然后元素可以基于此基点来缩放(scale属性)和旋转(rotation属性),默认基点是Item.Center,即元素的中心点。系统预定义了9个基点,请看图:
当然,应该也可以设置自己的基点,具体方法,还需探索
7、rotation :
这个属性是用来设置元素旋转的角度的。默认元素是不旋转的,即值是0。他旋转的基点也是取自transformOrigin的值。
注意:如果一个元素想缩放和旋转的基点不同,那么应该怎么做呢,继续探索。
8、opacity :
这个属性是用来设置元素是否透明的,取值范围0-1,默认值为1,不透明,值越小越透明,值越大越不透明。另外,这个属性,不同于其他属性,他是可以继承的,也就是说如果父元素的opacity属性设置为了某个值,则子元素默认的opacity属性的值即为父元素opacity属性的值。例如:
Item {
Rectangle { id: firstItem; width:50; height:50; x:0; y: 0; color: "blue"; opacity: 0.5; Rectangle { id: firstSonItem; width:50; height:50; x:50; y: 50; color: "red"; } } Rectangle { id: secondItem; width:50; height:50; x:100; y: 100; color: "red"; } }虽然只是设置了firstItem的opacity的值为0.5,但是firstItem和firstSonItem元素都为半透明,secondItem不受影响,仍旧为不透明。
注意:并不是所有场景下设置opacity都能得到想要的结果,可能有例外。
9、activeFocus : read-only
这个属性被用来描述当前元素是否处于被聚焦的状态(可以接受键盘输入),他一个只读属性,什么是只读属性呢,就是你不能显示的设置的属性,例如你不能在Item中设置activeFocus: true,你只能在其他地方调用这个属性。那么怎么才能够显示设置元素聚焦与否呢,这就需要使用focus属性。一般来讲当一个元素focus为true的时候,activeFocus属性返回true值。
10、focus :
这个属性用来设置当前元素是否被聚焦。
注意:如果两个元素同时focus被设置为了true,则如果是兄弟关系,后一个被聚焦,如果是父子关系,儿子被聚焦。
11、state :
这个属性是被用来描述元素的状态的,一般来讲,每个元素的基本状态都是空的,因而当设置state=‘’时,可以使元素返回基本状态。另,系统没有为元素预定义任何的state,因而对于state的使用,我们可以自己定义一些state,然后使元素在合适的时候改变state,例如:
下面是一个按钮,点击按钮,按钮放大,点击完毕,按钮恢复正常
import Qt 4.7
Rectangle { id: abutton width:80; height:30; radius : 13 color: "black" smooth: true Text { id: atext text: "Click Me" color: "blue"; font.bold: true; font.pointSize:8; anchors.centerIn: parent } MouseArea { id: amousearea anchors.fill:parent onReleased : { abutton.state = "Off" } } state : "Off" states: [ State { name: "On" PropertyChanges { target: abutton scale : 1.4 color: "red" } when: amousearea.pressed }, State { name: "Off" PropertyChanges { target: abutton } } ]}在上面的程序中我们预定义了两个state:On和Off,默认设置按钮的状态为Off,点击按钮时状态变为On,点击完毕按钮状态变为Off. 预定义状态的写法形如:states:[State{...},State{...}],当只有一个预定义状态时也可以写成:State{...}.对于State类,其至少应当有如下两个属性:name、PropertyChanges(这两个属性省略掉了就没有多大意义了),而且对于任何改变元素state的行为,除非特别指定,否则元素的状态在改变后都会自动还原到空状态,即state为''.state属性的取值来自于states属性定义的值。
12、states : <> read-only
这个属性描述了元素所具有的属性,他是只读的,也就是说一旦预定义了当前元素的states,则就不允许我们去设置他,去改变他。states属性一般配合state属性使用。
13、parent : Item
这个属性描述了当前元素的父元素,一般来讲,当前元素的父元素是按照层次结构来位于上层的元素,当然我们也可以通过设置parent属性改变当前元素的parent,例如:
Item {
id: one x: 1; Item { id: two x: 2; } Item { id : three x: 3; } Item { id: four focus : true parent : three Keys.onSelectPressed : { console.log(parent.x); console.log(parent.parent.x); } }}上面程序中元素four的父元素便不是one,而是three,点击手机模拟器的中键,会在控制台打印出日志3和114、children : list<Item> read-only
resources : list<Object> read-only
这两个属性描述了当前元素所拥有的子元素和资源,都是只读属性,你不能动态的设置和改变他,他只是一个定义而已。children 表示子元素,什么是子元素呢,就是所有能够可视化的元素;resources 表示资源,什么是资源呢,就是不可可视化的元素,他们一般是通过name来引用,而非id来引用,比如之前的State就是一种资源。通常我们在定义Item元素的时候,程序会默认帮你归类children和resources(参见data属性),当然我们也可以在定义的时候,手工去归类,例如:
Item {
children: [ Text { id : one x : 10 y : 10 text : "ONE" }, Rectangle {} ] resources: [ Text { id : two x : 10 y : 100 text : "TWO" }, Component { id: myComponent Text {} } ] focus : true Keys.onSelectPressed : { console.log(one.x); console.log(two.x); } }
在上面程序中我们手动归类了children和resources,注意这里有两个Text元素,那么运行的结果是在界面上显示ONE和TWO字符串呢,还是只显示ONE呢?运行后我们发现只显示了字符串ONE。那么是什么原因没有显示TWO呢,我们知道resources指的是那些不可可视化的元素,一般用name属性来引用,当然也是可以用id引用的。所以在以上程序中我们将two元素放入了resources里面,也就剥夺了他可视化的权限,也就是说尽管他具有可视化的能力,但是他被当做了资源,故而不能再可视化了。如果我们将它放入children中,界面上立即显示出TWO字符串。这也是手动归类的一个好处,就是能够把一些本来可视化的元素作为不可可视化处理
14、data : <Object> default read-only
这个也是一个只读属性,跟children和resources类似,他允许用户在定义元素时,不指明children和resources,他可以自动将可见的元素划入children,不可见的元素划入resources,例如:
通常我们这样写一个元素:
Item {
Text {} Rectangle {} Timer {}
}
data元素将其区分后就为
Item { children: [ Text {}, Rectangle {} ] resources: [ Timer {} ] }
一般来讲data元素会自动将我们声明的children和resources进行归类,他是一个后台元素,我们不需要显示去区分各个元素是children呢还是resources.
15、
anchors.top : AnchorLine
anchors.bottom : AnchorLine
anchors.left : AnchorLine
anchors.right : AnchorLine
anchors.horizontalCenter : AnchorLine
anchors.verticalCenter : AnchorLine
anchors.baseline : AnchorLine
anchors.fill : Item
anchors.centerIn : Item
anchors.margins :
anchors.topMargin :
anchors.bottomMargin :
anchors.leftMargin :
anchors.rightMargin :
anchors.horizontalCenterOffset :
anchors.verticalCenterOffset :
anchors.baselineOffset :
这个属性主要用于设置当前元素相对于其他元素(其他元素只能是和当前元素具有父子关系和兄弟关系的元素)的一种相对位置关系,例如margins,类似于css中margin,相对于上层的间距,这里为相对于其他元素的间距。centerIn这个属性可以使当前元素位于相对的元素的中央位置。其他属性类似,暂略过不研究。
注意:如果需要清空anchors的某一个属性的值,只需将它设置为undefined即可。
请看下面一些实例:
Item {
Rectangle { id : oneRect x : 20; y : 20 width : 100; height : 100 color : "green" Rectangle { id : twoRect anchors.top : oneRect.bottom width : 100; height : 100 color : "red" } }}
anchors.top他实际上描述的就是一条水平线,在上面的程序中指的就是oneRect元素下面的那条线,相当于指明twoRect的坐标为x : 20; y : 120
Item {
Rectangle { id : oneRect x : 20; y : 120 width : 100; height : 100 color : "green" Rectangle { id : twoRect anchors.bottom : oneRect.top width : 100; height : 100 color : "red" } }}
anchors.bottom描述的也是一条水平线,在上面程序中指的就是oneRect的上边那条线,相当于指明twoRect的坐标为x : 20; y : 20
Item {
Rectangle { id : oneRect x : 120; y : 20 width : 100; height : 100 color : "green" Rectangle { id : twoRect anchors.left : oneRect.right width : 80; height : 80 color : "red" } }}
anchors.left描述的是一条垂直线,在上面程序中描述的就是oneRect的右边的那条线
Item {
Rectangle { id : oneRect x : 120; y : 20 width : 100; height : 100 color : "green" Rectangle { id : twoRect anchors.left : oneRect.right width : 80; height : 80 color : "red" } }}anchors.right描述的是一条垂直线,在上面程序中描述的就是oneRect的左边的那条线。注意如果anchors的属性是一条垂直线则不能将为水平线的属性设置给他,否则会报异常"Cannot anchor a horizontal edge to a vertical edge",同理anchors的属性是一条水平线则不能将为垂直线的属性设置给他。
Item {
Rectangle { id : oneRect x : 120; y : 20 width : 100; height : 100 color : "green" Rectangle { id : twoRect anchors.horizontalCenter : oneRect.horizontalCenter width : 80; height : 80 color : "red" } }}anchors.horizontalCenter描述的是一个点,这个点实际上就是anchors.top的中心点,注意如果将anchors.horizontalCenter和其他一些anchors属性一起使用可能引发一些未知的结果。比如我们在twoRect中加入anchors.right : oneRect.left,这样子会导致twoRect的宽度和oneRect的宽度一样,都是100,而不是设置的80。所以设置相对属性的时候,避免相对属性间冲突。Item { Rectangle { id : oneRect x : 120; y : 20 width : 100; height : 100 color : "green" Rectangle { id : twoRect anchors.verticalCenter : oneRect.verticalCenter width : 80; height : 80 color : "red" } }}
anchors.verticalCenter属性也是描述的一个点,这个点实际上就是anchors.left的中心点。
Item { Rectangle { id : oneRect x : 120; y : 20 width : 100; height : 100 color : "green" Rectangle { id : twoRect anchors.centerIn : oneRect width : 80; height : 80 color : "red" } }}
anchors.centerIn描述的是一个区域,如上程序中就指的值twoRect元素位于oneRect元素的中心区域,他是基于oneRect元素中心点辐射的一个区域(可能大于oneRect的区域)。anchors.centerIn和anchors.fill属性有点类似,不过anchors.centerIn更加着重强调两个元素之间具有同一个中心点。而anchors.fill则更加着重强调相对元素对当前元素的包含关系,当前元素的大小是不会超过相对元素的区域大小的。
Item { Rectangle { id : oneRect x : 120; y : 20 width : 100; height : 100 color : "green" Rectangle { id : twoRect anchors.baseline : oneRect.baseline width : 80; height : 80 color : "red" } }}anchors.baseline描述的是一个点,这个点表述了相对元素在屏幕的位置,例如如上程序中twoRect和oneRect的x和y实际上是相等的。如果将相对的元素作为一个坐标系的话,这个点正好是相对元素的坐标原点。Item { Rectangle { id : oneRect x : 120; y : 20 width : 100; height : 100 color : "green" Rectangle { id : twoRect anchors.fill : oneRect width : 1; height : 800 color : "red" } }}
anchors.fill描述的是一个区域,如上程序中是将oneRect的区域的大小来填充twoRect的区域大小,这样填充后,twoRect的大小就跟oneRect的大小一样了,注意此时,对twoRect设置height和width是不起作用的
Item {
Rectangle { id : oneRect x : 120; y : 20 width : 100; height : 100 color : "green" Rectangle { id : twoRect anchors.fill : oneRect anchors.margins : 10 width : 1; height : 800 color : "red" } }}
anchors.margins以及各个anchors.*Margins描述的也是一个区域,这个区域是当前元素距离相对元素的间距区域,如上程序中oneRect的大小就等于twoRect的大小加上margins描述的区域的大小。这个属性类似于css的margin属性,不再详述。
Item {
Rectangle { id : oneRect x : 120; y : 20 width : 100; height : 100 color : "green" Rectangle { id : twoRect anchors.top : oneRect.bottom anchors.horizontalCenter : oneRect.horizontalCenter anchors.horizontalCenterOffset : 10 width : 80; height : 80 color : "red" } }}anchors.horizontalCenterOffset属性需要配合anchors.horizontalCenter属性一起使用,他描述的是相对元素水平中心点的偏移值,注意通常是向右偏移,同理anchors.verticalCenterOffset是描述的垂直中心点的偏移值,偏移是向下偏移,anchors.baselineOffset描述的是相对元素原点的偏移量,偏移是向下偏移,这里不再详述。
16、clip : bool
此属性描述当前元素所属画刷画出来的且不在当前元素基本区域内的子元素是否支持剪接(个人觉得显示和隐藏还更贴切些)。注意剪接的对象是当前元素的子元素(因为只有子元素才是由自己的画刷所画出来的)。也就是说clip只能剪接当前元素自身画刷画出来的对象,通常就是自己的子元素,并且这些子元素不能在自身的基本区域内,否则不会有任何影响。例如:
Item {
Rectangle {
id : oneRect x : 120; y : 20 width : 100; height : 100 color : "green" Text { id: name text: "text" } focus : true Keys.onSelectPressed : { oneRect.clip = !oneRect.clip; } Rectangle { id : twoRect anchors.top : oneRect.bottom width : 50; height : 50 color : "red" Text { id: twoText text: "text" } } Rectangle { id : threeRect anchors.top : twoRect.bottom width : 50; height : 50 color : "black" Text { id: threeText text: "text" } } clip : false }}
以上程序我们设定了通过手机模拟器的中键来改变oneRect元素是否支持剪接,通过运行效果可以看出,当clip为true的时候twoRect和threeRect被隐藏了,而oneRect基本区域内的颜色和文字(这部分是属于父元素所画出来的)则不受任何影响。这个程序我们发现,twoRect和threeRect都在oneRect的基本区域之外,那么我们将twoRect放入基本区域之内(即将twoRect的anchors.top修改为oneRect.top)时,会是怎么的一种情况呢,twoRect和threeRect还会被隐藏吗,运行后我们发现,twoRect没有被隐藏了,threeRect被隐藏了。那么我们得出这样的结论:当clip为true的时候,当前元素基本区域之外的任何子元素以及子元素的子元素都会被隐藏,而基本区域之内的任何子元素不会受到影响。而基本区域指的是当clip即将变为true的时候,当前元素通过width和height所设定的那么一块区域。
注意:clip所能够剪接的区域必须是类似矩形的区域,其他区域不支持