文章目录
一.SpringBoot配置文件
SpringBoot配置文件主要有两类
application.properties,application.yml:全局配置文件,作用是对一些默认配置的配置值进行修改,在spring boot启动时默认加载此文件自定义属性文件:通过@PropertySource加载。@PropertySource可以同时加载多个文件,也可以加载单个文件。如果相同第一个属性文件和第二属性文件存在相同key,则最后一个属性文件里的key启作用。加载文件的路径也可以配置变量
二.@Value
1.@Value("#{}")与@Value("${}")的区别
@Value(“#{}”)表示SpEl表达式,通常用来获取bean的属性,或者调用bean的某个方法。当然还有可以表示常量- 用
@Value(“${xxxx}”): 用于从配置文件读取值
2.使用
2.1.${…}用法
@Value(“${spelDefault.value}”)可以从属性文件中读取对应的值,如果属性文件中没有这个属性,会报错。可以通过赋予默认值解决这个问题。
    // 如果属性文件没有spelDefault.value,则会报错
    //  @Value("${spelDefault.value}")
    //  private String spelDefault2;

    // 使用default.value设置值,如果spelDefault.value不存在则使用默认值
    @Value("${spelDefault.value:127.0.0.1}")
    private String spelDefault;
2.2.#{…}用法
@Value(“#{}”)表示SpEL表达式,通常用来获取bean的属性,或者调用bean的某个方法。当然还有可以表示常量
@Value(“#{}”) 使用的场景有:
- 注入普通字符串
- 注入操作系统属性
- 注入表达式结果
- 注入其他Bean属性
- 注入文件资源
- 注入URL资源
详见代码
    @Value("normal")
    private String normal; // 注入普通字符串

    @Value("#{systemProperties['os.name']}")
    private String systemPropertiesName; // 注入操作系统属性

    @Value("#{ T(java.lang.Math).random() * 100.0 }")
    private double randomNumber; //注入表达式结果

    @Value("#{dataSource.loginTimeout}")
    private int dataSourceLoginTimeout; // 注入其他Bean属性:注入dataSource对象的属性loginTimeout,类具体定义见下面

    @Value("classpath:config.txt")
    private Resource resourceFile; // 注入文件资源

    @Value("http://www.baidu.com")
    private Resource testUrl; // 注入URL资源

    // SpEL:调用字符串Hello World的concat方法
    @Value("#{'Hello World'.concat('!')}")
    private String helloWorld;

    // SpEL: 调用字符串的getBytes方法,然后调用length属性
    @Value("#{'Hello World'.bytes.length}")
    private String helloWorldbytes;
执行结果
normal=normal,
systemPropertiesName=Windows 10,
randomNumber=86.79399842602025,
dataSourceLoginTimeout=0,
resourceFile=class path resource [config.txt],
testUrl=URL [http://www.baidu.com],
helloWorld=Hello World!,
helloWorldbytes=11
${…}和#{…}混合使用
通过${server.name}从属性文件中获取值并进行替换,然后就变成了 执行SpEL表达式#{'xxxx'.split(',')}
// SpEL: 传入一个字符串,根据","切分后插入列表中, #{}和${}配置使用(注意单引号,注意不能反过来${}在外面,#{}在里面)
    @Value("#{'${server.name}'.split(',')}")
    private List<String> servers;
在上文中在#{}外面,${}在里面可以执行成功,那么反过来是否可以呢${}在外面,#{}在里面,如代码
    // SpEL: 注意不能反过来${}在外面,#{}在里面,这个会执行失败
    @Value("${#{'HelloWorld'.concat('_')}}")
    private List<String> servers2;
答案是不能。因为spring执行${}是时机要早于#{}。所以${}在外面,#{}在里面是非法操作,${}内的#{}会被当成属性去属性文件中查找,如果查不到,默认是会报错的。
3.总结
#{…}用于执行SpEl表达式,并将内容赋值给属性
-${…}主要用于加载外部属性文件中的值#{…} 和${…}可以混合使用,但是必须#{}外面,${}在里面
三.@Value读取指定属性
application.properties提供自定义属性的支持,可以把一些常用的配置加到其中:
com.oyjp.name=HelloWorld
com.oyjp.want=祝大家恭喜发财,年年Double
在要使用的属性上面通过注解@Value(value="${config.name}")就可以注入进去
@RestController
@Slf4j
public class TestController {


    @Value("${com.test.name}")
    private String name;
    @Value("${com.test.age}")
    private String age;

    @GetMapping("/testValue1")
    public Map<String,Object> testValue() {


        log.info("name={},age={}",name,age);
        Map<String,Object> result = new HashMap<>(16);
        result.put("name",name);
        result.put("age",age);
        return result;
    }
}
请求/testValue2接口

四.@ConfigurationProperties多属性读取并绑定bean
有时候属性太多了,一个个绑定到属性字段上太累,官方提倡@ConfigurationProperties注解,将某一类前缀等于prefix = "前缀"的属性映射到当前Bean的属性值上面
@ConfigurationProperties告诉SpringBoot将本类中的所有属性和核心配置文件中相关的配置进行绑定
- prefix: 要扫描属性的前缀
- ignoreUnknownFields:忽略未知的字段。
- ignoreInvalidFields:是否忽略验证失败的字段。这个怎么理解呢?比如我们在配置文件中配置了一个字符串类型的变量,类中的字段是int类型,那肯定会报错的。如果出现这种情况我们可以容忍,则需要配置该属性值为true。该参数值默认为false。
application.properties文件
com.ws.name=李四
com.ws.age=18
使用@ConfigurationProperties注解,映射application.properties所有前缀为"com.ws"的配置项的值到类ConfigBean的属性中
需要注意的是类的属性名要和配置项的后缀一样
@ConfigurationProperties(prefix = "com.ws",ignoreInvalidFields=true)
@Component//加载到Spring容器
@Data
public class ConfigBean {


    private String name;
    private Integer age;
    private Integer sex;//此属性在配置文件中没有
}
在启动类中使用注解@EnableConfigurationProperties
- 如果
启动类与controller,model的父包位于同一级中会默认扫描,不用添加@EnableConfigurationProperties注解.- 如果不在同一包下可以通过下面的方法指定这里配置完还需要在spring Boot入口类加上
@EnableConfigurationProperties({ConfigBean.class})并指明要加载哪个bean
@SpringBootApplication
@EnableConfigurationProperties
public class SpringDemoApplication {


    // 启动入口
    public static void main(String[] args) {


        SpringApplication.run(SpringDemoApplication.class, args);
    }
请求/testValue2接口
@RestController
@Slf4j
public class TestController {


    @Autowired
    ConfigBean configBean;

    @GetMapping("/testValue2")
    public Map<String,Object> testValue2() {


        log.info("name={},age={}",configBean.getName(),configBean.getAge());
        Map<String,Object> result = new HashMap<>(16);
        result.put("name",configBean.getName());
        result.put("age",configBean.getAge());
        return result;
    }
}
执行结果:

五.@PropertySource自定义properties读取
5.1.@PropertySource使用
@Value与@ConfigurationProperties可以从全局配置文件“application.properties”或者“application.yml”中取值,然后为需要的属性赋值。
当应用比较大的时候,如果所有的内容都当在一个配置文件中,就会显得比较臃肿,同时也不太好理解和维护,此时可以将一个文件拆分为多个,使用 @PropertySource注解加载指定的配置文件。
@PropertySource:注解读取指定文件并将属性注入到配置类
- encoding: 指定读取属性文件所使用的编码,我们通常使用的是UTF-8;
- ignoreResourceNotFound : 当指定的配置文件不存在是否报错,默认是false; 实际项目开发中,最好设置ignoreResourceNotFound为false。该参数默认值为false。
- value:设置需要加载的属性文件,可以一次性加载多个。
notDefault.properties
com.nd.name=王五
com.nd.age=25
NotDefaultConfigBean
需要通过@Configuration + @propertySource 指定配置文件位置, 然后结合@ConfigurationProperties或者@Value使用
@Component
@ConfigurationProperties(prefix = "com.nd",ignoreInvalidFields=true)
@Configuration
@PropertySource(value = {

    "classpath:notDefault.properties"},encoding = "UTF-8")
public class NotDefaultConfigBean {


    private String name;
    private Integer age;
    //被依赖项可以不加 @ConfigurationProperties 注解,但是必须提供 getter、setter 方法,可以放一个对象,配置文件里面的取名方式为com.nd.对象名.属性名

}
注意:如果你使用的是
1.5前的版本,那么可以通过@ConfigurationProperties的locations指定properties文件的位置,这样:
1.5后没有这个属性了,添加@Configuration+@PropertySource("classpath:xxx.properties")后才可以读取。

请求/testValue3接口
@RestController
@Slf4j
public class TestController {


    @Autowired
    NotDefaultConfigBean notDefaultConfigBean;

    @GetMapping("/testValue3")
    public Map<String,Object> testValue3() {


        log.info("name={},age={}",notDefaultConfigBean.getName(),notDefaultConfigBean.getAge());
        Map<String,Object> result = new HashMap<>(16);
        result.put("name",notDefaultConfigBean.getName());
        result.put("age",notDefaultConfigBean.getAge());
        return result;
    }
}
执行结果

5.2.@PropertySource 加载 yml 配置文件
@PropertySource(value = {

    "classpath:xxxx.yml"}, factory = PropertySourceFactory.class)
import org.springframework.boot.env.YamlPropertySourceLoader;
import org.springframework.core.env.PropertySource;
import org.springframework.core.io.support.DefaultPropertySourceFactory;
import org.springframework.core.io.support.EncodedResource;
import java.io.IOException;
import java.util.List;
/**
 * 用于  @PropertySource 加载 yml 配置文件.
 */
public class PropertySourceFactory extends DefaultPropertySourceFactory {


    @Override
    public PropertySource<?> createPropertySource(String name, EncodedResource resource) throws IOException {


        if (resource == null) {


            return super.createPropertySource(name, resource);
        }
        List<PropertySource<?>> sources = new YamlPropertySourceLoader().load(resource.getResource().getFilename(), resource.getResource());
        return sources.get(0);
    }
}
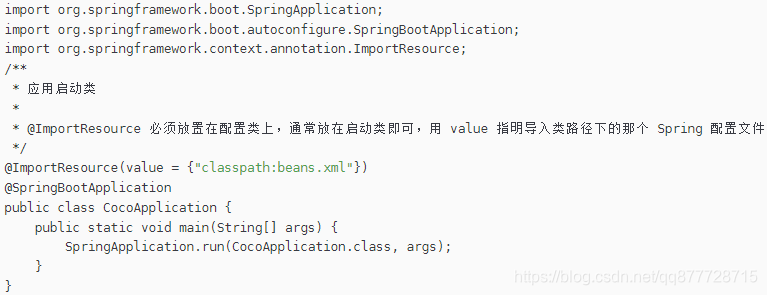
5.3.@ImportResource 导入Spring 配置文件
1、
@ImportResource 注解用来导入 Spring 的配置文件,如核心配置文件 “beans.xml”,从而让配置文件里面的内容生效;
2、如果应用中仍然想采用以前 xml 文件的配置方式,如 “beans.xml” ,则使用 “@ImportResource” 注解轻松搞定。
3、将 @ImportResource 标注在一个配置类上,通常直接放置在应用启动类上,和 @SpringBootApplication 一起即可。

六.读取多个自定义properties
第一个属性文件 config.properties 内容如下:
book.name=bookName
#${anotherfile.configinject}作为第二个属性文件加载路径的变量值
anotherfile.configinject=placeholder
第二个属性文件 config_placeholder.properties内容如下:
book.name.placeholder=bookNamePlaceholder
下面通过@Value(“${app.name}”)语法将属性文件的值注入bean属性值
@Data
@Component
@PropertySource({

    "classpath:config.properties","classpath:config_${anotherfile.configinject}.properties"})
public class ConfigurationFileInject{


    @Value("${app.name}")
    private String appName; // 这里的值来自application.properties,spring boot启动时默认加载此文件

    @Value("${book.name}")
    private String bookName; // 注入第一个配置外部文件属性

    @Value("${book.name.placeholder}")
    private String bookNamePlaceholder; // 注入第二个配置外部文件属性

    @Autowired
    private Environment env;  //注入环境变量对象,存储注入的属性值
}
@RunWith(SpringRunner.class)
@SpringBootTest(webEnvironment = SpringBootTest.WebEnvironment.RANDOM_PORT)
public class ConfiginjectApplicationTest {


    @Autowired
    private ConfigurationFileInject configurationFileInject;

    @Test
    public void configurationFileInject(){


        System.out.println(configurationFileInject.toString());
    }
}
ConfigurationFileInject(
appName=SpringBootDemo,
bookName=bookName,
bookNamePlaceholder=bookNamePlaceholder,
env=StandardEnvironment {

    activeProfiles=[dev], defaultProfiles=[default], propertySources=[MapPropertySource {

    name='server.ports'}, ConfigurationPropertySourcesPropertySource {

    name='configurationProperties'}, MapPropertySource {

    name='Inlined Test Properties'}, PropertiesPropertySource {

    name='systemProperties'}, OriginAwareSystemEnvironmentPropertySource {

    name='systemEnvironment'}, RandomValuePropertySource {

    name='random'}, OriginTrackedMapPropertySource {

    name='applicationConfig: [classpath:/application-dev.properties]'}, OriginTrackedMapPropertySource {

    name='applicationConfig: [classpath:/application.properties]'}, ResourcePropertySource {

    name='class path resource [user.properties]'}, ResourcePropertySource {

    name='class path resource [notDefault.properties]'}, ResourcePropertySource {

    name='class path resource [config_placeholder.properties]'}, ResourcePropertySource {

    name='class path resource [config.properties]'}]}
)
七.拓展
7.1.参数间引用
在xxx.properties中的各个配置项之间也可以${xxx}来使用:
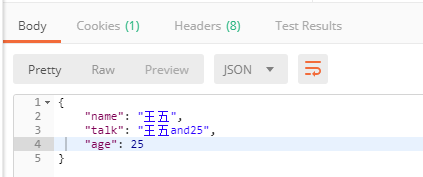
notDefault.properties
com.nd.name=王五
com.nd.age=25
com.nd.talk=${com.nd.name}and${com.nd.age}
NotDefaultConfigBean
@Data
@Component
@ConfigurationProperties(prefix = "com.nd", ignoreInvalidFields = true)
@Configuration
@PropertySource(value = {

    "classpath:notDefault.properties"}, encoding = "UTF-8")
public class NotDefaultConfigBean {


    private String name;
    private Integer age;
    private String talk;
}
请求/testValue3接口
@RestController
@Slf4j
public class TestController {


    @Autowired
    NotDefaultConfigBean notDefaultConfigBean;

    @GetMapping("/testValue3")
    public Map<String,Object> testValue3() {


        log.info("name={},age={},talk={}",notDefaultConfigBean.getName(),notDefaultConfigBean.getAge(),notDefaultConfigBean.getTalk());
        Map<String,Object> result = new HashMap<>(16);
        result.put("name",notDefaultConfigBean.getName());
        result.put("age",notDefaultConfigBean.getAge());
        result.put("talk",notDefaultConfigBean.getTalk());
        return result;
    }
}
7.2.外部配置-命令行参数配置
java -jar xxx.jar --server.port=8080 &
可以看出,命令行中连续的两个减号--就是对application.properties中的属性值进行赋值的标识。
所以java -jar xx.jar --server.port=8080等价于在application.properties中添加属性server.port=8080。
如果你怕命令行有风险,可以使用
SpringApplication.setAddCommandLineProperties(false)禁用它。
7.3.配置文件的优先级
SpringBoot配置文件可以放在多种路径下,不同路径下的配置优先级有所不同。
可放置目录(优先级从高到低)
- file:./config/ (当前项目路径config目录下);
- file:./ (当前项目路径下);
- classpath:/config/ (类路径config目录下);
- classpath:/ (类路径config下).
不同优先级同名属性,优先级高的会覆盖优先级低的, 同优先级同名属性,yml里面的属性就会覆盖properties里的属性。
7.4.Profile
7.4.1.多环境配置
当应用程序需要部署到不同运行环境时,一些配置细节通常会有所不同
- 最简单的比如日志,生产日志会将日志级别设置为
WARN或更高级别,并将日志写入日志文件,而开发日志的时候需要日志级别为DEBUG,日志输出到控制台即可。
如果按照以前的做法,就是每次发布的时候替换掉配置文件,这样太麻烦了,Spring Boot的Profile就给我们提供了解决方案
在Spring Boot中多环境配置文件名需要满足application-{profile}.properties的格式,其中{profile}对应你的环境标识,比如:

- application.properties:项目总(入口)配置文件(公共属性以及指定
spring.profiles.active)

spring.profiles.active= dev #dev、test、prod 三种配置可以在这里进行一键切换,默认激活 dev(开发)环境配置
- application-dev.properties:开发环境

- application-test.properties:测试环境

- application-prod.properties:生产环境

想要使用对应的环境,只需要在application.properties中使用spring.profiles.active属性来设置, 我这里配置的是开发、测试、生产时使用不同的端口启动,分别是8080、8081、8082。
当然也可以用命令行启动的时候带上参数:java -jar xxx.jar --spring.profiles.active=dev & 来指定使用那些配置文件
7.4.2.@Profile
除了可以用profile的配置文件来分区配置我们的环境变量,在代码中还可以用@Profile注解指定组件在哪个环境的情况下才能被注册到容器中,不指定,任何环境下都能注册这个组件
- 任何
@Component或@Configuration注解修饰的类或者@Bean修饰的方法都可以使用@Profile注解。使用位置
- @component或@Configuration修饰的类上
- 作为元注解修饰自定义注解
任何@Bean修饰的方法上
- 通过@Profile注解,我们可以根据不同的环境,生成不同的bean。
- @Profile({“p1”, “!p2”})的意思为p1的profile生效或p2的profile为生效时就会去生成修饰的类
- 如果要使用不同环境下生成不同配置的同一个bean,方法名不要相同,即尽量不要重载。
7.4.3.自定义注解
@Profile注解支持定义在其他注解之上,以创建自定义场景注解。这样就创建了一个@Dev注解,该注解可以标识bean使用于@Dev这个场景。后续就不再需要使用@Profile(“dev”)的方式,这样即可以简化代码。
@Target({

    ElementType.TYPE, ElementType.METHOD})
@Retention(RetentionPolicy.RUNTIME)
@Profile("dev")
public @interface Dev{


}
7.4.4.profile激活
properties文件
spring.profiles.active=dev
yaml
spring:
  profiles:
    active: dev
命令行
java -jar xxxx.jar --spring.profiles.active=dev &
7.4.5.场景:根据不同环境在代码中使用不用数据源
/**
 * 数据库连接
 */
public interface DBConnector {


    void configure();
}
/**
 * 开发测试环境数据库连接器
 */
@Component
@Profile("dev")
public class DevDBConnector implements DBConnector{


    @Override
    public Sreing configure() {


        System.out.println("DevDB");
    }
}
/**
 * 测试环境数据库连接器
 */
@Component
@Profile("test")
public class TestDBConnector implements DBConnector {


   @Override
    public String configure() {


        return "TestDB";
    }
}
@RestController
@Slf4j
public class TestController {


    @Autowired
    DBConnector dbConnector;
    @GetMapping("/testValue4")
    public String testValue4() {


        return  dbConnector.configure();
    }
}
请求/testValue4接口
spring.profiles.active=dev时

spring.profiles.active=test时

7.4.6.spring.profiles.active + spring.profiles.include使用
假设有这样一个springBoot项目。项目分为开发、测试、生产三个不同阶段(环境),每个阶段都会有db、ftp、redis等的不同配置信息。我们可以使用spring.profiles.include来实现三种不同环境的一键切换。
项目总(入口)配置文件:
bootstrap.yml:内容如下spring.profiles.active: dev #dev、test、prod 三种配置可以在这里进行一键切换,默认激活 dev(开发)环境配置
项目开发环境配置文件:
application-dev.yml (开发环境入口配置)、application-devDb.yml 、application-devFtp.yml、application-devRedis.ymlapplication-dev.yml 中含有如下内容
spring.profiles.include: devDb,devFtp,devRedis项目测试环境配置文件:
application-test.yml (测试环境入口配置)、application-testDb.yml 、application-testFtp.yml、application-testRedis.ymlapplication-test.yml 中含有如下内容
spring.profiles.include: testDb,testFtp,testRedis项目生产环境配置文件:
application-prod.yml (生产环境入口配置)、application-prodDb.yml 、application-prodFtp.yml、application-prodRedis.ymlapplication-prod.yml 中含有如下内容
spring.profiles.include: prodDb,prodFtp,prodRedis
spring.profiles.include 的作用是可以叠加激活新的profile ,这样可以在总的项目配置(bootstrap.yml)中实现一键切换dev、test、prod三者不同环境, 即
- 切换为dev时,同时激活了dev、devDb、devFtp、devRedis 的profile
- 切换为test时,同时激活了test、testDb、testFtp、testRedis 的profile
- 切换为prod时,同时激活了prod、prodDb、prodFtp、prodRedis 的profile
另外: 在yml配置文件中配置List 的值,可以采用 -子项 的方式,如 :
spring.profiles.include:
- 子项1
- 子项2
- 子项3
也可以采用 逗号分隔元素列表的方式,如: spring.profiles.include: 子项1,子项2,子项3
7.4.7.总结
- application.properties文件是必定要加载的,而且是先加载的,无论是通过哪种方式指定的。
- 当加载完application文件之后才加载指定的profiles文件
- 如果application文件和指定的profile文件有相同的配置或冲突的配置项,则以profile中的为基准
- application文件中写通用的配置项,profile文件中写特定环境的配置项,
spring.profiles.include指定公共的配置项(起到了分离的作用),这样可以简化配置文件的书写。
7.5.使用${random}产生的随机数
在一些情况下,有些参数我们需要它不是一个固定的值,比如密钥、服务端口等。
- Spring Boot的属性配置文件中可以通过
${random}来产生int值、long值、string字符串或者UUID,来支持属性的随机值。从配置文件中获取符合规则的随机数。
user.properties
#user类
user.id=2001
# 随机字符串:32位MD5字符串
user.username=李四${random.value}
# 随机uuid
user.pazzword=${random.uuid}
user.birthday=2019/05/08
# 100以内的随机数
user.age=${random.int(100)}
user.list=aaa,bbb,ccc
# 取引用变量的值,若不存在时,取默认值
user.map.key1=${user.username:默认值1}
# 变量不存在时,取默认值
user.map.key2=${abcd:默认值2}
# [5000,6000]范围内的随机数
user.address.id=${random.int[5000,6000]}
user.address.detail=浙江杭州
UserConfig
@Data
@Component
@ConfigurationProperties(prefix = "user")
@PropertySource("classpath:user.properties")
public class UserConfig {


    private String id;
    private String username;
    private String password;
    private String birthday;
    private String age;
    private List<String> list;
    private Map<String, String> map;
    private Address address;

    @Data
    static class Address {


        private Integer id;
        private String detail;
    }
}
打印结果:
{


	"address":{

    "detail":"浙江杭州","id":5652},
	"age":"10",
	"birthday":"2019/05/08",
	"id":"2001",
	"list":["aaa","bbb","ccc"],
	"map":{

    "key2":"默认值2","key1":"李四388fb500046a45c238a667da654a6d84"},
	"username":"李四2bffb942b13733c1ea7081b665fc5915"
}
7.6.和maven的profile一起使用
这里定义了dev,prod,test三个文件夹,用来演示maven中profile的使用。
项目结构如下:

注意,这里结合springboot的Profile的使用,每个文件夹里还定义了
application.properties,application-{xxx}.properties文件,是我比较推荐的方式,在application.properties都有spring.profiles.active=xxx去加载对应的application-{xxx}.properties
pom.xml文件里的关键配置为:
 <build>
        <plugins>
            <plugin>
                <groupId>org.springframework.boot</groupId>
                <artifactId>spring-boot-maven-plugin</artifactId>
                <executions>
                    <execution>
                        <goals>
                            <goal>repackage</goal>
                        </goals>
                    </execution>
                </executions>
                <configuration>
                    <executable>true</executable>
                </configuration>
            </plugin>
        </plugins>

        <resources>
            <resource>
                <directory>src/main/resources/</directory>
                <!--打包时先排除掉三个文件夹-->
                <excludes>
                    <exclude>dev/*</exclude>
                    <exclude>prod/*</exclude>
                    <exclude>test/*</exclude>
                </excludes>
                <includes>
                    <!--如果有其他定义通用文件,需要包含进来-->
                    <!--<include>messages/*</include>-->
                </includes>
            </resource>
            <resource>
                <!--这里是关键! 根据不同的环境,把对应文件夹里的配置文件打包-->
                <directory>src/main/resources/${profiles.active}</directory>
            </resource>
        </resources>
    </build>

    <profiles>
        <profile>
            <!--不同环境Profile的唯一id-->
            <id>dev</id>
            <properties>
                <!--profiles.active是自定义的字段,自定义字段可以有多个-->
                <profiles.active>dev</profiles.active>
            </properties>
        </profile>
        <profile>
            <id>prod</id>
            <properties>
                <profiles.active>prod</profiles.active>
            </properties>
            <!--activation用来指定激活方式,可以根据jdk环境,环境变量,文件的存在或缺失-->
            <activation>
                <!--这个字段表示默认激活-->
                <activeByDefault>true</activeByDefault>
            </activation>
        </profile>
        <profile>
            <id>test</id>
            <properties>
                <profiles.active>test</profiles.active>
            </properties>
        </profile>
    </profiles>
如果IDEA可以勾选Profiles为prod

然后install进行打包

打包后的接口如下,只有prod包的配置文件被打进classpath里面了

和maven的profile一起使用
Springboot1.x和2.x 通过@ConfigurationProperties对bean刷新自定义属性的实现和使用差别