目录
个人服务器选用
服务器有分硬件和云端的服务器。市场上有非常多服务器厂商,大型企业选用的一般是硬件服务器,因为它的性能和稳定性方面要优越与云端的服务器。近年来随着云计算的技术迅速发展,云服务器迅速占领市场,比较有名的有腾讯云,阿里云,华为云等等服务器厂商。这两种类型的服务器都需要付费的,硬件的还会偏贵一点,最后还有一种服务器就是本地的服务器,也就是从服务器的官网下载官方镜像iso,然后本地安装,缺点就是不借助工具的情况下无法通过外网访问。
博主是一个刚入职不到一年的Java程序员小白一枚,还在学习阶段,选用的Centos 7本地服务器的安装,最后也会介绍Java基本开发环境的安装,有JDK安装,MySQL安装,Redis安装,SVN的安装,maven以及Jenkins的集成。
1. Centos 7 安装流程
- 进入Centos官网,地址
https://vault.centos.org/,下载iso镜像文件

选择

选用64位操作系统

选择第一个版本安装

这个过程可能下载比较慢,可以借助第三方工具下载,如IDM或者Free Download Manager等工具。
下载完之后

- 下载Oracle VM VirtualBox并导入iso镜像
为什么不用VMware Workstation安装,原因是VM太吃内存了!!
Oracle VM VirtualBox下载地址https://www.virtualbox.org/wiki/Downloads

安装过程可以修改安装位置,其余选项默认即可。
-
安装后打开,开始装系统

名称和文件夹可以自由选择

内存大小根据自己的物理机进行选择,一般不要超过物理机的一半

下一步

下一步

下一步

可以修改啊文件夹位置,如果C盘有条件尽量默认值

创建完之后进入设置=>存储,添加盘片

点击注册,不要点创建,然后选择我们下载好的iso文件,完成就行了。 -
点击启动服务,进行Linux系统安装配置
2. Linux服务器基础配置
刚刚下载完的服务器选用的最小安装,除了没有桌面外,还没有网络连接和SSH服务
开启网络连接:
// 查看有线网设备
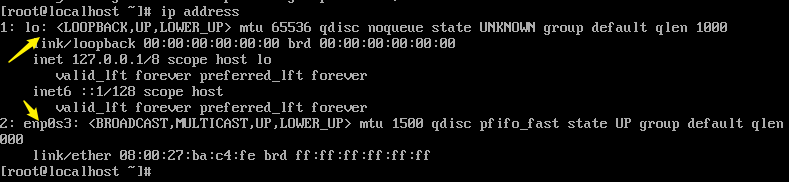
可以看到本地回环接口和有线网络接口enp0s3,此时修改有线网络配置文件
vi /etc/sysconfig/network-scripts/ifcfg-enp0s3

保存退出,重启网络连接
systemctl restart network.service
查看ip地址

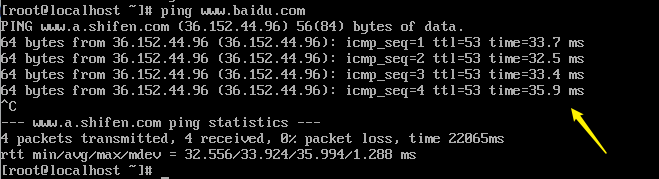
由于Virtual Box默认采用NAT网络地址转换,所以我们可以改成网卡桥接,与我们本地的物理网卡进行桥接,此时使用的ip地址就是同一个网段的了

再次查看ip地址

测试访问百度:
接下来更换yum官方源
# 下载wget工具
yum install -y wget
# 进入yum源配置文件所在文件夹
cd /etc/yum.repos.d/
# 备份本地yum源
mv CentOS-Base.repo CentOS-Base.repo_bak
# 获取国内yum源(阿里、163二选一)
wget -O CentOS-Base.repo http://mirrors.aliyun.com/repo/Centos-7.repo
# wget -O CentOS-Base.repo http://mirrors.163.com/.help/CentOS7-Base-163.repo

# 清理yum缓存
yum clean all
# 重建缓存
yum makecache
# 升级Linux系统
yum -y update
参考
https://www.cnblogs.com/angdh/p/12459223.html
https://www.cnblogs.com/kinwing/p/11134179.html
3. JDK 8 下载与配置
下载:Oracle官网下载
解压:tar -zxvf jdk-8u241-linux-x64.tar.gz
JDK的配置比较简单:
vi /etc/profile
#注意替换相应的Java路径
JAVA_HOME=/develop/java/jdk1.8.0_144
JRE_HOME=/develop/java/jdk1.8.0_144/jre
PATH=$PATH:$JAVA_HOME/bin:$JRE_HOME/bin
CLASSPATH=.:$JAVA_HOME/lib/dt.jar:$JAVA_HOME/lib/tools.jar:$JRE_HOME/lib
export JAVA_HOME JRE_HOME PATH CLASSPATH
需要注意的是下载安装路径一定要对的上。
参考
https://www.cnblogs.com/taohaijun/p/7153176.html
4. MySQL 下载与配置
#指定文件位置下载
wget http://dev.mysql.com/get/mysql-community-release-el7-5.noarch.rpm
rpm -ivh mysql-community-release-el7-5.noarch.rpm
yum install mysql-community-server
如果发现安装失败,尝试更换国内源
wget -O CentOS-Base.repo http://mirrors.aliyun.com/repo/Centos-7.repo
wget -O CentOS-Base.repo http://mirrors.163.com/.help/CentOS7-Base-163.repo

yun clean all
yum makecache
yum -y update
安装成功后!
重启mysql 服务 service mysqld restart
尝试登陆,此时是没有登录密码就可以登录:
[root@localhost mysql]# mysql -u root
Welcome to the MySQL monitor.  Commands end with ; or \g.
Your MySQL connection id is 2
Server version: 5.6.51 MySQL Community Server (GPL)

Copyright (c) 2000, 2021, Oracle and/or its affiliates. All rights reserved.

Oracle is a registered trademark of Oracle Corporation and/or its
affiliates. Other names may be trademarks of their respective
owners.

Type 'help;' or '\h' for help. Type '\c' to clear the current input statement.

mysql> quit
Bye
[root@localhost mysql]#
设置登录密码
mysql> set password for 'root'@'localhost' =password('809080');
Query OK, 0 rows affected (0.00 sec)
现在尝试远程,连接失败:

猜想可能是由于防火墙拦截,所以关闭服务器防火墙
CentOS 7.0默认使用的是firewall作为防火墙
#查看防火墙状态
firewall-cmd --state
#关闭防火墙
systemctl stop firewalld.service
#设置开机关闭防火墙
systemctl disable firewalld.service

参考
https://www.cnblogs.com/starof/p/4680083.html
5. Redis 安装与配置
由于Redis是C语言编写的,所以需要服务器安装gcc编译环境
yum install -y gcc
创建文件夹,下载redis
复制到指定文件夹里面解压
tar -zxvf redis-6.0.6.tar.gz
有条件的上个梯子下载,否则下载会有点慢。
解压后的文件夹
进入
[root@localhost redis-6.0.6]# pwd
/develop/redis-6.0.6
执行编译命令:
[root@localhost redis-6.0.6]# make
如果出现

表示没有编译成功,原因是gcc版本问题,具体原因可以参考:问题原因
更换高版本的gcc
[root@localhost redis-6.0.1]# gcc -v                             # 查看gcc版本
[root@localhost redis-6.0.1]# yum -y install centos-release-scl  # 升级到9.1版本
[root@localhost redis-6.0.1]# yum -y install devtoolset-9-gcc devtoolset-9-gcc-c++ devtoolset-9-binutils
[root@localhost redis-6.0.1]# scl enable devtoolset-9 bash
以上为临时启用,如果要长期使用gcc 9.1的话:
[root@localhost redis-6.0.1]# echo "source /opt/rh/devtoolset-9/enable" >>/etc/profile
换版本后重新make

出现红色框框的表示已经编译成功!
紧接着,指定安装目录路径

启动redis服务端

设置开机自启
编辑文件
[Unit]Description=redis-serverAfter=network.target
[Service]Type=forkingExecStart=/develop/redis/bin/redis-server /develop/redis/bin/redis.conf
PrivateTmp=true
[Install]WantedBy=multi-user.target
注意forkingExecStart路径必须配置相应的redis安装路径
开启后台启动:
vi /develop/redis/bin/redis.conf
修改daemonize = yes开启守护进程
接着进入redis的下载文件夹vi /develop/redis-6.0.6/utils
执行服务器的安装脚本:
[root@VM-0-6-centos utils]# ./install_server.sh
Welcome to the redis service installer
This script will help you easily set up a running redis server

This systems seems to use systemd.
Please take a look at the provided example service unit files in this directory, and adapt and install them. Sorry!
如果出现上面的情况,则需要修改install_server.sh 文件
vi ./install_server.sh
注释掉下面的内容
#bail if this system is managed by systemd
#_pid_1_exe="$(readlink -f /proc/1/exe)"
#if [ "${_pid_1_exe##*/}" = systemd ]
#then
#       echo "This systems seems to use systemd."
#       echo "Please take a look at the provided example service unit files in this directory, and adapt and install them. Sorry!"
#       exit 1
#fi
重新[root@VM-0-6-centos utils]# ./install_server.sh
会有如下的提示信息,直接默认就好了(或者可以自行修改路径)
最后,给redis客户端设置软连接
[root@localhost ~]# ln -s /develop/redis/bin/redis-cli /usr/bin/redis
开启自启命令:
[root@localhost bin]# systemctl daemon-reload

[root@localhost bin]# systemctl start redis.service

[root@localhost bin]# systemctl enable redis.service
如果报错提示redis.service不是是识别的服务,则可以进入cd /etc/init.d/查看具体的服务名称,运行上面的install_server.sh就是为了生成这个服务。
参考:
https://blog.csdn.net/weixin_44519874/article/details/112285537
https://www.cnblogs.com/heqiuyong/p/10463334.html
https://blog.csdn.net/ytangdigl/article/details/79796961
https://www.cnblogs.com/Sungeek/p/11691231.html
6. SVN服务器的安装
安装
yum -y install subversion
创建测试仓库
mkdir /develop/svnrepos
进入三个配置文件,添加如下内容
[root@localhost var]# cd /develop/
[root@localhost develop]# mkdir svnrepos
[root@localhost develop]# svnadmin create test
[root@localhost develop]# cd test/
[root@localhost test]# ls
conf  db  format  hooks  locks  README.txt
[root@localhost test]# cd conf/
[root@localhost conf]# ls
authz  passwd  svnserve.conf
[root@localhost conf]# vi authz
[root@localhost conf]# vi passwd
[root@localhost conf]# vi svnserve.conf
[root@localhost conf]# pwd
/develop/test/conf
vi authz添加svn用户和具备的权限
[/]
liuzeyu12a = rw
vi passwd设置用户的账号和密码
[users]
liuzeyu12a = 809080
vi svnserve.conf编辑svn的配置文件
[general]
anon-access = none
auth-access = write
password-db = passwd
authz-db = authz
realm = /develop/svnrepos
启动svn服务器
[root@localhost conf]# svnserve -d -r /develop/svnrepos/
[root@localhost conf]# ps -ef | grep 'svnserve'
root      1779     1  0 10:14 ?        00:00:00 svnserve -d -r /develop/svnrepos/
root      1781  1633  0 10:14 pts/0    00:00:00 grep --color=auto svnserve
[root@localhost conf]#
测试是否启动成功:
[root@localhost ~]# svn co svn://127.0.0.1:3690/test
用户名: liuzeyu12a
“liuzeyu12a”的密码:

-----------------------------------------------------------------------
注意!  你的密码,对于认证域:

   <svn://127.0.0.1:3690> /develop/svnrepos

只能明文保存在磁盘上!  如果可能的话,请考虑配置你的系统,让 Subversion
可以保存加密后的密码。请参阅文档以获得详细信息。

你可以通过在“/root/.subversion/servers”中设置选项“store-plaintext-passwords”为“yes”或“no”,
来避免再次出现此警告。
-----------------------------------------------------------------------
保存未加密的密码(yes/no)?yes
取出版本 0。
[root@localhost ~]#
也可以取本地的浏览器输入svn://ip地址:3690/xxxx进行访问到
此时SVN的安装配置到此为止,接下来来集成IDEA
安装SVN客户端
如果本地没有装SVN客户端的话,IDEA也是不能集成成功,下载地址
https://tortoisesvn.net/downloads.zh.html
选择我们下载的SVN.exe即可,这样IDEA就和客户端进行关联了
用打开一个要上传的项目,右击项目名称,找到

此时有可能没找到,取设置里面讲项目与svn进行关联,就可以找到了。

关联之后的项目就会变成红色,表示还在本地。

接下来开始关联SVN服务器

输入远程的SVN仓库地址

输入我们配置的SVN账号和密码

如果没报错说明连接成功

点击share,等待一小会
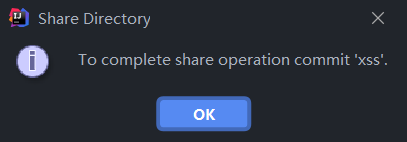
此时可以将代码全部变绿了,说明添加到了本地仓库里

最后一步提交到SVN服务器

选择要提交的文件,点击commit即可

验证是否提交代码成功?
提交后的IDEA代码会变成白色的

并且查看服务器上面的项目
[root@localhost test]# ls
conf  db  format  hooks  locks  README.txt
可以看到并没有我们上传的项目,其实事实上是有的,其实SVN为了安全起见令其不可见,我们呢可以通过其它的命令查看到
[root@localhost svnrepos]# svn co svn://127.0.0.1:3690/test
A    test/pom.xml
A    test/xss.iml
A    test/.idea
A    test/.idea/encodings.xml
A    test/.idea/compiler.xml
A    test/.idea/misc.xml
A    test/.idea/vcs.xml
A    test/.idea/libraries
A    test/.idea/libraries/Maven__org_springframework_boot_spring_boot_starter_tomcat_2_4_2.xml
A    test/.idea/libraries/Maven__org_springframework_spring_expression_5_3_3.xml
A    test/.idea/libraries/Maven__jakarta_xml_bind_jakarta_xml_bind_api_2_3_3.xml
A    test/.idea/libraries/Maven__org_xmlunit_xmlunit_core_
可见,代码确实已经上传的了SVN服务器,IDEA集成也告一段落。
参考:
https://www.cnblogs.com/-mrl/p/8980244.html
7. Git 的安装
#有时间再弄,目前暂时没用到Git
8. Maven安装
下载
[root@localhost develop]# wget https://mirrors.tuna.tsinghua.edu.cn/apache/maven/maven-3/3.6.3/binaries/apache-maven-3.6.3-bin.tar.gz
[root@localhost develop]# tar -xf apache-maven-3.6.3-bin.tar.gz -C .
[root@localhost develop]# mv /develop/apache-maven-3.6.3/ maven3.6
设置环境变量
在/etc/profile文件最下方加入新的一行export PATH=$PATH:/develop/maven3.6/bin
添加完后,执行source /etc/profile,让配置生效
验证是否安装成功
[root@localhost maven3.6]# which mvn
/develop/maven3.6/bin/mvn
[root@localhost maven3.6]# mvn -v
Apache Maven 3.6.3 (cecedd343002696d0abb50b32b541b8a6ba2883f)
Maven home: /develop/maven3.6
Java version: 1.8.0_144, vendor: Oracle Corporation, runtime: /develop/java/jdk1.8.0_144/jre
Default locale: zh_CN, platform encoding: UTF-8
OS name: "linux", version: "3.10.0-1160.15.2.el7.x86_64", arch: "amd64", family: "unix"
[root@localhost maven3.6]#
安装成功!
设置国内源镜像和本地仓库,编辑maven的settings.xml文件
<!-- 自行指定位置-->
<localRepository>/develop/maven3.6/mavenrepos</localRepository>

<!-- 阿里镜像源-->
<mirror>
     <id>alimaven</id>
     <name>aliyun maven</name>
     <url>http://maven.aliyun.com/nexus/content/groups/public/</url>
     <mirrorOf>central</mirrorOf>
</mirror>
9. Jenkins集成
Jenkins安装
第一种方法
sudo wget -O /etc/yum.repos.d/jenkins.repo https://pkg.jenkins.io/redhat-stable/jenkins.repo
sudo rpm --import https://pkg.jenkins.io/redhat-stable/jenkins.io.key

yum install jenkins
修改配置文件vim /etc/sysconfig/jenkins
#监听端口,改成其它的端口
JENKINS_PORT="8080"

#使用root,避免权限问题
$JENKINS_USER="root"
修改目录权限
chown -R root:root /var/lib/jenkins
chown -R root:root /var/cache/jenkins
chown -R root:root /var/log/jenkins
配置Jenkins的Java 环境
vii /etc/init.d/jenkins
加上

重启
service jenkins restart
ps -ef | grep jenkins
尝试访问Jenkins首页
http://192.168.0.103:8585/login?from=%2F

[root@localhost ~]# cat /var/lib/jenkins/secrets/initialAdminPassword
66d76ade223e4d1b9dccead8c8d8f4b7
如果觉得访问网页慢,可以修改hudson.model.UpdateCenter.xml文件
cd /var/lib/jenkins
去掉https的s

如果缺少插件又下载缓慢,可以去Jenkins的插件官网下载
https://plugins.jenkins.io/
下载后导入


全局配置
配置其实很简单,网上的教程也很多,这边演示的最简单的springboot打包成jar包运行
配置maven


配置maven的目的是为了我们在构建的时候将代码打包成jar包
配置JDK

项目配置
新建item

选择maven项目

进入配置

主要需要配置svn,maven和构建前的操作和构建后的操作


我们这个时候可以点击构建

左下角有进度条可以看,并且可以看控制台输出

构建成功后,查看工作空间

所以构建后的操作我们可以将maven打包好的jar包移动到指定位置,然后构建后,就是运行这个jar包即可。
进入服务器查看具体的构建位置
[root@localhost workspace]# ls
springboot-test
[root@localhost workspace]# cd springboot-test/
[root@localhost springboot-test]# ls
pom.xml  src  target  xss.iml
[root@localhost springboot-test]# cd target/
[root@localhost target]# ls
classes                 maven-archiver    test-classes
generated-sources       maven-status      xss-0.0.1-SNAPSHOT.jar
generated-test-sources  surefire-reports  xss-0.0.1-SNAPSHOT.jar.original
[root@localhost target]# pwd
/var/lib/jenkins/workspace/springboot-test/target
[root@localhost target]#
xss-0.0.1-SNAPSHOT.jar就是我们要的jar包。
构建后,执行相关脚本
vi start.sh
写入相关脚本

[root@localhost javaWrok]# chmod 777 start.sh

重新构建

出现蓝色的按钮,表示构建成功!
查看相关的Java进程:

表示项目已经自动化部署成功!!
参考
https://blog.csdn.net/wuruijie321/article/details/84134763