抽象类和接口
抽象类
语法规则
没有实际工作的方法, 比如上篇文章的Shape类, 我们可以把它设计成一个 抽象方法(abstractmethod), 包含抽象方法的类我们称为 抽象类(abstract class)
abstract class Shape {


	abstract public void draw();
}
- 在 draw 方法前加上 abstract 关键字, 表示这是一个抽象方法. 同时抽象方法没有方法体(没有 { }, 不能执行具体代码)
- 对于包含抽象方法的类, 必须加上 abstract 关键字表示这是一个抽象类
注意事项
- 抽象类不能直接实例化
Shape shape = new Shape();

// 编译出错
Error:(30, 23) java: Shape是抽象的; 无法实例化
- 在抽象类中,可以拥有和普通类一样的数据成员和方法
abstract class Shape {


	int count;
	public static float sum;
	public abstract void draw();
	public int bian(){


		return count;
	}
}
- 抽象类是可以被继承的,发生向上转型,动态绑定以及多态
abstract class Shape1 {


    public abstract void draw();
}

class Cricle1 extends Shape1 {


    @Override
    public void draw() {


        System.out.println("⭕");
    }
}

public class Demo {


    public static void drawMap(Shape1 shape1) {


        shape1.draw();;
    }
    public static void main(String[] args) {


        Cricle1 cricle1 = new Cricle1();
        drawMap(cricle1);
    }
}
- 当一个普通类继承了一个抽象类,那么这么普通类一定要重写抽象类中的抽象方法。
//子类中没有重写Shape1中的draw抽象方法
class Cricle1 extends Shape1 {


}
此时会报错

- 当普通类继承了抽象类,且不想实现抽象类中的抽象方法的时候,那么这个普通类可以被修改为抽象类,此时就不需要进行实现了,当然也可以实现
abstract class Cricle1 extends Shape1 {


}
这时就没有报错了
- 抽象方法不能是private修饰的,因为抽象方法就是用来被重写的
abstract class Shape1 {


    private abstract void draw();
}

- 抽象类存在的最大意义就是为了被继承
接口
使用关键字interface
interface IShape {


    void draw();
}
- 接口当中的方法,不能有具体实现
接口当中的方法,默认是:public abstract
interface IShape {


    public abstract void draw();
    void write();
}
- 接口当中的成员变量,默认是public static final
interface IShape {


    public static final int age = 10;
    int age2 = 20;
}
- JDK1.8引入的新特性,default修饰的方法,为默认方法,可以有具体的实现
interface IShape {


    public static final int age = 10;
    int age2 = 20;
    public abstract void draw();
    void write();
}
- 接口和抽象类一样,是不能实例化的
- 类和接口的关系是,implements,而不是用extends
class Flower1 implements IShape{


    @Override
    public void draw() {


        System.out.println("❀");
    }
}
- 接口也是可以被继承的,发生向上转型,动态绑定以及多态
interface IShape {


    void draw();
}

class Flower1 implements IShape{


    @Override
    public void draw() {


        System.out.println("❀");
    }
}
class Rect1 implements IShape {


    @Override
    public void draw() {


        System.out.println("♦");
    }
}

public class Demo2 {


    public static void drawMap(IShape iShape) {


        iShape.draw();
    }

    public static void main(String[] args) {


        IShape iShape = new Flower1();
        drawMap(iShape);
        drawMap(new Rect1());
    }
}
- 一个类可以实现多个接口
interface A {


    void funcA();
}
interface B {


    void funcB();
}
interface C {


    void funcC();
}
class Test implements A,B,C {


    @Override
    public void funcA() {


    }
    @Override
    public void funcB() {


    }
    @Override
    public void funcC() {


    }
}
- 一个类可以继承类,同时实现多个接口
interface A {


    void funcA();
}
interface B {


    void funcB();
}
interface C {


    void funcC();
}
abstract class TestAbstrect {


    public abstract void testAbstrect();
}
class Test extends TestAbstrect implements A,B,C {


    @Override
    public void funcA() {


    }
    @Override
    public void funcB() {


    }
    @Override
    public void funcC() {


    }
    @Override
    public void testAbstrect() {


    }
}
- 接口可以扩展多个接口
interface A {


    void funcA();
}
interface B {


    void funcB();
}
interface C {


    void funcC();
}
interface D extends A,B,C{


    void funcD();
}
class F implements D {


    @Override
    public void funcA() {


    }
    @Override
    public void funcB() {


    }
    @Override
    public void funcC() {


    }
    @Override
    public void funcD() {


    }
}
- 所以接口的作用就是解决java多继承的问题
理解接口
看一个例子
interface IFlying {


    void fly();
}
interface IRunning {


    void run();
}
interface ISwimming {


    void swim();
}

class Animal {


    protected String name;
    public Animal(String name) {


        this.name = name;
    }
}

class Cat extends Animal implements IRunning{


    public Cat(String name) {


        super(name);
    }
    @Override
    public void run() {


        System.out.println(this.name + "跑");
    }
}

class Fish extends Animal implements ISwimming {


    public Fish(String name) {


        super(name);
    }
    @Override
    public void swim() {


        System.out.println(this.name + "游");
    }
}

class Duck extends Animal implements IRunning,ISwimming,IFlying {


    public Duck(String name) {


        super(name);
    }
    @Override
    public void fly() {


        System.out.println(this.name + "飞");
    }
    @Override
    public void run() {


        System.out.println(this.name + "跑");
    }
    @Override
    public void swim() {


        System.out.println(this.name + "游");
    }
}

public class Demo4 {


    public static void main(String[] args) {


        IRunning iRunning = new Duck("唐老鸭");
        iRunning.run();
        IFlying iFlying = new Duck("唐老鸭");
        iFlying.fly();
        ISwimming iSwimming = new Duck("唐老鸭");
        iSwimming.swim();
    }
}
主函数也可以这样写
public class Demo5 {


    public static void goRun(IRunning iRunning) {


        iRunning.run();
    }
    public static void goFly(IFlying iFlying) {


        iFlying.fly();
    }
    public static void goSwim(ISwimming iSwimming) {


        iSwimming.swim();
    }
    public static void main(String[] args) {


        Duck duck = new Duck("唐老鸭");
        goRun(duck);
        goFly(duck);
        goSwim(duck);
    }
}
这样设计有什么好处呢?
时刻牢记多态的好处, 让程序猿忘记类型. 有了接口之后, 类的使用者就不必关注具体类型, 而只关注某个类是否具备某种能力
常见的两个接口
Comparable
class Student implements Comparable<Student>{


    public String name;
    public int score;
    public Student(String name, int score) {


        this.name = name;
        this.score = score;
    }
    @Override
    public String toString() {


        return "Student{" +
                "name='" + name + '\'' +
                ", score=" + score +
                '}';
    }
    @Override
    public int compareTo(Student o) {


        if(this.score > o.score) {


            return 1;
        }else if(this.score == o.score) {


            return 0;
        }else {


            return -1;
        }
    }
}

public class Demo5 {


    public static void main(String[] args) {


        Student[] students = new Student[3];
        students[0] = new Student("星星",21);
        students[1] = new Student("狒狒",12);
        students[2] = new Student("朵朵",23);
        System.out.println(Arrays.toString(students));
        System.out.println("============排序=============");
        Arrays.sort(students);
        System.out.println(Arrays.toString(students));
    }
}

此时就会按照成绩排序
Comparator
比较器:一般在类外定义
//分数比较器
public class ScoreComparator implements Comparator<Student1> {


    @Override
    public int compare(Student1 o1, Student1 o2) {


        return o1.score - o2.score;
    }
}
//姓名比较器
public class NameComparator implements Comparator<Student1> {


    @Override
    public int compare(Student1 o1, Student1 o2) {


        return o1.name.compareTo(o2.name);
    }
}
class Student1{


    public String name;
    public int score;

    public Student1(String name, int score) {


        this.name = name;
        this.score = score;
    }

    @Override
    public String toString() {


        return "Student{" +
                "name='" + name + '\'' +
                ", score=" + score +
                '}';
    }
}

public class Demo6 {


    public static void main(String[] args) {


        Student1[] students = new Student1[3];
        students[0] = new Student1("星星",21);
        students[1] = new Student1("狒狒",12);
        students[2] = new Student1("朵朵",23);
        System.out.println(Arrays.toString(students));
        System.out.println("============根据分数排序=============");
        ScoreComparator scoreComparator = new ScoreComparator();
        Arrays.sort(students, scoreComparator);
        System.out.println(Arrays.toString(students));
        System.out.println("============根据姓名排序=============");
        NameComparator nameComparator = new NameComparator();
        Arrays.sort(students, nameComparator);
        System.out.println(Arrays.toString(students));
    }

}

Cloneable
深拷贝:
class Person implements Cloneable {
public String name;
public int age;
public Person(String name) {
this.name = name;
}
@Override
public String toString() {
return "Person{" +
"name='" + name + '\'' +
", age=" + age +
'}';
}
@Override
protected Object clone() throws CloneNotSupportedException {
return super.clone();
}
}
public class Demo7 {
public static void main(String[] args) throws CloneNotSupportedException {
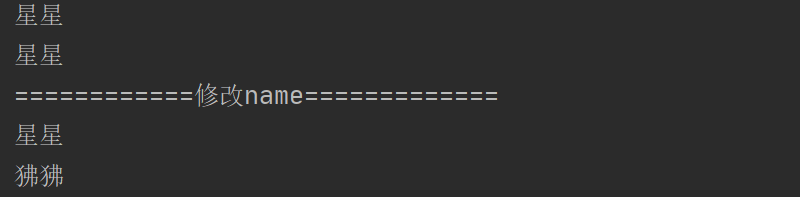
Person person1 = new Person("星星");
Person person2 = (Person) person1.clone();
System.out.println(person1.name);
System.out.println(person2.name);
System.out.println("============修改name=============");
person2.name = "狒狒";
System.out.println(person1.name);
System.out.println(person2.name);
}
}

浅拷贝:
class Money {
public double money = 12.8;
}
class Person implements Cloneable {
public String name;
public Money m = new Money();
public Person(String name) {
this.name = name;
}
@Override
public String toString() {
return "Person{" +
"name='" + name + '\'' +
'}';
}
@Override
protected Object clone() throws CloneNotSupportedException {
return super.clone();
}
}
public class Demo7 {
public static void main(String[] args) throws CloneNotSupportedException {
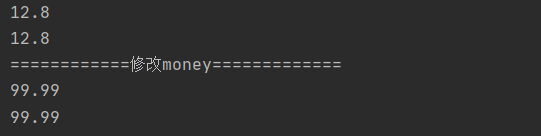
Person person1 = new Person("星星");
Person person2 = (Person) person1.clone();
System.out.println(person1.m.money);
System.out.println(person2.m.money);
System.out.println("============修改name=============");
person2.m.money = 99.99;
System.out.println(person1.m.money);
System.out.println(person2.m.money);
}
}
怎么将上面的代码变为深拷贝呢
class Money implements Cloneable{


    public double money = 12.8;

    @Override
    protected Object clone() throws CloneNotSupportedException {


        return super.clone();
    }
}

class Person implements Cloneable {


    public String name;
    public Money m = new Money();

    public Person(String name) {


        this.name = name;
    }

    @Override
    public String toString() {


        return "Person{" +
                "name='" + name + '\'' +
                '}';
    }

    @Override
    protected Object clone() throws CloneNotSupportedException {


        Person person2 = (Person)super.clone();
        person2.m = (Money)this.m.clone();
        return person2;
    }
}
这样子进行修改后,则达到了深拷贝
