Shiro 实战教程
![[外链图片转存失败,源站可能有防盗链机制,建议将图片保存下来直接上传(img-Je7YhpbK-1617089045960)(C:\Users\Administrator\AppData\Roaming\Typora\typora-user-images\image-20210325142901128.png)]](https://img-blog.csdnimg.cn/20210330152825545.png?x-oss-process=image/watermark,type_ZmFuZ3poZW5naGVpdGk,shadow_10,text_aHR0cHM6Ly9ibG9nLmNzZG4ubmV0L3dlaXhpbl80NjE5NTk1Nw==,size_16,color_FFFFFF,t_70)
1、权限的管理
1、什么是权限管理
基本上涉及到用户参与的系统都要进行权限管理,权限管理属于系统安全的范畴,权限管理实现对用户访问的控制,按照安全规则或者安全策略控制用户可以访问而且只能访问自己被授权的资源。
权限管理包括用户身份认证 和 授权两部分,简称认证授权。对于需要访问控制的资源用户首先经过身份认证,认证通过后用户具有该资源的访问权限方可访问。
2、什么是身份认证
身份认证,就是判断一个用户是否为合法用户的处理过程。最常用的简单身份认证方式就是系统通过核对用户输入的用户名和口令,看其是否与系统中存储的用户的用户名和口令一致,来判断用户身份是否正确,对于采用指纹等系统,则出示指纹;对于硬件key等刷卡系统,则需要刷卡。
3、什么是授权
授权,即访问控制,控制谁能访问哪些资源。主体进行身份认证后需要根据权限方可访问系统的资源,对于某些资源没有权限是无法访问的
2、什么是shiro
Apache Shiro™ is a powerful and easy-to-use Java security framework that performs authentication, authorization, cryptography, and session management. With Shiro’s easy-to-understand API, you can quickly and easily secure any application – from the smallest mobile applications to the largest web and enterprise applications.
Apache Shiro™是一个功能强大且易于使用的Java安全框架,可执行身份验证、授权、加密和会话管理。通过Shiro易于理解的API,您可以快速、轻松地保护任何应用程序——从最小的移动应用程序到最大的web和企业应用程序。
Shiro是Apache旗下一个开源框架,它将软件系统的安全认证相关的功能抽取出来,实现用户身份认证,权限授权,加密、会话管理等功能,组成了一个通用的安全认证框架
3、shiro核心架构图
![[外链图片转存失败,源站可能有防盗链机制,建议将图片保存下来直接上传(img-X1y0mfx2-1617089045961)(Shiro 实战教程.assets/image-20210325172318547.png)]](https://img-blog.csdnimg.cn/20210330152841569.png?x-oss-process=image/watermark,type_ZmFuZ3poZW5naGVpdGk,shadow_10,text_aHR0cHM6Ly9ibG9nLmNzZG4ubmV0L3dlaXhpbl80NjE5NTk1Nw==,size_16,color_FFFFFF,t_70)
1、认证与授权相关基本概念
Subject (org.apache.shiro.subject.Subject)
A security-specific ‘view’ of the entity (user, 3rd-party service, cron job, etc) currently interacting with the software.
当前与软件交互的实体(用户、第三方服务、cron作业等)的特定安全“视图”。
Subject:主体,代表了当前“用户”,这个用户不一定是一个具体的人,与当前应用交互的任何东西都是Subject,如网络爬虫,机器人等;即一个抽象概念;所有Subject都绑定到SecurityManager,与Subject的所有交互都会委托给SecurityManager;可以把Subject认为是一个门面;SecurityManager才是实际的执行者;
SecurityManager (org.apache.shiro.mgt.SecurityManager)
-
As mentioned above, the SecurityManager is the heart of Shiro’s architecture.
如上所述,SecurityManager是Shiro体系结构的核心。
-
It is mostly an ‘umbrella’ object that coordinates its managed components to ensure they work smoothly together.
它主要是一个“伞形”对象,用来协调它的托管组件,以确保它们能够顺利地一起工作。
-
It also manages Shiro’s view of every application user, so it knows how to perform security operations per user.
它还管理Shiro的每个应用程序用户视图,因此它知道如何对每个用户执行安全操作。
SecurityManager:安全管理器;即所有与安全有关的操作都会与SecurityManager交互;且它管理着所有Subject;可以看出它是Shiro的核心,它负责与后边介绍的其他组件进行交互,如果学习过SpringMVC,你可以把它看成DispatcherServlet前端控制器;
Authenticator (org.apache.shiro.authc.Authenticator) 身份验证
**Authentication:**身份认证/登录,验证用户是不是拥有相应的身份;
-
The Authenticator is the component that is responsible for executing and reacting to authentication (log-in) attempts by users.
身份验证器是负责执行和响应用户身份验证(登录)尝试的组件。
-
When a user tries to log-in, that logic is executed by the Authenticator.
当用户尝试登录时,验证程序将执行该逻辑。
-
The Authenticator knows how to coordinate with one or more Realms that store relevant user/account information.
验证者知道如何与存储相关用户/帐户信息的一个或多个领域协调。
-
The data obtained from these Realms is used to verify the user’s identity to guarantee the user really is who they say they are.
从这些领域获得的数据用于验证用户的身份,以保证用户确实是他们所说的那个人。
Authentication Strategy (org.apache.shiro.authc.pam.AuthenticationStrategy)身份验证策略
-
If more than one Realm is configured, the AuthenticationStrategy will coordinate the Realms to determine the conditions under which an authentication attempt succeeds or fails (for example, if one realm succeeds but others fail, is the attempt successful?Must all realms succeed?Only the first?
如果配置了多个域,AuthenticationStrategy将协调域以确定身份验证尝试成功或失败的条件(例如,如果一个域成功但其他域失败,尝试成功吗?所有的领域都必须成功吗?只有第一个?
Authorizer (org.apache.shiro.authz.Authorizer) 授权
**Authorization:**授权,即权限验证,验证某个已认证的用户是否拥有某个权限;即判断用户是否能做事情,常见的如:验证某个用户是否拥有某个角色。或者细粒度的验证某个用户对某个资源是否具有某个权限;
-
The Authorizer is the component responsible determining users’ access control in the application.
授权者是负责确定应用程序中用户访问控制的组件。
-
It is the mechanism that ultimately says if a user is allowed to do something or not.
它是最终决定用户是否被允许做某事的机制。
-
Like the Authenticator, the Authorizer also knows how to coordinate with multiple back-end data sources to access role and permission information.
与Authenticator一样,授权者也知道如何与多个后端数据源协调,以访问角色和权限信息。
-
The Authorizer uses this information to determine exactly if a user is allowed to perform a given action.
授权者使用此信息来确定是否允许用户执行给定的操作。
SessionManager (org.apache.shiro.session.mgt.SessionManager)
Session Manager:会话管理,即用户登录后就是一次会话,在没有退出之前,它的所有信息都在会话中;会话可以是普通JavaSE环境的,也可以是如Web环境的;
-
The SessionManager knows how to create and manage user Session lifecycles to provide a robust Session experience for users in all environments.
SessionManager知道如何创建和管理用户会话生命周期,为所有环境中的用户提供健壮的会话体验。
-
This is a unique feature in the world of security frameworks - Shiro has the ability to natively manage user Sessions in any environment, even if there is no Web/Servlet or EJB container available.
这是安全框架世界中一个独特的特性——Shiro能够在任何环境中本地管理用户会话,即使没有Web/Servlet或EJB容器可用。
-
By default, Shiro will use an existing session mechanism if available, (e.g. Servlet Container), but if there isn’t one, such as in a standalone application or non-web environment, it will use its built-in enterprise session management to offer the same programming experience.
默认情况下,Shiro将使用现有的会话机制(如Servlet容器),但如果没有这种机制,例如在独立应用程序或非web环境中,它将使用其内置的企业会话管理来提供相同的编程体验。
-
The SessionDAO exists to allow any datasource to be used to persist sessions.
SessionDAO的存在是为了允许使用任何数据源来持久化会话。
SessionDAO (org.apache.shiro.session.mgt.eis.SessionDAO)
-
The SessionDAO performs Session persistence (CRUD) operations on behalf of the SessionManager.
SessionDAO代表SessionManager执行会话持久性(CRUD)操作。
-
This allows any data store to be plugged in to the Session Management infrastructure.
这允许将任何数据存储插入到会话管理基础设施中。
CacheManager (org.apache.shiro.cache.CacheManager)
Caching:缓存,比如用户登录后,其用户信息、拥有的角色/权限不必每次去查,这样可以提高效率;
-
The CacheManager creates and manages Cache instance lifecycles used by other Shiro components.
CacheManager创建和管理其他Shiro组件使用的缓存实例生命周期。
-
Because Shiro can access many back-end data sources for authentication, authorization and session management, caching has always been a first-class architectural feature in the framework to improve performance while using these data sources.
由于Shiro可以访问许多后端数据源进行身份验证、授权和会话管理,因此缓存一直是框架中的一流体系结构特性,可以在使用这些数据源时提高性能。
-
Any of the modern open-source and/or enterprise caching products can be plugged in to Shiro to provide a fast and efficient user-experience.
任何现代的开源和/或企业缓存产品都可以插入Shiro,以提供快速和高效的用户体验。
Cryptography (org.apache.shiro.crypto.*) 加密
Cryptography:加密,保护数据的安全性,如密码加密存储到数据库,而不是明文存储;
-
Cryptography is a natural addition to an enterprise security framework.
密码学是企业安全框架的自然补充。
-
Shiro’s crypto package contains easy-to-use and understand representations of crytographic Ciphers, Hashes (aka digests) and different codec implementations.
Shiro的crypto包包含易于使用和理解的加密密码表示、散列(又名摘要)和不同的编解码器实现。
-
All of the classes in this package are carefully designed to be very easy to use and easy to understand.
这个包中的所有类都经过精心设计,非常易于使用和理解。
-
Anyone who has used Java’s native cryptography support knows it can be a challenging animal to tame.
任何使用过Java原生密码学支持的人都知道,驯服它可能是一种具有挑战性的动物。
-
Shiro’s crypto APIs simplify the complicated Java mechanisms and make cryptography easy to use for normal mortal human beings.
Shiro的crypto api简化了复杂的Java机制,并使加密技术易于用于普通人。
Realms (org.apache.shiro.realm.Realm) 领域
-
As mentioned above, Realms act as the ‘bridge’ or ‘connector’ between Shiro and your application’s security data.
如上所述,领域充当Shiro和应用程序安全数据之间的“桥梁”或“连接器”。
-
When it comes time to actually interact with security-related data like user accounts to perform authentication (login) and authorization (access control), Shiro looks up many of these things from one or more Realms configured for an application.
当需要与安全相关的数据(如用户帐户)进行实际交互以执行身份验证(登录)和授权(访问控制)时,Shiro会从为应用程序配置的一个或多个领域中查找这些内容。
-
You can configure as many Realms as you need (usually one per data source) and Shiro will coordinate with them as necessary for both authentication and authorization.
您可以根据需要配置任意多个域(通常每个数据源一个域),Shiro将根据身份验证和授权的需要与它们进行协调。
Realm:域,Shiro从从Realm获取安全数据(如用户、角色、权限),就是说SecurityManager要验证用户身份, 那么它需要从Realm获取相应的用户进行比较以确定用户身份是否合法;也需要从Realm得到用户相应的角色/权限 进行验证用户是否能进行操作;可以把Realm看成DataSource,即安全数据源。
Web Support
Web支持,可以非常容易的集成到Web环境;
Concurrency
shiro支持多线程应用的并发验证,即如在一个线程中开启另一个线程,能把权限自动传播过去;
Testing:提供测试支持;
Run As:允许一个用户假装为另一个用户(如果他们允许)的身份进行访问;
Remember Me:记住我,这个是非常常见的功能,即一次登录后,下次再来的话不用登录了。
2、Shiro四大核心功能
Authentication,Authorization,Cryptography,Session Management
![[外链图片转存失败,源站可能有防盗链机制,建议将图片保存下来直接上传(img-KtdKCO2j-1617089045964)(Shiro 实战教程.assets/image-20210326091636305.png)]](https://img-blog.csdnimg.cn/20210330153039352.png?x-oss-process=image/watermark,type_ZmFuZ3poZW5naGVpdGk,shadow_10,text_aHR0cHM6Ly9ibG9nLmNzZG4ubmV0L3dlaXhpbl80NjE5NTk1Nw==,size_16,color_FFFFFF,t_70)
3、Shiro三个核心组件
Subject, SecurityManager 和 Realms.
Subject:主体,代表了当前“用户”,这个用户不一定是一个具体的人,与当前应用交互的任何东西都是Subject,如网络爬虫,机器人等;即一个抽象概念;所有Subject都绑定到SecurityManager,与Subject的所有交互都会委托给SecurityManager;可以把Subject认为是一个门面;SecurityManager才是实际的执行者;
SecurityManager:安全管理器;即所有与安全有关的操作都会与SecurityManager交互;且它管理着所有Subject;可以看出它是Shiro的核心,它负责与后边介绍的其他组件进行交互,如果学习过SpringMVC,你可以把它看成DispatcherServlet前端控制器;
Realm:域,Shiro从从Realm获取安全数据(如用户、角色、权限),就是说SecurityManager要验证用户身份,那么它需要从Realm获取相应的用户进行比较以确定用户身份是否合法;也需要从Realm得到用户相应的角色/权限进行验证用户是否能进行操作;可以把Realm看成DataSource,即安全数据源。
4、shiro中的认证
1、认证
身份认证,就是判断一个人用户是否为合法用户的处理过程。最常用的简单身份认证方式是系统通过核对用户输入的用户名和口令,看其中是否与用户存储的该用户名的口令一致,来判断用户身份是否正确。
2、shiro中认证的关键对象
Subject: 主体
访问系统的用户,主体可以是用户、程序等,进行认证的都称为主体
Principal: 身份信息
是主体(subject)进行身份认证的标识,表示必须具有唯一性,如用户名、手机号、邮箱地址等,一个主体可以有多个身份,但是必须有一个主身份(Primary Principal)
credential: 凭证信息
是只有主体自己知道的安全信息,如密码、证书。
3、认证流程
[外链图片转存失败,源站可能有防盗链机制,建议将图片保存下来直接上传(img-GM3DR1XH-1617089045965)(Shiro 实战教程.assets/image-20210325180418072.png)]
4、认证的开发
1、创建项目并引入依赖
<!--引入shiro依赖-->
        <dependency>
            <groupId>org.apache.shiro</groupId>
            <artifactId>shiro-core</artifactId>
            <version>1.7.1</version>
        </dependency>
2、shiro配置文件
注意:shiro配置文件是以.ini 为结尾的文件 类似于.txt
.ini 复杂数据格式
日后在整合springboot是用不到这个文件的,现在需要使用到ini文件是为了用来学习shiro中书写我们系统中 相关权限数据
3、简单的shiro认证
package com.shuang;

import org.apache.shiro.SecurityUtils;
import org.apache.shiro.authc.AuthenticationException;
import org.apache.shiro.authc.IncorrectCredentialsException;
import org.apache.shiro.authc.UnknownAccountException;
import org.apache.shiro.authc.UsernamePasswordToken;
import org.apache.shiro.mgt.DefaultSecurityManager;
import org.apache.shiro.realm.text.IniRealm;
import org.apache.shiro.subject.Subject;


public class TestAuthenticator {


    public static void main(String[] args) {


        // 1、创建安全管理器对象
        DefaultSecurityManager securityManager = new DefaultSecurityManager();

        // 2、给安全管理器设置realm
        securityManager.setRealm(new IniRealm("classpath:shiro.ini"));

        // 3、SecurityUtils 给全局安全工具类设置安全管理器
        SecurityUtils.setSecurityManager(securityManager);

        // 4、关键对象 subject 主体
        Subject subject = SecurityUtils.getSubject();

        // 5、创建令牌
        UsernamePasswordToken token = new UsernamePasswordToken("xiaoshuang","123");
        try {


            System.out.println("认证状态:" + subject.isAuthenticated());
            subject.login(token); // 用户认证
            System.out.println("认证状态:" + subject.isAuthenticated());
        } catch (UnknownAccountException e) {


            e.printStackTrace();
            System.out.println("认证失败,用户名不存在");
        }catch (IncorrectCredentialsException e){


            e.printStackTrace();
            System.out.println("认证失败:密码错误");
        }
    }
}
[users]
xiaoshuang=123
zhangsan=123456
lisi=789
5、认证源码
- 最终执行用户名比较 SimpleAccountRealm
- doGetAuthenticationInfo 在这个方法中完成用户名校验
- 最终密码的校验是在AuthenticatingRealm中
- assertCredentialsMatch 自动完成密码校验
总结:
AuthenticatingRealm 认证realm doGetAuthenticationInfo
AuthorizingRealm 授权realm doGetAuthorizaitonInfo
5、自定义Realm
package com.shuang.realm;

import org.apache.shiro.authc.AuthenticationException;
import org.apache.shiro.authc.AuthenticationInfo;
import org.apache.shiro.authc.AuthenticationToken;
import org.apache.shiro.authc.SimpleAuthenticationInfo;
import org.apache.shiro.authz.AuthorizationInfo;
import org.apache.shiro.realm.AuthorizingRealm;
import org.apache.shiro.subject.PrincipalCollection;


public class CustomerRealm extends AuthorizingRealm {


    // 授权
    protected AuthorizationInfo doGetAuthorizationInfo(PrincipalCollection principalCollection) {


        return null;
    }

    // 认证
    protected AuthenticationInfo doGetAuthenticationInfo(AuthenticationToken token) throws AuthenticationException {


        // 在token中获取用户名
        String principal = (String) token.getPrincipal();
        System.out.println(principal);
        // 根据身份信息去使用jdbc或者mybatis查询相关的数据库
        if ("xiaoshuang".equals(principal)){


            // 参数1 代表返回数据库中正确的用户名  参数2  返回数据库中的正确密码    参数3  提供当前realm的名字  this.getName()
            SimpleAuthenticationInfo simpleAuthenticationInfo = new SimpleAuthenticationInfo("xiaoshuang","123456",this.getName());
            return simpleAuthenticationInfo;
        }
        return null;
    }
}
public class TestCustomerRealmAuthenticatpr {


    public static void main(String[] args) {


        // 创建securityManager
        DefaultSecurityManager defaultSecurityManager = new DefaultSecurityManager();
        // 设置自定义realm
        defaultSecurityManager.setRealm(new CustomerRealm());
        // 将安全工具类设置安全管理器
        SecurityUtils.setSecurityManager(defaultSecurityManager);
        // 通过安全工具类获取subject
        Subject subject = SecurityUtils.getSubject();
        // 创建token
        UsernamePasswordToken token = new UsernamePasswordToken("xiaoshuang", "123456");
        try {


            System.out.println("认证状态:" + subject.isAuthenticated());
            subject.login(token); // 用户认证
            System.out.println("认证状态:" + subject.isAuthenticated());
        } catch (UnknownAccountException e) {


            e.printStackTrace();
            System.out.println("认证失败,用户名不存在");
        }catch (IncorrectCredentialsException e){


            e.printStackTrace();
            System.out.println("认证失败:密码错误");
        }
    }
}
![[外链图片转存失败,源站可能有防盗链机制,建议将图片保存下来直接上传(img-1161ePhL-1617089045966)(Shiro 实战教程.assets/image-20210325230057626.png)]](https://img-blog.csdnimg.cn/20210330153129778.png)
6、MD5
什么是MD5
md5可以对文件内容进行校验(比较两个文件的内容是否一致)
作用:一般用来做加密或者签名(校验和)
特点:MD5算法不可逆 如果内容相同无论执行多少次MD5生成的结果始终是一致
在线MD5解码网站都是使用穷举算法,将常用简单的列举出来
生成结果:始终是一个16进制32位长度的字符串
![[外链图片转存失败,源站可能有防盗链机制,建议将图片保存下来直接上传(img-cNEqpbZk-1617089045967)(Shiro 实战教程.assets/image-20210327100300130.png[外链图片转存失败,源站可能有防盗链机制,建议将图片保存下来直接上传(img-7zl2AGgy-1617089047205)(Shiro 实战教程.assets/image-20210327100910117.png)]]](https://img-blog.csdnimg.cn/20210330153146982.png?x-oss-process=image/watermark,type_ZmFuZ3poZW5naGVpdGk,shadow_10,text_aHR0cHM6Ly9ibG9nLmNzZG4ubmV0L3dlaXhpbl80NjE5NTk1Nw==,size_16,color_FFFFFF,t_70)
使用MD5
// 使用MD5
    Md5Hash md5Hash = new Md5Hash("123");
    System.out.println("123使用了md5加密");
    System.out.println(md5Hash.toHex());
    System.out.println("");

    // 使用MD5 + salt处理
    Md5Hash md5Hash1 = new Md5Hash("123", "XO*7ps");
    System.out.println("123使用了md5加密+salt");
    System.out.println(md5Hash1.toHex());
    System.out.println("");
    // 使用MD5 + salt + hash散列
    Md5Hash md5Hash2 = new Md5Hash("123", "XO*7ps", 1024);
    System.out.println("123使用MD5 + salt + hash散列");
    System.out.println(md5Hash2.toHex());
}

MD5 密码验证
package com.shuang.realm;


/**
 * 使用自定义realm 加入md5 + salt + hash
 */
public class CustomerMd5Realm extends AuthorizingRealm {


    protected AuthorizationInfo doGetAuthorizationInfo(PrincipalCollection principals) {


        return null;
    }

    protected AuthenticationInfo doGetAuthenticationInfo(AuthenticationToken token) throws AuthenticationException {


        // 获取身份信息
        String principal = (String) token.getPrincipal();

        // 根据用户名查询数据库
        if ("xiaoshuang".equals(principal)){


            return new SimpleAuthenticationInfo(principal,"202cb962ac59075b964b07152d234b70",this.getName());
        }
        return null;
    }
}
public class TestCustomerMd5RealmAuthenicator {


    @Test
    public void test01(){


        // 创建安全管理器
        DefaultSecurityManager defaultSecurityManager = new DefaultSecurityManager();
        // 注入realm
        CustomerMd5Realm realm = new CustomerMd5Realm();
        // 设置relam使用hash凭证匹配器
        HashedCredentialsMatcher credentialsMatcher = new HashedCredentialsMatcher();
        credentialsMatcher.setHashAlgorithmName("md5");
        realm.setCredentialsMatcher(credentialsMatcher);
        defaultSecurityManager.setRealm(realm);

        // 将安全管理器注入安全工具
        SecurityUtils.setSecurityManager(defaultSecurityManager);
        // 通过安全工具类获取subject
        Subject subject = SecurityUtils.getSubject();
        // 认证
        UsernamePasswordToken token = new UsernamePasswordToken("xiaoshuang", "123");
        try {


            subject.login(token);
            System.out.println("登录成功");
        } catch (UnknownAccountException e) {


            e.printStackTrace();
            System.out.println("用户名错误");
        }catch (IncorrectCredentialsException e){


            e.printStackTrace();
            System.out.println("密码错误");
        }
    }
}
![[外链图片转存失败,源站可能有防盗链机制,建议将图片保存下来直接上传(img-fSc4Ubri-1617089045967)(Shiro 实战教程.assets/image-20210327183718512.png)]](https://img-blog.csdnimg.cn/2021033015322246.png)
MD5+Salt 密码验证
注意
在new SimpleAuthenticationInfo的时候加入第三个位置参数为加盐处理,在安全管理器注入realm的时候就已经做好加盐的准备,跟普通md5一样不需要进行其他多余的操作
package com.shuang.realm;


/**
 * 使用自定义realm 加入md5 + salt + hash
 */
public class CustomerMd5Realm extends AuthorizingRealm {


    protected AuthorizationInfo doGetAuthorizationInfo(PrincipalCollection principals) {


        return null;
    }

    protected AuthenticationInfo doGetAuthenticationInfo(AuthenticationToken token) throws AuthenticationException {


        // 获取身份信息
        String principal = (String) token.getPrincipal();

        // 根据用户名查询数据库
        if ("xiaoshuang".equals(principal)){


            // 参数1:数据库用户名  参数2:数据库md5+salt之后的密码 参数3:注册时的随机盐  参数4:realm的名字
            // 只要加上了随机盐,在调用验证的时候Realm会自动加上盐
            return new SimpleAuthenticationInfo(principal,
                    "f4a75d10907d8bd97c7c850e947550ee",
                    ByteSource.Util.bytes("XO*7ps"),
                    this.getName());
        }
        return null;
    }
}
public class TestCustomerMd5RealmAuthenicator {


    @Test
    public void test01(){


        // 创建安全管理器
        DefaultSecurityManager defaultSecurityManager = new DefaultSecurityManager();
        // 注入realm
        CustomerMd5Realm realm = new CustomerMd5Realm();
        // 设置relam使用hash凭证匹配器
        HashedCredentialsMatcher credentialsMatcher = new HashedCredentialsMatcher();
        credentialsMatcher.setHashAlgorithmName("md5");
        realm.setCredentialsMatcher(credentialsMatcher);
        defaultSecurityManager.setRealm(realm);

        // 将安全管理器注入安全工具
        SecurityUtils.setSecurityManager(defaultSecurityManager);
        // 通过安全工具类获取subject
        Subject subject = SecurityUtils.getSubject();
        // 认证
        UsernamePasswordToken token = new UsernamePasswordToken("xiaoshuang", "123");
        try {


            subject.login(token);
            System.out.println("登录成功");
        } catch (UnknownAccountException e) {


            e.printStackTrace();
            System.out.println("用户名错误");
        }catch (IncorrectCredentialsException e){


            e.printStackTrace();
            System.out.println("密码错误");
        }
    }
}
MD5+Salt+散列 密码验证
只需要在创建realm的时候设置散列次数即可
public class TestCustomerMd5RealmAuthenicator {


    @Test
    public void test01(){


        // 创建安全管理器
        DefaultSecurityManager defaultSecurityManager = new DefaultSecurityManager();
        // 注入realm
        CustomerMd5Realm realm = new CustomerMd5Realm();
        // 设置relam使用hash凭证匹配器
        HashedCredentialsMatcher credentialsMatcher = new HashedCredentialsMatcher();
        // 使用算法
        credentialsMatcher.setHashAlgorithmName("md5");
        // 散列次数
        credentialsMatcher.setHashIterations(1024);
        realm.setCredentialsMatcher(credentialsMatcher);
        defaultSecurityManager.setRealm(realm);

        // 将安全管理器注入安全工具
        SecurityUtils.setSecurityManager(defaultSecurityManager);
        // 通过安全工具类获取subject
        Subject subject = SecurityUtils.getSubject();
        // 认证
        UsernamePasswordToken token = new UsernamePasswordToken("xiaoshuang", "123");
        try {


            subject.login(token);
            System.out.println("登录成功");
        } catch (UnknownAccountException e) {


            e.printStackTrace();
            System.out.println("用户名错误");
        }catch (IncorrectCredentialsException e){


            e.printStackTrace();
            System.out.println("密码错误");
        }
    }
}
5、shiro中的授权
1、授权
授权,即访问控制,控制谁能访问哪些资源。主体进行身份认证后需要分配权限方可访问系统的资源,对于某些资源没有权限是无法访问的。
2、关键对象
授权可简单理解为who对what(which)进行How操作
Who,即主体(Subject),主体需要访问系统中的资源
What,即资源(Resource),如系统菜单、页面、按钮、类方法、系统商品信息等。资源包括资源类型和资源实例,比如商品信息为资源类型,类型为t01的商品为资源实例,编号为001的商品信息也也属于资源实例。
How 权限/许可(Permission),规定了主体对资源的操作许可,权限离开资源没有意义,如用户查询权限、用户添加权限、某个类方法的权限调用、编号为001用户的修改权限等,通过权限可知主题对哪些资源都有哪些操作许可。
3、授权流程

4、授权方式
1、基于角色的访问控制
RBAC基于角色的访问控制(Role-Based Access Control)是以角色为主中心进行访问控制
if(subject.hasRole("admin")){


    // 操作什么资源
}
2、基于资源的访问控制
RBAC基于资源的访问控制(Resource-Based Access Control)是以资源为中心进行访问控制
if(subject.isPermission("user:update:01")){

      // 资源实例
    // 对所有用户进行查询权限
}
if(subject.isPermission("user:update:*")){

      // 资源类型
    // 对01用户进行修改
}
5、权限字符串
权限字符串的规则是:资源标识符:操作:资源实例标识符,意思是对哪个资源的哪个实例具有什么操作,“:”是资源/操作/实例的分隔符,权限字符串也可以使用*通配符
# 例子
- 用户创建权限: user:create, 或 user:create:※
- 用户修改实例001的权限: user:※:001
- 用户实例001的所有权限: user:※:001
6、Shiro中授权编程实现方式
package com.shuang.realm;


 * 使用自定义realm 加入md5 + salt + hash
 */
public class CustomerMd5Realm extends AuthorizingRealm {


    protected AuthorizationInfo doGetAuthorizationInfo(PrincipalCollection principals) {


        String primaryPrincipal = (String) principals.getPrimaryPrincipal();
        System.out.println("身份信息:"+primaryPrincipal);
        // 根据身份信息  用户名 获取当前用户的角色信息,以及权限信息  xiaoshuang  admin user
        SimpleAuthorizationInfo simpleAuthorizationInfo = new SimpleAuthorizationInfo();

        // 将数据库中查询角色信息赋值给权限对象
        simpleAuthorizationInfo.addRole("admin");
        simpleAuthorizationInfo.addRole("xiaoshuang");

        // 将数据库中查询权限信息赋值给权限对象
        simpleAuthorizationInfo.addStringPermission("user:*:01");
        simpleAuthorizationInfo.addStringPermission("product:create");

        return simpleAuthorizationInfo;
    }

    protected AuthenticationInfo doGetAuthenticationInfo(AuthenticationToken token) throws AuthenticationException {


        // 获取身份信息
        String principal = (String) token.getPrincipal();

        System.out.println(principal);
        // 根据用户名查询数据库
        if ("xiaoshuang".equals(principal)){


            // 参数1:数据库用户名  参数2:数据库md5+salt之后的密码 参数3:注册时的随机盐  参数4:realm的名字
            // 只要加上了随机盐,在调用验证的时候Realm会自动加上盐
            return new SimpleAuthenticationInfo(principal,
                    "908da6d8e6057542323d9f58de42f9ab",
                    ByteSource.Util.bytes("XO*7ps"),
                    this.getName());
        }
        return null;
    }
}
/**
 * @DATE: 2021/03/27 10:21
 * @Author: 小爽帅到拖网速
 */
public class TestCustomerMd5RealmAuthenicator {


    @Test
    public void test01(){


        // 创建安全管理器
        DefaultSecurityManager defaultSecurityManager = new DefaultSecurityManager();
        // 注入realm
        CustomerMd5Realm realm = new CustomerMd5Realm();
        // 设置relam使用hash凭证匹配器
        HashedCredentialsMatcher credentialsMatcher = new HashedCredentialsMatcher();
        // 使用算法
        credentialsMatcher.setHashAlgorithmName("md5");
        // 散列次数
        credentialsMatcher.setHashIterations(1024);
        realm.setCredentialsMatcher(credentialsMatcher);
        defaultSecurityManager.setRealm(realm);

        // 将安全管理器注入安全工具
        SecurityUtils.setSecurityManager(defaultSecurityManager);
        // 通过安全工具类获取subject
        Subject subject = SecurityUtils.getSubject();
        // 认证
        UsernamePasswordToken token = new UsernamePasswordToken("xiaoshuang", "123");
        try {


            subject.login(token);
            System.out.println("登录成功");
        } catch (UnknownAccountException e) {


            e.printStackTrace();
            System.out.println("用户名错误");
        }catch (IncorrectCredentialsException e){


            e.printStackTrace();
            System.out.println("密码错误");
        }

        // 认证用户进行授权
        if (subject.isAuthenticated()){


            // 1、基于角色权限控制
            System.out.println(subject.hasRole("admin"));
            System.out.println(subject.hasRole("xiaoshuang"));
            System.out.println(subject.hasRole("user1"));

            // 2、基于多角色权限控制
            System.out.println(subject.hasAllRoles(Arrays.asList("admin", "xiaoshuang")));

            // 3、是否具有其中一个角色
            System.out.println(Arrays.toString(subject.hasRoles(Arrays.asList("admin", "xiaoshuang", "1"))));

            System.out.println("————————————————————————————————————————————————");

            // 4、基于权限字符串的访问控制
            // 资源标识符:操作:资源类型
            System.out.println("权限:" + subject.isPermitted("user:update:01"));
            System.out.println("权限:" + subject.isPermitted("product:create"));

            // 分别具有哪些权限
            boolean[] permitted = subject.isPermitted("user:*:01", "order:*:10");
            System.out.print("分别具有哪些权限:");
            for (boolean b : permitted) {


                System.out.print(b);
            }
            // 同时具有哪些权限
            boolean permittedAll = subject.isPermittedAll("user:*:01", "product:create:01");
            System.out.print("同时具有哪些权限:");
            System.out.println(permittedAll);

        }

    }
}
6、整合SpringBoot项目实战
整合思路
![[外链图片转存失败,源站可能有防盗链机制,建议将图片保存下来直接上传(img-OoDmFsDi-1617089045968)(Shiro 实战教程.assets/image-20210328094356180.png)]](https://img-blog.csdnimg.cn/20210330153317234.png?x-oss-process=image/watermark,type_ZmFuZ3poZW5naGVpdGk,shadow_10,text_aHR0cHM6Ly9ibG9nLmNzZG4ubmV0L3dlaXhpbl80NjE5NTk1Nw==,size_16,color_FFFFFF,t_70)
1、导入依赖
<dependency>
    <groupId>javax.servlet</groupId>
    <artifactId>javax.servlet-api</artifactId>
</dependency>
<dependency>
    <groupId>javax.servlet</groupId>
    <artifactId>jstl</artifactId>
</dependency>
<dependency>
    <groupId>org.apache.tomcat.embed</groupId>
    <artifactId>tomcat-embed-jasper</artifactId>
</dependency>
<dependency>
    <groupId>org.apache.tomcat</groupId>
    <artifactId>tomcat-jsp-api</artifactId>
</dependency>
2、环境基本搭建
applicationContext.properties
spring.application.name=shiro
server.port=8888
server.servlet.context-path=/shiro

spring.mvc.view.prefix=/
spring.mvc.view.suffix=.jsp
shiro
/**
 * 自定义realm
 */
public class CustomerRealm extends AuthorizingRealm {


    @Override
    protected AuthorizationInfo doGetAuthorizationInfo(PrincipalCollection principals) {


        return null;
    }

    @Override
    protected AuthenticationInfo doGetAuthenticationInfo(AuthenticationToken token) throws AuthenticationException {


        return null;
    }
}
shiroConifg
/**
 *  这是用来整合Shiro相关的配置类
 */
@Configuration
public class ShiroConfig {


    // 1、创建shiroFilter   负责拦截所有请求
    @Bean
    public ShiroFilterFactoryBean getShiroFilterFactoryBean(DefaultWebSecurityManager defaultWebSecurityManager){


        ShiroFilterFactoryBean shiroFilterFactoryBean = new ShiroFilterFactoryBean();

        // 给filter设置安全管理器
        shiroFilterFactoryBean.setSecurityManager(defaultWebSecurityManager);
        // 配置系统受限资源
        // 配置系统公共资源
        HashMap<String, String> map = new HashMap<>();
        map.put("/index.jsp","authc"); // authc  代表请求这个资源需要认证和授权

        // 默认认证界面的路径,如果你不写,默认的就是返回login.jsp
        shiroFilterFactoryBean.setLoginUrl("/login.jsp");
        shiroFilterFactoryBean.setFilterChainDefinitionMap(map);


        return shiroFilterFactoryBean;
    }
    // 2、创建安全管理器
    @Bean
    public DefaultWebSecurityManager getDefaultWebSecurityManager(Realm realm){


        DefaultWebSecurityManager defaultWebSecurityManager = new DefaultWebSecurityManager();
        // 给安全管理器设置realm
        defaultWebSecurityManager.setRealm( realm);
        return defaultWebSecurityManager;
    }

    // 3、创建自定义realm
    @Bean
    public CustomerRealm getReal(){


        CustomerRealm customerRealm = new CustomerRealm();
        return customerRealm;
    }
}
3、项目认证和退出
shiroConfig
// 1、创建shiroFilter   负责拦截所有请求
@Bean
public ShiroFilterFactoryBean getShiroFilterFactoryBean(DefaultWebSecurityManager defaultWebSecurityManager){


    ShiroFilterFactoryBean shiroFilterFactoryBean = new ShiroFilterFactoryBean();
    // 给filter设置安全管理器
    shiroFilterFactoryBean.setSecurityManager(defaultWebSecurityManager);
    // 配置系统受限资源
    // 配置系统公共资源
    HashMap<String, String> map = new HashMap<>();
    map.put("/user/login","anon"); // 设置为公共资源
    map.put("/**","authc"); // authc  代表请求这个资源需要认证和授权,如果没有做认证和授权直接就被重定向到login.jsp
    // 默认认证界面的路径,如果你不写,默认的就是返回login.jsp
    shiroFilterFactoryBean.setLoginUrl("/login.jsp");
    shiroFilterFactoryBean.setFilterChainDefinitionMap(map);
    return shiroFilterFactoryBean;
}
Controller
@Controller
@RequestMapping("user")
public class UserController {


    @RequestMapping("logout")
    public String logout(){


        Subject subject = SecurityUtils.getSubject();
        subject.logout();  // 退出登录
        return "redirect:/login.jsp";
    }
   /**
     * 用来处理身份认证
     * @param username
     * @param password
     * @return
     */
    @RequestMapping("login")
    public String login(String username,String password){


        // 获取主体对象
        // 原来使用SecurityUtils需要注入安全管理器,在web环境下,
        // 只要我们创建了安全管理器就会被自动注入到shiro的安全工具类
        Subject subject = SecurityUtils.getSubject();
        try {


            subject.login(new UsernamePasswordToken(username,password));
            return "redirect:/index.jsp";
        } catch (UnknownAccountException e) {


            e.printStackTrace();
            System.out.println("用户名错误!");
        }catch (IncorrectCredentialsException e){


            System.out.println("密码输入错误!");
        }
        return "redirect:/login.jsp";
    }
}
CustomerRealm
/**
 * 自定义realm
 */
public class CustomerRealm extends AuthorizingRealm {


    @Override
    protected AuthorizationInfo doGetAuthorizationInfo(PrincipalCollection principals) {


        return null;
    }

    @Override
    protected AuthenticationInfo doGetAuthenticationInfo(AuthenticationToken token) throws AuthenticationException {


        System.out.println("===================");
        String principal = (String) token.getPrincipal();
        if ("xiaoshuang".equals(principal)){


            return new SimpleAuthenticationInfo(principal,"123",this.getName());
        }
        return null;
    }
}
4、shiro连接数据库基于(MD5 + Salt )完成注册
1、导入依赖
<dependency>
    <groupId>com.alibaba</groupId>
    <artifactId>druid</artifactId>
    <version>1.1.23</version>
</dependency>
<!--mybatis相关依赖-->
<dependency>
    <groupId>org.mybatis.spring.boot</groupId>
    <artifactId>mybatis-spring-boot-starter</artifactId>
    <version>2.1.4</version>
</dependency>
<dependency>
    <groupId>mysql</groupId>
    <artifactId>mysql-connector-java</artifactId>
    <version>5.1.47</version>
</dependency>
2、整合Myabtis
spring.datasource.type=com.alibaba.druid.pool.DruidDataSource
spring.datasource.driver-class-name=com.mysql.jdbc.Driver
spring.datasource.url=jdbc:mysql://localhost:3306/shiro?characterEncoding=UTF-8
spring.datasource.username=root
spring.datasource.password=******

mybatis.type-aliases-package=com.shuang.springboot_jsp_shiro.entity
mybatis.mapper-locations=classpath:com/shuang/mapper/*.xml
3、创建数据库
SET NAMES utf8mb4;
SET FOREIGN_KEY_CHECKS = 0;

-- ----------------------------
-- Table structure for t_user
-- ----------------------------
DROP TABLE IF EXISTS `t_user`;
CREATE TABLE `t_user`  (
  `id` int(6) NOT NULL AUTO_INCREMENT,
  `username` varchar(40) CHARACTER SET utf8 COLLATE utf8_unicode_ci NULL DEFAULT NULL,
  `password` varchar(40) CHARACTER SET utf8 COLLATE utf8_unicode_ci NULL DEFAULT NULL,
  `salt` varchar(255) CHARACTER SET utf8 COLLATE utf8_unicode_ci NULL DEFAULT NULL,
  PRIMARY KEY (`id`) USING BTREE
) ENGINE = MyISAM AUTO_INCREMENT = 2 CHARACTER SET = utf8 COLLATE = utf8_unicode_ci ROW_FORMAT = Dynamic;

SET FOREIGN_KEY_CHECKS = 1;
4、创建实体类
/**
 * @DATE: 2021/03/28 14:41
 * @Author: 小爽帅到拖网速
 */
@Data
@AllArgsConstructor
@NoArgsConstructor
@Accessors(chain = true)
public class User {


    private String id;
    private String username;
    private String password;
    private String salt;
}
5、Utils
public class SaltUtils {


    /**
     * 生成salt的静态方法
     * @param n
     * @return
     */
    public static String getSalt(int n){


        char[] chars = "ABCDEFGHIJKLMNOPQRSTUVWXYZabcdefghijklmnopqrstuvwxyz0123456789!@#$%^&*()".toCharArray();

        StringBuilder sb = new StringBuilder();
        for (int i = 0; i < n; i++) {


            char aChar = chars[new Random().nextInt(chars.length)];
            sb.append(aChar);
        }
        return sb.toString();
    }
}
6、Dao层
@Mapper
@Repository
public interface UserDao {


    void save(User user);
}
<?xml version="1.0" encoding="UTF-8" ?>
<!DOCTYPE mapper
        PUBLIC "-//mybatis.org//DTD Mapper 3.0//EN"
        "http://mybatis.org/dtd/mybatis-3-mapper.dtd">
<mapper namespace="com.shuang.springboot_jsp_shiro.dao.UserDao">
    <insert id="save" parameterType="User" keyProperty="id" useGeneratedKeys="true">
        insert into shiro.t_user values (#{id},#{username},#{password},#{salt});
    </insert>
</mapper>
7、service层
public interface UserService {


    // 注册用户
    void register(User user);
}


@Service
public class UserServiceImpl implements UserService{


    @Autowired
    UserDao userDao;

    @Override
    public void register(User user) {


        // 处理业务调用dao
        // 明文密码进行md5 + salt + hash散列
        // 1、生成随机盐
        String salt = SaltUtils.getSalt(8);
        // 2、将随机盐保存到数据库
        user.setSalt(salt);
        // 3、明文密码进行md5 + salt + hash散列
        Md5Hash md5Hash = new Md5Hash(user.getPassword(),salt,1024);
        user.setPassword(md5Hash.toHex());
        userDao.save(user);
    }
}
8、Controller
/**
 * 用户注册
 * @param user
 * @return
 */
@RequestMapping("register")
public String register(User user){


    try {


        userService.register(user);
        return "redirect:/login.jsp";
    } catch (Exception e) {


        e.printStackTrace();
        return "redirect:/register.jsp";
    }
}
![[外链图片转存失败,源站可能有防盗链机制,建议将图片保存下来直接上传(img-c6kNKt58-1617089045969)(Shiro 实战教程.assets/image-20210328151220072.png)]](https://img-blog.csdnimg.cn/20210330153435892.png)
5、验证登录
1、Dao,Service,Controller
@Mapper
@Repository
public interface UserDao {


    void save(User user);
    User findByUserName(String username);
}

public interface UserService {


    // 注册用户
    void register(User user);

    // 根据用户名查询业务的方法
    User findByUserName(String username);
}

@Service("userService")
@Transactional
public class UserServiceImpl implements UserService{


    @Autowired
    UserDao userDao;

    @Override
    public void register(User user) {


        // 处理业务调用dao
        // 明文密码进行md5 + salt + hash散列
        // 1、生成随机盐
        String salt = SaltUtils.getSalt(8);
        // 2、将随机盐保存到数据库
        user.setSalt(salt);
        // 3、明文密码进行md5 + salt + hash散列
        Md5Hash md5Hash = new Md5Hash(user.getPassword(),salt,1024);
        user.setPassword(md5Hash.toHex());
        userDao.save(user);
    }

    @Override
    public User findByUserName(String username) {


        return userDao.findByUserName(username);
    }
}

/**
     * 用来处理身份认证
     * @param username
     * @param password
     * @return
     */
    @RequestMapping("login")
    public String login(String username,String password){


        // 获取主体对象
        // 原来使用SecurityUtils需要注入安全管理器,在web环境下,
        // 只要我们创建了安全管理器就会被自动注入到shiro的安全工具类
        Subject subject = SecurityUtils.getSubject();
        try {


            subject.login(new UsernamePasswordToken(username,password));
            return "redirect:/index.jsp";
        } catch (UnknownAccountException e) {


            e.printStackTrace();
            System.out.println("用户名错误!");
        }catch (IncorrectCredentialsException e){


            System.out.println("密码输入错误!");
        }
        return "redirect:/login.jsp";
    }
2、CustomerRealm
@Override
protected AuthenticationInfo doGetAuthenticationInfo(AuthenticationToken token) throws AuthenticationException {


    // 根据身份信息
    String principal = (String) token.getPrincipal();

    // 在工厂中获取service对象
   /* UserService userService = (UserService) ApplicationContextUtils.getBean("userService");
    System.out.println(userService);*/

    User user = userService.findByUserName(principal);

    /*if ("xiaoshuang".equals(principal)){
        return new SimpleAuthenticationInfo(principal,"123",this.getName());
    }*/

    // 使用数据库中的用户信息进行验证
    if (!ObjectUtils.isEmpty(user)) {


        return new SimpleAuthenticationInfo(user.getUsername(), user.getPassword(), ByteSource.Util.bytes(user.getSalt()), this.getName());
    }
    return null;
}
3、ShiroConfig
/

/**
 *  这是用来整合Shiro相关的配置类
 */
@Configuration
public class ShiroConfig {


    // 1、创建shiroFilter   负责拦截所有请求
    @Bean
    public ShiroFilterFactoryBean getShiroFilterFactoryBean(DefaultWebSecurityManager defaultWebSecurityManager){


        ShiroFilterFactoryBean shiroFilterFactoryBean = new ShiroFilterFactoryBean();

        // 给filter设置安全管理器
        shiroFilterFactoryBean.setSecurityManager(defaultWebSecurityManager);
        // 配置系统受限资源
        // 配置系统公共资源
        HashMap<String, String> map = new HashMap<>();
        map.put("/user/login","anon"); // 设置为公共资源
        map.put("/user/register","anon"); // 设置为公共资源
        map.put("/register.jsp","anon"); // 设置为公共资源
        map.put("/**","authc"); // authc  代表请求这个资源需要认证和授权,如果没有做认证和授权直接就被重定向到login.jsp

        // 默认认证界面的路径,如果你不写,默认的就是返回login.jsp
        shiroFilterFactoryBean.setLoginUrl("/login.jsp");
        shiroFilterFactoryBean.setFilterChainDefinitionMap(map);


        return shiroFilterFactoryBean;
    }
    // 2、创建安全管理器
    @Bean
    public DefaultWebSecurityManager getDefaultWebSecurityManager(Realm realm){


        DefaultWebSecurityManager defaultWebSecurityManager = new DefaultWebSecurityManager();
        // 给安全管理器设置realm
        defaultWebSecurityManager.setRealm( realm);
        return defaultWebSecurityManager;
    }

    // 3、创建自定义realm
    @Bean
    public CustomerRealm getReal(){


        // 这里已经将CustomerRealm进行注入,所以有权在CustomerRealm中进行注解自动注入
        CustomerRealm customerRealm = new CustomerRealm();
        // 修改凭证校验匹配器
        HashedCredentialsMatcher credentialsMatcher = new HashedCredentialsMatcher();
        // 设置加密算法为MD5
        credentialsMatcher.setHashAlgorithmName("MD5");
        // 设置散列次数
        credentialsMatcher.setHashIterations(1024);
        customerRealm.setCredentialsMatcher(credentialsMatcher);
        return customerRealm;
    }
}
6、Shiro授权使用
编程式
/**
 * 基于角色获取权限
 */
@RequestMapping("save")
public String save(){


    // 获取主题对象
    Subject subject = SecurityUtils.getSubject();
    // 代码方式
    if (subject.hasRole("admin")) {


        System.out.println("保存订单!");
    }else {


        System.out.println("无权访问!");
    }
    return "redirect:/index.jsp";
}
注解式
/**
 * 基于注解获取角色权限
 */
@RequestMapping("delete")
// @RequiresRoles("user")
@RequiresRoles(value = {

    "admin","user"})  // 用来判断角色  同时具有 admin  user才可以
public String delete(){


    // 获取对象主体
    System.out.println("删除成功");
    return "redirect:/index.jsp";
}
标签式
<ul>
     <shiro:hasPermission name="user:add:*">
     <li><a href="">添加</a></li>
     </shiro:hasPermission>
     <shiro:hasPermission name="user:delete:*">
     <li><a href="">删除</a></li>
      </shiro:hasPermission>
      <shiro:hasPermission name="user:update:*">
       <li><a href="">修改</a></li>
      </shiro:hasPermission>
      <shiro:hasPermission name="user:select:*">
       <li><a href="">查询</a></li>
       </shiro:hasPermission>
</ul>
1、Realm
/**
 * 自定义realm
 */

public class CustomerRealm extends AuthorizingRealm {


    @Autowired
    UserService userService;

    @Override
    protected AuthorizationInfo doGetAuthorizationInfo(PrincipalCollection principals) {


        // 获取身份信息
        String primaryPrincipal = (String) principals.getPrimaryPrincipal();

        // 根据主身份信息获取角色和权限信息
        if ("郑爽".equals(primaryPrincipal)){


            SimpleAuthorizationInfo simpleAuthorizationInfo = new SimpleAuthorizationInfo();

            /*simpleAuthorizationInfo.addRole("user");
            simpleAuthorizationInfo.addRole("admin");*/
            simpleAuthorizationInfo.addRoles(Arrays.asList("admin","user"));

            // 参数1:user模块 参数2:操作权限 参数3:资源
            simpleAuthorizationInfo.addStringPermission("user:update:*");
            simpleAuthorizationInfo.addStringPermission("user:select:*");
            simpleAuthorizationInfo.addStringPermission("user:add:*");

            return simpleAuthorizationInfo;
        }
        return null;
    }

    @Override
    protected AuthenticationInfo doGetAuthenticationInfo(AuthenticationToken token) throws AuthenticationException {


        // 根据身份信息
        String principal = (String) token.getPrincipal();
        // 在工厂中获取service对象
       /* UserService userService = (UserService) ApplicationContextUtils.getBean("userService");
        System.out.println(userService);*/
        // System.out.println(userService);
        User user = userService.findByUserName(principal);

        /*if ("xiaoshuang".equals(principal)){
            return new SimpleAuthenticationInfo(principal,"123",this.getName());
        }*/

        // 使用数据库中的用户信息进行验证
        if (!ObjectUtils.isEmpty(user)) {


            return new SimpleAuthenticationInfo(user.getUsername(), user.getPassword(), ByteSource.Util.bytes(user.getSalt()), this.getName());
        }

        return null;
    }
}
2、Controller
@Controller
@RequestMapping("order")
public class OrderController {


    /**
     * 基于注解的权限字符串
     */
    @RequestMapping("add")
    @RequiresPermissions("user:add:01")
    public String add(){


        System.out.println("添加成功!");
        return "redirect:/index.jsp";
    }

    /**
     * 基于注解获取角色权限
     */
    @RequestMapping("delete")
    // @RequiresRoles("user")
    @RequiresRoles(value = {

    "admin","user"})  // 用来判断角色  同时具有 admin  user才可以
    public String delete(){


        // 获取对象主体
        System.out.println("删除成功");
        return "redirect:/index.jsp";
    }

    /**
     * 基于权限字符串
     * @return
     */
    @RequestMapping("update")
    public String update(){


        // 获取主题对象
        Subject subject = SecurityUtils.getSubject();
        if (subject.isPermitted("user:update:*")) {


            System.out.println("查询成功");
        }else {


            System.out.println("查询失败");
        }
        return "redirect:/index.jsp";
    }

    /**
     * 基于角色获取权限
     */
    @RequestMapping("save")
    public String save(){


        // 获取主题对象
        Subject subject = SecurityUtils.getSubject();
        // 代码方式
        if (subject.hasRole("admin")) {


            System.out.println("保存订单!");
        }else {


            System.out.println("无权访问!");
        }
        return "redirect:/index.jsp";
    }
}
3、前端页面定义
<body>
      <h1>小爽帅到拖网速</h1>
      <a href="${pageContext.request.contextPath}/user/logout">退出登录</a>
      <ul>
          <shiro:hasAnyRoles name="user,admin">
          <li><a href="">用户管理</a>
              <ul>
                  <shiro:hasPermission name="user:add:*">
                  <li><a href="">添加</a></li>
                  </shiro:hasPermission>
                  <shiro:hasPermission name="user:delete:*">
                  <li><a href="">删除</a></li>
                  </shiro:hasPermission>
                  <shiro:hasPermission name="user:update:*">
                  <li><a href="">修改</a></li>
                  </shiro:hasPermission>
                  <shiro:hasPermission name="user:select:*">
                  <li><a href="">查询</a></li>
                  </shiro:hasPermission>
              </ul>
          </li>
          </shiro:hasAnyRoles>
          <shiro:hasRole name="admin">
              <li><a href="">商品管理</a></li>
              <li><a href="">订单管理</a></li>
              <li><a href="">物流管理</a></li>
          </shiro:hasRole>
      </ul>
</body>
7、Shiro授权数据库化
1、数据库表结构
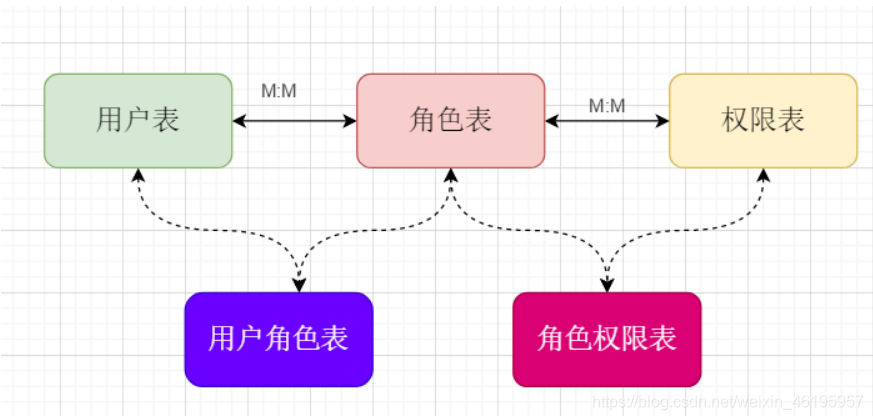
2、数据库表
/*
 Navicat Premium Data Transfer

 Source Server         : root
 Source Server Type    : MySQL
 Source Server Version : 50726
 Source Host           : localhost:3306
 Source Schema         : shiro

 Target Server Type    : MySQL
 Target Server Version : 50726
 File Encoding         : 65001

 Date: 29/03/2021 20:56:43
*/

SET NAMES utf8mb4;
SET FOREIGN_KEY_CHECKS = 0;

-- ----------------------------
-- Table structure for t_perms
-- ----------------------------
DROP TABLE IF EXISTS `t_perms`;
CREATE TABLE `t_perms`  (
  `id` int(6) NOT NULL,
  `name` varchar(80) CHARACTER SET utf8 COLLATE utf8_unicode_ci NULL DEFAULT NULL,
  `url` varchar(255) CHARACTER SET utf8 COLLATE utf8_unicode_ci NULL DEFAULT NULL,
  PRIMARY KEY (`id`) USING BTREE
) ENGINE = MyISAM CHARACTER SET = utf8 COLLATE = utf8_unicode_ci ROW_FORMAT = Dynamic;

-- ----------------------------
-- Table structure for t_role
-- ----------------------------
DROP TABLE IF EXISTS `t_role`;
CREATE TABLE `t_role`  (
  `id` int(6) NOT NULL,
  `name` varchar(60) CHARACTER SET utf8 COLLATE utf8_unicode_ci NULL DEFAULT NULL,
  PRIMARY KEY (`id`) USING BTREE
) ENGINE = MyISAM CHARACTER SET = utf8 COLLATE = utf8_unicode_ci ROW_FORMAT = Dynamic;

-- ----------------------------
-- Table structure for t_role_perms
-- ----------------------------
DROP TABLE IF EXISTS `t_role_perms`;
CREATE TABLE `t_role_perms`  (
  `id` int(6) NOT NULL,
  `roleid` int(6) NULL DEFAULT NULL,
  `permsid` int(6) NULL DEFAULT NULL,
  PRIMARY KEY (`id`) USING BTREE
) ENGINE = MyISAM CHARACTER SET = utf8 COLLATE = utf8_unicode_ci ROW_FORMAT = Fixed;

-- ----------------------------
-- Table structure for t_user
-- ----------------------------
DROP TABLE IF EXISTS `t_user`;
CREATE TABLE `t_user`  (
  `id` int(6) NOT NULL AUTO_INCREMENT,
  `username` varchar(40) CHARACTER SET utf8 COLLATE utf8_unicode_ci NULL DEFAULT NULL,
  `password` varchar(40) CHARACTER SET utf8 COLLATE utf8_unicode_ci NULL DEFAULT NULL,
  `salt` varchar(255) CHARACTER SET utf8 COLLATE utf8_unicode_ci NULL DEFAULT NULL,
  PRIMARY KEY (`id`) USING BTREE
) ENGINE = MyISAM AUTO_INCREMENT = 2 CHARACTER SET = utf8 COLLATE = utf8_unicode_ci ROW_FORMAT = Dynamic;

-- ----------------------------
-- Table structure for t_user_role
-- ----------------------------
DROP TABLE IF EXISTS `t_user_role`;
CREATE TABLE `t_user_role`  (
  `id` int(6) NOT NULL,
  `userid` int(6) NULL DEFAULT NULL,
  `roleid` int(6) NULL DEFAULT NULL,
  PRIMARY KEY (`id`) USING BTREE
) ENGINE = MyISAM CHARACTER SET = utf8 COLLATE = utf8_unicode_ci ROW_FORMAT = Fixed;

SET FOREIGN_KEY_CHECKS = 1;
3、获取用户角色
1、实体类
@Data
@AllArgsConstructor
@NoArgsConstructor
@Accessors(chain = true)
public class User {


    private String id;
    private String username;
    private String password;
    private String salt;

    // 一个用户可能有多个角色,需要定义角色集合
    private List<Role> roles;
}


@Data
@AllArgsConstructor
@NoArgsConstructor
@Accessors(chain = true)
public class Role {


    private String id;
    private String name;
}
2、DAO
@Mapper
@Repository
public interface UserDao {


    void save(User user);

    User findByUserName(String username);

    // 根据用户名查询所有角色
    User findRolesByUserName(String username);
}
<?xml version="1.0" encoding="UTF-8" ?>
<!DOCTYPE mapper
        PUBLIC "-//mybatis.org//DTD Mapper 3.0//EN"
        "http://mybatis.org/dtd/mybatis-3-mapper.dtd">

<mapper namespace="com.shuang.springboot_jsp_shiro.dao.UserDao">
    <insert id="save" parameterType="User" keyProperty="id" useGeneratedKeys="true">
        insert into shiro.t_user
        values (#{id}, #{username}, #{password}, #{salt});
    </insert>
    <select id="findByUserName" resultType="User">
        select id, username, password, salt
        from shiro.t_user
        where username = #{username}
    </select>

    <resultMap id="userMap" type="User">
        <id column="uid" property="id"/>
        <result column="username" property="username"/>
        <!--角色信息-->
        <collection property="roles" javaType="list" ofType="Role">
            <id column="id" property="id"/>
            <result column="rname" property="name"/>
        </collection>
    </resultMap>

    <select id="findRolesByUserName" resultMap="userMap">
        SELECT u.id uid, u.username, r.id, r.name rname
        from shiro.t_user u
                 left join shiro.t_user_role ur on u.id = ur.userid
                 left join shiro.t_role r on ur.roleid = r.id
        where u.username = #{username}
    </select>
</mapper>
3、Service
public interface UserService {


    // 注册用户
    void register(User user);

    // 根据用户名查询业务的方法
    User findByUserName(String username);

    // 根据用户名查询所有角色
    User findRolesByUserName(String username);
}
@Service("userService")
@Transactional
public class UserServiceImpl implements UserService{


    @Autowired
    UserDao userDao;

    @Override
    public void register(User user) {


        // 处理业务调用dao
        // 明文密码进行md5 + salt + hash散列
        // 1、生成随机盐
        String salt = SaltUtils.getSalt(8);
        // 2、将随机盐保存到数据库
        user.setSalt(salt);
        // 3、明文密码进行md5 + salt + hash散列
        Md5Hash md5Hash = new Md5Hash(user.getPassword(),salt,1024);
        user.setPassword(md5Hash.toHex());
        userDao.save(user);
    }

    @Override
    public User findByUserName(String username) {


        return userDao.findByUserName(username);
    }

    @Override
    public User findRolesByUserName(String username) {


        return userDao.findRolesByUserName(username);
    }
}
4、Realm
/**
 * 自定义realm
 */

public class CustomerRealm extends AuthorizingRealm {


    @Autowired
    UserService userService;

    @Override
    protected AuthorizationInfo doGetAuthorizationInfo(PrincipalCollection principals) {


        // 获取身份信息
        String primaryPrincipal = (String) principals.getPrimaryPrincipal();

        System.out.println("调用授权验证:" + primaryPrincipal);
        // 根据主身份从数据库中获取角色和权限信息
        User user = userService.findRolesByUserName(primaryPrincipal);
        if (!CollectionUtils.isEmpty(user.getRoles())){


            SimpleAuthorizationInfo simpleAuthorizationInfo = new SimpleAuthorizationInfo();
            user.getRoles().forEach(role -> {


                simpleAuthorizationInfo.addRole(role.getName());
            });
            return simpleAuthorizationInfo;
        }
        return null;

        /*// 根据主身份信息获取角色和权限信息
        if ("郑爽".equals(primaryPrincipal)){
            SimpleAuthorizationInfo simpleAuthorizationInfo = new SimpleAuthorizationInfo();

            *//*simpleAuthorizationInfo.addRole("user");
            simpleAuthorizationInfo.addRole("admin");*//*
            simpleAuthorizationInfo.addRoles(Arrays.asList("admin","user"));

            // 参数1:user模块 参数2:操作权限 参数3:资源
            simpleAuthorizationInfo.addStringPermission("user:update:*");
            simpleAuthorizationInfo.addStringPermission("user:select:*");
            simpleAuthorizationInfo.addStringPermission("user:add:*");

            return simpleAuthorizationInfo;
        }*/
    }

    @Override
    protected AuthenticationInfo doGetAuthenticationInfo(AuthenticationToken token) throws AuthenticationException {


        // 根据身份信息
        String principal = (String) token.getPrincipal();
        // 在工厂中获取service对象
       /* UserService userService = (UserService) ApplicationContextUtils.getBean("userService");
        System.out.println(userService);*/
        // System.out.println(userService);
        User user = userService.findByUserName(principal);

        /*if ("xiaoshuang".equals(principal)){
            return new SimpleAuthenticationInfo(principal,"123",this.getName());
        }*/

        // 使用数据库中的用户信息进行验证
        if (!ObjectUtils.isEmpty(user)) {


            return new SimpleAuthenticationInfo(user.getUsername(), user.getPassword(), ByteSource.Util.bytes(user.getSalt()), this.getName());
        }
        return null;
    }
}
4、获取用户权限信息
1、实体类
@Data
@AllArgsConstructor
@NoArgsConstructor
@Accessors(chain = true)
public class Role {


    private String id;
    private String name;

    //定义权限集合
    private List<Perms> perms;
}

@Data
@AllArgsConstructor
@NoArgsConstructor
@Accessors(chain = true)
public class Perms {


    private String id;
    private String name;
    private String url;
}
2、DAO
@Mapper
@Repository
public interface UserDao {


    void save(User user);

    User findByUserName(String username);

    // 根据用户名查询所有角色
    User findRolesByUserName(String username);

    // 根据角色id查询权限集合
    List<Perms> findPermsByRoleId(String id);
}
<select id="findPermsByRoleId" resultType="Perms">
    select p.id, p.name, p.url, r.name
    from shiro.t_role r
             LEFT JOIN shiro.t_role_perms rp
                       on r.id = rp.roleid
             LEFT JOIN shiro.t_perms p
                       on rp.permsid = p.id
    where r.id = #{id}
</select>
3、Service
public interface UserService {


    // 根据角色id查询权限集合
    List<Perms> findPermsByRoleId(String id);
}
@Service("userService")
@Transactional
public class UserServiceImpl implements UserService{


    @Autowired
    UserDao userDao;

    @Override
    public List<Perms> findPermsByRoleId(String id) {


        return userDao.findPermsByRoleId(id);
    }
}
4、Realm
/**
 * 自定义realm
 */

public class CustomerRealm extends AuthorizingRealm {


    @Autowired
    UserService userService;

    @Override
    protected AuthorizationInfo doGetAuthorizationInfo(PrincipalCollection principals) {


        // 获取身份信息
        String primaryPrincipal = (String) principals.getPrimaryPrincipal();

        System.out.println("调用授权验证:" + primaryPrincipal);
        // 根据主身份从数据库中获取角色和权限信息
        User user = userService.findRolesByUserName(primaryPrincipal);
        if (!CollectionUtils.isEmpty(user.getRoles())){


            SimpleAuthorizationInfo simpleAuthorizationInfo = new SimpleAuthorizationInfo();
            user.getRoles().forEach(role -> {


                simpleAuthorizationInfo.addRole(role.getName());

                // 权限信息
                List<Perms> perms = userService.findPermsByRoleId(role.getId());
                if (!CollectionUtils.isEmpty(perms)) {


                    perms.forEach(perm->{


                        simpleAuthorizationInfo.addStringPermission(perm.getName());
                    });
                }
            });
            return simpleAuthorizationInfo;
        }
        return null;

        /*// 根据主身份信息获取角色和权限信息
        if ("郑爽".equals(primaryPrincipal)){
            SimpleAuthorizationInfo simpleAuthorizationInfo = new SimpleAuthorizationInfo();

            *//*simpleAuthorizationInfo.addRole("user");
            simpleAuthorizationInfo.addRole("admin");*//*
            simpleAuthorizationInfo.addRoles(Arrays.asList("admin","user"));

            // 参数1:user模块 参数2:操作权限 参数3:资源
            simpleAuthorizationInfo.addStringPermission("user:update:*");
            simpleAuthorizationInfo.addStringPermission("user:select:*");
            simpleAuthorizationInfo.addStringPermission("user:add:*");

            return simpleAuthorizationInfo;
        }*/

    }

    @Override
    protected AuthenticationInfo doGetAuthenticationInfo(AuthenticationToken token) throws AuthenticationException {


        // 根据身份信息
        String principal = (String) token.getPrincipal();
        // 在工厂中获取service对象
       /* UserService userService = (UserService) ApplicationContextUtils.getBean("userService");
        System.out.println(userService);*/
        // System.out.println(userService);
        User user = userService.findByUserName(principal);

        /*if ("xiaoshuang".equals(principal)){
            return new SimpleAuthenticationInfo(principal,"123",this.getName());
        }*/

        // 使用数据库中的用户信息进行验证
        if (!ObjectUtils.isEmpty(user)) {


            return new SimpleAuthenticationInfo(user.getUsername(), user.getPassword(), ByteSource.Util.bytes(user.getSalt()), this.getName());
        }

        return null;
    }
}
7、自定义缓存
1、Cache作用
- Cache缓存:计算机内存中一段数据
- 作用:用来减轻DB的访问压力,从而提高系统的查询效率
- 流程
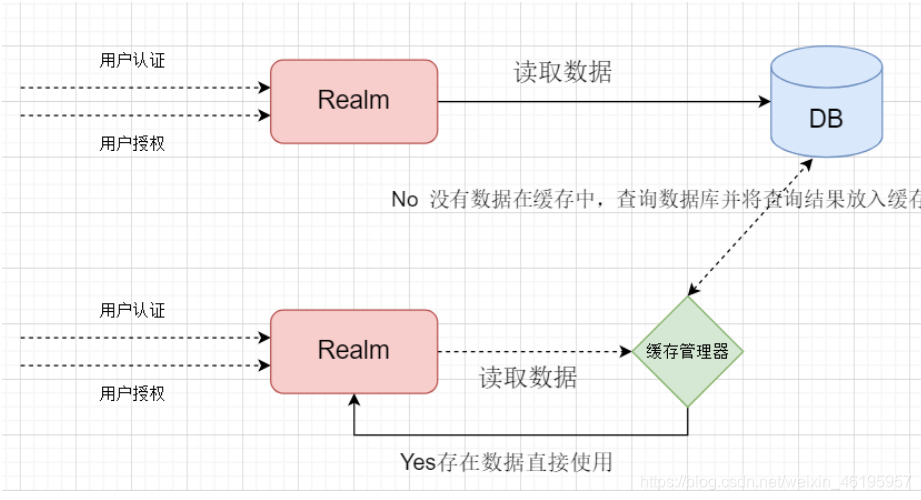
2、使用Shiro中默认EhCache实现缓存
1、引入依赖
<!--引入shiro和ehcache-->
<dependency>
    <groupId>org.apache.shiro</groupId>
    <artifactId>shiro-ehcache</artifactId>
    <version>1.7.1</version>
</dependency>
2、开启缓存管理器
/**
 *  这是用来整合Shiro相关的配置类
 */
@Configuration
public class ShiroConfig {


    // 1、创建shiroFilter   负责拦截所有请求
    @Bean
    public ShiroFilterFactoryBean getShiroFilterFactoryBean(DefaultWebSecurityManager defaultWebSecurityManager){


        ShiroFilterFactoryBean shiroFilterFactoryBean = new ShiroFilterFactoryBean();

        // 给filter设置安全管理器
        shiroFilterFactoryBean.setSecurityManager(defaultWebSecurityManager);
        // 配置系统受限资源
        // 配置系统公共资源
        HashMap<String, String> map = new HashMap<>();
        map.put("/user/login","anon"); // 设置为公共资源
        map.put("/user/register","anon"); // 设置为公共资源
        map.put("/register.jsp","anon"); // 设置为公共资源
        map.put("/**","authc"); // authc  代表请求这个资源需要认证和授权,如果没有做认证和授权直接就被重定向到login.jsp

        // 默认认证界面的路径,如果你不写,默认的就是返回login.jsp
        shiroFilterFactoryBean.setLoginUrl("/login.jsp");
        shiroFilterFactoryBean.setFilterChainDefinitionMap(map);

        return shiroFilterFactoryBean;
    }
    // 2、创建安全管理器
    @Bean
    public DefaultWebSecurityManager getDefaultWebSecurityManager(Realm realm){


        DefaultWebSecurityManager defaultWebSecurityManager = new DefaultWebSecurityManager();
        // 给安全管理器设置realm
        defaultWebSecurityManager.setRealm( realm);
        return defaultWebSecurityManager;
    }

    // 3、创建自定义realm
    @Bean
    public CustomerRealm getReal(){


        // 这里已经将CustomerRealm进行注入,所以有权在CustomerRealm中进行注解自动注入
        CustomerRealm customerRealm = new CustomerRealm();

        // 修改凭证校验匹配器
        HashedCredentialsMatcher credentialsMatcher = new HashedCredentialsMatcher();
        // 设置加密算法为MD5
        credentialsMatcher.setHashAlgorithmName("MD5");
        // 设置散列次数
        credentialsMatcher.setHashIterations(1024);
        customerRealm.setCredentialsMatcher(credentialsMatcher);

        // 开启缓存管理
        customerRealm.setCacheManager(new EhCacheManager());
        customerRealm.setCachingEnabled(true); // 开启全局缓存
        customerRealm.setAuthenticationCachingEnabled(true);// 开启认证缓存
        customerRealm.setAuthenticationCacheName("authenticationCache");
        customerRealm.setAuthorizationCachingEnabled(true); // 开启授权缓存
        customerRealm.setAuthorizationCacheName("authorizationCache");

        return customerRealm;
    }
}
8、Shiro验证码实现
1、导入图片工具类
package com.shuang.utils;

import javax.imageio.ImageIO;
import java.awt.*;
import java.awt.geom.AffineTransform;
import java.awt.image.BufferedImage;
import java.io.File;
import java.io.FileOutputStream;
import java.io.IOException;
import java.io.OutputStream;
import java.util.Arrays;
import java.util.Random;


public class VerifyCodeUtils{


    //使用到Algerian字体,系统里没有的话需要安装字体,字体只显示大写,去掉了1,0,i,o几个容易混淆的字符
    public static final String VERIFY_CODES = "23456789ABCDEFGHJKLMNPQRSTUVWXYZ";
    private static Random random = new Random();


    /**
     * 使用系统默认字符源生成验证码
     * @param verifySize    验证码长度
     * @return
     */
    public static String generateVerifyCode(int verifySize){


        return generateVerifyCode(verifySize, VERIFY_CODES);
    }
    /**
     * 使用指定源生成验证码
     * @param verifySize    验证码长度
     * @param sources   验证码字符源
     * @return
     */
    public static String generateVerifyCode(int verifySize, String sources){


        if(sources == null || sources.length() == 0){


            sources = VERIFY_CODES;
        }
        int codesLen = sources.length();
        Random rand = new Random(System.currentTimeMillis());
        StringBuilder verifyCode = new StringBuilder(verifySize);
        for(int i = 0; i < verifySize; i++){


            verifyCode.append(sources.charAt(rand.nextInt(codesLen-1)));
        }
        return verifyCode.toString();
    }

    /**
     * 生成随机验证码文件,并返回验证码值
     * @param w
     * @param h
     * @param outputFile
     * @param verifySize
     * @return
     * @throws IOException
     */
    public static String outputVerifyImage(int w, int h, File outputFile, int verifySize) throws IOException{


        String verifyCode = generateVerifyCode(verifySize);
        outputImage(w, h, outputFile, verifyCode);
        return verifyCode;
    }

    /**
     * 输出随机验证码图片流,并返回验证码值
     * @param w
     * @param h
     * @param os
     * @param verifySize
     * @return
     * @throws IOException
     */
    public static String outputVerifyImage(int w, int h, OutputStream os, int verifySize) throws IOException{


        String verifyCode = generateVerifyCode(verifySize);
        outputImage(w, h, os, verifyCode);
        return verifyCode;
    }

    /**
     * 生成指定验证码图像文件
     * @param w
     * @param h
     * @param outputFile
     * @param code
     * @throws IOException
     */
    public static void outputImage(int w, int h, File outputFile, String code) throws IOException{


        if(outputFile == null){


            return;
        }
        File dir = outputFile.getParentFile();
        if(!dir.exists()){


            dir.mkdirs();
        }
        try{


            outputFile.createNewFile();
            FileOutputStream fos = new FileOutputStream(outputFile);
            outputImage(w, h, fos, code);
            fos.close();
        } catch(IOException e){


            throw e;
        }
    }

    /**
     * 输出指定验证码图片流
     * @param w
     * @param h
     * @param os
     * @param code
     * @throws IOException
     */
    public static void outputImage(int w, int h, OutputStream os, String code) throws IOException{


        int verifySize = code.length();
        BufferedImage image = new BufferedImage(w, h, BufferedImage.TYPE_INT_RGB);
        Random rand = new Random();
        Graphics2D g2 = image.createGraphics();
        g2.setRenderingHint(RenderingHints.KEY_ANTIALIASING,RenderingHints.VALUE_ANTIALIAS_ON);
        Color[] colors = new Color[5];
        Color[] colorSpaces = new Color[] {

     Color.WHITE, Color.CYAN,
                Color.GRAY, Color.LIGHT_GRAY, Color.MAGENTA, Color.ORANGE,
                Color.PINK, Color.YELLOW };
        float[] fractions = new float[colors.length];
        for(int i = 0; i < colors.length; i++){


            colors[i] = colorSpaces[rand.nextInt(colorSpaces.length)];
            fractions[i] = rand.nextFloat();
        }
        Arrays.sort(fractions);

        g2.setColor(Color.GRAY);// 设置边框色
        g2.fillRect(0, 0, w, h);

        Color c = getRandColor(200, 250);
        g2.setColor(c);// 设置背景色
        g2.fillRect(0, 2, w, h-4);

        //绘制干扰线
        Random random = new Random();
        g2.setColor(getRandColor(160, 200));// 设置线条的颜色
        for (int i = 0; i < 20; i++) {


            int x = random.nextInt(w - 1);
            int y = random.nextInt(h - 1);
            int xl = random.nextInt(6) + 1;
            int yl = random.nextInt(12) + 1;
            g2.drawLine(x, y, x + xl + 40, y + yl + 20);
        }

        // 添加噪点
        float yawpRate = 0.05f;// 噪声率
        int area = (int) (yawpRate * w * h);
        for (int i = 0; i < area; i++) {


            int x = random.nextInt(w);
            int y = random.nextInt(h);
            int rgb = getRandomIntColor();
            image.setRGB(x, y, rgb);
        }

        shear(g2, w, h, c);// 使图片扭曲

        g2.setColor(getRandColor(100, 160));
        int fontSize = h-4;
        Font font = new Font("Algerian", Font.ITALIC, fontSize);
        g2.setFont(font);
        char[] chars = code.toCharArray();
        for(int i = 0; i < verifySize; i++){


            AffineTransform affine = new AffineTransform();
            affine.setToRotation(Math.PI / 4 * rand.nextDouble() * (rand.nextBoolean() ? 1 : -1), (w / verifySize) * i + fontSize/2, h/2);
            g2.setTransform(affine);
            g2.drawChars(chars, i, 1, ((w-10) / verifySize) * i + 5, h/2 + fontSize/2 - 10);
        }

        g2.dispose();
        ImageIO.write(image, "jpg", os);
    }

    private static Color getRandColor(int fc, int bc) {


        if (fc > 255)
            fc = 255;
        if (bc > 255)
            bc = 255;
        int r = fc + random.nextInt(bc - fc);
        int g = fc + random.nextInt(bc - fc);
        int b = fc + random.nextInt(bc - fc);
        return new Color(r, g, b);
    }

    private static int getRandomIntColor() {


        int[] rgb = getRandomRgb();
        int color = 0;
        for (int c : rgb) {


            color = color << 8;
            color = color | c;
        }
        return color;
    }

    private static int[] getRandomRgb() {


        int[] rgb = new int[3];
        for (int i = 0; i < 3; i++) {


            rgb[i] = random.nextInt(255);
        }
        return rgb;
    }

    private static void shear(Graphics g, int w1, int h1, Color color) {


        shearX(g, w1, h1, color);
        shearY(g, w1, h1, color);
    }

    private static void shearX(Graphics g, int w1, int h1, Color color) {


        int period = random.nextInt(2);

        boolean borderGap = true;
        int frames = 1;
        int phase = random.nextInt(2);

        for (int i = 0; i < h1; i++) {


            double d = (double) (period >> 1)
                    * Math.sin((double) i / (double) period
                    + (6.2831853071795862D * (double) phase)
                    / (double) frames);
            g.copyArea(0, i, w1, 1, (int) d, 0);
            if (borderGap) {


                g.setColor(color);
                g.drawLine((int) d, i, 0, i);
                g.drawLine((int) d + w1, i, w1, i);
            }
        }

    }

    private static void shearY(Graphics g, int w1, int h1, Color color) {


        int period = random.nextInt(40) + 10; // 50;

        boolean borderGap = true;
        int frames = 20;
        int phase = 7;
        for (int i = 0; i < w1; i++) {


            double d = (double) (period >> 1)
                    * Math.sin((double) i / (double) period
                    + (6.2831853071795862D * (double) phase)
                    / (double) frames);
            g.copyArea(i, 0, 1, h1, 0, (int) d);
            if (borderGap) {


                g.setColor(color);
                g.drawLine(i, (int) d, i, 0);
                g.drawLine(i, (int) d + h1, i, h1);
            }

        }

    }
    public static void main(String[] args) throws IOException {


        //获取验证码
        String s = generateVerifyCode(4);
        //将验证码放入图片中
        outputImage(260,60,new File("/Users/chenyannan/Desktop/安工资料/aa.jpg"),s);
        System.out.println(s);
    }
}
2、用户登录界面添加验证码输入
<body>
  <h1>用户登录</h1>
  <form action="${pageContext.request.contextPath}/user/login" method="post">
      用户名:<input type = "text" name="username"><br/>
      密码:<input type = "text" name="password"><br/>
      请输入验证码:<input type="text"><img src="${pageContext.request.contextPath}/user/getImage" alt="">
      <br>
      <input type="submit" value="登录">
  </form>
</body>
3、修改登录接口
/**
 * 用来处理身份认证
 *
 * @param username
 * @param password
 * @return
 */
@RequestMapping("login")
public String login(String username, String password, String code, HttpSession session) {


    // 比较验证码
    String codeSession = (String) session.getAttribute("code");
    try {


        if (codeSession.equalsIgnoreCase(code)) {


            // 获取主体对象
            // 原来使用SecurityUtils需要注入安全管理器,在web环境下,
            // 只要我们创建了安全管理器就会被自动注入到shiro的安全工具类
            Subject subject = SecurityUtils.getSubject();

            subject.login(new UsernamePasswordToken(username, password));
            return "redirect:/index.jsp";

        } else {


            throw new RuntimeException("验证码错误");
        }
    } catch (UnknownAccountException e) {


        e.printStackTrace();
        System.out.println("用户名错误!");
    } catch (IncorrectCredentialsException e) {


        System.out.println("密码输入错误!");
    } catch (Exception e){


        e.getStackTrace();
        System.out.println(e.getMessage());
    }

    return "redirect:/login.jsp";
![[外链图片转存失败,源站可能有防盗链机制,建议将图片保存下来直接上传(img-BpC65G8b-1617089045972)(Shiro 实战教程.assets/image-20210330150734838.png)]](https://img-blog.csdnimg.cn/20210330153719867.png)