关于SiamKPN代码的一些要点
这是出自快手公司的一篇单目标跟踪论文,是最早的anchor-free tracking scheme(是的,应该比SiamFC++还早):
paper: Siamese Keypoint Prediction Network for Visual Object Tracking
code: https://github.com/ZekuiQin/SiamKPN based on pysot
一、Architecture
模型没有什么话可说,整体架构就是下面这张图:
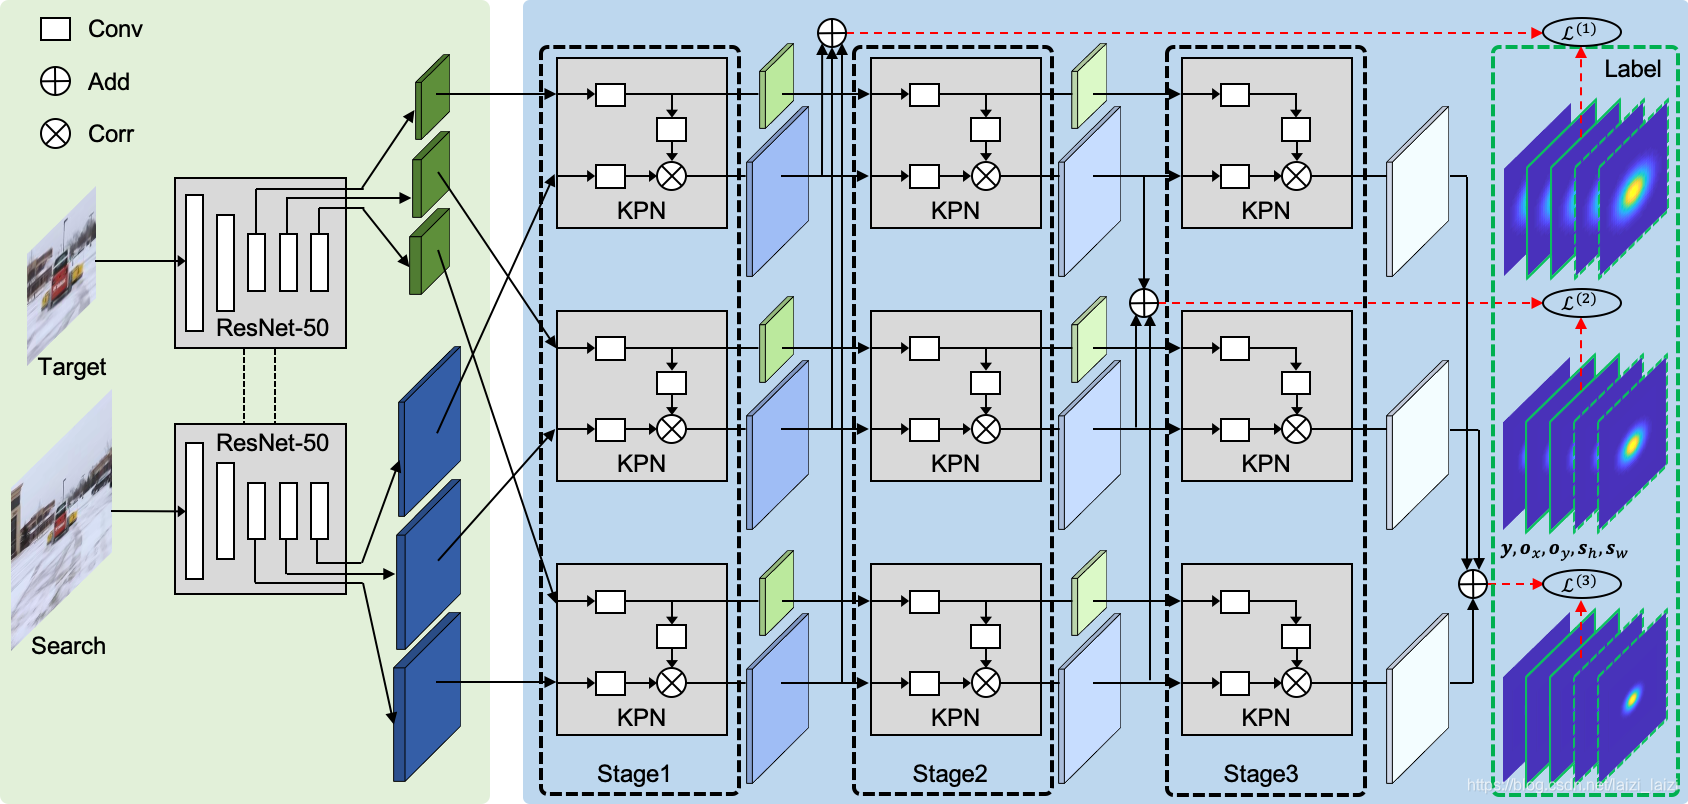
但是在具体实现的时候有些要注意的:
- 1、每个stage三个branch的加和起来共有5个通道,1个heatmap,2个objsize,2个offsets
- 2、每个stage输出的search map都是
31*31,因为在cross-correlation的时候会padding=2,而kernal又是5*5的,所以不会减小spatial size
这里三个stage都使用的话,输出的预测值的形式是这样的:
# 这里的三个都是因为3 stages
heatmap:list [[1,31,31], [1,31,31], [1,31,31]]
objsize:list [[2,31,31], [2,31,31], [2,31,31]]
offsets:list [[2,31,31], [2,31,31], [2,31,31]]
二、label generation
在SiamKPN-master/pysot/datasets/keypoint_target.py下生成的标签,调用形式:
heatmap_label, offsets_label, objsize_label = self.keypoint_target(bbox, cfg.TRAIN.OUTPUT_SIZE, neg)
bbox: xyxy形式的标签框
cfg.TRAIN.OUTPUT_SIZE: 输出特征图大小,一般为31
neg:是否为negative pair
下面列举了输出tensor的维度(这里没有包括batch size维度):
heatmap_label:list [(1,31,31),(1,31,31),(1,31,31)]
offsets_label:(2,31,31)
objsize_label:(2,31,31)
heatmap:

这个原文是这样说的:
Hence, as the number of stage increases, the Gaussian heatmap becomes more peaked around the target center point. In other words, the supervision signal is getting stricter along the cascade.
offsets:
- 当SAMEOFF==False时:

- 当SAMEOFF==True时(忽略位置,因为重新运行一次,有随机增强因素):

这个原文是这样说的:
In particular, the point offsets label { O x , O y } \left\{\mathbf{O}_{x}, \mathbf{O}_{y}\right\} {
Ox,Oy}are calculated as the discretization gap between the accurate position and a stride-clamped version,i.e., { i m − ⌊ i m ⌋ , j m − ⌊ j m ⌋ } \left\{\frac{i}{m}-\left\lfloor\frac{i}{m}\right\rfloor, \frac{j}{m}-\left\lfloor\frac{j}{m}\right\rfloor\right\} {
mi−⌊mi⌋,mj−⌊mj⌋} for position (i, j) and stride m.
objsize:

这个原文是这样说的:
Besides, we define the target size label {sh, sw} as the ground-truth height and width {h, w} around the center point and zero otherwise.
三、LOSS
这里也就是三种损失:heatmap_loss,offsets_loss,objsize_loss,如论文中所说的:

heatmap_loss
调用入口:
heatmap_loss = [focal_loss(heatmap[i], label_heatmap[i]) for i in range(cfg.TRAIN.STACK)]
heatmap_loss = sum(heatmap_loss)/cfg.TRAIN.STACK
函数定义:
def focal_loss(pred, gt):
    '''focal loss from CornerNet'''
	# https://github.com/princeton-vl/CornerNet/blob/0017821eb0e127918dfd29a1a5976558babb582d/models/py_utils/kp_utils.py#L152
    alpha = 2
    beta = 4
    gamma = cfg.TRAIN.FOCAL_NEG  # 0.05
    pos_inds = gt.eq(1)
    neg_inds = gt.lt(1)
    neg_weights = torch.pow(1 - gt[neg_inds], beta)

    loss = 0
    pos_pred = pred[pos_inds]
    neg_pred = pred[neg_inds]
    pos_loss = torch.log(pos_pred) * torch.pow(1 - pos_pred, alpha)
    neg_loss = torch.log(1 - neg_pred) * torch.pow(neg_pred, alpha) * neg_weights
    num_pos  = pos_inds.float().sum()
    pos_loss = pos_loss.sum()
    neg_loss = neg_loss.sum()

    loss = loss - (pos_loss + gamma*neg_loss)  # 我觉得在pos_loss前面缺少了(1-gamma)
    return loss/num_pos
offsets_loss
调用入口:
pos_inds = label_heatmap[0].gt(0)
            indx = torch.cat((pos_inds,pos_inds),1)
            if cfg.TRAIN.OFFSETS:
                if cfg.TRAIN.SAMEOFF:
                    offsets_loss = [F.smooth_l1_loss(offsets[i][indx],label_offsets[indx]) for i in range(cfg.TRAIN.STACK)]
                else:
                    weight_offsets = label_heatmap[0][pos_inds]
                    weight_offsets = torch.cat((weight_offsets,weight_offsets),0)
                    offsets_loss = [F.smooth_l1_loss(weight_offsets*offsets[i][indx],weight_offsets*label_offsets[indx]) for i in range(cfg.TRAIN.STACK)]
                offsets_loss = sum(offsets_loss)/cfg.TRAIN.STACK
函数定义:
F.smooth_l1_loss

objsize_loss
调用入口:
objsize_loss = [F.smooth_l1_loss(objsize[i][indx],label_objsize[indx]) for i in range(cfg.TRAIN.STACK)]
objsize_loss = sum(objsize_loss)/cfg.TRAIN.STACK
函数定义:同上
四、Tracking
这一部分在SiamKPN-master/pysot/tracker/siamkpn_tracker.py里,主要实现两个方法:init和track:
下面就是init部分代码,做了:1、输入第一帧图像,进行crop成127*127 2、送入backbone和adjust layer生成template特征:
def init(self, img, bbox):
    """
    args:
        img(np.ndarray): BGR image
        bbox: (x, y, w, h) bbox
    """
    self.center_pos = np.array([bbox[0]+(bbox[2]-1)/2,
                                bbox[1]+(bbox[3]-1)/2])
    self.size = np.array([bbox[2], bbox[3]])

    # calculate z crop size
    w_z = self.size[0] + cfg.TRACK.CONTEXT_AMOUNT * np.sum(self.size)
    h_z = self.size[1] + cfg.TRACK.CONTEXT_AMOUNT * np.sum(self.size)
    s_z = round(np.sqrt(w_z * h_z))

    # calculate channle average
    self.channel_average = np.mean(img, axis=(0, 1))

    # get crop
    z_crop = self.get_subwindow(img, self.center_pos,
                                cfg.TRACK.EXEMPLAR_SIZE,
                                s_z, self.channel_average)
    self.template = self.model.template(z_crop)
    # template has go through Adjust layer
    if self.frame>1:
        self.frame += 5
下面就是track部分代码,做了:1、输入后续帧图像,进行crop成255*255 2、送入backbone和adjust layer生成search特征 3、根据heatmap预测值定位,offsets值进行修正,objsize值进行尺度估计4、尺度|宽高比|余弦窗惩罚,得到当前帧预测结果:
def track(self, img):
    """
    args:
        img(np.ndarray): BGR image
    return:
        bbox(list):[x, y, width, height]
    """
    # self.size: w,h of last bbox
    w_z = self.size[0] + cfg.TRACK.CONTEXT_AMOUNT * np.sum(self.size)
    h_z = self.size[1] + cfg.TRACK.CONTEXT_AMOUNT * np.sum(self.size)
    s_z = np.sqrt(w_z * h_z)
    scale_z = cfg.TRACK.EXEMPLAR_SIZE / s_z
    s_x = s_z * (cfg.TRACK.INSTANCE_SIZE / cfg.TRACK.EXEMPLAR_SIZE)
    x_crop = self.get_subwindow(img, self.center_pos,
                                cfg.TRACK.INSTANCE_SIZE,
                                round(s_x), self.channel_average)
    with torch.no_grad():
        outputs = self.model.track(self.template, x_crop)

    hm_score = outputs['heatmap'][-1].contiguous().view(1, -1)  # (1, 1*1*31*31)
    score, rank = hm_score.sort(descending=True)  # values, indices same shape with hm_score
    topk_score = score[:, :self.topk]  # 16
    score = torch.sigmoid(topk_score)
    score_threshold = score.gt(self.threshold)  # 0.15
    idx_number = score_threshold.sum().cpu().item()
    num = max(self.mink, min(idx_number, self.topk))  # >= mink
    topk_rank = rank[0, :num].cpu().numpy()  # (num,)

    score = score[:, :num].data[0, :].cpu().numpy()  # dim reduce by 1 (num,)
    if cfg.TRAIN.OFFSETS:
        off = outputs['offsets'][-1]  # using third stage
    else:
        off = 0
    # off: (1,2,31,31), outputs['objsize'][-1]: (1,2,31,31)
    pred_bbox = self._convert_bbox(off, outputs['objsize'][-1], topk_rank, num)

    # pred_bbox[0]: cx_offset,  pred_bbox[1]: cy_offset
    # pred_bbox[2]: bbox_w,  pred_bbox[1]: bbox_h

    def change(r):
        return np.maximum(r, 1. / r)

    def sz(w, h):
        pad = (w + h) * 0.5
        return np.sqrt((w + pad) * (h + pad))

    # just do the penalty in num points not whole feature_map
    # scale penalty
    s_c = change(sz(pred_bbox[2, :], pred_bbox[3, :]) /
                 (sz(self.size[0] * scale_z, self.size[1] * scale_z)))

    # aspect ratio penalty
    r_c = change((self.size[0] / self.size[1]) /
                 (pred_bbox[2, :] / pred_bbox[3, :]))
    penalty = np.exp(-(r_c * s_c - 1) * cfg.TRACK.PENALTY_K)
    pscore = penalty * score  # re-rank classification score

    # window penalty
    window = self.window[topk_rank]
    pscore = pscore * (1 - cfg.TRACK.WINDOW_INFLUENCE) + \
             window * cfg.TRACK.WINDOW_INFLUENCE  # (num,)
    best_idx = np.argmax(pscore)
    # go back scale that it hasn't crop x_patch
    bbox = pred_bbox[:, best_idx] / scale_z
    lr = penalty[best_idx] * score[best_idx] * cfg.TRACK.LR

    cx = bbox[0] + self.center_pos[0]
    cy = bbox[1] + self.center_pos[1]

    # smooth bbox
    width = self.size[0] * (1 - lr) + bbox[2] * lr
    height = self.size[1] * (1 - lr) + bbox[3] * lr

    # clip boundary
    cx, cy, width, height = self._bbox_clip(cx, cy, width,
                                            height, img.shape[:2])

    # udpate state
    self.center_pos = np.array([cx, cy])
    self.size = np.array([width, height])

    bbox = [cx - width / 2,
            cy - height / 2,
            width,
            height]
    best_score = score[best_idx]
    self.frame += 1
    return {


        'bbox': bbox,
        'best_score': best_score,
        'hm': outputs['heatmap'],
        'xcrop': x_crop,
        'scale_z': scale_z
    }
这里面关键的就是self._convert_bbox函数:他就是用anchors(这里只是表面继续使用pysot里代码,实际anchor-free,这里的anchors代表映射回x_crop点与x_crop中心点的距离)基础修正预测的offsets,然后又因为x_crop是以上一帧的bbox的中心crop的,所以在【67-68行】就加上上一帧的cx,cy坐标。
五、Coordinate remapping summary
最近看了几篇anchor free tracking的代码后,总离不开一个步骤,就是feature map coordinate和original coordinate的映射关系,这里SiamFC++和SiamKPN在写法上稍微不一样(但是意思是差不多的),故此列举总结一下:
SiamFC++【given feature map coordinate --> return remapping coordinate in original image】:
SiamFC++这部分主要在regression branch预测出offsets后返回原图来得到预测出的bbox,来与GT bbox_x计算IoU
- 这里的score_size:就是feature map的大小
- score_offset:就是起始点相对于original image起始点的偏移,可见这篇图,
score_offset = (x_size - 1 - (score_size - 1) * total_stride) // 2 - total_stride:就是到取用的这层feature map的backbone的stride总和
def get_xy_ctr_np(score_size, score_offset, total_stride):
    """ generate coordinates on image plane for score map pixels (in numpy)
    """
    batch, fm_height, fm_width = 1, score_size, score_size

    y_list = np.linspace(0., fm_height - 1.,
                         fm_height).reshape(1, fm_height, 1, 1)
    y_list = y_list.repeat(fm_width, axis=2)
    x_list = np.linspace(0., fm_width - 1., fm_width).reshape(1, 1, fm_width, 1)
    x_list = x_list.repeat(fm_height, axis=1)
    xy_list = score_offset + np.concatenate((x_list, y_list), 3) * total_stride
    xy_ctr = np.repeat(xy_list, batch, axis=0).reshape(
        batch, -1,
        2)  # .broadcast([batch, fm_height, fm_width, 2]).reshape(batch, -1, 2)
    # TODO: consider use float32 type from the beginning of this function
    xy_ctr = torch.from_numpy(xy_ctr.astype(np.float32))
    return xy_ctr
因为 SiamFC++的label生成部分需要看feature map哪些pixel是映射回原图在GT bbox里面的,从而在这些对应区域撒label,所以也需要从feature map映射回 search image,主要在make_densebox_target.py【下面截取一小段】:
fm_height, fm_width = score_size, score_size  # h, w
fm_offset = score_offset
stride = total_stride

# coordinate meshgrid on feature map, shape=(h, w)
x_coords_on_fm = torch.arange(0, fm_width, dtype=torch.int64)  # (w, )
y_coords_on_fm = torch.arange(0, fm_height, dtype=torch.int64)  # (h, )
y_coords_on_fm, x_coords_on_fm = torch.meshgrid(x_coords_on_fm,
                                                y_coords_on_fm)  # (h, w)
y_coords_on_fm = y_coords_on_fm.reshape(-1)  # (hxw, ), flattened
x_coords_on_fm = x_coords_on_fm.reshape(-1)  # (hxw, ), flattened

# (hxw, #boxes, 4-d_offset_(l/t/r/b), )
offset_on_fm = offset[fm_offset + y_coords_on_fm * stride, fm_offset +
                          x_coords_on_fm * stride]  # will reduce dim by 1
因为SiamFC++没有需要从original image coordinate映射回feature map coordinate的,所以没有这部分的相关代码
SiamKPN:
同样的,SiamKPN在撒label的时候也需要这种映射关系:
从feature map coordinate映射回original image coordinate
if cfg.TRAIN.OFFSETS:
    self.keypoints = np.zeros((2, cfg.TRAIN.OUTPUT_SIZE, cfg.TRAIN.OUTPUT_SIZE), dtype=np.float32)
    for i in range(cfg.TRAIN.OUTPUT_SIZE):
        for j in range(cfg.TRAIN.OUTPUT_SIZE):
            self.keypoints[0][i][j] = (cfg.TRAIN.SEARCH_SIZE-1)/2 + self.stride*(j-cfg.TRAIN.OUTPUT_SIZE//2)
            self.keypoints[1][i][j] = (cfg.TRAIN.SEARCH_SIZE-1)/2 + self.stride*(i-cfg.TRAIN.OUTPUT_SIZE//2)
# also can write like this:
start = (SEARCH_SIZE-1)/2 + stride*(0-OUTPUT_SIZE//2)
end = (SEARCH_SIZE-1)/2 + stride*((OUTPUT_SIZE-1)-OUTPUT_SIZE//2)
x = np.linspace(start, end, num=OUTPUT_SIZE)
self.keypoints[0], self.keypoints[1] = np.meshgrid(x, x)
两种方法是等效的,但是下面这种要快8倍:

从original image coordinate映射回feature map coordinate
heat_cx = cfg.TRAIN.OUTPUT_SIZE//2 + (tcx-(cfg.TRAIN.SEARCH_SIZE-1)/2)/self.stride
heat_cy = cfg.TRAIN.OUTPUT_SIZE//2 + (tcy-(cfg.TRAIN.SEARCH_SIZE-1)/2)/self.stride

for i in range(cfg.TRAIN.OUTPUT_SIZE):
    for j in range(cfg.TRAIN.OUTPUT_SIZE):
        distance = (i-heat_cy)**2 + (j-heat_cx)**2
可以看到,对于这种anchor free tracking中需要coordinate remapping的主要是make target这一步
PS
因为pysot里面的训练集都是raw dataset经过处理后目标已经在图像的中心了,所以在生成正负样本对的时候就直接crop,如这句话体现的