内容分为两个部分:
第一部分:用户画像概述
第二部分:用户画像案例
数据和源码 移步到Github : https://github.com/Stormzudi/Data-Mining-Case
邮箱:[email protected]
目录
第一部分:
1. 用户画像概述
1.1 什么是用户画像?
用户画像是指在大数据时代,我们通过对海量数字信息进行清洗、聚类、分析,从而将数据抽象成标签,利用这些标签将用户形象具体化,从而为用户提供有针对性的服务。
1.2 用户画像的主要内容
按业务要求,用户画像会划分成多个类别模块,除了常见的人口统计,社会属性外,还有用户消费画像、用户行为画像,用户兴趣画像等。业务不同,用户画像的内容也有所差异,以下分析用户画像的主要内容。
人口属性和行为特征是大部分互联网公司做用户画像时会包含的:人口属性主要指用户的年龄、性别、所在的省份和城市、教育程度、婚姻情况、生育情况、工作所在的行业和职业等。行为特征主要包含活跃度、忠诚度等指标。

除了以上较通用的特征,用户画像包含的内容并不完全固定,根据行业和产品的不同所关注的特征也有不同。
① 以内容为主的媒体或阅读类网站、搜索引擎,或通用导航类网站,往往会提取用户对浏览内容的兴趣特征,比如体育类、娱乐类、美食类、理财类、旅游类、房产类、汽车类等等。
②社交网站的用户画像,也会提取用户的社交网络,从中可以发现关系紧密的用户群和在社群中起到意见领袖作用的明星节点。
③电商购物网站的用户画像,一般会提取用户的网购兴趣和消费能力等指标。网购兴趣主要指用户在网购时的类目偏好,比如服饰类、箱包类、居家类、母婴类、洗护类、饮食类等。消费能力指用户的购买力,如果做得足够细致,可以把用户的实际消费水平和在每个类目的心理消费水平区分开,分别建立特征纬度。

④像金融领域,还会有风险画像,包括征信、违约、洗钱、还款能力、保险黑名单等。
另外还可以加上用户的环境属性,比如当前时间、访问地点LBS特征、当地天气、节假日情况等。当然,对于特定的网站或App,肯定又有特殊关注的用户维度,就需要把这些维度做到更加细化,从而能给用户提供更精准的个性化服务和内容。
1.3 构造用户画像的过程
用户画像的形成需要经历四个过程,主要包括数据收集与清洗、用户关联分析、数据建模分析、数据产出。其中,数据清洗和数据建模统称数据处理,在经过数据处理之后,个推凭借多年积累的大数据能力,以独特的冷、热、温数据维度分析进行数据产出形成用户画像。

用户画像的形成需要经历以上四个基本步骤,那么用户画像用了哪些技术?
(1)数据处理阶段:大数据计算架构采用了 Kafka 分布式发布订阅消息系统
(2)数据清洗阶段:HADOOP、SPARK

(3)数据建模分析阶段:聚类(无监督学习) 和深度学习技术

(4)数据产出阶段:定制化标签是将个推数据与第三方数据结合起来,共同建模得出具有价值的特征标签,这里推荐PowerBI。

之后,数据的产出会形成冷数据画像、温数据回溯、热数据场景和定制化标签四种画像。冷数据画像,是指基于大数据分析出用户的属性,改变概率较小的数据,如用户的年龄段、性别等。
“温数据” 则可以回溯用户近期活跃的线上和线下场景,具有一定的时效性。
“热数据” 是指用户当下的场景及实时的用户特征,帮助 APP 运营者抓住稍纵即逝的营销机会。
定制化标签是将个推数据与第三方数据结合起来,共同建模得出具有价值的特征标签。总的来说,个推用户画像产品不仅能产出通用的标签维度,也有定制化标签的输出能力。
2. 如何构建用户画像?
“用户画像”的构建需要技术和业务人员的共同参与,以避免形式化的用户画像,具体做法可参考个推构建用户画像的流程:
(1)标签体系设计。开发者需要先了解自身的数据,确定需要设计的标签形式。
(2)基础数据收集、多数据源数据融合。在建设用户画像时,个推用户画像产品会整合个推以及该 APP 自身的数据。
(3)实现用户统一标识。多数情况下,APP 的众多用户分布于不同的账号体系中,个推会将其统一标识,帮助 APP 打通账号,实现信息快速共享。
(4)用户画像特征层构建,即将每一个数据进行特征化。
(5)画像标签规则 + 算法建模,两者缺一不可。在实际的应用中,算法难以解决的问题,利用简单的规则也可以达到很好的效果。
(6)利用算法对所有用户打标签。
(7)画像质量监控。在实际的应用中,用户画像会产生一定的波动,为了解决这个问题,个推建设了相应的监控系统,对画像的质量进行监控。
总之,个推用户画像构建的整体流程,可以概况为三个部分:
第一,基础数据处理。基础数据包括用户设备信息、用户的线上 APP 偏好以及线下场景数据等。
第二,画像中间数据处理。处理结果包括线上 APP 偏好特征和线下场景特征等。
第三,画像信息表。表中应有四种信息:设备基础属性;用户基础画像,包括用户的性别、年龄段、相关消费水平等;用户兴趣画像,即用户更有兴趣的方向,比如用户更偏好拼团还是海淘;用户其它画像等。
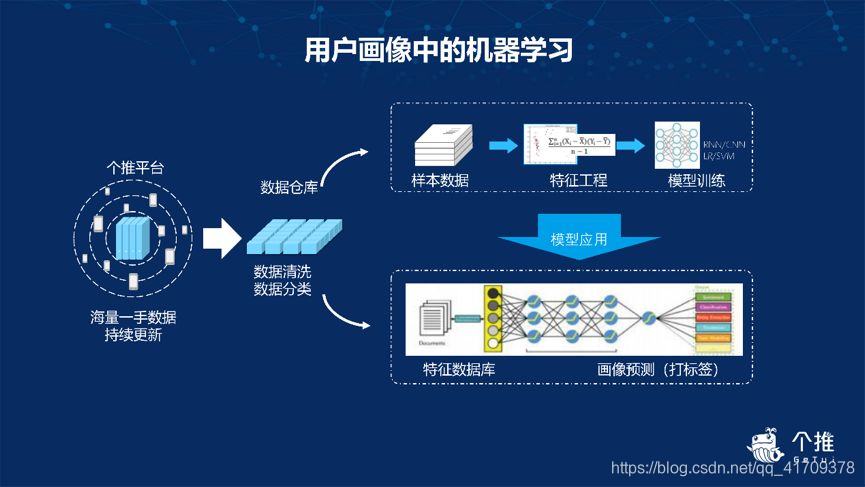
在个推用户画像构建的过程中,机器学习占据了较为重要的位置。机器学习主要应用在海量设备数据采集、数据清洗、数据存储的过程。
3. 用户画像能做什么?
用户画像常用在电商、新闻资讯等 APP,帮助 APP 打造内容精准推荐系统,实现千人千面运营。
(1)基于用户特征的个性化推荐
APP 的运营者通过个推用户画像提供的性别、年龄段、兴趣爱好等标签,分别展示不同的内容给用户, 以达到精准化运营。

(2)基于用户特征指导内容推荐
基于用户特征指导内容的推荐是指找到与目标相似的用户群,利用该用户群的行为特征对目标用户进行内容推荐,具体过程如下图:

在这里,我们需要解释一下其中所涉及到的相似性建模技术。相似性建模可类比于聚类建模,它是无监督学习中的一种,它指的是寻找数据中的特征,把具有相同特征的数据聚集在一组,赋予这些聚集在一起的数据相同的特征标签,从而给这些具有这些特性的用户推送相同的内容。

这种推荐方式的优点是,它的自有特征是经过 APP 长期积淀而来,颗粒度更细,适用性更强,对用户的认识更全面,效果能持续提升,而且它还能针对 APP 所处行业与自身需求,量身定制匹配算法,让推荐更精准。
此外,如上文所言,个推用户画像能够结合第三方数据做定制化建模,通过双方共同建模得出显著价值和特征标签,依据不同标签向用户推送不同的内容。这样不仅能保证推送的内容更精准,覆盖面也更广泛,而且标签增补的方式,也可以很大程度上提升流量价值。
第二部分:
1. 用户画像-案例整体流程
用户画像-案例:基于用户搜索关键词数据为用户打上标签(年龄,性别,学历)

整体流程:
(一)数据预处理
- 编码方式转换
- 对数据搜索内容进行分词
- 词性过滤
- 数据检查
(二)特征选择
- 建立word2vec词向量模型
- 对所有搜索数据求平均向量
(三)建模预测
- 不同机器学习模型对比
- 堆叠模型
2. 数据预处理
将原始数据转换成utf-8编码,防止后续出现各种编码问题
由于原始数据比较大,在分词与过滤阶段会比较慢,这里我们选择了原始数据中的1W个
import csv

#原始数据存储路径
data_path = './data/user_tag_query.10W.TRAIN'
#生成数据路径
csvfile = open(data_path + '-1w.csv', 'w')
writer = csv.writer(csvfile)
writer.writerow(['ID', 'age', 'Gender', 'Education', 'QueryList'])
#转换成utf-8编码的格式
with open(data_path, 'r',encoding='gb18030',errors='ignore') as f:
    lines = f.readlines()
    for line in lines[0:10000]:
        try:
            line.strip()
            data = line.split("\t")
            writedata = [data[0], data[1], data[2], data[3]]
            querystr = ''
            data[-1]=data[-1][:-1]
            for d in data[4:]:
                try:
                    cur_str = d.encode('utf8')
                    cur_str = cur_str.decode('utf8')
                    querystr += cur_str + '\t'
                except:
                    continue
                    #print (data[0][0:10])
            querystr = querystr[:-1]
            writedata.append(querystr)
            writer.writerow(writedata)
        except:
            #print (data[0][0:20])
            continue
测试集的编码转换方式同上
data_path = './data/user_tag_query.10W.TEST'

csvfile = open(data_path + '-1w.csv', 'w')
writer = csv.writer(csvfile)
writer.writerow(['ID', 'QueryList'])
with open(data_path, 'r',encoding='gb18030',errors='ignore') as f:
    lines = f.readlines()
    for line in lines[0:10000]:
        try:
            data = line.split("\t")
            writedata = [data[0]]
            querystr = ''
            data[-1]=data[-1][:-1]
            for d in data[1:]:
                try:
                    cur_str = d.encode('utf8')
                    cur_str = cur_str.decode('utf8')
                    querystr += cur_str + '\t'
                except:
                    #print (data[0][0:10])
                    continue
            querystr = querystr[:-1]
            writedata.append(querystr)
            writer.writerow(writedata)
        except:
            #print (data[0][0:20])
            continue
生成对应的数据表
import pandas as pd

#编码转换完成的数据,取的是1W的子集
trainname = './data/user_tag_query.10W.TRAIN-1w.csv'
testname = './data/user_tag_query.10W.TEST-1w.csv'

data = pd.read_csv(trainname,encoding='gbk')
print (data.info())

#分别生成三种标签数据(性别,年龄,学历)
data.age.to_csv("./data/train_age.csv", index=False)
data.Gender.to_csv("./data/train_gender.csv", index=False)
data.Education.to_csv("./data/train_education.csv", index=False)
#将搜索数据单独拿出来
data.QueryList.to_csv("./data/train_querylist.csv", index=False)

data = pd.read_csv(testname,encoding='gbk')
print (data.info())

data.QueryList.to_csv("./data/test_querylist.csv", index=False)
对用户的搜索数据进行分词与词性过滤
这里需要分别对训练集和测试集进行相同的操作,路径名字要改动一下
import pandas as pd
import jieba.analyse
import time
import jieba
import jieba.posseg
import os, sys


def input(trainname):
    traindata = []
    with open(trainname, 'rb') as f:
        line = f.readline()
        count = 0
        while line:
            try:
                traindata.append(line)
                count += 1
            except:
                print ("error:", line, count)
            line=f.readline()
    return traindata
start = time.clock()

filepath = './data/test_querylist.csv'
QueryList = input(filepath)

writepath = './data/test_querylist_writefile-1w.csv'
csvfile = open(writepath, 'w')

POS = {

    }
for i in range(len(QueryList)):
    #print (i)
    if i%2000 == 0 and i >=1000:
        print (i,'finished')
    s = []
    str = ""
    words = jieba.posseg.cut(QueryList[i])# 带有词性的精确分词模式
    allowPOS = ['n','v','j']
    for word, flag in words:
        POS[flag]=POS.get(flag,0)+1
        if (flag[0] in allowPOS) and len(word)>=2:
            str += word + " "

    cur_str = str.encode('utf8')
    cur_str = cur_str.decode('utf8')
    s.append(cur_str)

    csvfile.write(" ".join(s)+'\n')
csvfile.close()

end = time.clock()
print ("total time: %f s" % (end - start))
3. 特征选择
使用Gensim库建立word2vec词向量模型
参数定义:
-
sentences:可以是一个list
-
sg: 用于设置训练算法,默认为0,对应CBOW算法;sg=1则采用skip-gram算法。
-
size:是指特征向量的维度,默认为100。大的size需要更多的训练数据,但是效果会更好. 推荐值为几十到几百。
-
window:表示当前词与预测词在一个句子中的最大距离是多少
-
alpha: 是学习速率
-
seed:用于随机数发生器。与初始化词向量有关。
-
min_count: 可以对字典做截断. 词频少于min_count次数的单词会被丢弃掉, 默认值为5
-
max_vocab_size: 设置词向量构建期间的RAM限制。如果所有独立单词个数超过这个,则就消除掉其中最不频繁的一个。每一千万个单词需要大约1GB的RAM。设置成None则没有限制。
-
workers参数控制训练的并行数。
-
hs: 如果为1则会采用hierarchica·softmax技巧。如果设置为0(defau·t),则negative sampling会被使用。
-
negative: 如果>0,则会采用negativesamp·ing,用于设置多少个noise words
-
iter: 迭代次数,默认为5
from gensim.models import word2vec
#将数据变换成list of list格式
train_path = './data/train_querylist_writefile-1w.csv'
with open(train_path, 'r') as f:
    My_list = []
    lines = f.readlines()
    for line in lines:
        cur_list = []
        line = line.strip()
        data = line.split(" ")
        for d in data:
            cur_list.append(d)
        My_list.append(cur_list)

    model = word2vec.Word2Vec(My_list, size=300, window=10,workers=4)
    savepath = '1w_word2vec_' + '300'+'.model' # 保存model的路径

    model.save(savepath)
检测输出结果,例如:
model.most_similar("清华")

输出:
[('北京大学', 0.9314329028129578),
 ('委员', 0.9181340932846069),
 ('特长生', 0.9098962545394897),
 ('中国人民大学', 0.9066182374954224),
 ('北大', 0.9033325910568237),
 ('清华大学', 0.9025564789772034),
 ('工作部', 0.8978621363639832),
 ('复旦大学', 0.8967786431312561),
 ('金融学', 0.8937995433807373),
 ('投档', 0.8907859325408936)]
加载训练好的word2vec模型,求用户搜索结果的平均向量
import numpy as np
file_name = './data/train_querylist_writefile-1w.csv'
cur_model = gensim.models.Word2Vec.load('1w_word2vec_300.model')
with open(file_name, 'r') as f:
    cur_index = 0
    lines = f.readlines()
    doc_cev = np.zeros((len(lines),300))
    for line in lines:
        word_vec = np.zeros((1,300))
        words = line.strip().split(' ')
        wrod_num = 0
        #求模型的平均向量
        for word in words:
            if word in cur_model:
                wrod_num += 1
                word_vec += np.array([cur_model[word]])
        doc_cev[cur_index] = word_vec / float(wrod_num)
        cur_index += 1
def removezero(x, y):
        nozero = np.nonzero(y)
        y = y[nozero]
        x = np.array(x)
        x = x[nozero]
        return x, y
gender_train, genderlabel = removezero(doc_cev, genderlabel)
age_train, agelabel = removezero(doc_cev, agelabel)
education_train, educationlabel = removezero(doc_cev, educationlabel)
print (gender_train.shape,genderlabel.shape)
print (age_train.shape,agelabel.shape)
print (education_train.shape,educationlabel.shape)
建立一个绘图函数,以性别为例,绘制混淆矩阵
import matplotlib.pyplot as plt
import itertools
def plot_confusion_matrix(cm, classes,
                          title='Confusion matrix',
                          cmap=plt.cm.Blues):
    """
    This function prints and plots the confusion matrix.
    """
    plt.imshow(cm, interpolation='nearest', cmap=cmap)
    plt.title(title)
    plt.colorbar()
    tick_marks = np.arange(len(classes))
    plt.xticks(tick_marks, classes, rotation=0)
    plt.yticks(tick_marks, classes)

    thresh = cm.max() / 2.
    for i, j in itertools.product(range(cm.shape[0]), range(cm.shape[1])):
        plt.text(j, i, cm[i, j],
                 horizontalalignment="center",
                 color="white" if cm[i, j] > thresh else "black")

    plt.tight_layout()
    plt.ylabel('True label')
    plt.xlabel('Predicted label')
4. 建模与预测
建立一个基础预测模型
from sklearn.linear_model import LogisticRegression
from sklearn.metrics import confusion_matrix
from sklearn.cross_validation import train_test_split

X_train, X_test, y_train, y_test = train_test_split(gender_train,genderlabel,test_size = 0.2, random_state = 0)

LR_model = LogisticRegression()

LR_model.fit(X_train,y_train)
y_pred = LR_model.predict(X_test)
print (LR_model.score(X_test,y_test))

cnf_matrix = confusion_matrix(y_test,y_pred)

print("Recall metric in the testing dataset: ", cnf_matrix[1,1]/(cnf_matrix[1,0]+cnf_matrix[1,1]))

print("accuracy metric in the testing dataset: ", (cnf_matrix[1,1]+cnf_matrix[0,0])/(cnf_matrix[0,0]+cnf_matrix[1,1]+cnf_matrix[1,0]+cnf_matrix[0,1]))

# Plot non-normalized confusion matrix
class_names = [0,1]
plt.figure()
plot_confusion_matrix(cnf_matrix
                      , classes=class_names
                      , title='Gender-Confusion matrix')
plt.show()

from sklearn.ensemble import RandomForestClassifier
from sklearn.metrics import confusion_matrix
from sklearn.cross_validation import train_test_split

X_train, X_test, y_train, y_test = train_test_split(gender_train,genderlabel,test_size = 0.2, random_state = 0)

RF_model = RandomForestClassifier(n_estimators=100,min_samples_split=5,max_depth=10)

RF_model.fit(X_train,y_train)
y_pred = RF_model.predict(X_test)
print (RF_model.score(X_test,y_test))

cnf_matrix = confusion_matrix(y_test,y_pred)

print("Recall metric in the testing dataset: ", cnf_matrix[1,1]/(cnf_matrix[1,0]+cnf_matrix[1,1]))

print("accuracy metric in the testing dataset: ", (cnf_matrix[1,1]+cnf_matrix[0,0])/(cnf_matrix[0,0]+cnf_matrix[1,1]+cnf_matrix[1,0]+cnf_matrix[0,1]))

# Plot non-normalized confusion matrix
class_names = [0,1]
plt.figure()
plot_confusion_matrix(cnf_matrix
                      , classes=class_names
                      , title='Gender-Confusion matrix')
plt.show()

建立堆叠模型

from sklearn.svm import SVC
from sklearn.naive_bayes import MultinomialNB
clf1 = RandomForestClassifier(n_estimators=100,min_samples_split=5,max_depth=10)
clf2 = SVC()
clf3 = LogisticRegression()
basemodes = [
            ['rf', clf1],
            ['svm', clf2],
            ['lr', clf3]
            ]
from sklearn.cross_validation import KFold, StratifiedKFold
models = basemodes

#X_train, X_test, y_train, y_test

folds = list(KFold(len(y_train), n_folds=5, random_state=0))
print (len(folds))
S_train = np.zeros((X_train.shape[0], len(models)))
S_test = np.zeros((X_test.shape[0], len(models)))

for i, bm in enumerate(models):
    clf = bm[1]

    #S_test_i = np.zeros((y_test.shape[0], len(folds)))
    for j, (train_idx, test_idx) in enumerate(folds):
        X_train_cv = X_train[train_idx]
        y_train_cv = y_train[train_idx]
        X_val = X_train[test_idx]
        clf.fit(X_train_cv, y_train_cv)
        y_val = clf.predict(X_val)[:]

        S_train[test_idx, i] = y_val
    S_test[:,i] = clf.predict(X_test)

final_clf = RandomForestClassifier(n_estimators=100)
final_clf.fit(S_train,y_train)

print (final_clf.score(S_test,y_test))
结果:
5
0.796106557377
参考博客:
- https://www.zhihu.com/question/31429786
- https://baijiahao.baidu.com/s?id=1594141083999253585&wfr=spider&for=pc
- https://blog.csdn.net/zzhhoubin/article/details/79727130?utm_medium=distribute.pc_relevant.none-task-blog-BlogCommendFromMachineLearnPai2-2.add_param_isCf&depth_1-utm_source=distribute.pc_relevant.none-task-blog-BlogCommendFromMachineLearnPai2-2.add_param_isCf