- kvm的命令行工具virsh
1.概述
virsh工具功能非常丰富,它可以全生命周期的管理kvm;比如创建虚拟机,查看虚拟机,动态热插拔硬盘,给虚拟机做快照,迁移、启动、停止、挂起、暂停、删除虚拟机等等操作。
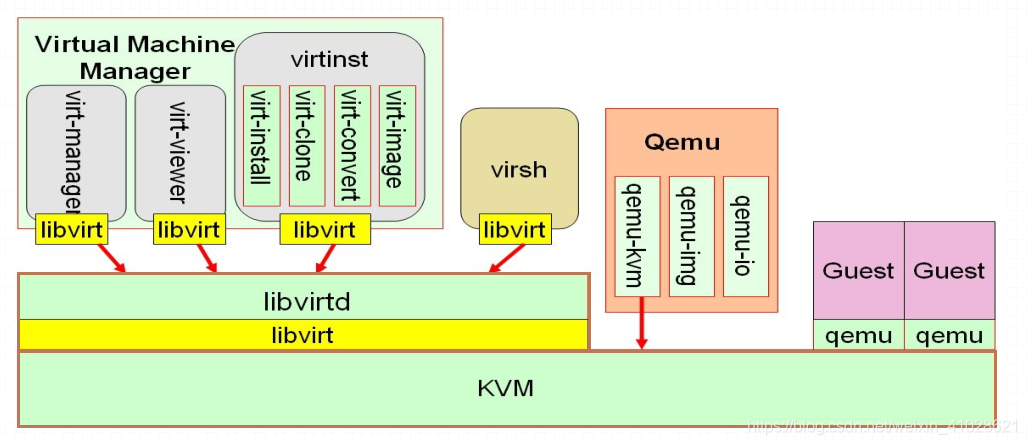
上图主要描述了kvm的主要工具栈,从大的类别可以分为libvirt和qemu这两大类,其中libvirt中分virtual machine manager和virsh。
- virtual machine manager中的virt-manager是基于图形界面的管理,其他都是可以在命令行直接使用命令来管理虚拟机;
- virsh是基于终端命令行管理;两者都是通过libvirt连接至libvirtd进行管理;而对于qemu来说,它管理虚拟机上直接调用kvm内核中模块的API进行管理;
2.virsh
virsh 是用来管理客户端及其管理程序的命令行界面工具。
virsh 工具是构建在 libvirt 管理 API 上,可作为 xm 命令和图形客户端管理程序(virt-manager)的替代工具使用。非特权用户只能以只读模式使用 virsh。您可使用 virsh 为客户端机器执行脚本。
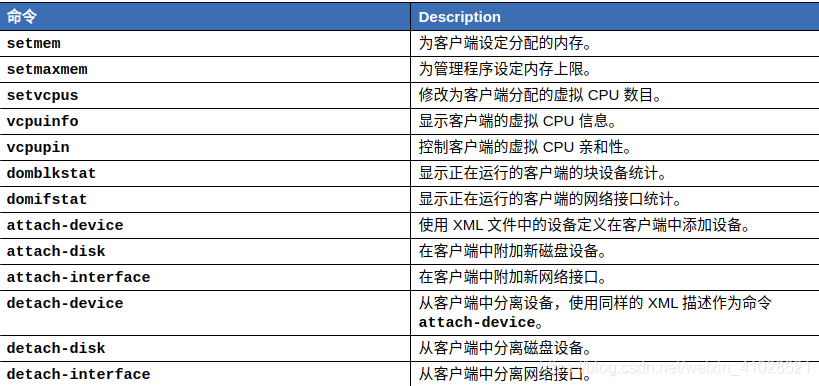
virsh常见的基础操作命令:
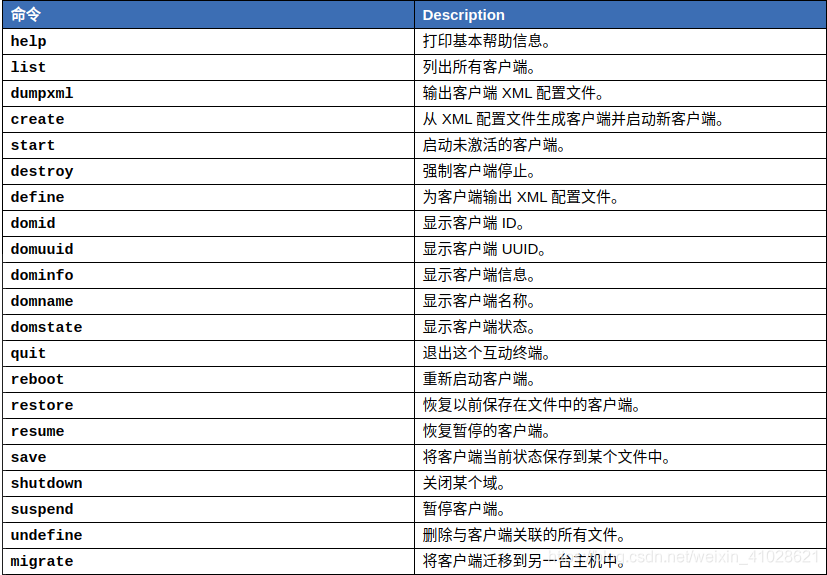
使用以下 virsh 命令管理客户端及管理程序资源:
- sudo virsh list --all 查看你所有虚拟机的情况
- sudo visrh list 查看正在运行的虚拟机的情况
3.安装和配置 kvm 环境
3.1.检查宿主机处理器是否支持虚拟化
[root@kvm ~]# egrep -o 'vmx | svm' /proc/cpuinfo | wc -l
如果有数据,说明 CPU 支持虚拟化(现在的大部分 CPU 都支持虚拟化,除非你的 CPU 真的太老了),如果没有,则需要开启,如果是物理机则在 BIOS 界面开启这个功能,如果是在虚拟机上,则在虚拟机上开启 CPU 的嵌套虚拟化功能。
3.2.工具安装

sudo apt install qemu-kvm libvirt virt-install virt-manager bridge-utils qemu-img
#qemu-kvm:核心软件包,实现虚拟化
#libvirt:核心软件包,管理KVM的工具,类似VMware也是管理虚拟机的工具
#virt-install:KVM虚拟机命令行管理工具
#virt-manager:KVM虚拟机图形化管理工具,可不装
#bridge-utils:实现网卡桥接的工具
3.3.设置相关网络
- 创建/etc/systemd/network/br0.netdev
[NetDev]
Name=br0
Kind=bridge
- 创建/etc/systemd/network/br0.network
[Match]
Name=br0
[Network]
Address=10.0.0.3/16
Gateway=10.0.0.1
DNS=10.0.0.1
- 创建/etc/systemd/network/uplink.network
[Match]
Name=eno1

[Network]
Bridge=br0
查看systemctl status systemd-networkd状态,然后执行systemctl restart systemd-networkd。
$ brctl show
bridge name     bridge id               STP enabled     interfaces
br0             8000.429f5774d8b6       no              eno1
3.3.安装虚拟机
- 创建虚拟机镜像
//关于虚拟机镜像,有很多种类型:raw、qcow2、vmdk等,推荐使用 qcow2 格式的镜像,因为 qcow2 格式的镜像支持快照,使用的比较广泛。
sudo mkdir /data/kvm
sudo qemu-img create -f qcow2 -o preallocation=metadata /data/kvm/liwei01.qcow2 50G
- 执行虚拟机的安装
通过 iso 镜像实现本地安装,支持 vnc ,无文本控制台。
sudo virt-install --connect qemu:///system --virt-type kvm --vcpus=8 --name ubuntu16 --ram 512 --cdrom ubuntu-16.04.6-desktop-amd64.iso --disk path=/var/lib/libvirt/images/ubuntu16.img,size=50,format=qcow2,bus=virtio --network bridge=br0 --os-type=linux
-
–name VM_GUEST_NAME : Specify the name of the new virtual machine. The name
must be unique across all guests known to the hypervisor on the same connection. It
is used to create and name the guest’s conguration le and you can access the guest
with this name from virsh . Alphanumeric and _-.:+ characters are allowed. -
–memory REQUIRED_MEMORY : Specify the amount of memory to allocate for the new
virtual machine in megabytes. -
–vcpus NUMBER_OF_CPUS : Specify the number of virtual CPUs. For best
performance, the number of virtual processors should be less than or equal to the
number of physical processors. -
–paravirt : Set up a paravirtualized guest. This is the default if the VM Host Server
supports paravirtualization and full virtualization. -
–hvm : Set up a fully virtualized guest.
-
–virt-type HYPERVISOR : Specify the hypervisor. Supported values are kvm , xen ,
or lxc . -
–graphics VALUE option to specify how to access the installation. openSUSE
Leap supports the values vnc or none .
If using VNC, virt-install tries to launch virt-viewer . If it is not installed or cannot be run, connect to the VM Guest manually with you preferred viewer. To explicitly prevent virt-install from launching the viewer use --noautoconsole . To define a password for accessing the VNC session, use the following syntax: --graphics vnc,password=PASSWORD.
Note: 调整CPU、内存规格
如果要调整的 cpu 核数和内存超过安装虚机时指定的最大值,则需要关闭虚机来修改最大值,动态调整的值不能超过设置最大值,擦,一般使用值和最大值都是保持一致,一起修改。所以在线动态修改没什么意义,推荐直接修改配置文件就 OK。
[root@kvm ~]# virsh edit liwei01
1048576
1048576
1
重启虚机 liwei01 就ok.
3.5.virsh 操作
- 宿主机CPU特性查看
使用virsh nodeinfo可以看到一些基本信息
virsh nodeinfo
CPU model: x86_64
CPU(s): 32
CPU frequency: 1200 MHz
CPU socket(s): 1
Core(s) per socket: 8
Thread(s) per core: 2
NUMA cell(s): 2
Memory size: 132119080 KiB
- 使用virsh capabilities可以查看物理机CPU的详细信息,包括物理CPU个数,每个CPU的核数,是否开了超线程。
virsh capabilities
<capabilities>
  <host>
    <uuid>36353332-3030-3643-5534-3235445a564a</uuid>
    <cpu>
      <arch>x86_64</arch>
      <model>SandyBridge</model>
      <vendor>Intel</vendor>
      <topology sockets='1' cores='8' threads='2'/>
      <feature name='erms'/>
      <feature name='smep'/>
     ...
- 查看当前正在运行的虚拟机列表,查看所有的虚拟机列表
$ sudo virsh list --all
 Id   Name        State
----------------------------
 2    ubuntu16    running
- 查看虚拟机的基本信息
$ sudo virsh dominfo ubuntu16   //sudo virsh dominfo 2 (ID:2)
Id:             2
Name:           ubuntu16
UUID:           4a32a984-177c-429f-98c8-538ba014577e
OS Type:        hvm
State:          running
CPU(s):         1
CPU time:       28.1s
Max memory:     524288 KiB
Used memory:    524288 KiB
Persistent:     yes
Autostart:      disable
Managed save:   no
Security model: none
Security DOI:   0
- virsh vcpuinfo命令查看虚拟机vcpu和物理CPU的对应关系
$ sudo virsh vcpuinfo ubuntu16 //sudo virsh vcpuinfo 2 //2:ID
VCPU:           0
CPU:            3
State:          running
CPU time:       36.6s
CPU Affinity:   yyyy
可以看到vcpu0被调度到物理机CPU3上,目前是使用状态
- 使用emulatorpin可以查看虚拟机可以使用那些物理逻辑CPU
virsh # emulatorpin 2
emulator: CPU Affinity
----------------------------------
       *: 0-4
可以看到0-4我们都可以使用,意味这我们也可以强制将CPU调度到任何CPU上。
- 关闭虚拟机
$ sudo virsh shutdown ubuntu16
Domain ubuntu16 is being shutdown
-
备份虚拟机配置文件,将配置文件保存为ubuntu16.xml
virsh dumpxml ubuntu16 > ubuntu16.xml重新定义虚拟机
-
virsh define ubuntu16.xml
-
修改虚拟机配置信息(用来修改系统内存大小、磁盘文件等信息)
直接通过vim命令修改
# vim  /etc/libvirt/qemu/ubuntu16.xml
通过virsh命令修改
# virsh  edit  ubuntu16
refer to
- https://libvirt.org/
- https://www.cnblogs.com/sammyliu/p/4558638.html
- https://www.cnblogs.com/sammyliu/p/4543110.html
- https://wiki.archlinux.org/index.php/Systemd-networkd_(%E7%AE%80%E4%BD%93%E4%B8%AD%E6%96%87)
- https://huataihuang.gitbooks.io/cloud-atlas/content/virtual/
- https://unix.stackexchange.com/questions/411936/configuring-a-bridge-interface-with-systemd-networkd
- https://docs.fedoraproject.org/zh-CN/Fedora/12/html/Virtualization_Guide/chap-Virtualization_Guide-Managing_guests_with_virsh.html