1.命令行解析
How to use on the command line
On Linux use ./darknet instead of darknet.exe, like this:./darknet detector test ./cfg/coco.data ./cfg/yolov4.cfg ./yolov4.weights
On Linux find executable file ./darknet in the root directory, while on Windows find it in the directory \build\darknet\x64
- 1.测试图片
- Yolo v4 COCO - image:
darknet.exe detector test cfg/coco.data cfg/yolov4.cfg yolov4.weights -thresh 0.25 2.测试并保存图片- Output coordinates of objects:
darknet.exe detector test cfg/coco.data yolov4.cfg yolov4.weights -ext_output dog.jpg 3.测试视频- Yolo v4 COCO - video:
darknet.exe detector demo cfg/coco.data cfg/yolov4.cfg yolov4.weights -ext_output test.mp4 4.测试摄像头- Yolo v4 COCO - WebCam 0:
darknet.exe detector demo cfg/coco.data cfg/yolov4.cfg yolov4.weights -c 0 - 5.测试远程摄像头???
- Yolo v4 COCO for net-videocam - Smart WebCam:
darknet.exe detector demo cfg/coco.data cfg/yolov4.cfg yolov4.weights http://192.168.0.80:8080/video?dummy=param.mjpg 6.测试视频并保存视频结果- Yolo v4 - save result videofile res.avi:
darknet.exe detector demo cfg/coco.data cfg/yolov4.cfg yolov4.weights test.mp4 -out_filename res.avi 7.用 yolov3-tiny 测试视频- Yolo v3 Tiny COCO - video:
darknet.exe detector demo cfg/coco.data cfg/yolov3-tiny.cfg yolov3-tiny.weights test.mp4 8.- JSON and MJPEG server that allows multiple connections from your soft or Web-browser
ip-address:8070and 8090:./darknet detector demo ./cfg/coco.data ./cfg/yolov3.cfg ./yolov3.weights test50.mp4 -json_port 8070 -mjpeg_port 8090 -ext_output 9.用gpu去测试视频- Yolo v3 Tiny on GPU #1:
darknet.exe detector demo cfg/coco.data cfg/yolov3-tiny.cfg yolov3-tiny.weights -i 1 test.mp4 10.可变阈值筛选检测结果 没写图片地址啊?待测试- Alternative method Yolo v3 COCO - image:
darknet.exe detect cfg/yolov4.cfg yolov4.weights -i 0 -thresh 0.25 11.- Train on Amazon EC2, to see mAP & Loss-chart using URL like:
http://ec2-35-160-228-91.us-west-2.compute.amazonaws.com:8090in the Chrome/Firefox (Darknet should be compiled with OpenCV):./darknet detector train cfg/coco.data yolov4.cfg yolov4.conv.137 -dont_show -mjpeg_port 8090 -map 12.- 186 MB Yolo9000 - image:
darknet.exe detector test cfg/combine9k.data cfg/yolo9000.cfg yolo9000.weights 13.build app- Remeber to put data/9k.tree and data/coco9k.map under the same folder of your app if you use the cpp api to build an app
- 14.
- To process a list of images
data/train.txtand save results of detection toresult.jsonfile use:darknet.exe detector test cfg/coco.data cfg/yolov4.cfg yolov4.weights -ext_output -dont_show -out result.json < data/train.txt 15.测试一系列数据并保存结果到txt文件中- To process a list of images
data/train.txtand save results of detection toresult.txtuse:darknet.exe detector test cfg/coco.data cfg/yolov4.cfg yolov4.weights -dont_show -ext_output < data/train.txt > result.txt 16.- Pseudo-lableing - to process a list of images
data/new_train.txtand save results of detection in Yolo training format for each image as label<image_name>.txt(in this way you can increase the amount of training data) use:darknet.exe detector test cfg/coco.data cfg/yolov4.cfg yolov4.weights -thresh 0.25 -dont_show -save_labels < data/new_train.txt 17.计算自己数据集的anchors- To calculate anchors:
darknet.exe detector calc_anchors data/obj.data -num_of_clusters 9 -width 416 -height 416 18.计算iou=50的mAP- To check accuracy mAP@IoU=50:
darknet.exe detector map data/obj.data yolo-obj.cfg backup\yolo-obj_7000.weights 19.计算iou=50的mAP- To check accuracy mAP@IoU=75:
darknet.exe detector map data/obj.data yolo-obj.cfg backup\yolo-obj_7000.weights -iou_thresh 0.75
2.安卓手机摄像头检测
For using network video-camera mjpeg-stream with any Android smartphone
-
Download for Android phone mjpeg-stream soft: IP Webcam / Smart WebCam
- Smart WebCam - preferably: https://play.google.com/store/apps/details?id=com.acontech.android.SmartWebCam2
- IP Webcam: https://play.google.com/store/apps/details?id=com.pas.webcam
-
Connect your Android phone to computer by WiFi (through a WiFi-router) or USB
-
Start Smart WebCam on your phone
-
Replace the address below, on shown in the phone application (Smart WebCam) and launch:
- Yolo v4 COCO-model:
darknet.exe detector demo data/coco.data yolov4.cfg yolov4.weights http://192.168.0.80:8080/video?dummy=param.mjpg -i 0
3.Linux 安装yolov4
How to compile on Linux (using cmake)
The CMakeLists.txt will attempt to find installed optional dependencies like CUDA, cudnn, ZED and build against those. It will also create a shared object library file to use darknet for code development.
Open a bash terminal inside the cloned repository and launch:
./build.shHow to compile on Linux (using make) # 用这个,记得修改makefile 之后 make
Just do make in the darknet directory. (You can try to compile and run it on Google Colab in cloud link (press «Open in Playground» button at the top-left corner) and watch the video link ) Before make, you can set such options in the Makefile: link
GPU=1to build with CUDA to accelerate by using GPU (CUDA should be in/usr/local/cuda)CUDNN=1to build with cuDNN v5-v7 to accelerate training by using GPU (cuDNN should be in/usr/local/cudnn)CUDNN_HALF=1to build for Tensor Cores (on Titan V / Tesla V100 / DGX-2 and later) speedup Detection 3x, Training 2xOPENCV=1to build with OpenCV 4.x/3.x/2.4.x - allows to detect on video files and video streams from network cameras or web-camsDEBUG=1to bould debug version of YoloOPENMP=1to build with OpenMP support to accelerate Yolo by using multi-core CPULIBSO=1to build a librarydarknet.soand binary runable fileuselibthat uses this library. Or you can try to run soLD_LIBRARY_PATH=./:$LD_LIBRARY_PATH ./uselib test.mp4How to use this SO-library from your own code - you can look at C++ example: https://github.com/AlexeyAB/darknet/blob/master/src/yolo_console_dll.cpp or use in such a way:LD_LIBRARY_PATH=./:$LD_LIBRARY_PATH ./uselib data/coco.names cfg/yolov4.cfg yolov4.weights test.mp4ZED_CAMERA=1to build a library with ZED-3D-camera support (should be ZED SDK installed), then runLD_LIBRARY_PATH=./:$LD_LIBRARY_PATH ./uselib data/coco.names cfg/yolov4.cfg yolov4.weights zed_camera
To run Darknet on Linux use examples from this article, just use ./darknet instead of darknet.exe, i.e. use this command: ./darknet detector test ./cfg/coco.data ./cfg/yolov4.cfg ./yolov4.weights
4.多GPU训练
How to train with multi-GPU:
-
Train it first on 1 GPU for like 1000 iterations:
darknet.exe detector train cfg/coco.data cfg/yolov4.cfg yolov4.conv.137 -
Then stop and by using partially-trained model
/backup/yolov4_1000.weightsrun training with multigpu (up to 4 GPUs):darknet.exe detector train cfg/coco.data cfg/yolov4.cfg /backup/yolov4_1000.weights -gpus 0,1,2,3
If you get a Nan, then for some datasets better to decrease learning rate, for 4 GPUs set learning_rate = 0,00065 (i.e. learning_rate = 0.00261 / GPUs). In this case also increase 4x times burn_in = in your cfg-file. I.e. use burn_in = 4000 instead of 1000.
https://groups.google.com/d/msg/darknet/NbJqonJBTSY/Te5PfIpuCAAJ
5.训练自己的数据集
How to train (to detect your custom objects):
(to train old Yolo v2 yolov2-voc.cfg, yolov2-tiny-voc.cfg, yolo-voc.cfg, yolo-voc.2.0.cfg, ... click by the link)
Training Yolo v4 (and v3):
-
For training
cfg/yolov4-custom.cfgdownload the pre-trained weights-file (162 MB): yolov4.conv.137 (Google drive mirror yolov4.conv.137 ) # 下载预训练模型 yolov4.conv.137 -
Create file
yolo-obj.cfgwith the same content as inyolov4-custom.cfg(or copyyolov4-custom.cfgtoyolo-obj.cfg)and:
- change line batch to
batch=64 - change line subdivisions to
subdivisions=16 - change line max_batches to (
classes*2000but not less than number of training images, but not less than number of training images and not less than6000), f.e.max_batches=6000if you train for 3 classes - change line steps to 80% and 90% of max_batches, f.e.
steps=4800,5400 - set network size
width=416 height=416or any value multiple of 32: https://github.com/AlexeyAB/darknet/blob/0039fd26786ab5f71d5af725fc18b3f521e7acfd/cfg/yolov3.cfg#L8-L9 - change line
classes=80to your number of objects in each of 3[yolo]-layers:- https://github.com/AlexeyAB/darknet/blob/0039fd26786ab5f71d5af725fc18b3f521e7acfd/cfg/yolov3.cfg#L610
- https://github.com/AlexeyAB/darknet/blob/0039fd26786ab5f71d5af725fc18b3f521e7acfd/cfg/yolov3.cfg#L696
- https://github.com/AlexeyAB/darknet/blob/0039fd26786ab5f71d5af725fc18b3f521e7acfd/cfg/yolov3.cfg#L783
- change [
filters=255] to filters=(classes + 5)x3 in the 3[convolutional]before each[yolo]layer, keep in mind that it only has to be the last[convolutional]before each of the[yolo]layers.- https://github.com/AlexeyAB/darknet/blob/0039fd26786ab5f71d5af725fc18b3f521e7acfd/cfg/yolov3.cfg#L603
- https://github.com/AlexeyAB/darknet/blob/0039fd26786ab5f71d5af725fc18b3f521e7acfd/cfg/yolov3.cfg#L689
- https://github.com/AlexeyAB/darknet/blob/0039fd26786ab5f71d5af725fc18b3f521e7acfd/cfg/yolov3.cfg#L776
- when using
[Gaussian_yolo]layers, change [filters=57] filters=(classes + 9)x3 in the 3[convolutional]before each[Gaussian_yolo]layer- https://github.com/AlexeyAB/darknet/blob/6e5bdf1282ad6b06ed0e962c3f5be67cf63d96dc/cfg/Gaussian_yolov3_BDD.cfg#L604
- https://github.com/AlexeyAB/darknet/blob/6e5bdf1282ad6b06ed0e962c3f5be67cf63d96dc/cfg/Gaussian_yolov3_BDD.cfg#L696
- https://github.com/AlexeyAB/darknet/blob/6e5bdf1282ad6b06ed0e962c3f5be67cf63d96dc/cfg/Gaussian_yolov3_BDD.cfg#L789
So if classes=1 then should be filters=18. If classes=2 then write filters=21. If classes=3 then write filters=24.
(Do not write in the cfg-file: filters=(classes + 5)x3)
(Generally filters depends on the classes, coords and number of masks, i.e. filters=(classes + coords + 1)*<number of mask>, where mask is indices of anchors. If mask is absence, then filters=(classes + coords + 1)*num)
So for example, for 2 objects, your file yolo-obj.cfg should differ from yolov4-custom.cfg in such lines in each of 3 [yolo]-layers:
[convolutional]
filters=21

[region]
classes=2
-
Create file
obj.namesin the directorybuild\darknet\x64\data\, with objects names - each in new line -
Create file
obj.datain the directorybuild\darknet\x64\data\, containing (where classes = number of objects):
classes= 2
train  = data/train.txt
valid  = data/test.txt
names = data/obj.names
backup = backup/
-
Put image-files (.jpg) of your objects in the directory
build\darknet\x64\data\obj\ -
You should label each object on images from your dataset. Use this visual GUI-software for marking bounded boxes of objects and generating annotation files for Yolo v2 & v3: https://github.com/AlexeyAB/Yolo_mark
It will create .txt-file for each .jpg-image-file - in the same directory and with the same name, but with .txt-extension, and put to file: object number and object coordinates on this image, for each object in new line:
标签文件形式
<object-class> <x_center> <y_center> <width> <height>
Where:
<object-class>- integer object number from0to(classes-1)<x_center> <y_center> <width> <height>- float values relative to width and height of image, it can be equal from(0.0 to 1.0]- for example:
<x> = <absolute_x> / <image_width>or<height> = <absolute_height> / <image_height> - atention:
<x_center> <y_center>- are center of rectangle (are not top-left corner)
For example for img1.jpg you will be created img1.txt containing:
1 0.716797 0.395833 0.216406 0.147222
0 0.687109 0.379167 0.255469 0.158333
1 0.420312 0.395833 0.140625 0.166667
- Create file
train.txtin directorybuild\darknet\x64\data\, with filenames of your images, each filename in new line, with path relative todarknet.exe, for example containing:
data/obj/img1.jpg
data/obj/img2.jpg
data/obj/img3.jpg
-
Download pre-trained weights for the convolutional layers and put to the directory
build\darknet\x64- for
yolov4.cfg,yolov4-custom.cfg(162 MB): yolov4.conv.137 (Google drive mirror yolov4.conv.137 ) - for
csresnext50-panet-spp.cfg(133 MB): csresnext50-panet-spp.conv.112 - for
yolov3.cfg, yolov3-spp.cfg(154 MB): darknet53.conv.74 - for
yolov3-tiny-prn.cfg , yolov3-tiny.cfg(6 MB): yolov3-tiny.conv.11 - for
enet-coco.cfg (EfficientNetB0-Yolov3)(14 MB): enetb0-coco.conv.132
- for
-
Start training by using the command line:
darknet.exe detector train data/obj.data yolo-obj.cfg yolov4.conv.137To train on Linux use command:
./darknet detector train data/obj.data yolo-obj.cfg yolov4.conv.137(just use./darknetinstead ofdarknet.exe)- (file
yolo-obj_last.weightswill be saved to thebuild\darknet\x64\backup\for each 100 iterations) - (file
yolo-obj_xxxx.weightswill be saved to thebuild\darknet\x64\backup\for each 1000 iterations) - (to disable Loss-Window use
darknet.exe detector train data/obj.data yolo-obj.cfg yolov4.conv.137 -dont_show, if you train on computer without monitor like a cloud Amazon EC2) - (to see the mAP & Loss-chart during training on remote server without GUI, use command
darknet.exe detector train data/obj.data yolo-obj.cfg yolov4.conv.137 -dont_show -mjpeg_port 8090 -mapthen open URLhttp://ip-address:8090in Chrome/Firefox browser)
- (file
8.1. For training with mAP (mean average precisions) calculation for each 4 Epochs (set valid=valid.txt or train.txt in obj.data file) and run: darknet.exe detector train data/obj.data yolo-obj.cfg yolov4.conv.137 -map
- After training is complete - get result
yolo-obj_final.weightsfrom pathbuild\darknet\x64\backup\
-
After each 100 iterations you can stop and later start training from this point. For example, after 2000 iterations you can stop training, and later just start training using:
darknet.exe detector train data/obj.data yolo-obj.cfg backup\yolo-obj_2000.weights(in the original repository https://github.com/pjreddie/darknet the weights-file is saved only once every 10 000 iterations
if(iterations > 1000)) -
Also you can get result earlier than all 45000 iterations.
Note: If during training you see nan values for avg (loss) field - then training goes wrong, but if nan is in some other lines - then training goes well.
Note: If you changed width= or height= in your cfg-file, then new width and height must be divisible by 32.
Note: After training use such command for detection: darknet.exe detector test data/obj.data yolo-obj.cfg yolo-obj_8000.weights
Note: if error Out of memory occurs then in .cfg-file you should increase subdivisions=16, 32 or 64: link
6.什么时候停止训练
When should I stop training:
# 1.每个类别2000次,不少于训练图片数量。不少于6000次。
Usually sufficient 2000 iterations for each class(object), but not less than number of training images and not less than 6000 iterations in total. But for a more precise definition when you should stop training, use the following manual:
- During training, you will see varying indicators of error, and you should stop when no longer decreases 0.XXXXXXX avg: ###当avg处于0.几且不再下降时停止训练,一般位于0.5-3 模型复杂度和数据集规模有关
Region Avg IOU: 0.798363, Class: 0.893232, Obj: 0.700808, No Obj: 0.004567, Avg Recall: 1.000000, count: 8 Region Avg IOU: 0.800677, Class: 0.892181, Obj: 0.701590, No Obj: 0.004574, Avg Recall: 1.000000, count: 8
9002: 0.211667, 0.60730 avg, 0.001000 rate, 3.868000 seconds, 576128 images Loaded: 0.000000 seconds
- 9002 - iteration number (number of batch)
- 0.60730 avg - average loss (error) - the lower, the better
When you see that average loss 0.xxxxxx avg no longer decreases at many iterations then you should stop training. The final avgerage loss can be from 0.05 (for a small model and easy dataset) to 3.0 (for a big model and a difficult dataset).
Or if you train with flag -map then you will see mAP indicator Last accuracy [email protected] = 18.50% in the console - this indicator is better than Loss, so train while mAP increases.
- Once training is stopped, you should take some of last
.weights-files fromdarknet\build\darknet\x64\backupand choose the best of them:
For example, you stopped training after 9000 iterations, but the best result can give one of previous weights (7000, 8000, 9000). It can happen due to overfitting. Overfitting - is case when you can detect objects on images from training-dataset, but can't detect objects on any others images. You should get weights from Early Stopping Point:
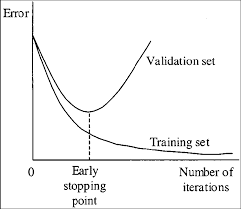
To get weights from Early Stopping Point:
2.1. At first, in your file obj.data you must specify the path to the validation dataset valid = valid.txt (format of valid.txt as in train.txt), and if you haven't validation images, just copy data\train.txt to data\valid.txt.
2.2 If training is stopped after 9000 iterations, to validate some of previous weights use this commands:
(If you use another GitHub repository, then use darknet.exe detector recall... instead of darknet.exe detector map...)
darknet.exe detector map data/obj.data yolo-obj.cfg backup\yolo-obj_7000.weightsdarknet.exe detector map data/obj.data yolo-obj.cfg backup\yolo-obj_8000.weightsdarknet.exe detector map data/obj.data yolo-obj.cfg backup\yolo-obj_9000.weights
And comapre last output lines for each weights (7000, 8000, 9000):
Choose weights-file with the highest mAP (mean average precision) or IoU (intersect over union)
For example, bigger mAP gives weights yolo-obj_8000.weights - then use this weights for detection.
Or just train with -map flag:
darknet.exe detector train data/obj.data yolo-obj.cfg yolov4.conv.137 -map
So you will see mAP-chart (red-line) in the Loss-chart Window. mAP will be calculated for each 4 Epochs using valid=valid.txt file that is specified in obj.data file (1 Epoch = images_in_train_txt / batch iterations)
(to change the max x-axis value - change max_batches= parameter to 2000*classes, f.e. max_batches=6000 for 3 classes)

Example of custom object detection: darknet.exe detector test data/obj.data yolo-obj.cfg yolo-obj_8000.weights
-
IoU (intersect over union) - average instersect over union of objects and detections for a certain threshold = 0.24
-
mAP (mean average precision) - mean value of
average precisionsfor each class, whereaverage precisionis average value of 11 points on PR-curve for each possible threshold (each probability of detection) for the same class (Precision-Recall in terms of PascalVOC, where Precision=TP/(TP+FP) and Recall=TP/(TP+FN) ), page-11: http://homepages.inf.ed.ac.uk/ckiw/postscript/ijcv_voc09.pdf
mAP is default metric of precision in the PascalVOC competition, this is the same as AP50 metric in the MS COCO competition. In terms of Wiki, indicators Precision and Recall have a slightly different meaning than in the PascalVOC competition, but IoU always has the same meaning.

7.如何改进物体检测
How to improve object detection:
- Before training:
-
set flag
random=1in your.cfg-file - it will increase precision by training Yolo for different resolutions: link -
increase network resolution in your
.cfg-file (height=608,width=608or any value multiple of 32) - it will increase precision -
check that each object that you want to detect is mandatory labeled in your dataset - no one object in your data set should not be without label. In the most training issues - there are wrong labels in your dataset (got labels by using some conversion script, marked with a third-party tool, ...). Always check your dataset by using: https://github.com/AlexeyAB/Yolo_mark
-
my Loss is very high and mAP is very low, is training wrong? Run training with
-show_imgsflag at the end of training command, do you see correct bounded boxes of objects (in windows or in filesaug_...jpg)? If no - your training dataset is wrong. -
for each object which you want to detect - there must be at least 1 similar object in the Training dataset with about the same: shape, side of object, relative size, angle of rotation, tilt, illumination. So desirable that your training dataset include images with objects at diffrent: scales, rotations, lightings, from different sides, on different backgrounds - you should preferably have 2000 different images for each class or more, and you should train
2000*classesiterations or more -
desirable that your training dataset include images with non-labeled objects that you do not want to detect - negative samples without bounded box (empty
.txtfiles) - use as many images of negative samples as there are images with objects -
What is the best way to mark objects: label only the visible part of the object, or label the visible and overlapped part of the object, or label a little more than the entire object (with a little gap)? Mark as you like - how would you like it to be detected.
-
for training with a large number of objects in each image, add the parameter
max=200or higher value in the last[yolo]-layer or[region]-layer in your cfg-file (the global maximum number of objects that can be detected by YoloV3 is0,0615234375*(width*height)where are width and height are parameters from[net]section in cfg-file) -
for training for small objects (smaller than 16x16 after the image is resized to 416x416) - set
layers = 23instead of https://github.com/AlexeyAB/darknet/blob/6f718c257815a984253346bba8fb7aa756c55090/cfg/yolov4.cfg#L895 setstride=4instead of https://github.com/AlexeyAB/darknet/blob/6f718c257815a984253346bba8fb7aa756c55090/cfg/yolov4.cfg#L892 and setstride=4instead of https://github.com/AlexeyAB/darknet/blob/6f718c257815a984253346bba8fb7aa756c55090/cfg/yolov4.cfg#L989 -
for training for both small and large objects use modified models:
- Full-model: 5 yolo layers: https://raw.githubusercontent.com/AlexeyAB/darknet/master/cfg/yolov3_5l.cfg
- Tiny-model: 3 yolo layers: https://raw.githubusercontent.com/AlexeyAB/darknet/master/cfg/yolov3-tiny_3l.cfg
- YOLOv4: 3 yolo layers: https://raw.githubusercontent.com/AlexeyAB/darknet/master/cfg/yolov4-custom.cfg
-
If you train the model to distinguish Left and Right objects as separate classes (left/right hand, left/right-turn on road signs, ...) then for disabling flip data augmentation - add
flip=0here: https://github.com/AlexeyAB/darknet/blob/3d2d0a7c98dbc8923d9ff705b81ff4f7940ea6ff/cfg/yolov3.cfg#L17 -
General rule - your training dataset should include such a set of relative sizes of objects that you want to detect:
train_network_width * train_obj_width / train_image_width ~= detection_network_width * detection_obj_width / detection_image_widthtrain_network_height * train_obj_height / train_image_height ~= detection_network_height * detection_obj_height / detection_image_height
I.e. for each object from Test dataset there must be at least 1 object in the Training dataset with the same class_id and about the same relative size:
object width in percent from Training dataset~=object width in percent from Test datasetThat is, if only objects that occupied 80-90% of the image were present in the training set, then the trained network will not be able to detect objects that occupy 1-10% of the image.
-
to speedup training (with decreasing detection accuracy) set param
stopbackward=1for layer-136 in cfg-file -
each:
model of object, side, illimination, scale, each 30 gradof the turn and inclination angles - these are different objects from an internal perspective of the neural network. So the more different objects you want to detect, the more complex network model should be used. -
to make the detected bounded boxes more accurate, you can add 3 parameters
ignore_thresh = .9 iou_normalizer=0.5 iou_loss=giouto each[yolo]layer and train, it will increase [email protected], but decrease [email protected]. -
Only if you are an expert in neural detection networks - recalculate anchors for your dataset for
widthandheightfrom cfg-file:darknet.exe detector calc_anchors data/obj.data -num_of_clusters 9 -width 416 -height 416then set the same 9anchorsin each of 3[yolo]-layers in your cfg-file. But you should change indexes of anchorsmasks=for each [yolo]-layer, so for YOLOv4 the 1st-[yolo]-layer has anchors smaller than 30x30, 2nd smaller than 60x60, 3rd remaining, and vice versa for YOLOv3. Also you should change thefilters=(classes + 5)*<number of mask>before each [yolo]-layer. If many of the calculated anchors do not fit under the appropriate layers - then just try using all the default anchors.
- After training - for detection:
-
Increase network-resolution by set in your
.cfg-file (height=608andwidth=608) or (height=832andwidth=832) or (any value multiple of 32) - this increases the precision and makes it possible to detect small objects: link- it is not necessary to train the network again, just use
.weights-file already trained for 416x416 resolution - but to get even greater accuracy you should train with higher resolution 608x608 or 832x832, note: if error
Out of memoryoccurs then in.cfg-file you should increasesubdivisions=16, 32 or 64: link
- it is not necessary to train the network again, just use
8.标注工具
How to mark bounded boxes of objects and create annotation files:
Here you can find repository with GUI-software for marking bounded boxes of objects and generating annotation files for Yolo v2 - v4: https://github.com/AlexeyAB/Yolo_mark
With example of: train.txt, obj.names, obj.data, yolo-obj.cfg, air1-6.txt, bird1-4.txt for 2 classes of objects (air, bird) and train_obj.cmd with example how to train this image-set with Yolo v2 - v4
Different tools for marking objects in images:
- in C++: https://github.com/AlexeyAB/Yolo_mark
- in Python: https://github.com/tzutalin/labelImg
- in Python: https://github.com/Cartucho/OpenLabeling
- in C++: https://www.ccoderun.ca/darkmark/
- in JavaScript: https://github.com/opencv/cvat