写在前面 Github 源码地址(可以直接运行):
- ServletContext – servlet-02
- HttpServletResponse – response
- HttpServletRequest – request
文章目录
一. ServletContext
web 容器在启动的时候,它会为每个 web 程序都创建一个对应的 ServletContext 对象,它代表了当前的 web 应用;
1.1 共享数据
- HelloServlet
public class HelloServlet extends HttpServlet {


    @Override
    protected void doGet(HttpServletRequest req, HttpServletResponse resp) throws ServletException, IOException {


//        resp.getWriter().println("Hello,Serlvet"); //响应流
        //this.getInitParameter()   初始化参数
        //this.getServletConfig()   Servlet配置
        //this.getServletContext()  Servlet上下文
        ServletContext context = this.getServletContext();

        String username = "秦疆"; //数据
        context.setAttribute("username",username); //将一个数据保存在了ServletContext中,名字为:username 。值 username
        resp.getWriter().println("Hello Servlet!");
    }
}
- GetServlet
public class GetServlet extends HttpServlet {


    @Override
    protected void doGet(HttpServletRequest req, HttpServletResponse resp) throws ServletException, IOException {


        ServletContext context = this.getServletContext();
        String username = (String) context.getAttribute("username");

        resp.setContentType("text/html");
        resp.setCharacterEncoding("utf-8");
        resp.getWriter().print("名字"+username);
    }
}
1.2 获取初始化参数
- 在 web.xml 中设置参数
    <context-param>
        <param-name>url</param-name>
        <param-value>jdbc:mysql://localhost:3306/mybatis</param-value>
    </context-param>
- ParamServlet
public class ParamServlet extends HttpServlet {


    @Override
    protected void doGet(HttpServletRequest req, HttpServletResponse resp) throws ServletException, IOException {


        ServletContext context = this.getServletContext();
        String url = context.getInitParameter("url");
        resp.getWriter().println(url);

    }

    @Override
    protected void doPost(HttpServletRequest req, HttpServletResponse resp) throws ServletException, IOException {


        doGet(req, resp);
    }
}
1.3 请求转发

- TransferServlet
public class TransferServlet extends HttpServlet {


    @Override
    protected void doGet(HttpServletRequest req, HttpServletResponse resp) throws ServletException, IOException {


        ServletContext context = this.getServletContext();
        System.out.println("进入了param");
        //RequestDispatcher requestDispatcher = context.getRequestDispatcher("/gp"); //转发的请求路径
        //requestDispatcher.forward(req,resp); //调用forward实现请求转发;
        context.getRequestDispatcher("/param").forward(req,resp);
    }

    @Override
    protected void doPost(HttpServletRequest req, HttpServletResponse resp) throws ServletException, IOException {


        doGet(req, resp);
    }
}
1.4 读取资源文件
- db.propreties
username = kobe_bryant
password = fds4f5ds4f65ds4f6ds4f
- PropServlet
public class PropServlet extends HttpServlet {


    @Override
    protected void doGet(HttpServletRequest req, HttpServletResponse resp) throws ServletException, IOException {


        InputStream is = this.getServletContext().getResourceAsStream("/WEB-INF/classes/db.properties");

        Properties prop = new Properties();
        prop.load(is);
        String user = prop.getProperty("username");
        String pwd = prop.getProperty("password");

        resp.getWriter().print(user+":"+pwd);
    }

    @Override
    protected void doPost(HttpServletRequest req, HttpServletResponse resp) throws ServletException, IOException {


        doGet(req, resp);
    }
}
二. HttpServletResponse
web 服务器接收到客户端的 http 请求,针对这个请求,分别创建一个代表请求的 HttpServletRequest 对象,代表响应的一个 HttpServletResponse;
- 如果要获取客户端请求过来的参数:找 HttpServletRequest
- 如果要给客户端响应一些信息:找 HttpServletResponse
2.1 简单分类
- 负责向浏览器发动数据的方法
ServletOutputStream getOutputStream() throws IOException;
PrintWriter getWriter() throws IOException;
- 负责向浏览器发送响应头的常用方法
    void setCharacterEncoding(String var1);

    void setContentLength(int var1);

    void setContentType(String var1);

    void setHeader(String var1, String var2);

    void addHeader(String var1, String var2);

    void setIntHeader(String var1, int var2);

    void addIntHeader(String var1, int var2);
- 常用响应的状态码
    int SC_OK = 200;
    int SC_MULTIPLE_CHOICES = 300;
    int SC_NOT_FOUND = 404;
    int SC_INTERNAL_SERVER_ERROR = 500;
2.2 下载文件
- 向浏览器输出消息
- 下载文件
- 要获取下载文件的路径
- 下载的文件名是啥?
- 设置想办法让浏览器能够支持下载我们需要的东西
- 获取下载文件的输入流
- 创建缓冲区
- 获取 OutputStream 对象
- 将 FileOutputStream 流写入到buffer缓冲区
- 使用 OutputStream 将缓冲区中的数据输出到客户端!
- FileServlet
public class FileServlet extends HttpServlet {


    @Override
    protected void doGet(HttpServletRequest req, HttpServletResponse resp) throws ServletException, IOException {


        // 1. 要获取下载文件的路径
        String realPath = "D:\\Java\\IntelliJ IDEA 2020.3\\Projects\\Javaweb-study\\response\\target\\classes\\科比.jpg";
        System.out.println("下载文件的路径:"+realPath);
        // 2. 下载的文件名是啥?
        String fileName = realPath.substring(realPath.lastIndexOf("\\") + 1);
        // 3. 设置想办法让浏览器能够支持(Content-Disposition)下载我们需要的东西,中文文件名URLEncoder.encode编码,否则有可能乱码
        resp.setHeader("Content-Disposition","attachment;filename="+ URLEncoder.encode(fileName,"UTF-8"));
        // 4. 获取下载文件的输入流
        FileInputStream in = new FileInputStream(realPath);
        // 5. 创建缓冲区
        int len = 0;
        byte[] buffer = new byte[1024];
        // 6. 获取OutputStream对象
        ServletOutputStream out = resp.getOutputStream();
        // 7. 将FileOutputStream流写入到buffer缓冲区,使用OutputStream将缓冲区中的数据输出到客户端!
        while ((len=in.read(buffer))>0){


            out.write(buffer,0,len);
        }

        in.close();
        out.close();
    }

    @Override
    protected void doPost(HttpServletRequest req, HttpServletResponse resp) throws ServletException, IOException {


        doGet(req, resp);
    }
}
2.3 验证码功能
public class ImageServlet extends HttpServlet {


    @Override
    protected void doGet(HttpServletRequest req, HttpServletResponse resp) throws ServletException, IOException {


        //如何让浏览器3秒自动刷新一次;
        resp.setHeader("refresh","3");

        //在内存中创建一个图片
        BufferedImage image = new BufferedImage(80,20,BufferedImage.TYPE_INT_RGB);
        //得到图片
        Graphics2D g = (Graphics2D) image.getGraphics(); //笔
        //设置图片的背景颜色
        g.setColor(Color.white);
        g.fillRect(0,0,80,20);
        //给图片写数据
        g.setColor(Color.BLUE);
        g.setFont(new Font(null,Font.BOLD,20));
        g.drawString(makeNum(),0,20);

        //告诉浏览器,这个请求用图片的方式打开
        resp.setContentType("image/jpeg");
        //网站存在缓存,不让浏览器缓存
        resp.setDateHeader("expires",-1);
        resp.setHeader("Cache-Control","no-cache");
        resp.setHeader("Pragma","no-cache");

        //把图片写给浏览器
        ImageIO.write(image,"jpg", resp.getOutputStream());

    }

    //生成随机数
    private String makeNum(){


        Random random = new Random();
        String num = random.nextInt(9999999) + "";
        StringBuffer sb = new StringBuffer();
        for (int i = 0; i < 7-num.length() ; i++) {


            sb.append("0");
        }
        num = sb.toString() + num;
        return num;
    }

    @Override
    protected void doPost(HttpServletRequest req, HttpServletResponse resp) throws ServletException, IOException {


        doGet(req, resp);
    }
}
2.4 实现重定向
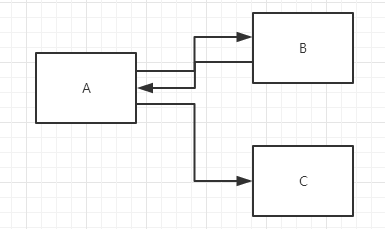
- B一个web资源收到客户端A请求后,B他会通知A客户端去访问另外一个web资源C,这个过程叫重定向
- 方法
void sendRedirect(String var1) throws IOException;
- 测试
@Override
protected void doGet(HttpServletRequest req, HttpServletResponse resp) throws ServletException, IOException {


    /*
        resp.setHeader("Location","/r/img");
        resp.setStatus(302);
         */
    resp.sendRedirect("/r/img");//重定向
}
2.5 重定向和转发的区别
相同点
- 页面都会实现跳转
不同点
- 请求转发的时候,url 不会产生变化
- 重定向时候,url 地址栏会发生变化;
三. HttpServletRequest
3.1 实现重定向(代码实例)
- index.jsp
<%@ page contentType="text/html;charset=UTF-8" language="java" %>
<html>
<head>
    <title>登录页面</title>
</head>
<body>
<h1>登录</h1>
<div style="text-align: center">
    <%-- 以Post方式提交表单,提交到我们的login请求 --%>
    <form action="${

    pageContext.request.contextPath}/login" method="post">
        用户名:<input type="text" name="username"><br>
        密码:<input type="password" name="password"><br>
        爱好:
        <input type="checkbox" name="hobbys" value="女孩">女孩
        <input type="checkbox" name="hobbys" value="代码">代码
        <input type="checkbox" name="hobbys" value="唱歌">唱歌
        <input type="checkbox" name="hobbys" value="电影">电影
        <br>
        <input type="submit">
    </form>

</div>
</body>
</html>
- success.jsp
<%@ page contentType="text/html;charset=UTF-8" language="java" %>
<html>
<head>
    <title>Success</title>
</head>
<body>
    <h1>登录成功!!!</h1>
</body>
</html>
- LoginServlet.jsp
public class LoginServlet extends HttpServlet {


    @Override
    protected void doGet(HttpServletRequest req, HttpServletResponse resp) throws ServletException, IOException {


        req.setCharacterEncoding("utf-8");
        resp.setCharacterEncoding("utf-8");

        String username = req.getParameter("username");
        String password = req.getParameter("password");
        String[] hobbys = req.getParameterValues("hobbys");
        System.out.println("=============================");
        //后台接收中文乱码问题
        System.out.println(username);
        System.out.println(password);
        System.out.println(Arrays.toString(hobbys));
        System.out.println("=============================");


        System.out.println(req.getContextPath());
        //通过请求转发
        //这里的 / 代表当前的web应用
        req.getRequestDispatcher("/success.jsp").forward(req,resp);
    }

    @Override
    protected void doPost(HttpServletRequest req, HttpServletResponse resp) throws ServletException, IOException {


        doGet(req, resp);
    }
}
- 测试结果