Swing 开发之图书管理系统(四)登录页面
Swing 开发之图书管理系统(四)登录页面
系统:Win10
IDE:IntelliJ IDEA 2017.3.7
JDK:1.8.0_121
数据库:MySQL 5.7.17
数据库工具:Navicat Premium 11.2.7
1.页面布局
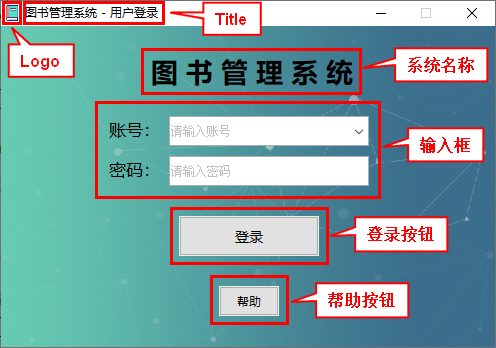
先把页面图放出来吧,就是下面这个样子,大小:500(宽)x350(高),自定义了logo和背景图,显示窗口标题,主页面上最上方是系统名称,中间是账号和密码输入框,下面是登录按钮,最下方是帮助按钮,外观设置的是当前系统。
2.代码实现
1):设置系统默认外观
设置LookAndFeel使用的是:UIManager.getSystemLookAndFeelClassName()),获取当前系统外观配置
public class Start {


    public static void main(String[] args) {


        try {


            // 让swing界面变得和当前系统一样
            UIManager.setLookAndFeel(UIManager.getSystemLookAndFeelClassName());
        } catch (Exception e) {


            System.out.println(e);
        }
        new loginView();
    }
}
2):设置Logo和背景图片
这里为了方便,我再Utils包里创建了一个静态方法专门设置Logo,后面JFrame窗口直接使用该方法就好了
// 设置统一Logo
    public static void setLogo(JFrame frame){


        // 定义图片路径
        String logoPath = "images/logo.png";
        // 获取该图片
        Image logo = new ImageIcon(ClassLoader.getSystemResource(logoPath)/*图片的路径*/).getImage();
        // 设置图标
        frame.setIconImage(logo);
    }
设置背景图的功能是直接放到了构造方法里,调用paintComponent实现
// 构造函数,一般界面分两个部分初始化,一部分是新建(new)(构造函数),一部分是定义位置和属性(init函数)
    public loginView() {


        // 新建一个画布,并且带一个匿名内部类
        loginWin = new JPanel() {


            // 定义一张图片,新建一个ImageIcon对象并调用getImage方法获得一个Image对象
            String bgPath = "images/loginView/loginBackground.png";
            private Image image = new ImageIcon(ClassLoader.getSystemResource(bgPath)/*图片的路径*/).getImage();

            // 这里系统要调用这个paintComponent方法来画这张图片,这里系统传入了一个Graphics对象(画笔),
            // 我们需要用这个对象来画背景图片
            protected void paintComponent(Graphics g) {


                // 调用画笔的drawImage方法,参数是要画的图片,初始坐标,结束坐标,和在哪里画
                // this代表是LoginWin这个“画布”对象
                g.drawImage(image, 0, 0, this.getWidth(), this.getHeight(), this);
            }
        };
        // 新建一个label,传入初始参数,暨要显示的内容,后面也可用setText方法来更新
        loginTitle = new JLabel("图 书 管 理 系 统");
        loginName = new JLabel("账号:");
        loginPWD = new JLabel("密码:");
        loginButton = new JButton("登录");
        helpButton = new JButton("帮助");
        usernameField = new MyComboBox<String>();
        passwordField = new MyPasswordField();

        System.out.println("新建窗口成功!");
        // 调用初始化函数,这里包括设置坐标、大小、设置监听方法
        intiView();
    }
3):输入框设置
我这里的用户输入框使用的是JCombobox,下拉可编辑;密码使用的JPasswordField
为了能让输入框有类似placeholder (提示信息)的功能,我这里写了个JCombobox和JPasswordField的子类,实现了该方法。在我前面的文章:JComboBox添加FocusListener 里有讲到具体方法
JCombobox 的子类 MyComboBox
/**
 * 自定义用户框类
 */
public class MyComboBox<E> extends JComboBox<E> {


    private static final long serialVersionUID = -5644130161720236522L;

    // 自定义遮罩层
    JLabel mask = new JLabel();

    /* 默认显示值 */
    public void setPlaceholder(String text) {


        Rectangle bs = this.getBounds();
        mask.setText(text);
        mask.setForeground(Color.lightGray);
        mask.setBounds(2, 0, bs.width - 2, bs.height - 2);
        mask.setFont(new java.awt.Font("宋体", 0, 12));
        this.getEditor().getEditorComponent().addFocusListener(focusThere);
        this.add(mask);
    }

    // 添加焦点监听器,监听输入动作
    FocusListener focusThere = new FocusListener() {


        public void focusGained(FocusEvent e) {


            mask.setVisible(false);
        }

        public void focusLost(FocusEvent e) {


            JTextField textField = (JTextField) e.getComponent();
            String text = textField.getText();
            if (text == null || text.length() == 0) {


                mask.setVisible(true);
            }
        }
    };


    /* 键盘监听 */
    private MyKeyCall call;

    KeyAdapter adapter = new KeyAdapter() {


        public void keyPressed(KeyEvent e) {


            call.callBack(e);
        }
    };

    /* 键盘监听 */
    public void keyPressedCall(MyKeyCall call) {


        this.call = call;
        addKeyListener(adapter);
    }
}
JPasswordField 的子类 MyPasswordField
/**
 * 自定义密码框类
 */
public class MyPasswordField extends JPasswordField {


    /**
     * 密码框
     */
    private static final long serialVersionUID = 65487378352678L;

    JLabel mask = new JLabel();

    final int fontSize = 12;

    public MyPasswordField() {


        super();
        setFont(new java.awt.Font("宋体", 0, fontSize));
    }

    public MyPasswordField(String text) {


        super(text);
        setFont(new java.awt.Font("宋体", 0, fontSize));
    }

    /* 默认显示值 */

    /**
     * @param @param text 参数
     * @return void 返回类型
     * @throws
     * @Description 设置空值时的默认显示
     */
    public void setPlaceholder(String text) {


        addFocusListener(focusThere);
        Rectangle bs = this.getBounds();
        mask.setText(text);
        mask.setForeground(Color.lightGray);
        mask.setBounds(2, 0, bs.width - 2, bs.height - 2);
        mask.setFont(new java.awt.Font("宋体", 0, 12));
        this.add(mask);
    }

    // 添加焦点监听器,监听输入动作
    FocusListener focusThere = new FocusListener() {


        public void focusGained(FocusEvent arg0) {


            mask.setVisible(false);
        }

        public void focusLost(FocusEvent arg0) {


            String text = String.valueOf(getPassword()).trim();
            if (text.length() == 0) {


                mask.setVisible(true);
            }
        }
    };

    // 键盘监听
    public void keyPressedCall(MyKeyCall call) {


        this.call = call;
        addKeyListener(adapter);
    }

    private MyKeyCall call;
    // 键盘监听
    KeyAdapter adapter = new KeyAdapter() {


        public void keyPressed(KeyEvent e) {


            call.callBack(e);
        }
    };
}
密码输入框还有一个小功能,回车触发登录事件,感觉在现实中应该挺实用的
// 密码输入框回车触发登录事件
passwordField.addActionListener(new LoginView_loginButton_ActionListener(this));
4):登录功能设计
登录功能采用账号+密码进行登录,密码采用16位MD5大写加密验证,账号和密码都设置了非空验证
/**
 * 登录界面的登录按钮监听类
 */
public class LoginView_loginButton_ActionListener implements ActionListener {


    loginView view;
    JTextField userField;
    JPasswordField passwordField;

    public LoginView_loginButton_ActionListener(loginView loginView) {


        // TODO Auto-generated constructor stub
        this.view = loginView;
        this.userField = view.getLoginUser();
        this.passwordField = view.getPasswordField();
    }

    @Override
    public void actionPerformed(ActionEvent e) {


        // 获取账号
        String account = userField.getText();
        // 判断账号是否为空
        if (account == null || account.length() == 0) {


            System.out.println("输入账号为空!");
            JOptionPane.showMessageDialog(null, "账号不能为空,请输入您的账号!", "提示", JOptionPane.WARNING_MESSAGE);
            return;
        }
        // 获得密码并且进行MD5加密
        String password = new String(passwordField.getPassword());
        String passwordMD5 = MD5Util.MD5EncodeUtf8(password);
        // 判断密码是否为空
        if (password == null || password.length() == 0) {


            System.out.println("输入密码为空!");
            JOptionPane.showMessageDialog(null, "密码不能为空,请输入您的密码!", "提示", JOptionPane.WARNING_MESSAGE);
            return;
        }
        UserService userService = new UserService();
        User user = userService.getUserByAccount(account);
        // 判断输入的密码与用户密码是否一致
        // System.out.println(passwordMD5);
        // System.out.println(user.getPassword());
        if(user!= null && passwordMD5.equals(user.getPassword())){


            // System.out.println("密码正确!");
            //JOptionPane.showMessageDialog(null, "欢迎:" + account);
            // 设置一个显示500ms的提示框
            new messageDialog(view, "登录成功!", new Dimension(200, 60)).setVisible(true);
            new MainView(user);
            view.dispose();
        } else {


            System.out.println("账号或密码错误!");
            JOptionPane.showMessageDialog(null, "账号或密码错误,请重新登录!", "错误", JOptionPane.ERROR_MESSAGE);
        }
    }
}
5):帮助页面
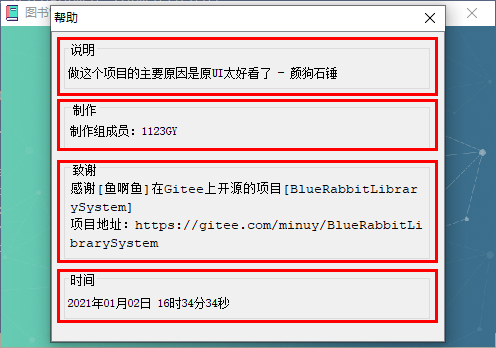
点击帮助按钮会弹出一个帮助页面,主要有说明、制作、致谢、时间这四块
- 说明里面随便写的一些东西
- 制作写的我的Gitbuh和Gitee的用户名
- 致谢主要感谢原项目的开源作者的项目对我的启发,原项目使用MIT开源协议,大家也可以在该项目的基础上去进行修改,学习
- 时间显示的是当前系统的实时时间
实现代码:
/**
 * 帮助界面
 */
public class helpView extends JDialog {


    private static final long serialVersionUID = 1L;
    private boolean refreshTime = true;
    private JPanel helpWin;
    private JLabel explainField;
    private JTextField producerField;
    private JTextArea thankField;
    private JScrollPane scrollPane;
    private JLabel dateLabel;

    public helpView(loginView lv) {


        //设置父窗口标题并且禁止操作父视图
        super(lv, "帮助", true);
        helpWin = new JPanel();
        explainField = new JLabel("做这个项目的主要原因是原UI太好看了 - 颜狗石锤");
        producerField = new JTextField();
        thankField = new JTextArea();
        scrollPane = new JScrollPane();
        dateLabel = new JLabel();
        this.setResizable(false);
        Init();
    }

    private void Init() {


        //启用窗口关闭
        this.setDefaultCloseOperation(JDialog.DISPOSE_ON_CLOSE);
        //设置窗口大小
        this.setSize(400, 340);
        //设置窗口居中
        CenterView.CenterByWindow(this);
        //设置容器布局方式为空布局
        helpWin.setLayout(null);

        explainField.setBounds(10, 10, 370, 50);
        explainField.setBorder(BorderFactory.createTitledBorder("说明"));

        // 制作组
        producerField.setBounds(10, 70, 370, 50);
        producerField.setEditable(false);
        producerField.setBorder(BorderFactory.createTitledBorder("制作"));
        producerField.setText("制作组成员:1123GY");

        // 致谢
        thankField.setBounds(10, 130, 370, 100);
        thankField.setBackground(new Color(240, 240, 240)); // 设置背景色
        thankField.setLineWrap(true); // 设置自动换行
        thankField.setEditable(false);
        thankField.setBorder(BorderFactory.createTitledBorder("致谢"));
        thankField.setText("感谢[鱼啊鱼]在Gitee上开源的项目[BlueRabbitLibrarySystem]\r\n" +
                "项目地址:https://gitee.com/minuy/BlueRabbitLibrarySystem");

        // 时间
        dateLabel.setBounds(10, 240, 370, 50);
        dateLabel.setBorder(BorderFactory.createTitledBorder("时间"));
        dateLabel.setText(getStringDate(new Date()));

        helpWin.add(dateLabel);
        helpWin.add(explainField);
        helpWin.add(thankField);
        helpWin.add(producerField);

        //设置主视图的大小
        helpWin.setPreferredSize(new Dimension(370, 300));


        //添加滑动条
        scrollPane.setViewportView(helpWin);
        scrollPane.setBounds(0, 0, 380, 330);

        this.getContentPane().add(scrollPane);
        showTime();
        this.setVisible(true);

        refreshTime = false;
    }


    // 将时间转换成String类型返回
    private String getStringDate(Date date) {


        DateFormat dateFormat = new SimpleDateFormat("yyyy年MM月dd日 HH时mm分ss秒");
        String stringDate = dateFormat.format(date);
        return stringDate;
    }

    // 在时间框内显示当前时间
    private void showTime() {


        new Thread() {


            @Override
            public void run() {


                while (refreshTime) {


                    try {


                        sleep(1000);
                        Date now = new Date();
                        dateLabel.setText(getStringDate(now));
                    } catch (InterruptedException e) {


                        e.printStackTrace();
                    }
                }
            }
        }.start();
    }
}
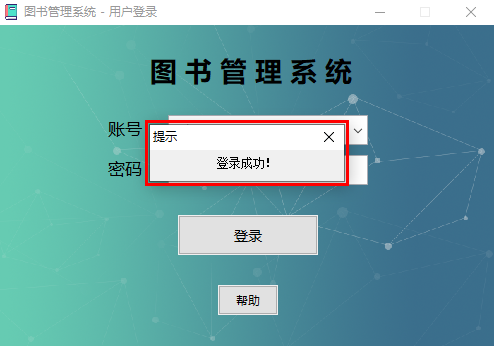
6):登陆成功
当登录成功后会弹出一个登录成功的提示框,显示0.5秒后会自动关闭然后进入系统。这里是基于JDialog自定义的一个子类,专门用于弹出提示信息,可自定义大小
/**
 * 自定义提示框
 */
public class messageDialog extends JDialog {


    // 计时器设置为500ms
    Timer timer = new Timer(100, new ActionListener() {


        int p = 5;
        @Override
        public void actionPerformed(ActionEvent e) {


            p--;
            if (p < 0) {


                // 停止计时器
                timer.stop();
                // 提示框自我销毁
                messageDialog.this.dispose();
            }
        }
    });

    public messageDialog(Frame owner, String message,Dimension dimension) {


        super(owner,"提示",true);
        // 设置大小
        this.setSize(dimension);
        // 设置居中显示
        this.setLocationRelativeTo(null);
        // 添加消息内容
        JPanel panel = new JPanel();
        JLabel messageLabel = new JLabel(message);
        panel.add(messageLabel);
        this.setContentPane(panel);
        // 设置大小不可变
        this.setResizable(false);
        // 启动计时器
        timer.start();
    }

}
3.效果演示