目录
一、什么是HBase?
介绍
- HBASE是一个高可靠性、高性能、面向列、可伸缩的分布式存储系统,利用HBASE技术可在廉价PC Server上搭建起大规模结构化存储集群。
- HBASE的目标是存储并处理大型的数据,更具体来说是仅需使用普通的硬件配置,就能够处理由成千上万的行和列所组成的大型数据。
- HBASE是Google Bigtable的开源实现,但是也有很多不同之处。比如:Google Bigtable利用GFS作为其文件存储系统,HBASE利用Hadoop HDFS作为其文件存储系统;Google运行MAPREDUCE来处理Bigtable中的海量数据,HBASE同样利用Hadoop MapReduce来处理HBASE中的海量数据;Google Bigtable利用Chubby作为协同服务,HBASE利用Zookeeper作为对应。
- 它介于nosql和RDBMS之间,仅能通过主键(row key)和主键的range来检索数据,仅支持单行事务(可通过hive支持来实现多表join等复杂操作)。主要用来存储非结构化和半结构化的松散数据。
HBASE与mysql、oralce、db2、sqlserver等关系型数据库不同,它是一个NoSQL数据库(非关系型数据库)
1.Hbase的表模型与关系型数据库的表模型不同:
2.Hbase的表没有固定的字段定义;
3.Hbase的表中每行存储的都是一些key-value对
4.Hbase的表中有列族的划分,用户可以指定将哪些kv插入哪个列族
5.Hbase的表在物理存储上,是按照列族来分割的,不同列族的数据一定存储在不同的文件中
6.Hbase的表中的每一行都固定有一个行键,而且每一行的行键在表中不能重复
7.Hbase中的数据,包含行键,包含key,包含value,都是byte[ ]类型,hbase不负责为用户维护数据类型
8.HBASE对事务的支持很差
特点
- 数据访问速度快,响应时间约2-20毫秒
- 支持随机读写,每个节点20k~100k+ ops/s
- 可扩展性,可扩展到20,000+节点
二、HBase架构
HBase采用Master/Slave架构

HMaster的作用
- 是HBase集群的主节点,可以配置多个,用来实现HA
- 管理和分配Region
- 负责RegionServer的负载均衡
- 发现失效的RegionServer并重新分配其上的Region
RegionServer的作用
- 管理自己所负责的region数据的读写。
- 读写HDFS,管理Table中的数据。
- Client直接通过HRegionServer读写数据(从HMaster中获取元数据,找到RowKey所在的HRegion/HRegionServer后)。
- 刷新缓存到HDFS
- 维护Hlog
- 执行压缩
- 负责分裂(region split)在运行过程中变得过大的region
RegionServer运行机制

-
WAL即Write Ahead Log,在早期版本中称为HLog,它是HDFS上的一个文件,如其名字所表示的,所有写操作都会先保证将数据写入这个Log文件后,才会真正更新MemStore,最后写入HFile中。WAL文件存储在/hbase/WALs/${HRegionServer_Name}的目录中
-
BlockCache是一个读缓存,即“引用局部性”原理(也应用于CPU,分空间局部性和时间局部性,空间局部性是指CPU在某一时刻需要某个数据,那么有很大的概率在一下时刻它需要的数据在其附近;时间局部性是指某个数据在被访问过一次后,它有很大的概率在不久的将来会被再次的访问),将数据预读取到内存中,以提升读的性能。
-
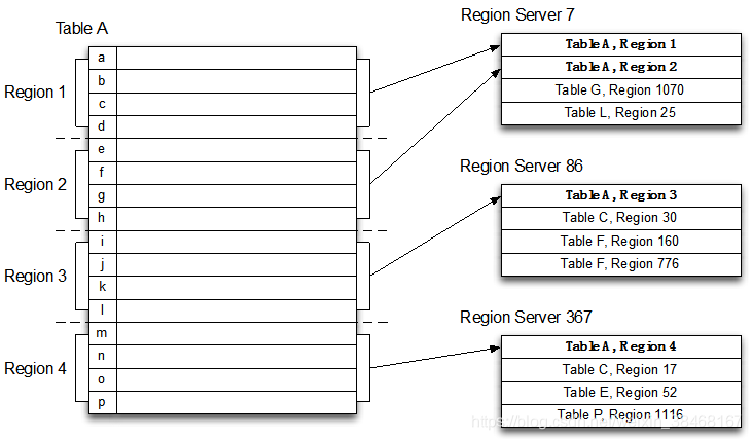
HRegion是一个Table中的一个Region在一个HRegionServer中的表达。一个Table可以有一个或多个Region,他们可以在一个相同的HRegionServer上,也可以分布在不同的HRegionServer上,一个HRegionServer可以有多个HRegion,他们分别属于不同的Table。
-
HRegion是一个Table中的一个Region在一个HRegionServer中的表达。一个Table可以有一个或多个Region,他们可以在一个相同的HRegionServer上,也可以分布在不同的HRegionServer上,一个HRegionServer可以有多个HRegion,他们分别属于不同的Table。
-
region按大小分割的,每个表一开始只有一个region,随着数据不断插入表,region不断增大,当增大到一个阀值的时候,Hregion就会等分会两个新的Hregion。当table中的行不断增多,就会有越来越多的Hregion。
-
HRegion由多个Store(HStore)构成,每个HStore对应了一个Table在这个HRegion中的一个Column Family,即每个Column Family就是一个集中的存储单元,因而最好将具有相近IO特性的Column存储在一个Column Family,以实现高效读取(数据局部性原理,可以提高缓存的命中率)。HStore是HBase中存储的核心,它实现了读写HDFS功能,一个HStore由一个MemStore 和0个或多个StoreFile组成。
-
MemStore是一个写缓存(In Memory Sorted Buffer),所有数据的写在完成WAL日志写后,会 写入MemStore中,由MemStore根据一定的算法将数据Flush到地层HDFS文件中(HFile),通常每个HRegion中的每个 Column Family有一个自己的MemStore。
-
HFile(StoreFile) 用于存储HBase的数据(Cell/KeyValue)。在HFile中的数据是按RowKey、Column Family、Column排序,对相同的Cell(即这三个值都一样),则按timestamp倒序排列。
Zookeeper作用
- 存放整个HBase集群的元数据以及集群的状态信息。
- 实现HMaster主从节点的failover。
注:HMaster通过监听ZooKeeper中的Ephemeral节点(默认:/hbase/rs/*)来监控HRegionServer的加入和宕机。
在第一个HMaster连接到ZooKeeper时会创建Ephemeral节点(默认:/hbasae/master)来表示Active的HMaster,其后加进来的HMaster则监听该Ephemeral节点
如果当前Active的HMaster宕机,则该节点消失,因而其他HMaster得到通知,而将自身转换成Active的HMaster,在变为Active的HMaster之前,它会在/hbase/masters/下创建自己的Ephemeral节点。
Region和Table
Row(逻辑存在)
- Rowkey(行键)是唯一的并已排序
- Schema可以定义何时插入记录
- 每个Row都可以定义自己的列,即使其他Row不使用
相关列定义为列族 - 使用唯一时间戳维护多个Row版本
在不同版本中值类型可以不同 - HBase数据全部以字节存储
排序特性
- 与nosql数据库们一样,row key是用来检索记录的主键。访问HBASE table中的行,只有三种方式:
-
通过单个row key访问
-
通过row key的range(正则)
-
全表扫描
-
Row key行键 (Row key)可以是任意字符串(最大长度 是 64KB,实际应用中长度一般为 10-100bytes),在HBASE内部,row key保存为字节数组。存储时,数据按照Row key的字典序(byte order)排序存储。设计key时,要充分排序存储这个特性,将经常一起读取的行存储放到一起。(位置相关性)
-
插入到hbase中去的数据,hbase会自动排序存储
排序规则: 首先看行键,然后看列族名,然后看列(key)名;按字典顺序
Hbase的这个特性跟查询效率有极大的关系 -
比如:一张用来存储用户信息的表,有名字,户籍,年龄,职业…等信息
然后,在业务系统中经常需要:
查询某个省的所有用户
经常需要查询某个省的指定姓的所有用户
思路:如果能将相同省的用户在hbase的存储文件中连续存储,并且能将相同省中相同姓的用户连续存储,那么,上述两个查询需求的效率就会提高!!!
做法:将查询条件拼到rowkey内
数据管理
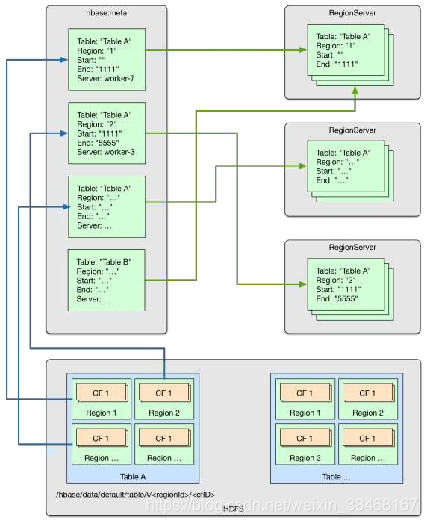
数据管理目录
- 系统目录表hbase:meta
存储元数据等 - HDFS目录中的文件
- Servers上的region实例
HBase数据在HDFS上
- 可以通过HDFS进行修复File
- 修复路径
RegionServer->Table->Region->RowKey->列
三、HBase读写流程
写数据
-
客户端要连接zookeeper, 从zk的/hbase节点找到hbase:meta表所在的regionserver(host:port);
-
regionserver扫描hbase:meta中的每个region的起始行健,对比r000001这条数据在那个region的范围内;
-
从对应的 info:server key中存储了region是有哪个regionserver(host:port)在负责的;
-
客户端直接请求对应的regionserver;
-
regionserver接收到客户端发来的请求之后,就会将数据写入到region中
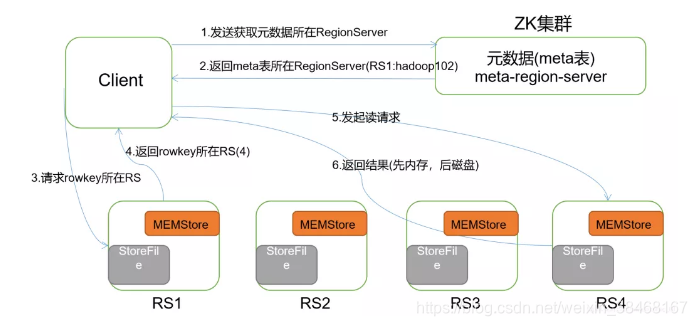
读数据
-
首先Client连接zookeeper, 找到hbase:meta表所在的regionserver;
-
请求对应的regionserver,扫描hbase:meta表,根据namespace、表名和rowkey在meta表中找到指定值所在的region是由那个regionserver负责的;
-
找到这个region对应的regionserver
-
regionserver收到了请求之后,扫描对应的region返回数据到Client
客户会缓存这些位置信息,然而第二步它只是缓存当前RowKey对应的HRegion的位置,因而如果下一个要查的RowKey不在同一个HRegion中,则需要继续查询hbase:meta所在的HRegion,然而随着时间的推移,客户端缓存的位置信息越来越多,以至于不需要再次查找hbase:meta Table的信息,除非某个HRegion因为宕机或Split被移动,此时需要重新查询并且更新缓存。
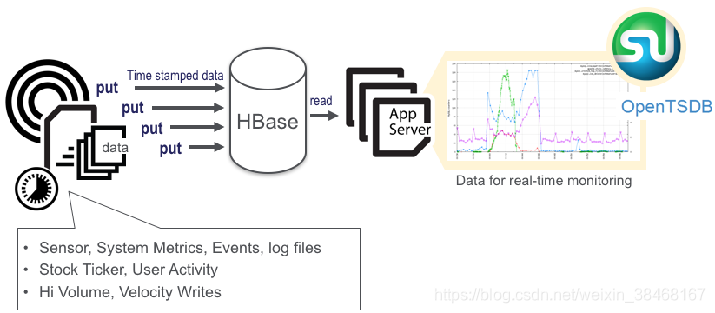
四、HBase应用场景
增量数据-时间序列数据
- 高容量,高速写入
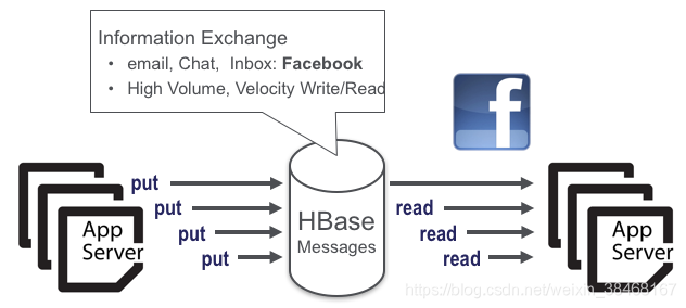
信息交换-消息传递
- 高容量,高速读写
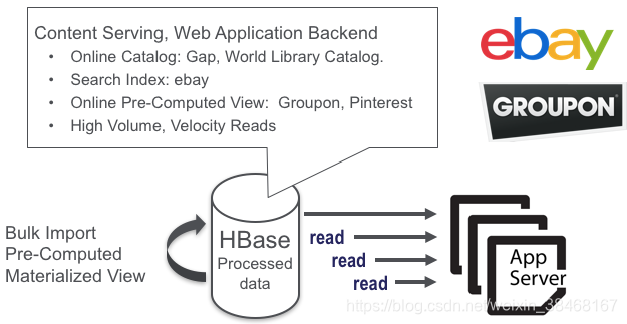
内容服务-Web后端应用程序
- 高容量,高速读写
五、HBase生态圈
- Lily – 基于HBase的CRM
- OpenTSDB – HBase面向时间序列数据管理
- Kylin – HBase上的OLAP
- Phoenix – SQL操作HBase工具
- Splice Machine – 基于HBase的OLTP
- Apache Tephra – HBase事务支持
- TiDB – 分布式SQL DB
- Apache Omid - 优化事务管理
- Yarn application timeline server v.2 迁移到HBase
- Hive metadata存储可以迁移到HBase
- Ambari Metrics Server将使用HBase做数据存储
六、安装配置
需要先有一个java环境
首先,要有一个HDFS集群,并正常运行;regionserver应该跟hdfs中的datanode在一起
其次,还需要一个zookeeper集群,并正常运行,然后,安装HBASE
角色分配如下:
Hdp01: namenode datanode regionserver hmaster zookeeper
Hdp02: datanode regionserver zookeeper
Hdp03: datanode regionserver zookeeper
- 第一步:下载对应版本的HBase:
hive-1.1.0-cdh5.14.2.tar.gz这是我使用的版本 - 第二步:将HBase解压至指定目录下:
tar -zxvf 文件名 -C /解压路径 - 第三步:设置etc/profile配置文件
vi /etc/profile
配置以下内容:
exprot HBASH_HOME=/hbash安装路径
exprot PATH=...:$HBASH_HOME/bin
profile配置完成保存退出后执行:
source /etc/profile
- 第四步:设置hbash/conf目录下的hbash-env.sh配置文件
vi conf/hbase-env.sh
修改:
exprot JAVA_HOME=/java安装路径
#使用内部zookeeper
exprot HBASE_MANAGES_ZK=true
- 第五步:设置hbash/conf目录下的hbash-site.sh配置文件
vi conf/hbase-site.sh
<!—hbase.rootdir 将数据写入哪个目录,value中file:/绝对路径,
如果是分布式则配置与hadoop的core-site.sh服务器、
端口以及zookeeper中事先创建的目录一致,-->
<property>
	 <name>>hbase.rootdir</name>
	 <value>hdfs://IP地址:9000/hbase</value>
</property>
<!—单机模式,此项为false-->
<property>
	 <name>hbase.cluster.distributed</name>
	 <value>false</value>
</property>
启动前保证hadoop已启动并且上面配置的rootdir目录不可以存在
- 第六步:启动hbase:
hbase-deamon.sh start master
如果该命令无法使用,可以进入hbase/bin目录,执行:./start-hbase.sh尝试一下
- 第七步:进入hbase命令行
hbase shell
如果该命令无法使用,也可以进入hbase/bin目录,执行:./hbase shell
七、HBase实践
启动HBase命令行:hbase shell
NameSpace:命令空间
HBase系统默认定义了两个缺省的namespace
hbase:系统内建表,包括namespace和meta表
default:用户建表时未指定namespace的表都创建在此
- 创建:
create_namespace 'lzc' - 删除:
drop_namespace 'lzc' - 查看:
describe_namespace 'lzc' - 列出所有:
list_namespace - 在namespace下创建表:
create 'lzc:user_info','id','name','age' - 查看namespace下的表 :
list_namespace_tables 'lzc'
Table:表
-
创建表:
create '表名', '列族名1','列族名2','列族名N' -
查看所有表:
list -
描述表:
describe '表名' -
判断表存在:
exists '表名' -
判断是否禁用/启用表:
is_enabled '表名'/is_disabled ‘表名’ -
添加记录 :
put '表名', 'rowKey', '列族 : 列' , '值' -
查看记录rowkey下的所有数据:
get '表名' , 'rowKey' -
查看表中的记录总数:
count '表名' -
获取某个列族:
get '表名','rowkey','列族' -
获取某个列族的某个列:
get '表名','rowkey','列族:列' -
修改表结构分两步
#第一步:
disable '表名'
#第二步:
alter '表名',{

    NAME=>'需要增加列簇'},{

    NAME=>'待删除的列簇',METHOD=>'delete'}	#替换列簇
alter '表名',NAME=>'列簇'  													#增加列簇
alter '表名',NAME=>'列簇',METHOD=>'delete' 									#删除列簇
-
根据原表生成一份快照:
snapshot '表名','镜像名' -
根据快照生成一张与原表一样的表以及数据:
clone_snapshot '镜像名','新表名' -
删除镜像:
delete_snapshot '镜像名' -
删除数据:
delete '表名' ,'rowKey', '列族:列' -
删除整行:
deleteall '表名','rowkey' -
删除表需要分两步:
#屏蔽表
disable '表名'
#删除表
drop '表名'
-
清空表:
truncate '表名' -
查看所有记录:
scan '表名' -
查看某个表某个列中所有数据:
scan '表名' , {COLUMNS=>'列族名:列名'} -
赋权:
grant '用户名 ','RWXCA' ,'表名' -
收回权限:
revoke '用户' '表名' -
通过hbase shell导入文档数据
hbase org.apache.hadoop.hbase.mapreduce.ImportTsv \
-Dimporttsv.separator="," \
-Dimporttsv.columns= \
"HBASE_ROW_KEY,列簇名:列名,列簇名:列名,列簇名:列名,列簇名:列名,列簇名:列名" \
"表名" [/HDFS下的数据文件路径]
HBase不支持修改数据,只能覆盖或追加
上传Jar包操作HBase
操作步骤
- 创建Maven项目并添加依赖
- 使用Java API开发代码
- 打包、上传Jar包并测试
流程相对简单,接下来模拟一下使用Jar包操作Hbase向表中插入数据
创建Maven项目
- maven项目创建可以参照这篇的开头部分如何创建maven项目
- 修改pom.xml文件

开发代码
- 创建HBaseConfs类
import org.apache.hadoop.conf.Configuration;
import org.apache.hadoop.fs.Path;
import org.apache.hadoop.hbase.HBaseConfiguration;
import org.apache.hadoop.hbase.client.Admin;
import org.apache.hadoop.hbase.client.Connection;
import org.apache.hadoop.hbase.client.ConnectionFactory;

import java.io.IOException;

/**
 * @ Author: Zhangyu
 * @ Date: 2020/10/10
 * @ Description:
 */
public class HBaseConfs {


    private HBaseConfs(){

    }
    private static Configuration getConf() {


        Configuration conf = HBaseConfiguration.create();
        //指定hbase-site配置文件位置
        conf.addResource(new Path("/opt/hbase/conf/hbase-site.xml"));、
        //指定core-site配置文件位置
        conf.addResource(new Path("/opt/hadoop/etc/hadoop/core-site.xml"));
        return conf;
    }
    public static Connection getConn(){


        Connection conn=null;
        try {


            conn= ConnectionFactory.createConnection(getConf());
        } catch (IOException e) {


            e.printStackTrace();
        }
        return  conn;
    }
    public static Admin getAdmin(){


        Admin admin=null;
        try {


            admin=getConn().getAdmin();
        } catch (IOException e) {


            e.printStackTrace();
        }
        return admin;
    }
}
- 创建插入类InsertTable
import cn.kgc.kb09.HBaseConfs;
import org.apache.hadoop.hbase.TableName;
import org.apache.hadoop.hbase.client.Admin;
import org.apache.hadoop.hbase.client.Connection;
import org.apache.hadoop.hbase.client.Put;
import org.apache.hadoop.hbase.client.Table;

/**
 * @ Author: Zhangyu
 * @ Date: 2020/10/10
 * @ Description:
 */
public class InsertTable {


    public static void main(String[] args) throws Exception{


    	//获取连接HBase连接实例
        Connection conn= HBaseConfs.getConn();
        Admin admin=HBaseConfs.getAdmin();
        //显示所有表
        TableName[] tableNames = admin.listTableNames();
        for (TableName tableName : tableNames) {


            System.out.println(tableName.getNameAsString());
        }
        //向hello表中插入数据
        //hello表需要提前建立好
        //hello建表语句 create 'hello',{NAME=>'name'},{NAME=>'addr'}
        Table table=conn.getTable(TableName.valueOf("hello"));
        String[][] values={


                {

    "1","张","三丰","1st White House","WDC"}
                ,{

    "2","李","小龙","10th tangningjie","London"}
                ,{

    "3","成","龙","111st wuhuan","Beijing"}
                ,{

    "4","叶","问","shanghai","Pingrang"}
        };
        for (int i = 0; i < values.length; i++) {


            Put put =new Put(values[i][0].getBytes());
            put.addColumn("name".getBytes(),"fname".getBytes(),values[i][1].getBytes());
            put.addColumn("name".getBytes(),"lname".getBytes(),values[i][2].getBytes());
            put.addColumn("addr".getBytes(),"address".getBytes(),values[i][3].getBytes());
            put.addColumn("addr".getBytes(),"city".getBytes(),values[i][4].getBytes());
            table.put(put);
        }
        admin.close();
        conn.close();
    }
}
打包、上传Jar包并测试
- 关于如何打Jar包也可以参考之前的文章如何打Jar包
- 注意:打Jar包的过程中需要增加一步,就是选择main class为InsertTable

- 上传Jar包至Linux中
- 测试Jar包:
hadoop jar[...JAR包路径/JAR包名.jar] [实现类的包路径]
hadoop jar /opt/testHbase2.jar cn.kgc.kb09.InsertTable --示例
- 结果

以上就完成了一个简单的操作过程
HBase API
在客户端操作需要将Linux下的主机映射复制一份到windows下:
将linux中/etc/hosts文件复制到winows系统的C:\Windows\System32\drivers\etc\下就可以了。
- 创建maven项目
- 添加hbase依赖
	<!- 根据自己使用的版本修改版本号 ->
	<dependency>
      <groupId>org.apache.hbase</groupId>
      <artifactId>hbase-client</artifactId>
      <version>1.2.0</version>
    </dependency>
    <dependency>
      <groupId>org.apache.hbase</groupId>
      <artifactId>hbase-server</artifactId>
      <version>1.2.0</version>
    </dependency>
- 实现代码
import java.util.ArrayList;
import org.apache.hadoop.conf.Configuration;
import org.apache.hadoop.hbase.Cell;
import org.apache.hadoop.hbase.CellUtil;
import org.apache.hadoop.hbase.HBaseConfiguration;
import org.apache.hadoop.hbase.HColumnDescriptor;
import org.apache.hadoop.hbase.HTableDescriptor;
import org.apache.hadoop.hbase.MasterNotRunningException;
import org.apache.hadoop.hbase.TableName;
import org.apache.hadoop.hbase.ZooKeeperConnectionException;
import org.apache.hadoop.hbase.client.Connection;
import org.apache.hadoop.hbase.client.ConnectionFactory;
import org.apache.hadoop.hbase.client.Delete;
import org.apache.hadoop.hbase.client.Get;
import org.apache.hadoop.hbase.client.HBaseAdmin;
import org.apache.hadoop.hbase.client.HConnection;
import org.apache.hadoop.hbase.client.HConnectionManager;
import org.apache.hadoop.hbase.client.Put;
import org.apache.hadoop.hbase.client.Result;
import org.apache.hadoop.hbase.client.ResultScanner;
import org.apache.hadoop.hbase.client.Scan;
import org.apache.hadoop.hbase.client.Table;
import org.apache.hadoop.hbase.filter.ColumnPrefixFilter;
import org.apache.hadoop.hbase.filter.CompareFilter;
import org.apache.hadoop.hbase.filter.FilterList;
import org.apache.hadoop.hbase.filter.FilterList.Operator;
import org.apache.hadoop.hbase.filter.RegexStringComparator;
import org.apache.hadoop.hbase.filter.RowFilter;
import org.apache.hadoop.hbase.filter.SingleColumnValueFilter;
import org.apache.hadoop.hbase.util.Bytes;
import org.junit.After;
import org.junit.Before;
import org.junit.Test;

public class HbaseTest {


  /**
   * 配置ss
   */
  static Configuration config = null;
  private Connection connection = null;
  private Table table = null;

  @Before
  public void init() throws Exception {


    config = HBaseConfiguration.create();// 配置
    config.set("hbase.zookeeper.quorum", "192.168.**.**");// zookeeper地址(单机)
    // config.set("hbase.zookeeper.quorum", "master,work1,work2");// zookeeper地址(集群)
    config.set("hbase.zookeeper.property.clientPort", "2181");// zookeeper端口
    connection = ConnectionFactory.createConnection(config);//创建连接HBase的实例
    table = connection.getTable(TableName.valueOf("user"));//指定操作的表
  }

  /**
   * 创建一个表
   *
   * @throws Exception
   */
  @Test
  public void createTable() throws Exception {


    // 创建表管理类
    HBaseAdmin admin = new HBaseAdmin(config); // hbase表管理
    // 创建表描述类
    TableName tableName = TableName.valueOf("test3"); // 表名称
    HTableDescriptor desc = new HTableDescriptor(tableName);
    // 创建列族的描述类
    HColumnDescriptor family = new HColumnDescriptor("info"); // 列族
    // 将列族添加到表中
    desc.addFamily(family);
    HColumnDescriptor family2 = new HColumnDescriptor("info2"); // 列族
    // 将列族添加到表中
    desc.addFamily(family2);
    // 创建表
    admin.createTable(desc); // 创建表
  }

  @Test
  @SuppressWarnings("deprecation")
  public void deleteTable() throws MasterNotRunningException,
      ZooKeeperConnectionException, Exception {


    HBaseAdmin admin = new HBaseAdmin(config);
    admin.disableTable("test3");
    admin.deleteTable("test3");
    admin.close();
  }

  /**
   * 向hbase中增加数据
   *
   * @throws Exception
   */
  @SuppressWarnings({

     "deprecation", "resource" })
  @Test
  public void insertData() throws Exception {


    table.setAutoFlushTo(false);
    table.setWriteBufferSize(534534534);
    ArrayList<Put> arrayList = new ArrayList<Put>();
    for (int i = 21; i < 50; i++) {


      Put put = new Put(Bytes.toBytes("1234"+i));
      put.add(Bytes.toBytes("info"), Bytes.toBytes("name"), Bytes.toBytes("wangwu"+i));
      put.add(Bytes.toBytes("info"), Bytes.toBytes("password"), Bytes.toBytes(1234+i));
      arrayList.add(put);
    }

    //插入数据
    table.put(arrayList);
    //提交
    table.flushCommits();
  }

  /**
   * 修改数据
   *
   * @throws Exception
   */
  @Test
  public void uodateData() throws Exception {


    Put put = new Put(Bytes.toBytes("1234"));
    put.add(Bytes.toBytes("info"), Bytes.toBytes("namessss"), Bytes.toBytes("lisi1234"));
    put.add(Bytes.toBytes("info"), Bytes.toBytes("password"), Bytes.toBytes(1234));
    //插入数据
    table.put(put);
    //提交
    table.flushCommits();
  }

  /**
   * 删除数据
   *
   * @throws Exception
   */
  @Test
  public void deleteDate() throws Exception {


    Delete delete = new Delete(Bytes.toBytes("1234"));
    table.delete(delete);
    table.flushCommits();
  }

  /**
   * 单条查询
   *
   * @throws Exception
   */
  @Test
  public void queryData() throws Exception {


    Get get = new Get(Bytes.toBytes("1234"));
    Result result = table.get(get);
    System.out.println(Bytes.toInt(result.getValue(Bytes.toBytes("info"), Bytes.toBytes("password"))));
    System.out.println(Bytes.toString(result.getValue(Bytes.toBytes("info"), Bytes.toBytes("namessss"))));
    System.out.println(Bytes.toString(result.getValue(Bytes.toBytes("info"), Bytes.toBytes("sex"))));
  }

  /**
   * 全表扫描
   *
   * @throws Exception
   */
  @Test
  public void scanData() throws Exception {


    Scan scan = new Scan();
    //scan.addFamily(Bytes.toBytes("info"));
    //scan.addColumn(Bytes.toBytes("info"), Bytes.toBytes("password"));
    scan.setStartRow(Bytes.toBytes("wangsf_0"));
    scan.setStopRow(Bytes.toBytes("wangwu"));
    ResultScanner scanner = table.getScanner(scan);
    for (Result result : scanner) {


      System.out.println(Bytes.toInt(result.getValue(Bytes.toBytes("info"), Bytes.toBytes("password"))));
      System.out.println(Bytes.toString(result.getValue(Bytes.toBytes("info"), Bytes.toBytes("name"))));
      //System.out.println(Bytes.toInt(result.getValue(Bytes.toBytes("info2"), Bytes.toBytes("password"))));
      //System.out.println(Bytes.toString(result.getValue(Bytes.toBytes("info2"), Bytes.toBytes("name"))));
    }
  }

  /**
   * 全表扫描的过滤器
   * 列值过滤器
   *
   * @throws Exception
   */
  @Test
  public void scanDataByFilter1() throws Exception {


    // 创建全表扫描的scan
    Scan scan = new Scan();
    //过滤器:列值过滤器
    SingleColumnValueFilter filter = new SingleColumnValueFilter(Bytes.toBytes("info"),
        Bytes.toBytes("name"), CompareFilter.CompareOp.EQUAL,
        Bytes.toBytes("zhangsan2"));
    // 设置过滤器
    scan.setFilter(filter);

    // 打印结果集
    ResultScanner scanner = table.getScanner(scan);
    for (Result result : scanner) {


      System.out.println(Bytes.toInt(result.getValue(Bytes.toBytes("info"), Bytes.toBytes("password"))));
      System.out.println(Bytes.toString(result.getValue(Bytes.toBytes("info"), Bytes.toBytes("name"))));
    }

  }
  /**
   * rowkey过滤器
   * @throws Exception
   */
  @Test
  public void scanDataByFilter2() throws Exception {


    // 创建全表扫描的scan
    Scan scan = new Scan();
    //匹配rowkey以wangsenfeng开头的
    RowFilter filter = new RowFilter(CompareFilter.CompareOp.EQUAL, new RegexStringComparator("^12341"));
    // 设置过滤器
    scan.setFilter(filter);
    // 打印结果集
    ResultScanner scanner = table.getScanner(scan);
    for (Result result : scanner) {


      System.out.println(Bytes.toInt(result.getValue(Bytes.toBytes("info"), Bytes.toBytes("password"))));
      System.out.println(Bytes.toString(result.getValue(Bytes.toBytes("info"), Bytes.toBytes("name"))));
      //System.out.println(Bytes.toInt(result.getValue(Bytes.toBytes("info2"), Bytes.toBytes("password"))));
      //System.out.println(Bytes.toString(result.getValue(Bytes.toBytes("info2"), Bytes.toBytes("name"))));
    }


  }

  /**
   * 匹配列名前缀
   * @throws Exception
   */
  @Test
  public void scanDataByFilter3() throws Exception {


    // 创建全表扫描的scan
    Scan scan = new Scan();
    //匹配rowkey以wangsenfeng开头的
    ColumnPrefixFilter filter = new ColumnPrefixFilter(Bytes.toBytes("na"));
    // 设置过滤器
    scan.setFilter(filter);
    // 打印结果集
    ResultScanner scanner = table.getScanner(scan);
    for (Result result : scanner) {


      System.out.println("rowkey:" + Bytes.toString(result.getRow()));
      System.out.println("info:name:"
          + Bytes.toString(result.getValue(Bytes.toBytes("info"),
              Bytes.toBytes("name"))));
      // 判断取出来的值是否为空
      if (result.getValue(Bytes.toBytes("info"), Bytes.toBytes("age")) != null) {


        System.out.println("info:age:"
            + Bytes.toInt(result.getValue(Bytes.toBytes("info"),
                Bytes.toBytes("age"))));
      }
      // 判断取出来的值是否为空
      if (result.getValue(Bytes.toBytes("info"), Bytes.toBytes("sex")) != null) {


        System.out.println("infi:sex:"
            + Bytes.toInt(result.getValue(Bytes.toBytes("info"),
                Bytes.toBytes("sex"))));
      }
      // 判断取出来的值是否为空
      if (result.getValue(Bytes.toBytes("info2"), Bytes.toBytes("name")) != null) {


        System.out
        .println("info2:name:"
            + Bytes.toString(result.getValue(
                Bytes.toBytes("info2"),
                Bytes.toBytes("name"))));
      }
      // 判断取出来的值是否为空
      if (result.getValue(Bytes.toBytes("info2"), Bytes.toBytes("age")) != null) {


        System.out.println("info2:age:"
            + Bytes.toInt(result.getValue(Bytes.toBytes("info2"),
                Bytes.toBytes("age"))));
      }
      // 判断取出来的值是否为空
      if (result.getValue(Bytes.toBytes("info2"), Bytes.toBytes("sex")) != null) {


        System.out.println("info2:sex:"
            + Bytes.toInt(result.getValue(Bytes.toBytes("info2"),
                Bytes.toBytes("sex"))));
      }
    }

  }
  /**
   * 过滤器集合
   * @throws Exception
   */
  @Test
  public void scanDataByFilter4() throws Exception {


    // 创建全表扫描的scan
    Scan scan = new Scan();
    //过滤器集合:MUST_PASS_ALL(and),MUST_PASS_ONE(or)
    FilterList filterList = new FilterList(Operator.MUST_PASS_ONE);
    //匹配rowkey以wangsenfeng开头的
    RowFilter filter = new RowFilter(CompareFilter.CompareOp.EQUAL, new RegexStringComparator("^wangsenfeng"));
    //匹配name的值等于wangsenfeng
    SingleColumnValueFilter filter2 = new SingleColumnValueFilter(Bytes.toBytes("info"),
        Bytes.toBytes("name"), CompareFilter.CompareOp.EQUAL,
        Bytes.toBytes("zhangsan"));
    filterList.addFilter(filter);
    filterList.addFilter(filter2);
    // 设置过滤器
    scan.setFilter(filterList);
    // 打印结果集
    ResultScanner scanner = table.getScanner(scan);
    for (Result result : scanner) {


      System.out.println("rowkey:" + Bytes.toString(result.getRow()));
      System.out.println("info:name:"
          + Bytes.toString(result.getValue(Bytes.toBytes("info"),
              Bytes.toBytes("name"))));
      // 判断取出来的值是否为空
      if (result.getValue(Bytes.toBytes("info"), Bytes.toBytes("age")) != null) {


        System.out.println("info:age:"
            + Bytes.toInt(result.getValue(Bytes.toBytes("info"),
                Bytes.toBytes("age"))));
      }
      // 判断取出来的值是否为空
      if (result.getValue(Bytes.toBytes("info"), Bytes.toBytes("sex")) != null) {


        System.out.println("infi:sex:"
            + Bytes.toInt(result.getValue(Bytes.toBytes("info"),
                Bytes.toBytes("sex"))));
      }
      // 判断取出来的值是否为空
      if (result.getValue(Bytes.toBytes("info2"), Bytes.toBytes("name")) != null) {


        System.out
        .println("info2:name:"
            + Bytes.toString(result.getValue(
                Bytes.toBytes("info2"),
                Bytes.toBytes("name"))));
      }
      // 判断取出来的值是否为空
      if (result.getValue(Bytes.toBytes("info2"), Bytes.toBytes("age")) != null) {


        System.out.println("info2:age:"
            + Bytes.toInt(result.getValue(Bytes.toBytes("info2"),
                Bytes.toBytes("age"))));
      }
      // 判断取出来的值是否为空
      if (result.getValue(Bytes.toBytes("info2"), Bytes.toBytes("sex")) != null) {


        System.out.println("info2:sex:"
            + Bytes.toInt(result.getValue(Bytes.toBytes("info2"),
                Bytes.toBytes("sex"))));
      }
    }

  }

  @After
  public void close() throws Exception {


    table.close();
    connection.close();
  }

}
Hive建表映射HBase
- 创建HBase表:
create 'abc','info'表名为abc,列簇为info - 向表中插入数据
#列簇下有order_amt列
info:order_amt
#列簇下有order_id列
info:order_id
#列簇下有user_id列
info:user_id
#列簇下有user_namet列
info:user_name
- 创建Hive外部表映射HBase
#创建hive外部表
create external table info_to_hbase
(
#设置字段
id 		  string,
order_id  string,
order_amt string,
user_id   string,
user_name string
)
#指定映射依赖
STORED by 'org.apache.hadoop.hive.hbase.HBaseStorageHandler'
#将hive字段与hbase列对应起来
with serdeproperties("hbase.columns.mapping"=":key,info:order_id,info:order_amt,info:user_id,info:user_name")
#指定hbase表
tblproperties("hbase.table.name"="user_info");
- 查看外部表数据
select * from info_to_hbase;