PS:原文首发于微信公众号:躬行之(jzman-blog)
阅读本文之前可以阅读前面几篇:
- Spring Boot系列之开发一个接口
- Spring Boot系列之Thymeleaf模板入门
- Spring Boot系列之Thymeleaf常用语法
- Spring Boot系列之Thymeleaf模板布局
- Spring Boot系列之项目国际化
JDBC(Java Data Base Connectivity,Java 数据库连接),主要用途就是用于数据库的连接、执行 SQL 语句、处理 SQL 执行结果等,从零开始 Spring Boot 中 JDBC 的学习,主要内容如下:
- 安装MySQL
- 连接MySQL
- 创建数据库
- 依赖及配置
- 实体类
- 实现增删改查
- 测试效果
- 多数据源配置
安装MySQL
访问官网下载对应版本的 MySQL:
https://dev.mysql.com/downloads/
这里选择 Windows 操作系统对应的安装包进行下载,如下图所示:
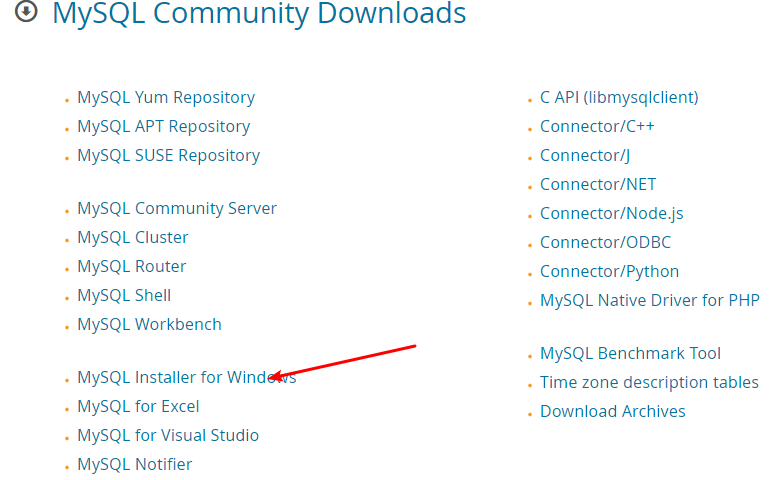
然后依次选择 next 进行安装,安装完成后就可以启动 MySQL 了。
连接MySQL
安装完成 MySQL 之后启动 MySQL,然后使用 navicat 来连接 MySQL,新建连接如下:

输入用户名、密码等点击测试连接,如果配置正确,则会提示连接成功。
创建数据库和表
连接 MySQL 之后,右键该连接创建数据库 db_student 如下:
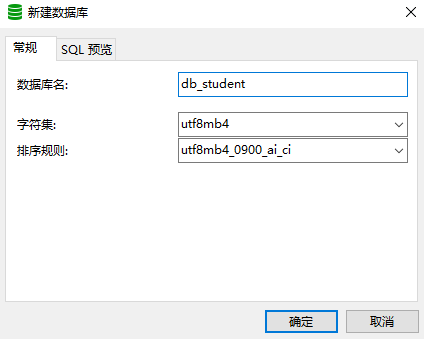
其创建数据库的对应命令如下:
CREATE DATABASE `db_student` CHARACTER SET 'utf8mb4' COLLATE 'utf8mb4_0900_ai_ci';
创建完数据库之后创建一个名为 student 的表,可以使用 navicat 创建也可以使用命令,创建表的命令如下:
CREATE TABLE `student` (
     `id` bigint(20) NOT NULL AUTO_INCREMENT COMMENT '主键id',
     `name` varchar(32) DEFAULT NULL COMMENT '用户名',
     `password` varchar(32) DEFAULT NULL COMMENT '密码',
     `age`  int DEFAULT NULL COMMENT '年龄',
     PRIMARY KEY (`id`)
) ENGINE=InnoDB AUTO_INCREMENT=1 DEFAULT CHARSET=utf8;
依赖及配置
创建 Spring Boot 项目,在其 build.gradle 文件中添加 JDBC 和 MySQL 驱动的依赖如下:
dependencies {


    // jdbc依赖
    implementation 'org.springframework.boot:spring-boot-starter-data-jdbc'
    // mysql驱动
    runtime("mysql:mysql-connector-java")
    // ...
}
然后在项目的 application.properties 文件中进行数据库基本配置,如下:
# 数据库用户名
spring.datasource.username=root
# 数据库密码
spring.datasource.password=admin
# JDBC Driver
spring.datasource.driver-class-name=com.mysql.cj.jdbc.Driver
# JDBC URL
spring.datasource.url=jdbc:mysql://localhost:3306/db_student?serverTimezone=Asia/Shanghai
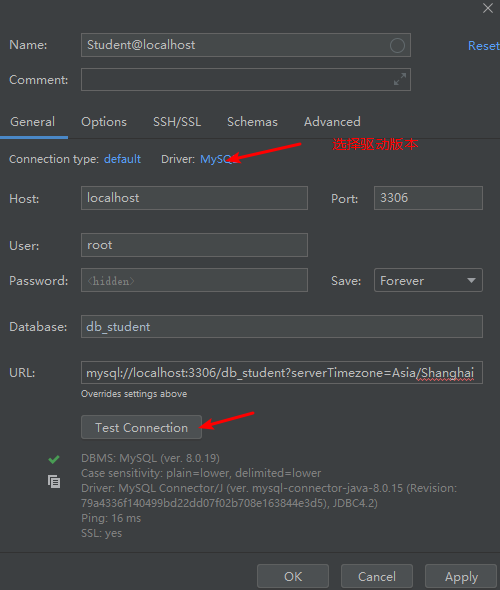
配置完成之后,可以借助 IDEA 的 Database 工具测试配置是否正确,测试成功如下图所示:
实体类
创建数据表 student 对应的数据实体类如下:
/**
 * 实体类
 */
public class Student {


    private long id;
    private String name;
    private String password;
    private int age;

    public Student() {


    }

    public Student(String name, String password, int age) {


        this.name = name;
        this.password = password;
        this.age = age;
    }

    public Student(long id,String name, String password, int age) {


        this.id = id;
        this.name = name;
        this.password = password;
        this.age = age;
    }

    // setter、getter方法
}
实现增删改查
定义增删改查接口 IStudentRepository 如下:
/**
 * @Desc: 定义增删查改接口
 * @Author: jzman
 */
public interface IStudentRepository {


    /**
     * 保存数据
     * @param student 单条student记录
     */
    void save(Student student);

    /**
     * 删除数据
     * @param id 学生id
     */
    void delete(long id);

    /**
     * 更新数据
     * @param student 单条student记录
     */
    void update(Student student);

    /**
     * 查询数据
     * @param name 姓名
     * @return 返回单条记录
     */
    Student findByName(String name);

    /**
     * 查询全部数据
     * @return 返回全部记录
     */
    List<Student> findAll();
}
创建 StudentRepositoryImpl 实现 IStudentRepository 接口实现增删改查:
/**
 * @Desc: 具体实现
 * @Author: jzman
 */
@Repository
public class StudentRepositoryImpl implements IStudentRepository {


    public JdbcTemplate mJdbcTemplate;

    /**
     * 构造方法自动装配
     * @param jdbcTemplate JdbcTemplate
     */
    public StudentRepositoryImpl(JdbcTemplate jdbcTemplate) {


        this.mJdbcTemplate = jdbcTemplate;
    }

    @Override
    public void save(Student student) {


        mJdbcTemplate.update("INSERT INTO student(name,password,age) values(?,?,?) ",
                student.getName(), student.getPassword(), student.getAge());
    }

    @Override
    public void delete(long id) {


        mJdbcTemplate.update("DELETE FROM student where id=?", id);
    }

    @Override
    public void update(Student student) {


        mJdbcTemplate.update("UPDATE student SET name=?,password=?,age=? WHERE id=?",
                student.getName(), student.getPassword(), student.getAge(), student.getId());
    }

    @Override
    public Student findByName(String name) {


        Object[] args = {

    name};
        return mJdbcTemplate.queryForObject("SELECT * FROM student WHERE name=?", args,
                new BeanPropertyRowMapper<Student>(Student.class));
    }

    @Override
    public List<Student> findAll() {


        return mJdbcTemplate.query("SELECT * FROM student",new BeanPropertyRowMapper<>(Student.class));
    }
}
测试效果
编写测试程序进行测试,这里以添加数据为例,插入两条数据如下:
 * @Desc: StudentRepositoryTests
 * @Author: jzman
 */
@RunWith(SpringRunner.class)
@SpringBootTest
public class StudentRepositoryTests {


    @Autowired
    private IStudentRepository mStudentRepository;

    @Test
    public void testSave(){


        Student student1 = new Student("躬行之", "111",3);
        Student student2 = new Student(2,"jzman", "123",20);
        mStudentRepository.save(student1);
        mStudentRepository.save(student2);
    }
}
运行 testSave 之后,使用 IDEA 提供的 Database 工具,双击表 student 查看数据表内容,如下:
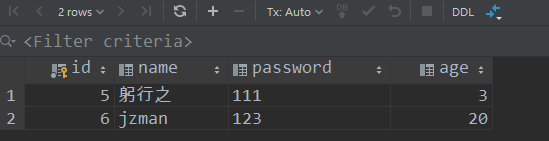
到此,数据插入操作就成功了,删除、修改、查询也是一样。
多数据源配置
多数据源配置的配置主要是配置对应的 DataSource 和 JdbcTemplate,定义多数据源如下:
/**
 * @Desc: 数据源配置
 * @Author: jzman
 */
@Configuration
public class DataSourceConfig {


    @Primary
    @Bean(name = "primaryDataSource")
    @Qualifier("primaryDataSource")
    @ConfigurationProperties(prefix = "spring.datasource.primary")
    public DataSource primaryDataSource() {


        return DataSourceBuilder.create().build();
    }

    @Bean(name = "secondaryDataSource")
    @Qualifier("secondaryDataSource")
    @ConfigurationProperties(prefix = "spring.datasource.secondary")
    public DataSource secondaryDataSource() {


        return DataSourceBuilder.create().build();
    }

    @Bean(name = "primaryJdbcTemplate")
    public JdbcTemplate primaryJdbcTemplate(@Qualifier("primaryDataSource") DataSource dataSource){


        return new JdbcTemplate(dataSource);
    }

    @Bean(name = "secondaryJdbcTemplate")
    public JdbcTemplate secondaryJdbcTemplate(@Qualifier("secondaryDataSource") DataSource dataSource){


        return new JdbcTemplate(dataSource);
    }
}
然后在 application.properties 文件中配置多个数据库连接,如下:
# dataSource1
spring.datasource.primary.username=root
spring.datasource.primary.password=admin
spring.datasource.primary.driver-class-name=com.mysql.cj.jdbc.Driver
spring.datasource.primary.jdbc-url=jdbc:mysql://localhost:3306/data_source_one?serverTimezone=Asia/Shanghai


# dataSource1
spring.datasource.secondary.username=root
spring.datasource.secondary.password=admin
spring.datasource.secondary.driver-class-name=com.mysql.cj.jdbc.Driver
spring.datasource.secondary.jdbc-url=jdbc:mysql://localhost:3306/data_source_two?serverTimezone=Asia/Shanghai
不同的数据源对应不同的 JdbcTemplate 即可操作对应数据源的数据,具体可参考文末提示查看对应源码。
可关注公众号【躬行之】交流学习,回复关键字【Spring Boot】获取对应案例源码链接。
