微信公众号:测试加油站
关注可了解更多的测试开发技术。问题或建议,请公众号留言;
如果你觉得文章对你有帮助,欢迎转发[^1]
随着微服务的兴起,SpringBoot框架越来越火,相信大部分公司已经开始转向使用这个框架,我们开发测试平台的时候,也是会使用这个框架。但是这个框架的原理不知道大家是否了解,上一篇文章说了一下它的使用,所以本次说一下SpringBoot的启动原理,每次启动我们都会用到这个启动类。
@SpringBootApplication
public class SpringbootApplication {


    public static void main(String[] args) {


        SpringApplication.run(SpringbootApplication.class,args);
    }
}
从代码上看我们可以看出,重要的两个点一个是这个注解@SpringBootApplication,另一个是SpringApplication.run。
一、首先我们先看@SpringBootApplication注解,它是SpringBoot的核心注解,同时它也是一个组合注解,我们点进去这个注解看一下
@Target({

    ElementType.TYPE})
@Retention(RetentionPolicy.RUNTIME)
@Documented
@Inherited
@SpringBootConfiguration
@EnableAutoConfiguration
@ComponentScan(
    excludeFilters = {

    @Filter(
    type = FilterType.CUSTOM,
    classes = {

    TypeExcludeFilter.class}
), @Filter(
    type = FilterType.CUSTOM,
    classes = {

    AutoConfigurationExcludeFilter.class}
)}
)
public @interface SpringBootApplication {


.....
}
这里面有三个重要的注解,分别是@SpringBootConfiguration、@EnableAutoConfiguration、@ComponentScan。然后我们再点进去@SpringBootConfiguration这个注解,
@Target({

    ElementType.TYPE})
@Retention(RetentionPolicy.RUNTIME)
@Documented
@Configuration
public @interface SpringBootConfiguration {


}
可以看到这个里面有个@Configuration这个注解,如果了解Spring的应该知道这个注解是做什么用的。所以从上面的整个分析来看,其实@SpringBootApplication这个核心注解包含三个重要的注解,分别是@Configuration、@EnableAutoConfiguration、@ComponentScan。那么接下来我们继续看源码详细说一下这三个注解的作用。
1、首先是@Configuration这个注解,它是JavaConfig形式的SpringIoc容器配置配置类使用的那个@Configuration,因为SpringBoot推荐使用基于JavaConfig配置的形式,如果用这个@Configuration注解,代表本身其实也是一个Ioc的配置类。简单说一下它与xml配置的区别。
1)、表现形式的区别
当我们用xml方式的时候,我们是这么写的
 <?xml version="1.0" encoding="UTF-8"?>
 <beans xmlns="http://www.springframework.org/schema/beans"
        xmlns:xsi="http://www.w3.org/2001/XMLSchema-instance"
        xsi:schemaLocation="http://www.springframework.org/schema/beans http://www.springframework.org/schema/beans/spring-beans-3.0.xsd"
        default-lazy-init="true">
     <!--bean定义-->
 </beans>
如果我们用JavaConfig方式配置的时候这么写
@Configuration
public class SpringConfiguration{


      //bean定义
}
2)、注册bean定义层面
使用xml方式
1 <bean id="mailService" class="..MailServiceImpl">
2     ...
3 </bean>
如果我们用JavaConfig方式配置的时候这么写
@Configuration
 public class MailConfiguration{


     @Bean
     public MailService mailService(){


         return new MailServiceImpl();
     }
 }
任何一个标注了@Bean的方法,其返回值将作为一个bean定义注册到Spring的IoC容器,方法名将默认成该bean定义的id。
3)、依赖注入关系
如果是bean之间有互相依赖的时候,xml是这么写的
<bean id="mailService" class="..MailServiceImpl">
     <propery name ="dependencyService" ref="dependencyService" />
 </bean>
 <bean id="dependencyService" class="DependencyServiceImpl"></bean>
如果我们用JavaConfig方式配置的时候这么写
 @Configuration
 public class MailConfiguration{


      @Bean
      public MailService mailService(){


          return new MailServiceImpl(dependencyService());
      }

      @Bean
      public DependencyService dependencyService(){


         return new DependencyServiceImpl();
     }
 }
如果一个bean的定义依赖其他bean,则直接调用对应的JavaConfig类中依赖bean的创建方法就可以。
@Configuration的注解,标识这个类可以使用Spring IoC容器作为bean定义的来源。
@Bean注解告诉Spring,一个带有@Bean的注解方法将返回一个对象,该对象应该被注册为在Spring应用程序上下文中的bean。以上就是对@Configuration这个注解的一个简单说明。
2、@ComponentScan,接下来我们说下这个重要的注解,它的主要作用就是就是自动扫描并加载符合条件的组件(比如@Component和@Repository等)或者bean定义,最终把这些bean定义加载到Ioc容器中。所以SpringBoot的启动类最好是放在root package下,因为默认不指定basePackages
3、@EnableAutoConfiguration这个注解也是这三个中最重要的一个,它的作用是让Spring自动进行配置,@EnableAutoConfiguration是借助@Import的帮助,将所有符合自动配置条件的bean定义加载到IoC容器。跟@EnableMBeanExport是通过@Import将JMX相关的bean定义加载到IoC容器这种用法的含义是一样的。@EnableAutoConfiguration会根据类路径中的jar依赖为项目进行自动配置,例如,我们添加一个spring-boot-starter-web依赖,会自动添加Tomcat和SpringMVC依赖,并且SpringBoot会对Tomcat和SpringMVC进行自动配置。接下来我们点进去看一下这个注解。
@Target({

    ElementType.TYPE})
@Retention(RetentionPolicy.RUNTIME)
@Documented
@Inherited
@AutoConfigurationPackage
@Import({

    EnableAutoConfigurationImportSelector.class})
public @interface EnableAutoConfiguration {


    String ENABLED_OVERRIDE_PROPERTY = "spring.boot.enableautoconfiguration";

    Class<?>[] exclude() default {

    };

    String[] excludeName() default {

    };
}
它里面有两个是重要的注解,一个是@AutoConfigurationPackage,@Import({EnableAutoConfigurationImportSelector.class}),这个注解就是把符合自动配置条件的bean加载到SpringIoc容器中。我们点进去这个EnableAutoConfigurationImportSelector.class 这个类里,可以看出它继承了AutoConfigurationImportSelector 这个类。
@Deprecated
public class EnableAutoConfigurationImportSelector extends AutoConfigurationImportSelector {


    public EnableAutoConfigurationImportSelector() {


    }

    protected boolean isEnabled(AnnotationMetadata metadata) {


        return this.getClass().equals(EnableAutoConfigurationImportSelector.class)?((Boolean)this.getEnvironment().getProperty("spring.boot.enableautoconfiguration", Boolean.class, Boolean.valueOf(true))).booleanValue():true;
    }
}
我们接下来进入AutoConfigurationImportSelector 这个类里看一下。
public class AutoConfigurationImportSelector implements DeferredImportSelector, BeanClassLoaderAware, ResourceLoaderAware, BeanFactoryAware, EnvironmentAware, Ordered {


    .....

       protected List<String> getCandidateConfigurations(AnnotationMetadata metadata, AnnotationAttributes attributes) {


               List configurations = SpringFactoriesLoader.loadFactoryNames(this.getSpringFactoriesLoaderFactoryClass(), this.getBeanClassLoader());
               Assert.notEmpty(configurations, "No auto configuration classes found in META-INF/spring.factories. If you are using a custom packaging, make sure that file is correct.");
               return configurations;
    }
    .....
这类里面有个getCandidateConfigurations()方法,它的作用是引入系统已经加载好的类,我们可以看到里面有个SpringFactoriesLoader.loadFactoryNames()这个方法,继续点进去看一下.SpringFactoriesLoader,其主要功能就是从指定的配置文件META-INF/spring.factories加载配置
   public static List<String> loadFactoryNames(Class<?> factoryClass, ClassLoader classLoader) {


        String factoryClassName = factoryClass.getName();

        try {


            Enumeration ex = classLoader != null?classLoader.getResources("META-INF/spring.factories"):ClassLoader.getSystemResources("META-INF/spring.factories");
            ArrayList result = new ArrayList();

            while(ex.hasMoreElements()) {


                URL url = (URL)ex.nextElement();
                Properties properties = PropertiesLoaderUtils.loadProperties(new UrlResource(url));
                String factoryClassNames = properties.getProperty(factoryClassName);
                result.addAll(Arrays.asList(StringUtils.commaDelimitedListToStringArray(factoryClassNames)));
            }

            return result;
        } catch (IOException var8) {


            throw new IllegalArgumentException("Unable to load [" + factoryClass.getName() + "] factories from location [" + "META-INF/spring.factories" + "]", var8);
        }
    }
从里面我们可以看出如果classLoader不是null,会读取"META-INF/spring.factories"这个配置文件,那么这个配置文件在哪里呢。在这个包里spring.factories。
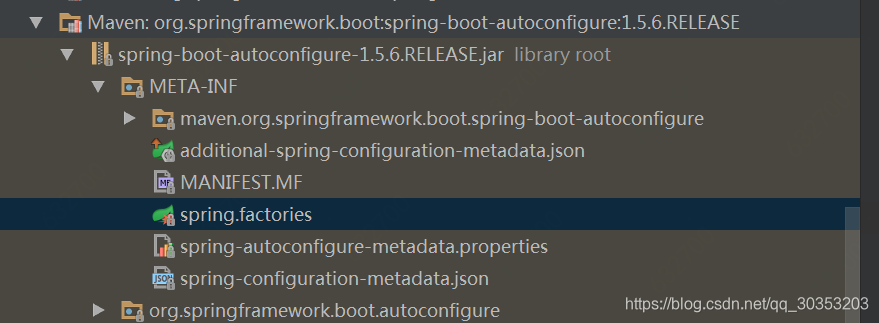
然后我们点击这个配置文件。
# Initializers
org.springframework.context.ApplicationContextInitializer=\
org.springframework.boot.autoconfigure.SharedMetadataReaderFactoryContextInitializer,\
org.springframework.boot.autoconfigure.logging.AutoConfigurationReportLoggingInitializer

# Application Listeners
org.springframework.context.ApplicationListener=\
org.springframework.boot.autoconfigure.BackgroundPreinitializer

# Auto Configuration Import Listeners
org.springframework.boot.autoconfigure.AutoConfigurationImportListener=\
org.springframework.boot.autoconfigure.condition.ConditionEvaluationReportAutoConfigurationImportListener

# Auto Configuration Import Filters
org.springframework.boot.autoconfigure.AutoConfigurationImportFilter=\
org.springframework.boot.autoconfigure.condition.OnClassCondition

# Auto Configure
org.springframework.boot.autoconfigure.EnableAutoConfiguration=\
org.springframework.boot.autoconfigure.admin.SpringApplicationAdminJmxAutoConfiguration,\
org.springframework.boot.autoconfigure.aop.AopAutoConfiguration,\
org.springframework.boot.autoconfigure.amqp.RabbitAutoConfiguration,\
org.springframework.boot.autoconfigure.batch.BatchAutoConfiguration,\
org.springframework.boot.autoconfigure.cache.CacheAutoConfiguration,\
org.springframework.boot.autoconfigure.cassandra.CassandraAutoConfiguration,\
org.springframework.boot.autoconfigure.cloud.CloudAutoConfiguration,\
org.springframework.boot.autoconfigure.context.ConfigurationPropertiesAutoConfiguration,\
org.springframework.boot.autoconfigure.context.MessageSourceAutoConfiguration,\
org.springframework.boot.autoconfigure.context.PropertyPlaceholderAutoConfiguration,\
org.springframework.boot.autoconfigure.couchbase.CouchbaseAutoConfiguration,\
org.springframework.boot.autoconfigure.dao.PersistenceExceptionTranslationAutoConfiguration,\
org.springframework.boot.autoconfigure.data.cassandra.CassandraDataAutoConfiguration,\
org.springframework.boot.autoconfigure.data.cassandra.CassandraRepositoriesAutoConfiguration,\
org.springframework.boot.autoconfigure.data.couchbase.CouchbaseDataAutoConfiguration,\
org.springframework.boot.autoconfigure.data.couchbase.CouchbaseRepositoriesAutoConfiguration,\
org.springframework.boot.autoconfigure.data.elasticsearch.ElasticsearchAutoConfiguration,\
org.springframework.boot.autoconfigure.data.elasticsearch.ElasticsearchDataAutoConfiguration,\
org.springframework.boot.autoconfigure.data.elasticsearch.ElasticsearchRepositoriesAutoConfiguration,\
org.springframework.boot.autoconfigure.data.jpa.JpaRepositoriesAutoConfiguration,\
org.springframework.boot.autoconfigure.data.ldap.LdapDataAutoConfiguration,\
org.springframework.boot.autoconfigure.data.ldap.LdapRepositoriesAutoConfiguration,\
org.springframework.boot.autoconfigure.data.mongo.MongoDataAutoConfiguration,\
org.springframework.boot.autoconfigure.data.mongo.MongoRepositoriesAutoConfiguration,\
org.springframework.boot.autoconfigure.data.neo4j.Neo4jDataAutoConfiguration,\
org.springframework.boot.autoconfigure.data.neo4j.Neo4jRepositoriesAutoConfiguration,\
org.springframework.boot.autoconfigure.data.solr.SolrRepositoriesAutoConfiguration,\
org.springframework.boot.autoconfigure.data.redis.RedisAutoConfiguration,\
org.springframework.boot.autoconfigure.data.redis.RedisRepositoriesAutoConfiguration,\
org.springframework.boot.autoconfigure.data.rest.RepositoryRestMvcAutoConfiguration,\
org.springframework.boot.autoconfigure.data.web.SpringDataWebAutoConfiguration,\
org.springframework.boot.autoconfigure.elasticsearch.jest.JestAutoConfiguration,\
org.springframework.boot.autoconfigure.freemarker.FreeMarkerAutoConfiguration,\
org.springframework.boot.autoconfigure.gson.GsonAutoConfiguration,\
org.springframework.boot.autoconfigure.h2.H2ConsoleAutoConfiguration,\
org.springframework.boot.autoconfigure.hateoas.HypermediaAutoConfiguration,\
org.springframework.boot.autoconfigure.hazelcast.HazelcastAutoConfiguration,\
org.springframework.boot.autoconfigure.hazelcast.HazelcastJpaDependencyAutoConfiguration,\
org.springframework.boot.autoconfigure.info.ProjectInfoAutoConfiguration,\
org.springframework.boot.autoconfigure.integration.IntegrationAutoConfiguration,\
org.springframework.boot.autoconfigure.jackson.JacksonAutoConfiguration,\
org.springframework.boot.autoconfigure.jdbc.DataSourceAutoConfiguration,\
org.springframework.boot.autoconfigure.jdbc.JdbcTemplateAutoConfiguration,\
org.springframework.boot.autoconfigure.jdbc.JndiDataSourceAutoConfiguration,\
org.springframework.boot.autoconfigure.jdbc.XADataSourceAutoConfiguration,\
org.springframework.boot.autoconfigure.jdbc.DataSourceTransactionManagerAutoConfiguration,\
org.springframework.boot.autoconfigure.jms.JmsAutoConfiguration,\
org.springframework.boot.autoconfigure.jmx.JmxAutoConfiguration,\
org.springframework.boot.autoconfigure.jms.JndiConnectionFactoryAutoConfiguration,\
org.springframework.boot.autoconfigure.jms.activemq.ActiveMQAutoConfiguration,\
org.springframework.boot.autoconfigure.jms.artemis.ArtemisAutoConfiguration,\
org.springframework.boot.autoconfigure.flyway.FlywayAutoConfiguration,\
org.springframework.boot.autoconfigure.groovy.template.GroovyTemplateAutoConfiguration,\
org.springframework.boot.autoconfigure.jersey.JerseyAutoConfiguration,\
org.springframework.boot.autoconfigure.jooq.JooqAutoConfiguration,\
org.springframework.boot.autoconfigure.kafka.KafkaAutoConfiguration,\
org.springframework.boot.autoconfigure.ldap.embedded.EmbeddedLdapAutoConfiguration,\
org.springframework.boot.autoconfigure.ldap.LdapAutoConfiguration,\
org.springframework.boot.autoconfigure.liquibase.LiquibaseAutoConfiguration,\
org.springframework.boot.autoconfigure.mail.MailSenderAutoConfiguration,\
org.springframework.boot.autoconfigure.mail.MailSenderValidatorAutoConfiguration,\
org.springframework.boot.autoconfigure.mobile.DeviceResolverAutoConfiguration,\
org.springframework.boot.autoconfigure.mobile.DeviceDelegatingViewResolverAutoConfiguration,\
org.springframework.boot.autoconfigure.mobile.SitePreferenceAutoConfiguration,\
org.springframework.boot.autoconfigure.mongo.embedded.EmbeddedMongoAutoConfiguration,\
org.springframework.boot.autoconfigure.mongo.MongoAutoConfiguration,\
org.springframework.boot.autoconfigure.mustache.MustacheAutoConfiguration,\
org.springframework.boot.autoconfigure.orm.jpa.HibernateJpaAutoConfiguration,\
org.springframework.boot.autoconfigure.reactor.ReactorAutoConfiguration,\
org.springframework.boot.autoconfigure.security.SecurityAutoConfiguration,\
org.springframework.boot.autoconfigure.security.SecurityFilterAutoConfiguration,\
org.springframework.boot.autoconfigure.security.FallbackWebSecurityAutoConfiguration,\
org.springframework.boot.autoconfigure.security.oauth2.OAuth2AutoConfiguration,\
org.springframework.boot.autoconfigure.sendgrid.SendGridAutoConfiguration,\
org.springframework.boot.autoconfigure.session.SessionAutoConfiguration,\
org.springframework.boot.autoconfigure.social.SocialWebAutoConfiguration,\
org.springframework.boot.autoconfigure.social.FacebookAutoConfiguration,\
org.springframework.boot.autoconfigure.social.LinkedInAutoConfiguration,\
org.springframework.boot.autoconfigure.social.TwitterAutoConfiguration,\
org.springframework.boot.autoconfigure.solr.SolrAutoConfiguration,\
org.springframework.boot.autoconfigure.thymeleaf.ThymeleafAutoConfiguration,\
org.springframework.boot.autoconfigure.transaction.TransactionAutoConfiguration,\
org.springframework.boot.autoconfigure.transaction.jta.JtaAutoConfiguration,\
org.springframework.boot.autoconfigure.validation.ValidationAutoConfiguration,\
org.springframework.boot.autoconfigure.web.DispatcherServletAutoConfiguration,\
org.springframework.boot.autoconfigure.web.EmbeddedServletContainerAutoConfiguration,\
org.springframework.boot.autoconfigure.web.ErrorMvcAutoConfiguration,\
org.springframework.boot.autoconfigure.web.HttpEncodingAutoConfiguration,\
org.springframework.boot.autoconfigure.web.HttpMessageConvertersAutoConfiguration,\
org.springframework.boot.autoconfigure.web.MultipartAutoConfiguration,\
org.springframework.boot.autoconfigure.web.ServerPropertiesAutoConfiguration,\
org.springframework.boot.autoconfigure.web.WebClientAutoConfiguration,\
org.springframework.boot.autoconfigure.web.WebMvcAutoConfiguration,\
org.springframework.boot.autoconfigure.websocket.WebSocketAutoConfiguration,\
org.springframework.boot.autoconfigure.websocket.WebSocketMessagingAutoConfiguration,\
org.springframework.boot.autoconfigure.webservices.WebServicesAutoConfiguration

# Failure analyzers
org.springframework.boot.diagnostics.FailureAnalyzer=\
org.springframework.boot.autoconfigure.diagnostics.analyzer.NoSuchBeanDefinitionFailureAnalyzer,\
org.springframework.boot.autoconfigure.jdbc.DataSourceBeanCreationFailureAnalyzer,\
org.springframework.boot.autoconfigure.jdbc.HikariDriverConfigurationFailureAnalyzer

# Template availability providers
org.springframework.boot.autoconfigure.template.TemplateAvailabilityProvider=\
org.springframework.boot.autoconfigure.freemarker.FreeMarkerTemplateAvailabilityProvider,\
org.springframework.boot.autoconfigure.mustache.MustacheTemplateAvailabilityProvider,\
org.springframework.boot.autoconfigure.groovy.template.GroovyTemplateAvailabilityProvider,\
org.springframework.boot.autoconfigure.thymeleaf.ThymeleafTemplateAvailabilityProvider,\
org.springframework.boot.autoconfigure.web.JspTemplateAvailabilityProvider
从这里面我们可以看出,它帮我们配置了很多类的全路径,比如你想整合freemarker,redis等等。根据@EnableAutoConfiguration的完整类名org.springframework.boot.autoconfigure.EnableAutoConfiguration作为查找的Key,value的值就是一组@Configuration类。
所以,@EnableAutoConfiguration自动配置,其实就是从classpath中搜寻所有的META-INF/spring.factories配置文件,并将其中org.springframework.boot.autoconfigure.EnableutoConfiguration对应的配置项通过反射(Java Refletion)实例化为对应的标注了@Configuration的JavaConfig形式的Ioc容器配置类,然后汇总为一个,并加载到Ioc容器里。
以上就是@SpringBootApplication注解的里三个注解的分析,总结一下@SpringBootApplication注解的作用就是把很多东西都准备好,具体是否使用取决于我们程序或者是我们的配置,那到底用了哪些,我们接下来往下看,它的run方法。
二、SpringApplication.run()启动过程的源码分析
执行run方法到底有没有用到哪些自动配置的东西,比如说内置的Tomcat,那我们来找找内置Tomcat,我们点进run()方法,这里面还有个run方法
 public static ConfigurableApplicationContext run(Object source, String... args) {


        return run(new Object[]{

    source}, args);
    }
我们继续点进去run()方法,对于源码的解释写到每行的注释上,方便大家看。
 public ConfigurableApplicationContext run(String... args) {


        // 创建并启动计时监控类
        StopWatch stopWatch = new StopWatch();
        stopWatch.start();

        // 初始化应用上下文和异常报告集合
        ConfigurableApplicationContext context = null;
        Object analyzers = null;
        // 设置系统属性 `java.awt.headless` 的值
        this.configureHeadlessProperty();

        // 创建所有 Spring 运行监听器并发布应用启动事件
        SpringApplicationRunListeners listeners = this.getRunListeners(args);
        listeners.starting();

        try {


            // 初始化默认应用参数类
            DefaultApplicationArguments ex = new DefaultApplicationArguments(args);
            // 根据运行监听器和应用参数来准备 Spring 环境
            ConfigurableEnvironment environment = this.prepareEnvironment(listeners, ex);

            // 创建 Banner 打印类
            Banner printedBanner = this.printBanner(environment);

            // 创建应用上下文
            context = this.createApplicationContext();
            new FailureAnalyzers(context);

            // 准备应用上下文
            this.prepareContext(context, environment, listeners, ex, printedBanner);

           //刷新应用上下文
            this.refreshContext(context);

            // 应用上下文刷新后置处理
            this.afterRefresh(context, ex);
            listeners.finished(context, (Throwable)null);
            // 停止计时监控类
            stopWatch.stop();
            // 输出日志记录执行主类名、时间信息
            if(this.logStartupInfo) {


                (new StartupInfoLogger(this.mainApplicationClass)).logStarted(this.getApplicationLog(), stopWatch);
            }

            // 返回应用上下文
            return context;
        } catch (Throwable var9) {


            this.handleRunFailure(context, listeners, (FailureAnalyzers)analyzers, var9);
            throw new IllegalStateException(var9);
        }
    }
那我们关注的就是 refreshContext(context); 刷新context,我们点进来看
 private void refreshContext(ConfigurableApplicationContext context) {


        this.refresh(context);
        if(this.registerShutdownHook) {


            try {


                context.registerShutdownHook();
            } catch (AccessControlException var3) {


                ;
            }
        }

    }
点进refresh(context)方法中
protected void refresh(ApplicationContext applicationContext) {


        Assert.isInstanceOf(AbstractApplicationContext.class, applicationContext);
        ((AbstractApplicationContext)applicationContext).refresh();
    }
它调用 ((AbstractApplicationContext) applicationContext).refresh()点击refresh()方法
public void refresh() throws BeansException, IllegalStateException {


        Object var1 = this.startupShutdownMonitor;
        synchronized(this.startupShutdownMonitor) {


            this.prepareRefresh();
            ConfigurableListableBeanFactory beanFactory = this.obtainFreshBeanFactory();
            this.prepareBeanFactory(beanFactory);

            try {


                this.postProcessBeanFactory(beanFactory);
                this.invokeBeanFactoryPostProcessors(beanFactory);
                this.registerBeanPostProcessors(beanFactory);
                this.initMessageSource();
                this.initApplicationEventMulticaster();
                this.onRefresh();
                this.registerListeners();
                this.finishBeanFactoryInitialization(beanFactory);
                this.finishRefresh();
            } catch (BeansException var9) {


                if(this.logger.isWarnEnabled()) {


                    this.logger.warn("Exception encountered during context initialization - cancelling refresh attempt: " + var9);
                }

                this.destroyBeans();
                this.cancelRefresh(var9);
                throw var9;
            } finally {


                this.resetCommonCaches();
            }

        }
    }
这段里面大家是否觉得有点熟悉,在之前的文章Spring-IOC原理简述里说过这个,这就是一个spring的bean的加载过程。这里面主要是看这个方法onRefresh(),
protected void onRefresh() throws BeansException {


    }
它没有实现,看下它有哪些实现,

我们看下tomcat的是如何内嵌的,因为是看tomcat所以肯定是看ServletWebServerApplicationContext这个类。
   protected void onRefresh() {


        super.onRefresh();

        try {


            this.createWebServer();
        } catch (Throwable var2) {


            throw new ApplicationContextException("Unable to start web server", var2);
        }
    }
这里面有个createWebServer()方法,创建web容器的,点进去看一下,webServer是通过ServletWebServerFactory创建的,我们看下这个类。
  private void createWebServer() {


        WebServer webServer = this.webServer;
        ServletContext servletContext = this.getServletContext();
        if(webServer == null && servletContext == null) {


            ServletWebServerFactory ex = this.getWebServerFactory();
            this.webServer = ex.getWebServer(new ServletContextInitializer[]{

    this.getSelfInitializer()});
        } else if(servletContext != null) {


            try {


                this.getSelfInitializer().onStartup(servletContext);
            } catch (ServletException var4) {


                throw new ApplicationContextException("Cannot initialize servlet context", var4);
            }
        }

        this.initPropertySources();
    }
进入ServletWebServerFactory接口类,猜测它应该可以创建几个不同类型的容器,我们点一下看下它的实现类
@FunctionalInterface
public interface ServletWebServerFactory {


    WebServer getWebServer(ServletContextInitializer... var1);
}

果然我们可以看出来,这接口实现类包括TomcatServletWebServerFactory和JettyServletWebServerFactory,因为要看tomcat,所以我们点进入TomcatServletWebServerFactory看一下,
 public WebServer getWebServer(ServletContextInitializer... initializers) {


        Tomcat tomcat = new Tomcat();
        File baseDir = this.baseDirectory != null?this.baseDirectory:this.createTempDir("tomcat");
        tomcat.setBaseDir(baseDir.getAbsolutePath());
        //创建Connector对象
        Connector connector = new Connector(this.protocol);
        tomcat.getService().addConnector(connector);
        this.customizeConnector(connector);
        tomcat.setConnector(connector);
        tomcat.getHost().setAutoDeploy(false);
        this.configureEngine(tomcat.getEngine());
        Iterator var5 = this.additionalTomcatConnectors.iterator();

        while(var5.hasNext()) {


            Connector additionalConnector = (Connector)var5.next();
            tomcat.getService().addConnector(additionalConnector);
        }

        this.prepareContext(tomcat.getHost(), initializers);
        return this.getTomcatWebServer(tomcat);
    }
这个方法是创建tomcat的对象,把连接都放到tomcat中,并且返回getTomcatWebServer()方法,我们看下这个方法里有啥,继续进入getTomcatWebServer()方法中。
protected TomcatWebServer getTomcatWebServer(Tomcat tomcat) {


        return new TomcatWebServer(tomcat, this.getPort() >= 0);
    }
进入TomcatWebServer()方法中
    public TomcatWebServer(Tomcat tomcat, boolean autoStart) {


        this.monitor = new Object();
        this.serviceConnectors = new HashMap();
        Assert.notNull(tomcat, "Tomcat Server must not be null");
        this.tomcat = tomcat;
        this.autoStart = autoStart;
        this.initialize();
    }
这里面主要的应该是,initialize()这个方法,我们点进去看下
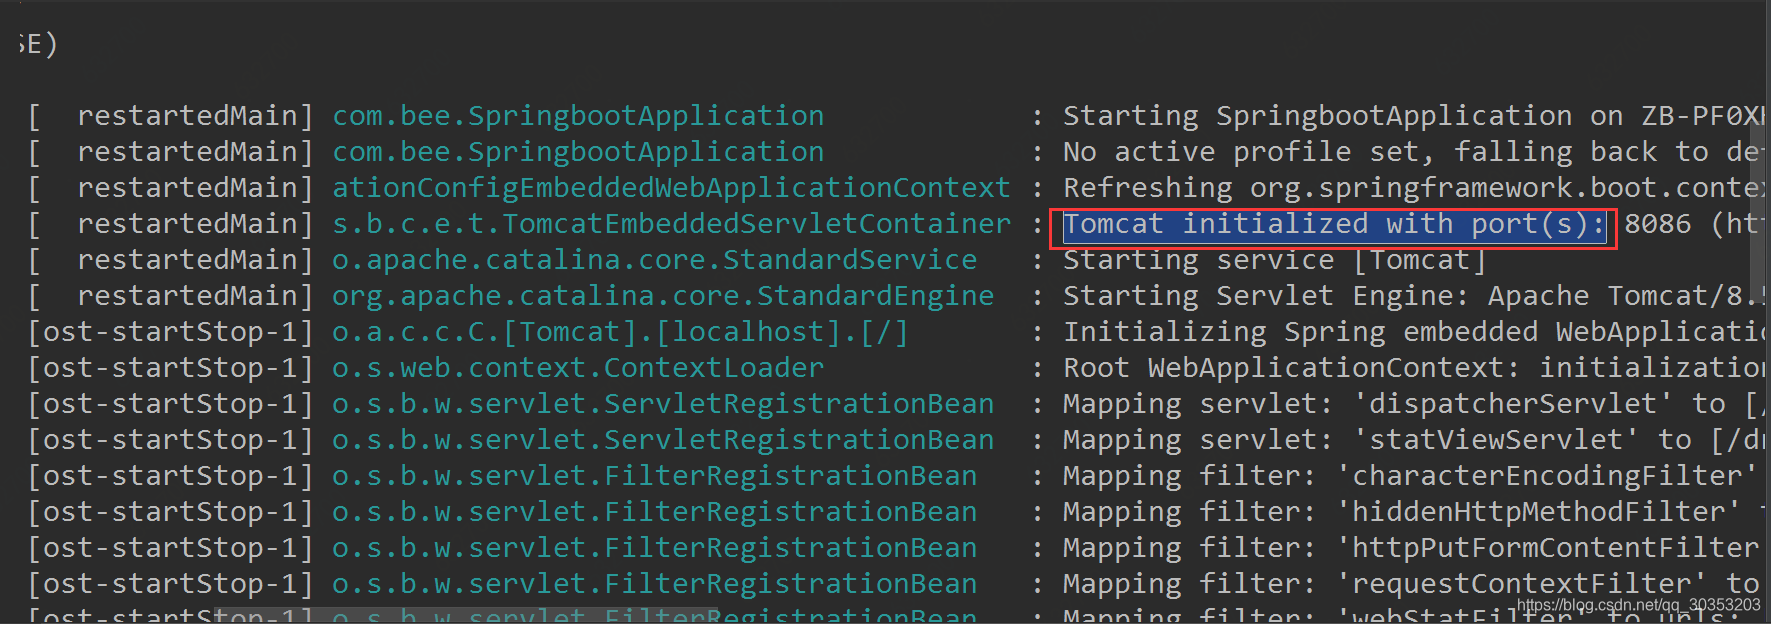
 private void initialize() throws WebServerException {


//在控制台会看到这句日志
logger.info("Tomcat initialized with port(s): " + this.getPortsDescription(false));
        Object var1 = this.monitor;
        synchronized(this.monitor) {


            try {


                this.addInstanceIdToEngineName();
                Context ex = this.findContext();
                ex.addLifecycleListener((event) -> {


                    if(ex.equals(event.getSource()) && "start".equals(event.getType())) {


                        this.removeServiceConnectors();
                    }

                });
                //启动tomcat服务
                this.tomcat.start();
                this.rethrowDeferredStartupExceptions();

                try {


                    ContextBindings.bindClassLoader(ex, ex.getNamingToken(), this.getClass().getClassLoader());
                } catch (NamingException var5) {


                    ;
                }

                this.startDaemonAwaitThread();
            } catch (Exception var6) {


                this.stopSilently();
                throw new WebServerException("Unable to start embedded Tomcat", var6);
            }
        }
    }
进入start()方法看一下
 public void start() throws LifecycleException {


        this.getServer();
        this.server.start();
    }
一个tomcat只包含一个server,一个server可以包含多个service,一个service只有一个Container,但是有多个Connector,这样一个服务可以处理多个连接。多个Connector和一个Container就形成了一个Service,
以上就是我们从SpringApplication.run()一步步跟源码找到它是如何内嵌启动tomcat的步骤。过程可能有点长,在这再次总结一下吧,SpringBoot的启动主要是通过实例化SpringApplication来启动的,启动过程主要做了以下几件事情:配置属性、获取监听器,发布应用开始启动事件初、始化输入参数、配置环境,输出banner、创建上下文、预处理上下文、刷新上下文、再刷新上下文、发布应用已经启动事件、发布应用启动完成事件,启动tomcat在刷新上下文这块,然后到了Spring的bean加载的过程中,然后是找到创建createWebServer,到getTomcatWebServer,最后找到启动tomcat服务。
总结,本篇有些过长,第一分部分主要说了是SpringBoot的核心注解SpringBootApplication 是由三个子注解组合而成的,分别是@Configuration、@EnableAutoConfiguration、@ComponentScan,然后详细说明了下每个注解的作用。第二部分是主要说了下SpringApplication.run的启动过程,包括内嵌tomcat是如何启动的。关于SpringBoot的启动原理就说这些吧。感谢大家的阅读。
微信公众号:测试加油站
欢迎关注我,一起学习,一起进步!