本章讲解的是ajax的ie缓存
ie浏览器对ajax请求的的结果进行缓存,这会导致ie浏览器ajax请求的的结果(最新返回结果)显示失败,因为它调取了旧的缓存。
1.创建在testsix文件夹并在这个文件夹里面
2.创建iecache.html文件
3.创建server.js文件
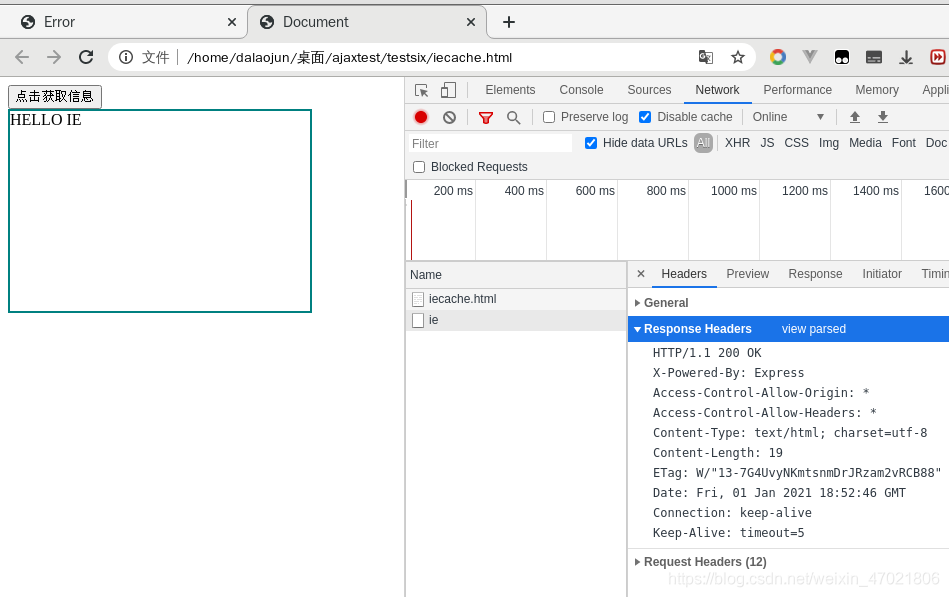
案例一
未添加解决方法
iecache.html文件
<!DOCTYPE html>
<html lang="en">
<head>
    <meta charset="UTF-8">
    <meta name="viewport" content="width=device-width, initial-scale=1.0">
    <title>Document</title>
</head>
<body>
    <button>点击获取信息</button>
    <div id="result" style="width: 300px;height: 200px;border: solid 2px teal;"></div>
    <script>
        // 一:获取元素对象
        const texttwo = document.getElementsByTagName('button')[0];
        //
        const result = document.querySelector('#result');
        //
        texttwo.addEventListener('click', function(){


            console.log('点击发送测试成功.')
            // 1.发送请求
            const textone = new XMLHttpRequest();
            //
            // 自动转化
            // 借助textone对象里面的属性来转化
            // 设置响应体数据的类型
            textone.responseType = 'json';
            // 2.初始化
            textone.open('GET','http://127.0.0.1:8000/ie');
            // 3.发送
            textone.send();
            // 4.事件绑定
            textone.onreadystatechange = function(){


                if(textone.readyState === 4){


                    if(textone.status >= 200 && textone.status < 300){


                        // 测试打印
                        console.log(textone.response);
                        //  使用自动转化
                        result.innerHTML = textone.response.name;
                    }
                }
            }
        });
    </script>
</body>
</html>
server.js文件
// 1. 引入express
const express = require('express');

// 2.创建对象
const app = express();

// 3.创建路由规则  里面的形参 request与response   (自己可以随便定义名字的)
//  建议写成  request与response  因为可以见名思意,方便自己看
// request  对请求报文的封装
// responst 对响应报文的封装
//  请求路径为'/server'

// 当使用post请求时候会因为发送的信息没有收到对应的结果所以回报错
// 所以该处使用all  表示可以接收任意类型的请求      如get post 等等
app.get('/ie', (request, response)=>{


    // 设置响应头 设置允许跨域
    // 头名字为Access-Control-Allow-Origin
    // 头的值为
    response.setHeader('Access-Control-Allow-Origin','*');
    // 响应头        *号表示所有的头信息都可以接收
    response.setHeader('Access-Control-Allow-Headers','*');
    // 响应一个数据   把这个对象返回给浏览器
    const data = {


        name: 'HELLO IE'
    };
    // 对对象进行字符串转换
    let str = JSON.stringify(data);
    // 设置响应体
    response.send(str);

});

// 4. 监听端口启动服务
// 这里listen(8000)后面添加了一个回调,用来提示,告诉自己是否监听成功
app.listen(8000, ()=>{


    console.log("服务已经启动,8000端口监听中......");
});
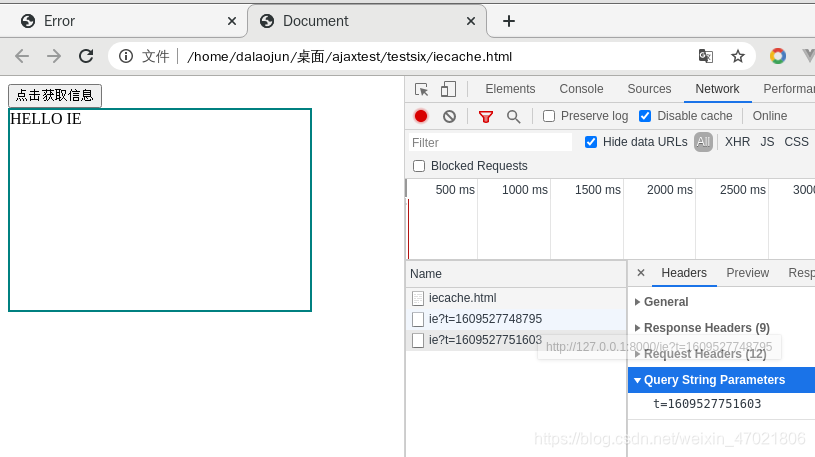
案例二
在url里面添加+Date.now()
textone.open('GET','http://127.0.0.1:8000/ie?t='+Date.now());
这样会在访问的时候添加一个时间戳
那么每次访问获取的时间戳都是不一样的
那么浏览器就会认为你这里是两次不同的请求
一般情况下我们不需要自己去添加这个,会有工具自动把这个添加上去。
js这边没有修改
修改的只是html,完整的是
<!DOCTYPE html>
<html lang="en">
<head>
    <meta charset="UTF-8">
    <meta name="viewport" content="width=device-width, initial-scale=1.0">
    <title>Document</title>
</head>
<body>
    <button>点击获取信息</button>
    <div id="result" style="width: 300px;height: 200px;border: solid 2px teal;"></div>
    <script>
        // 一:获取元素对象
        const texttwo = document.getElementsByTagName('button')[0];
        //
        const result = document.querySelector('#result');
        //
        texttwo.addEventListener('click', function(){


            console.log('点击发送测试成功.')
            // 1.发送请求
            const textone = new XMLHttpRequest();
            //
            // 自动转化
            // 借助textone对象里面的属性来转化
            // 设置响应体数据的类型
            textone.responseType = 'json';
            // 2.初始化
            textone.open('GET','http://127.0.0.1:8000/ie?t='+Date.now());
            // 3.发送
            textone.send();
            // 4.事件绑定
            textone.onreadystatechange = function(){


                if(textone.readyState === 4){


                    if(textone.status >= 200 && textone.status < 300){


                        // 测试打印
                        console.log(textone.response);
                        //  使用自动转化
                        result.innerHTML = textone.response.name;
                    }
                }
            }
        });
    </script>
</body>
</html>
对比图
url后面多了t=时间戳,并且查询字符串参数多了t=时间戳