命名锚点的作用:在同一页面内的不同位置进行跳转。
通俗理解:可以通过锚点跳转到页面中的其他位置,当页面过长时,可以将页面分为几部分,通过顶部设置一些锚点,点击可以方便浏览者快速定位到相应的位置。
制作锚标记:
        1)给元素定义命名锚记名
        语法:<标记 id="命名锚记名"> </标记>

        2)命名锚记连接
        语法:<a href="#命名锚记名称"></a>
注意:
- href属性的属性值最前面要加**#**(href="#id名)
- 在要跳转到的位置的标签中添加的是id属性

<!DOCTYPE html>
<html lang="en">
<head>
<meta charset="UTF-8">
<meta name="viewport" content="width=device-width, initial-scale=1.0">
<title>Document</title>
<style>
* {
margin: 0;
padding: 0;
}
/* 自适应窗口高度 */
html,
body {
height: 100%;
}
p {
height: 100%;
text-align: center;
line-height: 600px;
font-size: 100px;
font-family: "宋体";
color: #fff;
}
p:nth-of-type(1) {
background-color: rgb(32, 59, 4);
}
p:nth-of-type(2) {
background-color: rgb(11, 10, 31);
}
p:nth-of-type(3) {
background-color: rgb(77, 83, 20);
}
p:nth-of-type(4) {
background-color: rgb(58, 9, 34);
}
a {
display: block;
width: 100px;
height: 40px;
border: 1px solid rgb(105, 36, 36);
text-align: center;
line-height: 40px;
font-size: 14px;
color: #fff;
margin-bottom: 10px;
}
div {
position: fixed;
right: 0;
top: 200px;
}
</style>
</head>
<body>
<!-- 1.作用:同一页面不同位置快速跳转 -->
<!-- 2.语法 -->
<div>
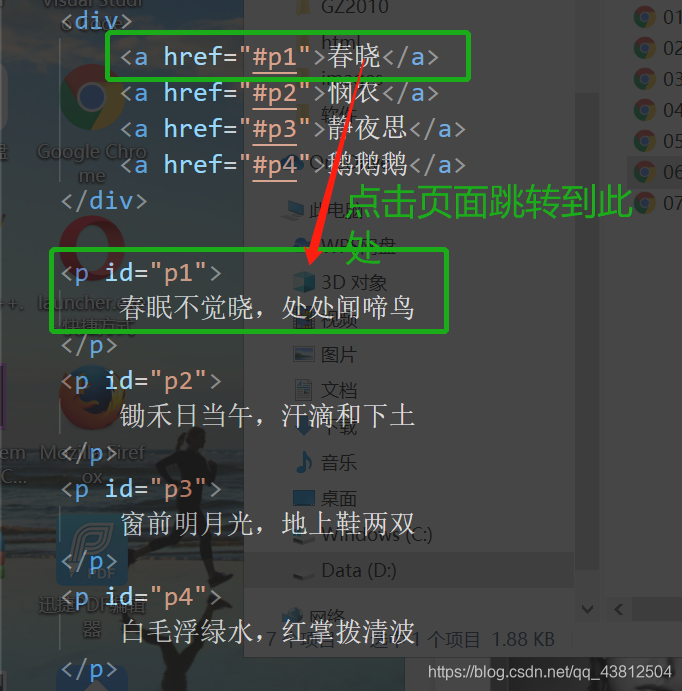
<a href="#p1">春晓</a>
<a href="#p2">悯农</a>
<a href="#p3">静夜思</a>
<a href="#p4">鹅鹅鹅</a>
</div>
<p id="p1">
春眠不觉晓,处处闻啼鸟
</p>
<p id="p2">
锄禾日当午,汗滴和下土
</p>
<p id="p3">
窗前明月光,地上鞋两双
</p>
<p id="p4">
白毛浮绿水,红掌拨清波
</p>
</body>
</html>
跳转到另一个页面的固定位置
<a href="practice.html#one"></a>
<!-- 跳转到practice.html页面中id名为one的标签的位置-->
小练习:

<!DOCTYPE html>
<html lang="en">
<head>
    <meta charset="UTF-8">
    <meta name="viewport" content="width=device-width, initial-scale=1.0">
    <title>电子相册</title>
    <style>
        *{


            margin: 0px;
            padding: 0px;
        }
        .box1{


            width: 421px;
            height: 325px;
            border: 1px solid #CDCDCD;
            background-color: #666666;
            position: relative;
            margin: 200px auto;
        }

        h1{


            color: #fff;
            height: 48px;
            line-height: 48px;
            text-align: center;
            font-size: 18px;
            width: 100%;
        }

        .box2{


            width: 280px;
            height: 196px;
            border: 1px solid #fff;
            margin-left: 20px;
            overflow: hidden;
        }

        .box3{


            width: 80px;
            height: 196px;
            position: absolute;
            right: 0px;
            top: 48px;
            overflow: auto;
            /* overflow-y:scroll;也可以 */
        }

        .box3 img {


            vertical-align: top;
            /* 用来解决图片把外层容器多撑开3px的问题 */
        }
        .box3 a{


            display: block;
            margin-bottom: 5px;
        }

    </style>
</head>
<body>
    <div class="box1">
        <h1>电子相册</h1>
        <div class="box2">
        <!-- 快捷键生成:img[src="../images/mn$.ipg"]*8 按回车 -->
            <img src="../images/mn1.jpg" alt="" id="photo1">
            <img src="../images/mn2.jpg" alt="" id="photo2">
            <img src="../images/mn3.jpg" alt="" id="photo3">
            <img src="../images/mn4.jpg" alt="" id="photo4">
            <img src="../images/mn5.jpg" alt="" id="photo5">
            <img src="../images/mn6.jpg" alt="" id="photo6">
            <img src="../images/mn7.jpg" alt="" id="photo7">
            <img src="../images/mn8.jpg" alt="" id="photo8">
        </div>
        <div class="box3">
        <!-- 快捷键生成:a[href="#photo$"]*8>img[src="../images/c$.ipg"] 按回车 -->
            <a href="#photo1"><img src="../images/c1.jpg" alt=""></a>
            <a href="#photo2"><img src="../images/c2.jpg" alt=""></a>
            <a href="#photo3"><img src="../images/c3.jpg" alt=""></a>
            <a href="#photo4"><img src="../images/c4.jpg" alt=""></a>
            <a href="#photo5"><img src="../images/c5.jpg" alt=""></a>
            <a href="#photo6"><img src="../images/c6.jpg" alt=""></a>
            <a href="#photo7"><img src="../images/c7.jpg" alt=""></a>
            <a href="#photo8"><img src="../images/c8.jpg" alt=""></a>
        </div>
    </div>
</body>
</html>